audio FORD E SERIES 2002 4.G Owner's Manual
[x] Cancel search | Manufacturer: FORD, Model Year: 2002, Model line: E SERIES, Model: FORD E SERIES 2002 4.GPages: 272, PDF Size: 2.6 MB
Page 64 of 272
Using headphones/Personal Audio Feature
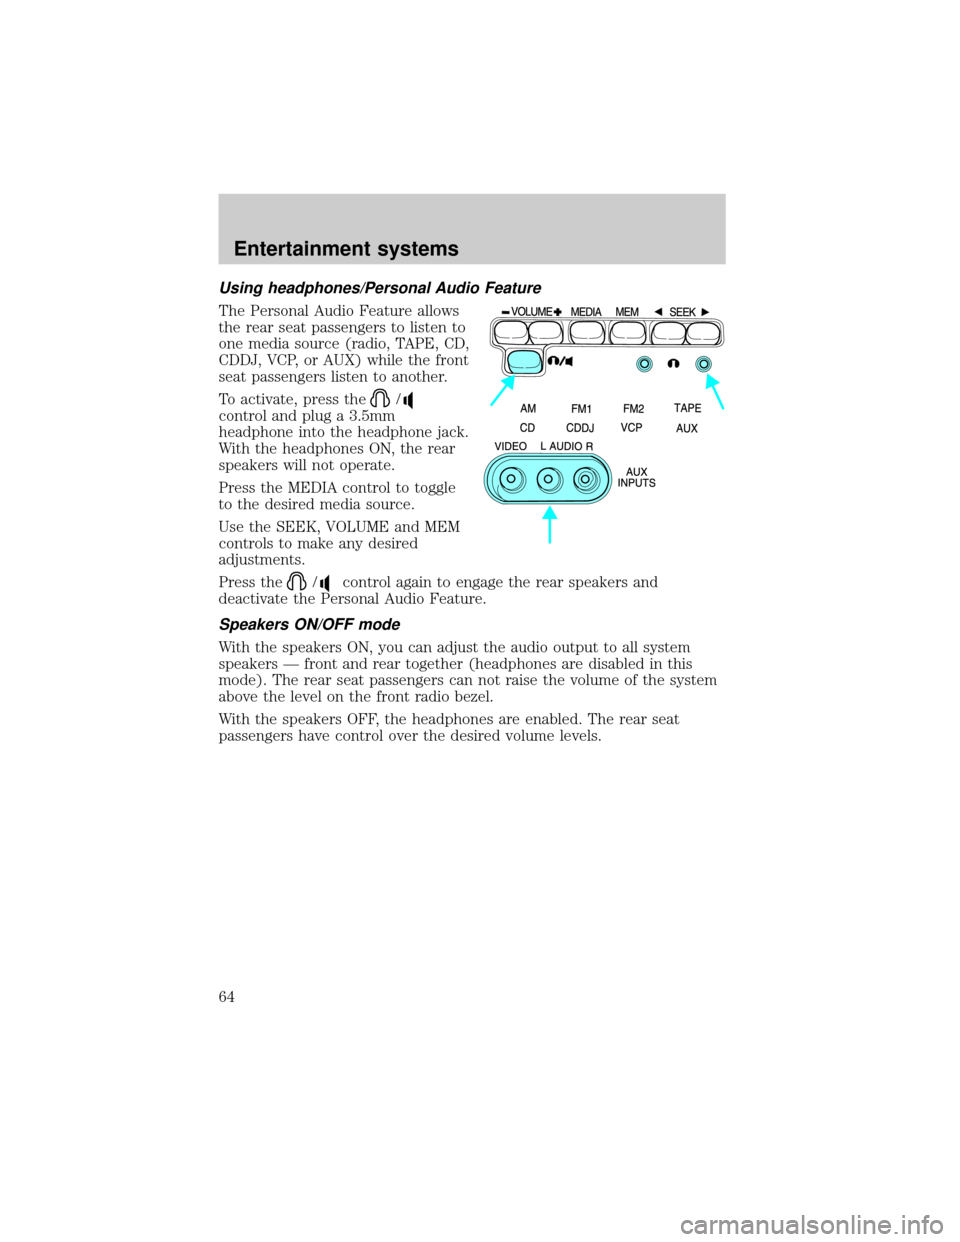
The Personal Audio Feature allows
the rear seat passengers to listen to
one media source (radio, TAPE, CD,
CDDJ, VCP, or AUX) while the front
seat passengers listen to another.
To activate, press the
/
control and plug a 3.5mm
headphone into the headphone jack.
With the headphones ON, the rear
speakers will not operate.
Press the MEDIA control to toggle
to the desired media source.
Use the SEEK, VOLUME and MEM
controls to make any desired
adjustments.
Press the
/control again to engage the rear speakers and
deactivate the Personal Audio Feature.
Speakers ON/OFF mode
With the speakers ON, you can adjust the audio output to all system
speakers Ð front and rear together (headphones are disabled in this
mode). The rear seat passengers can not raise the volume of the system
above the level on the front radio bezel.
With the speakers OFF, the headphones are enabled. The rear seat
passengers have control over the desired volume levels.
Entertainment systems
64
Page 68 of 272
²When the ignition is turned ON, audio is through the headphones as
LOW volume. Press the (+) control to increase volume. To listen
through the vehicle's speaker system, press the speaker button (
)
on the media control panel.
Inserting/removing cassette
Inserting cassette
²Open the AutoVisiontconsole cover.
²Insert the videocassette into the cassette compartment.
Inserting a videocassette into the VCP automatically turns the power ON
(the indicator lamp will illuminate) and the tape will begin playback.
If the vehicle is traveling over rough terrain, it may be difficult to insert
the cassette because the machine attempts to hold the cassette firmly to
prevent vibration. If this condition is encountered, either press firmly or
remove the cassette and insert it again.
The system will not allow a cassette to be inserted in the wrong position.
²Once the cassette is completely inserted, close the VCP and console
covers.
Removing cassette
1. Open the console cover, open the VCP cover and press the STOP
button.
2. Press the EJECT button.
Do not insert any foreign substances into the cassette compartment.
After removing the cassette from the VCP, close the door.
When the engine is turned OFF, the cassette is ejected from the
compartment.
To play a video game
1. Connect the video line from your video game device to the YELLOW
jack.
2. Connect the left and right audio cables to the WHITE and RED jacks
respectively.
3. Ensure that the system is in AUX mode. The LCD screen will turn on
and the AUX indicator will illuminate.
Entertainment systems
68
Page 70 of 272
Encore (on remote control)
²Press the ENCORE control while in playback mode.
The VCP will reverse to the previous five seconds of the selection and
then operate at normal playback mode.
Auxiliary input jacks
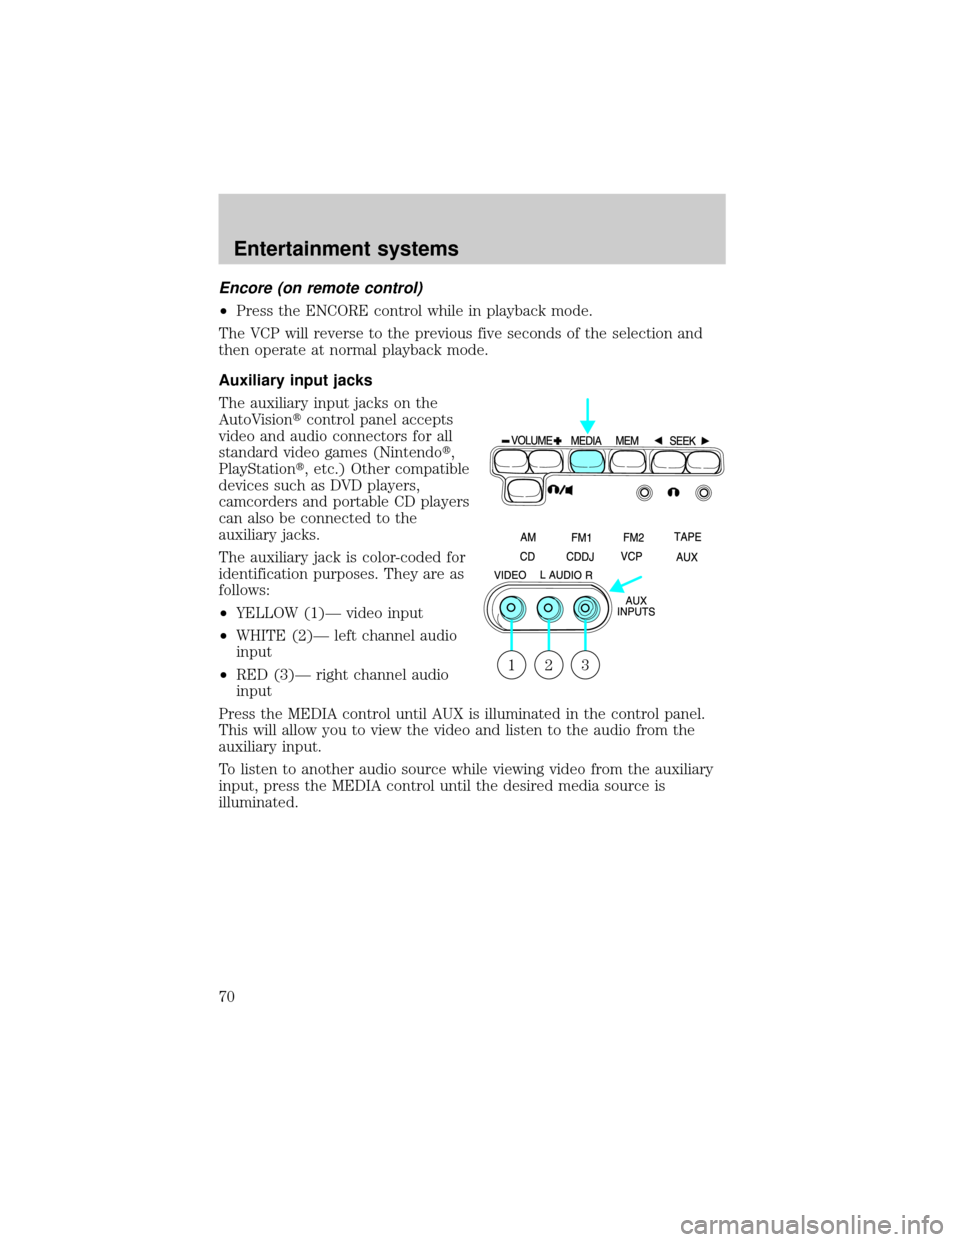
The auxiliary input jacks on the
AutoVisiontcontrol panel accepts
video and audio connectors for all
standard video games (Nintendot,
PlayStationt, etc.) Other compatible
devices such as DVD players,
camcorders and portable CD players
can also be connected to the
auxiliary jacks.
The auxiliary jack is color-coded for
identification purposes. They are as
follows:
²YELLOW (1)Ð video input
²WHITE (2)Ð left channel audio
input
²RED (3)Ð right channel audio
input
Press the MEDIA control until AUX is illuminated in the control panel.
This will allow you to view the video and listen to the audio from the
auxiliary input.
To listen to another audio source while viewing video from the auxiliary
input, press the MEDIA control until the desired media source is
illuminated.
321
Entertainment systems
70
Page 71 of 272
Video source selection
The MEDIA control determines
which video (VCP or Auxiliary
input) is seen on the AutoVisiont
screen.
When the vehicle ignition is ON and
the system is not in VCP mode, the
AutoVisiontselects the Auxiliary
input as the video source. (If there
is not a video source connected to
the Auxiliary input jack, the screen
will be blank.)
AutoPlay feature
Your AutoVisiontsystem is equipped with an AutoPlay Feature. When a
video cassette is inserted into the player, video and audio sources are
automatically switched to VCP. This will override any other selections
currently made.
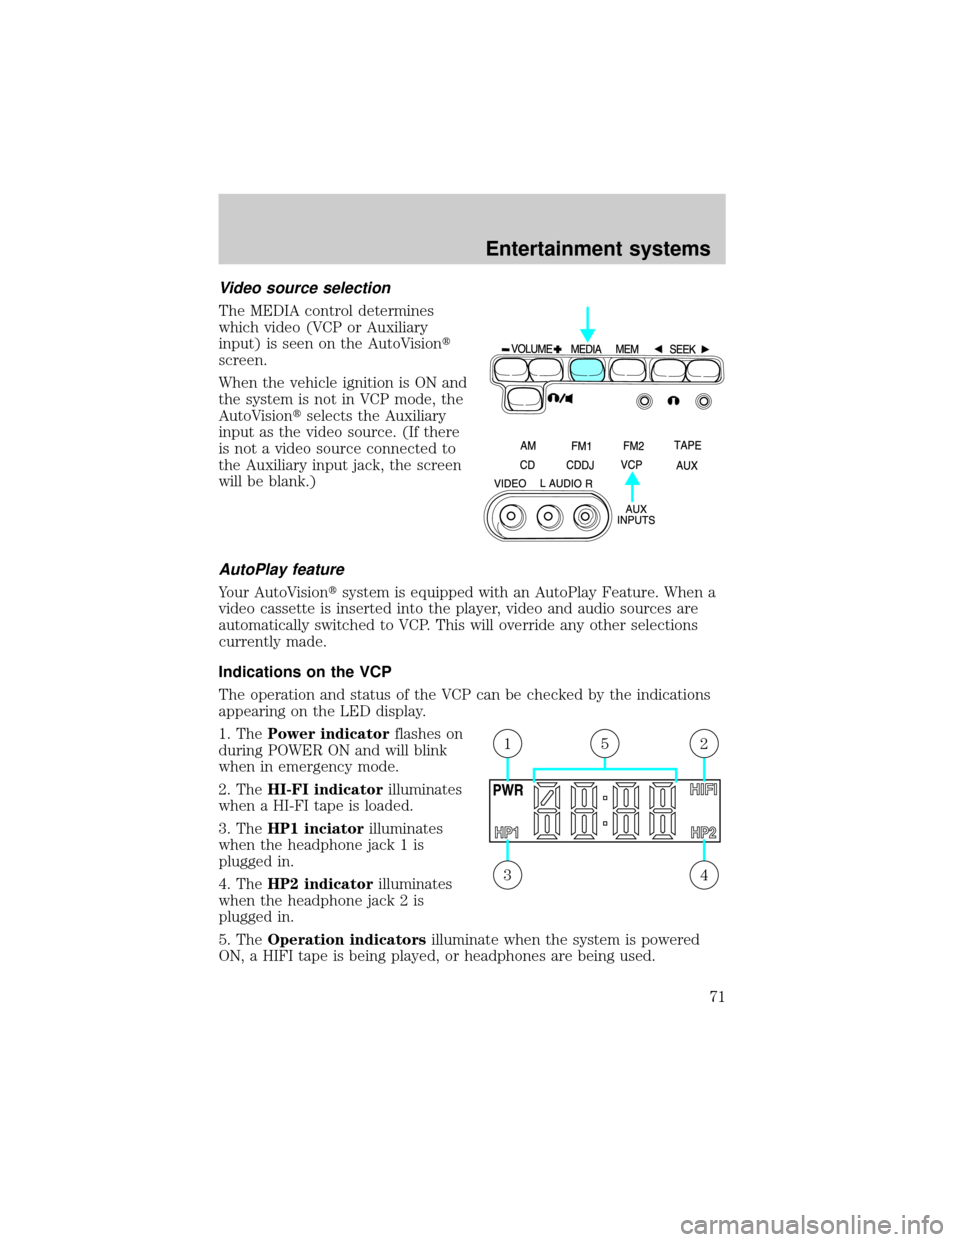
Indications on the VCP
The operation and status of the VCP can be checked by the indications
appearing on the LED display.
1. ThePower indicatorflashes on
during POWER ON and will blink
when in emergency mode.
2. TheHI-FI indicatorilluminates
when a HI-FI tape is loaded.
3. TheHP1 inciatorilluminates
when the headphone jack 1 is
plugged in.
4. TheHP2 indicatorilluminates
when the headphone jack 2 is
plugged in.
5. TheOperation indicatorsilluminate when the system is powered
ON, a HIFI tape is being played, or headphones are being used.
43
215
Entertainment systems
71
Page 74 of 272
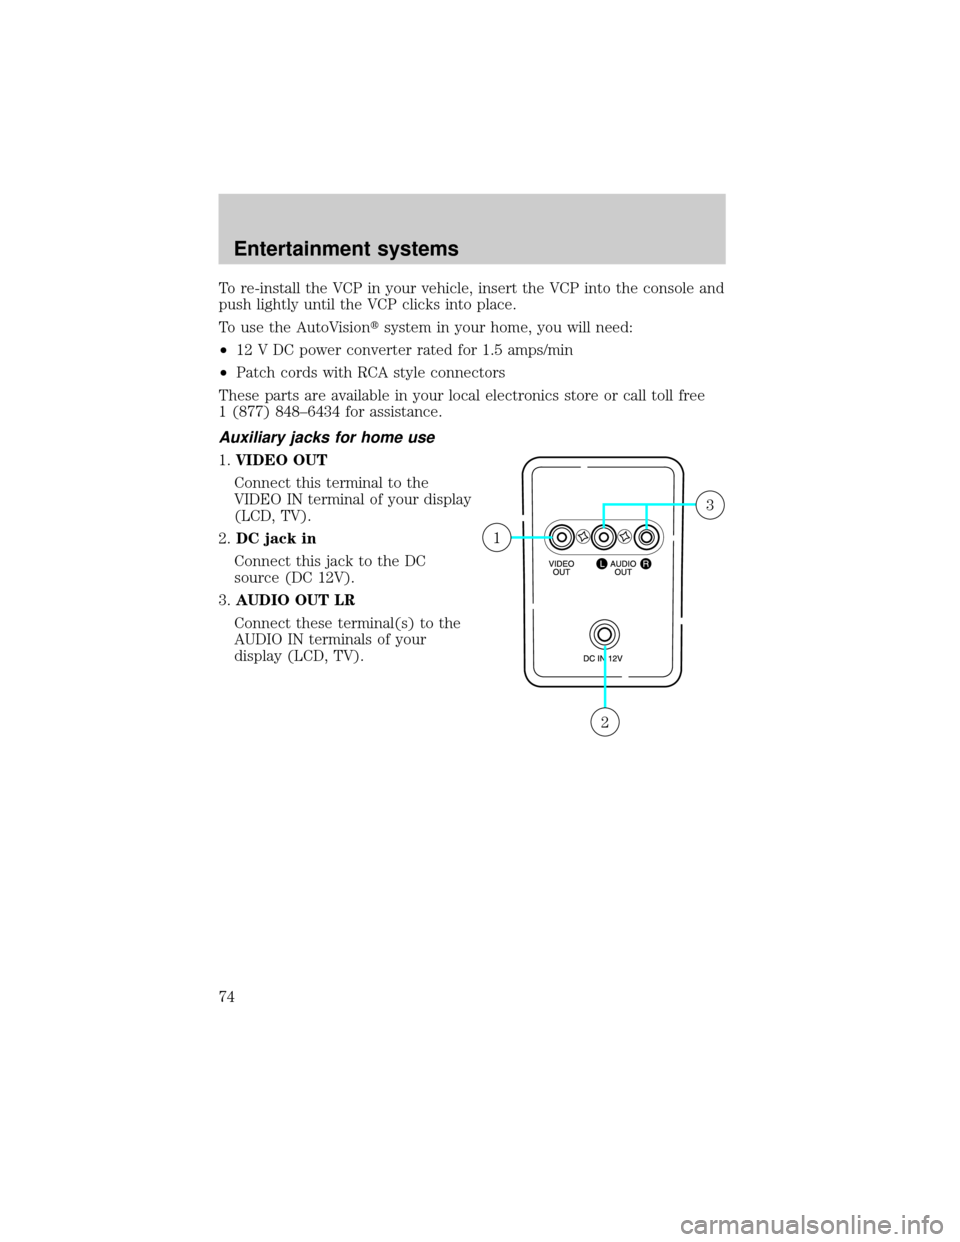
To re-install the VCP in your vehicle, insert the VCP into the console and
push lightly until the VCP clicks into place.
To use the AutoVisiontsystem in your home, you will need:
²12 V DC power converter rated for 1.5 amps/min
²Patch cords with RCA style connectors
These parts are available in your local electronics store or call toll free
1 (877) 848±6434 for assistance.
Auxiliary jacks for home use
1.VIDEO OUT
Connect this terminal to the
VIDEO IN terminal of your display
(LCD, TV).
2.DC jack in
Connect this jack to the DC
source (DC 12V).
3.AUDIO OUT LR
Connect these terminal(s) to the
AUDIO IN terminals of your
display (LCD, TV).
2
1
3
Entertainment systems
74
Page 75 of 272
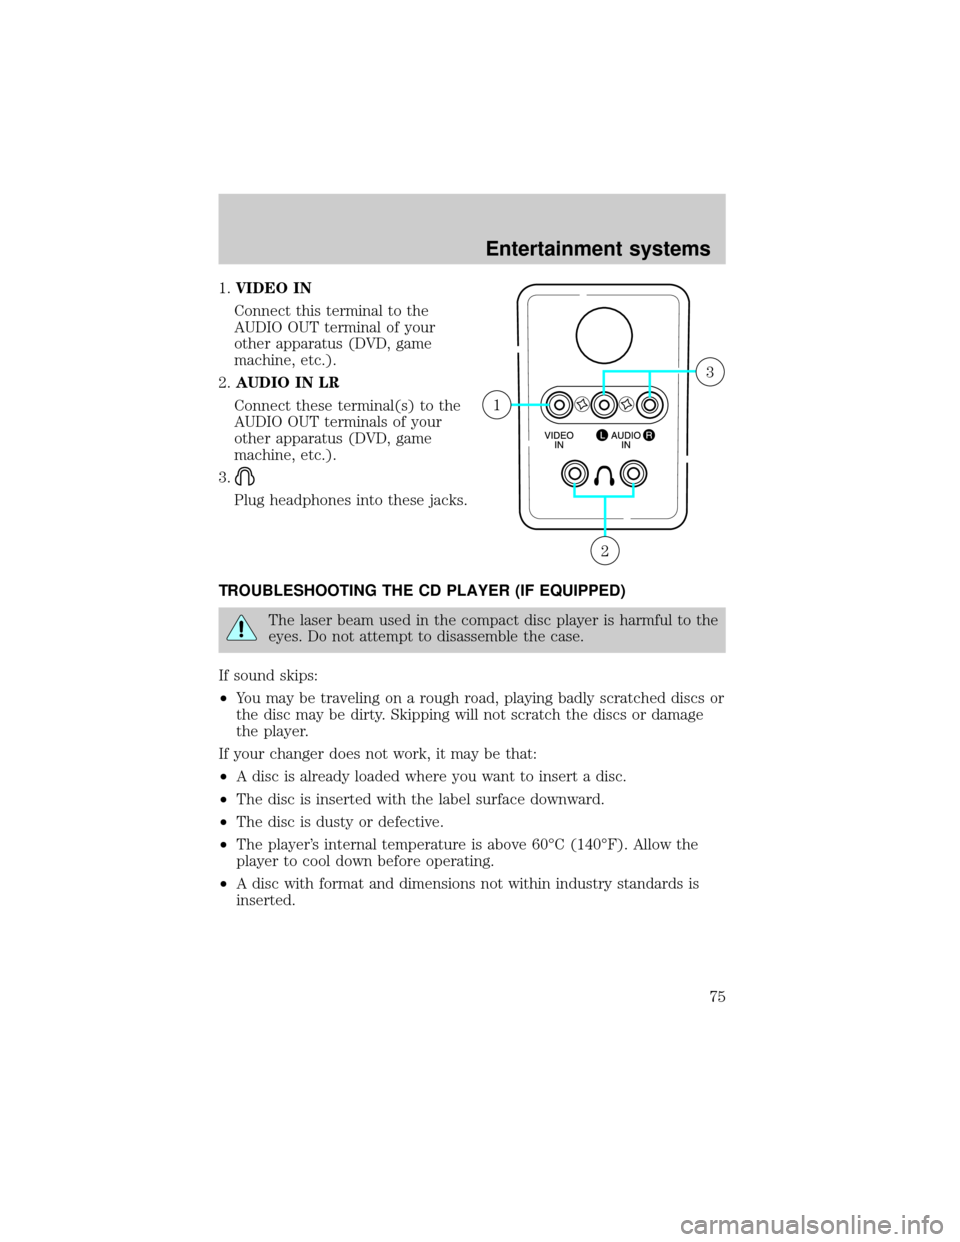
1.VIDEO IN
Connect this terminal to the
AUDIO OUT terminal of your
other apparatus (DVD, game
machine, etc.).
2.AUDIO IN LR
Connect these terminal(s) to the
AUDIO OUT terminals of your
other apparatus (DVD, game
machine, etc.).
3.
Plug headphones into these jacks.
TROUBLESHOOTING THE CD PLAYER (IF EQUIPPED)
The laser beam used in the compact disc player is harmful to the
eyes. Do not attempt to disassemble the case.
If sound skips:
²You may be traveling on a rough road, playing badly scratched discs or
the disc may be dirty. Skipping will not scratch the discs or damage
the player.
If your changer does not work, it may be that:
²A disc is already loaded where you want to insert a disc.
²The disc is inserted with the label surface downward.
²The disc is dusty or defective.
²The player's internal temperature is above 60ÉC (140ÉF). Allow the
player to cool down before operating.
²A disc with format and dimensions not within industry standards is
inserted.
2
1
3
Entertainment systems
75
Page 77 of 272

RADIO FREQUENCY INFORMATION
The Federal Communications Commission (FCC) and the Canadian Radio
and Telecommunications Commission(CRTC) establish the frequencies
AM and FM stations may use for their broadcasts. Allowable frequencies
are:
AM 530, 540±1600, 1610 kHz
FM 87.7, 87.9±107.7, 107.9 MHz
Not all frequencies are used in a given area.
RADIO RECEPTION FACTORS
Three factors can affect radio reception:
²Distance/strength.The further an FM signal travels, the weaker it is.
The listenable range of the average FM station is approximately 40 km
(24 miles). This range can be affected by ªsignal modulation.º Signal
modulation is a process radio stations use to increase their
strength/volume relative to other stations.
²Terrain.Hills, mountains and tall buildings between your vehicle's
antenna and the radio station signal can cause FM reception problems.
Static can be caused on AM stations by power lines, electric fences,
traffic lights and thunderstorms. Moving away from an interfering
structure (out of its ªshadowº) returns your reception to normal.
²Station overload.Weak signals are sometimes captured by stronger
signals when you pass a broadcast tower. A stronger signal may
temporarily overtake a weaker signal and play while the weak station
frequency is displayed.
The audio system automatically switches to single channel reception if it
will improve the reception of a station normally received in stereo.
AUDIO SYSTEM WARRANTIES AND SERVICE
Refer to theWarranty Guidefor audio system warranty information.
If service is necessary, see your dealer or a qualified technician.
Entertainment systems
77
Page 267 of 272

A
Air bag supplemental restraint
system ........................................132
and child safety seats ............134
description ..............................132
disposal ....................................137
driver air bag ..........................135
indicator light ...................14, 136
operation .................................135
passenger air bag ...................135
Air cleaner filter ...............247, 253
Air conditioning
manual heating and air
conditioning system .................79
Ambulance packages ....................7
Antifreeze (see Engine
coolant) .....................................226
Anti-lock brake system (see
Brakes) ..............................152±153
Audio system (see Radio) ...20, 41
Automatic transmission
driving an automatic
overdrive .................................157
fluid, adding ............................245
fluid, checking ........................245
fluid, refill capacities ..............254
fluid, specification ..................260
Auxiliary power point .................96
Axle
lubricant specifications ..258, 260
refill capacities ........................254
traction lok ..............................155
B
Battery .......................................220
acid, treating emergencies .....220charging system warning light 14
disconnecting ..........................222
jumping a disabled battery ....191
maintenance-free ....................220
replacement, specifications ...253
servicing ..................................220
voltage gauge ............................18
Belt minder ...............................127
Brakes ........................................152
anti-lock ...........................152±153
anti-lock brake system (ABS)
warning light .....................13, 153
brake warning light ..................13
fluid, checking and adding ....244
fluid, refill capacities ..............254
fluid, specifications .........258, 260
lubricant specifications ..258, 260
shift interlock ..........................156
Break-in period .............................5
C
Capacities for refilling fluids ....254
Child safety restraints ..............138
child safety belts ....................138
Child safety seats ......................139
in front seat ............................140
in rear seat ..............................140
tether anchorage hardware ...143
Cleaning your vehicle
engine compartment ..............209
exterior ....................................212
instrument cluster lens ..........211
instrument panel ....................211
interior .....................................211
plastic parts ............................210
safety belts ..............................212
washing ....................................207
waxing .....................................207
Index
267