ESP FORD E SERIES 2016 4.G Owner's Manual
[x] Cancel search | Manufacturer: FORD, Model Year: 2016, Model line: E SERIES, Model: FORD E SERIES 2016 4.GPages: 319, PDF Size: 6.18 MB
Page 127 of 319
For customers in Guam, the
Commonwealth of the Northern Mariana
Islands (CNMI), America Samoa, and the
U.S. Virgin Islands, please feel free to call
our Toll-Free Number: (800) 841-FORD
(3673).
If your vehicle must be serviced while you
are traveling or living in Puerto Rico,
contact the nearest authorized dealer. If
the authorized dealer cannot help you,
contact:
FORD MOTOR COMPANY
Customer Relationship Center
1555 Fairlane Drive
Fairlane Business Park #3
Allen Park, Michigan 48101
U.S.A.
Telephone: (800) 841-FORD (3673)
FAX: (313) 390-0804
Email: [email protected]
www.ford.com.pr
If your vehicle must be serviced while you
are traveling or living in the Middle East,
contact the nearest authorized dealer. If
the authorized dealer cannot help you,
contact:
FORD MOTOR COMPANY
Customer Relationship Center
1555 Fairlane Drive
Fairlane Business Park #3
Allen Park, Michigan 48101
U.S.A.
Ford: 80004443673
Lincoln: 80004441067
If calling from the UAE: 80004441066
If calling from the Kingdom of Saudi
Arabia:
8008443673
If calling from Kuwait: 22280384
FAX: +971 4 3327266
Email: [email protected]
www.me.ford.com If you buy your vehicle in North America
and then relocate to any of the above
locations, register your vehicle
identification number (VIN) and new
address with Ford Motor Company Export
Operations & Global Growth Initiatives by
emailing
[email protected].
If you are in another foreign country,
contact the nearest authorized dealer. In
the event your inquiry is unresolved,
communicate your concern with the
dealership ’s Sales Manager, Service
Manager or Customer Relations Manager.
If you require additional assistance or
clarification, please contact the respective
Customer Relationship Center as
previously listed.
Customers in the U.S. should call
1-800-392-3673.
ORDERING ADDITIONAL
OWNER'S LITERATURE
To order the publications in this portfolio,
contact Helm, Incorporated at:
HELM, INCORPORATED
47911 Halyard Drive
Plymouth, Michigan 48170
Attention: Customer Service
Or to order a free publication catalog, call
toll free: 1-800-782-4356
Monday-Friday 8:00 a.m. - 6:00 p.m. EST
Helm, Incorporated can also be reached
by their website:
www.helminc.com
(Items in this catalog may be purchased
by credit card, check or money order.)
124
E-Series (TE4) Canada/United States of America, enUSA, Edition date: 03/2015, Second Printing Customer Assistance
Page 149 of 319
WARNINGS
Batteries normally produce explosive
gases which can cause personal
injury. Therefore, do not allow
flames, sparks or lighted substances to
come near the battery. When working near
the battery, always shield your face and
protect your eyes. Always provide proper
ventilation. When lifting a plastic-cased battery,
excessive pressure on the end walls
could cause acid to flow through the
vent caps, resulting in personal injury
and/or damage to the vehicle or battery.
Lift the battery with a battery carrier or
with your hands on opposite corners. Keep batteries out of reach of
children. Batteries contain sulfuric
acid. Avoid contact with skin, eyes or
clothing. Shield your eyes when working
near the battery to protect against possible
splashing of acid solution. In case of acid
contact with skin or eyes, flush
immediately with water for a minimum of
15 minutes and get prompt medical
attention. If acid is swallowed, call a
physician immediately. Battery posts, terminals and related
accessories contain lead and lead
compounds. Wash hands after
handling. Note:
If your vehicle battery has a cover,
make sure it is reinstalled after the battery
has been cleaned or replaced.
Note: Electrical or electronic accessories
or components added to the vehicle by the
dealer or the owner may adversely affect
battery performance and durability.
Your vehicle is fitted with a Motorcraft®
maintenance-free battery which normally
does not require additional water during
its life of service. For longer, trouble-free operation, keep the
top of the battery clean and dry. Also,
make certain the battery cables are always
tightly fastened to the battery terminals.
If you see any corrosion on the battery or
terminals, remove the cables from the
terminals and clean with a wire brush. You
can neutralize the acid with a solution of
baking soda and water.
Always dispose of automotive batteries in
a responsible manner. Follow your local
authorized standards for disposal. Call your
local authorized recycling center to find
out more about recycling automotive
batteries.
Reconnecting the Battery
Because your vehicle
’s engine is
electronically controlled by a computer,
some control conditions are maintained
by power from the battery. When the
battery is disconnected or a new battery
is installed, the engine must relearn its idle
and fuel trim strategy for optimum
driveability and performance. Flexible fuel
vehicles (FFV) must also relearn the
ethanol content of the fuel for optimum
driveability and performance.
To begin this process.
1. Switch off all accessories and start the
engine.
2. Run the engine until it reaches normal operating temperature.
3. Allow the engine to idle for at least one
minute.
4. Turn the A/C on and allow the engine to idle for at least one minute.
5. Fully press the foot brake. Release the parking brake. Shift the gearshift lever
to Drive (D) and allow the engine to
idle for at least one minute.
6. Drive the vehicle for approximately 10 mi (16 km) to complete the
relearning process.
146
E-Series (TE4) Canada/United States of America, enUSA, Edition date: 03/2015, Second Printing Maintenance
Page 152 of 319
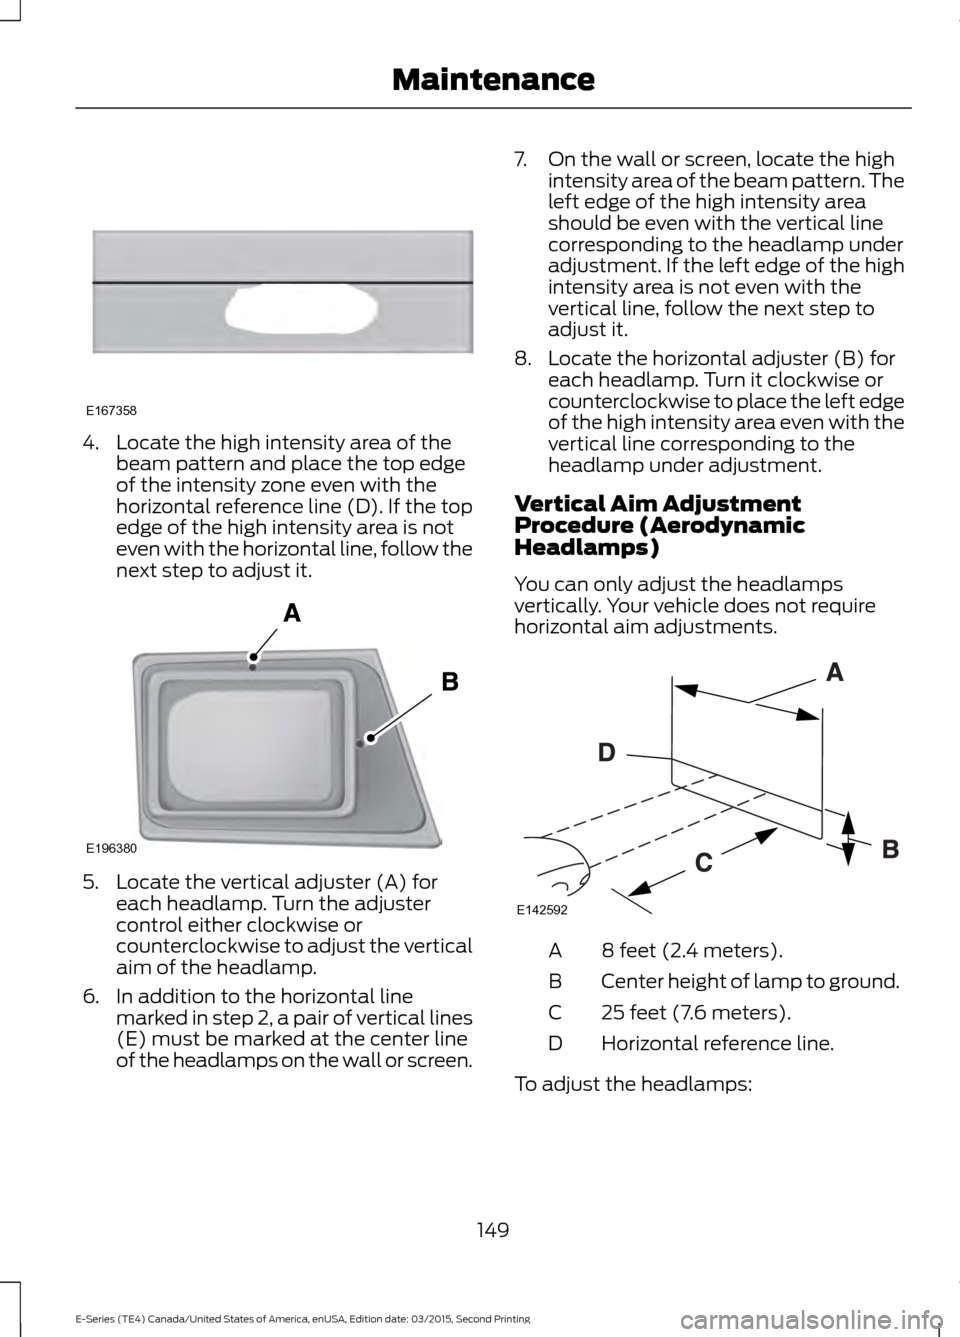
4. Locate the high intensity area of the
beam pattern and place the top edge
of the intensity zone even with the
horizontal reference line (D). If the top
edge of the high intensity area is not
even with the horizontal line, follow the
next step to adjust it. 5. Locate the vertical adjuster (A) for
each headlamp. Turn the adjuster
control either clockwise or
counterclockwise to adjust the vertical
aim of the headlamp.
6. In addition to the horizontal line marked in step 2, a pair of vertical lines
(E) must be marked at the center line
of the headlamps on the wall or screen. 7. On the wall or screen, locate the high
intensity area of the beam pattern. The
left edge of the high intensity area
should be even with the vertical line
corresponding to the headlamp under
adjustment. If the left edge of the high
intensity area is not even with the
vertical line, follow the next step to
adjust it.
8. Locate the horizontal adjuster (B) for each headlamp. Turn it clockwise or
counterclockwise to place the left edge
of the high intensity area even with the
vertical line corresponding to the
headlamp under adjustment.
Vertical Aim Adjustment
Procedure (Aerodynamic
Headlamps)
You can only adjust the headlamps
vertically. Your vehicle does not require
horizontal aim adjustments. 8 feet (2.4 meters).
A
Center height of lamp to ground.
B
25 feet (7.6 meters).
C
Horizontal reference line.
D
To adjust the headlamps:
149
E-Series (TE4) Canada/United States of America, enUSA, Edition date: 03/2015, Second Printing MaintenanceE167358 E196380 E142592
Page 167 of 319
•
Higher - to allow higher load carrying
capacity and to allow it to travel over
rough terrain without getting hung up
or damaging underbody components.
• Shorter - to give it the capability to
approach inclines and drive over the
crest of a hill without getting hung up
or damaging underbody components.
All other things held equal, a shorter
wheelbase may make your vehicle
quicker to respond to steering inputs
than a vehicle with a longer wheelbase.
• Narrower - to provide greater
maneuverability in tight spaces,
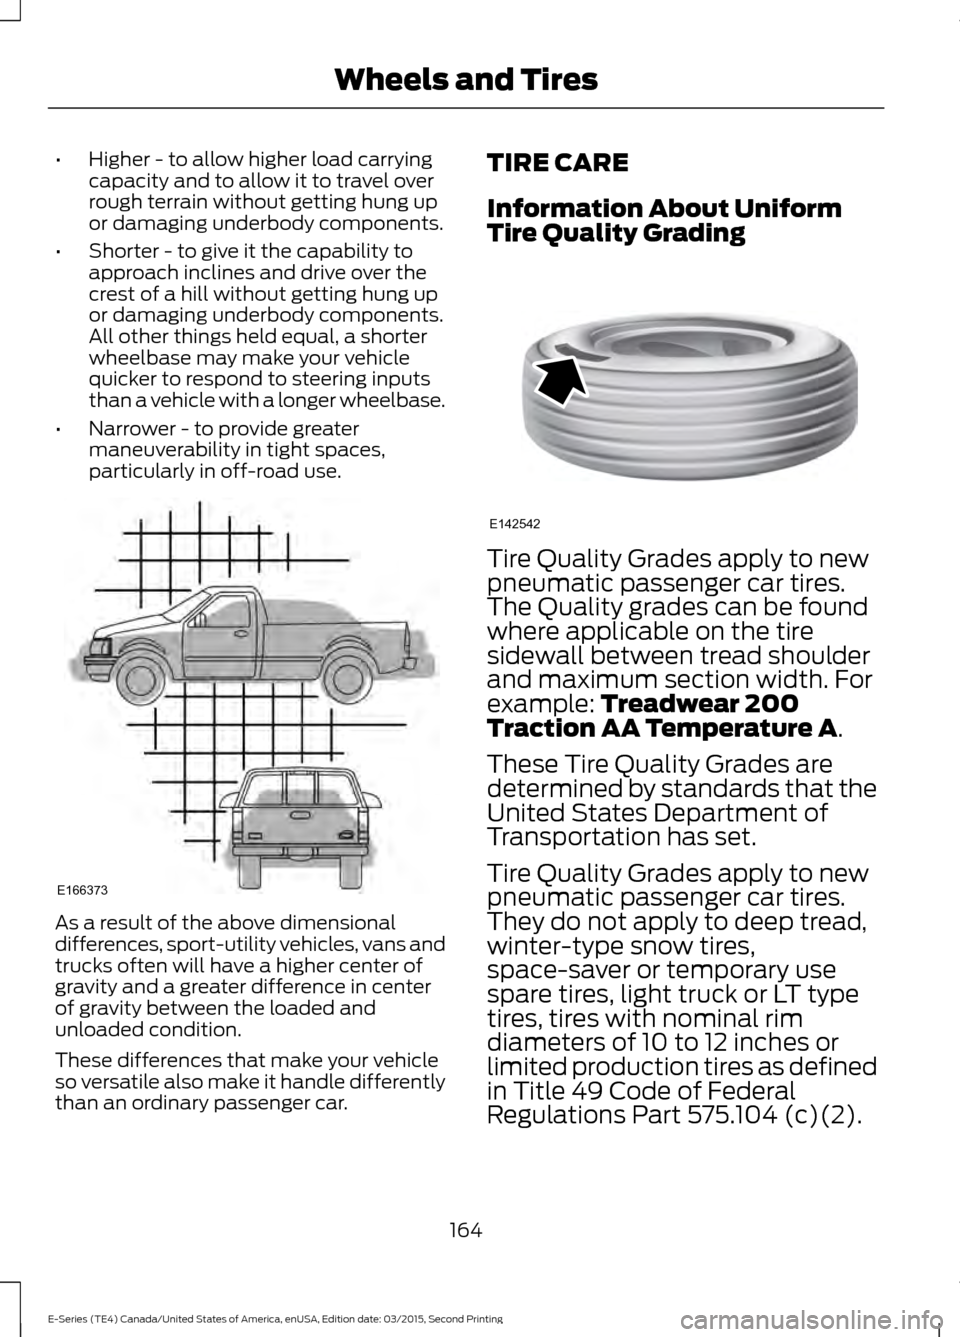
particularly in off-road use. As a result of the above dimensional
differences, sport-utility vehicles, vans and
trucks often will have a higher center of
gravity and a greater difference in center
of gravity between the loaded and
unloaded condition.
These differences that make your vehicle
so versatile also make it handle differently
than an ordinary passenger car. TIRE CARE
Information About Uniform
Tire Quality Grading
Tire Quality Grades apply to new
pneumatic passenger car tires.
The Quality grades can be found
where applicable on the tire
sidewall between tread shoulder
and maximum section width. For
example: Treadwear 200
Traction AA Temperature A.
These Tire Quality Grades are
determined by standards that the
United States Department of
Transportation has set.
Tire Quality Grades apply to new
pneumatic passenger car tires.
They do not apply to deep tread,
winter-type snow tires,
space-saver or temporary use
spare tires, light truck or LT type
tires, tires with nominal rim
diameters of 10 to 12 inches or
limited production tires as defined
in Title 49 Code of Federal
Regulations Part 575.104 (c)(2).
164
E-Series (TE4) Canada/United States of America, enUSA, Edition date: 03/2015, Second Printing Wheels and TiresE166373 E142542
Page 168 of 319
U.S. Department of
Transportation Tire quality
grades: The U.S. Department of
Transportation requires Ford
Motor Company to give you the
following information about tire
grades exactly as the government
has written it.
Treadwear
The treadwear grade is a
comparative rating based on the
wear rate of the tire when tested
under controlled conditions on a
specified government test course.
For example, a tire graded 150
would wear one and one-half (1
½) times as well on the
government course as a tire
graded 100. The relative
performance of tires depends
upon the actual conditions of their
use, however, and may depart
significantly from the norm due to
variations in driving habits, service
practices, and differences in road
characteristics and climate.
Traction AA A B C WARNING
The traction grade assigned
to this tire is based on
straight-ahead braking traction
tests, and does not include
acceleration, cornering,
hydroplaning or peak traction
characteristics The traction grades, from highest
to lowest are AA, A, B, and C. The
grades represent the tire
’s ability
to stop on wet pavement as
measured under controlled
conditions on specified
government test surfaces of
asphalt and concrete. A tire
marked C may have poor traction
performance.
Temperature A B C WARNING
The temperature grade for
this tire is established for a
tire that is properly inflated and
not overloaded. Excessive speed,
underinflation, or excessive
loading, either separately or in
combination, can cause heat
buildup and possible tire failure. The temperature grades are A
(the highest), B and C,
representing the tire
’s resistance
to the generation of heat and its
ability to dissipate heat when
tested under controlled conditions
on a specified indoor laboratory
test wheel. Sustained high
temperature can cause the
material of the tire to degenerate
and reduce tire life, and excessive
temperature can lead to sudden
tire failure. The grade C
corresponds to a level of
performance which all passenger
car tires must meet under the
165
E-Series (TE4) Canada/United States of America, enUSA, Edition date: 03/2015, Second Printing Wheels and Tires
Page 176 of 319
the B-pillar or the edge of the
driver's door. The cold inflation
pressure should never be set lower
than the recommended pressure
on the Safety Compliance
Certification Label or Tire Label.
When weather temperature
changes occur, tire inflation
pressures also change. A 10°F
(6°C) temperature drop can
cause a corresponding drop of 1
psi (7 kPa) in inflation pressure.
Check your tire pressures
frequently and adjust them to the
proper pressure which can be
found on the Safety Compliance
Certification Label or Tire Label.
To check the pressure in your
tire(s):
1. Make sure the tires are cool,
meaning they are not hot from
driving even a mile.
Note:
If you are checking tire
pressure when the tire is hot, (for
example, driven more than 1 mile
[1.6 kilometers]), never bleed or
reduce air pressure. The tires are
hot from driving and it is normal for
pressures to increase above
recommended cold pressures. A
hot tire at or below recommended
cold inflation pressure could be
significantly under-inflated. Note:
If you have to drive a
distance to get air for your tire(s),
check and record the tire pressure
first and add the appropriate air
pressure when you get to the
pump. It is normal for tires to heat
up and the air pressure inside to go
up as you drive.
2. Remove the cap from the valve
on one tire, then firmly press the
tire gauge onto the valve and
measure the pressure.
3. Add enough air to reach the
recommended air pressure.
Note: If you overfill the tire, release
air by pressing on the metal stem
in the center of the valve. Then
recheck the pressure with your tire
gauge.
4. Replace the valve cap.
5. Repeat this procedure for each
tire, including the spare.
Note: Some spare tires operate at
a higher inflation pressure than the
other tires. For T type mini-spare
tires, (see the Dissimilar spare
wheel and tire assembly
information for a description. Store
and maintain at 60 psi (4.15 bar).
For full-size and dissimilar spare
tires, see the Dissimilar spare wheel
and tire assembly information for
a description. Store and maintain
at the higher of the front and rear
inflation pressure as shown on the
Safety Compliance Certification
Label or Tire Label.
173
E-Series (TE4) Canada/United States of America, enUSA, Edition date: 03/2015, Second Printing Wheels and Tires
Page 186 of 319
•
Install chains securely, verifying that
the chains do not touch any wiring,
brake lines or fuel lines.
• Drive cautiously. If you hear the chains
rub or bang against your vehicle, stop
and retighten the chains. If this does
not work, remove the chains to prevent
damage to your vehicle.
• Remove the tire chains when they are
no longer needed. Do not use tire
chains on dry roads.
If you have any questions regarding snow
chains or cables, please contact your
authorized dealer.
TIRE PRESSURE MONITORING
SYSTEM WARNING
The tire pressure monitoring system
is not a substitute for manually
checking tire pressure. The tire
pressure should be checked periodically
(at least monthly) using a tire gauge, see
Inflating your tires in this chapter. Failure
to properly maintain your tire pressure
could increase the risk of tire failure, loss
of control, vehicle rollover and personal
injury. Each tire, including the spare (if
provided), should be checked
monthly when cold and inflated
to the inflation pressure recommended by
the vehicle manufacturer on the vehicle
placard or tire inflation pressure label. (If
your vehicle has tires of a different size
than the size indicated on the vehicle
placard or tire inflation pressure label, you
should determine the proper tire inflation
pressure for those tires.) As an added safety feature, your vehicle
has been equipped with a Tire Pressure
Monitoring System (TPMS) that
illuminates a low tire pressure telltale
when one or more of your tires is
significantly under-inflated. Accordingly,
when the low tire pressure telltale
illuminates, you should stop and check
your tires as soon as possible, and inflate
them to the proper pressure. Driving on a
significantly under-inflated tire causes the
tire to overheat and can lead to tire failure.
Under-inflation also reduces fuel efficiency
and tire tread life, and may affect the
vehicle
’s handling and stopping ability.
Please note that the TPMS is not a
substitute for proper tire maintenance, and
it is the driver ’s responsibility to maintain
correct tire pressure, even if under-inflation
has not reached the level to trigger
illumination of the TPMS low tire pressure
telltale.
Your vehicle has also been equipped with
a TPMS malfunction indicator to indicate
when the system is not operating properly.
The TPMS malfunction indicator is
combined with the low tire pressure
telltale. When the system detects a
malfunction, the telltale will flash for
approximately one minute and then remain
continuously illuminated. This sequence
will continue upon subsequent vehicle
start-ups as long as the malfunction exists.
When the malfunction indicator is
illuminated, the system may not be able
to detect or signal low tire pressure as
intended. TPMS malfunctions may occur
for a variety of reasons, including the
installation of replacement or alternate
tires or wheels on the vehicle that prevent
the TPMS from functioning properly.
Always check the TPMS malfunction
telltale after replacing one or more tires or
wheels on your vehicle to ensure that the
replacement or alternate tires and wheels
allow the TPMS to continue to function
properly.
183
E-Series (TE4) Canada/United States of America, enUSA, Edition date: 03/2015, Second Printing Wheels and Tires
Page 188 of 319
Customer action required
Possible cause
Low tire pressure
warning light
Make sure tires are at the proper pres-
sure. See Inflating your tires in this
chapter. After inflating your tires to the
manufacturer’s recommended pressure
as shown on the Tire Label (located on
the edge of driver ’s door or the B-Pillar),
the vehicle must be driven for at least
two minutes over 20 mph (32 km/h)
before the light turns off.
Tire(s) under-inflated
Solid warning light
Repair the damaged road wheel and tire
assembly and reinstall it on the vehicle
to restore system function. For a
description on how the system functions,
see When your temporary spare tire
is installed in this section.
Spare tire in use
If the tires are properly inflated and the
spare tire is not in use but the light
remains on, contact your authorized
dealer as soon as possible.
TPMS malfunction
Repair the damaged road wheel and tire
assembly and reinstall it on the vehicle
to restore system function. For a
description on how the system functions,
see
When your temporary spare tire
is installed in this section.
Spare tire in use
Flashing warning
light
If the tires are properly inflated and the
spare tire is not in use but the light
remains on, contact your authorized
dealer as soon as possible.
TPMS malfunction
When Inflating Your Tires
When putting air into your tires (such as at
a gas station or in your garage), the tire
pressure monitoring system may not
respond immediately to the air added to
your tires. It may take up to two minutes of driving
over 20 mph (32 km/h) for the light to turn
off after you have filled your tires to the
recommended inflation pressure
185
E-Series (TE4) Canada/United States of America, enUSA, Edition date: 03/2015, Second Printing Wheels and Tires
Page 210 of 319
•
MP3 and WMA folder mode represents
a folder structure consisting of one
level of folders. The CD player numbers
all MP3 and WMA tracks on the disc
(noted by the MP3 or WMA file
extension) and all folders containing
MP3 and WMA files, from F001 (folder)
T001 (track) to F253 T255.
• Creating discs with only one level of
folders helps with navigation through
the disc files.
If you are burning your own MP3 and WMA
discs, it is important to understand how
the system reads the structures you create.
While various files may be present (files
with extensions other than MP3 and
WMA), only files with the MP3 and WMA
extension are played; other files are
ignored by the system. This enables you to
use the same MP3 and WMA disc for a
variety of tasks on your work computer,
home computer and your in-vehicle
system. In track mode, the system displays and
plays the structure as if it were only one
level deep (all MP3 and WMA files play,
regardless of being in a specific folder). In
folder mode, the system only plays the
MP3 and WMA files in the current folder.
AUDIO UNIT - VEHICLES WITH:
AM/FM WARNING
Driving while distracted can result in
loss of vehicle control, crash and
injury. We strongly recommend that
you use extreme caution when using any
device that may take your focus off the
road. Your primary responsibility is the safe
operation of your vehicle. We recommend
against the use of any hand-held device
while driving and encourage the use of
voice-operated systems when possible.
Make sure you are aware of all applicable
local laws that may affect the use of
electronic devices while driving. 207
E-Series (TE4) Canada/United States of America, enUSA, Edition date: 03/2015, Second Printing Audio SystemE163157
Page 211 of 319
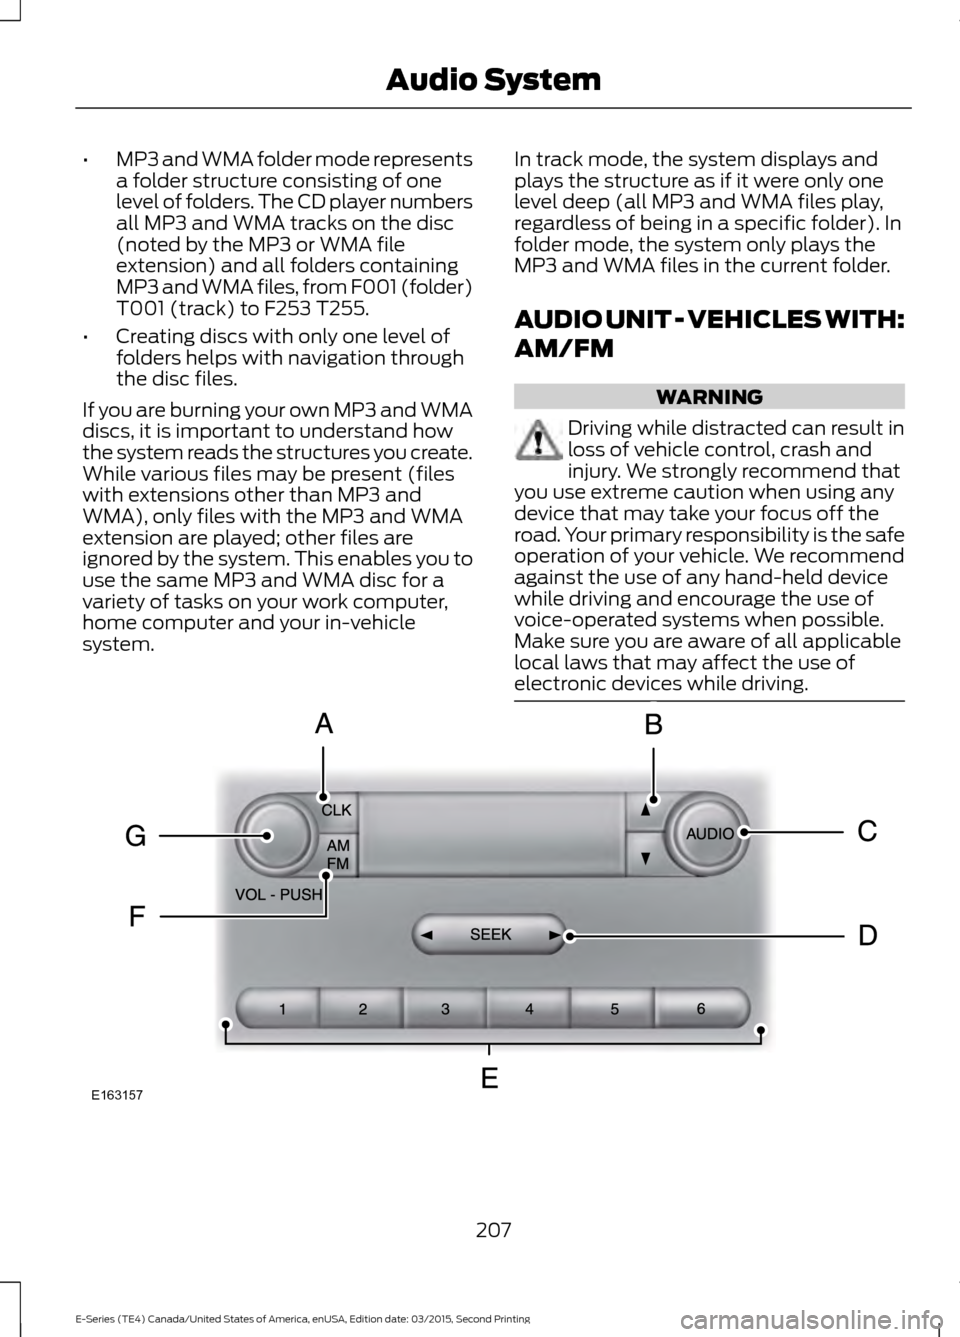
CLOCK: Press to display the clock. To set the time, press and hold until the
hours start to flash. Press the arrow buttons to adjust the hours, then repeat to
set the minutes. Press again to exit clock mode.
A
TUNE:
In radio mode, press to manually search through the radio frequency
band.
B
AUDIO:
Press to access settings for Treble, Midrange, Bass, Fade or Balance.
C
Seek, Fast Forward and Reverse:
In radio mode, select a frequency band
and press this button. The system stops at the first station it finds in that
direction.
D
Numeric keypad:
In radio mode, you can store your favorite radio stations. To
store a radio station, tune to the station, then press and hold a preset button
until sound returns.
E
AM/FM:
Press to access different audio modes, for example AM, FM, audio
input jack.
F
VOL and Power:
Press to switch the system on and off. Turn to adjust the
volume.
G
AUDIO UNIT - VEHICLES WITH:
AM/FM/CD/SYNC WARNING
Driving while distracted can result in
loss of vehicle control, crash and
injury. We strongly recommend that
you use extreme caution when using any
device that may take your focus off the
road. Your primary responsibility is the safe
operation of your vehicle. We recommend
against the use of any hand-held device
while driving and encourage the use of
voice-operated systems when possible.
Make sure you are aware of all applicable
local laws that may affect the use of
electronic devices while driving. Note:
You can operate your audio system
for up to one hour after you switch off the
ignition. Press the power control to operate
the system with the ignition turned off. The
system automatically turns off after one
hour.
208
E-Series (TE4) Canada/United States of America, enUSA, Edition date: 03/2015, Second Printing Audio System