hood open FORD E SERIES 2017 4.G Owners Manual
[x] Cancel search | Manufacturer: FORD, Model Year: 2017, Model line: E SERIES, Model: FORD E SERIES 2017 4.GPages: 318, PDF Size: 6.21 MB
Page 6 of 318
Hazard Warning Flashers...........................114
Fuel Shutoff
.....................................................114
Jump Starting the Vehicle..........................115
Transporting the Vehicle.............................117
Customer Assistance
Getting the Services You Need
.................118
In California (U.S. Only)..............................119
The Better Business Bureau (BBB) Auto Line Program (U.S. Only)
......................120
Utilizing the Mediation/Arbitration Program (Canada Only).........................121
Getting Assistance Outside the U.S. and Canada..........................................................121
Ordering Additional Owner's Literature......................................................122
Reporting Safety Defects (U.S. Only)..............................................................123
Reporting Safety Defects (Canada Only)..............................................................123
Fuses
Fuse Specification Chart............................125
Changing a Fuse
............................................132
Maintenance
General Information....................................134
Opening and Closing the Hood
...............134
Under Hood Overview................................135
Engine Oil Dipstick.......................................136
Engine Oil Check
...........................................136
Oil Change Indicator Reset.......................136
Engine Coolant Check.................................137
Automatic Transmission Fluid Check.............................................................141
Brake Fluid Check.........................................144
Power Steering Fluid Check
.....................144
Washer Fluid Check.....................................145
Changing the 12V Battery..........................145
Checking the Wiper Blades.......................147
Changing the Wiper Blades......................147 Adjusting the Headlamps..........................147
Removing a Headlamp
..............................150
Changing a Bulb
.............................................151
Bulb Specification Chart............................153
Changing the Engine Air Filter.................155
Vehicle Care
General Information
....................................156
Cleaning Products
........................................156
Cleaning the Exterior
...................................157
Waxing..............................................................158
Cleaning the Engine....................................158
Cleaning the Windows and Wiper Blades...........................................................159
Cleaning the Interior....................................159
Cleaning the Instrument Panel and Instrument Cluster Lens........................160
Cleaning Leather Seats
..............................160
Repairing Minor Paint Damage................161
Cleaning the Alloy Wheels.........................161
Vehicle Storage
..............................................161
Wheels and Tires
General Information
....................................164
Tire Care...........................................................165
Using Snow Chains......................................183
Tire Pressure Monitoring System...........184
Changing a Road Wheel............................187
Technical Specifications
.............................191
Capacities and Specific- ations
Engine Specifications - 6.2L
.....................192
Engine Specifications - 6.8L....................192
Motorcraft Parts - 6.2L...............................193
Motorcraft Parts - 6.8L
..............................194
Vehicle Identification Number.................195
Vehicle Certification Label
........................196
Transmission Code Designation.............196
Capacities and Specifications - 6.2L.....197
3
E-Series (TE4) Canada/United States of America, enUSA, First Printing Table of Contents
Page 137 of 318
GENERAL INFORMATION
Have your vehicle serviced regularly to help
maintain its roadworthiness and resale
value. There is a large network of
authorized dealers that are there to help
you with their professional servicing
expertise. We believe that their specially
trained technicians are best qualified to
service your vehicle properly and expertly.
They are supported by a wide range of
highly specialized tools developed
specifically for servicing your vehicle.
If your vehicle requires professional service,
an authorized dealer can provide the
necessary parts and service. Check your
warranty information to find out which
parts and services are covered.
Use only recommended fuels, lubricants,
fluids and service parts conforming to
specifications. Motorcraft® parts are
designed and built to provide the best
performance in your vehicle.
Precautions
•
Do not work on a hot engine.
• Make sure that nothing gets caught in
moving parts.
• Do not work on a vehicle with the
engine running in an enclosed space,
unless you are sure you have enough
ventilation.
• Keep all open flames and other burning
material (such as cigarettes) away
from the battery and all fuel related
parts.
Working with the Engine Off
1. Set the parking brake and shift to park
(P). 2. Switch off the engine.
3. Block the wheels.
Working with the Engine On WARNING
To reduce the risk of vehicle damage
and/or personal burn injuries, do not
start your engine with the air cleaner
removed and do not remove it while the
engine is running. 1.
Set the parking brake and shift to park
(P).
2. Block the wheels.
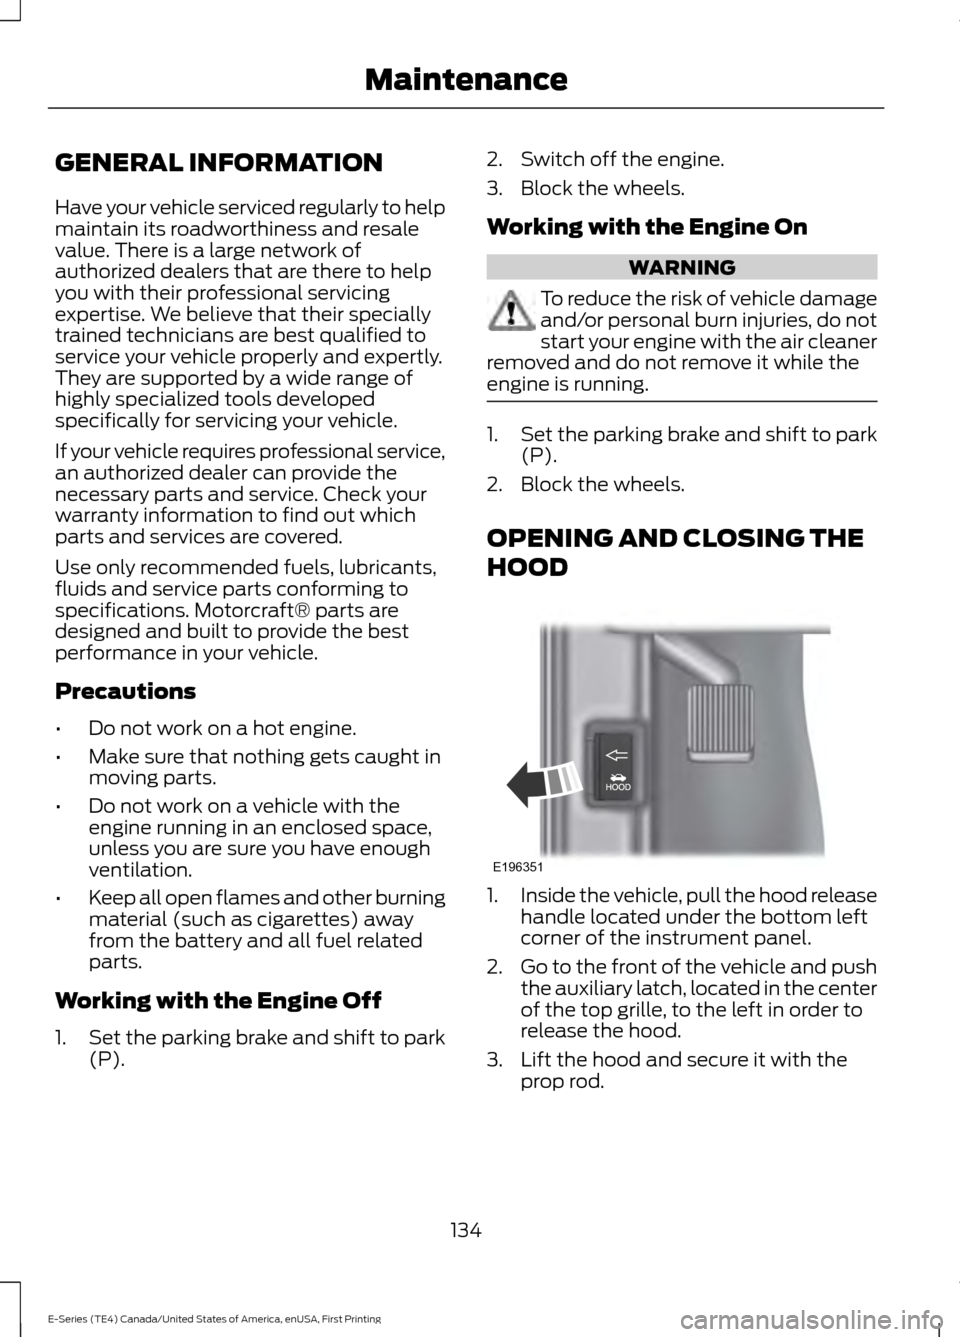
OPENING AND CLOSING THE
HOOD 1.
Inside the vehicle, pull the hood release
handle located under the bottom left
corner of the instrument panel.
2. Go to the front of the vehicle and push
the auxiliary latch, located in the center
of the top grille, to the left in order to
release the hood.
3. Lift the hood and secure it with the prop rod.
134
E-Series (TE4) Canada/United States of America, enUSA, First Printing MaintenanceE196351
Page 151 of 318
Vertical and Horizontal Aim
Adjustment (Sealed Beam
Headlamps)
Use the mechanical aimers on your vehicle
to aim the headlamps. If mechanical
aimers are used and the cross-car sight
line is in any way blocked, set the legs of
the universal adaptor all to the same
setting, such that the cross-car sight line
is no longer blocked (per the instructions
for the brand of mechanical aimer you are
using). You can also aim the headlamps
visually using the procedure below.
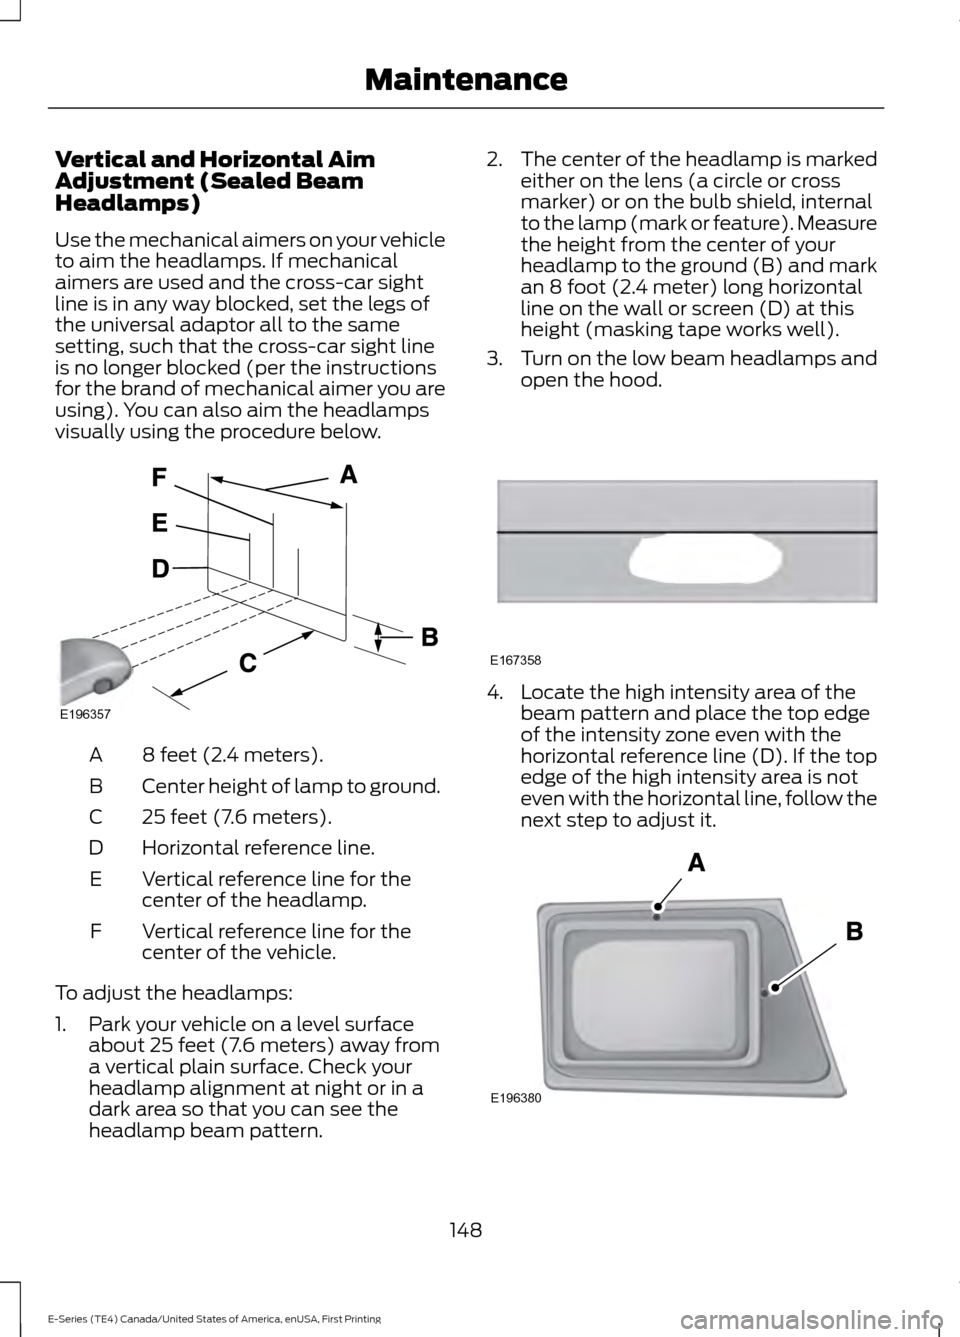
8 feet (2.4 meters).
A
Center height of lamp to ground.
B
25 feet (7.6 meters).
C
Horizontal reference line.
D
Vertical reference line for the
center of the headlamp.
E
Vertical reference line for the
center of the vehicle.
F
To adjust the headlamps:
1. Park your vehicle on a level surface about 25 feet (7.6 meters) away from
a vertical plain surface. Check your
headlamp alignment at night or in a
dark area so that you can see the
headlamp beam pattern. 2.
The center of the headlamp is marked
either on the lens (a circle or cross
marker) or on the bulb shield, internal
to the lamp (mark or feature). Measure
the height from the center of your
headlamp to the ground (B) and mark
an 8 foot (2.4 meter) long horizontal
line on the wall or screen (D) at this
height (masking tape works well).
3. Turn on the low beam headlamps and open the hood. 4. Locate the high intensity area of the
beam pattern and place the top edge
of the intensity zone even with the
horizontal reference line (D). If the top
edge of the high intensity area is not
even with the horizontal line, follow the
next step to adjust it. 148
E-Series (TE4) Canada/United States of America, enUSA, First Printing MaintenanceE196357 E167358 E196380
Page 152 of 318
5. Locate the vertical adjuster (A) for
each headlamp. Turn the adjuster
control either clockwise or
counterclockwise to adjust the vertical
aim of the headlamp.
6. In addition to the horizontal line marked in step 2, a pair of vertical lines
(E) must be marked at the center line
of the headlamps on the wall or screen.
7. On the wall or screen, locate the high intensity area of the beam pattern. The
left edge of the high intensity area
should be even with the vertical line
corresponding to the headlamp under
adjustment. If the left edge of the high
intensity area is not even with the
vertical line, follow the next step to
adjust it.
8. Locate the horizontal adjuster (B) for each headlamp. Turn it clockwise or
counterclockwise to place the left edge
of the high intensity area even with the
vertical line corresponding to the
headlamp under adjustment.
Vertical Aim Adjustment
Procedure (Aerodynamic
Headlamps)
You can only adjust the headlamps
vertically. Your vehicle does not require
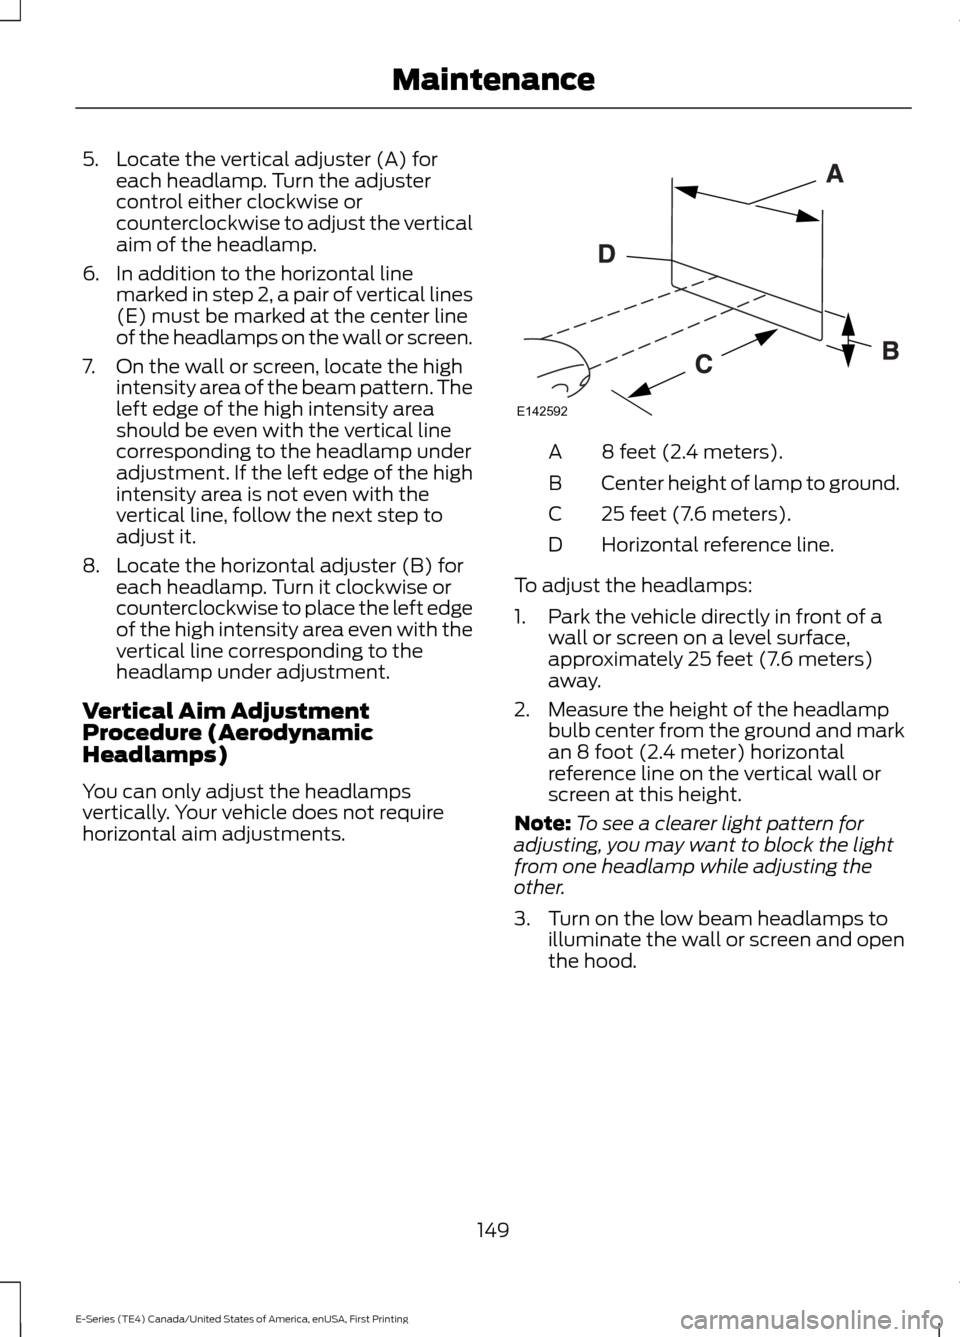
horizontal aim adjustments. 8 feet (2.4 meters).
A
Center height of lamp to ground.
B
25 feet (7.6 meters).
C
Horizontal reference line.
D
To adjust the headlamps:
1. Park the vehicle directly in front of a wall or screen on a level surface,
approximately 25 feet (7.6 meters)
away.
2. Measure the height of the headlamp bulb center from the ground and mark
an 8 foot (2.4 meter) horizontal
reference line on the vertical wall or
screen at this height.
Note: To see a clearer light pattern for
adjusting, you may want to block the light
from one headlamp while adjusting the
other.
3. Turn on the low beam headlamps to illuminate the wall or screen and open
the hood.
149
E-Series (TE4) Canada/United States of America, enUSA, First Printing MaintenanceE142592
Page 153 of 318
4.
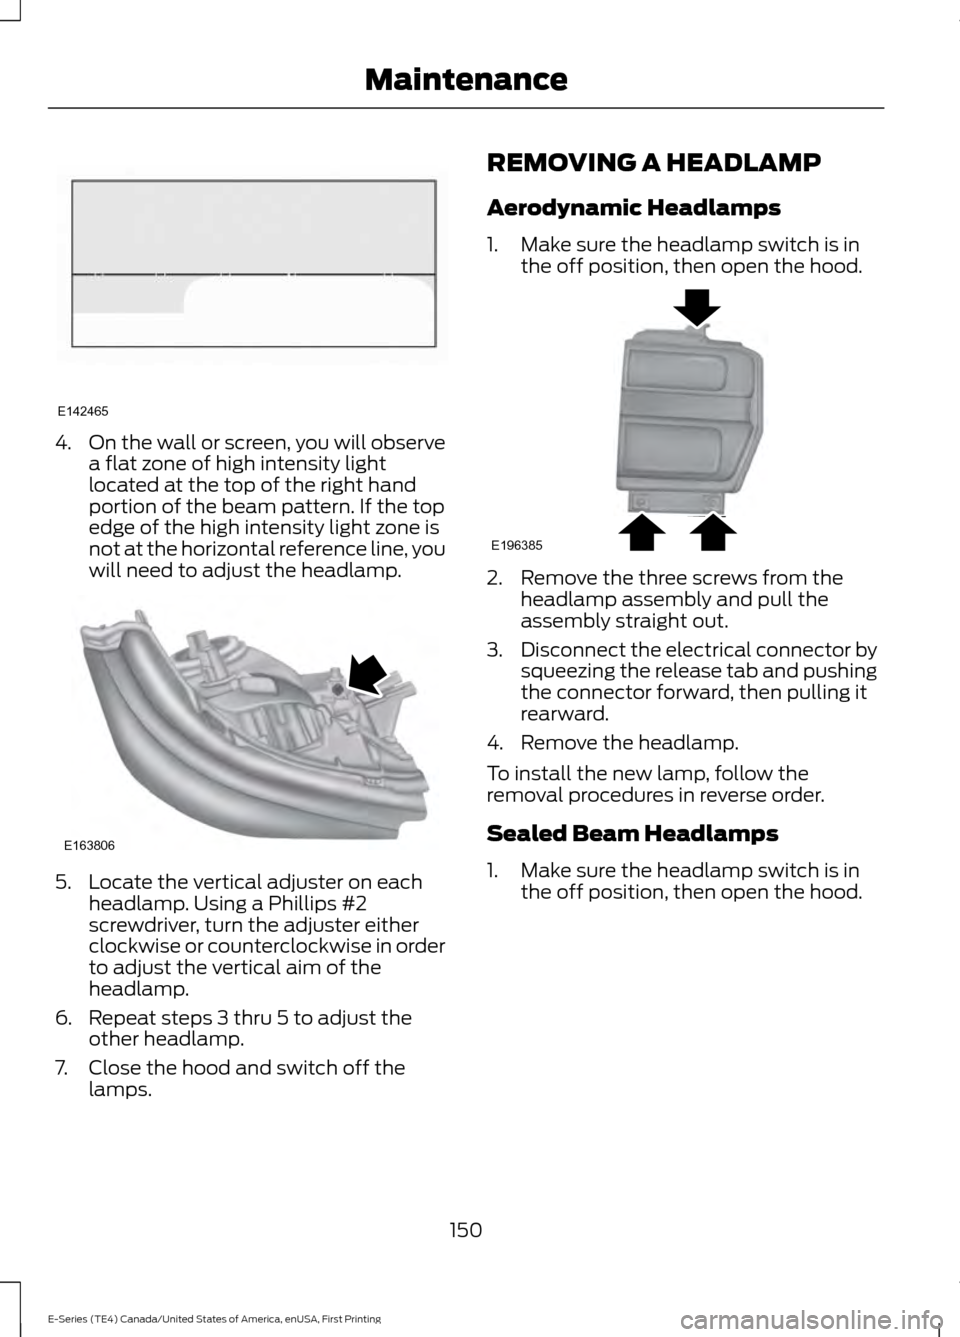
On the wall or screen, you will observe
a flat zone of high intensity light
located at the top of the right hand
portion of the beam pattern. If the top
edge of the high intensity light zone is
not at the horizontal reference line, you
will need to adjust the headlamp. 5. Locate the vertical adjuster on each
headlamp. Using a Phillips #2
screwdriver, turn the adjuster either
clockwise or counterclockwise in order
to adjust the vertical aim of the
headlamp.
6. Repeat steps 3 thru 5 to adjust the other headlamp.
7. Close the hood and switch off the lamps. REMOVING A HEADLAMP
Aerodynamic Headlamps
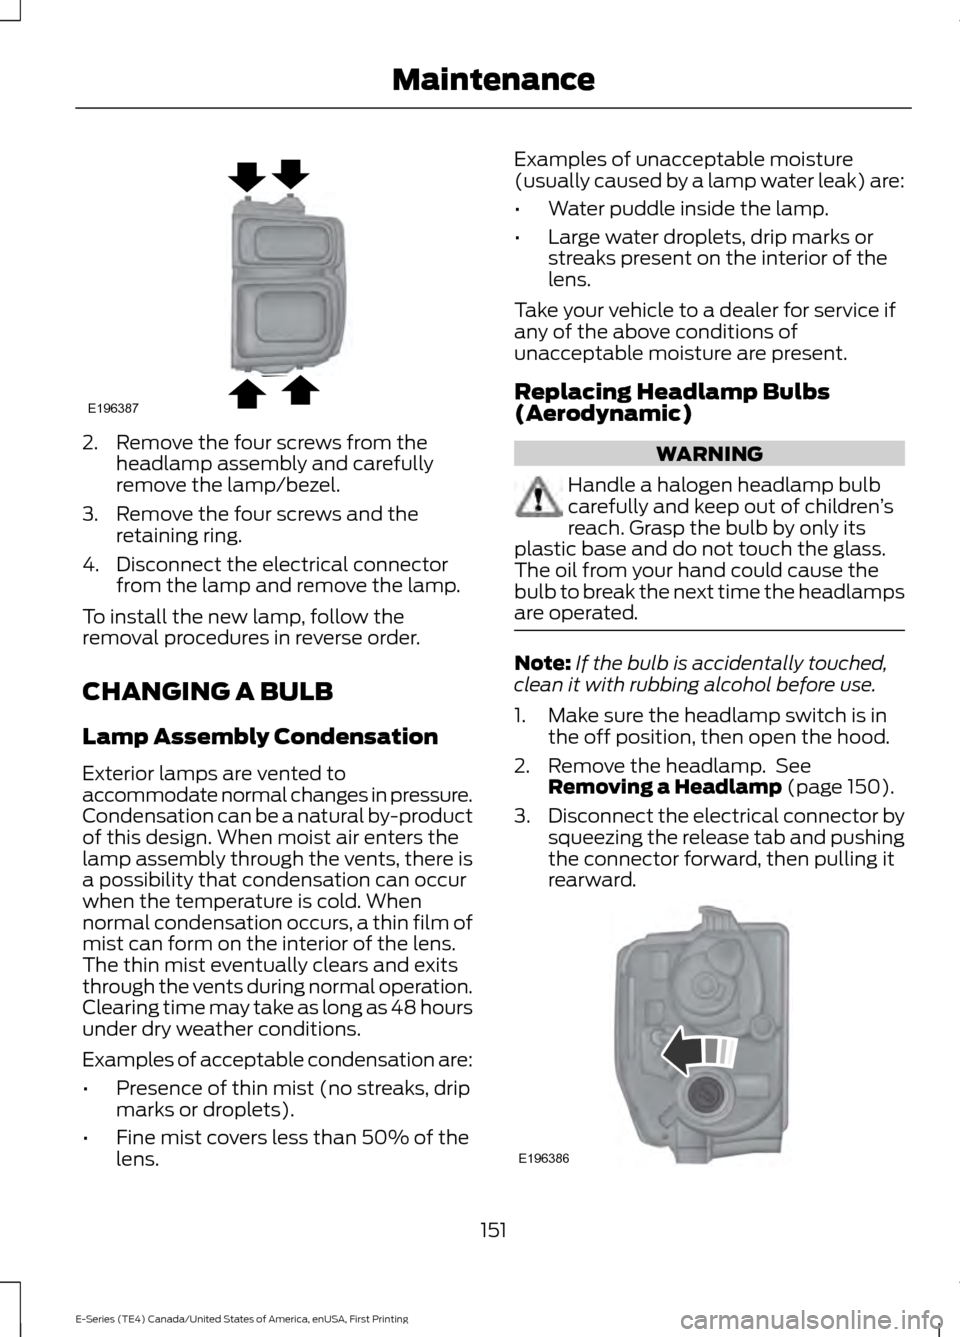
1. Make sure the headlamp switch is in
the off position, then open the hood. 2. Remove the three screws from the
headlamp assembly and pull the
assembly straight out.
3. Disconnect the electrical connector by
squeezing the release tab and pushing
the connector forward, then pulling it
rearward.
4. Remove the headlamp.
To install the new lamp, follow the
removal procedures in reverse order.
Sealed Beam Headlamps
1. Make sure the headlamp switch is in the off position, then open the hood.
150
E-Series (TE4) Canada/United States of America, enUSA, First Printing MaintenanceE142465 E163806 E196385
Page 154 of 318
2. Remove the four screws from the
headlamp assembly and carefully
remove the lamp/bezel.
3. Remove the four screws and the retaining ring.
4. Disconnect the electrical connector from the lamp and remove the lamp.
To install the new lamp, follow the
removal procedures in reverse order.
CHANGING A BULB
Lamp Assembly Condensation
Exterior lamps are vented to
accommodate normal changes in pressure.
Condensation can be a natural by-product
of this design. When moist air enters the
lamp assembly through the vents, there is
a possibility that condensation can occur
when the temperature is cold. When
normal condensation occurs, a thin film of
mist can form on the interior of the lens.
The thin mist eventually clears and exits
through the vents during normal operation.
Clearing time may take as long as 48 hours
under dry weather conditions.
Examples of acceptable condensation are:
• Presence of thin mist (no streaks, drip
marks or droplets).
• Fine mist covers less than 50% of the
lens. Examples of unacceptable moisture
(usually caused by a lamp water leak) are:
•
Water puddle inside the lamp.
• Large water droplets, drip marks or
streaks present on the interior of the
lens.
Take your vehicle to a dealer for service if
any of the above conditions of
unacceptable moisture are present.
Replacing Headlamp Bulbs
(Aerodynamic) WARNING
Handle a halogen headlamp bulb
carefully and keep out of children
’s
reach. Grasp the bulb by only its
plastic base and do not touch the glass.
The oil from your hand could cause the
bulb to break the next time the headlamps
are operated. Note:
If the bulb is accidentally touched,
clean it with rubbing alcohol before use.
1. Make sure the headlamp switch is in the off position, then open the hood.
2. Remove the headlamp. See Removing a Headlamp (page 150).
3. Disconnect the electrical connector by
squeezing the release tab and pushing
the connector forward, then pulling it
rearward. 151
E-Series (TE4) Canada/United States of America, enUSA, First Printing MaintenanceE196387 E196386
Page 155 of 318
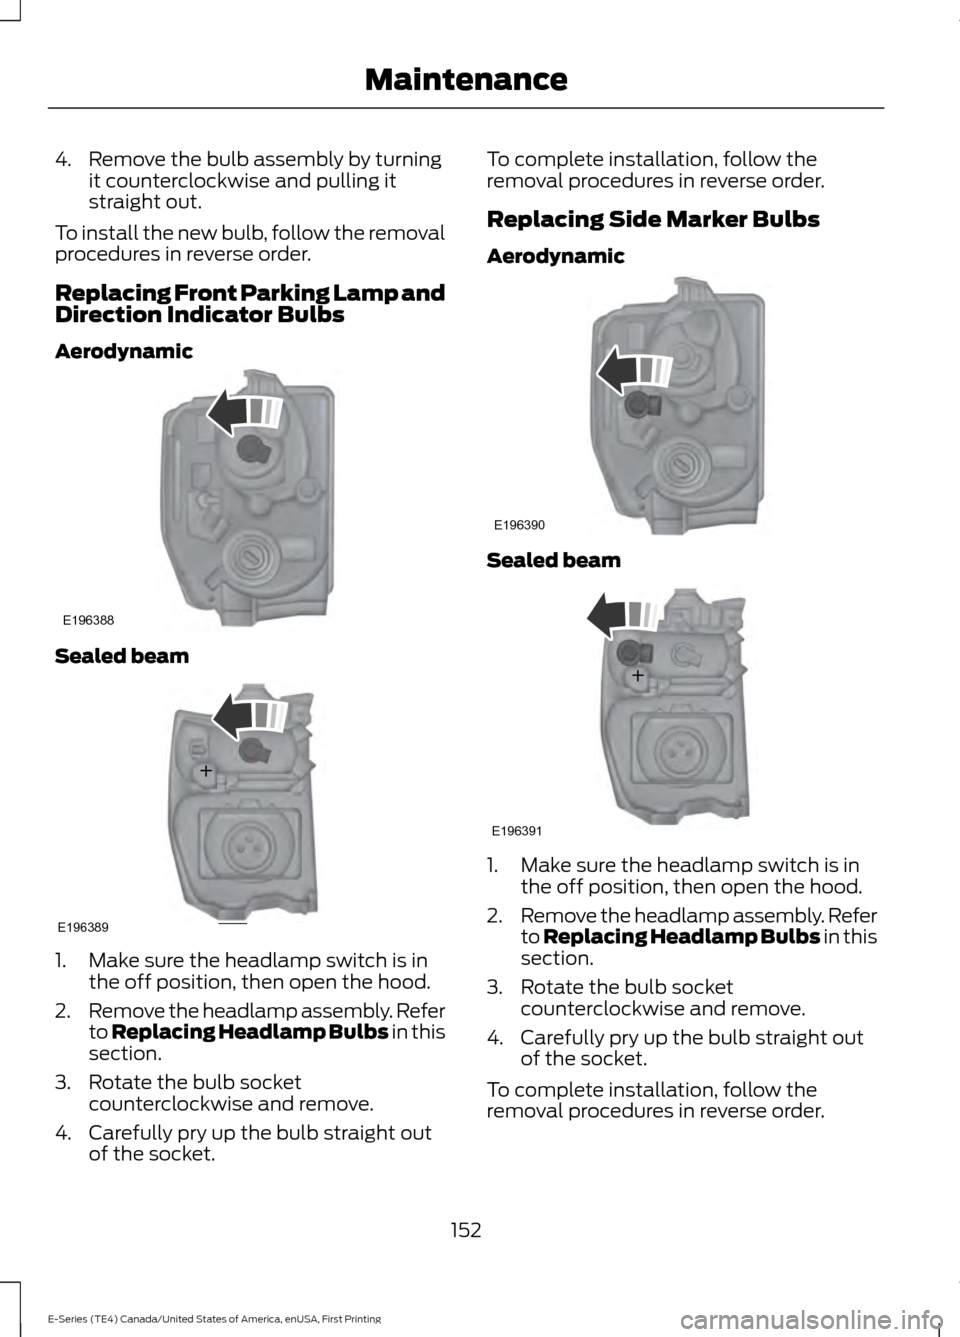
4. Remove the bulb assembly by turning
it counterclockwise and pulling it
straight out.
To install the new bulb, follow the removal
procedures in reverse order.
Replacing Front Parking Lamp and
Direction Indicator Bulbs
Aerodynamic Sealed beam
1. Make sure the headlamp switch is in
the off position, then open the hood.
2. Remove the headlamp assembly. Refer
to Replacing Headlamp Bulbs in this
section.
3. Rotate the bulb socket counterclockwise and remove.
4. Carefully pry up the bulb straight out of the socket. To complete installation, follow the
removal procedures in reverse order.
Replacing Side Marker Bulbs
Aerodynamic
Sealed beam
1. Make sure the headlamp switch is in
the off position, then open the hood.
2. Remove the headlamp assembly. Refer
to
Replacing Headlamp Bulbs in this
section.
3. Rotate the bulb socket counterclockwise and remove.
4. Carefully pry up the bulb straight out of the socket.
To complete installation, follow the
removal procedures in reverse order.
152
E-Series (TE4) Canada/United States of America, enUSA, First Printing MaintenanceE196388 E196389 E196390 E196391
Page 312 of 318
A
A/C
See: Climate Control........................................... 63
About This Manual...........................................5
ABS See: Brakes............................................................. 88
ABS driving hints See: Hints on Driving With Anti-Lock
Brakes.................................................................. 88
Accessories....................................................263 Exterior Style....................................................... 263
Interior Style........................................................ 263
Lifestyle................................................................. 263
Peace of Mind..................................................... 263
Accessories See: Replacement Parts
Recommendation............................................ 10
Adjusting the Headlamps..........................147 Vertical Aim Adjustment Procedure
(Aerodynamic Headlamps)...................... 149
Vertical and Horizontal Aim Adjustment (Sealed Beam Headlamps)...................... 148
Adjusting the Steering Wheel....................43
Airbag Disposal...............................................34
Air Conditioning See: Climate Control........................................... 63
Air Filter See: Changing the Engine Air Filter..............155
Appendices....................................................286
Audible Warnings and Indicators.............53 Fail-Safe Cooling Warning Chime.................. 53
Headlamps On Warning Chime...................... 53
Key in Ignition Warning Chime......................... 53
Parking Brake On Warning Chime.................. 53
Shift to Park Warning Chime........................... 54
Audio System...............................................206 General Information......................................... 206
Audio Unit - Vehicles With: AM/FM/CD/ SYNC.............................................................208
Audio Unit - Vehicles With: AM/ FM...................................................................207
Automatic Transmission
.............................83
Brake-Shift Interlock........................................... 85
If Your Vehicle Gets Stuck In Mud or Snow.................................................................... 86
Understanding the Shift Positions of a 6– Speed Automatic Transmission..........84 Understanding the Shift Positions of the
5– Speed Automatic Transmission..........83
Automatic Transmission Fluid Check
..............................................................141
Automatic Transmission Fluid Filter...........144
Checking Automatic Transmission
Fluid..................................................................... 141
Auxiliary Power Points
..................................70
110 Volt AC Power Point..................................... 70
12 Volt DC Power Point....................................... 70
Locations................................................................. 70
Auxiliary Switches.......................................264
B
Battery See: Changing the 12V Battery...................... 145
Bonnet Lock See: Opening and Closing the Hood...........134
Booster Seats...................................................19 Types of Booster Seats...................................... 20
Brake Fluid Check
.........................................144
Brakes................................................................88 General Information........................................... 88
Breaking-In......................................................110
Bulb Specification Chart............................153
C
California Proposition 65...............................9
Capacities and Specifications - 6.2L..................................................................197
Specifications...................................................... 198
Capacities and Specifications - 6.8L.................................................................201
Specifications..................................................... 202
Capacities and Specifications
.................192
Car Wash See: Cleaning the Exterior................................ 157
Changing a Bulb
.............................................151
Lamp Assembly Condensation...................... 151
Replacing Brake/Tail/Turn/Reverse Lamp Bulbs (Cut-Away Only)............................... 153
Replacing Front Parking Lamp and Direction Indicator Bulbs................................................ 152
Replacing Headlamp Bulbs (Aerodynamic)................................................ 151
Replacing Side Marker Bulbs......................... 152
309
E-Series (TE4) Canada/United States of America, enUSA, First Printing Index
Page 314 of 318
Hitches...................................................................
103
Launching or Retrieving a Boat or Personal Watercraft (PWC)........................................ 108
Safety Chains....................................................... 104
Trailer Brakes....................................................... 104
Trailer Lamps........................................................ 107
Trailer Towing Connector................................ 103
When Towing a Trailer...................................... 107
Event Data Recording See: Data Recording............................................... 7
Exterior Mirrors.................................................47
Fold-Away Exterior Mirrors................................ 47
Power Exterior Mirrors......................................... 47
Telescoping Mirrors ............................................ 48
F
Fastening the Seatbelts...............................24 Seatbelt Locking Modes.................................... 25
Using Seatbelts During Pregnancy................24
Floor Mats
..........................................................111
Ford Credit...........................................................9
US Only....................................................................... 9
Ford Protect
..................................................266
EXTENDED SERVICE PLAN (CANADA
ONLY)................................................................ 267
Ford Protect (U.S. Only)................................. 266
Fuel and Refueling.........................................75
Fuel Consumption.........................................79 Calculating Fuel Economy................................ 79
Filling the Fuel Tank............................................. 79
Fuel Quality - E85
..........................................76
Choosing the Right Fuel - Flex Fuel
Vehicles............................................................... 76
Switching Between E85 and Gasoline.........77
Fuel Quality - Gasoline.................................76 Choosing the Right Fuel..................................... 76
Fuel Shutoff
.....................................................114
Fuses.................................................................125
Fuse Specification Chart............................125 Passenger Compartment Fuse Panel.........129
Power Distribution Box..................................... 125
G
Gauges...............................................................49 Battery Voltage Gauge....................................... 50
Engine Coolant Temperature Gauge............50 Fuel Gauge..............................................................
49
Information Display............................................. 50
General Information on Radio Frequencies...................................................35
General Maintenance Information
.......268
Multi-point Inspection..................................... 270
Owner Checks and Services.......................... 269
Protecting Your Investment.......................... 268
Why Maintain Your Vehicle?......................... 268
Why Maintain Your Vehicle at Your Dealership?..................................................... 268
Getting Assistance Outside the U.S. and Canada...........................................................121
Getting the Services You Need
.................118
Away From Home................................................ 118
H
Handbrake See: Parking Brake............................................... 89
Hazard Warning Flashers
............................114
Headlamp Adjusting See: Adjusting the Headlamps...................... 147
Headlamp Removal See: Removing a Headlamp.......................... 150
Head Restraints..............................................67
Heating See: Climate Control........................................... 63
Hints on Controlling the Interior Climate
............................................................65
Cooling the Interior Quickly.............................. 65
General Hints......................................................... 65
Heating the Interior Quickly.............................. 65
Maximum Cooling Performance in Instrument Panel or Instrument Panel
and Footwell Positions................................. 66
Recommended Settings for Cooling ...........65
Recommended Settings for Heating............65
Side Window Defogging in Cold Weather.............................................................. 66
Vehicle Stationary for Extended Periods During Extreme High Ambient
Temperatures................................................... 65
Hints on Driving With Anti-Lock Brakes
.............................................................88
Hood Lock See: Opening and Closing the Hood...........134
311
E-Series (TE4) Canada/United States of America, enUSA, First Printing Index
Page 315 of 318
I
Ignition Switch.................................................72
In California (U.S. Only)..............................119
Information Displays.....................................55 General Information............................................ 55
Information Messages
.................................60
Brake System........................................................ 60
Fuel........................................................................\
... 60
Maintenance.......................................................... 60
Tire........................................................................\
...... 61
Traction Control..................................................... 61
Trailer........................................................................\
62
Transmission.......................................................... 62
Installing Child Restraints............................15 Child Seats............................................................... 15
Using Lap and Shoulder Belts.......................... 16
Using Tether Straps.............................................. 18
Instrument Cluster........................................49
Instrument Lighting Dimmer.....................46
Interior Mirror...................................................48 Auto-Dimming Mirror......................................... 48
Introduction........................................................5
J
Jump Starting the Vehicle..........................115 Connecting the Jumper Cables...................... 115
Jump Starting........................................................ 116
Preparing Your Vehicle....................................... 115
Removing the Jumper Cables......................... 116
K
Keys and Remote Controls.........................35
L
Lighting Control
..............................................45
Headlamp Flasher............................................... 46
High Beams............................................................ 45
Lighting..............................................................45 General Information............................................ 45
Load Carrying
..................................................95
Load Limit.........................................................95
Special Loading Instructions for Owners of
Pick-up Trucks and Utility-type
Vehicles.............................................................. 99Vehicle Loading - with and without a
Trailer................................................................... 95
Locking and Unlocking.................................38 Autolock Feature.................................................. 39
Autounlock Feature............................................. 39
Enabling or Disabling Autolock and Autounlock........................................................ 39
Illuminated Entry.................................................. 39
Power Door Locks................................................ 38
Remote Control.................................................... 38
Lug Nuts See: Changing a Road Wheel......................... 187
M
Maintenance..................................................134 General Information.......................................... 134
Manual Climate Control..............................63 Heater Only System............................................ 63
Manual Climate Control.................................... 64
Manual Seats
..................................................68
Manual Lumbar ................................................... 69
Moving the Seat Backward and Forward.............................................................. 68
Recline Adjustment............................................ 68
Message Center See: Information Displays................................. 55
Mirrors See: Windows and Mirrors................................ 47
Mobile Communications Equipment
.......12
Motorcraft Parts - 6.2L...............................193
Motorcraft Parts - 6.8L..............................194
N
Normal Scheduled Maintenance
............271
O
Oil Change Indicator Reset.......................136 Resetting the Oil Life Monitoring
System............................................................... 136
Oil Check See: Engine Oil Check....................................... 136
Opening and Closing the Hood
...............134
Ordering Additional Owner's Literature.......................................................122
Obtaining a French Owner ’s Manual...........123
312
E-Series (TE4) Canada/United States of America, enUSA, First Printing Index