ECO mode FORD E SERIES 2019 User Guide
[x] Cancel search | Manufacturer: FORD, Model Year: 2019, Model line: E SERIES, Model: FORD E SERIES 2019Pages: 329, PDF Size: 2.92 MB
Page 38 of 329
The passenger side airbag should alwaysbe on (the airbag off light should not beilluminated) unless the passenger is aperson who meets the requirements statedeither in Category 1, 2 or 3 of the NationalHighway Traffic SafetyAdministration/Transport Canadadeactivation criteria which follows.
The vast majority of drivers and passengersare much safer with an airbag thanwithout. To do their job and reduce the riskof life threatening injuries, airbags mustopen with great force, and this force canpose a potentially deadly risk in somesituations, particularly when a front seatoccupant is not properly buckled up. Themost effective way to reduce the risk ofunnecessary airbag injuries withoutreducing the overall safety of the vehicleis to make sure all occupants are properlyrestrained in the vehicle, especially in thefront seat. This provides the protection ofseatbelts and permits the airbags toprovide the additional protection they weredesigned to provide. If you choose todeactivate your airbag, you are losing thevery significant risk reducing benefits ofthe airbag and you are also reducing theeffectiveness of the seatbelts, becauseseatbelts in modern vehicles are designedto work as a safety system with theairbags.
National Highway Traffic SafetyAdministration Deactivation Criteria(Excluding Canada)
WARNING: This vehicle hasspecial energy management seatbeltsfor the driver and right front passenger.These particular seatbelts arespecifically designed to work withairbags to help reduce the risk of injuryin a crash. The energy managementseatbelt gives or releases additionalseatbelt webbing in some accidents to
reduce the concentration of force on anoccupant's chest and to reduce the riskof certain bone fractures and injuries tounderlying organs. In a crash, if the airbagis off, this energy management seatbeltmight permit the passenger wearing theseatbelt to move forward enough tohave a serious or fatal injury. The moresevere the crash, and the heavier theoccupant, the greater the risk. Make surethe airbag is on for any passenger whodoes not qualify under the NationalHighway Traffic Safety Administrationdeactivation criteria.
1.Infant. An infant (less than 1 year old)must ride in the front seat because:
•The vehicle has no rear seat.
•The vehicle has a rear seat too smallto accommodate a rear-facing infantseat.
•The infant has a medical conditionwhich, according to the infant'sphysician, makes it necessary for theinfant to ride in the front so that thedriver can constantly monitor thechild's condition.
2.Child age 1 to 12. A child age 1 to 12 mustride in the front seat because:
•The vehicle has no rear seat.
•Although children ages 1 to 12 ride inthe rear seat(s) whenever possible,children ages 1 to 12 sometimes mustride in the front because no space isavailable in the rear seat(s) of thevehicle.
•The child has a medical conditionwhich, according to the child'sphysician, makes it necessary for thechild to ride in the front seat so that thedriver can constantly monitor thechild's condition.
35
E-Series (TE4) Canada/United States of America, enUSA, Edition date: 201804, Second-Printing
Supplementary Restraints System
Page 46 of 329
Autolock Feature
The autolock feature locks all the doorswhen:
•All doors are closed.
•The ignition is on.
•You shift into any gear putting yourvehicle in motion.
•The ignition is on, all the doors areclosed and your vehicle has been inmotion at a speed greater than 12 mph(20 km/h).
Autounlock Feature
The autounlock feature unlocks all thedoors when:
•Your vehicle comes to a stop and youswitch the ignition off or to accessory.
•You open the driver door within 10minutes of switching the ignition off orto accessory.
Note:If you electronically lock your vehicleafter you switch the ignition off with thedriver door closed, the doors do notautounlock.
Enabling or Disabling Autolock andAutounlock
You can enable or disable the autolock andautounlock features independently of eachother.
To enable or disable autolock, do thefollowing:
1. Switch the ignition on.
2. Press the power door unlock controlthree times.
3. Switch the ignition off.
4. Press the power door unlock controlthree times.
5.Switch the ignition on. The horn soundsindicating your vehicle is inprogramming mode.
6. Press the power door unlock controland within five seconds, press thepower door lock control. The hornsounds once if disabled or twice ifenabled.
7.Switch the ignition off. The horn soundsindicating programming is complete.
Note:You can also switch this feature onor off using the information display. SeeInformation Displays (page 58).
To enable or disable autounlock, do thefollowing:
1. Switch the ignition on.
2. Press the power door unlock controlthree times.
3. Switch the ignition off.
4. Press the power door unlock controlthree times.
5.Switch the ignition on. The horn soundsindicating your vehicle is inprogramming mode.
6. Press the power door lock control andwithin five seconds, press the powerdoor unlock control. The horn soundsonce if disabled or twice if enabled.
7.Switch the ignition off. The horn soundsindicating programming is complete.
Note:You can also switch this feature onor off using the information display. SeeInformation Displays (page 58).
Illuminated Entry
The interior lamps and some exteriorlamps illuminate when you unlock thedoors with the remote control.
The lamps turn off if:
•The ignition is on.
•You press the remote control lockbutton.
•25 seconds have elapsed.
43
E-Series (TE4) Canada/United States of America, enUSA, Edition date: 201804, Second-Printing
Doors and Locks
Page 59 of 329
If it illuminates when the engine is runningthis indicates a malfunction. Stop yourvehicle as soon as it is safe to do so andswitch the engine off. Check the engine oillevel. If the oil level is sufficient, thisindicates a system malfunction. Have yourvehicle checked as soon as possible.
See Engine Oil Check (page 143).
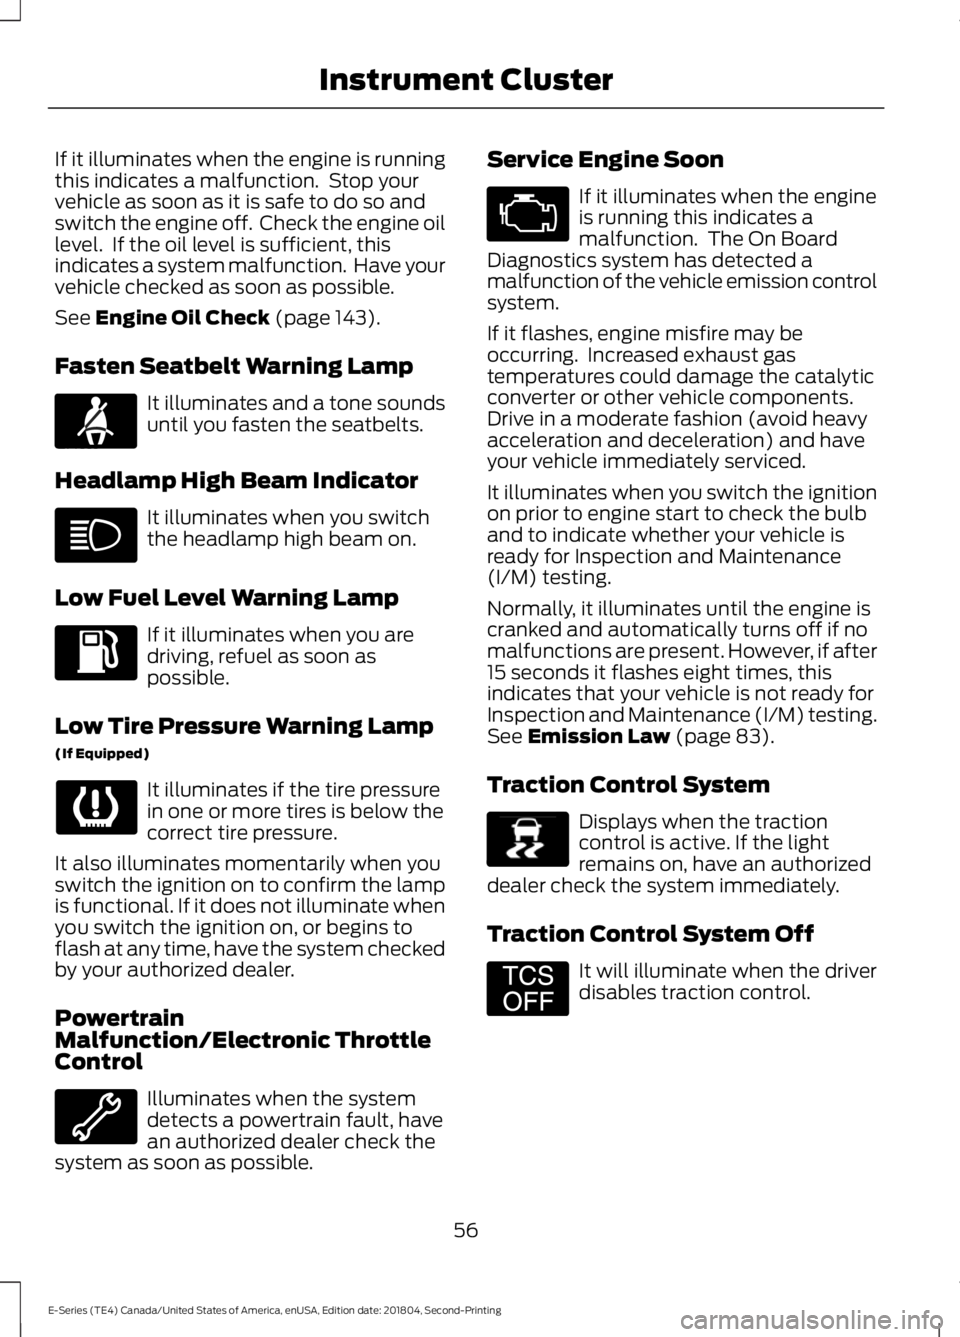
Fasten Seatbelt Warning Lamp
It illuminates and a tone soundsuntil you fasten the seatbelts.
Headlamp High Beam Indicator
It illuminates when you switchthe headlamp high beam on.
Low Fuel Level Warning Lamp
If it illuminates when you aredriving, refuel as soon aspossible.
Low Tire Pressure Warning Lamp
(If Equipped)
It illuminates if the tire pressurein one or more tires is below thecorrect tire pressure.
It also illuminates momentarily when youswitch the ignition on to confirm the lampis functional. If it does not illuminate whenyou switch the ignition on, or begins toflash at any time, have the system checkedby your authorized dealer.
PowertrainMalfunction/Electronic ThrottleControl
Illuminates when the systemdetects a powertrain fault, havean authorized dealer check thesystem as soon as possible.
Service Engine Soon
If it illuminates when the engineis running this indicates amalfunction. The On BoardDiagnostics system has detected amalfunction of the vehicle emission controlsystem.
If it flashes, engine misfire may beoccurring. Increased exhaust gastemperatures could damage the catalyticconverter or other vehicle components.Drive in a moderate fashion (avoid heavyacceleration and deceleration) and haveyour vehicle immediately serviced.
It illuminates when you switch the ignitionon prior to engine start to check the bulband to indicate whether your vehicle isready for Inspection and Maintenance(I/M) testing.
Normally, it illuminates until the engine iscranked and automatically turns off if nomalfunctions are present. However, if after15 seconds it flashes eight times, thisindicates that your vehicle is not ready forInspection and Maintenance (I/M) testing.See Emission Law (page 83).
Traction Control System
Displays when the tractioncontrol is active. If the lightremains on, have an authorizeddealer check the system immediately.
Traction Control System Off
It will illuminate when the driverdisables traction control.
56
E-Series (TE4) Canada/United States of America, enUSA, Edition date: 201804, Second-Printing
Instrument ClusterE71880 E138639 E194301
Page 63 of 329

System check and vehicle featurecustomization (If Equipped)
Note:System check and vehicle featurecustomization is only available with theoptional information display controls.
Note:When returning to the setup menuand you select a non-English language, youwill see a message appear HOLD RESETFOR ENGLISH to change back to English.Press and hold the SELECT/RESET stem tochange back to English.
Press and hold the SELECT/RESET stemto get into the setup menu sequence forthe following displays:
Setup
OIL LIFE
English or MetricPress and hold theSELECT/RESET stemUNITS ENG /METRIC
ON or OFFAUTOLOCK (ifequipped)
ON or OFFAUTOUNLOCK (ifequipped)
COMPASS ZONE (if equipped)
Electric or EOHPress and hold theSELECT/RESET stemTBC MODE (ifequipped)
English / Spanish / FrenchLANGUAGE =ENGLISH /SPANISH /FRENCH
SYSTEM CHECK
XXX% OIL LIFEPress and hold the SELECT/RESET stemRESET FOR SYSTEMCHECKENGINE HOURS (if enabled)
ENGINE IDLE HOURS (ifenabled)
60
E-Series (TE4) Canada/United States of America, enUSA, Edition date: 201804, Second-Printing
Information DisplaysE194389
Page 65 of 329
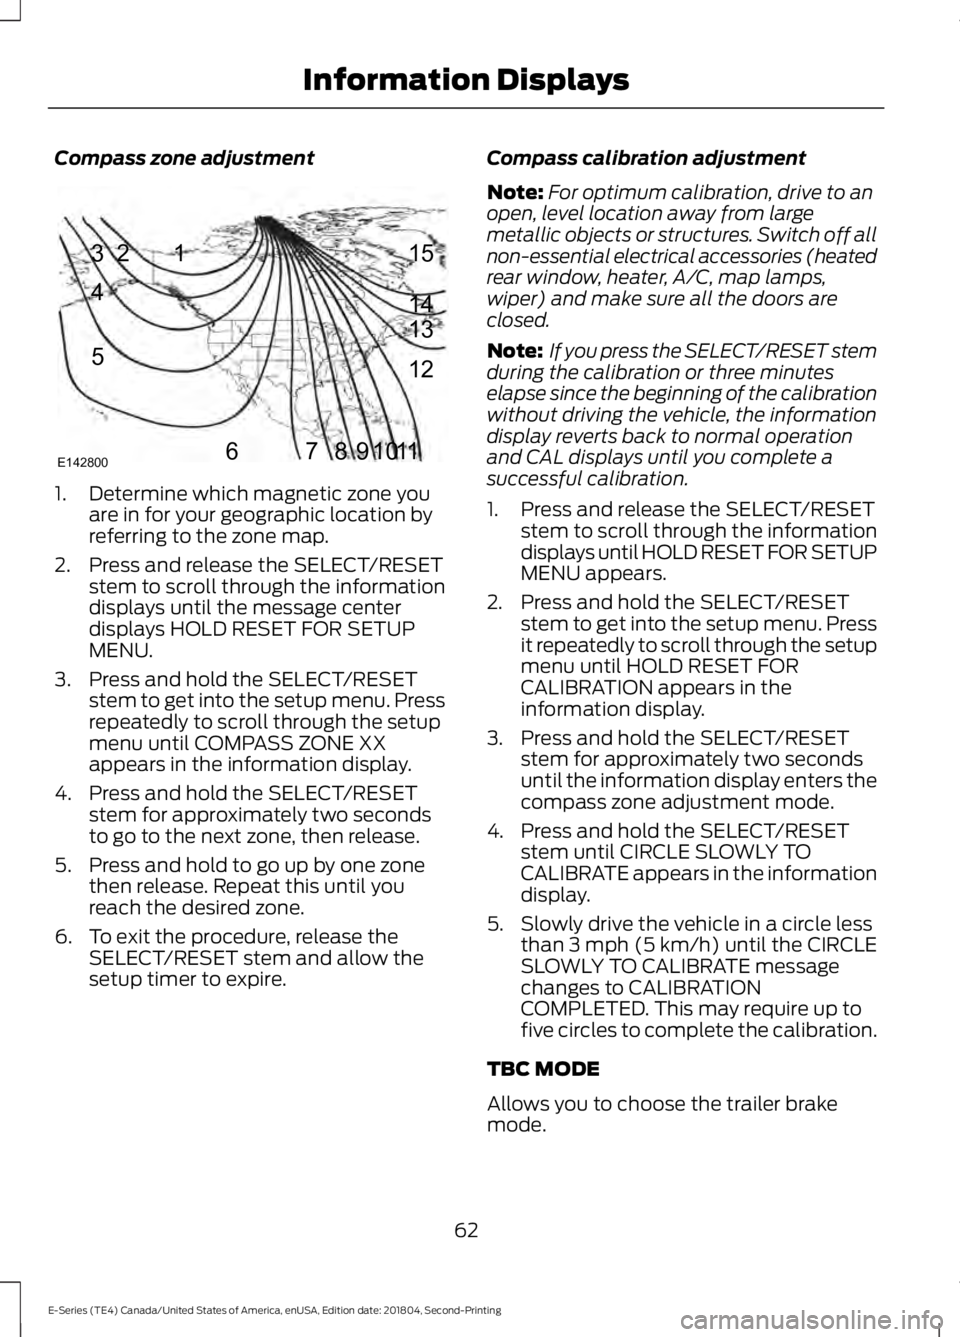
Compass zone adjustment
1. Determine which magnetic zone youare in for your geographic location byreferring to the zone map.
2. Press and release the SELECT/RESETstem to scroll through the informationdisplays until the message centerdisplays HOLD RESET FOR SETUPMENU.
3. Press and hold the SELECT/RESETstem to get into the setup menu. Pressrepeatedly to scroll through the setupmenu until COMPASS ZONE XXappears in the information display.
4. Press and hold the SELECT/RESETstem for approximately two secondsto go to the next zone, then release.
5. Press and hold to go up by one zonethen release. Repeat this until youreach the desired zone.
6. To exit the procedure, release theSELECT/RESET stem and allow thesetup timer to expire.
Compass calibration adjustment
Note:For optimum calibration, drive to anopen, level location away from largemetallic objects or structures. Switch off allnon-essential electrical accessories (heatedrear window, heater, A/C, map lamps,wiper) and make sure all the doors areclosed.
Note: If you press the SELECT/RESET stemduring the calibration or three minuteselapse since the beginning of the calibrationwithout driving the vehicle, the informationdisplay reverts back to normal operationand CAL displays until you complete asuccessful calibration.
1. Press and release the SELECT/RESETstem to scroll through the informationdisplays until HOLD RESET FOR SETUPMENU appears.
2. Press and hold the SELECT/RESETstem to get into the setup menu. Pressit repeatedly to scroll through the setupmenu until HOLD RESET FORCALIBRATION appears in theinformation display.
3. Press and hold the SELECT/RESETstem for approximately two secondsuntil the information display enters thecompass zone adjustment mode.
4. Press and hold the SELECT/RESETstem until CIRCLE SLOWLY TOCALIBRATE appears in the informationdisplay.
5. Slowly drive the vehicle in a circle lessthan 3 mph (5 km/h) until the CIRCLESLOWLY TO CALIBRATE messagechanges to CALIBRATIONCOMPLETED. This may require up tofive circles to complete the calibration.
TBC MODE
Allows you to choose the trailer brakemode.
62
E-Series (TE4) Canada/United States of America, enUSA, Edition date: 201804, Second-Printing
Information Displays123
4
5
6 7 8 9 1011 12 13 14 15
E142800
Page 76 of 329
When the indicator light on the power pointis:
•On: The power point is working, theignition is on and a device is pluggedin.
•Off: The power point is off, the ignitionis off or no device is plugged in.
•Flashing: The power point is in faultmode.
The power outlet temporarily turns offpower when in fault mode if the deviceexceeds the 150 watt limit. Unplug yourdevice and switch the ignition off. Switchthe ignition back on, but do not plug yourdevice back in. Let the system cool off andswitch the ignition off to reset the faultmode. Switch the ignition back on andmake sure the indicator light remains on.
Do not use the power point for certainelectric devices, including:
•Cathode-ray, tube-type televisions.
•Motor loads, such as vacuum cleaners,electric saws and other electric powertools or compressor-drivenrefrigerators.
•Measuring devices, which processprecise data, such as medicalequipment or measuring equipment.
•Other appliances requiring anextremely stable power supply such asmicrocomputer-controlled electricblankets or touch-sensor lamps.
73
E-Series (TE4) Canada/United States of America, enUSA, Edition date: 201804, Second-Printing
Auxiliary Power Points
Page 91 of 329
Tow/Haul Mode
To activate tow/haul, press thebutton on the gearshift lever.The TOW HAUL indicator lightilluminates in the instrument cluster.
The tow/haul feature:
•Delays upshifts to reduce the frequencyof transmission shifting.
•Provides engine braking in all forwardgears, which slows your vehicle andassists you in controlling your vehiclewhen descending a slope.
•Depending on driving conditions andload conditions, may downshift thetransmission, slow your vehicle andcontrol your vehicle speed whendescending a hill, without pressing theaccelerator pedal. The amount ofdownshift braking provided will varybased upon the amount you press thebrake pedal.
The tow/haul feature improvestransmission operation when towing atrailer or a heavy load. All transmissiongear ranges are available when usingtow/haul.
To deactivate the tow/haul feature andreturn to normal driving mode, press thebutton on the gearshift lever again. TheTOW HAUL light deactivates. Tow/haulalso deactivates when you power downyour vehicle.
WARNING: Do not use tow/haulwhen the road surface is slippery. Failureto follow this instruction could result inthe loss of control of your vehicle.
Brake-Shift Interlock
WARNING: When doing thisprocedure, you need to take thetransmission out of park (P) whichmeans your vehicle can roll freely. Toavoid unwanted vehicle movement,always fully apply the parking brake priorto doing this procedure. Use wheelschocks if appropriate.
WARNING: If the parking brake isfully released, but the brake warninglamp remains illuminated, the brakesmay not be working properly. Have yourvehicle checked as soon as possible.
Note:Do not drive your vehicle until youverify that the brake lamps are working.
Your vehicle has a brake-shift interlockfeature that prevents the gearshift leverfrom moving from park (P) when theignition is in the 3 (on) position and thebrake pedal is not pressed.
If you cannot move the gearshift lever outof park (P) position with the ignition in the4 (on) position and the brake pedalpressed, a malfunction may have occurred.It is possible that a fuse has blown or yourvehicle’s brake lamps are not operatingproperly. See Fuse Specification Chart(page 131).
If the fuse is not blown and the brakelamps are working properly, the followingprocedure allows you to move the gearshiftlever from park (P):
1. Apply the parking brake and turn theignition on.
2.Use a screwdriver to remove the lowertrim panel under the steering column.Make sure not to disturb the wires onthe electrical connector.
88
E-Series (TE4) Canada/United States of America, enUSA, Edition date: 201804, Second-Printing
TransmissionE161509
Page 100 of 329
Canceling the Set Speed
Tap the brake pedal to cancel the setspeed.
Note:The system remembers the setspeed.
Resuming the Set Speed
Press and release to resume theset speed.
Switching Cruise Control Off
Press and release when thesystem is in standby mode, orswitch the ignition off.
Note:You erase the set speed when youswitch the system off.
97
E-Series (TE4) Canada/United States of America, enUSA, Edition date: 201804, Second-Printing
Cruise Control (If Equipped) E265297
Page 111 of 329
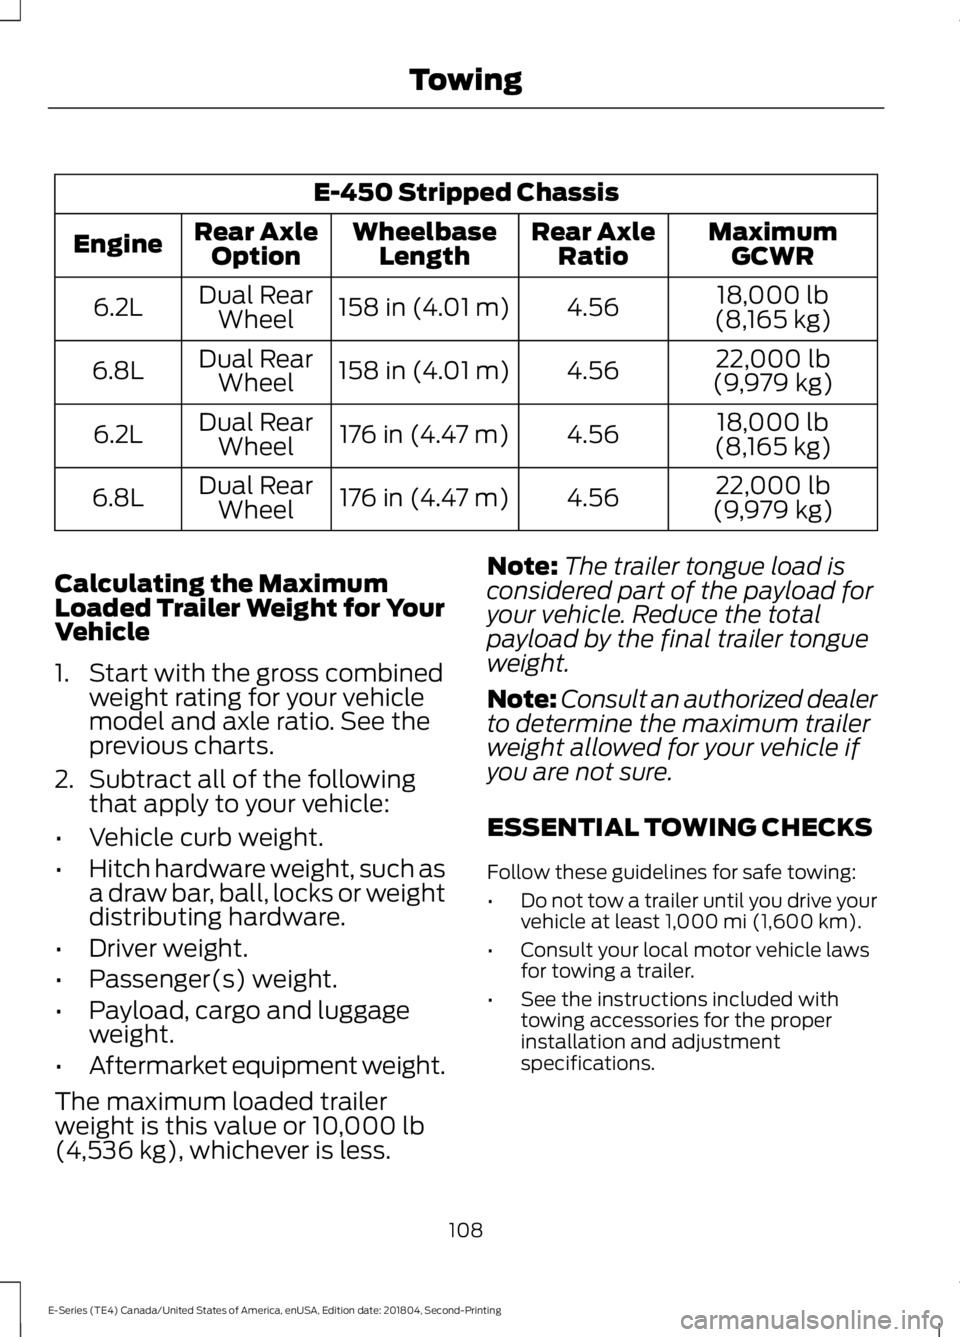
E-450 Stripped Chassis
MaximumGCWRRear AxleRatioWheelbaseLengthRear AxleOptionEngine
18,000 lb(8,165 kg)4.56158 in (4.01 m)Dual RearWheel6.2L
22,000 lb(9,979 kg)4.56158 in (4.01 m)Dual RearWheel6.8L
18,000 lb(8,165 kg)4.56176 in (4.47 m)Dual RearWheel6.2L
22,000 lb(9,979 kg)4.56176 in (4.47 m)Dual RearWheel6.8L
Calculating the MaximumLoaded Trailer Weight for YourVehicle
1. Start with the gross combinedweight rating for your vehiclemodel and axle ratio. See theprevious charts.
2.Subtract all of the followingthat apply to your vehicle:
•Vehicle curb weight.
•Hitch hardware weight, such asa draw bar, ball, locks or weightdistributing hardware.
•Driver weight.
•Passenger(s) weight.
•Payload, cargo and luggageweight.
•Aftermarket equipment weight.
The maximum loaded trailer
weight is this value or 10,000 lb(4,536 kg), whichever is less.
Note:The trailer tongue load isconsidered part of the payload foryour vehicle. Reduce the totalpayload by the final trailer tongueweight.
Note:Consult an authorized dealerto determine the maximum trailerweight allowed for your vehicle ifyou are not sure.
ESSENTIAL TOWING CHECKS
Follow these guidelines for safe towing:
•Do not tow a trailer until you drive yourvehicle at least 1,000 mi (1,600 km).
•Consult your local motor vehicle lawsfor towing a trailer.
•See the instructions included withtowing accessories for the properinstallation and adjustmentspecifications.
108
E-Series (TE4) Canada/United States of America, enUSA, Edition date: 201804, Second-Printing
Towing
Page 118 of 329
TOWING THE VEHICLE ON
FOUR WHEELS
Emergency Towing
WARNING: If your vehicle has asteering wheel lock make sure theignition is in the accessory or on positionwhen being towed.
You can flat-tow (all wheels on theground, regardless of the powertrain ortransmission configuration) your disabledvehicle (without access to wheel dolliesor vehicle transport trailer) under thefollowing conditions:
•Your vehicle is facing forward so youtow it in a forward direction.
•You shift into Neutral (N). If you cannotshift into Neutral (N), you may need tooverride the transmission. SeeTransmission (page 87).
•Maximum speed is 35 mph (56 km/h).
•Maximum distance is 50 mi (80 km).
Recreational Towing
Note: Put your climate control system inrecirculated air mode to prevent exhaustfumes from entering the vehicle. SeeClimate Control (page 66).
Follow these guidelines if you have a needfor recreational (RV) towing. An exampleof recreational towing would be towingyour vehicle behind a motorhome. Theseguidelines are to make sure you do notdamage the transmission during towing.
Do not tow your vehicle with any wheelson the ground, as vehicle or transmissiondamage may occur. It is recommended totow your vehicle with all four wheels offthe ground, for example when using avehicle transport trailer. Otherwise, youcannot tow your vehicle.
115
E-Series (TE4) Canada/United States of America, enUSA, Edition date: 201804, Second-Printing
Towing