check engine FORD E SERIES 2019 User Guide
[x] Cancel search | Manufacturer: FORD, Model Year: 2019, Model line: E SERIES, Model: FORD E SERIES 2019Pages: 329, PDF Size: 2.92 MB
Page 78 of 329
Before starting the engine check thefollowing:
•Make sure all occupants have fastenedtheir safety belts.
•Make sure the headlamps andelectrical accessories are off.
•Make sure the parking brake is on.
•Make sure the transmission is in park(P) or neutral (N).
•Turn the ignition key to the on position.
Note:Do not touch the accelerator pedal.
1. Fully press the brake pedal.
2. Turn the key to the start position tostart the engine. Release the key whenthe engine starts.
Note:The engine may continue crankingfor up to 15 seconds or until it starts.
Note:If you cannot start the engine on thefirst try, wait for a short period and try again.
Failure to Start
If you cannot start the engine after threeattempts, wait 10 seconds and follow thisprocedure:
1. Fully press the brake pedal.
2. Fully press the accelerator pedal andhold it there.
3. Start the engine.
Stopping the Engine When YourVehicle is Stationary
1. Shift into park (P) or neutral (N).
2. Turn the key to the off position.
3. Apply the parking brake.
Stopping the Engine When YourVehicle is Moving
WARNING: Switching off theengine when the vehicle is still movingwill result in a loss of brake and steeringassistance. The steering will not lock, buthigher effort will be required. When theignition is switched off, some electricalcircuits, including air bags, warning lampsand indicators may also be off. If theignition was turned off accidentally, youcan shift into neutral (N) and re-start theengine.
1. Put the transmission into neutral (N)and use the brakes to bring your vehicleto a safe stop.
2. When your vehicle has stopped, shiftinto park (P) or neutral (N) and switchthe ignition off.
3. Apply the parking brake.
Guarding Against Exhaust Fumes
WARNING: If you smell exhaustfumes inside your vehicle, have yourvehicle checked by your authorizeddealer immediately. Do not drive yourvehicle if you smell exhaust fumes.Carbon monoxide is present in exhaustfumes. Take precautions to avoid itsdangerous effects.
Important Ventilating Information
If you stop your vehicle and then leave theengine idling for long periods of time, werecommend that you do one of thefollowing:
•Open the windows at least 1 in (3 cm).
•Set your climate control to outside air.
75
E-Series (TE4) Canada/United States of America, enUSA, Edition date: 201804, Second-Printing
Starting and Stopping the Engine
Page 79 of 329
ENGINE BLOCK HEATER (IF
EQUIPPED)
WARNING: Failure to followengine block heater instructions couldresult in property damage or seriouspersonal injury.
WARNING: Do not use your heaterwith ungrounded electrical systems ortwo-pronged adapters. There is a risk ofelectrical shock.
WARNING: Do not fully close thehood, or allow it to drop under its ownweight when using the engine blockheater. This could damage the powercable and may cause an electrical shortresulting in fire, injury and propertydamage.
Note:The heater is most effective whenoutdoor temperatures are below 0°F(-18°C).
The heater acts as a starting aid bywarming the engine coolant. This allowsthe climate control system to respondquickly. The equipment includes a heaterelement (installed in the engine block) anda wire harness. You can connect thesystem to a grounded 120-volt ACelectrical source.
We recommend that you do the followingfor a safe and correct operation:
•Use a 16-gauge outdoor extension cordthat is product certified byUnderwriter’s Laboratory (UL) orCanadian Standards Association(CSA). This extension cord must besuitable for use outdoors, in cold
temperatures, and be clearly markedSuitable for Use with OutdoorAppliances. Do not use an indoorextension cord outdoors. This couldresult in an electric shock or become afire hazard.
•Use as short an extension cord aspossible.
•Do not use multiple extension cords.
•Make sure that when in operation, theextension cord plug and heater cordplug connections are free and clear ofwater. This could cause an electricshock or fire.
•Make sure your vehicle is parked in aclean area, clear of combustibles.
•Make sure the heater, heater cord andextension cord are firmly connected.
•Check for heat anywhere in theelectrical hookup once the system hasbeen operating for approximately 30minutes.
•Make sure the system is unplugged andproperly stowed before starting anddriving your vehicle. Make sure theprotective cover seals the prongs of theblock heater cord plug when not in use.
•Make sure the heater system ischecked for proper operation beforewinter.
Using the Engine Block Heater
Make sure the receptacle terminals areclean and dry prior to use. Clean them witha dry cloth if necessary.
The heater uses 0.4 to 1.0 kilowatt-hoursof energy per hour of use. The system doesnot have a thermostat. It achievesmaximum temperature afterapproximately three hours of operation.Using the heater longer than three hoursdoes not improve system performance andunnecessarily uses electricity.
76
E-Series (TE4) Canada/United States of America, enUSA, Edition date: 201804, Second-Printing
Starting and Stopping the Engine
Page 84 of 329
•Keep the fuel pump nozzle in contactwith the fuel container while filling.
•Do not use a device that would holdthe fuel pump handle in the fill position.
Fuel Filler Cap
WARNING: The fuel system maybe under pressure. If you hear a hissingsound near the fuel filler door, do notrefuel until the sound stops. Otherwise,fuel may spray out, which could causeserious personal injury.
WARNING: If you do not use theproper fuel filler cap, excessive pressureor vacuum in the fuel tank may damagethe fuel system or cause the fuel cap todisengage in a collision, which may resultin possible personal injury.
Note:If you must replace the fuel filler cap,replace it with a fuel filler cap that isdesigned for your vehicle. The customerwarranty may be void for any damage to thefuel tank or fuel system if the correctgenuine Ford, Motorcraft or other certifiedfuel filler cap is not used.
Your fuel tank filler cap has an indexeddesign with a 1/4th turn on and off feature.When fueling your vehicle:
1. Put your vehicle in park (P).
2. Switch the engine off.
3. Carefully turn the filler capcounterclockwise until it spins off.
4. Pull to remove the cap from the fuelfiller pipe.
5.To install the cap, align the tabs on thecap with the notches on the filler pipe.
6. Turn the filler cap clockwise 1/4 of aturn clockwise until it clicks at leastonce.
If the Check Fuel Cap light or a Check FuelCap message appears in the instrumentcluster and stays on after you start theengine, you may not have installed the fuelfiller properly.
If the fuel cap light remains on, at the nextopportunity, safely pull off of the road,remove the fuel filler cap, align the capproperly and reinstall it. The check fuel caplight or Check fuel cap message may notreset immediately. It may take severaldriving cycles for the indicators to turn off.A driving cycle consists of an enginestart-up (after four or more hours with theengine off) followed by normal city andhighway driving.
FUEL CONSUMPTION
Advertised Capacity
The advertised capacity is the maximumamount of fuel that you can add to the fueltank after running out of fuel. Included inthe advertised capacity is an emptyreserve. The empty reserve is anunspecified amount of fuel that remainsin the fuel tank when the fuel gaugeindicates empty.
Note:The amount of fuel in the emptyreserve varies and should not be relied uponto increase driving range.
Fuel Economy
Your vehicle calculates fuel economyfigures through the trip computer averagefuel function. See General Information(page 58).
The first 1,000 mi (1,500 km) of driving isthe break-in period of the engine. A moreaccurate measurement is obtained after2,000 mi (3,000 km).
81
E-Series (TE4) Canada/United States of America, enUSA, Edition date: 201804, Second-Printing
Fuel and Refueling
Page 86 of 329
EMISSION LAW
WARNING: Do not remove or alterthe original equipment floor covering orinsulation between it and the metal floorof the vehicle. The floor covering andinsulation protect occupants of thevehicle from the engine and exhaustsystem heat and noise. On vehicles withno original equipment floor coveringinsulation, do not carry passengers in amanner that permits prolonged skincontact with the metal floor. Failure tofollow these instructions may result infire or personal injury.
U.S. federal laws and certain state lawsprohibit removing or rendering inoperativeemission control system components.Similar federal or provincial laws mayapply in Canada. We do not approve of anyvehicle modification without firstdetermining applicable laws.
Tampering with emissionscontrol systems includingrelated sensors or the DieselExhaust Fluid system can result in reducedengine power and the illumination of theservice engine soon light.
Tampering With a Noise ControlSystem
Federal laws prohibit the following acts:
•Removal or rendering inoperative byany person other than for purposes ofmaintenance.
•Repair or replacement of any device orelement of the design incorporated intoa new vehicle for the purpose of noisecontrol prior to its sale or delivery tothe ultimate purchaser or while it is inuse.
•The use of the vehicle after any personremoves or renders inoperative anydevice or element of the design.
The U.S. Environmental Protection Agencymay presume to constitute tampering asfollows:
•Removal of hood blanket, fender apronabsorbers, fender apron barriers,underbody noise shields or acousticallyabsorptive material.
•Tampering or rendering inoperative theengine speed governor, to allow enginespeed to exceed manufacturerspecifications.
If the engine does not start, runs rough,experiences a decrease in engineperformance, experiences excess fuelconsumption or produces excessiveexhaust smoke, check for the following:
•A plugged or disconnected air inletsystem hose.
•A plugged engine air filter element.
•Water in the fuel filter and waterseparator.
•A clogged fuel filter.
•Contaminated fuel.
•Air in the fuel system, due to looseconnections.
•An open or pinched sensor hose.
•Incorrect engine oil level.
83
E-Series (TE4) Canada/United States of America, enUSA, Edition date: 201804, Second-Printing
Engine Emission Control
Page 87 of 329
•Incorrect fuel for climatic conditions.
•Incorrect engine oil viscosity forclimactic conditions.
Note:Some vehicles have a lifetime fuelfilter that is integrated with the fuel tank.Regular maintenance or replacement is notneeded.
Note:If these checks do not help youcorrect the concern, have your vehiclechecked as soon as possible.
Noise Emissions Warranty,Prohibited Tampering Acts andMaintenance
On January 1, 1978, Federal regulationbecame effective governing the noiseemission on trucks over 10,000 lb(4,536 kg) Gross Vehicle Weight Rating(GVWR). The preceding statementsconcerning prohibited tampering acts andmaintenance, and the noise warrantyfound in the Warranty Guide, areapplicable to complete chassis cabs over10,000 lb (4,536 kg) GVWR.
CATALYTIC CONVERTER
WARNING: Do not park, idle ordrive your vehicle on dry grass or otherdry ground cover. The emission systemheats up the engine compartment andexhaust system, creating the risk of fire.
WARNING: The normal operatingtemperature of the exhaust system isvery high. Never work around or attemptto repair any part of the exhaust systemuntil it has cooled. Use special care whenworking around the catalytic converter.The catalytic converter heats up to a veryhigh temperature after only a shortperiod of engine operation and stays hotafter the engine is switched off.
WARNING: Exhaust leaks mayresult in entry of harmful and potentiallylethal fumes into the passengercompartment. If you smell exhaustfumes inside your vehicle, have yourvehicle inspected immediately. Do notdrive if you smell exhaust fumes.
Your vehicle has various emission controlcomponents and a catalytic converter thatenables it to comply with applicableexhaust emission standards.
To make sure that the catalytic converterand other emission control componentscontinue to work properly:
•Do not crank the engine for more than10 seconds at a time.
•Do not run the engine with a spark pluglead disconnected.
•Do not push-start or tow-start yourvehicle. Use booster cables. See JumpStarting the Vehicle (page 121).
•Use only the specified fuel listed.
•Do not switch the ignition off when yourvehicle is moving.
•Avoid running out of fuel.
•Have the items listed in scheduledmaintenance information performedaccording to the specified schedule.
Note:Resulting component damage maynot be covered by the vehicle Warranty.
The scheduled maintenance items listedin scheduled maintenance information areessential to the life and performance ofyour vehicle and to its emissions system.
If you use anything other than Ford,Motorcraft or Ford-authorized parts formaintenance replacements or for serviceof components affecting emission control,such non-Ford parts should be equivalentto genuine Ford Motor Company parts inperformance and durability.
84
E-Series (TE4) Canada/United States of America, enUSA, Edition date: 201804, Second-Printing
Engine Emission Control
Page 89 of 329
Your vehicle may not pass the I/M test ifthe service engine soon indicator is on ornot working properly (bulb is burned out),or if the OBD-II system has determinedthat some of the emission control systemshave not been properly checked. In thiscase, the vehicle is not ready for I/Mtesting.
If the vehicle’s engine or transmission hasjust been serviced, or the battery hasrecently run down or been replaced, theOBD-II system may indicate that thevehicle is not ready for I/M testing. Todetermine if the vehicle is ready for I/Mtesting, turn the ignition key to the onposition for 15 seconds without crankingthe engine. If the service engine soonindicator blinks eight times, it means thatthe vehicle is not ready for I/M testing; ifthe service engine soon indicator stays onsolid, it means that your vehicle is readyfor I/M testing.
The OBD-II system checks the emissioncontrol system during normal driving. Acomplete check may take several days.
If the vehicle is not ready for I/M testing,you can perform the following driving cycleconsisting of mixed city and highwaydriving:
1. 15 minutes of steady driving on anexpressway or highway followed by 20minutes of stop-and-go driving with atleast four 30-second idle periods.
2. Allow your vehicle to sit for at leasteight hours with the ignition off. Then,start the vehicle and complete theabove driving cycle. The vehicle mustwarm up to its normal operatingtemperature. Once started, do not turnoff the vehicle until the above drivingcycle is complete.
If the vehicle is still not ready for I/Mtesting, you need to repeat the abovedriving cycle.
86
E-Series (TE4) Canada/United States of America, enUSA, Edition date: 201804, Second-Printing
Engine Emission Control
Page 91 of 329
Tow/Haul Mode
To activate tow/haul, press thebutton on the gearshift lever.The TOW HAUL indicator lightilluminates in the instrument cluster.
The tow/haul feature:
•Delays upshifts to reduce the frequencyof transmission shifting.
•Provides engine braking in all forwardgears, which slows your vehicle andassists you in controlling your vehiclewhen descending a slope.
•Depending on driving conditions andload conditions, may downshift thetransmission, slow your vehicle andcontrol your vehicle speed whendescending a hill, without pressing theaccelerator pedal. The amount ofdownshift braking provided will varybased upon the amount you press thebrake pedal.
The tow/haul feature improvestransmission operation when towing atrailer or a heavy load. All transmissiongear ranges are available when usingtow/haul.
To deactivate the tow/haul feature andreturn to normal driving mode, press thebutton on the gearshift lever again. TheTOW HAUL light deactivates. Tow/haulalso deactivates when you power downyour vehicle.
WARNING: Do not use tow/haulwhen the road surface is slippery. Failureto follow this instruction could result inthe loss of control of your vehicle.
Brake-Shift Interlock
WARNING: When doing thisprocedure, you need to take thetransmission out of park (P) whichmeans your vehicle can roll freely. Toavoid unwanted vehicle movement,always fully apply the parking brake priorto doing this procedure. Use wheelschocks if appropriate.
WARNING: If the parking brake isfully released, but the brake warninglamp remains illuminated, the brakesmay not be working properly. Have yourvehicle checked as soon as possible.
Note:Do not drive your vehicle until youverify that the brake lamps are working.
Your vehicle has a brake-shift interlockfeature that prevents the gearshift leverfrom moving from park (P) when theignition is in the 3 (on) position and thebrake pedal is not pressed.
If you cannot move the gearshift lever outof park (P) position with the ignition in the4 (on) position and the brake pedalpressed, a malfunction may have occurred.It is possible that a fuse has blown or yourvehicle’s brake lamps are not operatingproperly. See Fuse Specification Chart(page 131).
If the fuse is not blown and the brakelamps are working properly, the followingprocedure allows you to move the gearshiftlever from park (P):
1. Apply the parking brake and turn theignition on.
2.Use a screwdriver to remove the lowertrim panel under the steering column.Make sure not to disturb the wires onthe electrical connector.
88
E-Series (TE4) Canada/United States of America, enUSA, Edition date: 201804, Second-Printing
TransmissionE161509
Page 101 of 329
STEERING
To help prevent damage to the powersteering system:
•Do not hold the steering wheel at itsfurthest turning points for more thanthree to five seconds when the engineis running.
•Avoid continuously steering back andforth with elevated engine RPM as thismay overheat the system. If trying tofree a stuck vehicle, pause betweenattempts to allow the power steeringsystem to cool or seek assistance.Typical steering and driving maneuversallow the system to cool.
•Do not operate the vehicle if the powersteering pump fluid level is below theMIN mark on the reservoir.
•Some noise is normal during operation.If excessive, check for low powersteering pump fluid level beforeseeking service by your dealer.
•Heavy or uneven efforts may be causedby low power steering fluid. Check forlow power steering pump fluid levelbefore seeking service by your dealer.
•Do not fill the power steering pumpreservoir above the MAX mark on thereservoir, as this may result in leaksfrom the reservoir.
If the power steering system breaks downor if the engine is switched off, you cansteer the vehicle manually, but it takesmore effort.
If the steering wanders or pulls, check for:
•An improperly inflated tire.
•Uneven tire wear.
•Loose or worn suspensioncomponents.
•Loose or worn steering components.
•Improper vehicle alignment.
If any steering components are serviced orreplaced, install new fasteners. Manyfasteners are coated with thread adhesiveor have prevailing torque features whichmay not be re-used. Do not re-use a boltor nut. Torque fasteners to specifications.
A high crown in the road or high crosswindsmay also make the steering seem towander or pull.
98
E-Series (TE4) Canada/United States of America, enUSA, Edition date: 201804, Second-Printing
Driving Aids
Page 108 of 329
RECOMMENDED TOWING
WEIGHTS
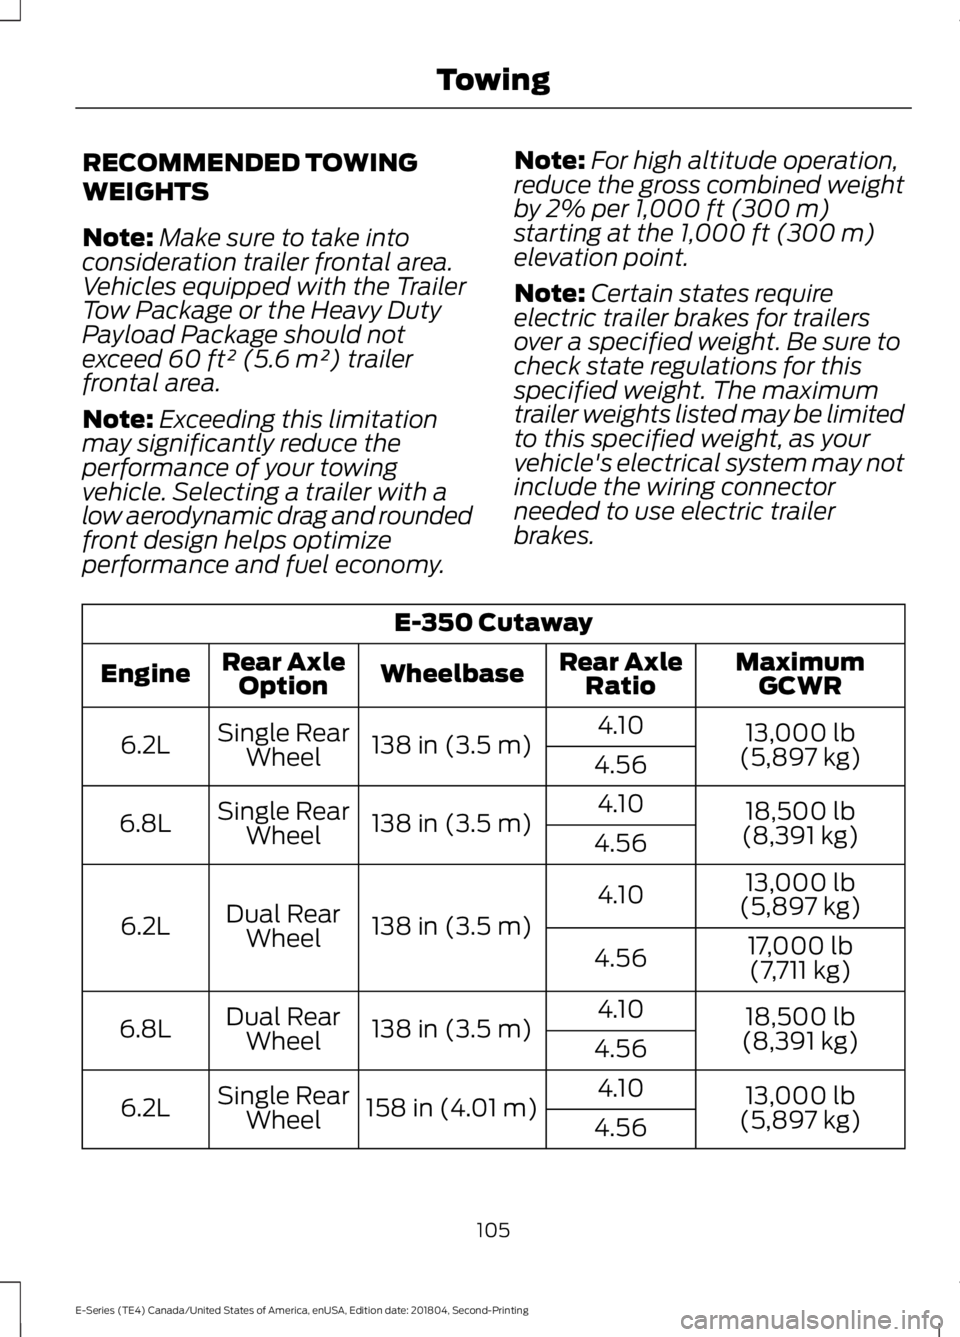
Note:Make sure to take intoconsideration trailer frontal area.Vehicles equipped with the TrailerTow Package or the Heavy DutyPayload Package should notexceed 60 ft² (5.6 m²) trailerfrontal area.
Note:Exceeding this limitationmay significantly reduce theperformance of your towingvehicle. Selecting a trailer with alow aerodynamic drag and roundedfront design helps optimizeperformance and fuel economy.
Note:For high altitude operation,reduce the gross combined weightby 2% per 1,000 ft (300 m)starting at the 1,000 ft (300 m)elevation point.
Note:Certain states requireelectric trailer brakes for trailersover a specified weight. Be sure tocheck state regulations for thisspecified weight. The maximumtrailer weights listed may be limitedto this specified weight, as yourvehicle's electrical system may notinclude the wiring connectorneeded to use electric trailerbrakes.
E-350 Cutaway
MaximumGCWRRear AxleRatioWheelbaseRear AxleOptionEngine
13,000 lb(5,897 kg)
4.10138 in (3.5 m)Single RearWheel6.2L4.56
18,500 lb(8,391 kg)
4.10138 in (3.5 m)Single RearWheel6.8L4.56
13,000 lb(5,897 kg)4.10
138 in (3.5 m)Dual RearWheel6.2L17,000 lb
(7,711 kg)4.56
18,500 lb(8,391 kg)
4.10138 in (3.5 m)Dual RearWheel6.8L4.56
13,000 lb(5,897 kg)
4.10158 in (4.01 m)Single RearWheel6.2L4.56
105
E-Series (TE4) Canada/United States of America, enUSA, Edition date: 201804, Second-Printing
Towing
Page 111 of 329
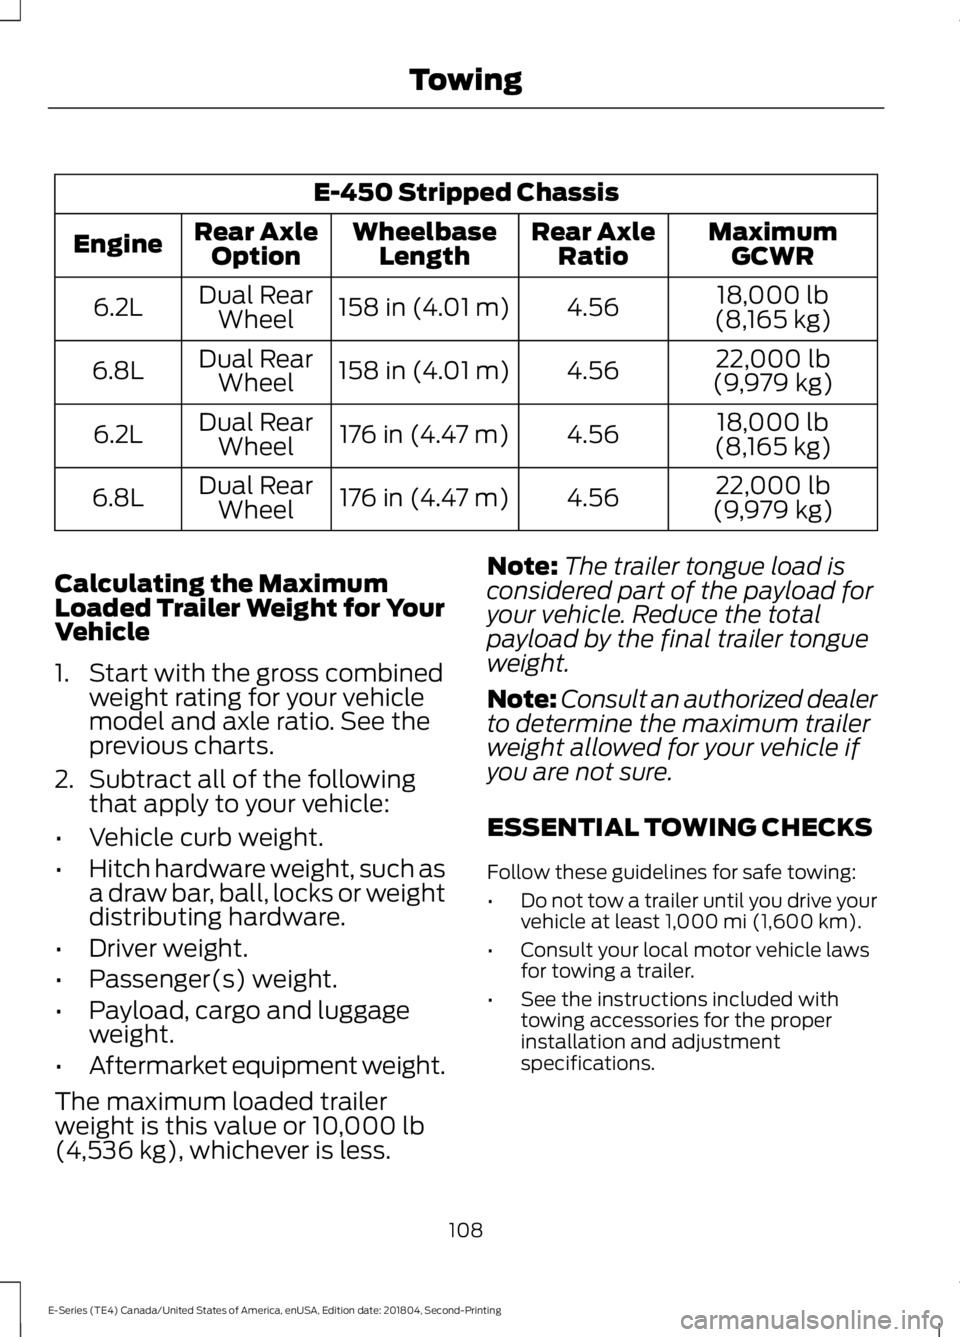
E-450 Stripped Chassis
MaximumGCWRRear AxleRatioWheelbaseLengthRear AxleOptionEngine
18,000 lb(8,165 kg)4.56158 in (4.01 m)Dual RearWheel6.2L
22,000 lb(9,979 kg)4.56158 in (4.01 m)Dual RearWheel6.8L
18,000 lb(8,165 kg)4.56176 in (4.47 m)Dual RearWheel6.2L
22,000 lb(9,979 kg)4.56176 in (4.47 m)Dual RearWheel6.8L
Calculating the MaximumLoaded Trailer Weight for YourVehicle
1. Start with the gross combinedweight rating for your vehiclemodel and axle ratio. See theprevious charts.
2.Subtract all of the followingthat apply to your vehicle:
•Vehicle curb weight.
•Hitch hardware weight, such asa draw bar, ball, locks or weightdistributing hardware.
•Driver weight.
•Passenger(s) weight.
•Payload, cargo and luggageweight.
•Aftermarket equipment weight.
The maximum loaded trailer
weight is this value or 10,000 lb(4,536 kg), whichever is less.
Note:The trailer tongue load isconsidered part of the payload foryour vehicle. Reduce the totalpayload by the final trailer tongueweight.
Note:Consult an authorized dealerto determine the maximum trailerweight allowed for your vehicle ifyou are not sure.
ESSENTIAL TOWING CHECKS
Follow these guidelines for safe towing:
•Do not tow a trailer until you drive yourvehicle at least 1,000 mi (1,600 km).
•Consult your local motor vehicle lawsfor towing a trailer.
•See the instructions included withtowing accessories for the properinstallation and adjustmentspecifications.
108
E-Series (TE4) Canada/United States of America, enUSA, Edition date: 201804, Second-Printing
Towing