FORD E SERIES 2021 Manual PDF
Manufacturer: FORD, Model Year: 2021, Model line: E SERIES, Model: FORD E SERIES 2021Pages: 301, PDF Size: 3.05 MB
Page 71 of 301
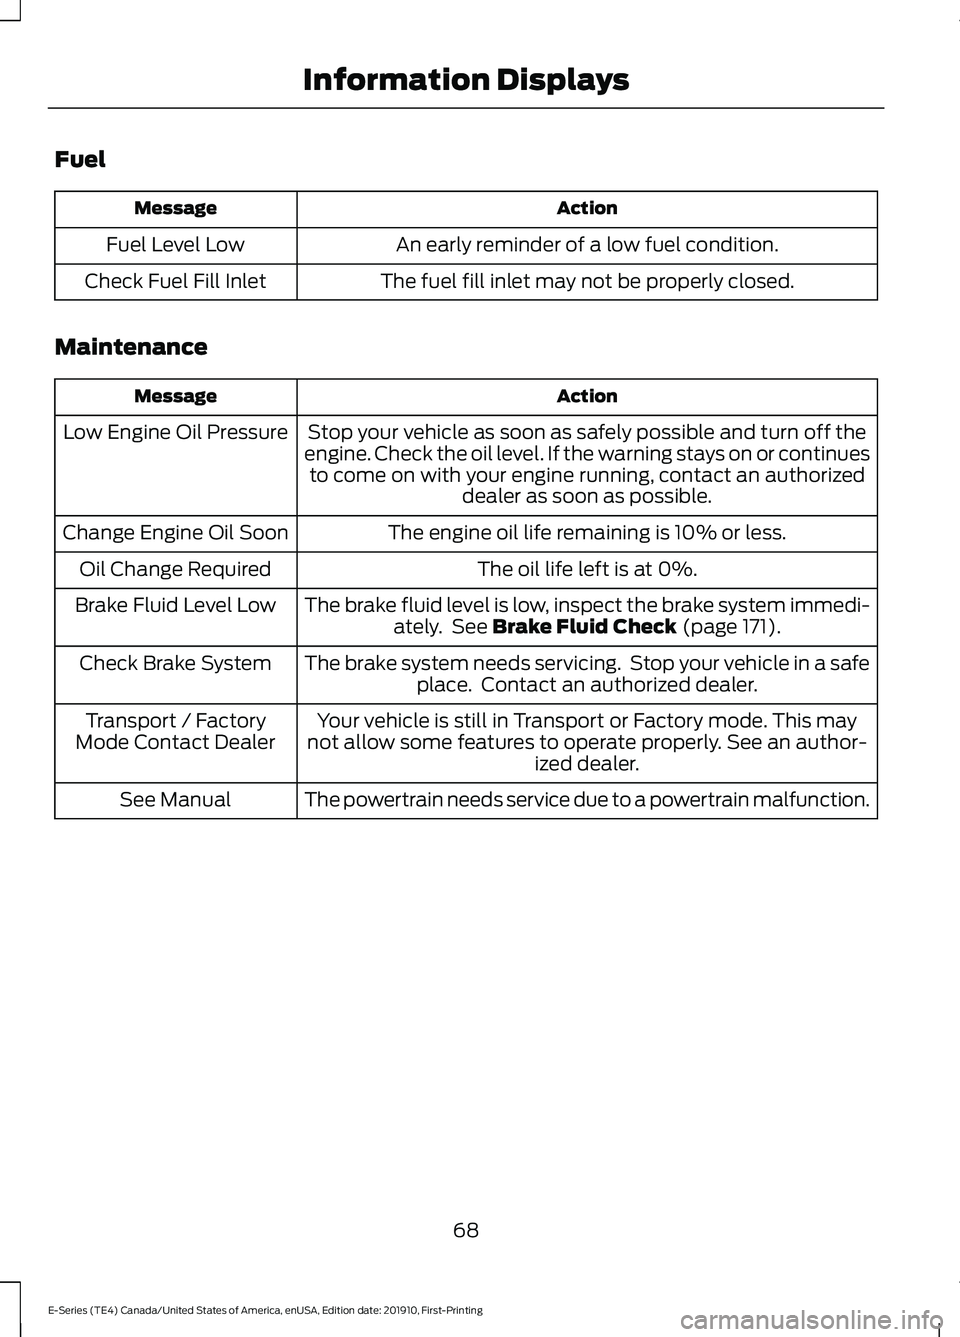
Fuel
Action
Message
An early reminder of a low fuel condition.
Fuel Level Low
The fuel fill inlet may not be properly closed.
Check Fuel Fill Inlet
Maintenance Action
Message
Stop your vehicle as soon as safely possible and turn off the
engine. Check the oil level. If the warning stays on or continues to come on with your engine running, contact an authorized dealer as soon as possible.
Low Engine Oil Pressure
The engine oil life remaining is 10% or less.
Change Engine Oil Soon
The oil life left is at 0%.
Oil Change Required
The brake fluid level is low, inspect the brake system immedi-ately. See Brake Fluid Check (page 171).
Brake Fluid Level Low
The brake system needs servicing. Stop your vehicle in a safeplace. Contact an authorized dealer.
Check Brake System
Your vehicle is still in Transport or Factory mode. This may
not allow some features to operate properly. See an author- ized dealer.
Transport / Factory
Mode Contact Dealer
The powertrain needs service due to a powertrain malfunction.
See Manual
68
E-Series (TE4) Canada/United States of America, enUSA, Edition date: 201910, First-Printing Information Displays
Page 72 of 301
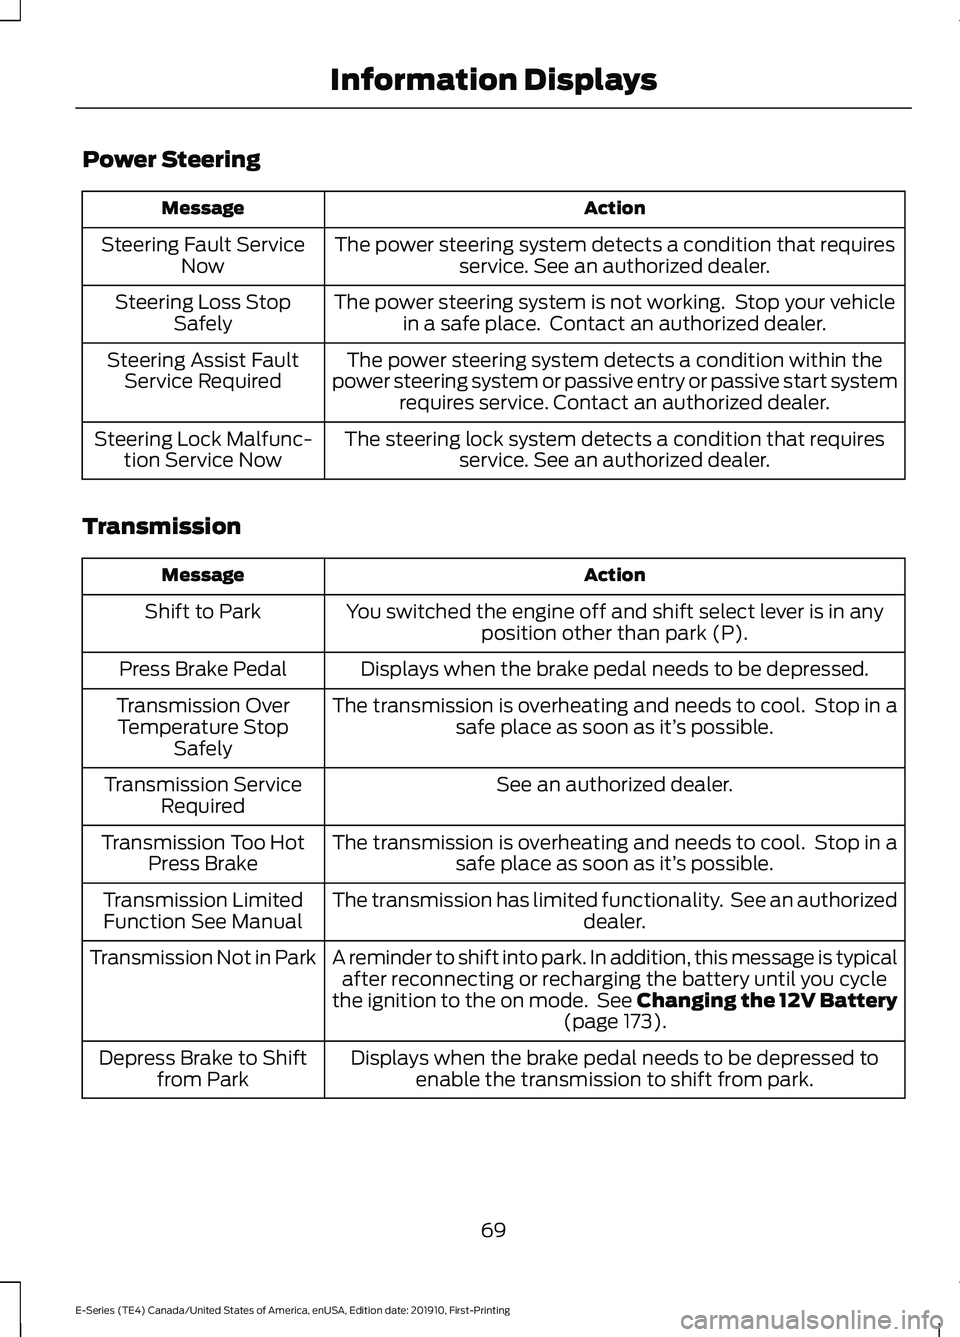
Power Steering
Action
Message
The power steering system detects a condition that requiresservice. See an authorized dealer.
Steering Fault Service
Now
The power steering system is not working. Stop your vehiclein a safe place. Contact an authorized dealer.
Steering Loss Stop
Safely
The power steering system detects a condition within the
power steering system or passive entry or passive start system requires service. Contact an authorized dealer.
Steering Assist Fault
Service Required
The steering lock system detects a condition that requiresservice. See an authorized dealer.
Steering Lock Malfunc-
tion Service Now
Transmission Action
Message
You switched the engine off and shift select lever is in anyposition other than park (P).
Shift to Park
Displays when the brake pedal needs to be depressed.
Press Brake Pedal
The transmission is overheating and needs to cool. Stop in asafe place as soon as it’ s possible.
Transmission Over
Temperature Stop Safely
See an authorized dealer.
Transmission Service
Required
The transmission is overheating and needs to cool. Stop in asafe place as soon as it’ s possible.
Transmission Too Hot
Press Brake
The transmission has limited functionality. See an authorized dealer.
Transmission Limited
Function See Manual
A reminder to shift into park. In addition, this message is typicalafter reconnecting or recharging the battery until you cycle
the ignition to the on mode. See Changing the 12V Battery (page 173).
Transmission Not in Park
Displays when the brake pedal needs to be depressed toenable the transmission to shift from park.
Depress Brake to Shift
from Park
69
E-Series (TE4) Canada/United States of America, enUSA, Edition date: 201910, First-Printing Information Displays
Page 73 of 301
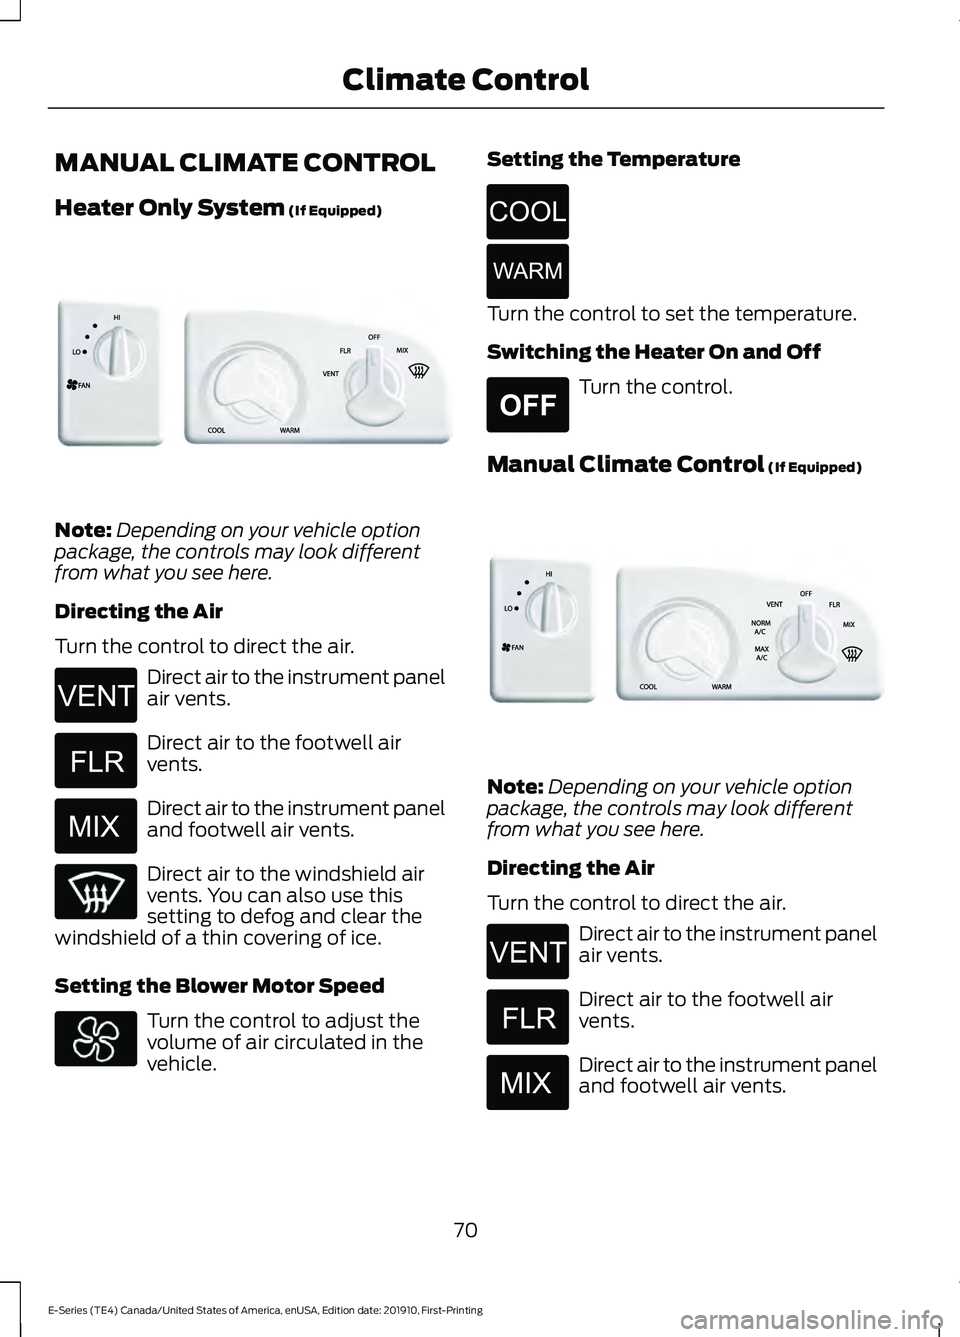
MANUAL CLIMATE CONTROL
Heater Only System (If Equipped)
Note:
Depending on your vehicle option
package, the controls may look different
from what you see here.
Directing the Air
Turn the control to direct the air. Direct air to the instrument panel
air vents.
Direct air to the footwell air
vents.
Direct air to the instrument panel
and footwell air vents.
Direct air to the windshield air
vents. You can also use this
setting to defog and clear the
windshield of a thin covering of ice.
Setting the Blower Motor Speed Turn the control to adjust the
volume of air circulated in the
vehicle. Setting the Temperature Turn the control to set the temperature.
Switching the Heater On and Off
Turn the control.
Manual Climate Control
(If Equipped) Note:
Depending on your vehicle option
package, the controls may look different
from what you see here.
Directing the Air
Turn the control to direct the air. Direct air to the instrument panel
air vents.
Direct air to the footwell air
vents.
Direct air to the instrument panel
and footwell air vents.
70
E-Series (TE4) Canada/United States of America, enUSA, Edition date: 201910, First-Printing Climate ControlE305221 E266044 E266043 E266042 E266045 E266046 E265297 E305209 E266044 E266043 E266042
Page 74 of 301
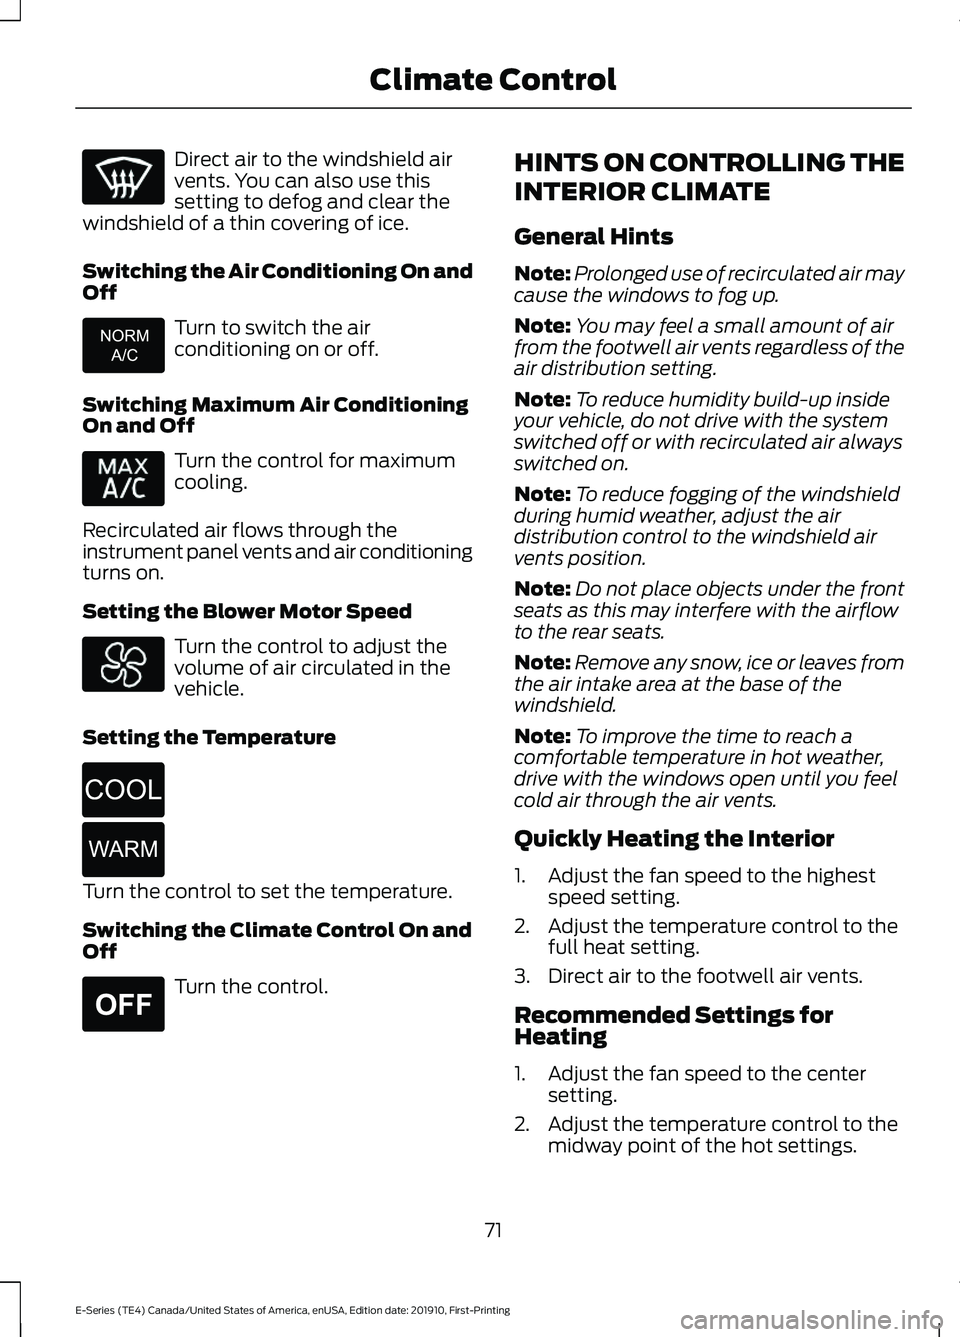
Direct air to the windshield air
vents. You can also use this
setting to defog and clear the
windshield of a thin covering of ice.
Switching the Air Conditioning On and
Off Turn to switch the air
conditioning on or off.
Switching Maximum Air Conditioning
On and Off Turn the control for maximum
cooling.
Recirculated air flows through the
instrument panel vents and air conditioning
turns on.
Setting the Blower Motor Speed Turn the control to adjust the
volume of air circulated in the
vehicle.
Setting the Temperature Turn the control to set the temperature.
Switching the Climate Control On and
Off
Turn the control. HINTS ON CONTROLLING THE
INTERIOR CLIMATE
General Hints
Note:
Prolonged use of recirculated air may
cause the windows to fog up.
Note: You may feel a small amount of air
from the footwell air vents regardless of the
air distribution setting.
Note: To reduce humidity build-up inside
your vehicle, do not drive with the system
switched off or with recirculated air always
switched on.
Note: To reduce fogging of the windshield
during humid weather, adjust the air
distribution control to the windshield air
vents position.
Note: Do not place objects under the front
seats as this may interfere with the airflow
to the rear seats.
Note: Remove any snow, ice or leaves from
the air intake area at the base of the
windshield.
Note: To improve the time to reach a
comfortable temperature in hot weather,
drive with the windows open until you feel
cold air through the air vents.
Quickly Heating the Interior
1. Adjust the fan speed to the highest speed setting.
2. Adjust the temperature control to the full heat setting.
3. Direct air to the footwell air vents.
Recommended Settings for
Heating
1. Adjust the fan speed to the center setting.
2. Adjust the temperature control to the midway point of the hot settings.
71
E-Series (TE4) Canada/United States of America, enUSA, Edition date: 201910, First-Printing Climate Control E266041 E266045 E266046 E265297
Page 75 of 301
3. Direct air to the footwell air vents.
Quickly Cooling the Interior
1. Turn to MAX A/C.
2. Drive with the windows open until you feel cold air through the air vents.
Recommended Settings for
Cooling
1. Adjust the fan speed to the center setting.
2. Adjust the temperature control to the midway point of the cold settings.
3. Direct air to the instrument panel air vents.
Vehicle Stationary for Extended
Periods During Extreme High
Ambient Temperatures
1. Apply the parking brake.
2. Place your vehicle in park (P) or neutral.
3. Turn to
MAX A/C.
4. Adjust the fan speed to the lowest speed setting.
Defogging the Side Windows in
Cold Weather
1. Direct air to the instrument panel and windshield vents.
2. Turn to
NORM A/C.
3. Adjust the temperature control to the desired setting.
4. Adjust the fan speed to the highest setting.
5. Direct air toward the side windows.
6. Close the instrument panel vents. REAR PASSENGER CLIMATE
CONTROLS
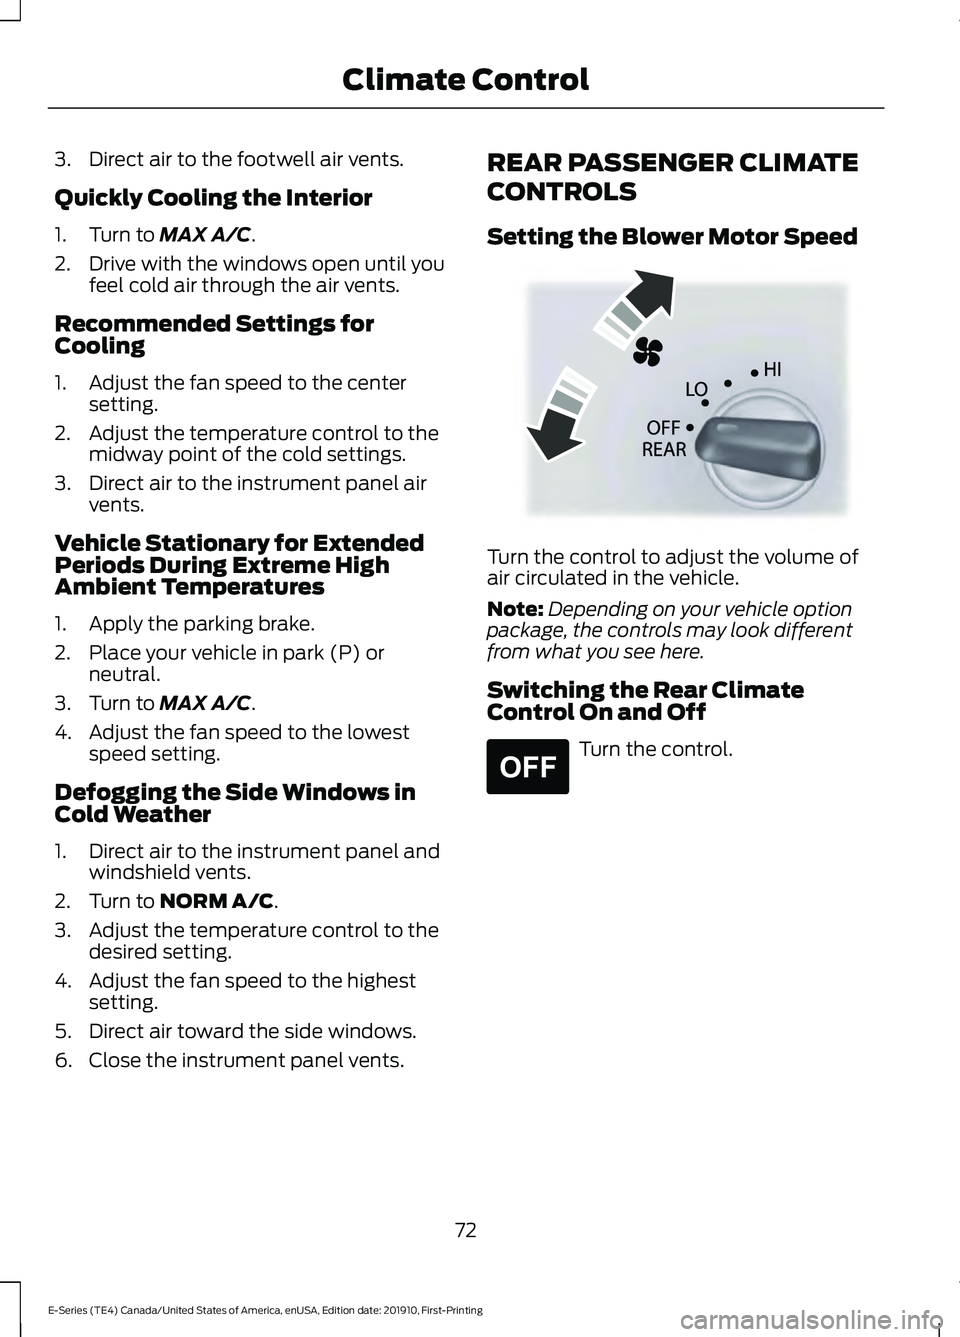
Setting the Blower Motor Speed
Turn the control to adjust the volume of
air circulated in the vehicle.
Note:
Depending on your vehicle option
package, the controls may look different
from what you see here.
Switching the Rear Climate
Control On and Off Turn the control.
72
E-Series (TE4) Canada/United States of America, enUSA, Edition date: 201910, First-Printing Climate ControlE305193 E265297
Page 76 of 301
SITTING IN THE CORRECT
POSITION
WARNING: Sitting improperly, out
of position or with the seatback reclined
too far can take weight off the seat
cushion and affect the decision of the
passenger sensing system, resulting in
serious injury or death in the event of a
crash. Always sit upright against your
seat back, with your feet on the floor. WARNING:
Do not recline the
seatback too far as this can cause the
occupant to slide under the seatbelt,
resulting in serious injury in the event of
a collision. WARNING:
Do not place objects
higher than the top of the seat backrest.
Failure to follow this instruction could
result in personal injury or death in the
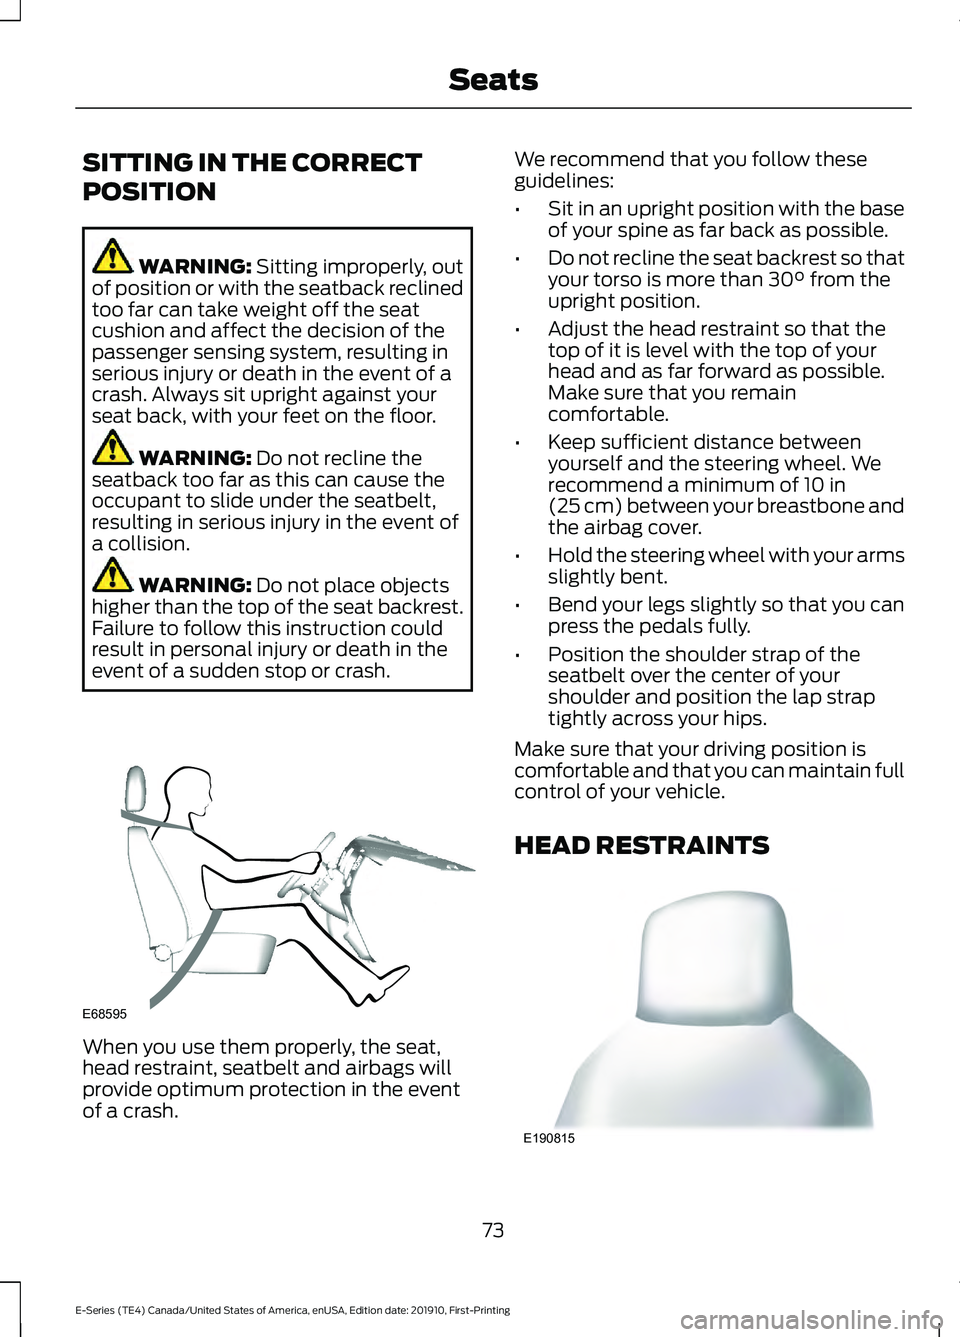
event of a sudden stop or crash. When you use them properly, the seat,
head restraint, seatbelt and airbags will
provide optimum protection in the event
of a crash. We recommend that you follow these
guidelines:
•
Sit in an upright position with the base
of your spine as far back as possible.
• Do not recline the seat backrest so that
your torso is more than
30° from the
upright position.
• Adjust the head restraint so that the
top of it is level with the top of your
head and as far forward as possible.
Make sure that you remain
comfortable.
• Keep sufficient distance between
yourself and the steering wheel. We
recommend a minimum of
10 in
(25 cm) between your breastbone and
the airbag cover.
• Hold the steering wheel with your arms
slightly bent.
• Bend your legs slightly so that you can
press the pedals fully.
• Position the shoulder strap of the
seatbelt over the center of your
shoulder and position the lap strap
tightly across your hips.
Make sure that your driving position is
comfortable and that you can maintain full
control of your vehicle.
HEAD RESTRAINTS 73
E-Series (TE4) Canada/United States of America, enUSA, Edition date: 201910, First-Printing SeatsE68595 E190815
Page 77 of 301
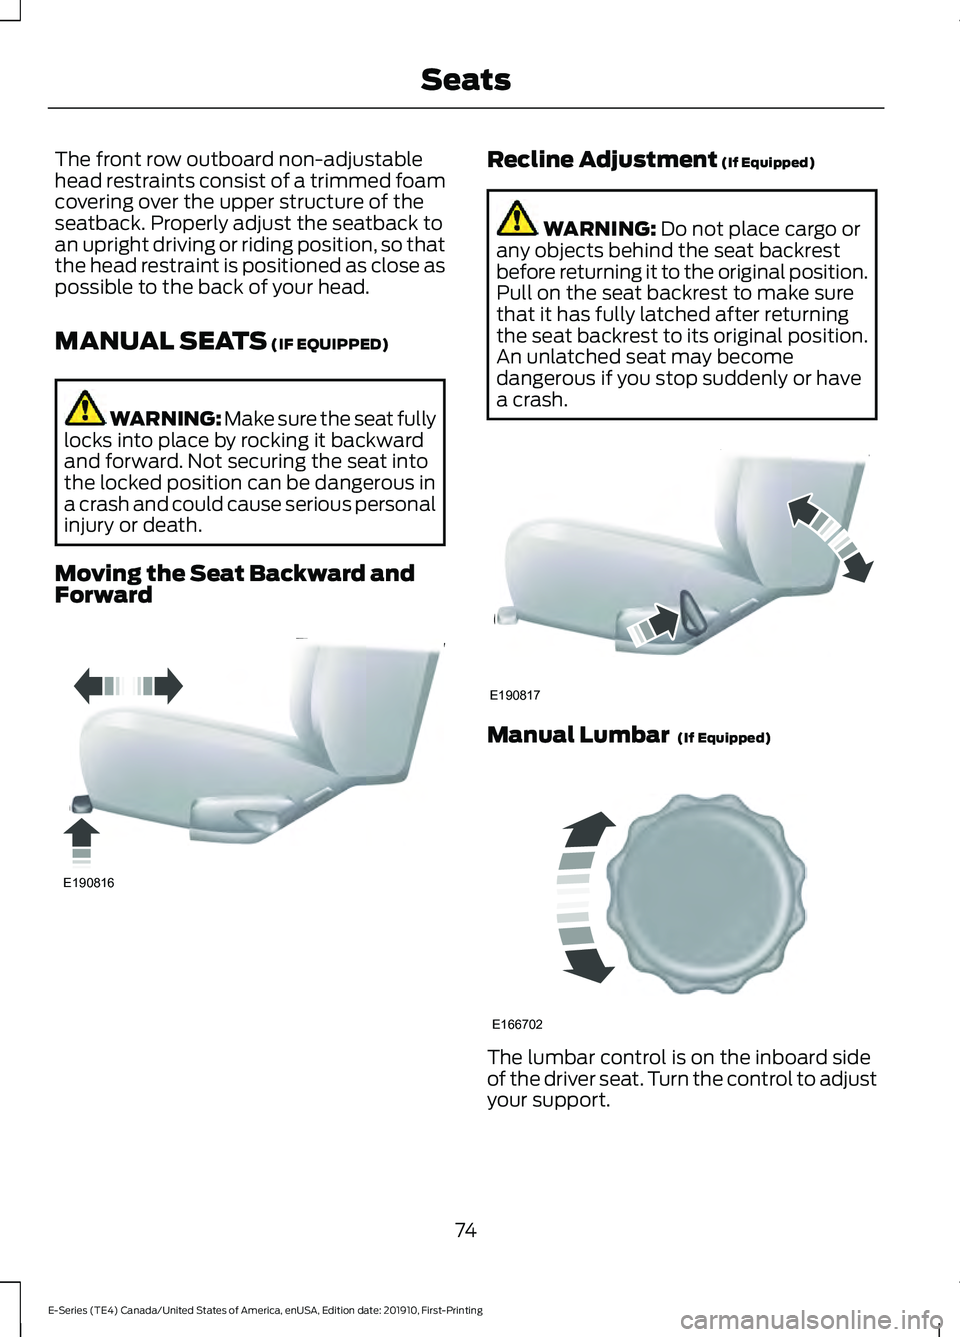
The front row outboard non-adjustable
head restraints consist of a trimmed foam
covering over the upper structure of the
seatback. Properly adjust the seatback to
an upright driving or riding position, so that
the head restraint is positioned as close as
possible to the back of your head.
MANUAL SEATS (IF EQUIPPED)
WARNING: Make sure the seat fully
locks into place by rocking it backward
and forward. Not securing the seat into
the locked position can be dangerous in
a crash and could cause serious personal
injury or death.
Moving the Seat Backward and
Forward Recline Adjustment
(If Equipped)
WARNING:
Do not place cargo or
any objects behind the seat backrest
before returning it to the original position.
Pull on the seat backrest to make sure
that it has fully latched after returning
the seat backrest to its original position.
An unlatched seat may become
dangerous if you stop suddenly or have
a crash. Manual Lumbar
(If Equipped)
The lumbar control is on the inboard side
of the driver seat. Turn the control to adjust
your support.
74
E-Series (TE4) Canada/United States of America, enUSA, Edition date: 201910, First-Printing SeatsE190816 E190817 E166702
Page 78 of 301
POWER SEATS (IF EQUIPPED)
WARNING: Do not adjust the driver
seat or seatback while your vehicle is
moving. Adjusting your seatback while
the vehicle is in motion may cause loss
of control of the vehicle.
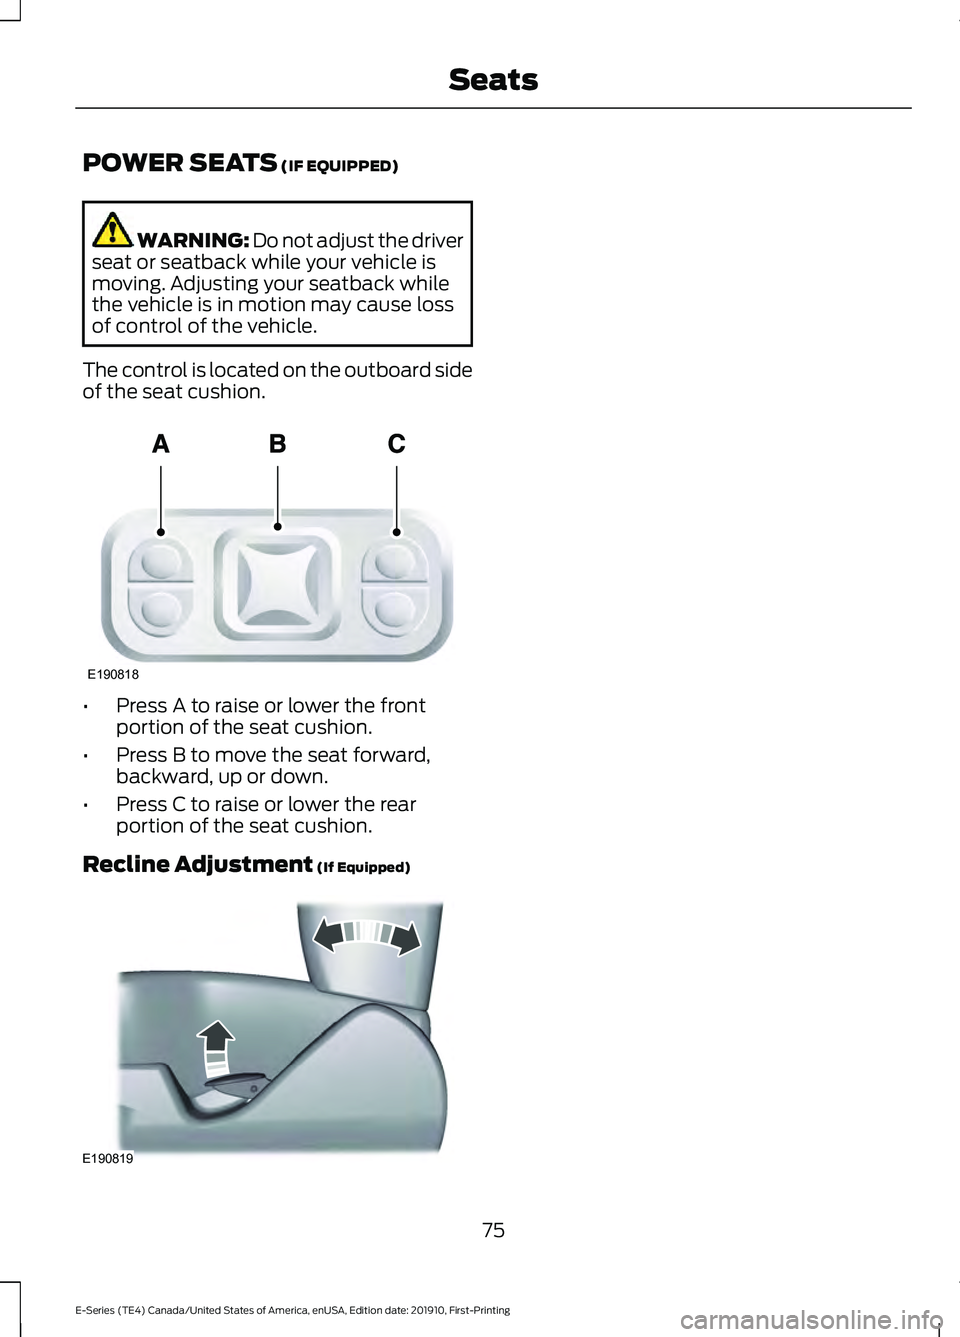
The control is located on the outboard side
of the seat cushion. •
Press A to raise or lower the front
portion of the seat cushion.
• Press B to move the seat forward,
backward, up or down.
• Press C to raise or lower the rear
portion of the seat cushion.
Recline Adjustment
(If Equipped) 75
E-Series (TE4) Canada/United States of America, enUSA, Edition date: 201910, First-Printing SeatsE190818 E190819
Page 79 of 301
12 Volt DC Power Point
WARNING: Do not plug optional
electrical accessories into the cigar
lighter socket. Incorrect use of the cigar
lighter can cause damage not covered
by the vehicle warranty, and can result
in fire or serious injury.
Note: When you switch the ignition on, you
can use the socket to power 12 volt
appliances with a maximum current rating
of 15 amps.
If the power supply does not work after you
switch the ignition off, switch the ignition
on.
Note: Do not hang any accessory from the
accessory plug.
Note: Do not use the power point over the
vehicle capacity of 12 volt DC 180 watts or
a fuse may blow.
Note: Always keep the power point caps
closed when not in use.
Do not insert objects other than an
accessory plug into the power point. This
damages the power point and may blow
the fuse.
Run the vehicle for full capacity use of the
power point.
To prevent the battery from running out of
charge:
• Do not use the power point longer than
necessary when the vehicle is not
running.
• Do not leave devices plugged in
overnight or when you park your vehicle
for extended periods. Locations
Power points may be in the following
locations:
•
On the instrument panel.
• Inside the glove box.
• Behind the driver's seat, upper trim
panel.
110 Volt AC Power Point
(If Equipped) WARNING:
Do not keep electrical
devices plugged in the power point
whenever the device is not in use. Do not
use any extension cord with the 110 volt
AC power point, since it will defeat the
safety protection design. Doing so may
cause the power point to overload due
to powering multiple devices that can
reach beyond the 150 watt load limit and
could result in fire or serious injury.
Note: The power point turns off when you
switch the ignition off, or when the battery
voltage drops below 11 volts.
You can use the power point for electric
devices that require up to 150 watts. It is
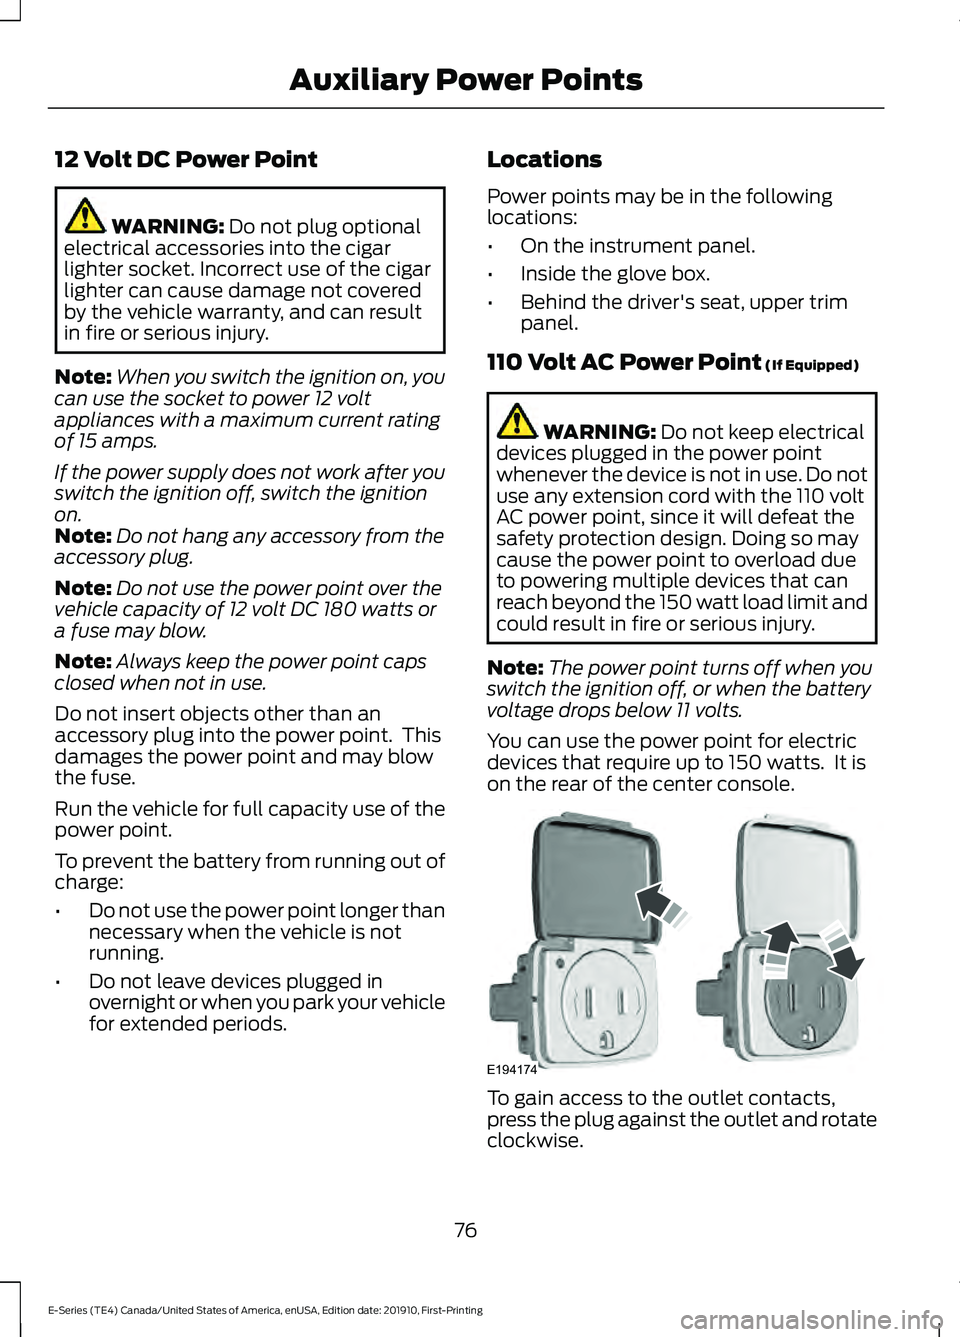
on the rear of the center console. To gain access to the outlet contacts,
press the plug against the outlet and rotate
clockwise.
76
E-Series (TE4) Canada/United States of America, enUSA, Edition date: 201910, First-Printing Auxiliary Power PointsE194174
Page 80 of 301
When the indicator light on the power point
is:
•
On: The power point is working, the
ignition is on and a device is plugged
in.
• Off: The power point is off, the ignition
is off or no device is plugged in.
• Flashing: The power point is in fault
mode.
The power outlet temporarily turns off
power when in fault mode if the device
exceeds the 150 watt limit. Unplug your
device and switch the ignition off. Switch
the ignition back on, but do not plug your
device back in. Let the system cool off and
switch the ignition off to reset the fault
mode. Switch the ignition back on and
make sure the indicator light remains on.
Do not use the power point for certain
electric devices, including:
• Cathode-ray, tube-type televisions.
• Motor loads, such as vacuum cleaners,
electric saws and other electric power
tools or compressor-driven
refrigerators.
• Measuring devices, which process
precise data, such as medical
equipment or measuring equipment.
• Other appliances requiring an
extremely stable power supply such as
microcomputer-controlled electric
blankets or touch-sensor lamps.
77
E-Series (TE4) Canada/United States of America, enUSA, Edition date: 201910, First-Printing Auxiliary Power Points