clock FORD EDGE 2015 2.G Owners Manual
[x] Cancel search | Manufacturer: FORD, Model Year: 2015, Model line: EDGE, Model: FORD EDGE 2015 2.GPages: 508, PDF Size: 6.2 MB
Page 31 of 508
Left-Hand Side
Turn counterclockwise to lock and
clockwise to unlock.
Right-Hand Side
Turn clockwise to lock and
counterclockwise to unlock.
28
Edge/Galaxy/S-MAX (CDQ), enUSA, First Printing Child Safety
Page 64 of 508
Locking the Doors
Press the button to lock all
doors. The direction indicators
flash.
Press the button again within three
seconds to confirm that all the doors are
closed. The doors lock again, the horn
sounds and the direction indicators flash
if all the doors and the luggage
compartment are closed.
Note: If the system does not function, use
the key blade to lock and unlock your
vehicle.
Mislock
If any door or the luggage compartment is
open, or if the hood is open on vehicles
with an anti-theft alarm or remote start,
the horn sounds twice and the direction
indicators do not flash. You can switch this
feature on or off in the information display.
See Information Displays (page 100).
Opening the Luggage Compartment Press twice within three seconds
to open the luggage
compartment. Locking and Unlocking the Doors
with the Key Blade
Locking the Doors If the central locking function does not
operate, lock the doors individually using
the key in the position shown.
Left-Hand Side
Turn clockwise to lock.
Right-Hand Side
Turn counterclockwise to lock.
Unlocking the Doors
If the central locking function fails to
operate, unlock the driver door and then
unlock all other doors individually by
pulling the interior door handles.
Note:
If the doors have been unlocked using
this method, the doors must be locked
individually until the central locking function
has been repaired.
61
Edge/Galaxy/S-MAX (CDQ), enUSA, First Printing LocksE138623 E138630 E112203
Page 266 of 508
WARNINGS
Only add oil when the engine is cold.
If the engine is hot, wait 10 minutes
for the engine to cool down.
Do not remove the filler cap when
the engine is running.
1. Remove the engine oil filler cap.
2. Add engine oil that meets Ford
specifications. See Maintenance
(page 258).
3. Wipe off any spilled oil.
4. Replace the engine oil filler cap. Turn it clockwise until you feel a strong
resistance.
Note: Do not add oil further than the
maximum mark. Oil levels above the
maximum mark may cause engine damage.
Note: Soak up any spillage with an
absorbent cloth immediately.
OIL CHANGE INDICATOR
RESET
Use the information display controls on
the steering wheel to reset the oil change
indicator.
From the main menu scroll to: Action and description
Message
Press the right arrow button,
then from this menu scroll
to the following message.
Settings
Press the right arrow button,
then from this menu scroll
to the following message.
Vehicle
Press the right arrow button,
then from this menu scroll
to the following message.
Oil Life Action and description
Message
Press and hold the
OK
button until the instrument
cluster displays the
following message.
Hold OK to
Reset
Reset Successful
When the oil change indic-
ator resets the instrument
cluster displays 100%.
Remaining Life
{00}%
If the instrument cluster
displays one of the following
messages, repeat the
process.
Not Reset
Reset Cancelled
ENGINE COOLANT CHECK WARNINGS
Do not add engine coolant when the
engine is hot. Steam and scalding
liquids released from a hot cooling
system can burn you badly. Also, spilling
coolant on hot engine parts can burn you. Do not put engine coolant in the
windshield washer fluid container. If
sprayed on the windshield, engine
coolant could make it difficult to see
through the windshield. To reduce the risk of personal injury,
make sure the engine is cool before
unscrewing the coolant pressure
relief cap. The cooling system is under
pressure. Steam and hot liquid can come
out forcefully when you loosen the cap
slightly.
263
Edge/Galaxy/S-MAX (CDQ), enUSA, First Printing Maintenance
Page 270 of 508
AUTOMATIC TRANSMISSION
FLUID CHECK - 2.7L
ECOBOOST™/3.5L
WARNING
Do not use supplemental
transmission fluid additives,
treatments or cleaning agents. The
use of these materials may affect
transmission operation and result in
damage to internal transmission
components. The transmission does not consume fluid.
However, if the transmission slips or shifts
slowly you should check the fluid level. If
you notice a sign of leaking fluid, contact
an authorized dealer.
Checking the Transmission Fluid
Level
*
Only check the transmission fluid level
when the engine is at normal operating
temprature 179°F (82°C)-199°F (93°C).
Normal operating temprature is reached
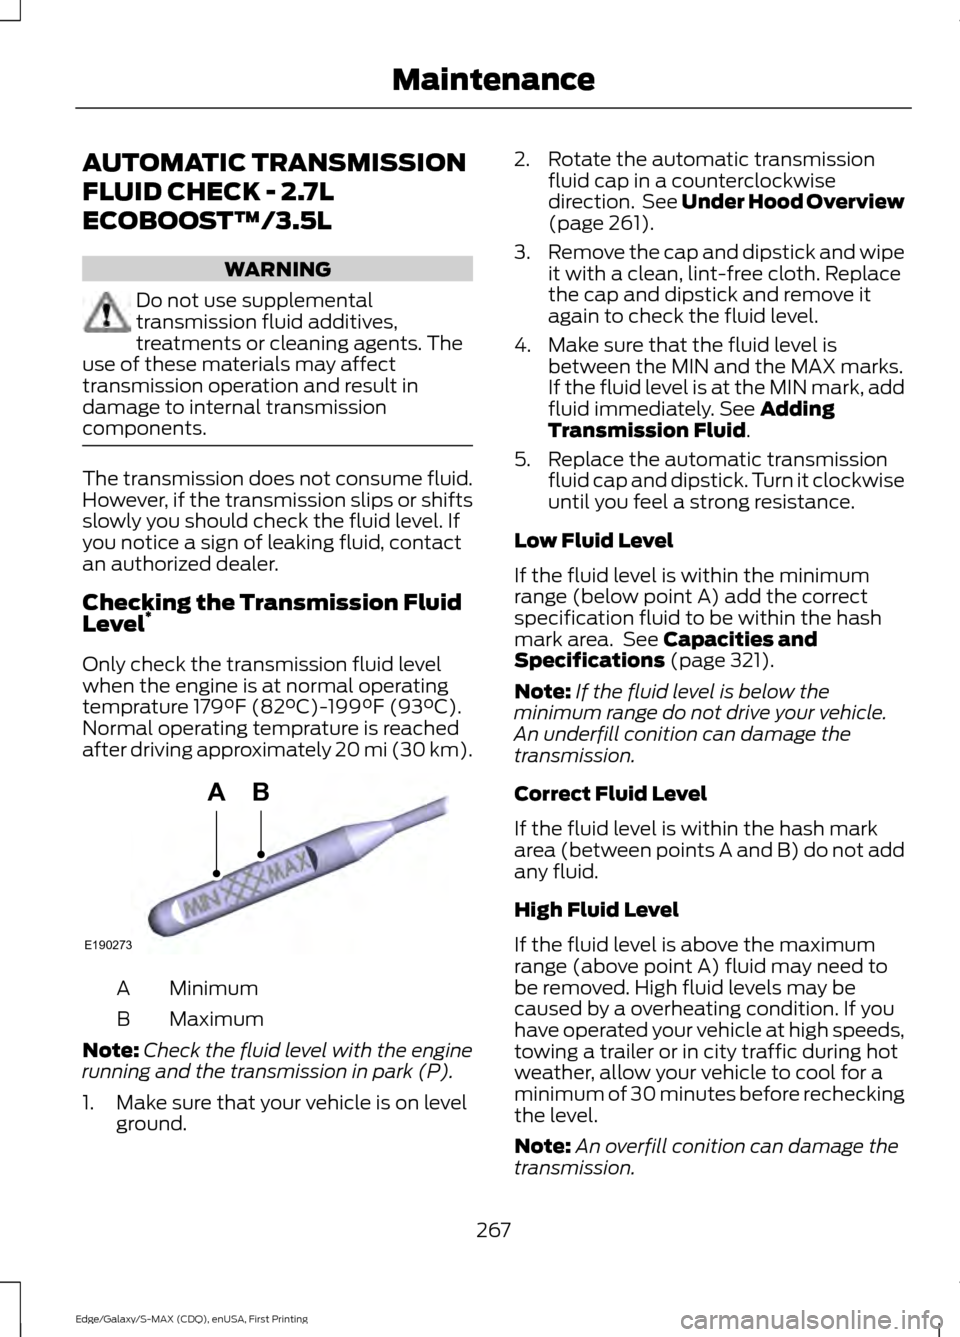
after driving approximately 20 mi (30 km). Minimum
A
Maximum
B
Note: Check the fluid level with the engine
running and the transmission in park (P).
1. Make sure that your vehicle is on level ground. 2. Rotate the automatic transmission
fluid cap in a counterclockwise
direction. See
Under Hood Overview
(page 261).
3. Remove the cap and dipstick and wipe
it with a clean, lint-free cloth. Replace
the cap and dipstick and remove it
again to check the fluid level.
4. Make sure that the fluid level is between the MIN and the MAX marks.
If the fluid level is at the MIN mark, add
fluid immediately. See
Adding
Transmission Fluid.
5. Replace the automatic transmission fluid cap and dipstick. Turn it clockwise
until you feel a strong resistance.
Low Fluid Level
If the fluid level is within the minimum
range (below point A) add the correct
specification fluid to be within the hash
mark area. See
Capacities and
Specifications (page 321).
Note: If the fluid level is below the
minimum range do not drive your vehicle.
An underfill conition can damage the
transmission.
Correct Fluid Level
If the fluid level is within the hash mark
area (between points A and B) do not add
any fluid.
High Fluid Level
If the fluid level is above the maximum
range (above point A) fluid may need to
be removed. High fluid levels may be
caused by a overheating condition. If you
have operated your vehicle at high speeds,
towing a trailer or in city traffic during hot
weather, allow your vehicle to cool for a
minimum of 30 minutes before rechecking
the level.
Note: An overfill conition can damage the
transmission.
267
Edge/Galaxy/S-MAX (CDQ), enUSA, First Printing MaintenanceE190273
AB
Page 271 of 508

Adding Transmission Fluid
*
1. Rotate the automatic transmission fluid cap in a counterclockwise
direction. *
2. Remove the cap and dipstick and wipe
it with a clean, lint-free cloth.
3. Add fluid that meets the Ford specifications. See Capacities and
Specifications (page 335). Pour the
fluid directly into the automatic
transmission fluid cap and dipstick
hole.
4. Replace the cap and dipstick and remove it again to check the fluid level.
5. Make sure that the fluid level is between the MIN and the MAX marks.
6. Replace the automatic transmission fluid cap and dipstick. Turn it clockwise
until you feel a strong resistance.
* Vehicles With 2.7L EcoBoost WARNING
Do not run the engine with the air
filter disconnected. 1. Remove the two air filter assembly
securing bolts.
2. Lift the air filter assembly to disengage
the locating pins.
3. Rotate the air filter assembly slightly in a counterclockwise direction.
4. Check the fluid level. See
Checking
the Transmission Fluid Level.
5. Install in reverse order. Tighten the two
air filter assembly securing bolts until
you feel a strong resistance.
BRAKE FLUID CHECK WARNINGS
Do not use any fluid other than the
recommended brake fluid as this will
reduce brake efficiency. Use of
incorrect fluid could result in the loss of
vehicle control, serious personal injury or
death.
268
Edge/Galaxy/S-MAX (CDQ), enUSA, First Printing MaintenanceE190367
x2
Page 273 of 508
WARNINGS
When lifting a plastic-cased battery,
excessive pressure on the end walls
could cause acid to flow through the
vent caps, resulting in personal injury and
damage to the vehicle or battery. Lift the
battery with a battery carrier or with your
hands on opposite corners. Keep batteries out of reach of
children. Batteries contain sulfuric
acid. Avoid contact with skin, eyes or
clothing. Shield your eyes when working
near the battery to protect against possible
splashing of acid solution. In case of acid
contact with skin or eyes, flush
immediately with water for a minimum of
15 minutes and get prompt medical
attention. If acid is swallowed, call a
physician immediately. Battery posts, terminals and related
accessories contain lead and lead
compounds. Wash hands after
handling. Your vehicle is equipped with a
Motorcraft® maintenance-free battery
which normally does not require additional
water during its life of service.
Note:
If your battery has a cover/shield,
make sure it is reinstalled after the battery
has been cleaned or replaced.
Note: See an authorized dealer for low
voltage battery access, testing, or
replacement.
When a low voltage battery replacement
is necessary, see an authorized dealer to
replace the low voltage battery with a Ford
recommended replacement low voltage
battery that matches the electrical
requirements of the vehicle. To ensure proper operation of the battery
management system (BMS), do not allow
a technician to connect any electrical
device ground connection directly to the
low voltage battery negative post. A
connection at the low voltage battery
negative post can cause inaccurate
measurements of the battery condition
and potential incorrect system operation.
Note:
If a person adds electrical or
electronic accessories or components to the
vehicle, the accessories or components may
adversely affect the low voltage battery
performance and durability and may also
affect the performance of other electrical
systems in the vehicle.
For longer, trouble-free operation, keep the
top of the battery clean and dry. Also,
make certain the battery cables are always
tightly fastened to the battery terminals.
If you see any corrosion on the battery or
terminals, remove the cables from the
terminals and clean with a wire brush. You
can neutralize the acid with a solution of
baking soda and water.
When a battery replacement is required,
the battery should only be replaced with
a Ford recommended replacement battery
that matches the electrical requirements
of the vehicle.
Because your vehicle ’s engine is
electronically-controlled by a computer,
some engine control settings are
maintained by power from the low voltage
battery. Some engine computer settings,
like the idle trim and fuel trim strategy,
optimize the driveability and performance
of the engine. Some other computer
settings, like the clock and radio station
presets, are also maintained in memory by
power from the low voltage battery. When
a technician disconnects and connects the
low voltage battery, these settings are
erased. Complete the following procedure
in order to restore the settings:
270
Edge/Galaxy/S-MAX (CDQ), enUSA, First Printing Maintenance
Page 274 of 508
1. With the vehicle at a complete stop,
set the parking brake.
2. Shift the transmission into P.
3. Turn off all accessories.
4. Step on the brake pedal and start the vehicle.
5. Run the engine until it reaches normal operating temperature. While the
engine is warming up, complete the
following: Reset the clock. See Audio
System (page 339). Reset the power
windows bounce-back feature. See
Windows and Mirrors
(page 88).
Reset the radio station presets. See
Audio System
(page 339).
6. Allow the engine to idle for at least one
minute. If the engine turns off, step on
the accelerator to start the engine.
7. While the engine is running, step on the
brake pedal and shift the transmission
to N.
8. Allow the engine to run for at least one
minute by pressing on the accelerator
pedal.
9. Drive the vehicle at least 10 miles (16 kilometers) to completely relearn the
idle and fuel trim strategy.
Note: If you do not allow the engine to
relearn the idle and fuel trim strategy, the
idle quality of your vehicle may be adversely
affected until the engine computer
eventually relearns the idle trim and fuel
trim strategy.
Note: Always dispose of automotive
batteries in a responsible manner. Follow
your local authorized standards for disposal.
Call your local authorized recycling center
to find out more about recycling automotive
batteries.
Note: It is recommended that the negative
battery cable terminal be disconnected from
the battery if you plan to store your vehicle
for an extended period of time. CHECKING THE WIPER
BLADES
Run the tip of your fingers over the edge of
the blade to check for roughness.
Clean the wiper blades with washer fluid
or water applied with a soft sponge or
cloth.
CHANGING THE WIPER
BLADES
Note:
If streaks or smears appear on the
windshield, clean the windshield and the
wiper blades. See
Checking the Wiper
Blades (page 271). If that does not resolve
the issue, install new wiper blades. See
Vehicle Care
(page 279).
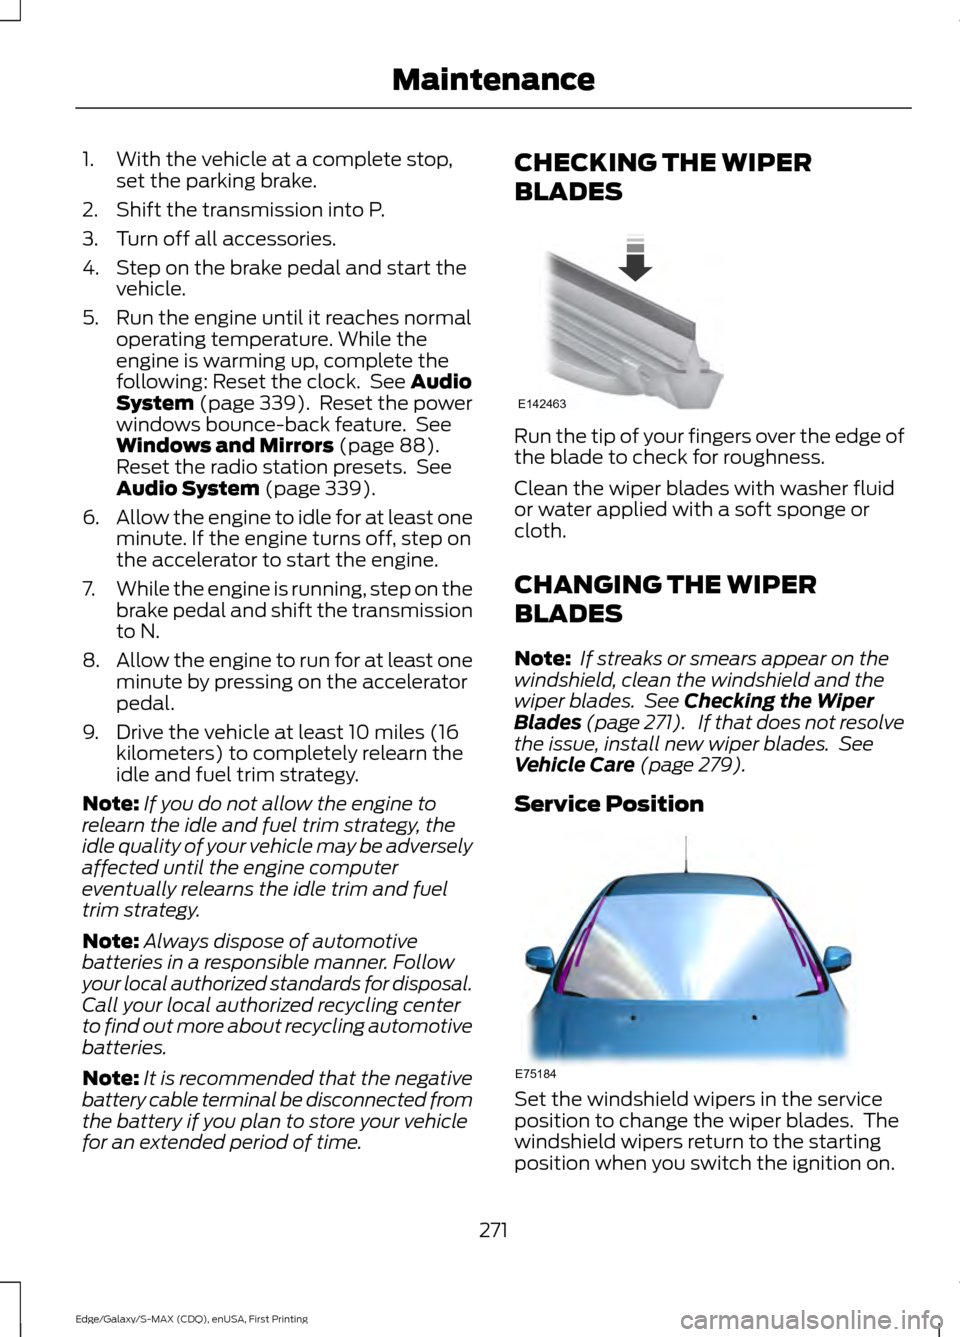
Service Position Set the windshield wipers in the service
position to change the wiper blades. The
windshield wipers return to the starting
position when you switch the ignition on.
271
Edge/Galaxy/S-MAX (CDQ), enUSA, First Printing MaintenanceE142463 E75184
Page 277 of 508
5. Locate the vertical adjuster on each
headlamp. Using a Phillips #2
screwdriver, turn the adjuster either
clockwise or counterclockwise in order
to adjust the vertical aim of the
headlamp. The horizontal edge of the
brighter light should touch the
horizontal reference line.
6. Close the hood and turn off the lamps.
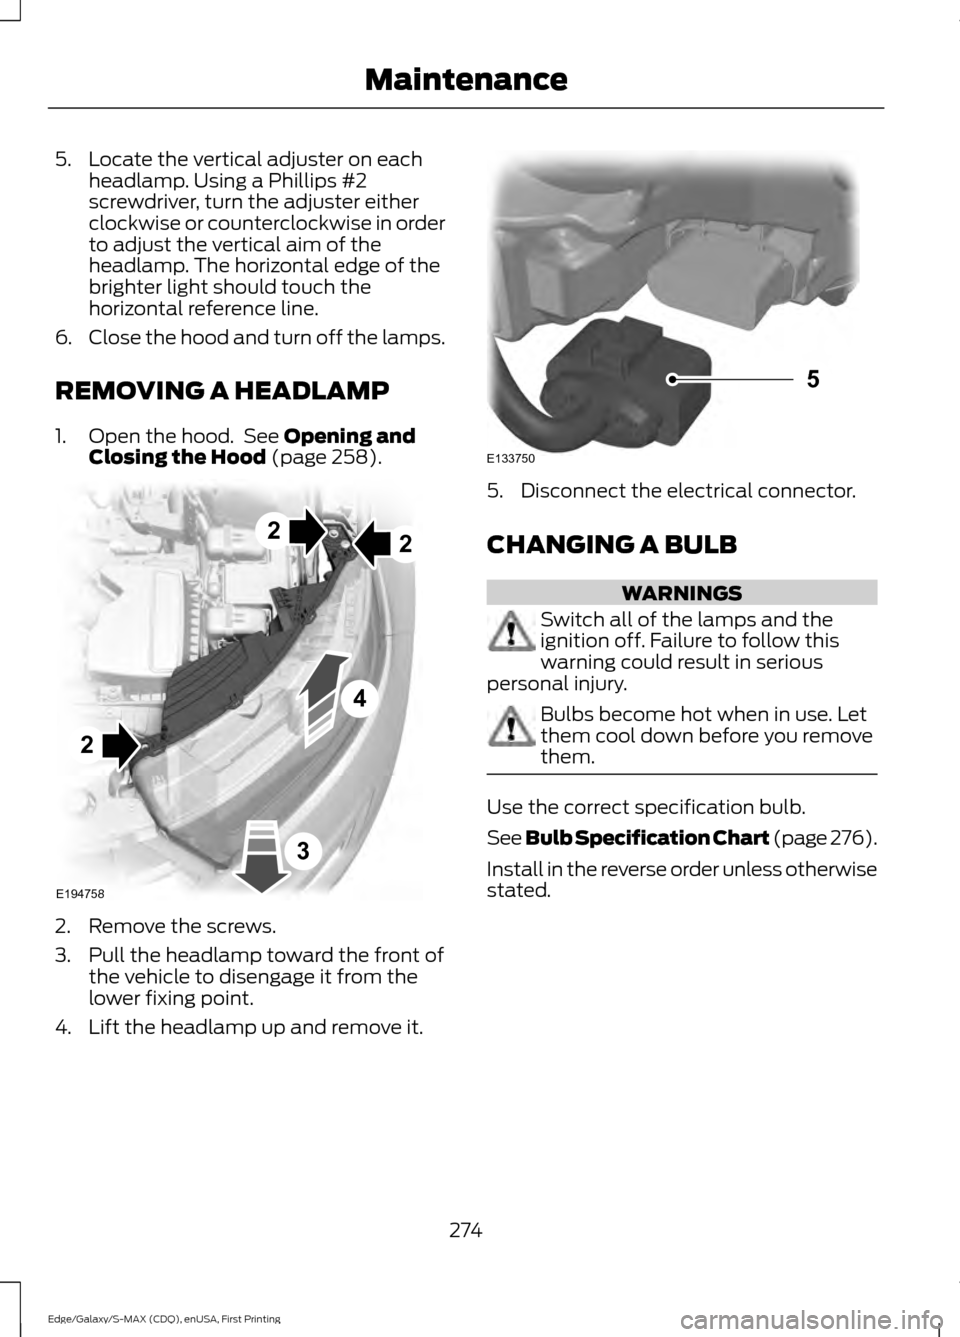
REMOVING A HEADLAMP
1. Open the hood. See Opening and
Closing the Hood (page 258). 2. Remove the screws.
3. Pull the headlamp toward the front of
the vehicle to disengage it from the
lower fixing point.
4. Lift the headlamp up and remove it. 5. Disconnect the electrical connector.
CHANGING A BULB
WARNINGS
Switch all of the lamps and the
ignition off. Failure to follow this
warning could result in serious
personal injury. Bulbs become hot when in use. Let
them cool down before you remove
them.
Use the correct specification bulb.
See Bulb Specification Chart (page 276).
Install in the reverse order unless otherwise
stated.
274
Edge/Galaxy/S-MAX (CDQ), enUSA, First Printing Maintenance2
2
E194758
2
4
3 E133750
5
Page 278 of 508
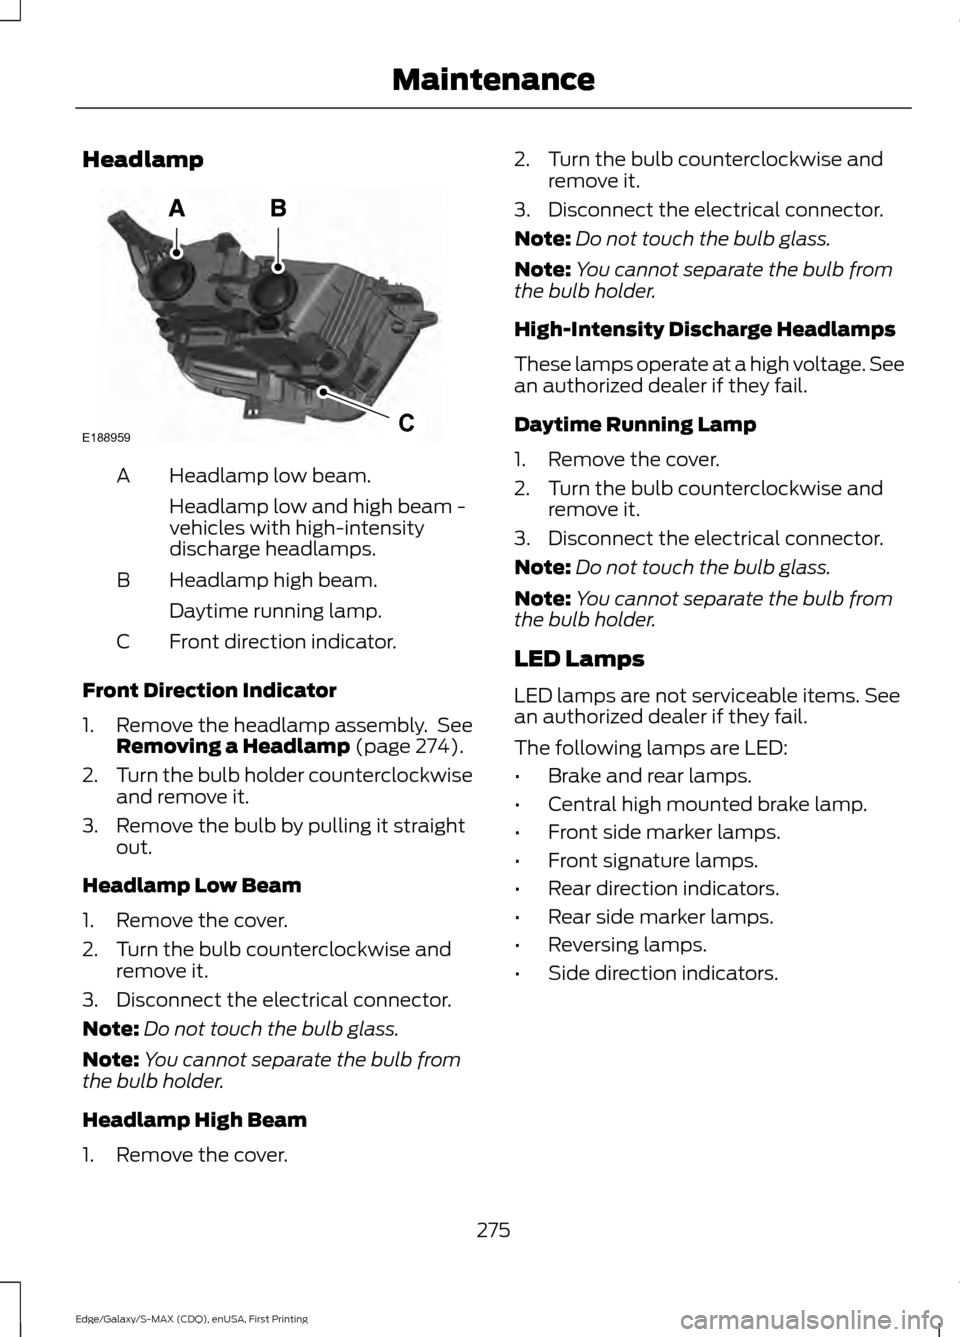
Headlamp
Headlamp low beam.
A
Headlamp low and high beam -
vehicles with high-intensity
discharge headlamps.
Headlamp high beam.
B
Daytime running lamp.
Front direction indicator.
C
Front Direction Indicator
1. Remove the headlamp assembly. See
Removing a Headlamp (page 274).
2. Turn the bulb holder counterclockwise
and remove it.
3. Remove the bulb by pulling it straight out.
Headlamp Low Beam
1. Remove the cover.
2. Turn the bulb counterclockwise and remove it.
3. Disconnect the electrical connector.
Note: Do not touch the bulb glass.
Note: You cannot separate the bulb from
the bulb holder.
Headlamp High Beam
1. Remove the cover. 2. Turn the bulb counterclockwise and
remove it.
3. Disconnect the electrical connector.
Note: Do not touch the bulb glass.
Note: You cannot separate the bulb from
the bulb holder.
High-Intensity Discharge Headlamps
These lamps operate at a high voltage. See
an authorized dealer if they fail.
Daytime Running Lamp
1. Remove the cover.
2. Turn the bulb counterclockwise and remove it.
3. Disconnect the electrical connector.
Note: Do not touch the bulb glass.
Note: You cannot separate the bulb from
the bulb holder.
LED Lamps
LED lamps are not serviceable items. See
an authorized dealer if they fail.
The following lamps are LED:
• Brake and rear lamps.
• Central high mounted brake lamp.
• Front side marker lamps.
• Front signature lamps.
• Rear direction indicators.
• Rear side marker lamps.
• Reversing lamps.
• Side direction indicators.
275
Edge/Galaxy/S-MAX (CDQ), enUSA, First Printing MaintenanceE188959C
Page 279 of 508
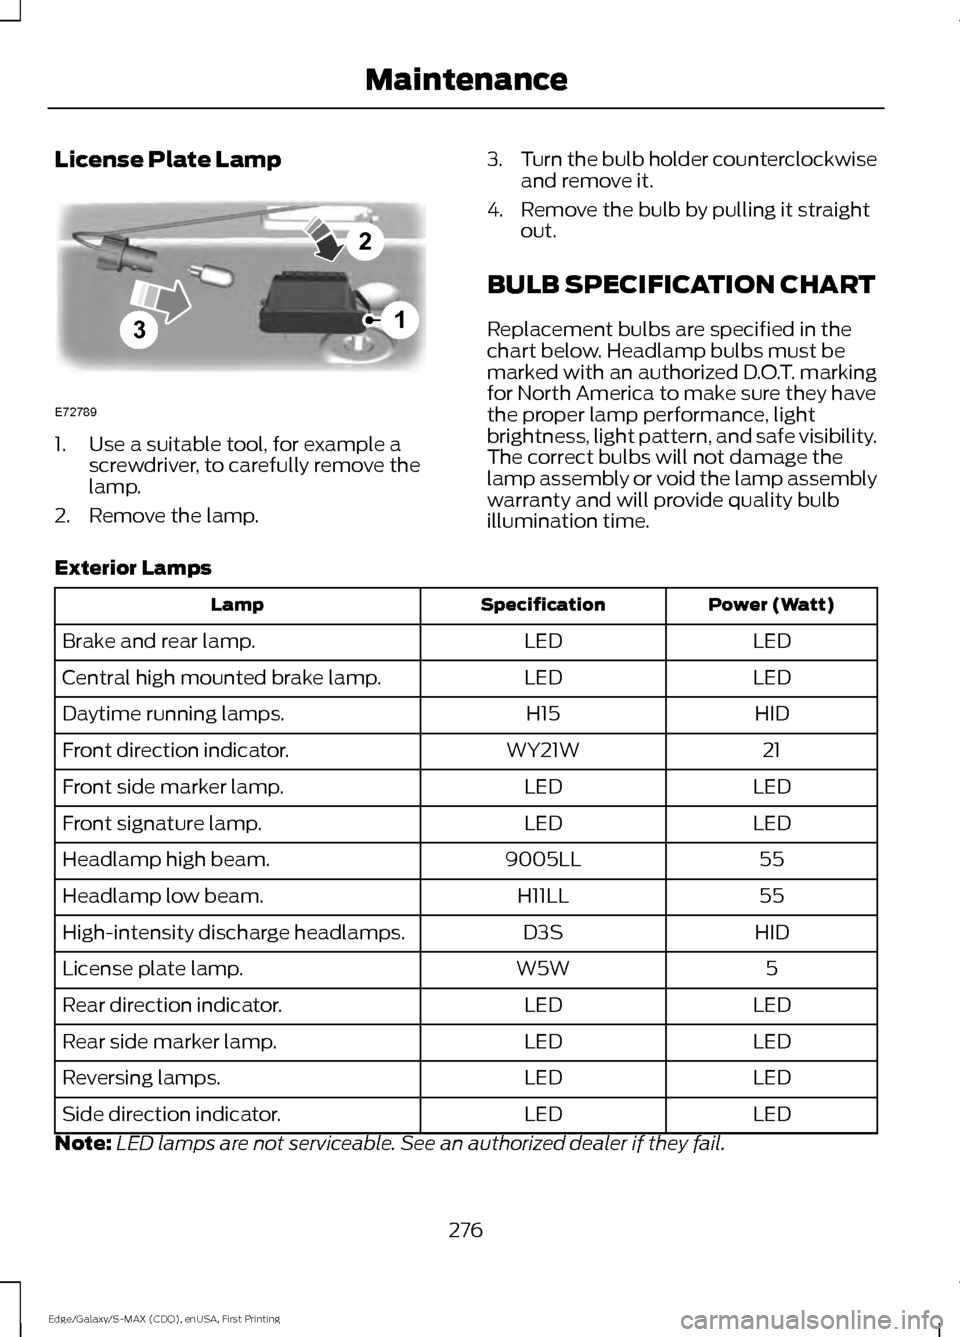
License Plate Lamp
1. Use a suitable tool, for example a
screwdriver, to carefully remove the
lamp.
2. Remove the lamp. 3.
Turn the bulb holder counterclockwise
and remove it.
4. Remove the bulb by pulling it straight out.
BULB SPECIFICATION CHART
Replacement bulbs are specified in the
chart below. Headlamp bulbs must be
marked with an authorized D.O.T. marking
for North America to make sure they have
the proper lamp performance, light
brightness, light pattern, and safe visibility.
The correct bulbs will not damage the
lamp assembly or void the lamp assembly
warranty and will provide quality bulb
illumination time.
Exterior Lamps Power (Watt)
Specification
Lamp
LED
LED
Brake and rear lamp.
LED
LED
Central high mounted brake lamp.
HID
H15
Daytime running lamps.
21
WY21W
Front direction indicator.
LED
LED
Front side marker lamp.
LED
LED
Front signature lamp.
55
9005LL
Headlamp high beam.
55
H11LL
Headlamp low beam.
HID
D3S
High-intensity discharge headlamps.
5
W5W
License plate lamp.
LED
LED
Rear direction indicator.
LED
LED
Rear side marker lamp.
LED
LED
Reversing lamps.
LED
LED
Side direction indicator.
Note: LED lamps are not serviceable. See an authorized dealer if they fail.
276
Edge/Galaxy/S-MAX (CDQ), enUSA, First Printing Maintenance3
2
1
E72789