set clock FORD EDGE 2015 2.G Owners Manual
[x] Cancel search | Manufacturer: FORD, Model Year: 2015, Model line: EDGE, Model: FORD EDGE 2015 2.GPages: 508, PDF Size: 6.2 MB
Page 266 of 508
WARNINGS
Only add oil when the engine is cold.
If the engine is hot, wait 10 minutes
for the engine to cool down.
Do not remove the filler cap when
the engine is running.
1. Remove the engine oil filler cap.
2. Add engine oil that meets Ford
specifications. See Maintenance
(page 258).
3. Wipe off any spilled oil.
4. Replace the engine oil filler cap. Turn it clockwise until you feel a strong
resistance.
Note: Do not add oil further than the
maximum mark. Oil levels above the
maximum mark may cause engine damage.
Note: Soak up any spillage with an
absorbent cloth immediately.
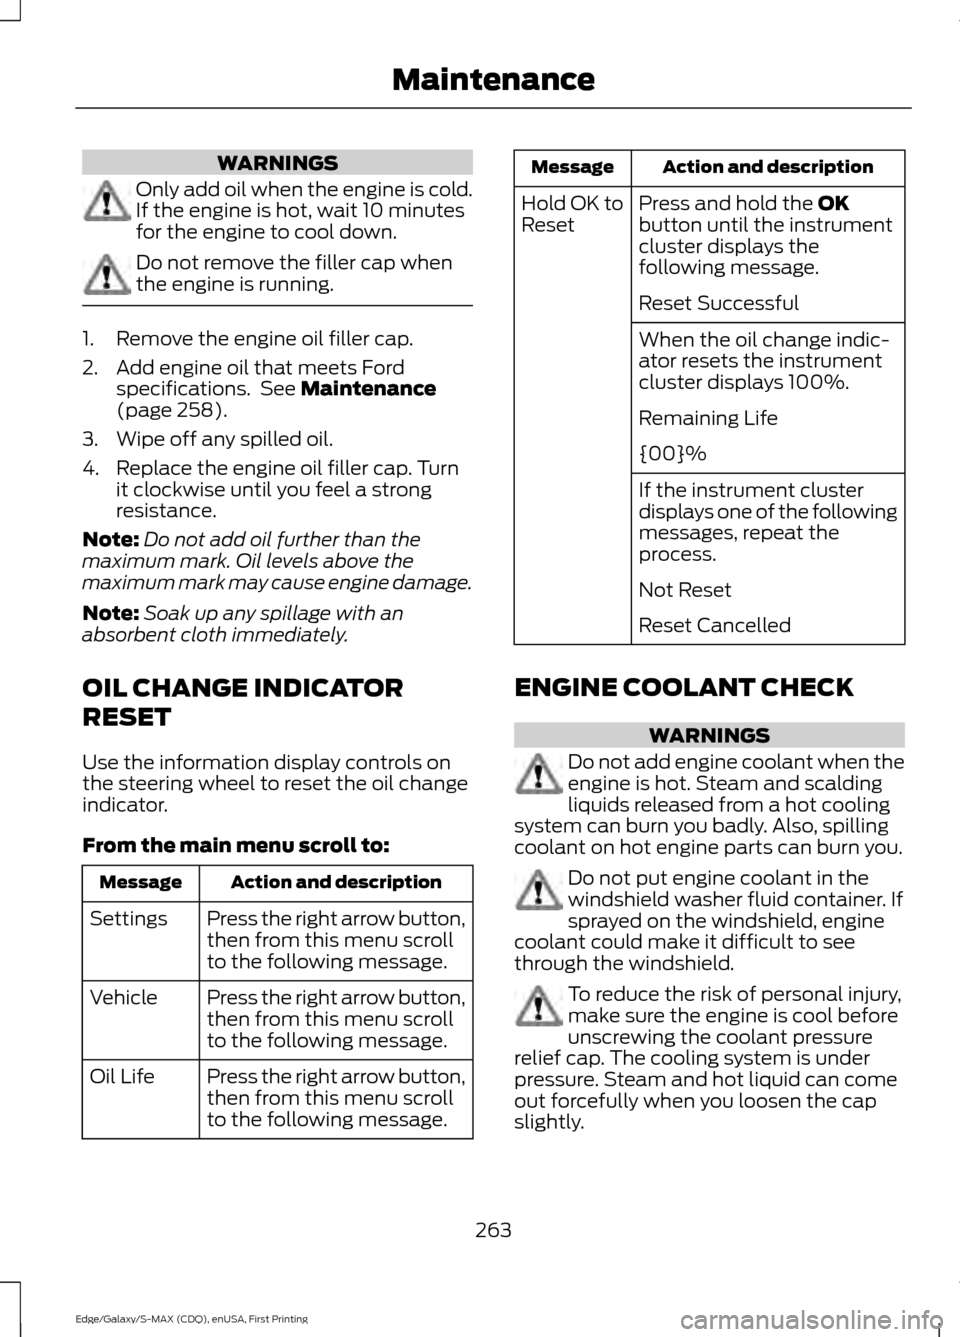
OIL CHANGE INDICATOR
RESET
Use the information display controls on
the steering wheel to reset the oil change
indicator.
From the main menu scroll to: Action and description
Message
Press the right arrow button,
then from this menu scroll
to the following message.
Settings
Press the right arrow button,
then from this menu scroll
to the following message.
Vehicle
Press the right arrow button,
then from this menu scroll
to the following message.
Oil Life Action and description
Message
Press and hold the
OK
button until the instrument
cluster displays the
following message.
Hold OK to
Reset
Reset Successful
When the oil change indic-
ator resets the instrument
cluster displays 100%.
Remaining Life
{00}%
If the instrument cluster
displays one of the following
messages, repeat the
process.
Not Reset
Reset Cancelled
ENGINE COOLANT CHECK WARNINGS
Do not add engine coolant when the
engine is hot. Steam and scalding
liquids released from a hot cooling
system can burn you badly. Also, spilling
coolant on hot engine parts can burn you. Do not put engine coolant in the
windshield washer fluid container. If
sprayed on the windshield, engine
coolant could make it difficult to see
through the windshield. To reduce the risk of personal injury,
make sure the engine is cool before
unscrewing the coolant pressure
relief cap. The cooling system is under
pressure. Steam and hot liquid can come
out forcefully when you loosen the cap
slightly.
263
Edge/Galaxy/S-MAX (CDQ), enUSA, First Printing Maintenance
Page 273 of 508
WARNINGS
When lifting a plastic-cased battery,
excessive pressure on the end walls
could cause acid to flow through the
vent caps, resulting in personal injury and
damage to the vehicle or battery. Lift the
battery with a battery carrier or with your
hands on opposite corners. Keep batteries out of reach of
children. Batteries contain sulfuric
acid. Avoid contact with skin, eyes or
clothing. Shield your eyes when working
near the battery to protect against possible
splashing of acid solution. In case of acid
contact with skin or eyes, flush
immediately with water for a minimum of
15 minutes and get prompt medical
attention. If acid is swallowed, call a
physician immediately. Battery posts, terminals and related
accessories contain lead and lead
compounds. Wash hands after
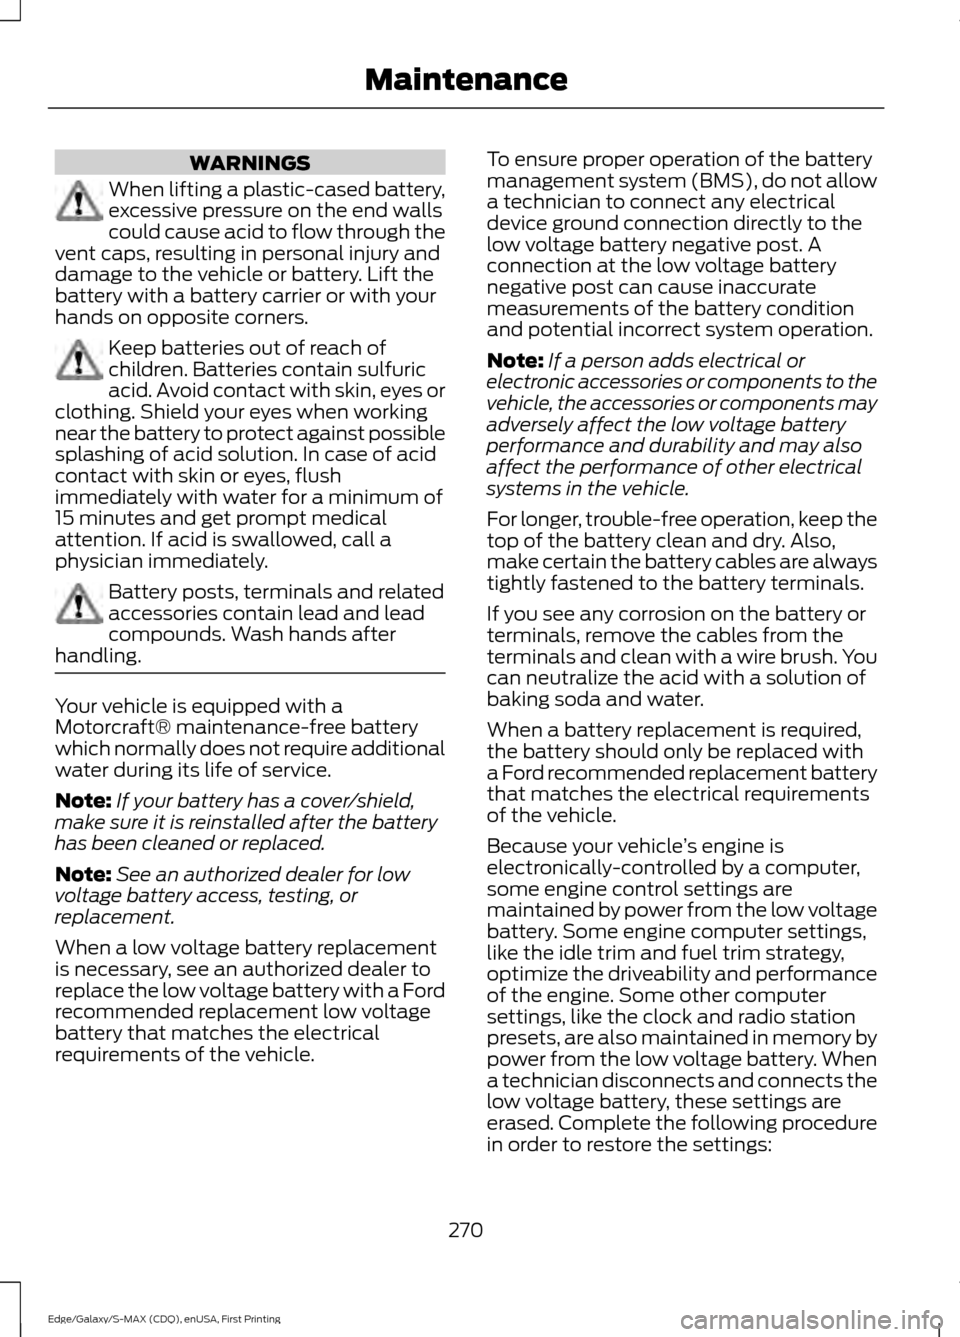
handling. Your vehicle is equipped with a
Motorcraft® maintenance-free battery
which normally does not require additional
water during its life of service.
Note:
If your battery has a cover/shield,
make sure it is reinstalled after the battery
has been cleaned or replaced.
Note: See an authorized dealer for low
voltage battery access, testing, or
replacement.
When a low voltage battery replacement
is necessary, see an authorized dealer to
replace the low voltage battery with a Ford
recommended replacement low voltage
battery that matches the electrical
requirements of the vehicle. To ensure proper operation of the battery
management system (BMS), do not allow
a technician to connect any electrical
device ground connection directly to the
low voltage battery negative post. A
connection at the low voltage battery
negative post can cause inaccurate
measurements of the battery condition
and potential incorrect system operation.
Note:
If a person adds electrical or
electronic accessories or components to the
vehicle, the accessories or components may
adversely affect the low voltage battery
performance and durability and may also
affect the performance of other electrical
systems in the vehicle.
For longer, trouble-free operation, keep the
top of the battery clean and dry. Also,
make certain the battery cables are always
tightly fastened to the battery terminals.
If you see any corrosion on the battery or
terminals, remove the cables from the
terminals and clean with a wire brush. You
can neutralize the acid with a solution of
baking soda and water.
When a battery replacement is required,
the battery should only be replaced with
a Ford recommended replacement battery
that matches the electrical requirements
of the vehicle.
Because your vehicle ’s engine is
electronically-controlled by a computer,
some engine control settings are
maintained by power from the low voltage
battery. Some engine computer settings,
like the idle trim and fuel trim strategy,
optimize the driveability and performance
of the engine. Some other computer
settings, like the clock and radio station
presets, are also maintained in memory by
power from the low voltage battery. When
a technician disconnects and connects the
low voltage battery, these settings are
erased. Complete the following procedure
in order to restore the settings:
270
Edge/Galaxy/S-MAX (CDQ), enUSA, First Printing Maintenance
Page 274 of 508
1. With the vehicle at a complete stop,
set the parking brake.
2. Shift the transmission into P.
3. Turn off all accessories.
4. Step on the brake pedal and start the vehicle.
5. Run the engine until it reaches normal operating temperature. While the
engine is warming up, complete the
following: Reset the clock. See Audio
System (page 339). Reset the power
windows bounce-back feature. See
Windows and Mirrors
(page 88).
Reset the radio station presets. See
Audio System
(page 339).
6. Allow the engine to idle for at least one
minute. If the engine turns off, step on
the accelerator to start the engine.
7. While the engine is running, step on the
brake pedal and shift the transmission
to N.
8. Allow the engine to run for at least one
minute by pressing on the accelerator
pedal.
9. Drive the vehicle at least 10 miles (16 kilometers) to completely relearn the
idle and fuel trim strategy.
Note: If you do not allow the engine to
relearn the idle and fuel trim strategy, the
idle quality of your vehicle may be adversely
affected until the engine computer
eventually relearns the idle trim and fuel
trim strategy.
Note: Always dispose of automotive
batteries in a responsible manner. Follow
your local authorized standards for disposal.
Call your local authorized recycling center
to find out more about recycling automotive
batteries.
Note: It is recommended that the negative
battery cable terminal be disconnected from
the battery if you plan to store your vehicle
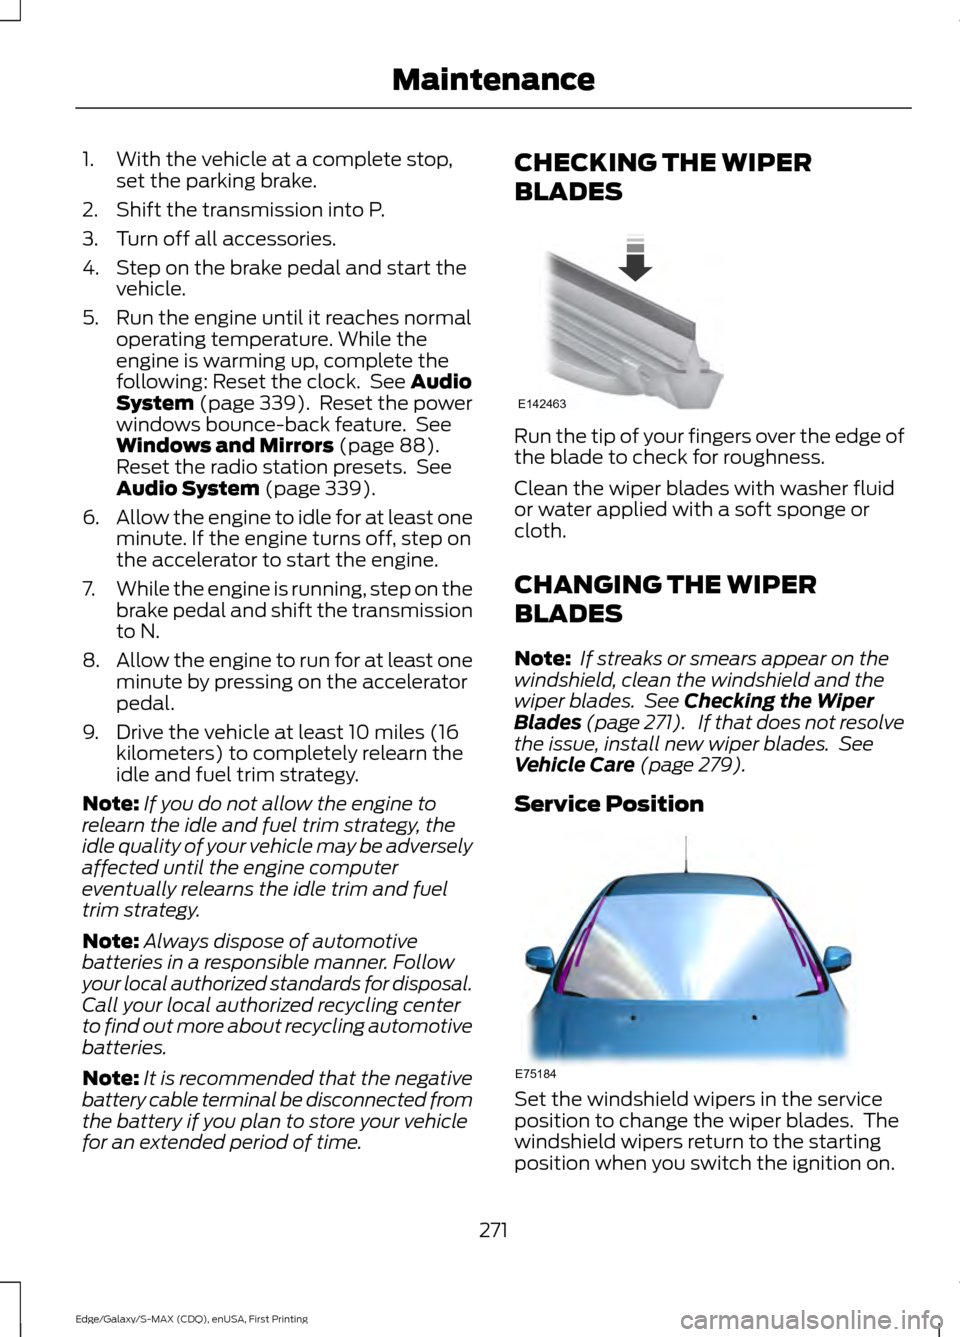
for an extended period of time. CHECKING THE WIPER
BLADES
Run the tip of your fingers over the edge of
the blade to check for roughness.
Clean the wiper blades with washer fluid
or water applied with a soft sponge or
cloth.
CHANGING THE WIPER
BLADES
Note:
If streaks or smears appear on the
windshield, clean the windshield and the
wiper blades. See
Checking the Wiper
Blades (page 271). If that does not resolve
the issue, install new wiper blades. See
Vehicle Care
(page 279).
Service Position Set the windshield wipers in the service
position to change the wiper blades. The
windshield wipers return to the starting
position when you switch the ignition on.
271
Edge/Galaxy/S-MAX (CDQ), enUSA, First Printing MaintenanceE142463 E75184
Page 320 of 508
WARNINGS
Never get underneath a vehicle that
is supported only by a jack. If your
vehicle slips off the jack, you or
someone else could be seriously injured. Do not attempt to change a tire on
the side of the vehicle close to
moving traffic. Pull far enough off the
road to avoid the danger of being hit when
operating the jack or changing the wheel. Always use the jack provided as
original equipment with your vehicle.
If using a jack other than the one
provided as original equipment with your
vehicle, make sure the jack capacity is
adequate for the vehicle weight, including
any vehicle cargo or modifications. Note:
Passengers should not remain in your
vehicle when the vehicle is being jacked.
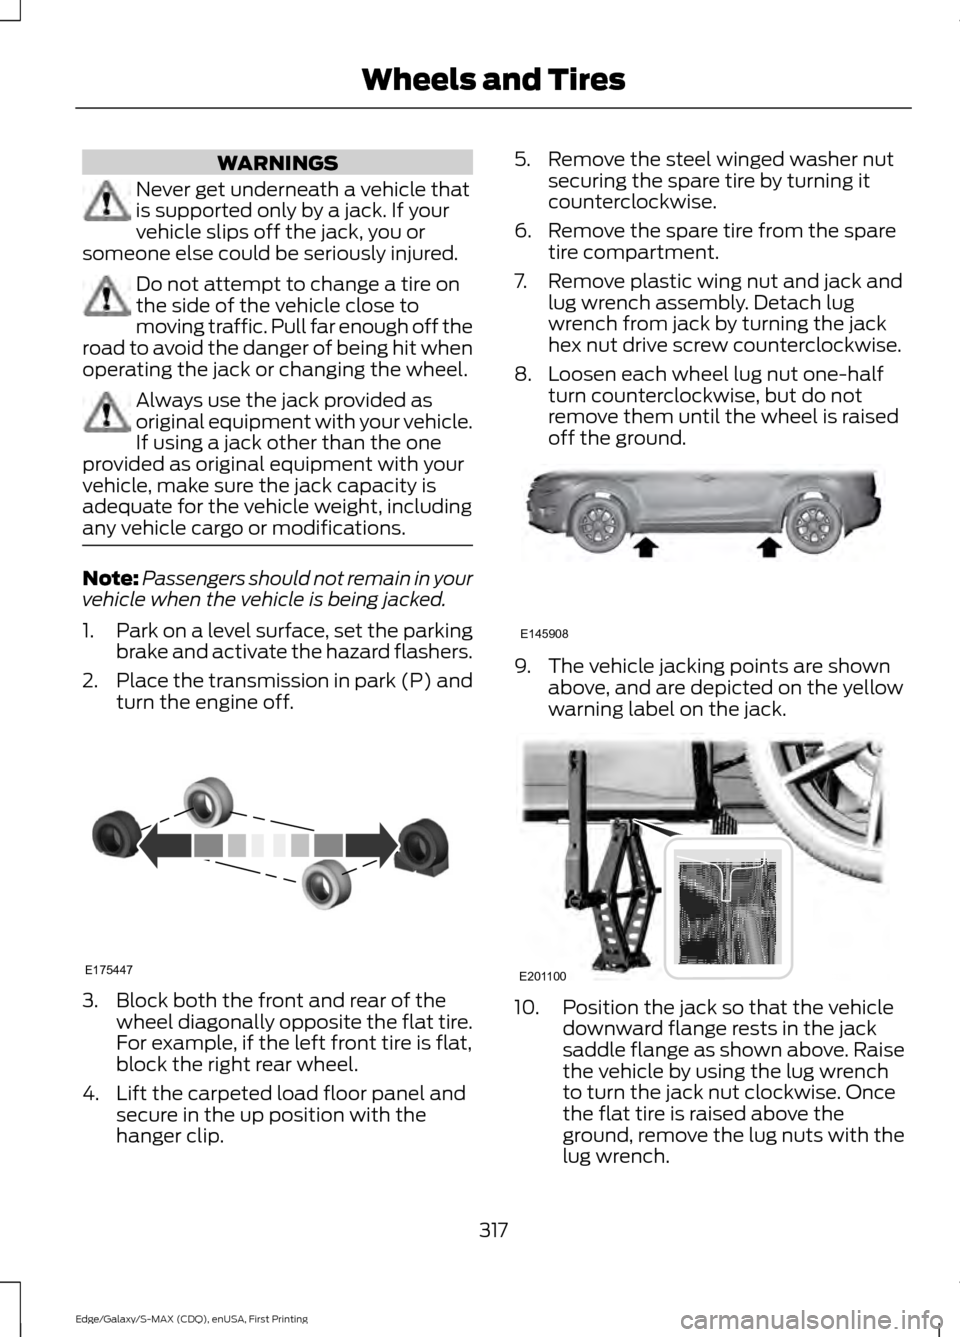
1. Park on a level surface, set the parking
brake and activate the hazard flashers.
2. Place the transmission in park (P) and
turn the engine off. 3. Block both the front and rear of the
wheel diagonally opposite the flat tire.
For example, if the left front tire is flat,
block the right rear wheel.
4. Lift the carpeted load floor panel and secure in the up position with the
hanger clip. 5. Remove the steel winged washer nut
securing the spare tire by turning it
counterclockwise.
6. Remove the spare tire from the spare tire compartment.
7. Remove plastic wing nut and jack and lug wrench assembly. Detach lug
wrench from jack by turning the jack
hex nut drive screw counterclockwise.
8. Loosen each wheel lug nut one-half turn counterclockwise, but do not
remove them until the wheel is raised
off the ground. 9. The vehicle jacking points are shown
above, and are depicted on the yellow
warning label on the jack. 10. Position the jack so that the vehicle
downward flange rests in the jack
saddle flange as shown above. Raise
the vehicle by using the lug wrench
to turn the jack nut clockwise. Once
the flat tire is raised above the
ground, remove the lug nuts with the
lug wrench.
317
Edge/Galaxy/S-MAX (CDQ), enUSA, First Printing Wheels and TiresE175447 E145908 E201100
Page 345 of 508
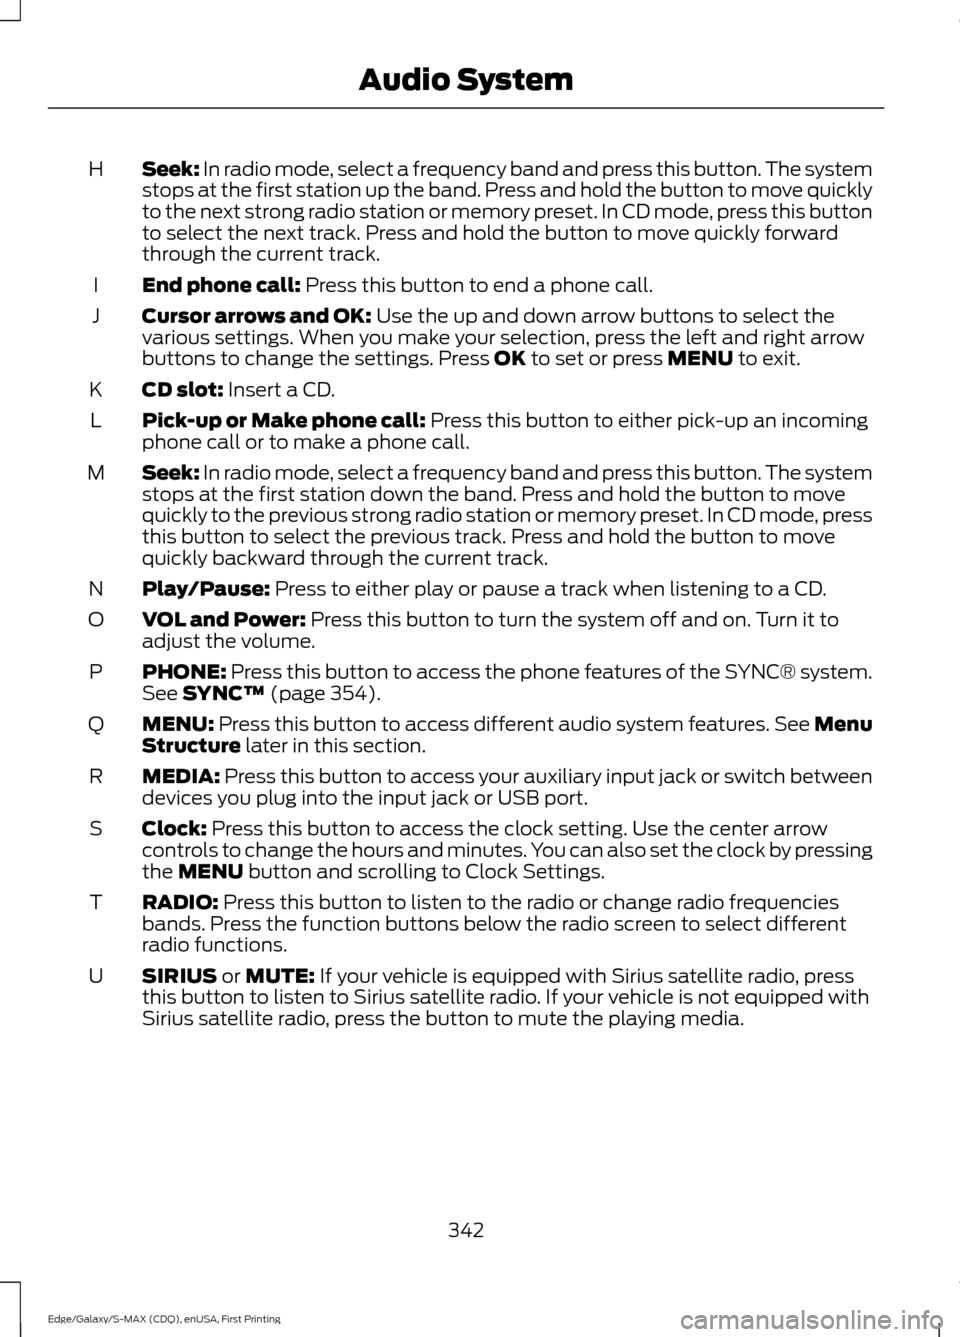
Seek: In radio mode, select a frequency band and press this button. The system
stops at the first station up the band. Press and hold the button to move quickly
to the next strong radio station or memory preset. In CD mode, press this button
to select the next track. Press and hold the button to move quickly forward
through the current track.
H
End phone call:
Press this button to end a phone call.
I
Cursor arrows and OK:
Use the up and down arrow buttons to select the
various settings. When you make your selection, press the left and right arrow
buttons to change the settings. Press
OK to set or press MENU to exit.
J
CD slot:
Insert a CD.
K
Pick-up or Make phone call:
Press this button to either pick-up an incoming
phone call or to make a phone call.
L
Seek:
In radio mode, select a frequency band and press this button. The system
stops at the first station down the band. Press and hold the button to move
quickly to the previous strong radio station or memory preset. In CD mode, press
this button to select the previous track. Press and hold the button to move
quickly backward through the current track.
M
Play/Pause:
Press to either play or pause a track when listening to a CD.
N
VOL and Power:
Press this button to turn the system off and on. Turn it to
adjust the volume.
O
PHONE:
Press this button to access the phone features of the SYNC® system.
See SYNC™ (page 354).
P
MENU:
Press this button to access different audio system features. See Menu
Structure later in this section.
Q
MEDIA:
Press this button to access your auxiliary input jack or switch between
devices you plug into the input jack or USB port.
R
Clock:
Press this button to access the clock setting. Use the center arrow
controls to change the hours and minutes. You can also set the clock by pressing
the
MENU button and scrolling to Clock Settings.
S
RADIO:
Press this button to listen to the radio or change radio frequencies
bands. Press the function buttons below the radio screen to select different
radio functions.
T
SIRIUS
or MUTE: If your vehicle is equipped with Sirius satellite radio, press
this button to listen to Sirius satellite radio. If your vehicle is not equipped with
Sirius satellite radio, press the button to mute the playing media.
U
342
Edge/Galaxy/S-MAX (CDQ), enUSA, First Printing Audio System
Page 349 of 508
Radio
Select for a brief sampling of all available channels.
Scan
Select to store the six strongest local stations on the AM-
AST and FM-AST frequency bands.
AST
Select to display extra information such as artist name.
Radio Text *
* Extra information may not always be available. Audio Settings
Automatically adjusts the volume to compensate for
speed and wind noise. You can set the system between
0 and +7.
Speed Compensated
Volume
Select to adjust settings for Treble, Midrange, Bass, Fade
and Balance.
Sound
Select to optimize sound quality for the chosen seating
position.
Occupancy Mode
Choose between STEREO SURROUND mode and STEREO
mode. Only with the external sound systems.
DSP CD Settings
Select to scan all disc selections.
Scan All
Select to scan all music in the current MP3 folder.
Scan Folder Clock Settings
Select to set the time.
Set Time
Select to set the calendar date.
Set Date
Select to view clock time in a 12-hour mode or 24-hour
mode.
24h Mode
346
Edge/Galaxy/S-MAX (CDQ), enUSA, First Printing Audio System
Page 392 of 508
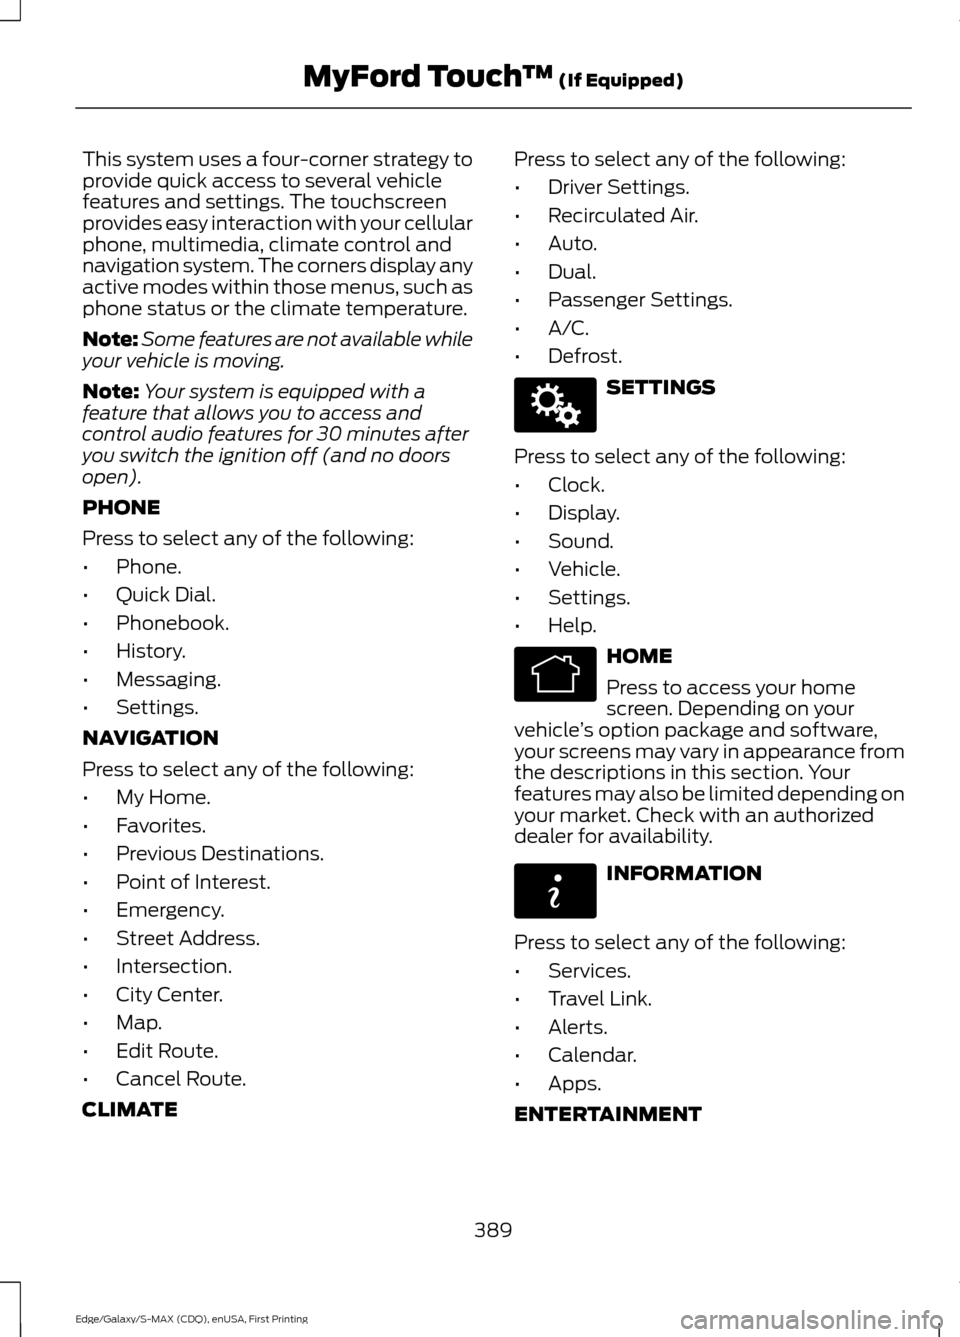
This system uses a four-corner strategy to
provide quick access to several vehicle
features and settings. The touchscreen
provides easy interaction with your cellular
phone, multimedia, climate control and
navigation system. The corners display any
active modes within those menus, such as
phone status or the climate temperature.
Note:
Some features are not available while
your vehicle is moving.
Note: Your system is equipped with a
feature that allows you to access and
control audio features for 30 minutes after
you switch the ignition off (and no doors
open).
PHONE
Press to select any of the following:
• Phone.
• Quick Dial.
• Phonebook.
• History.
• Messaging.
• Settings.
NAVIGATION
Press to select any of the following:
• My Home.
• Favorites.
• Previous Destinations.
• Point of Interest.
• Emergency.
• Street Address.
• Intersection.
• City Center.
• Map.
• Edit Route.
• Cancel Route.
CLIMATE Press to select any of the following:
•
Driver Settings.
• Recirculated Air.
• Auto.
• Dual.
• Passenger Settings.
• A/C.
• Defrost. SETTINGS
Press to select any of the following:
• Clock.
• Display.
• Sound.
• Vehicle.
• Settings.
• Help. HOME
Press to access your home
screen. Depending on your
vehicle ’s option package and software,
your screens may vary in appearance from
the descriptions in this section. Your
features may also be limited depending on
your market. Check with an authorized
dealer for availability. INFORMATION
Press to select any of the following:
• Services.
• Travel Link.
• Alerts.
• Calendar.
• Apps.
ENTERTAINMENT
389
Edge/Galaxy/S-MAX (CDQ), enUSA, First Printing MyFord Touch
™ (If Equipped)E142607 E142613 E142608
Page 400 of 508
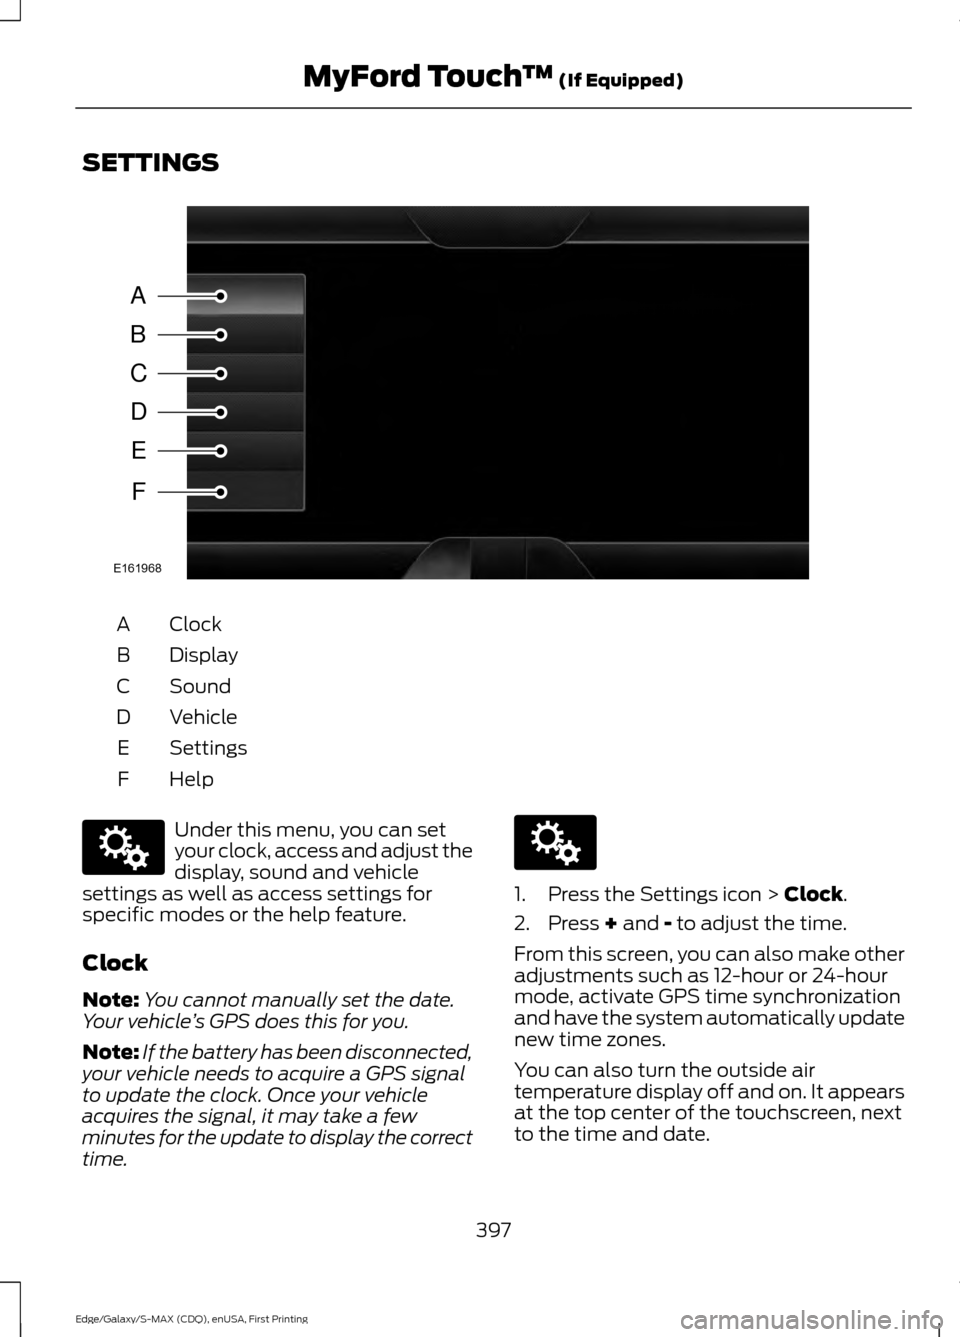
SETTINGS
Clock
A
Display
B
Sound
C
Vehicle
D
Settings
E
HelpF Under this menu, you can set
your clock, access and adjust the
display, sound and vehicle
settings as well as access settings for
specific modes or the help feature.
Clock
Note: You cannot manually set the date.
Your vehicle ’s GPS does this for you.
Note: If the battery has been disconnected,
your vehicle needs to acquire a GPS signal
to update the clock. Once your vehicle
acquires the signal, it may take a few
minutes for the update to display the correct
time. 1. Press the Settings icon > Clock.
2. Press
+ and - to adjust the time.
From this screen, you can also make other
adjustments such as 12-hour or 24-hour
mode, activate GPS time synchronization
and have the system automatically update
new time zones.
You can also turn the outside air
temperature display off and on. It appears
at the top center of the touchscreen, next
to the time and date.
397
Edge/Galaxy/S-MAX (CDQ), enUSA, First Printing MyFord Touch
™
(If Equipped)A
B
C
D
E
F
E161968 E142607 E142607
Page 444 of 508
Note: To prevent window fogging, you cannot select recirculated air when MAX
Defrost is on.
Driver settings:
K
Touch the
+ or – to increase or decrease the air temperature on the driver side
of the vehicle.
Touch the heated seat icon to switch the heated seat off and on (if equipped).
Touch the climate-controlled seat icon to switch the climate-controlled seat
off and on (if equipped).
Touch
MyTemp to select your preset temperature setpoint. Touch and hold
MyTemp to save a new preset temperature setpoint.
Touch the heated steering wheel icon to switch the heated steering wheel on
and off (if equipped).
Note: If your vehicle is equipped with a
wood-trimmed steering wheel, it does not
heat between the 10 o'clock and 2 o'clock
positions.
Climate Control Voice Commands
Note: The fan speed automatically
decreases when you start a voice command
session or phone call through SYNC. This
feature is dependent on the current climate
control settings and helps to reduce the
background noise in the vehicle. The fan
speed returns to normal when the voice
session ends. You can adjust the fan speed
manually during this time by using the fan
button or knob to reach the desired setting.
To disable or enable automatic fan speed,
press and hold the
AC and Recirculated air
buttons at the same time. Release the
buttons and immediately increase the fan
speed. Press the voice button on the
steering wheel controls. When
prompted, say any of the
following commands: Climate Control Commands
"Climate automatic"
"Climate my temperature" "Climate off""Climate on"
"Climate temperature <15.5-29.5> degrees"
"Climate temperature <60-85> degrees" "Help"
There are additional climate control
commands but in order to access them,
you have to say "Climate" first. When the
system is ready to listen, you may say any
of the following commands: "CLIMATE"
"A/C off""A/C on"
"Automatic"
"Defrost off"
441
Edge/Galaxy/S-MAX (CDQ), enUSA, First Printing MyFord Touch
™
(If Equipped)E142599
Page 505 of 508
Refueling.........................................................160
Easy Fuel ™ Capless Fuel System.................161
Remote Control...............................................47 Car Finder................................................................. 51
Integrated Keyhead Transmitters .................. 47
Intelligent Access Key........................................ 48
Remote Start ......................................................... 51
Replacing the Battery......................................... 49
Sounding a Panic Alarm..................................... 51
Using the Key Blade............................................ 48
Remote Start...................................................131
Automatic Settings............................................ 132
Removing a Headlamp..............................274
Repairing Minor Paint Damage..............283
Replacement Parts Recommendation.........................................11
Collision Repairs..................................................... 11
Scheduled Maintenance and Mechanical Repairs................................................................... 11
Warranty on Replacement Parts..................... 12
Replacing a Lost Key or Remote Control.............................................................53
Reporting Safety Defects (Canada Only)..............................................................247
Reporting Safety Defects (U.S. Only)..............................................................246
Roadside Assistance...................................237 Vehicles Sold in Canada: Getting Roadside
Assistance........................................................ 237
Vehicles Sold in Canada: Using Roadside Assistance........................................................ 237
Vehicles Sold in the United States: Getting Roadside Assistance.................................... 237
Vehicles Sold in the United States: Using Roadside Assistance.................................... 237
Roadside Emergencies
..............................237
Roof Racks and Load Carriers..................217
Running-In See: Breaking-In................................................. 234
Running Out of Fuel....................................159 Adding Fuel From a Portable Fuel
Container.......................................................... 160
Filling a Portable Fuel Container.................. 160
S
Safety Belt Height Adjustment
.................34 Safety Belt Minder
.........................................35
Belt-Minder™........................................................ 35
Safety Belts
......................................................29
Principle of Operation........................................ 29
Safety Belt Warning Lamp and Indicator Chime..............................................................34
Conditions of operation..................................... 34
Safety Canopy ™
............................................44
Safety Precautions......................................158
Satellite Radio..............................................349 Satellite Radio Electronic Serial Number
(ESN)................................................................ 350
Satellite Radio Reception Factors..............350
SIRIUS® Satellite Radio Service.................350
Troubleshooting.................................................. 351
Scheduled Maintenance Record
...........463
Scheduled Maintenance...........................455
Seats..................................................................133
Security
................................................................71
Settings............................................................397 Clock....................................................................... 397
Display................................................................... 398
Settings................................................................ 400
Sound.................................................................... 398
Vehicle................................................................... 399
Side Airbags.....................................................42
Side Sensing System..................................185 Obstacle Distance Indicator.......................... 186
Sitting in the Correct Position..................133
Snow Chains See: Using Snow Chains................................... 311
Special Notices................................................12 New Vehicle Limited Warranty......................... 12
On-board Diagnostics (OBD-II)....................... 12
Special Instructions.............................................. 12
Special Operating Conditions Scheduled Maintenance...............................................461
Exceptions............................................................ 463
Speed Control See: Cruise Control............................................ 196
Stability Control
.............................................181
Principle of Operation........................................ 181
Starter Switch See: Ignition Switch........................................... 150
502
Edge/Galaxy/S-MAX (CDQ), enUSA, First Printing Index