light FORD EDGE 2015 2.G Quick Reference Guide
[x] Cancel search | Manufacturer: FORD, Model Year: 2015, Model line: EDGE, Model: FORD EDGE 2015 2.GPages: 10, PDF Size: 4.54 MB
Page 3 of 10
INSTRUMENT PANEL
61
2
2
4
5
5
7
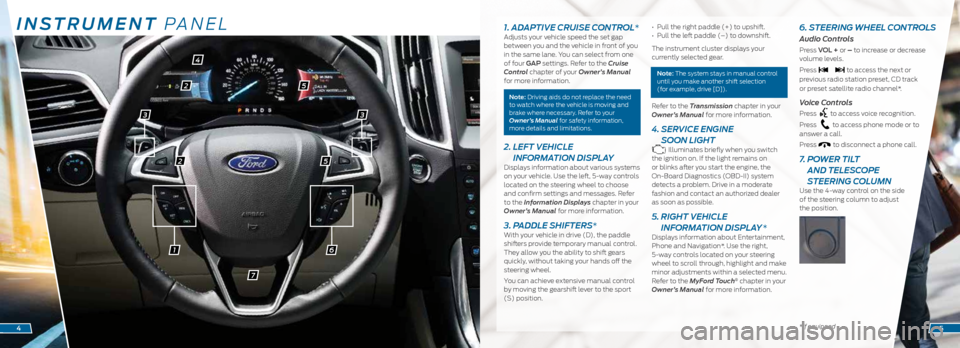
1. ADAPTIVE CRUISE CONTROL*Adjusts your vehicle speed the set gap
between you and the vehicle in front of you
in the same lane. You can select from one
of four GAP settings. Refer to the Cruise
Control chapter of your Owner’s Manual
for more information.
Note: Driving aids do not replace the need
to watch where the vehicle is moving and
brake where necessary. Refer to your
Owner’s Manual for safety information,
more details and limitations.
2. LEFT VEHICLE
INFORMATION DISPLAY
Displays information about various systems
on your vehicle. Use the left, 5-way controls
located on the steering wheel to choose
and confirm settings and messages. Refer
to the Information Displays chapter in your
Owner’s Manual for more information.
3. PADDLE SHIFTERS*With your vehicle in drive (D), the paddle
shifters provide temporary manual control.
They allow you the ability to shift gears
quickly, without taking your hands off the
steering wheel.
You can achieve extensive manual control
by moving the gearshift lever to the sport
(S) position. • Pull the right paddle (+) to upshift.
•
Pull the left paddle (–) to downshift.
The instrument cluster displays your
currently selected gear.
Note: The system stays in manual control
until you make another shift selection
(for example, drive [D]).
Refer to the Transmission chapter in your
Owner’s Manual for more information.
4. SERVICE ENGINE
SOON LIGHT
Illuminates briefly when you switch
the ignition on. If the light remains on
or blinks after you start the engine, the
On-Board Diagnostics (OBD-II) system
detects a problem. Drive in a moderate
fashion and contact an authorized dealer
as soon as possible.
5. RIGHT VEHICLE
INFORMATION DISPLAY *
Displays information about Entertainment,
Phone and Navigation*. Use the right,
5-way controls located on your steering
wheel to scroll through, highlight and make
minor adjustments within a selected menu.
Refer to the MyFord Touch
® chapter in your
Owner’s Manual for more information.
6. STEERING WHEEL CONTROLS
Audio Controls
Press VOL + or – to increase or decrease
volume levels.
Press
to access the next or
previous radio station preset, CD track
or preset satellite radio channel*.
Voice Controls
Press to access voice recognition.
Press
to access phone mode or to
answer a call.
Press
to disconnect a phone call.
7. POWER TILT
AND TELESCOPE
STEERING COLUMN
Use the 4-way control on the side
of the steering column to adjust
the position.
*if equipped45
33
Page 4 of 10
INSTRUMENT PANEL
98
10
11*if equipped6
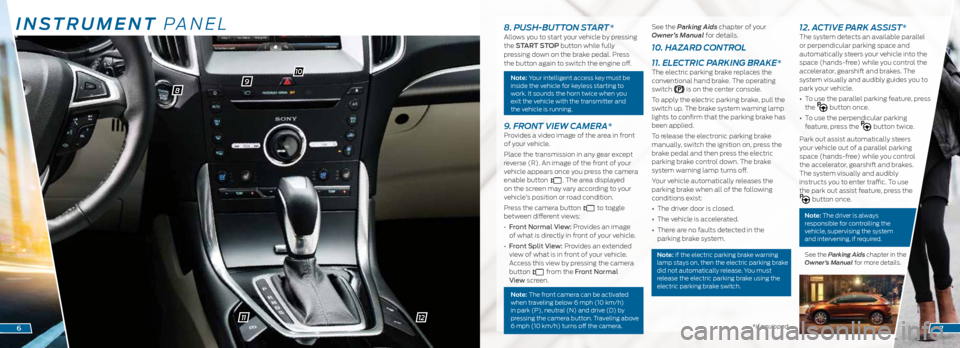
8. PUSH-BUTTON START *Allows you to start your vehicle by pressing
the START STOP button while fully
pressing down on the brake pedal. Press
the button again to switch the engine off.
Note: Your intelligent access key must be
inside the vehicle for keyless starting to
work. It sounds the horn twice when you
exit the vehicle with the transmitter and
the vehicle is running.
9. FRONT VIEW CAMERA*Provides a video image of the area in front
of your vehicle.
Place the transmission in any gear except
reverse (R). An image of the front of your
vehicle appears once you press the camera
enable button
. The area displayed
on the screen may vary according to your
vehicle’s position or road condition.
Press the camera button
to toggle
between different views:
• Front Normal View: Provides an image
of what is directly in front of your vehicle.
• Front Split View: Provides an extended
view of what is in front of your vehicle.
Access this view by pressing the camera
button
from the Front Normal
View screen.
Note: The front camera can be activated
when traveling below 6 mph (10 km/h)
in park (P), neutral (N) and drive (D) by
pressing the camera button. Traveling above
6 mph (10 km/h) turns off the camera.
See the Parking Aids chapter of your
Owner’s Manual for details.
10. HAZARD CONTROL
11. ELECTRIC PARKING BRAKE*
The electric parking brake replaces the
conventional hand brake. The operating
switch
is on the center console.
To apply the electric parking brake, pull the
switch up. The brake system warning lamp
lights to confirm that the parking brake has
been applied.
To release the electronic parking brake
manually, switch the ignition on, press the
brake pedal and then press the electric
parking brake control down. The brake
system warning lamp turns off.
Your vehicle automatically releases the
parking brake when all of the following
conditions exist:
• The driver door is closed.
• The vehicle is accelerated.
• There are no faults detected in the
parking brake system.
Note: If the electric parking brake warning
lamp stays on, then the electric parking brake
did not automatically release. You must
release the electric parking brake using the
electric parking brake switch.
12. ACTIVE PARK ASSIST*The system detects an available parallel
or perpendicular parking space and
automatically steers your vehicle into the
space (hands-free) while you control the
accelerator, gearshift and brakes. The
system visually and audibly guides you to
park your vehicle.
• To use the parallel parking feature, press
the
button once.
• To use the perpendicular parking
feature, press the
button twice.
Park out assist automatically steers
your vehicle out of a parallel parking
space (hands-free) while you control
the accelerator, gearshift and brakes.
The system visually and audibly
instructs you to enter traffic. To use
the park out assist feature, press the
button once.
Note: The driver is always
responsible for controlling the
vehicle, supervising the system
and intervening, if required.
See the Parking Aids chapter in the
Owner’s Manual for more details.
7
12
Page 7 of 10
CLIMATE
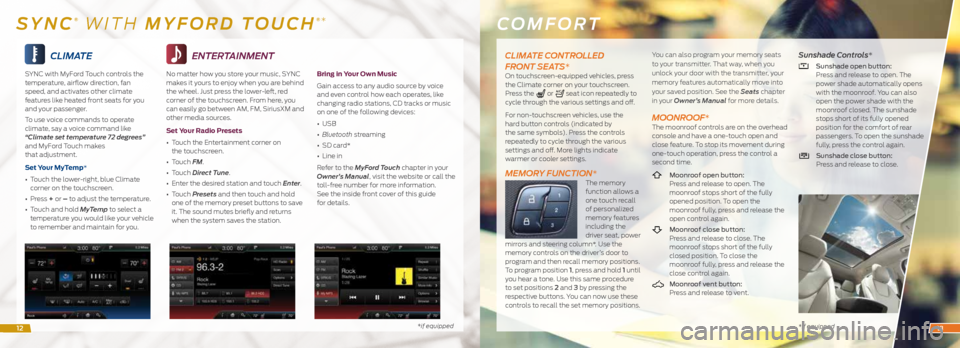
SYNC with MyFord Touch controls the
temperature, airflow direction, fan
speed, and activates other climate
features like heated front seats for you
and your passenger.
To use voice commands to operate
climate, say a voice command like
“Climate set temperature 72 degrees”
and MyFord Touch makes
that adjustment.
Set Your MyTemp*
• Touch the lower-right, blue Climate
corner on the touchscreen.
• Press + or – to adjust the temperature.
• Touch and hold MyTemp to select a
temperature you would like your vehicle
to remember and maintain for you.
*if equipped
ENTERTAINMENT
No matter how you store your music, SYNC
makes it yours to enjoy when you are behind
the wheel. Just press the lower-left, red
corner of the touchscreen. From here, you
can easily go between AM, FM, SiriusXM and
other media sources.
Set Your Radio Presets
• Touch the Entertainment corner on
the touchscreen.
• Touch FM.
• Touch Direct Tune.
• Enter the desired station and touch Enter.
• Touch Presets and then touch and hold
one of the memory preset buttons to save
it. The sound mutes briefly and returns
when the system saves the station.
Bring in Your Own Music
Gain access to any audio source by voice
and even control how each operates, like
changing radio stations, CD tracks or music
on one of the following devices:
• USB
• Bluetooth streaming
• SD card*
• Line in
Refer to the MyFord Touch chapter in your
Owner’s Manual, visit the website or call the
toll-free number for more information.
See the inside front cover of this guide
for details.
COMFORT
* if equipped
SYNC® WITH MYFORD TOUCH®*
CLIMATE CONTROLLED
FRONT SEATS*
On touchscreen-equipped vehicles, press
the Climate corner on your touchscreen.
Press the
or seat icon repeatedly to
cycle through the various settings and off.
For non-touchscreen vehicles, use the
hard button controls (indicated by
the same symbols). Press the controls
repeatedly to cycle through the various
settings and off. More lights indicate
warmer or cooler settings.
MEMORY FUNCTION*The memory
function allows a
one touch recall
of personalized
memory features
including the
driver seat, power
mirrors and steering column*. Use the
memory controls on the driver’s door to
program and then recall memory positions.
To program position 1, press and hold 1 until
you hear a tone. Use this same procedure
to set positions 2 and 3 by pressing the
respective buttons. You can now use these
controls to recall the set memory positions. You can also program your memory seats
to your transmitter. That way, when you
unlock your door with the transmitter, your
memory features automatically move into
your saved position. See the Seats
chapter
in your Owner’s Manual for more details.
MOONROOF*The moonroof controls are on the overhead
console and have a one-touch open and
close feature. To stop its movement during
one-touch operation, press the control a
second time.
Moonroof open button:
Press and release to open. The
moonroof stops short of the fully
opened position. To open the
moonroof fully, press and release the
open control again.
Moonroof close button:
Press and release to close. The
moonroof stops short of the fully
closed position. To close the
moonroof fully, press and release the
close control again.
Moonroof vent button:
Press and release to vent.
Sunshade Controls*
Sunshade open button:
Press and release to open. The
power shade automatically opens
with the moonroof. You can also
open the power shade with the
moonroof closed. The sunshade
stops short of its fully opened
position for the comfort of rear
passengers. To open the sunshade
fully, press the control again.
Sunshade close button:
Press and release to close.
1213
Page 9 of 10
*if equipped *if equipped*if equipped
REAR VIEW CAMERA*The feature provides a video image of
the area behind the vehicle. The image
automatically appears in the touchscreen
when the vehicle is in reverse (R) and
operates at speeds below 3 mph (5 km/h).
The system uses green, yellow and red
guides to alert you of your proximity
to objects.
ADAPTIVE STEERING* The adaptive steering system optimizes
your vehicle’s steering based on your
steering wheel input, changes in vehicle
speed and other conditions. You can change
the settings in the information display. Refer
to your Owner’s Manual for more details.
Note: The adaptive steering system includes
a locking device that may make a sound
when you start or switch off your vehicle.
This is completely normal.
BLIS® (BLIND SPOT
INFORMATION SYSTEM)
WITH CROSS TRAFFIC ALERT*
BLIS aids you in detecting vehicles that
may have entered into your blind spot area
on both sides of the vehicle, extending
rearward from the exterior mirrors to
approximately 10 feet (3 meters) beyond
the bumper. Cross traffic alert warns you of vehicles
approaching from the sides when the
transmission is in reverse (R). It detects
approaching vehicles from approximately
46 feet (14 meters) away.
The Blind Spot Information and cross traffic
alert systems illuminate a yellow alert
indicator in the outside mirror on the side
of your vehicle the approaching vehicle is
coming from. In addition, the yellow alert
indicator flashes if the direction indicator
is ON when a Blind Spot Warning System
alert is active.
Note: The alert indicator dims when the
system detects nighttime darkness.
Cross traffic alert also sounds a series
of tones and a message appears in the
information display indicating a vehicle is
coming from the right or left.
NEVER use
BLIS or cross traffic alert as a replacement
for using the interior and exterior mirrors and
looking over your shoulder before changing
lanes. The systems are not replacements
for careful driving. Use both systems only
as an assist.
SECURICODETM KEYLESS
ENTRY SYSTEM*
Invisible until touched, the keypad allows
you to lock or unlock the doors. Make sure
you have your five-digit factory code located
on your owner’s wallet card in the glove box.
To Unlock the Driver Door
Enter the factory-set 5-digit code or your
personal code. You must press each
number within five seconds of each other.
The interior lamps light.
To Unlock All Doors
Enter the factory-set code or your personal
code, then press 3·4 within five seconds.
To Lock All Doors
Press and hold 7·8 and 9·0 at the same
time (with the driver door closed). You do
not need to enter the keypad code first.
To Release the Liftgate
Enter the factory-set code or your personal
code, then press 5·6 within five seconds.
See the Locks chapter in your Owner’s
Manual for more information on how to
use SecuriCode.
FUNCTION
1617
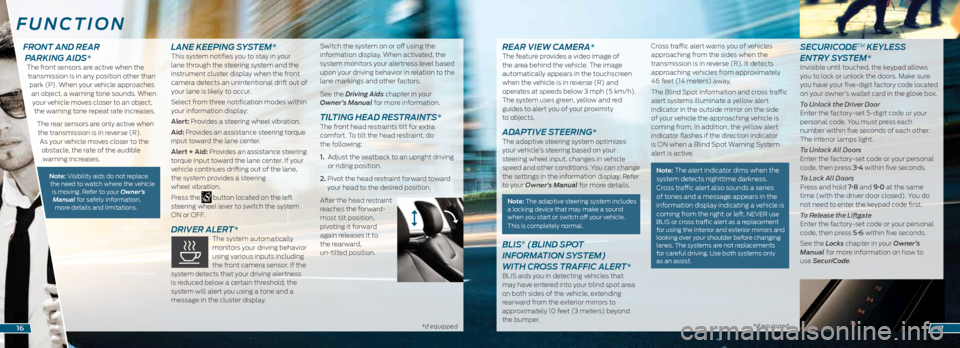
FRONT AND REAR PARKING AIDS*
The front sensors are active when the
transmission is in any position other than park (P). When your vehicle approaches an object, a warning tone sounds. When your vehicle moves closer to an object, the warning tone repeat rate increases.
The rear sensors are only active when the transmission is in reverse (R). As your vehicle moves closer to the obstacle, the rate of the audible warning increases.
Note: Visibility aids do not replace the need to watch where the vehicle is moving. Refer to your Owner’s Manual for safety information, more details and limitations.
LANE KEEPING SYSTEM*This system notifies you to stay in your
lane through the steering system and the
instrument cluster display when the front
camera detects an unintentional drift out of
your lane is likely to occur.
Select from three notification modes within
your information display:
Alert: Provides a steering wheel vibration.
Aid: Provides an assistance steering torque
input toward the lane center.
Alert + Aid: Provides an assistance steering
torque input toward the lane center. If your
vehicle continues drifting out of the lane,
the system provides a steering
wheel vibration.
Press the
button located on the left
steering wheel lever to switch the system
ON or OFF.
DRIVER ALERT* The system automatically
monitors your driving behavior
using various inputs including
the front camera sensor. If the
system detects that your driving alertness
is reduced below a certain threshold, the
system will alert you using a tone and a
message in the cluster display. Switch the system on or off using the
information display. When activated, the
system monitors your alertness level based
upon your driving behavior in relation to the
lane markings and other factors.
See the Driving Aids chapter in your
Owner’s Manual for more information.
TILTING HEAD RESTRAINTS* The front head restraints tilt for extra
comfort. To tilt the head restraint, do
the following:
1.
Adjust the seatback to an upright driving
or riding position.
2. Pivot the head restraint forward toward
your head to the desired position.
After the head restraint
reaches the forward-
most tilt position,
pivoting it forward
again releases it to
the rearward,
un-tilted position.
Page 10 of 10
EASY FUEL® SYSTEM
When Fueling Your Vehicle
1. Put the vehicle in park (P) and switch
off the ignition.
2. Press the center-rear edge of the fuel
filler door and release to open.
3. Slowly insert the fuel filler nozzle fully
into the fuel system to open both doors.
Leave the nozzle fully inserted until
you have stopped pumping fuel. Allow
about 5-10 seconds after pumping fuel
before removing the fuel filler nozzle.
This allows residual fuel to drain back
into the fuel tank and not spill onto
the vehicle.
4. Slowly remove the fuel filler nozzle and
close the fuel filler door.
REFUELING WITH A PORTABLE
FUEL CONTAINER
When using a portable fuel container,
slowly insert the fuel funnel (located in
the spare wheel storage tray) and pour
the fuel into the funnel. When done, clean
the funnel or properly dispose of it. You
can purchase extra funnels from your
authorized dealer. Do not use aftermarket
funnels as they do not work with the Easy
Fuel system and may cause damage.
FUEL TANK CAPACITY
AND FUEL INFO
Depending on your drive type, your vehicle’s
fuel tank capacity can vary. All-wheel drive
vehicles have an 18.5 gallon (70.0L) fuel
tank capacity. Front-wheel drive vehicles
have an 18.4 gallon (69.5L) fuel tank
capacity. Use only “Regular” unleaded
gasoline with a minimum octane rating of
87 or higher. Do not use E85 fuels because
your vehicle was not designed to run on
fuels with more than 15% ethanol.
MYKEY®
MyKey allows you to program certain
driving restrictions in order to promote
good driving habits. You can program
things like speed restrictions, limited volume levels and safety belt reminders.
For complete information, refer to the
MyKey chapter in your Owner’s Manual.
AUTO-START-STOP* The system helps reduce fuel consumption
by automatically shutting off and restarting
the engine when your vehicle is stopped.
The engine restarts automatically when
you release the brake pedal.
To switch this feature off, press the
auto-start-stop button on the center
console. The button lights. Press the button
again to restart, or restart the vehicle. See
the Unique Driving Characteristics chapter
in your Owner’s Manual for more details.
CONFIGURABLE DAYTIME
RUNNING LAMPS*
When you switch the feature on in the
information display, daytime running lamps
turn on when you are driving, the lighting
control is in the autolamps position
and the headlamps are off.
You can switch the Configurable Daytime
Running Lamps feature ON or OFF using
the information display controls. See the
Lighting chapter in your Owner’s Manual
for complete information.
* if equipped *
if equipped
ESSENTIAL INFORMATION
TIRE PRESSURE MONITORING SYSTEM Your vehicle has a tire pressure monitoring system that lights a low
tire pressure warning light in your instrument cluster when one
or more of your tires are significantly under-inflated. If this happens,
stop and check your tires as soon as possible. Inflate them to the
proper pressure.
Refer to the Tire Pressure Monitoring System section in the
Wheels and Tires chapter of your Owner’s Manual for
more information.
LOCATION OF SPARE TIRE AND TOOLS Your spare tire and tools are beneath the carpeted floor panel in
the rear of your vehicle. The spare tire is designed for emergency
use only and should be replaced as soon as possible. For complete
details on changing your tire, refer to the Changing a Road Wheel
section in the Wheels and Tires chapter in your Owner’s Manual.
OPEN WINDOW BUFFETING You may hear a pulsing noise when just one of the windows is
open. Lower the opposite window slightly to reduce this noise.
ROADSIDE ASSISTANCE Your new Ford vehicle comes with the assurance and support of
24-hour emergency roadside assistance.
To receive roadside assistance in the United States, call
1-800-241-3673. In Canada, call 1-800-665-2006.
PRE-COLLISION ASSIST SYSTEM* This system alerts you of certain collision risks. The system’s
sensor detects your vehicle’s rapid approach to other vehicles
traveling in the same direction as your vehicle.
When your vehicle rapidly approaches another vehicle, a red
warning light flashes and a tone sounds. The brake support
system assists you in reducing any collision speed by
pre-charging the brakes. If the risk of collision continues to
increases after the audio-visual warning, the brake support
prepares the brake system for rapid braking. The system does
not automatically activate the brakes, but if the brake pedal
is pressed even lightly, the brakes apply full stopping power.
TOWING YOUR VEHICLE Towing your vehicle behind an RV or any other vehicle may
be limited. Refer to Towing the Vehicle on Four Wheels
in the Towing chapter of your Owner’s Manual.
1819