sensor FORD EDGE 2017 2.G Workshop Manual
[x] Cancel search | Manufacturer: FORD, Model Year: 2017, Model line: EDGE, Model: FORD EDGE 2017 2.GPages: 544, PDF Size: 25.27 MB
Page 265 of 544
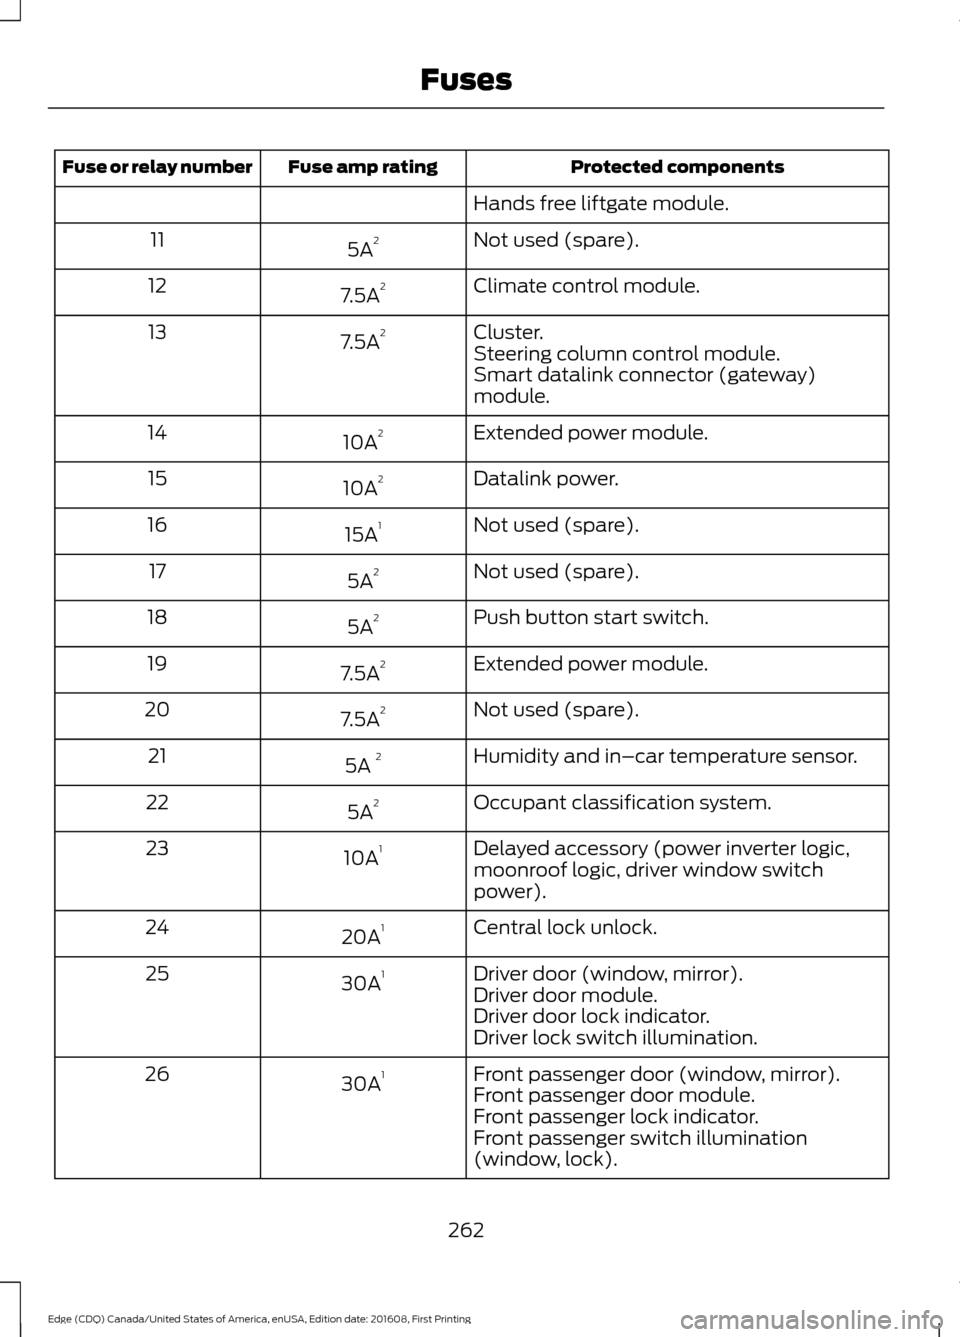
Protected components
Fuse amp rating
Fuse or relay number
Hands free liftgate module.
Not used (spare).
5A 2
11
Climate control module.
7.5A 2
12
Cluster.
7.5A 2
13
Steering column control module.
Smart datalink connector (gateway)
module.
Extended power module.
10A 2
14
Datalink power.
10A 2
15
Not used (spare).
15A 1
16
Not used (spare).
5A 2
17
Push button start switch.
5A 2
18
Extended power module.
7.5A 2
19
Not used (spare).
7.5A 2
20
Humidity and in–car temperature sensor.
5A 2
21
Occupant classification system.
5A 2
22
Delayed accessory (power inverter logic,
moonroof logic, driver window switch
power).
10A
1
23
Central lock unlock.
20A 1
24
Driver door (window, mirror).
30A 1
25
Driver door module.
Driver door lock indicator.
Driver lock switch illumination.
Front passenger door (window, mirror).
30A 1
26
Front passenger door module.
Front passenger lock indicator.
Front passenger switch illumination
(window, lock).
262
Edge (CDQ) Canada/United States of America, enUSA, Edition date: 201608, First Printing Fuses
Page 305 of 544
•
After sealant use, an authorized Ford
dealer must replace the tire pressure
monitoring system sensor and valve
stem on the wheel.
• Operating the kit could cause an
electrical disturbance in radio, CD and
DVD player operation. * When inflation only is required
for a tire or other objects, the
selector must be in the Air
position.
What to do When a Tire Is
Punctured
You can repair a tire puncture within the
tire's tread area in two stages with the kit.
• In the first stage, inflate the tire with a
sealing compound and air. After you
inflate the tire, you will need to drive
the vehicle a short distance (about 4
miles [6 kilometers]) to distribute the
sealant in the tire.
• In the second stage, check the tire
pressure and adjust, if necessary, to the
vehicle's specified tire inflation
pressure.
First Stage: Inflating the Tire with
Sealing Compound and Air WARNINGS
Do not stand directly over the kit
while inflating the tire. If you notice
any unusual bulges or deformations
in the tire's sidewall during inflation, stop
and call roadside assistance. If the tire does not inflate to the
recommended tire pressure within
15 minutes, stop and call roadside
assistance. Do not run the engine during kit
operation unless the vehicle is
outdoors or in a well-ventilated area. Preparation: Park the vehicle in a safe, level
and secure area, away from moving traffic.
Switch the hazard lights on. Apply the
parking brake and switch the engine off.
Inspect the flat tire for visible damage.
Sealant compound contains latex. Use
appropriate precautions to avoid any
allergic reactions.
Do not remove any foreign object that has
pierced the tire. If a puncture is located in
the tire sidewall, stop and call roadside
assistance.
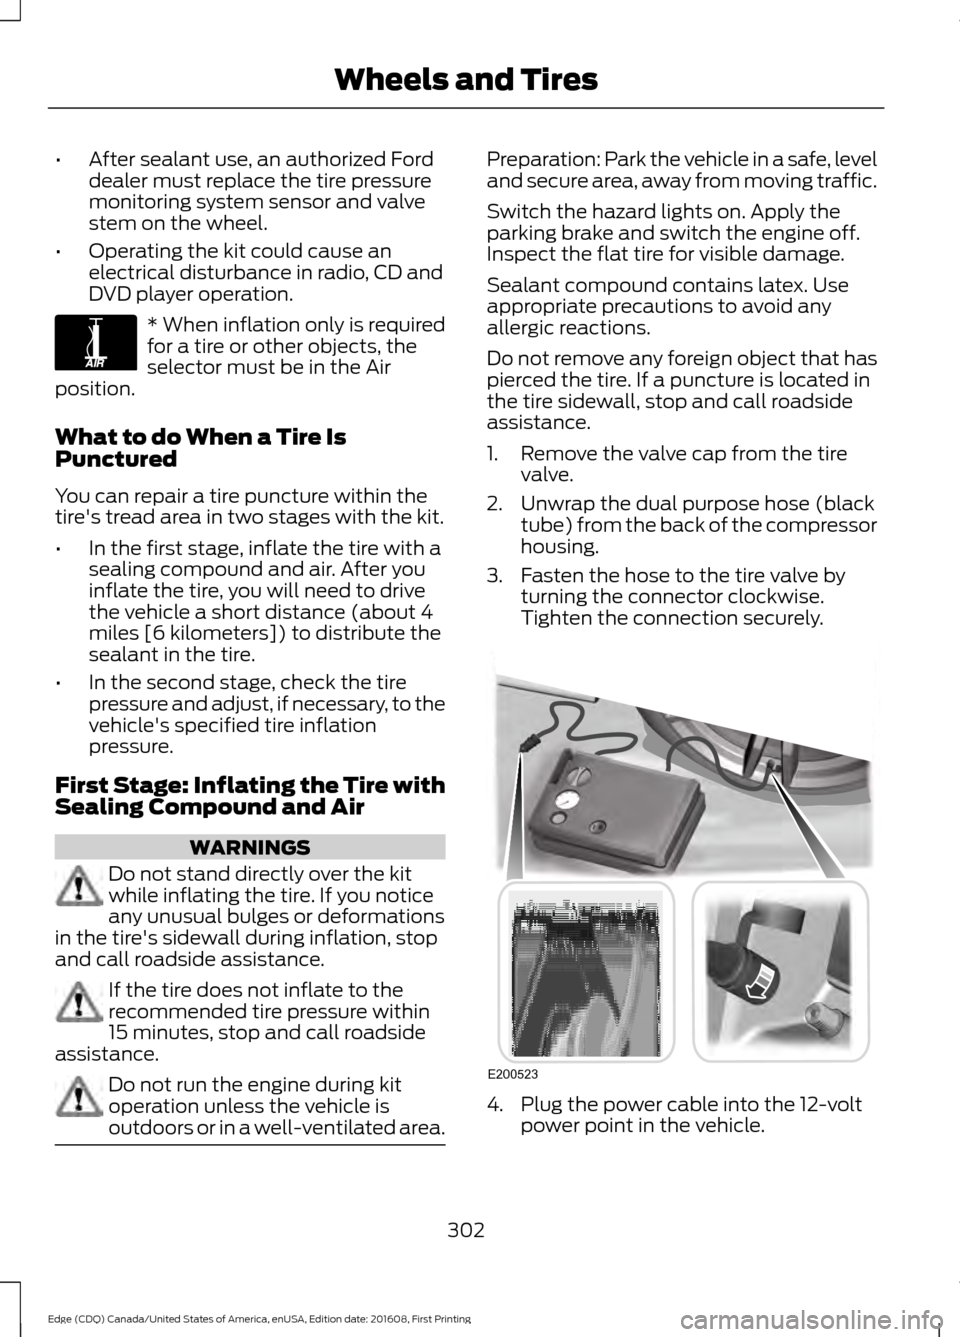
1. Remove the valve cap from the tire
valve.
2. Unwrap the dual purpose hose (black tube) from the back of the compressor
housing.
3. Fasten the hose to the tire valve by turning the connector clockwise.
Tighten the connection securely. 4. Plug the power cable into the 12-volt
power point in the vehicle.
302
Edge (CDQ) Canada/United States of America, enUSA, Edition date: 201608, First Printing Wheels and TiresE175978 E200523
Page 323 of 544
WARNINGS
is located on the B-Pillar or edge
of the driver's door. If this
information is not found on these
labels, then you should contact
your authorized dealer as soon as
possible. Use of any tire or wheel
not recommended by Ford can
affect the safety and performance
of your vehicle, which could result
in an increased risk of loss of
vehicle control, vehicle rollover,
personal injury and death. To reduce the risk of serious
injury, when mounting
replacement tires and wheels, you
should not exceed the maximum
pressure indicated on the sidewall
of the tire to set the beads without
additional precautions listed
below. If the beads do not seat at
the maximum pressure indicated,
re-lubricate and try again. When inflating the tire for
mounting pressures up to
20 psi (136 kPa) greater than the
maximum pressure on the tire
sidewall, the following
precautions must be taken to
protect the person mounting the
tire:
1. Make sure that you have the
correct tire and wheel size.
2. Lubricate the tire bead and
wheel bead seat area again.
3. Stand at a minimum of
12 ft
(3.66 m)
away from the wheel
and tire assembly. WARNINGS
4. Use both eye and ear
protection.
For a mounting pressure more
than 20 psi (1.38 bar) greater than
the maximum pressure, a Ford
dealer or other tire service
professional should do the
mounting.
Always inflate steel carcass tires
with a remote air fill with the
person inflating standing at a
minimum of
12 ft (3.66 m) away
from the wheel and tire assembly. Important: Remember to replace
the wheel valve stems when the
road tires are replaced on your
vehicle.
The two front tires or two rear tires
should generally be replaced as a
pair.
The tire pressure sensors mounted
in the wheels (originally installed
on your vehicle) are not designed
to be used in aftermarket wheels.
The use of wheels or tires not
recommended by Ford Motor
Company may affect the
operation of your tire pressure
monitoring system.
320
Edge (CDQ) Canada/United States of America, enUSA, Edition date: 201608, First Printing Wheels and Tires
Page 328 of 544
Changing Tires With a Tire
Pressure Monitoring System
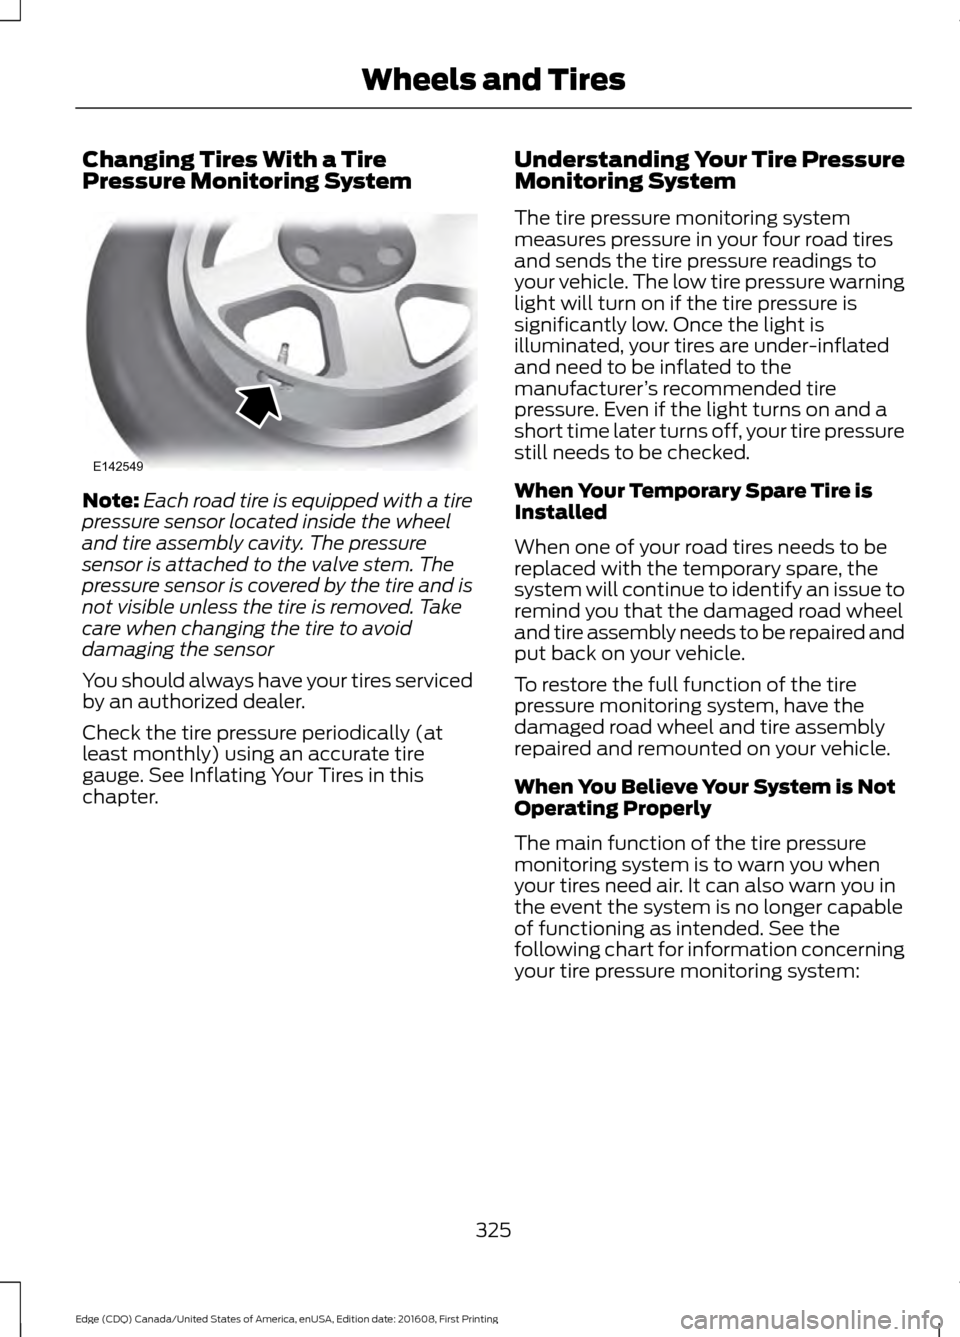
Note:
Each road tire is equipped with a tire
pressure sensor located inside the wheel
and tire assembly cavity. The pressure
sensor is attached to the valve stem. The
pressure sensor is covered by the tire and is
not visible unless the tire is removed. Take
care when changing the tire to avoid
damaging the sensor
You should always have your tires serviced
by an authorized dealer.
Check the tire pressure periodically (at
least monthly) using an accurate tire
gauge. See Inflating Your Tires in this
chapter. Understanding Your Tire Pressure
Monitoring System
The tire pressure monitoring system
measures pressure in your four road tires
and sends the tire pressure readings to
your vehicle. The low tire pressure warning
light will turn on if the tire pressure is
significantly low. Once the light is
illuminated, your tires are under-inflated
and need to be inflated to the
manufacturer
’s recommended tire
pressure. Even if the light turns on and a
short time later turns off, your tire pressure
still needs to be checked.
When Your Temporary Spare Tire is
Installed
When one of your road tires needs to be
replaced with the temporary spare, the
system will continue to identify an issue to
remind you that the damaged road wheel
and tire assembly needs to be repaired and
put back on your vehicle.
To restore the full function of the tire
pressure monitoring system, have the
damaged road wheel and tire assembly
repaired and remounted on your vehicle.
When You Believe Your System is Not
Operating Properly
The main function of the tire pressure
monitoring system is to warn you when
your tires need air. It can also warn you in
the event the system is no longer capable
of functioning as intended. See the
following chart for information concerning
your tire pressure monitoring system:
325
Edge (CDQ) Canada/United States of America, enUSA, Edition date: 201608, First Printing Wheels and TiresE142549
Page 330 of 544
How Temperature Affects Your Tire
Pressure
The tire pressure monitoring system
monitors tire pressure in each pneumatic
tire. While driving in a normal manner, a
typical passenger tire inflation pressure
may increase about 2
–4 psi (14– 28 kPa)
from a cold start situation. If the vehicle is
stationary overnight with the outside
temperature significantly lower than the
daytime temperature, the tire pressure may
decrease about 3 psi (21 kPa) for a drop of
30°F (17°C) in ambient temperature. This
lower pressure value may be detected by
the tire pressure monitoring system as
being significantly lower than the
recommended inflation pressure and
activate the system warning light for low
tire pressure. If the low tire pressure
warning light is on, visually check each tire
to verify that no tire is flat. If one or more
tires are flat, repair as necessary. Check
the air pressure in the road tires. If any tire
is under-inflated, carefully drive the vehicle
to the nearest location where air can be
added to the tires. Inflate all the tires to
the recommended inflation pressure.
CHANGING A ROAD WHEEL WARNINGS
Do not use tire sealants as they may
damage the tire pressure monitoring
system.
If the tire pressure monitor sensor
becomes damaged it may not
function. Note:
The use of tire sealant may damage
your tire pressure monitoring system and
should only be used in roadside
emergencies. If you must use a sealant, the
Ford Tire Mobility Kit sealant should be
used. The tire pressure monitoring system
sensor and valve stem on the wheel must
be replaced by an authorized dealer after
use of the sealant.
Note: The tire pressure monitoring system
indicator light will illuminate when the spare
tire is in use. To restore the full function of
the monitoring system, all road wheels
equipped with tire pressure monitoring
sensors must be mounted on the vehicle.
If you get a flat tire while driving, do not
apply the brake heavily. Instead, gradually
decrease your speed. Hold the steering
wheel firmly and slowly move to a safe
place on the side of the road.
Have a flat serviced by an authorized
dealer in order to prevent damage to the
tire pressure monitoring system sensors.
See
Tire Pressure Monitoring System
(page 324). Replace the spare tire with a
road tire as soon as possible. During
repairing or replacing of the flat tire, have
an authorized dealer inspect the tire
pressure monitoring system sensor for
damage.
Dissimilar Spare Wheel and Tire
Assembly Information WARNING
Failure to follow these guidelines
could result in an increased risk of
loss of vehicle control, injury or death.
327
Edge (CDQ) Canada/United States of America, enUSA, Edition date: 201608, First Printing Wheels and Tires
Page 390 of 544
To Access Using Voice Commands
Press the voice button then when prompted say:
Action and Description
Menu Item
Say the name of the application after the tone.
The app should start. When an app is running through SYNC, you can press the voice button and speak commands specific to the app, for example "Play Playlist Road Trip".
mobile (apps |
applications)
Use this command to discover the available voice commands.
help
SYNC Mobile App Voice Commands
The following voice commands are always available: Action and Description
Menu Item
SYNC prompts you to say the name of an
app to start it on SYNC.
mobile (apps | applications)
SYNC lists all of the currently available
mobile apps.
list [mobile] (apps | applications)
Searches your connected mobile device for
SYNC-compatible mobile apps.
find [new] [mobile] (apps | applications)
help
You can say the name of a mobile app at any time to start the mobile app on SYNC.
App Permissions
App permissions are organized by groups.
You can grant these group permissions
individually. You can change a permission
group status any time when not driving, by
using the settings menu. When you launch an app using SYNC, the
system may ask you to grant certain
permissions, for example:
•
To allow your vehicle to provide vehicle
information to the app such as, but not
limited to: Fuel level, fuel economy, fuel
consumption, engine speed, rain
sensor, odometer, VIN, external
temperature, gear position, tire
pressure, and head lamp status.
• To allow your vehicle to provide driving
characteristic information such as, but
not limited to: MyKey, seat belt status,
engine revolutions per minute, gear
position, braking events, steering wheel
angle, and accelerator pedal position.
387
Edge (CDQ) Canada/United States of America, enUSA, Edition date: 201608, First Printing SYNC™
Page 536 of 544
Cleaning Products......................................290
Materials............................................................... 290
Cleaning the Engine....................................292
Cleaning the Exterior.................................290 Exterior Chrome Parts....................................... 291
Exterior Plastic Parts......................................... 291
Stripes or Graphics............................................. 291
Underbody............................................................ 291
Under Hood.......................................................... 291
Cleaning the Instrument Panel and Instrument Cluster Lens.........................293
Cleaning the Interior...................................293
Cleaning the Wheels..................................294
Cleaning the Windows and Wiper Blades...........................................................292
Clearing All MyKeys......................................60
Climate.............................................................437
Climate Control.............................................128
Climate Controlled Seats..........................144
Cooled Seats........................................................ 144
Cold Weather Precautions.......................238
Collision Warning System..........................221 PRINCIPLE OF OPERATION............................ 221
Coolant Check See: Engine Coolant Check............................ 273
Crash Sensors and Airbag Indicator.......49
Creating a MyKey...........................................59 Programming/Changing Configurable
Settings............................................................... 59
Cross Traffic Alert.........................................216 False Alerts........................................................... 219
Switching the System Off and On...............219
System Errors....................................................... 219
System Lights, Messages and Audible Alerts.................................................................. 218
System Limitations............................................ 219
Using the System................................................ 216
Cruise Control
.................................................80
Principle of Operation...................................... 202
Type 1........................................................................\
80
Type 2........................................................................\
81
Cruise control See: Using Cruise Control............................... 202
Customer Assistance
..................................247 D
Data Recording
..................................................9
Event Data Recording.......................................... 10
Service Data Recording........................................ 9
Daytime Running Lamps
.............................87
Type 1 - Conventional
(Non-Configurable)........................................ 87
Type 2 - Configurable.......................................... 87
Digital Radio
..................................................362
HD Radio Reception and Station
Troubleshooting............................................ 363
Direction Indicators
.......................................89
Doors and Locks.............................................64
Drive Control
..................................................223
Adaptive Steering.............................................. 223
Driver Alert
.....................................................209
PRINCIPLE OF OPERATION.......................... 209
USING DRIVER ALERT.................................... 209
Driver and Passenger Airbags....................43 Children and Airbags........................................... 43
Proper Driver and Front Passenger Seating Adjustment........................................................ 43
Driver and Passenger Knee Airbags.........47
Driving Aids
....................................................209
Driving Hints..................................................238
Driving Through Water...............................238
DRL See: Daytime Running Lamps......................... 87
E
Economical Driving.....................................238
Electric Parking Brake
..................................181
Applying the Electric Parking brake..............181
Battery With No Charge................................... 183
Parking On a Hill (Vehicles With a Manual Transmission) ................................................. 181
Releasing the Electric Parking Brake...........182
Emission Control System..........................168 On-Board Diagnostics (OBD-II)...................169
Readiness for Inspection and Maintenance
(I/M) Testing................................................... 169
End User License Agreement
.................505
VEHICLE SOFTWARE END USER LICENSE
AGREEMENT (EULA) ................................ 505
Engine Block Heater....................................158 Using the Engine Block Heater...................... 158
533
Edge (CDQ) Canada/United States of America, enUSA, Edition date: 201608, First Printing Index
Page 543 of 544
Tire Repair Kit
See: Tire Sealant and Inflator Kit................300
Tire Sealant and Inflator Kit....................300 First Stage: Inflating the Tire with Sealing
Compound and Air....................................... 302
General Information.......................................... 301
Second Stage: Checking Tire Pressure........................................................... 304
Tips for Use of the Kit....................................... 301
What to Do After the Tire has Been Sealed............................................................... 304
What to do When a Tire Is Punctured........................................................ 302
Tires See: Wheels and Tires..................................... 298
Towing a Trailer............................................230
Load Placement................................................ 230
Towing the Vehicle on Four Wheels - 6-Speed Automatic Transmission -
6F35...............................................................235
Emergency Towing............................................ 235
Recreational Towing......................................... 235
Towing the Vehicle on Four Wheels - 6-Speed Automatic Transmission -
6F50/6F55
..................................................235
Emergency Towing............................................ 235
Recreational Towing......................................... 236
Towing.............................................................230
Traction Control............................................185 Principle of Operation....................................... 185
Trailer Sway Control.....................................231
Transmission Code Designation............339
Transmission....................................................171
Transmission See: Transmission................................................ 171
Transporting the Vehicle
...........................245
U
Under Hood Overview - 2.0L EcoBoost™.................................................268
Under Hood Overview - 2.7L EcoBoost™.................................................269
Under Hood Overview - 3.5L...................270
Unique Driving Characteristics................160
Universal Garage Door Opener...............146 HomeLink Wireless Control System...........146
USB Port..........................................................367 Using Adaptive Cruise Control...............203
Automatic Cancellation.................................. 206
Blocked Sensor................................................... 207
Canceling the Set Speed................................ 206
Changing the Set Speed................................ 206
Detection Issues................................................. 207
Following a Vehicle........................................... 204
Hilly Condition Usage...................................... 206
Overriding the System..................................... 206
Resuming the Set Speed............................... 206
Setting the Adaptive Cruise Speed............204
Setting the Gap Distance............................... 205
Switching Adaptive Cruise Control Off...................................................................... 206
Switching Adaptive Cruise Control On....................................................................... 203
Switching to Normal Cruise Control..........208
System Not Available....................................... 207
Using All-Wheel Drive
.................................175
Driving In Special Conditions With
All-Wheel Drive (AWD)................................ 175
Using Cruise Control...................................202 Switching Cruise Control Off........................203
Switching Cruise Control On......................... 202
Using MyKey With Remote Start Systems..........................................................62
Using Snow Chains.....................................323
Using Stability Control
................................187
Using Summer Tires...................................322
Using SYNC™ With Your Media Player............................................................389
Accessing Your USB Song Library...............393
Bluetooth Devices and System Settings............................................................ 395
Connecting Your Digital Media Player to the USB Port.......................................................... 389
Media Menu Features...................................... 392
Media Voice Commands................................ 390
USB 2..................................................................... 395
Voice Commands for Audio Sources.........396
Using SYNC™ With Your Phone.............372 Accessing Features through the Phone
Menu................................................................... 377
Accessing Your Phone Settings...................380
Bluetooth Devices.............................................. 381
Making Calls......................................................... 376
Pairing a Phone for the First Time...............373
Pairing Subsequent Phones........................... 374
540
Edge (CDQ) Canada/United States of America, enUSA, Edition date: 201608, First Printing Index