rear door FORD EDGE 2019 Owners Manual
[x] Cancel search | Manufacturer: FORD, Model Year: 2019, Model line: EDGE, Model: FORD EDGE 2019Pages: 547, PDF Size: 40.86 MB
Page 5 of 547
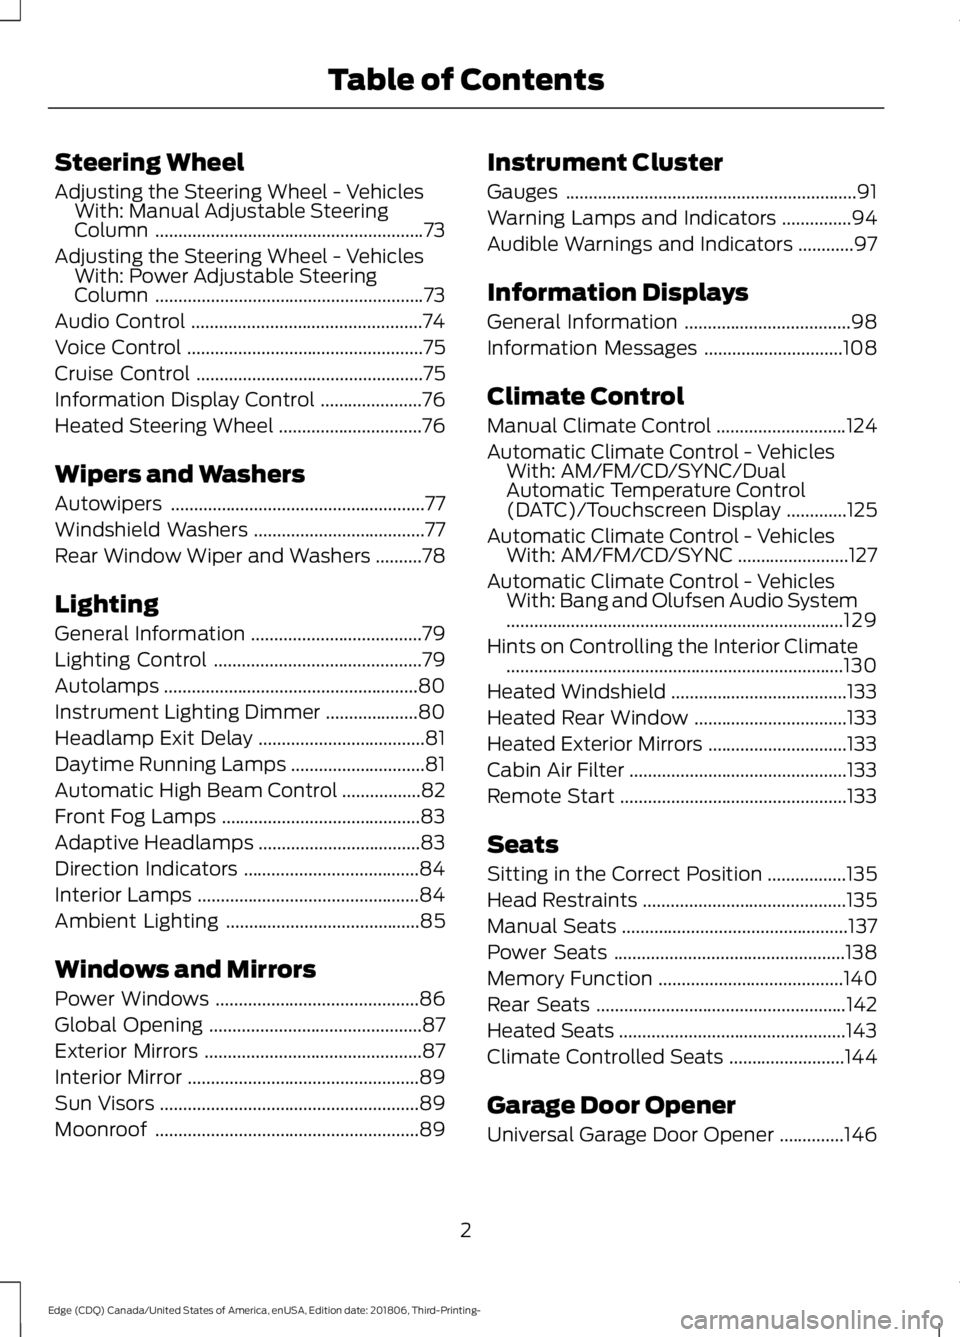
Steering Wheel
Adjusting the Steering Wheel - Vehicles
With: Manual Adjustable Steering
Column ..........................................................73
Adjusting the Steering Wheel - Vehicles With: Power Adjustable Steering
Column ..........................................................
73
Audio Control ..................................................
74
Voice Control ...................................................
75
Cruise Control .................................................
75
Information Display Control ......................
76
Heated Steering Wheel ...............................
76
Wipers and Washers
Autowipers .......................................................
77
Windshield Washers .....................................
77
Rear Window Wiper and Washers ..........
78
Lighting
General Information .....................................
79
Lighting Control .............................................
79
Autolamps .......................................................
80
Instrument Lighting Dimmer ....................
80
Headlamp Exit Delay ....................................
81
Daytime Running Lamps .............................
81
Automatic High Beam Control .................
82
Front Fog Lamps ...........................................
83
Adaptive Headlamps ...................................
83
Direction Indicators ......................................
84
Interior Lamps ................................................
84
Ambient Lighting ..........................................
85
Windows and Mirrors
Power Windows ............................................
86
Global Opening ..............................................
87
Exterior Mirrors ...............................................
87
Interior Mirror ..................................................
89
Sun Visors ........................................................
89
Moonroof .........................................................
89Instrument Cluster
Gauges
...............................................................
91
Warning Lamps and Indicators ...............
94
Audible Warnings and Indicators ............
97
Information Displays
General Information ....................................
98
Information Messages ..............................
108
Climate Control
Manual Climate Control ............................
124
Automatic Climate Control - Vehicles With: AM/FM/CD/SYNC/Dual
Automatic Temperature Control
(DATC)/Touchscreen Display .............
125
Automatic Climate Control - Vehicles With: AM/FM/CD/SYNC ........................
127
Automatic Climate Control - Vehicles With: Bang and Olufsen Audio System
........................................................................\
.
129
Hints on Controlling the Interior Climate ........................................................................\
.
130
Heated Windshield ......................................
133
Heated Rear Window .................................
133
Heated Exterior Mirrors ..............................
133
Cabin Air Filter ...............................................
133
Remote Start .................................................
133
Seats
Sitting in the Correct Position .................
135
Head Restraints ............................................
135
Manual Seats .................................................
137
Power Seats ..................................................
138
Memory Function ........................................
140
Rear Seats ......................................................
142
Heated Seats .................................................
143
Climate Controlled Seats .........................
144
Garage Door Opener
Universal Garage Door Opener ..............
146
2
Edge (CDQ) Canada/United States of America, enUSA, Edition date: 201806, Third-Printing- Table of Contents
Page 11 of 547
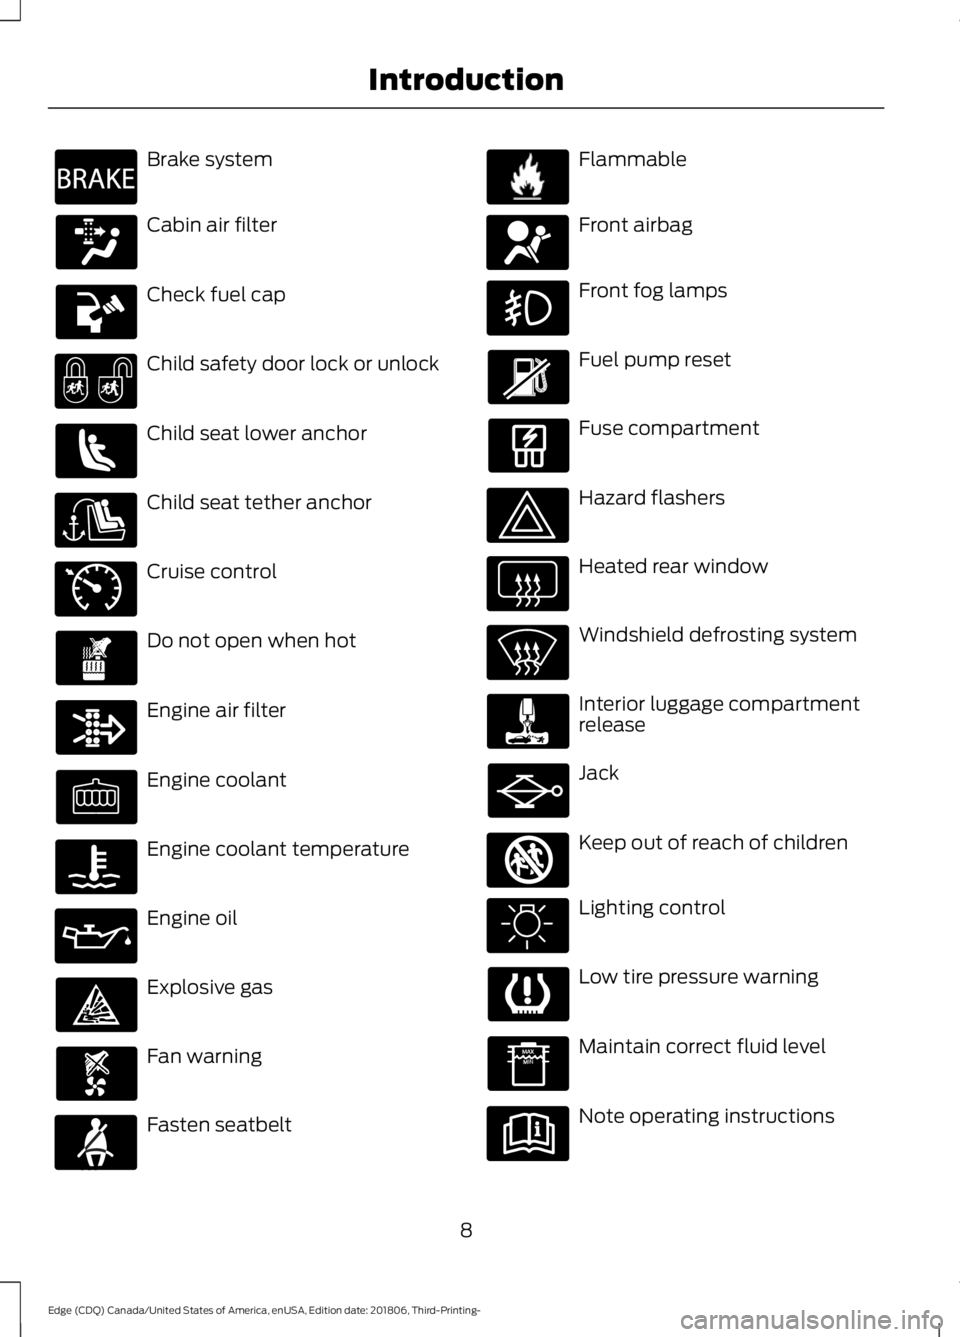
Brake system
Cabin air filter
Check fuel cap
Child safety door lock or unlock
Child seat lower anchor
Child seat tether anchor
Cruise control
Do not open when hot
Engine air filter
Engine coolant
Engine coolant temperature
Engine oil
Explosive gas
Fan warning
Fasten seatbelt Flammable
Front airbag
Front fog lamps
Fuel pump reset
Fuse compartment
Hazard flashers
Heated rear window
Windshield defrosting system
Interior luggage compartment
release
Jack
Keep out of reach of children
Lighting control
Low tire pressure warning
Maintain correct fluid level
Note operating instructions
8
Edge (CDQ) Canada/United States of America, enUSA, Edition date: 201806, Third-Printing- IntroductionE270480 E71340 E71880 E231160 E67017 E161353
Page 33 of 547
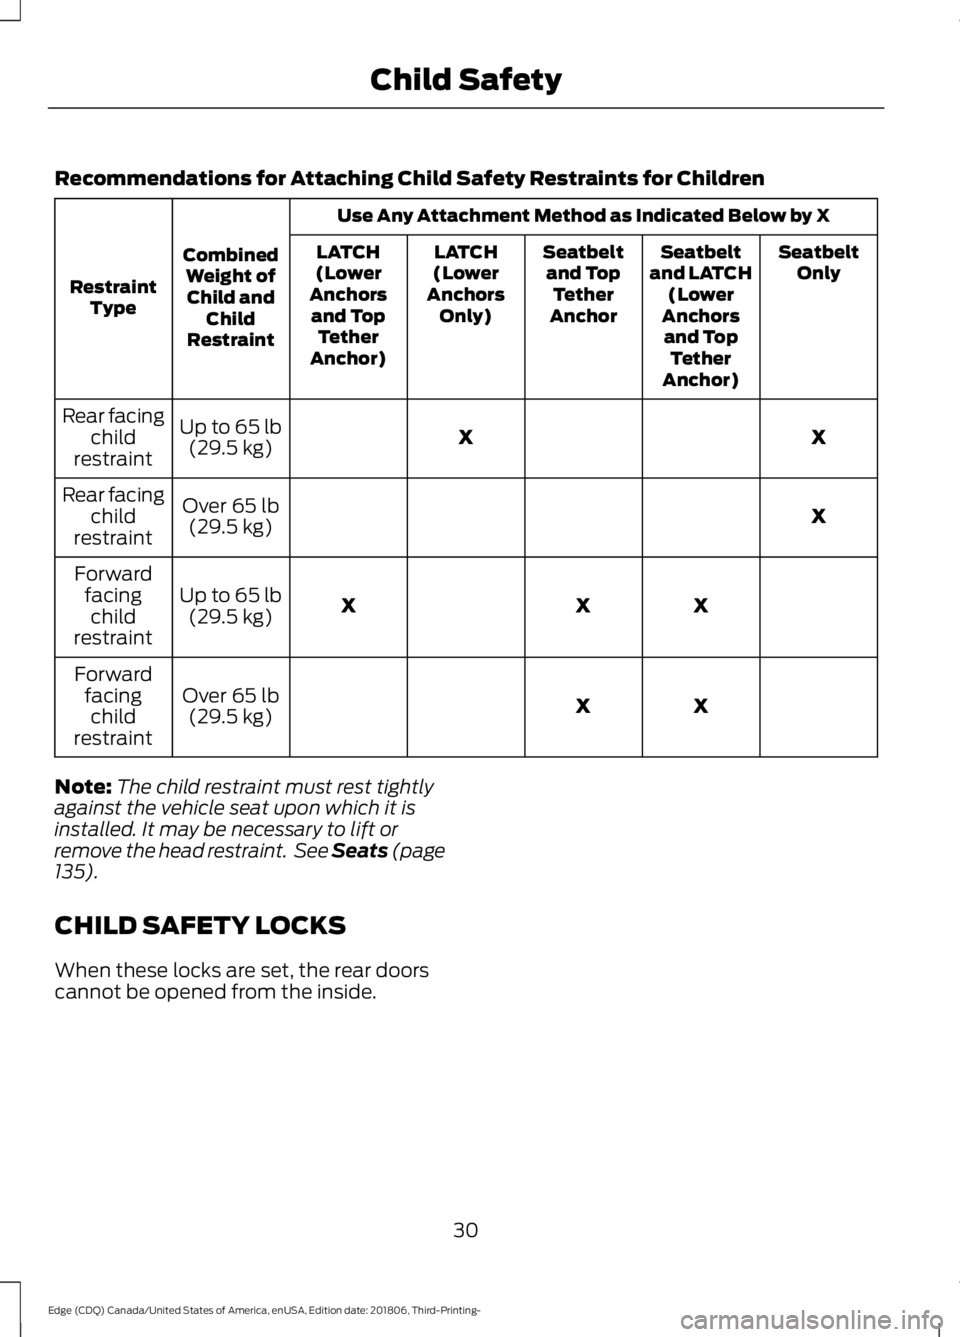
Recommendations for Attaching Child Safety Restraints for Children
Use Any Attachment Method as Indicated Below by X
Combined Weight ofChild and Child
Restraint
Restraint
Type Seatbelt
Only
Seatbelt
and LATCH (Lower
Anchors and Top Tether
Anchor)
Seatbelt
and Top Tether
Anchor
LATCH
(Lower
Anchors Only)
LATCH
(Lower
Anchors and Top Tether
Anchor)
X
X
Up to 65 lb
(29.5 kg)
Rear facing
child
restraint
X
Over
65 lb
(29.5 kg)
Rear facing
child
restraint
X
X
X
Up to
65 lb
(29.5 kg)
Forward
facingchild
restraint
X
X
Over
65 lb
(29.5 kg)
Forward
facingchild
restraint
Note: The child restraint must rest tightly
against the vehicle seat upon which it is
installed. It may be necessary to lift or
remove the head restraint. See Seats (page
135
).
CHILD SAFETY LOCKS
When these locks are set, the rear doors
cannot be opened from the inside.
30
Edge (CDQ) Canada/United States of America, enUSA, Edition date: 201806, Third-Printing- Child Safety
Page 34 of 547
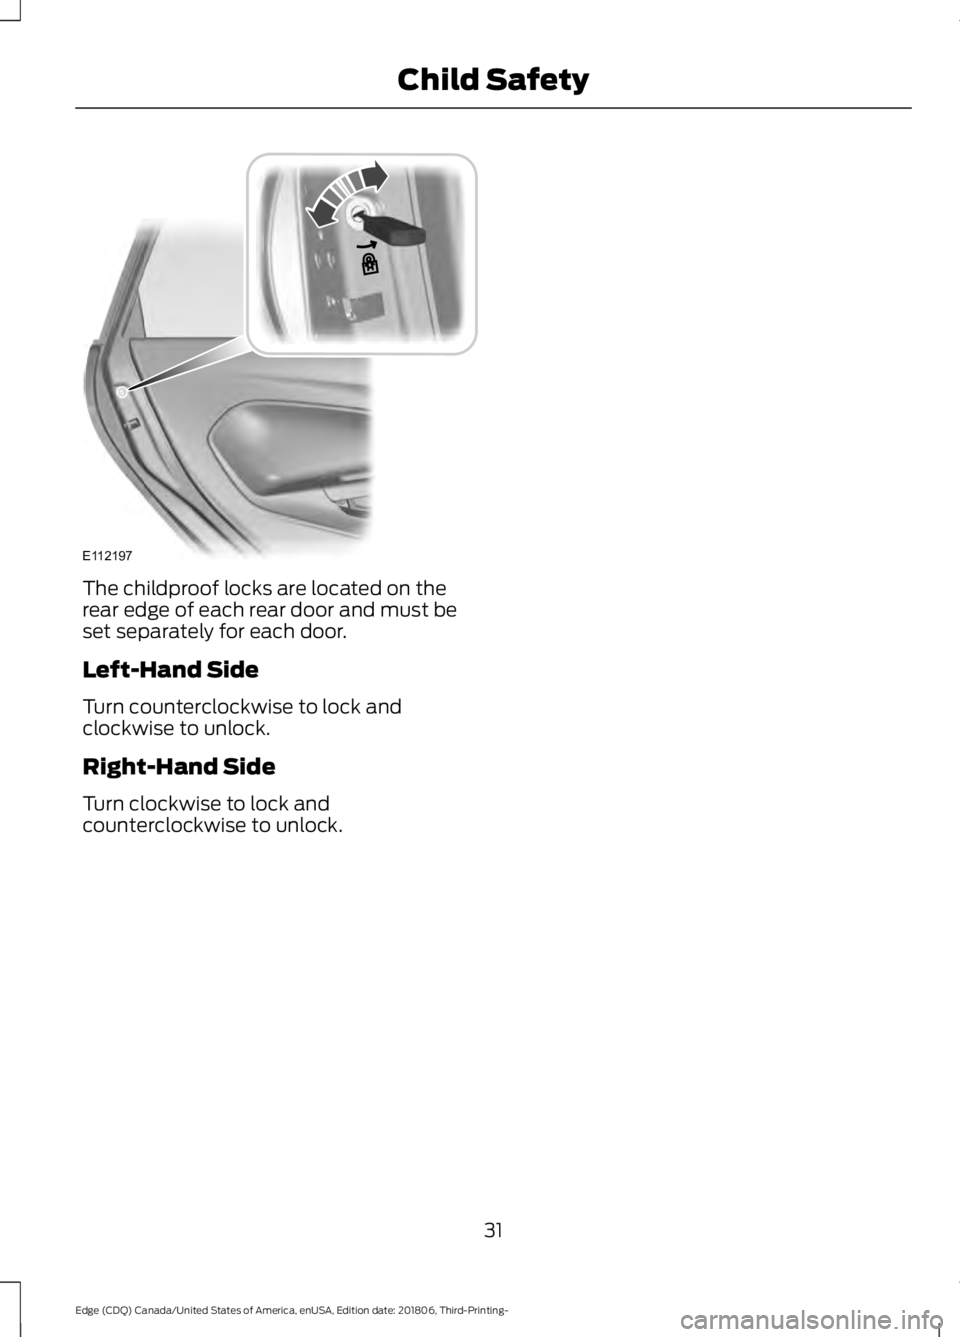
The childproof locks are located on the
rear edge of each rear door and must be
set separately for each door.
Left-Hand Side
Turn counterclockwise to lock and
clockwise to unlock.
Right-Hand Side
Turn clockwise to lock and
counterclockwise to unlock.
31
Edge (CDQ) Canada/United States of America, enUSA, Edition date: 201806, Third-Printing- Child SafetyE112197
Page 48 of 547
Do not attempt to repair or service the
system. Take your vehicle immediately to
an authorized dealer.
If it is necessary to modify an advanced
front airbag system to accommodate a
person with disabilities, contact the Ford
Customer Relationship Center. See
Getting the Services You Need (page
261).
SIDE AIRBAGS WARNING:
Do not place objects
or mount equipment on or near the
airbag cover, on the side of the front or
rear seatbacks, or in areas that may
come into contact with a deploying
airbag. Failure to follow these
instructions may increase the risk of
personal injury in the event of a crash. WARNING:
Do not use accessory
seat covers. The use of accessory seat
covers may prevent the deployment of
the side airbags and increase the risk of
injury in an accident. WARNING:
Do not lean your head
on the door. The side airbag could injure
you as it deploys from the side of the
seatback. WARNING:
Do not attempt to
service, repair, or modify the
supplementary restraint system or
associated components. Failure to
follow this instruction could result in
personal injury or death. WARNING:
If a supplementary
restraint system component has
deployed, it will not function again. Have
the system and associated components
inspected as soon as possible. Failure to
follow this instruction could result in
personal injury or death.
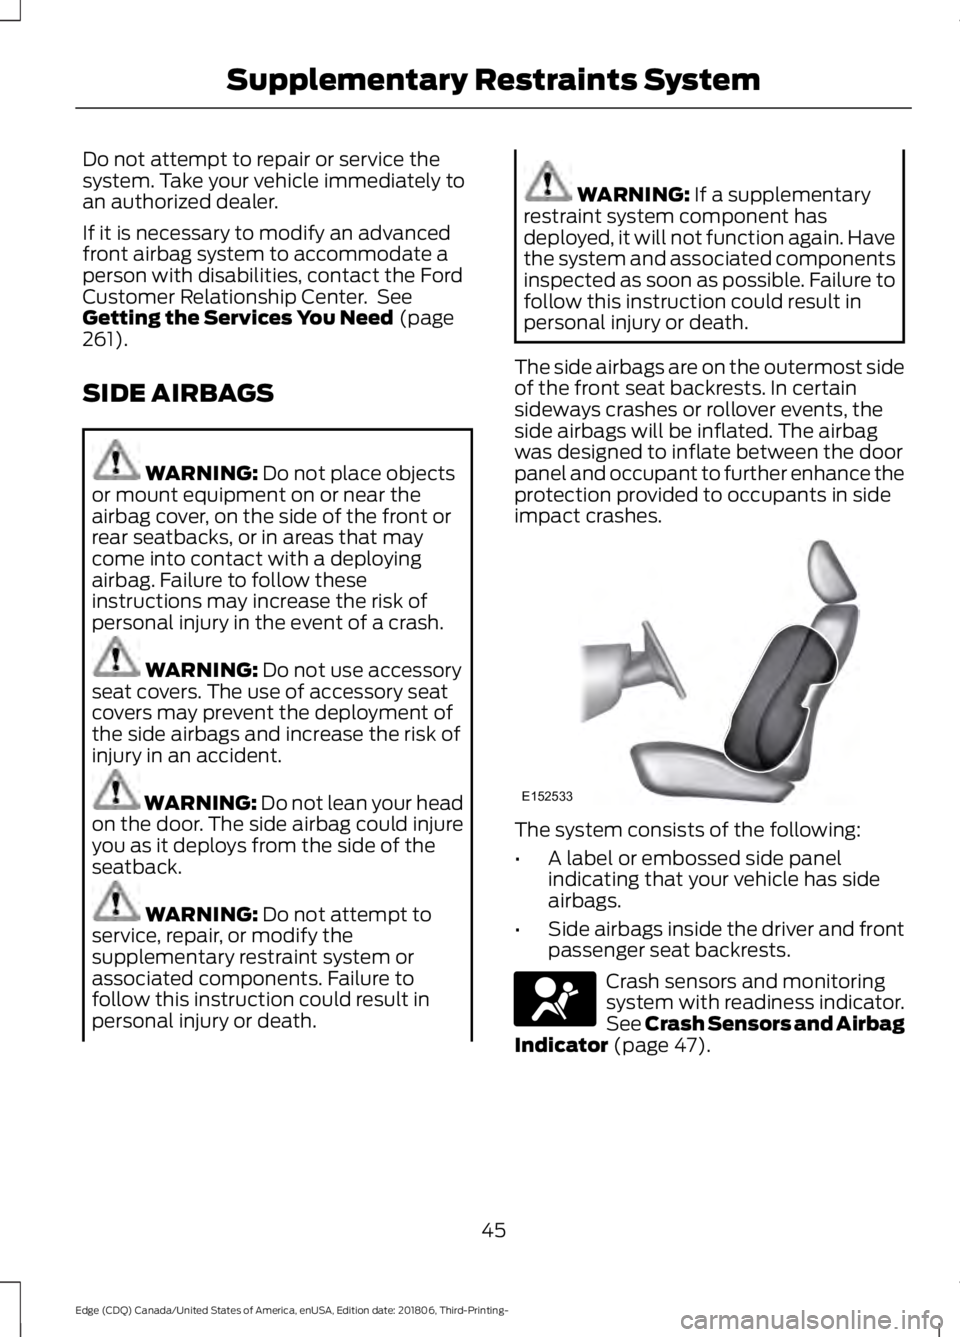
The side airbags are on the outermost side
of the front seat backrests. In certain
sideways crashes or rollover events, the
side airbags will be inflated. The airbag
was designed to inflate between the door
panel and occupant to further enhance the
protection provided to occupants in side
impact crashes. The system consists of the following:
•
A label or embossed side panel
indicating that your vehicle has side
airbags.
• Side airbags inside the driver and front
passenger seat backrests. Crash sensors and monitoring
system with readiness indicator.
See Crash Sensors and Airbag
Indicator
(page 47).
45
Edge (CDQ) Canada/United States of America, enUSA, Edition date: 201806, Third-Printing- Supplementary Restraints SystemE152533 E67017
Page 50 of 547
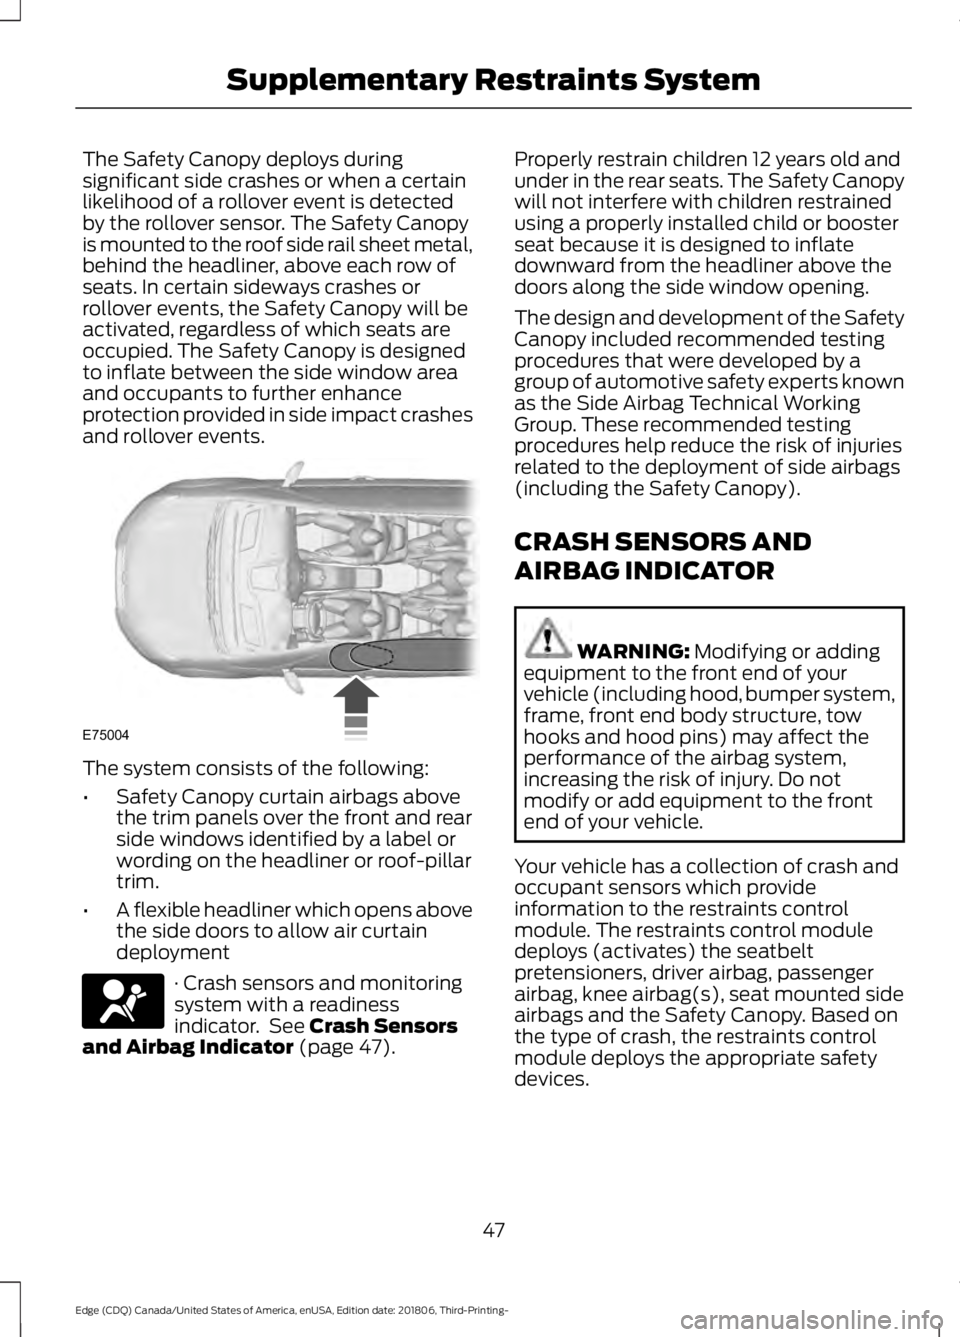
The Safety Canopy deploys during
significant side crashes or when a certain
likelihood of a rollover event is detected
by the rollover sensor. The Safety Canopy
is mounted to the roof side rail sheet metal,
behind the headliner, above each row of
seats. In certain sideways crashes or
rollover events, the Safety Canopy will be
activated, regardless of which seats are
occupied. The Safety Canopy is designed
to inflate between the side window area
and occupants to further enhance
protection provided in side impact crashes
and rollover events.
The system consists of the following:
•
Safety Canopy curtain airbags above
the trim panels over the front and rear
side windows identified by a label or
wording on the headliner or roof-pillar
trim.
• A flexible headliner which opens above
the side doors to allow air curtain
deployment · Crash sensors and monitoring
system with a readiness
indicator. See Crash Sensors
and Airbag Indicator (page 47). Properly restrain children 12 years old and
under in the rear seats. The Safety Canopy
will not interfere with children restrained
using a properly installed child or booster
seat because it is designed to inflate
downward from the headliner above the
doors along the side window opening.
The design and development of the Safety
Canopy included recommended testing
procedures that were developed by a
group of automotive safety experts known
as the Side Airbag Technical Working
Group. These recommended testing
procedures help reduce the risk of injuries
related to the deployment of side airbags
(including the Safety Canopy).
CRASH SENSORS AND
AIRBAG INDICATOR
WARNING:
Modifying or adding
equipment to the front end of your
vehicle (including hood, bumper system,
frame, front end body structure, tow
hooks and hood pins) may affect the
performance of the airbag system,
increasing the risk of injury. Do not
modify or add equipment to the front
end of your vehicle.
Your vehicle has a collection of crash and
occupant sensors which provide
information to the restraints control
module. The restraints control module
deploys (activates) the seatbelt
pretensioners, driver airbag, passenger
airbag, knee airbag(s), seat mounted side
airbags and the Safety Canopy. Based on
the type of crash, the restraints control
module deploys the appropriate safety
devices.
47
Edge (CDQ) Canada/United States of America, enUSA, Edition date: 201806, Third-Printing- Supplementary Restraints SystemE75004 E67017
Page 55 of 547
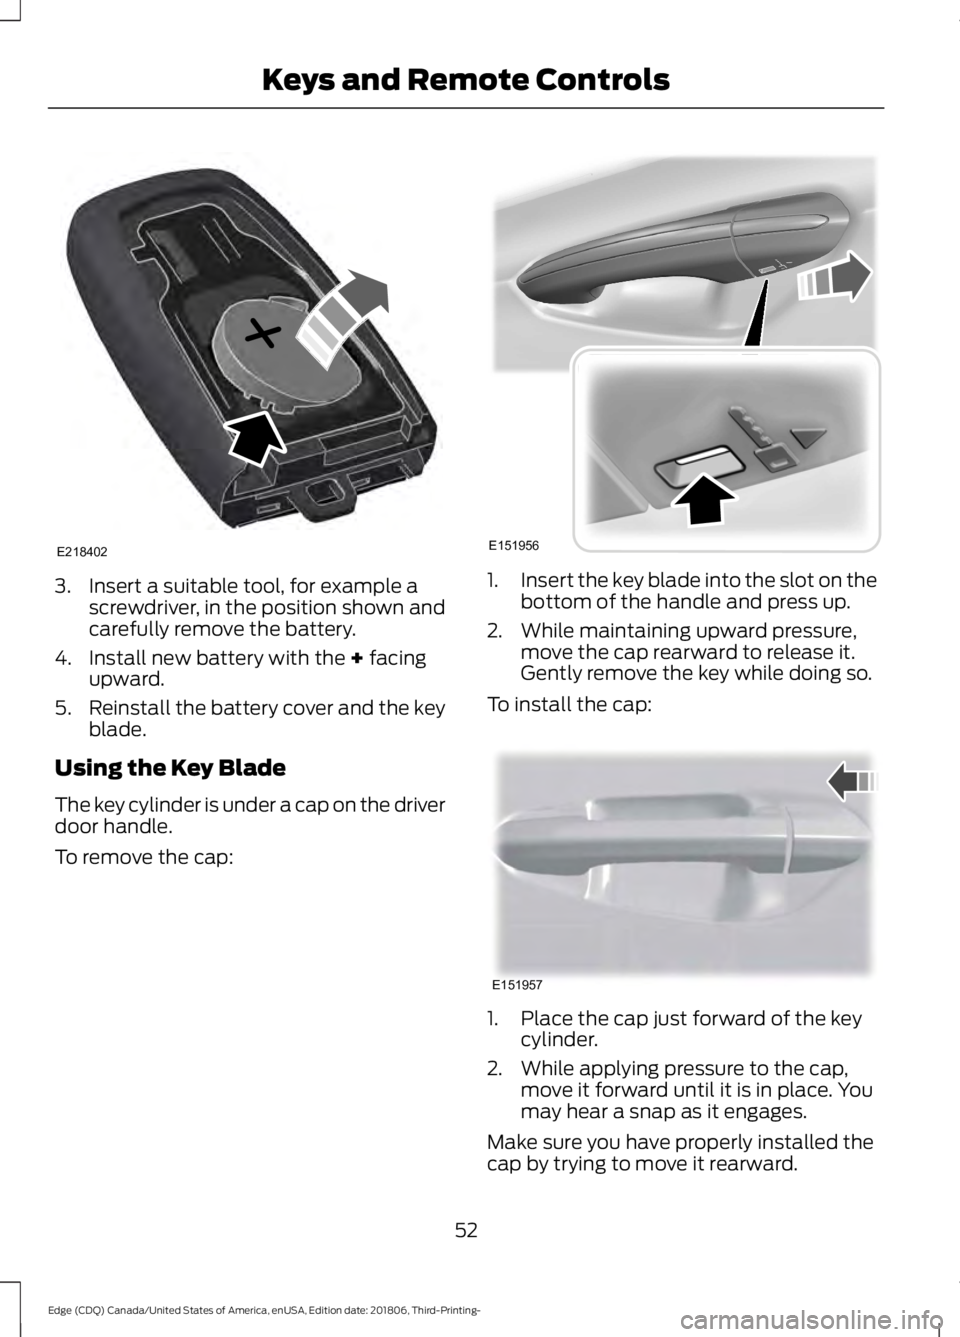
3. Insert a suitable tool, for example a
screwdriver, in the position shown and
carefully remove the battery.
4. Install new battery with the + facing
upward.
5. Reinstall the battery cover and the key
blade.
Using the Key Blade
The key cylinder is under a cap on the driver
door handle.
To remove the cap: 1.
Insert the key blade into the slot on the
bottom of the handle and press up.
2. While maintaining upward pressure, move the cap rearward to release it.
Gently remove the key while doing so.
To install the cap: 1. Place the cap just forward of the key
cylinder.
2. While applying pressure to the cap, move it forward until it is in place. You
may hear a snap as it engages.
Make sure you have properly installed the
cap by trying to move it rearward.
52
Edge (CDQ) Canada/United States of America, enUSA, Edition date: 201806, Third-Printing- Keys and Remote ControlsE218402 E151956 E151957
Page 62 of 547
LOCKING AND UNLOCKING
You can use the power door lock control
or the remote control to lock and unlock
your vehicle.
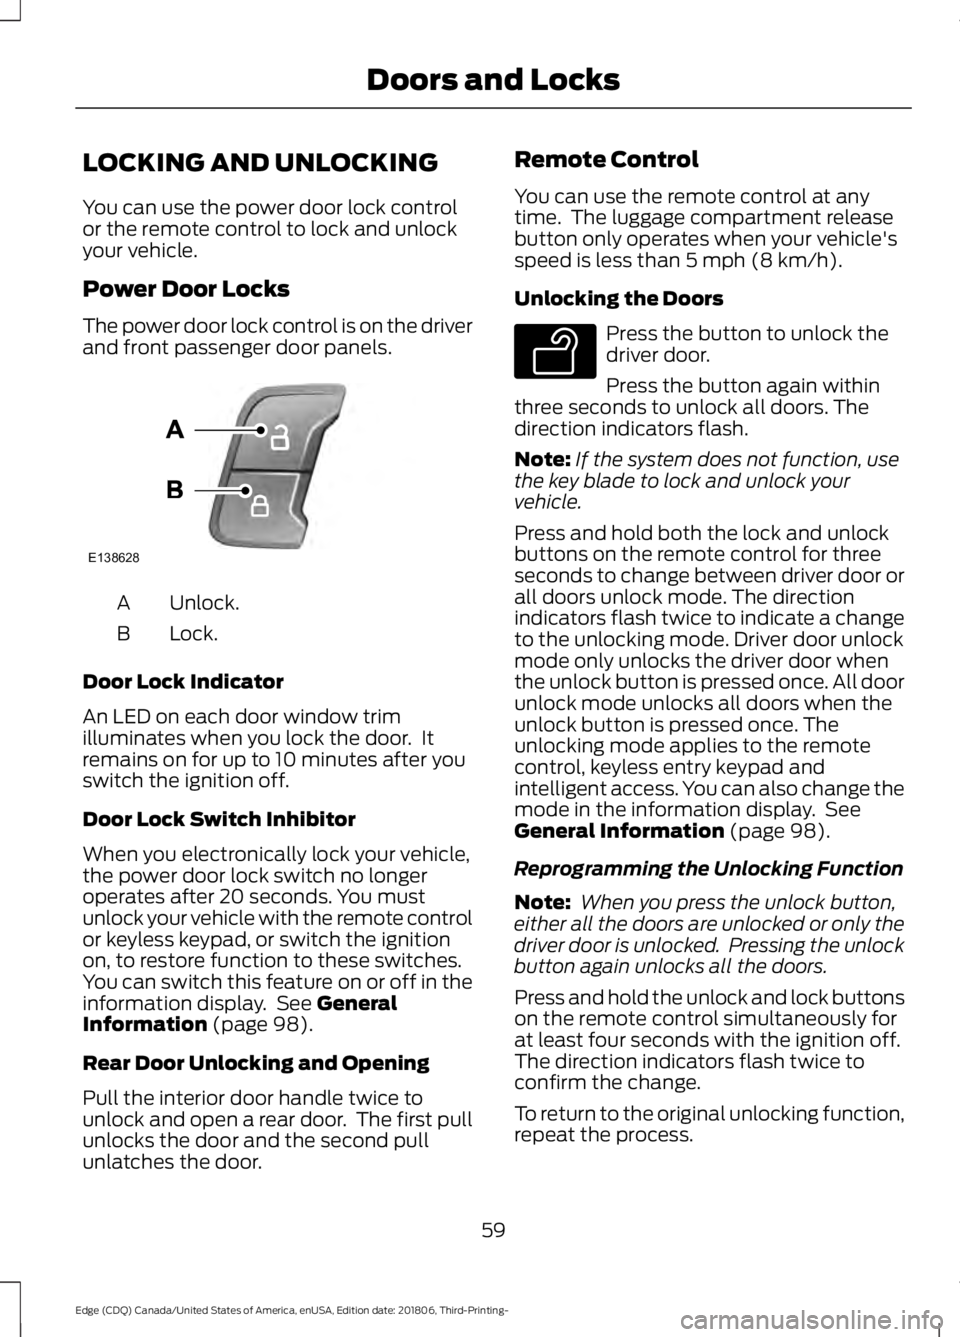
Power Door Locks
The power door lock control is on the driver
and front passenger door panels.
Unlock.
A
Lock.
B
Door Lock Indicator
An LED on each door window trim
illuminates when you lock the door. It
remains on for up to 10 minutes after you
switch the ignition off.
Door Lock Switch Inhibitor
When you electronically lock your vehicle,
the power door lock switch no longer
operates after 20 seconds. You must
unlock your vehicle with the remote control
or keyless keypad, or switch the ignition
on, to restore function to these switches.
You can switch this feature on or off in the
information display. See General
Information (page 98).
Rear Door Unlocking and Opening
Pull the interior door handle twice to
unlock and open a rear door. The first pull
unlocks the door and the second pull
unlatches the door. Remote Control
You can use the remote control at any
time. The luggage compartment release
button only operates when your vehicle's
speed is less than
5 mph (8 km/h).
Unlocking the Doors Press the button to unlock the
driver door.
Press the button again within
three seconds to unlock all doors. The
direction indicators flash.
Note: If the system does not function, use
the key blade to lock and unlock your
vehicle.
Press and hold both the lock and unlock
buttons on the remote control for three
seconds to change between driver door or
all doors unlock mode. The direction
indicators flash twice to indicate a change
to the unlocking mode. Driver door unlock
mode only unlocks the driver door when
the unlock button is pressed once. All door
unlock mode unlocks all doors when the
unlock button is pressed once. The
unlocking mode applies to the remote
control, keyless entry keypad and
intelligent access. You can also change the
mode in the information display. See
General Information
(page 98).
Reprogramming the Unlocking Function
Note: When you press the unlock button,
either all the doors are unlocked or only the
driver door is unlocked. Pressing the unlock
button again unlocks all the doors.
Press and hold the unlock and lock buttons
on the remote control simultaneously for
at least four seconds with the ignition off.
The direction indicators flash twice to
confirm the change.
To return to the original unlocking function,
repeat the process.
59
Edge (CDQ) Canada/United States of America, enUSA, Edition date: 201806, Third-Printing- Doors and LocksE138628 E138629
Page 64 of 547
Activating Intelligent Access
General Information
You can unlock and lock the vehicle
without taking the keys out of your pocket
or purse when your intelligent access key
is within 3 ft (1 m) of your vehicle.
Intelligent access uses a sensor on the
back of the door handle for unlocking and
a separate sensor on the face of each door
handle for locking.
The system does not function if:
• Your vehicle battery has no charge.
• The key battery has no charge.
• The key frequencies are jammed.
Note: The system may not function if the
key is close to metal objects or electronic
devices, for example keys or a cell phone.
Note: If the system does not function, use
the key blade to lock and unlock your
vehicle. See
Remote Control (page 49).
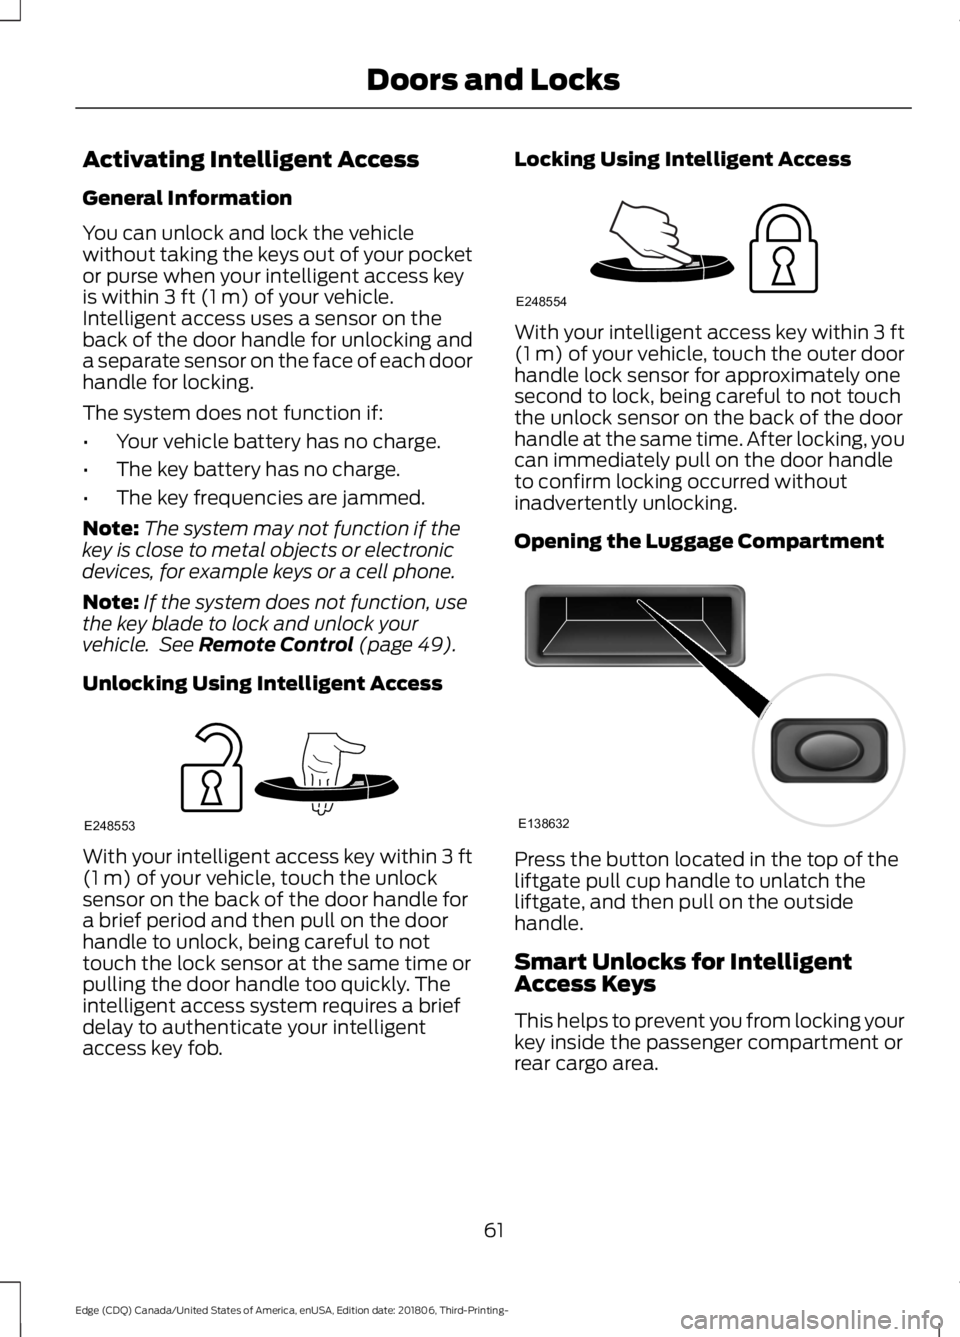
Unlocking Using Intelligent Access With your intelligent access key within
3 ft
(1 m) of your vehicle, touch the unlock
sensor on the back of the door handle for
a brief period and then pull on the door
handle to unlock, being careful to not
touch the lock sensor at the same time or
pulling the door handle too quickly. The
intelligent access system requires a brief
delay to authenticate your intelligent
access key fob. Locking Using Intelligent Access With your intelligent access key within
3 ft
(1 m) of your vehicle, touch the outer door
handle lock sensor for approximately one
second to lock, being careful to not touch
the unlock sensor on the back of the door
handle at the same time. After locking, you
can immediately pull on the door handle
to confirm locking occurred without
inadvertently unlocking.
Opening the Luggage Compartment Press the button located in the top of the
liftgate pull cup handle to unlatch the
liftgate, and then pull on the outside
handle.
Smart Unlocks for Intelligent
Access Keys
This helps to prevent you from locking your
key inside the passenger compartment or
rear cargo area.
61
Edge (CDQ) Canada/United States of America, enUSA, Edition date: 201806, Third-Printing- Doors and LocksE248553 E248554 E138632
Page 68 of 547
2.
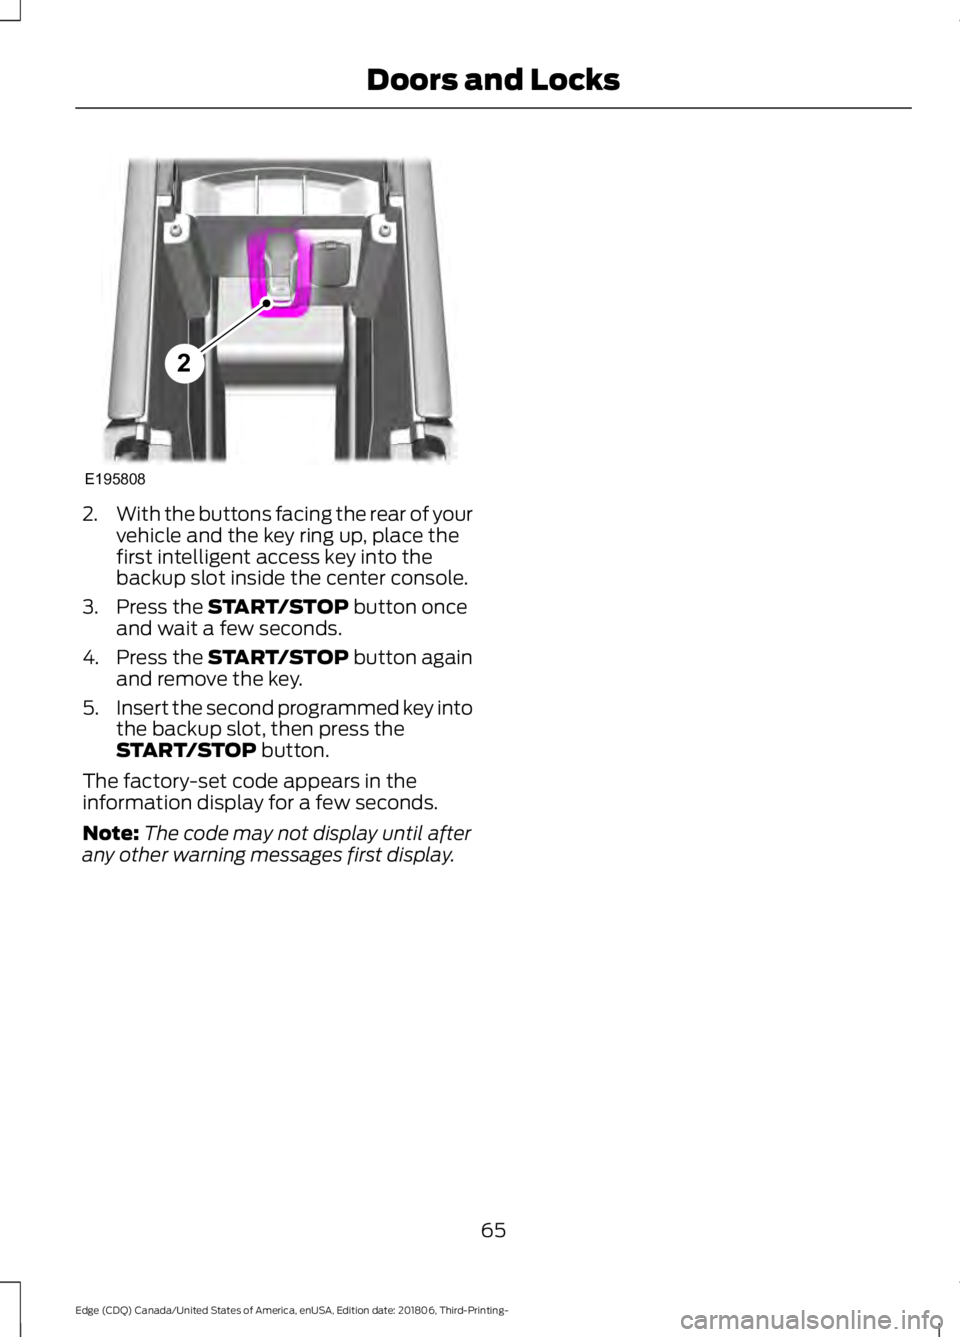
With the buttons facing the rear of your
vehicle and the key ring up, place the
first intelligent access key into the
backup slot inside the center console.
3. Press the START/STOP button once
and wait a few seconds.
4. Press the
START/STOP button again
and remove the key.
5. Insert the second programmed key into
the backup slot, then press the
START/STOP
button.
The factory-set code appears in the
information display for a few seconds.
Note: The code may not display until after
any other warning messages first display.
65
Edge (CDQ) Canada/United States of America, enUSA, Edition date: 201806, Third-Printing- Doors and LocksE195808
2