window FORD EDGE 2020 Owner's Guide
[x] Cancel search | Manufacturer: FORD, Model Year: 2020, Model line: EDGE, Model: FORD EDGE 2020Pages: 495, PDF Size: 6.38 MB
Page 273 of 495
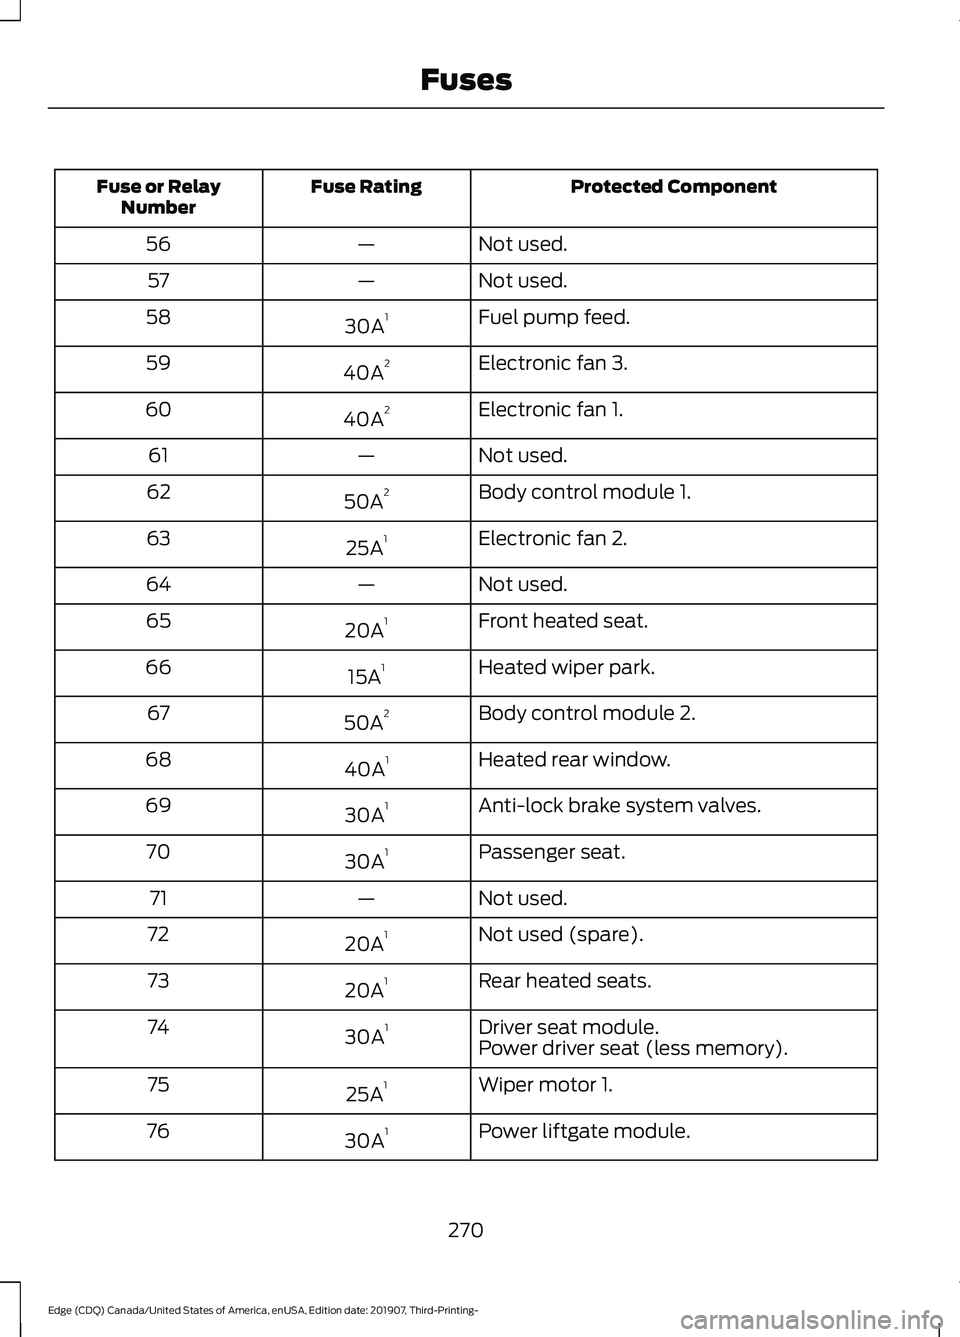
Protected Component
Fuse Rating
Fuse or Relay
Number
Not used.
—
56
Not used.
—
57
Fuel pump feed.
30A 1
58
Electronic fan 3.
40A 2
59
Electronic fan 1.
40A 2
60
Not used.
—
61
Body control module 1.
50A 2
62
Electronic fan 2.
25A 1
63
Not used.
—
64
Front heated seat.
20A 1
65
Heated wiper park.
15A 1
66
Body control module 2.
50A 2
67
Heated rear window.
40A 1
68
Anti-lock brake system valves.
30A 1
69
Passenger seat.
30A 1
70
Not used.
—
71
Not used (spare).
20A 1
72
Rear heated seats.
20A 1
73
Driver seat module.
30A 1
74
Power driver seat (less memory).
Wiper motor 1.
25A 1
75
Power liftgate module.
30A 1
76
270
Edge (CDQ) Canada/United States of America, enUSA, Edition date: 201907, Third-Printing- Fuses
Page 276 of 495
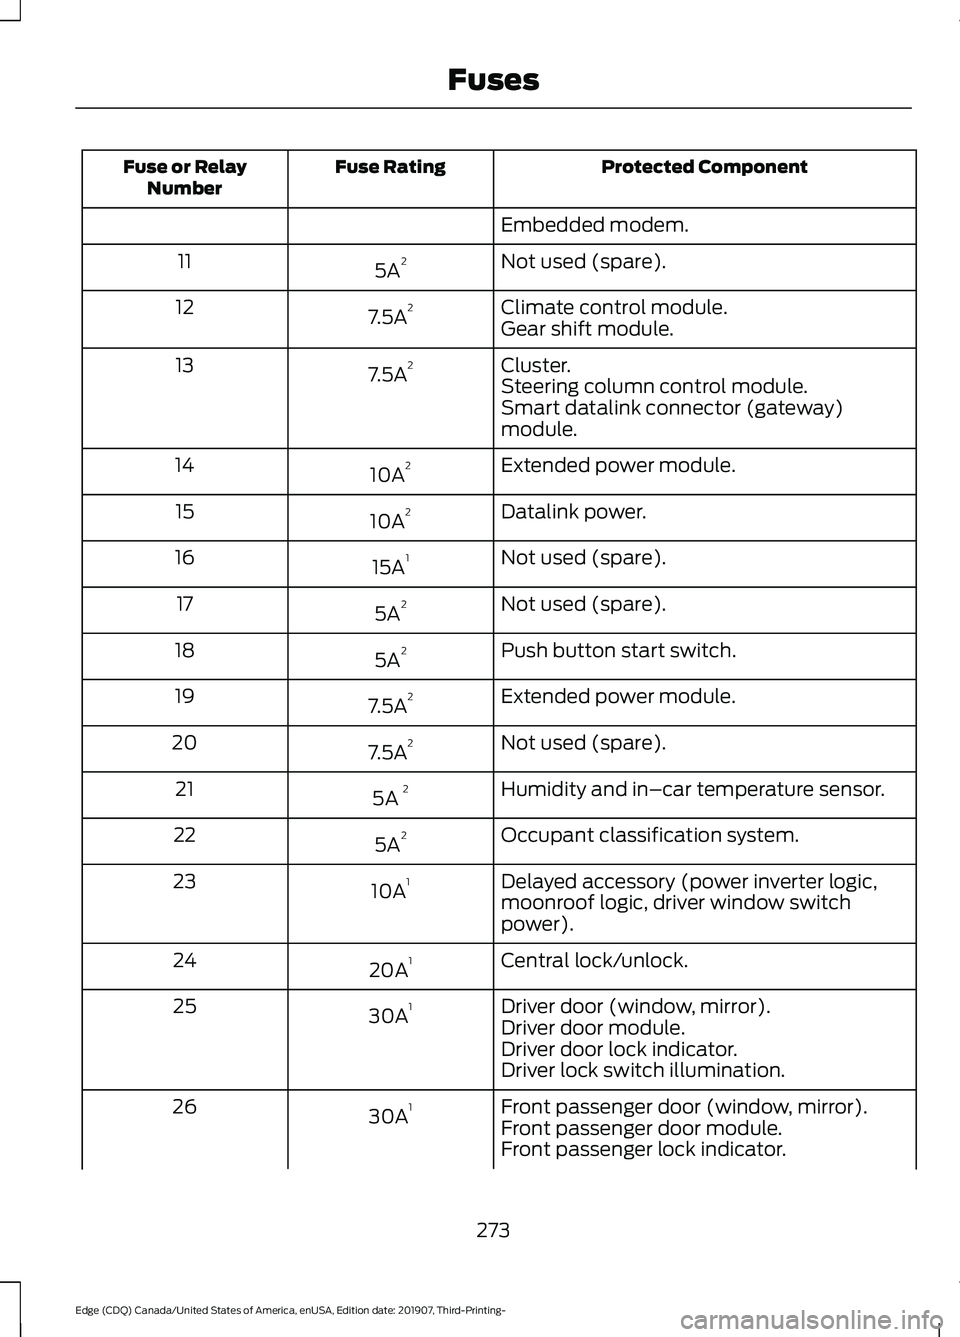
Protected Component
Fuse Rating
Fuse or Relay
Number
Embedded modem.
Not used (spare).
5A 2
11
Climate control module.
7.5A 2
12
Gear shift module.
Cluster.
7.5A 2
13
Steering column control module.
Smart datalink connector (gateway)
module.
Extended power module.
10A 2
14
Datalink power.
10A 2
15
Not used (spare).
15A 1
16
Not used (spare).
5A 2
17
Push button start switch.
5A 2
18
Extended power module.
7.5A 2
19
Not used (spare).
7.5A 2
20
Humidity and in–car temperature sensor.
5A 2
21
Occupant classification system.
5A 2
22
Delayed accessory (power inverter logic,
moonroof logic, driver window switch
power).
10A
1
23
Central lock/unlock.
20A 1
24
Driver door (window, mirror).
30A 1
25
Driver door module.
Driver door lock indicator.
Driver lock switch illumination.
Front passenger door (window, mirror).
30A 1
26
Front passenger door module.
Front passenger lock indicator.
273
Edge (CDQ) Canada/United States of America, enUSA, Edition date: 201907, Third-Printing- Fuses
Page 277 of 495
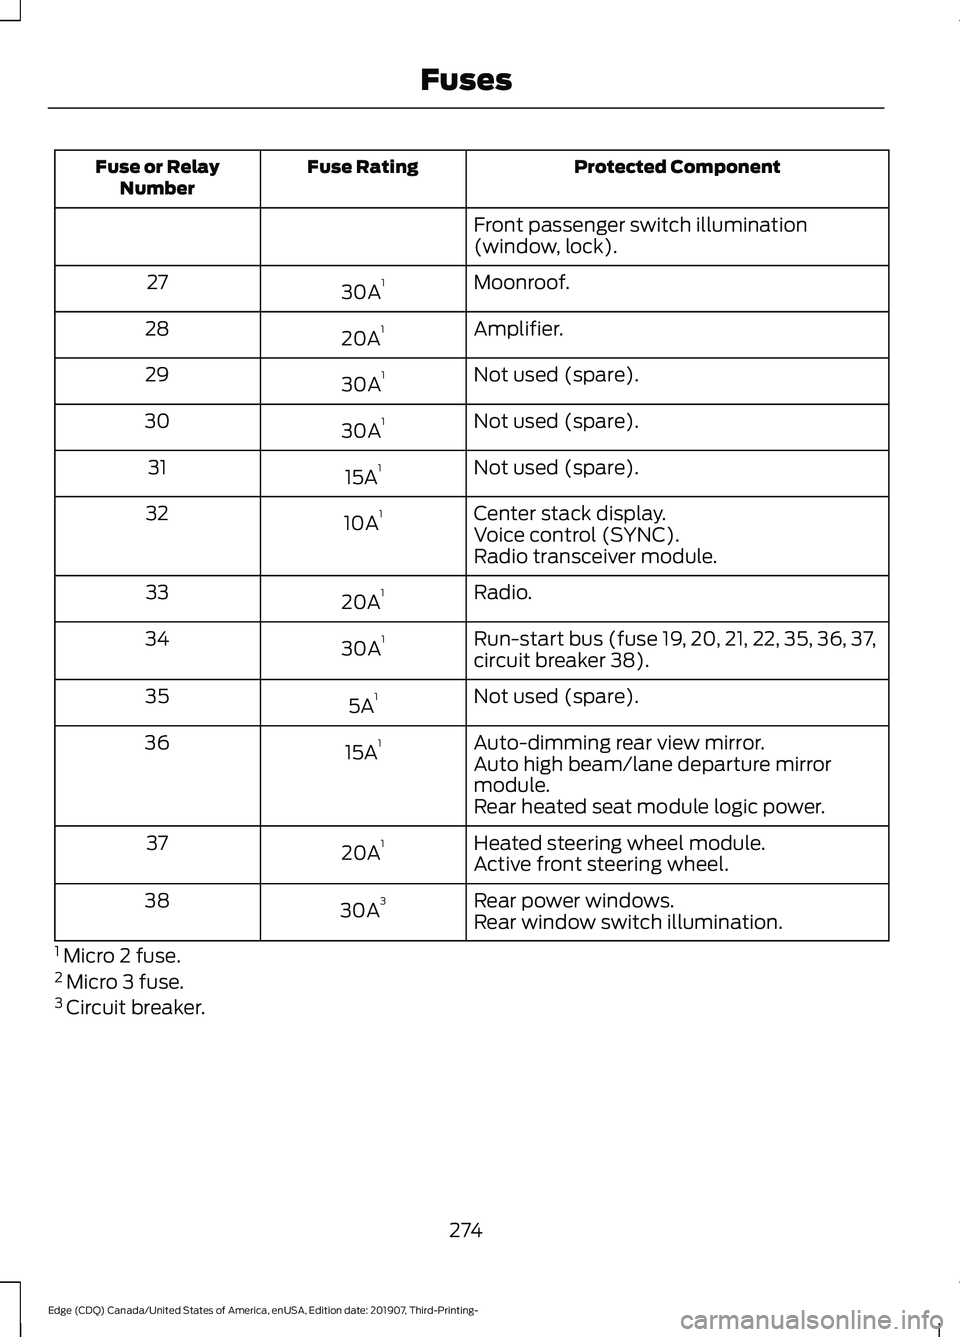
Protected Component
Fuse Rating
Fuse or Relay
Number
Front passenger switch illumination
(window, lock).
Moonroof.
30A 1
27
Amplifier.
20A 1
28
Not used (spare).
30A 1
29
Not used (spare).
30A 1
30
Not used (spare).
15A 1
31
Center stack display.
10A 1
32
Voice control (SYNC).
Radio transceiver module.
Radio.
20A 1
33
Run-start bus (fuse 19, 20, 21, 22, 35, 36, 37,
circuit breaker 38).
30A 1
34
Not used (spare).
5A 1
35
Auto-dimming rear view mirror.
15A 1
36
Auto high beam/lane departure mirror
module.
Rear heated seat module logic power.
Heated steering wheel module.
20A 1
37
Active front steering wheel.
Rear power windows.
30A 3
38
Rear window switch illumination.
1 Micro 2 fuse.
2 Micro 3 fuse.
3 Circuit breaker.
274
Edge (CDQ) Canada/United States of America, enUSA, Edition date: 201907, Third-Printing- Fuses
Page 293 of 495
WARNING: Battery posts,
terminals and related accessories
contain lead and lead compounds,
chemicals known to the State of
California to cause cancer and
reproductive harm. Wash your hands
after handling
.
Your vehicle has a Motorcraft®
maintenance-free battery which normally
does not require additional water during
its life of service.
Note: If your vehicle's battery has a cover
or shield, make sure it is reinstalled after the
battery has been cleaned or replaced.
Note: See an authorized dealer for low
voltage battery access, testing, or
replacement.
When a low voltage battery replacement
is necessary, see an authorized dealer to
replace the low voltage battery with a Ford
recommended replacement low voltage
battery that matches the electrical
requirements of the vehicle.
To ensure proper operation of the battery
management system (BMS), do not allow
a technician to connect any electrical
device ground connection directly to the
low voltage battery negative post. A
connection at the low voltage battery
negative post can cause inaccurate
measurements of the battery condition
and potential incorrect system operation.
Note: If a person adds electrical or
electronic accessories or components to the
vehicle, the accessories or components may
adversely affect the low voltage battery
performance and durability and may also
affect the performance of other electrical
systems in the vehicle.
For longer, trouble-free operation, keep the
top of the battery clean and dry. Also,
make certain the battery cables are always
tightly fastened to the battery terminals. If you see any corrosion on the battery or
terminals, remove the cables from the
terminals and clean with a wire brush. You
can neutralize the acid with a solution of
baking soda and water.
When a battery replacement is required,
the battery should only be replaced with
a Ford recommended replacement battery
that matches the electrical requirements
of the vehicle.
Because your vehicle
’s engine is
electronically-controlled by a computer,
some engine control settings are
maintained by power from the low voltage
battery. Some engine computer settings,
like the idle trim and fuel trim strategy,
optimize the driveability and performance
of the engine. Some other computer
settings, like the clock and radio station
presets, are also maintained in memory by
power from the low voltage battery. When
a technician disconnects and connects the
low voltage battery, these settings are
erased. Complete the following procedure
in order to restore the settings:
1. With the vehicle at a complete stop, set the parking brake.
2. Shift the transmission into park (P).
3. Switch off all accessories.
4. Fully press the brake pedal and start the vehicle.
5. Run the engine until it reaches normal operating temperature. While the
engine is warming up, complete the
following: Reset the clock. See
Audio
System (page 372). Reset the power
windows bounce-back feature. See
Windows and Mirrors
(page 93).
Reset the radio station presets. See
Audio System
(page 372).
6. Allow the engine to idle for at least one
minute. If the engine turns off, press
the accelerator pedal to start the
engine.
290
Edge (CDQ) Canada/United States of America, enUSA, Edition date: 201907, Third-Printing- Maintenance
Page 296 of 495
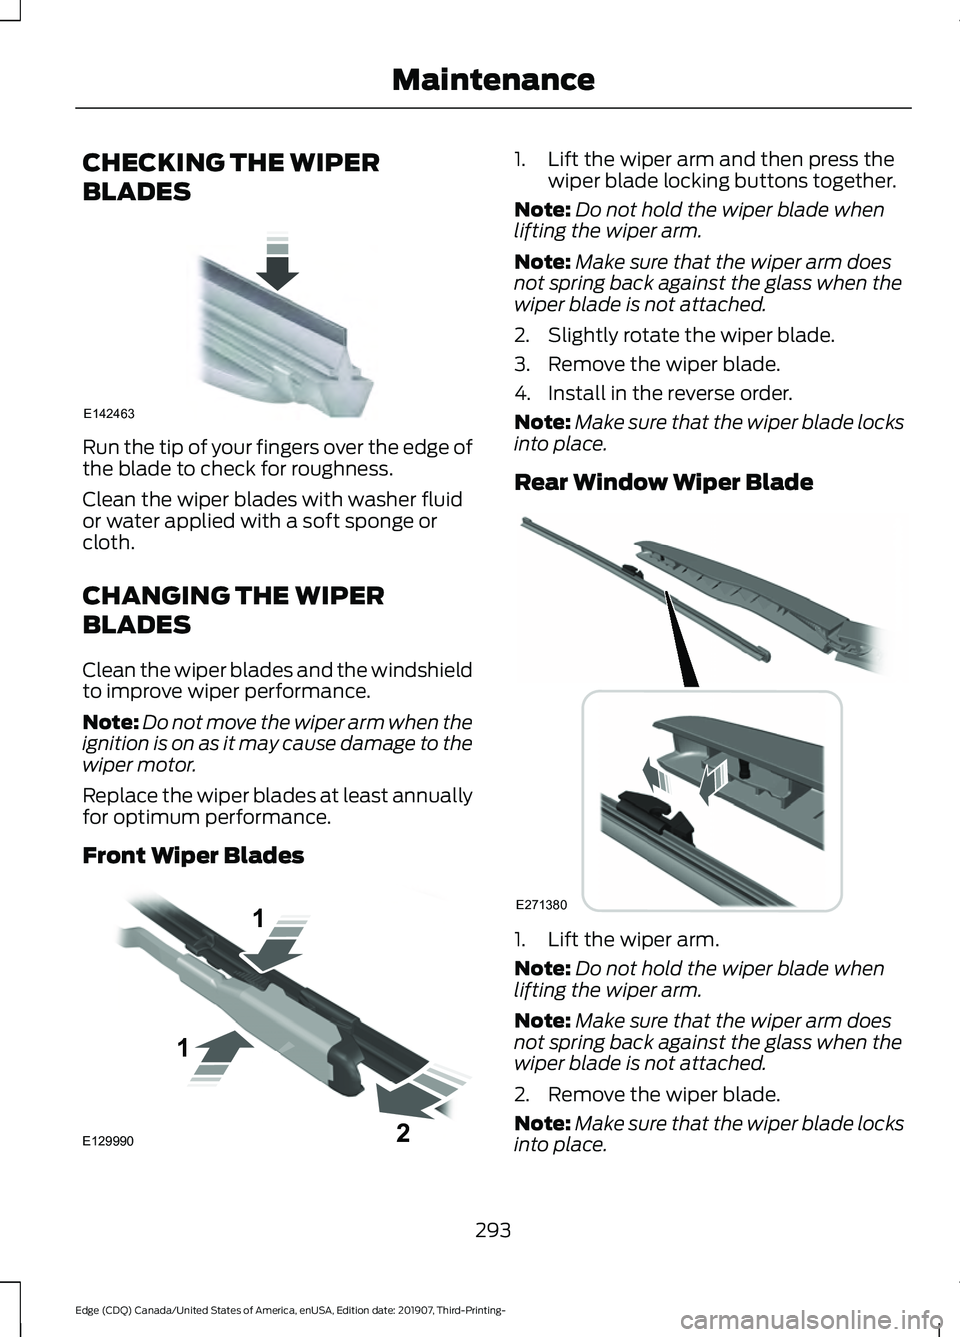
CHECKING THE WIPER
BLADES
Run the tip of your fingers over the edge of
the blade to check for roughness.
Clean the wiper blades with washer fluid
or water applied with a soft sponge or
cloth.
CHANGING THE WIPER
BLADES
Clean the wiper blades and the windshield
to improve wiper performance.
Note:
Do not move the wiper arm when the
ignition is on as it may cause damage to the
wiper motor.
Replace the wiper blades at least annually
for optimum performance.
Front Wiper Blades 1. Lift the wiper arm and then press the
wiper blade locking buttons together.
Note: Do not hold the wiper blade when
lifting the wiper arm.
Note: Make sure that the wiper arm does
not spring back against the glass when the
wiper blade is not attached.
2. Slightly rotate the wiper blade.
3. Remove the wiper blade.
4. Install in the reverse order.
Note: Make sure that the wiper blade locks
into place.
Rear Window Wiper Blade 1. Lift the wiper arm.
Note:
Do not hold the wiper blade when
lifting the wiper arm.
Note: Make sure that the wiper arm does
not spring back against the glass when the
wiper blade is not attached.
2. Remove the wiper blade.
Note: Make sure that the wiper blade locks
into place.
293
Edge (CDQ) Canada/United States of America, enUSA, Edition date: 201907, Third-Printing- MaintenanceE142463 E129990
1
1 2 E271380
Page 303 of 495
•
Never wash or rinse the engine while it
is hot or running; water in the running
engine may cause internal damage.
• Never wash or rinse any ignition coil,
spark plug wire or spark plug well, or
the area in and around these locations.
• Cover the battery, power distribution
box, and air filter assembly to prevent
water damage when cleaning the
engine.
CLEANING THE WINDOWS AND
WIPER BLADES
Car wash chemicals and environmental
fallout can result in windshield and wiper
blade contamination. Dirty windshield and
wipers will result in poor windshield wiper
operation. Keep the windshield and wiper
blades clean to maintain windshield wiper
performance.
To clean the windshield and wiper blades:
• Clean the windshield with a
non-abrasive glass cleaner. When
cleaning the interior of the windshield,
avoid getting any glass cleaner on the
instrument panel or door panels. Wipe
any glass cleaner off these surfaces
immediately.
• For windshields contaminated with
tree sap, chemicals, wax or bugs, clean
the entire windshield using steel wool
(no greater than 0000 grade) in a
circular motion and rinse with water.
• Clean the wiper blades with isopropyl
rubbing alcohol or windshield washer
concentrate.
Note: Do not use razor blades or other
sharp objects to clean or remove decals
from the inside of the heated rear window.
The vehicle warranty does not cover
damage caused to the heated rear window
grid lines. CLEANING THE INTERIOR WARNING: Do not use cleaning
solvents, bleach or dye on the vehicle's
seatbelts, as these actions may weaken
the belt webbing. WARNING:
On vehicles equipped
with seat-mounted airbags, do not use
chemical solvents or strong detergents.
Such products could contaminate the
side airbag system and affect
performance of the side airbag in a crash.
For fabric, carpets, cloth seats and seats
equipped with side airbags:
• Remove dust and loose dirt with a
vacuum cleaner.
• Remove light stains and soil with
Motorcraft Professional Strength
Carpet & Upholstery Cleaner.
• If grease or tar is present on the
material, spot-clean the area first with
Motorcraft Spot and Stain Remover. In
Canada, use Motorcraft Multi-Purpose
Cleaner.
• If a ring forms on the fabric after spot
cleaning, clean the entire area
immediately (but do not oversaturate)
or the ring will set.
• Do not use household cleaning
products or glass cleaners, which can
stain and discolor the fabric and affect
the flame retardant abilities of the seat
materials.
Mirrors
Do not clean the housing or glass of any
mirror with harsh abrasives, fuel or other
petroleum or ammonia-based cleaning
products.
300
Edge (CDQ) Canada/United States of America, enUSA, Edition date: 201907, Third-Printing- Vehicle Care
Page 307 of 495
Miscellaneous
•
Make sure all linkages, cables, levers
and pins under your vehicle are covered
with grease to prevent rust.
• Move vehicles at least 25 ft (7.5 m)
every 15 days to lubricate working parts
and prevent corrosion.
Removing Vehicle From Storage
When your vehicle is ready to come out of
storage, do the following:
• Wash your vehicle to remove any dirt
or grease film build-up on window
surfaces.
• Check windshield wipers for any
deterioration.
• Check under the hood for any foreign
material that may have collected
during storage such as mice or squirrel
nests.
• Check the exhaust for any foreign
material that may have collected
during storage.
• Check tire pressures and set tire
inflation per the Tire Label.
• Check brake pedal operation. Drive
your vehicle
15 ft (4.5 m) back and
forth to remove rust build-up.
• Check fluid levels (including coolant,
oil and gas) to make sure there are no
leaks, and fluids are at recommended
levels.
• If you remove the battery, clean the
battery cable ends and check for
damage.
Contact an authorized dealer if you have
any concerns or issues. BODY STYLING KITS
The distance between the underside of
your vehicle and the ground is less than
that of other models. Drive with extreme
care to avoid damage to your vehicle.
304
Edge (CDQ) Canada/United States of America, enUSA, Edition date: 201907, Third-Printing- Vehicle Care
Page 310 of 495
Tire valve connector.
G
Accessory power plug.
H
Casing/housing.
I
Bike/raft/sports ball adapters.
J
General Information WARNING: Failure to follow these
guidelines could result in an increased
risk of loss of vehicle control, injury or
death.
Note: Do not use the kit if you have severely
damaged a tire. Only seal punctures within
the tire tread with the kit.
Do not attempt to repair punctures larger
than ¼ inch (6 millimeters) or damage to
the tire's sidewall. The tire may not
completely seal.
Loss of air pressure may adversely affect
tire performance. For this reason:
Note: Do not drive the vehicle above
50 mph (80 km/h)
.
Note: Do not drive further than
120 mi
(200 km). Drive only to the closest
authorized dealer or tire repair shop to have
your tire inspected.
• Drive carefully and avoid abrupt
steering maneuvers.
• Periodically monitor tire inflation
pressure in the affected tire; if the tire
is losing pressure, have the vehicle
towed.
• Read the information in the Tips for
Use of the Kit section to make sure safe
operation of the kit and your vehicle.
Tips for Use of the Kit
To ensure safe operation of the kit: •
Read all instructions and cautions fully.
• Before operating the kit, make sure
your vehicle is safely off the road and
away from moving traffic. Switch on
the hazard lights.
• Always set the parking brake to ensure
the vehicle does not move
unexpectedly.
• Do not remove any foreign objects,
such as nails or screws, from the tire.
• When using the kit, leave the engine
running (only if the vehicle is outdoors
or in a well-ventilated area) so the
compressor does not drain the
vehicle's battery.
• Do not allow the compressor to
operate continuously for more than 15
minutes. This will help prevent the
compressor from overheating.
• Never leave the kit unattended during
operation.
• Sealant compound contains latex.
Those with latex sensitivities should
use appropriate precautions to avoid
an allergic reaction.
• Keep the kit away from children.
• Only use the kit when the ambient
temperature is between -22°F (-30°C)
and 158°F (70°C).
• Only use the sealing compound before
the use-by date. The use-by date is on
a label on the sealant canister, which
you can see through the rectangular
viewing window on the bottom of the
compressor. Check the use-by date
regularly and replace the canister when
the sealant expires.
• Do not store the kit unsecured inside
the passenger compartment of the
vehicle as it may cause injury during a
sudden stop or crash. Always store the
kit in its original location.
307
Edge (CDQ) Canada/United States of America, enUSA, Edition date: 201907, Third-Printing- Wheels and Tires
Page 315 of 495
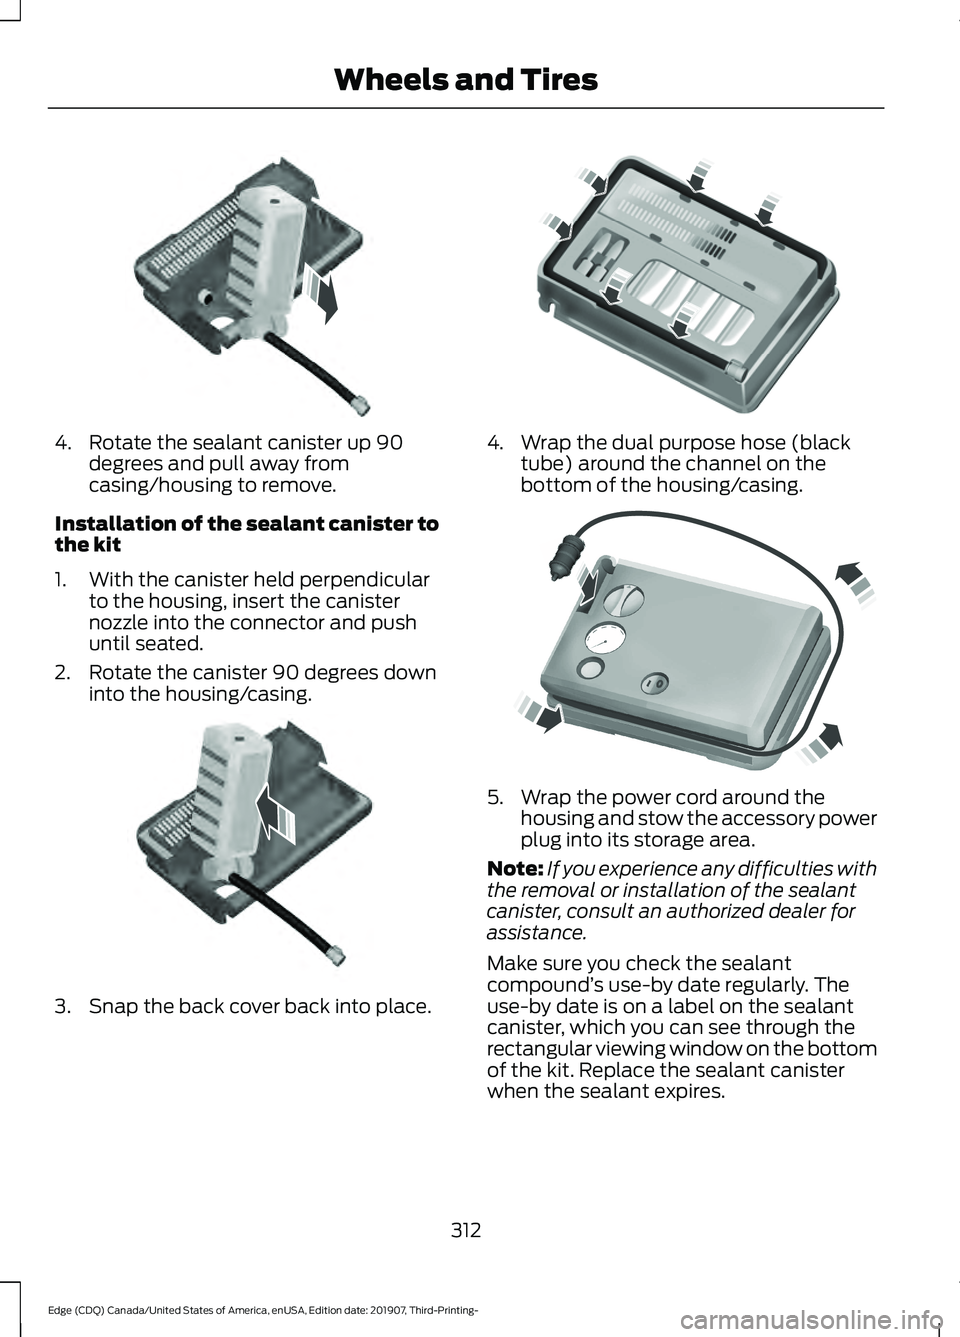
4. Rotate the sealant canister up 90
degrees and pull away from
casing/housing to remove.
Installation of the sealant canister to
the kit
1. With the canister held perpendicular to the housing, insert the canister
nozzle into the connector and push
until seated.
2. Rotate the canister 90 degrees down into the housing/casing. 3. Snap the back cover back into place. 4. Wrap the dual purpose hose (black
tube) around the channel on the
bottom of the housing/casing. 5. Wrap the power cord around the
housing and stow the accessory power
plug into its storage area.
Note: If you experience any difficulties with
the removal or installation of the sealant
canister, consult an authorized dealer for
assistance.
Make sure you check the sealant
compound ’s use-by date regularly. The
use-by date is on a label on the sealant
canister, which you can see through the
rectangular viewing window on the bottom
of the kit. Replace the sealant canister
when the sealant expires.
312
Edge (CDQ) Canada/United States of America, enUSA, Edition date: 201907, Third-Printing- Wheels and Tires E175987 E175988 E175989 E175990
Page 345 of 495
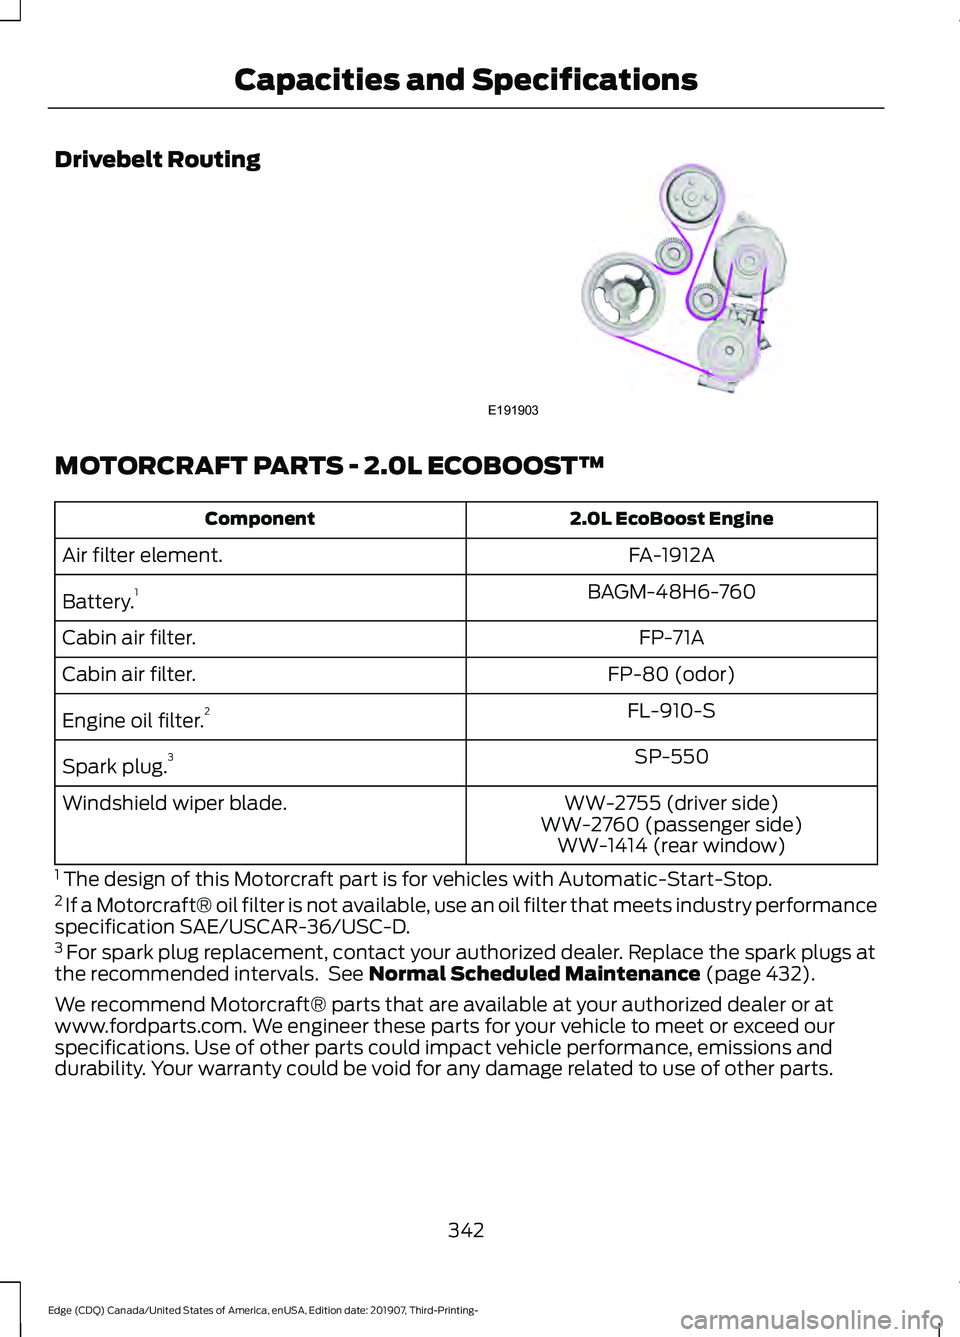
Drivebelt Routing
MOTORCRAFT PARTS - 2.0L ECOBOOST™
2.0L EcoBoost Engine
Component
FA-1912A
Air filter element.
BAGM-48H6-760
Battery. 1
FP-71A
Cabin air filter.
FP-80 (odor)
Cabin air filter.
FL-910-S
Engine oil filter. 2
SP-550
Spark plug. 3
WW-2755 (driver side)
Windshield wiper blade.
WW-2760 (passenger side)WW-1414 (rear window)
1 The design of this Motorcraft part is for vehicles with Automatic-Start-Stop.
2 If a Motorcraft® oil filter is not available, use an oil filter that meets industry performance
specification SAE/USCAR-36/USC-D.
3 For spark plug replacement, contact your authorized dealer. Replace the spark plugs at
the recommended intervals. See Normal Scheduled Maintenance (page 432).
We recommend Motorcraft® parts that are available at your authorized dealer or at
www.fordparts.com. We engineer these parts for your vehicle to meet or exceed our
specifications. Use of other parts could impact vehicle performance, emissions and
durability. Your warranty could be void for any damage related to use of other parts.
342
Edge (CDQ) Canada/United States of America, enUSA, Edition date: 201907, Third-Printing- Capacities and SpecificationsE191903