clock FORD EDGE 2021 Owners Manual
[x] Cancel search | Manufacturer: FORD, Model Year: 2021, Model line: EDGE, Model: FORD EDGE 2021Pages: 500, PDF Size: 8.52 MB
Page 15 of 500
Tire Pressure Monitoring System –
Troubleshooting ......................................339
Changing a Road Wheel
Changing a Flat Tire ....................................
341
Wheel Nuts ...................................................
346
Capacities and Specifications
Engine Specifications - 2.0L EcoBoost™ ........................................................................\
347
Engine Specifications - 2.7L EcoBoost™ ........................................................................\
348
Motorcraft Parts - 2.0L EcoBoost™ ....
349
Motorcraft Parts - 2.7L EcoBoost™ .....
350
Engine Oil Capacity and Specification - 2.0L EcoBoost™ ......................................
351
Engine Oil Capacity and Specification - 2.7L EcoBoost™ ......................................
352
Cooling System Capacity and Specification - 2.0L EcoBoost™ ......
354
Cooling System Capacity and Specification - 2.7L EcoBoost™ .......
355
Fuel Tank Capacity .....................................
355
Air Conditioning System Capacity and Specification - 2.0L EcoBoost™ ......
356
Air Conditioning System Capacity and Specification - 2.7L EcoBoost™ ........
357
Washer Fluid Specification .....................
357
Brake Fluid Specification .........................
358
Vehicle Identification
Vehicle Identification Number ...............
359
Connected Vehicle
What Is a Connected Vehicle ................
360
Connected Vehicle Requirements .......
360
Connected Vehicle Limitations .............
360
Connecting the Vehicle to a Mobile Network .....................................................
360
Connecting the Vehicle to a Wi-Fi Network .....................................................
360Connected Vehicle – Troubleshooting
........................................................................\
.
361
Vehicle Wi-Fi Hotspot
Creating a Vehicle Wi-Fi Hotspot .........
364
Changing the Vehicle Wi-Fi Hotspot Name or Password ................................
364
Audio System
Audio System Precautions .....................
366
Switching the Audio Unit On and Off .......................................................................
366
Selecting the Audio Source ....................
366
Playing or Pausing the Audio Source .......................................................................
366
Adjusting the Volume ...............................
366
Switching Shuffle Mode On and Off .......................................................................
366
Switching Repeat Mode On and Off ........................................................................\
367
Setting a Memory Preset .........................
367
Muting the Audio .........................................
367
Adjusting the Sound Settings ................
367
Setting the Clock and Date .....................
367
AM/FM Radio ...............................................
368
Switching the Display On and Off .......
369
Digital Radio .................................................
369
Satellite Radio .............................................
370
Identifying the Audio Unit ........................
372
Information and Entertainment Display
Overview
Information and Entertainment Display Precautions ...............................................
373
Information and Entertainment Display Limitations .................................................
373
Status Bar ......................................................
373
Accessing Feature Drawers .....................
374
11
2021 Edge (CDQ) Canada/United States of America, enUSA, Edition date: 202011, First-Printing Table of Contents
Page 45 of 500
If the booster seat slides on the vehicle
seat upon which it is being used, placing a
rubberized mesh sold as shelf or carpet
liner under the booster seat may improve
this condition. Do not use any item thicker
than this under the booster seat. Check
with the booster seat manufacturer's
instructions.
CHILD SAFETY LOCKS
WARNING: You cannot open the
rear doors from inside if you have put the
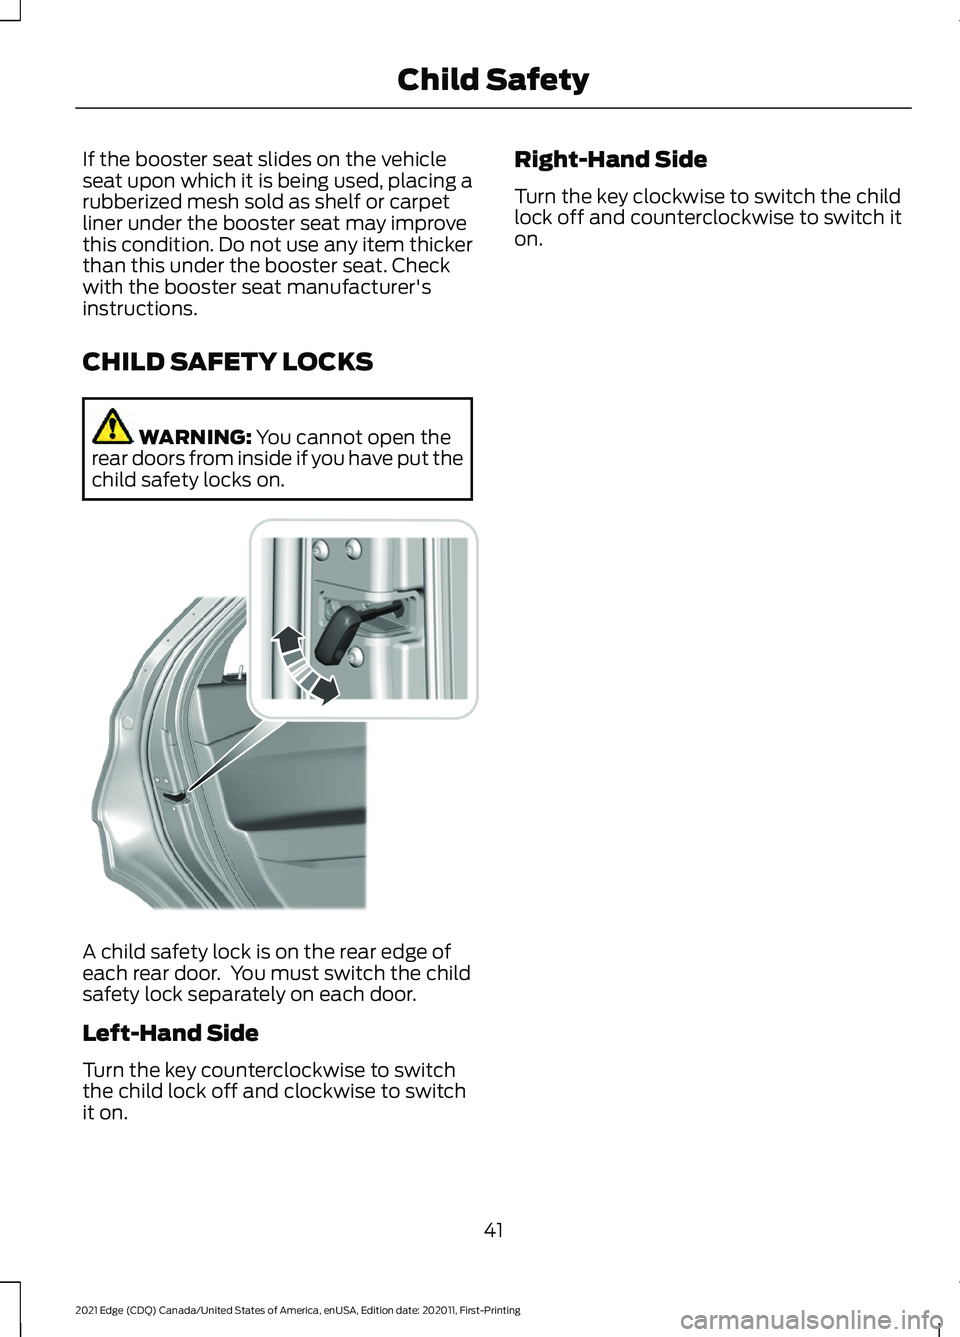
child safety locks on. A child safety lock is on the rear edge of
each rear door. You must switch the child
safety lock separately on each door.
Left-Hand Side
Turn the key counterclockwise to switch
the child lock off and clockwise to switch
it on. Right-Hand Side
Turn the key clockwise to switch the child
lock off and counterclockwise to switch it
on.
41
2021 Edge (CDQ) Canada/United States of America, enUSA, Edition date: 202011, First-Printing Child Safety E287259
Page 74 of 500
OPERATING THE DOORS
FROM OUTSIDE YOUR
VEHICLE
Unlocking and Locking the Doors
Using the Remote Control
You can only use the remote control when
your vehicle is stationary.
Unlocking the Doors
Press the button to unlock all
doors.
Locking the Doors Press the button to lock all
doors. One short flash of the
turn signal lamps confirms that
your vehicle has locked.
Note: For more information on operating
the doors from outside your vehicle See
Keyless Entry (page 74).
Unlocking and Locking the Doors
Using the Key Blade
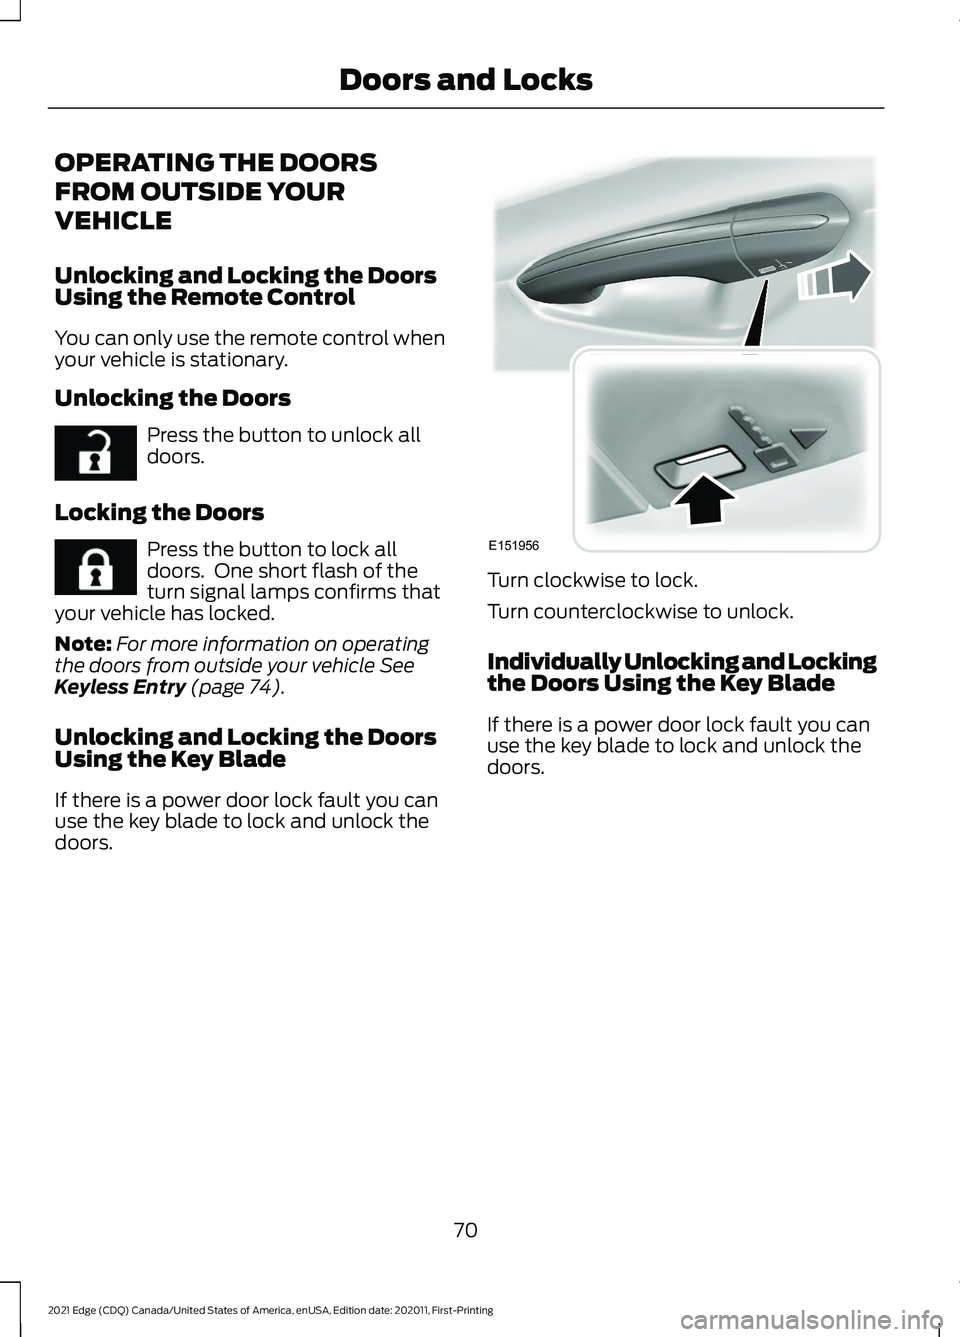
If there is a power door lock fault you can
use the key blade to lock and unlock the
doors. Turn clockwise to lock.
Turn counterclockwise to unlock.
Individually Unlocking and Locking
the Doors Using the Key Blade
If there is a power door lock fault you can
use the key blade to lock and unlock the
doors.
70
2021 Edge (CDQ) Canada/United States of America, enUSA, Edition date: 202011, First-Printing Doors and LocksE267112 E267111 E151956
Page 298 of 500
3. Add engine oil that meets our
specifications. See Capacities and
Specifications (page 347).
4. Reinstall the engine oil filler cap. Turn it clockwise until you feel a strong
resistance.
Note: Do not add oil further than the
maximum mark. Oil levels above the
maximum mark may cause engine damage.
Note: Immediately soak up any oil spillage
with an absorbent cloth.
Resetting the Engine Oil Change
Reminder
Int ellig ent Oil-Lif e Monit or - R e s e t with 4 .2”
L CD S cr e en
Use the information display controls on
the steering wheel to reset the oil change
indicator.
From the main menu scroll to:
Action and description
Message
Press the right arrow button,
then from this menu scroll
to the following message.
Settings
Press the right arrow button,
then from this menu scroll
to the following message.
Vehicle
Press the right arrow button,
then from this menu scroll
to the following message.
Oil Life
Press and hold the
OK
button until the instrument
cluster displays the
following message.
Hold OK to
Reset
Reset Successful
When the oil change indic-
ator resets the instrument
cluster displays 100%. Action and description
Message
Remaining Life
{00}%
If the instrument cluster
displays one of the following
messages, repeat the
process.
Not Reset
Reset Cancelled
Engine Oil Capacity and
Specification
For filling information, please refer to the
Capacities and Specifications section of
your owner's manual. See
Engine Oil
Capacity and Specification (page 351).
CHECKING THE COOLANT
When the engine is cold, check the
concentration and level of the coolant at
the intervals listed in the scheduled
maintenance information. See Scheduled
Maintenance
(page 391).
Note: Make sure that the coolant level is
between the minimum and maximum marks
on the coolant reservoir.
Note: Coolant expands when it is hot. The
level may extend beyond the
MAX mark.
If the coolant level is at or below the
minimum mark, add prediluted coolant
immediately.
Maintain coolant concentration within
48% to 50%, which equates to a freeze
point between
-29°F (-34°C) and -35°F
(-37°C). Coolant concentration should be
checked using a refractometer. We do not
recommend the use of hydrometers or
coolant test strips for measuring coolant
concentration.
294
2021 Edge (CDQ) Canada/United States of America, enUSA, Edition date: 202011, First-Printing Maintenance
Page 299 of 500
Adding Coolant
WARNING: Do not remove the
coolant reservoir cap when the engine is
on or the cooling system is hot. Wait 10
minutes for the cooling system to cool
down. Cover the coolant reservoir cap
with a thick cloth to prevent the
possibility of scalding and slowly remove
the cap. Failure to follow this instruction
could result in personal injury. WARNING:
Do not add engine
coolant when the engine is on or the
cooling system is hot. Failure to follow
this instruction could result in personal
injury. WARNING:
Do not add coolant
further than the MAX mark. WARNING:
Do not put coolant in
the windshield washer reservoir. If
sprayed on the windshield, coolant could
make it difficult to see through the
windshield.
Note: Do not use stop leak pellets, cooling
system sealants, or non-specified additives
as they can cause damage to the engine
cooling or heating systems. Resulting
component damage may not be covered by
the vehicle Warranty.
Note: Automotive fluids are not
interchangeable.
It is very important to use prediluted
coolant approved to the correct
specification in order to avoid plugging the
small passageways in the engine cooling
system. See
Capacities and
Specifications (page 354). Do not mix
different colors or types of coolant in your
vehicle. Mixing of engine coolants or using
an incorrect coolant may harm the engine
or cooling system components and could
void the vehicle Warranty. Note:
If prediluted coolant is not available,
use the approved concentrated coolant
diluting it to 50/50 with distilled water. See
Capacities and Specifications (page 354).
Using water that has not been deionized
may contribute to deposit formation,
corrosion and plugging of the small cooling
system passageways.
To top up the coolant level do the
following:
1. Unscrew the cap slowly. Any pressure escapes as you unscrew the cap.
2. Add enough prediluted coolant to reach the correct level.
Note: We do not recommend the use of
recycled coolant.
3. Replace the coolant reservoir cap. Turn
the cap clockwise until it contacts the
hard stop.
4. Check the coolant level in the coolant reservoir the next few times you drive
your vehicle. If necessary, repeat step
2.
If you have to add more than
1.1 qt (1 L) of
engine coolant per month, have your
vehicle checked as soon as possible.
Operating an engine with a low level of
coolant can result in engine overheating
and possible engine damage.
In case of emergency, you can add a large
amount of water without engine coolant
in order to reach a vehicle service location.
Service your vehicle as soon as possible.
Water alone, without engine coolant, can
cause engine damage from corrosion,
overheating or freezing.
Do not use the following as a coolant
substitute, as they can cause engine
damage from overheating or freezing:
• Alcohol.
• Methanol.
295
2021 Edge (CDQ) Canada/United States of America, enUSA, Edition date: 202011, First-Printing Maintenance
Page 305 of 500
Note:
Before reconnecting the battery,
make sure the ignition remains switched off.
Note: Make sure the battery cable terminals
are fully tightened.
Note: After cleaning or replacing the
battery, make sure you reinstall the battery
cover or shield.
If you disconnect or replace the vehicle
battery, you must reset the following
features:
• Window bounce-back. See Windows
(page 108).
• Clock Settings.
• Pre-set radio stations.
• Steering Angle Sensor.
Note: To calibrate the steering angle
sensor, drive the vehicle above
30 mph
(50 km/h) for a minimum of 1.2 mi (2 km).
Make sure to drive straight ahead for a
minimum of 30 seconds. Several vehicle
functions are disabled and a warning light
could appear until the sensor is calibrated.
Battery Management System
The battery management system monitors
battery conditions and takes actions to
extend battery life. If excessive battery
drain is detected, the system temporarily
disables some of the following features:
• Heated rear window.
• Heated seats.
• Climate control.
• Heated steering wheel.
• Audio unit.
• Navigation system.
A message may appear in the information
display to alert you that battery protection
actions are active. After battery replacement, or in some
cases after charging the battery with an
external charger, the battery management
system requires eight hours of vehicle sleep
time to relearn the battery state of charge.
During this time your vehicle must remain
fully locked with the ignition off.
Note:
If you add electrical accessories or
components to the vehicle, it may adversely
affect battery performance and durability.
This may also affect the performance of
other electrical systems in the vehicle.
Battery Disposal Make sure that you dispose of
old batteries in an
environmentally friendly way.
Seek advice from your local authority
about recycling old batteries.
ADJUSTING THE HEADLAMPS
Vertical Aim Adjustment
The headlamps on your vehicle are
properly aimed at the assembly plant. If
your vehicle has been involved in a crash,
have the aim of the headlamp beam
checked by an authorized dealer.
301
2021 Edge (CDQ) Canada/United States of America, enUSA, Edition date: 202011, First-Printing MaintenanceE107998
Page 307 of 500
5. Locate the vertical adjuster on each
headlamp. Using a Phillips #2
screwdriver, turn the adjuster either
clockwise or counterclockwise in order
to adjust the vertical aim of the headlamp. The horizontal edge of the
brighter light should touch the
horizontal reference line.
6. Close the hood and turn off the lamps.
EXTERIOR BULBS
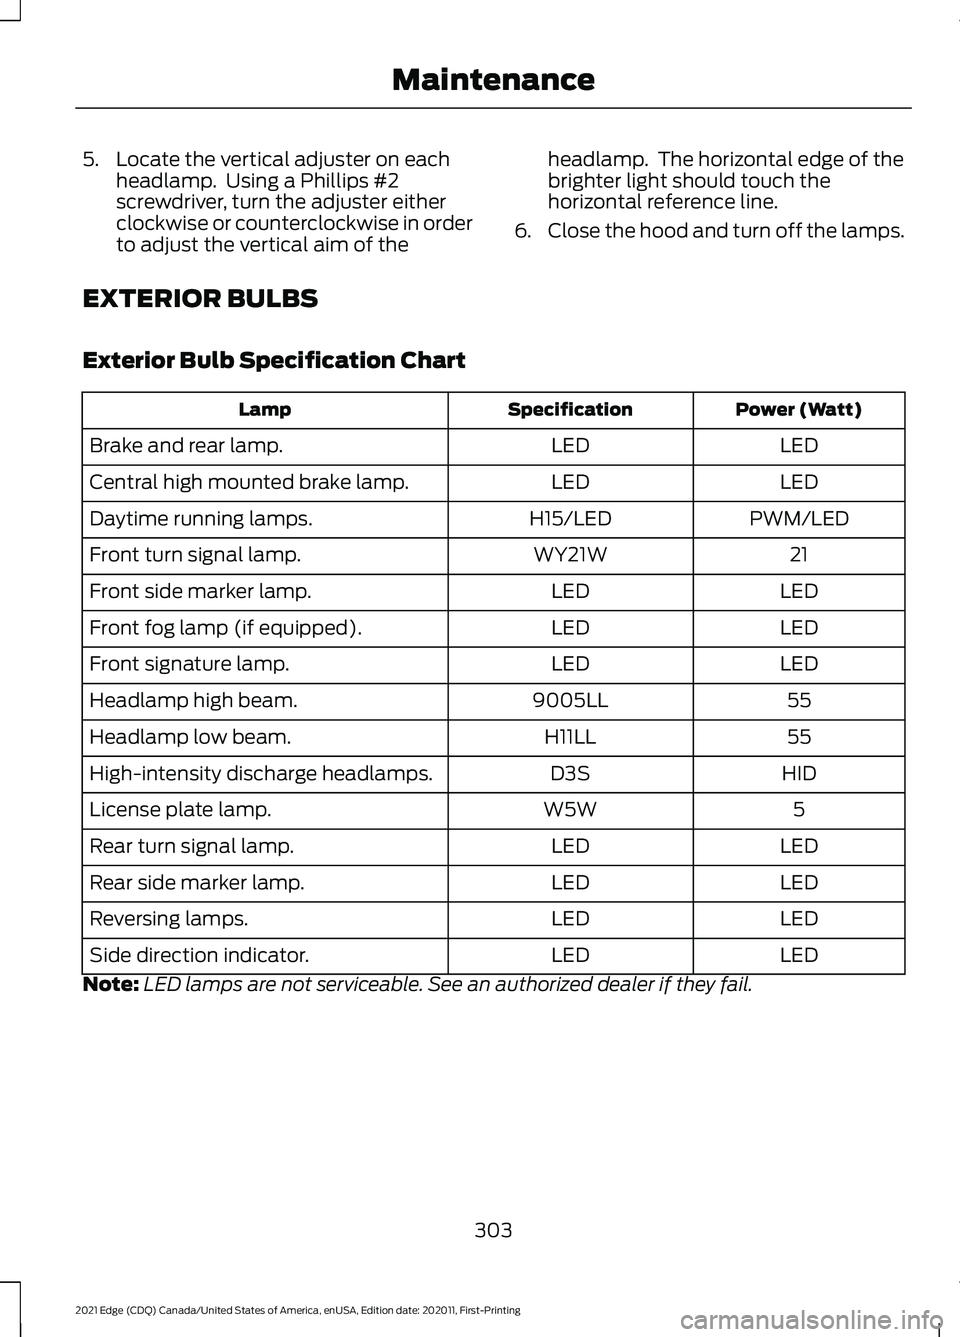
Exterior Bulb Specification Chart Power (Watt)
Specification
Lamp
LED
LED
Brake and rear lamp.
LED
LED
Central high mounted brake lamp.
PWM/LED
H15/LED
Daytime running lamps.
21
WY21W
Front turn signal lamp.
LED
LED
Front side marker lamp.
LED
LED
Front fog lamp (if equipped).
LED
LED
Front signature lamp.
55
9005LL
Headlamp high beam.
55
H11LL
Headlamp low beam.
HID
D3S
High-intensity discharge headlamps.
5
W5W
License plate lamp.
LED
LED
Rear turn signal lamp.
LED
LED
Rear side marker lamp.
LED
LED
Reversing lamps.
LED
LED
Side direction indicator.
Note: LED lamps are not serviceable. See an authorized dealer if they fail.
303
2021 Edge (CDQ) Canada/United States of America, enUSA, Edition date: 202011, First-Printing Maintenance
Page 308 of 500
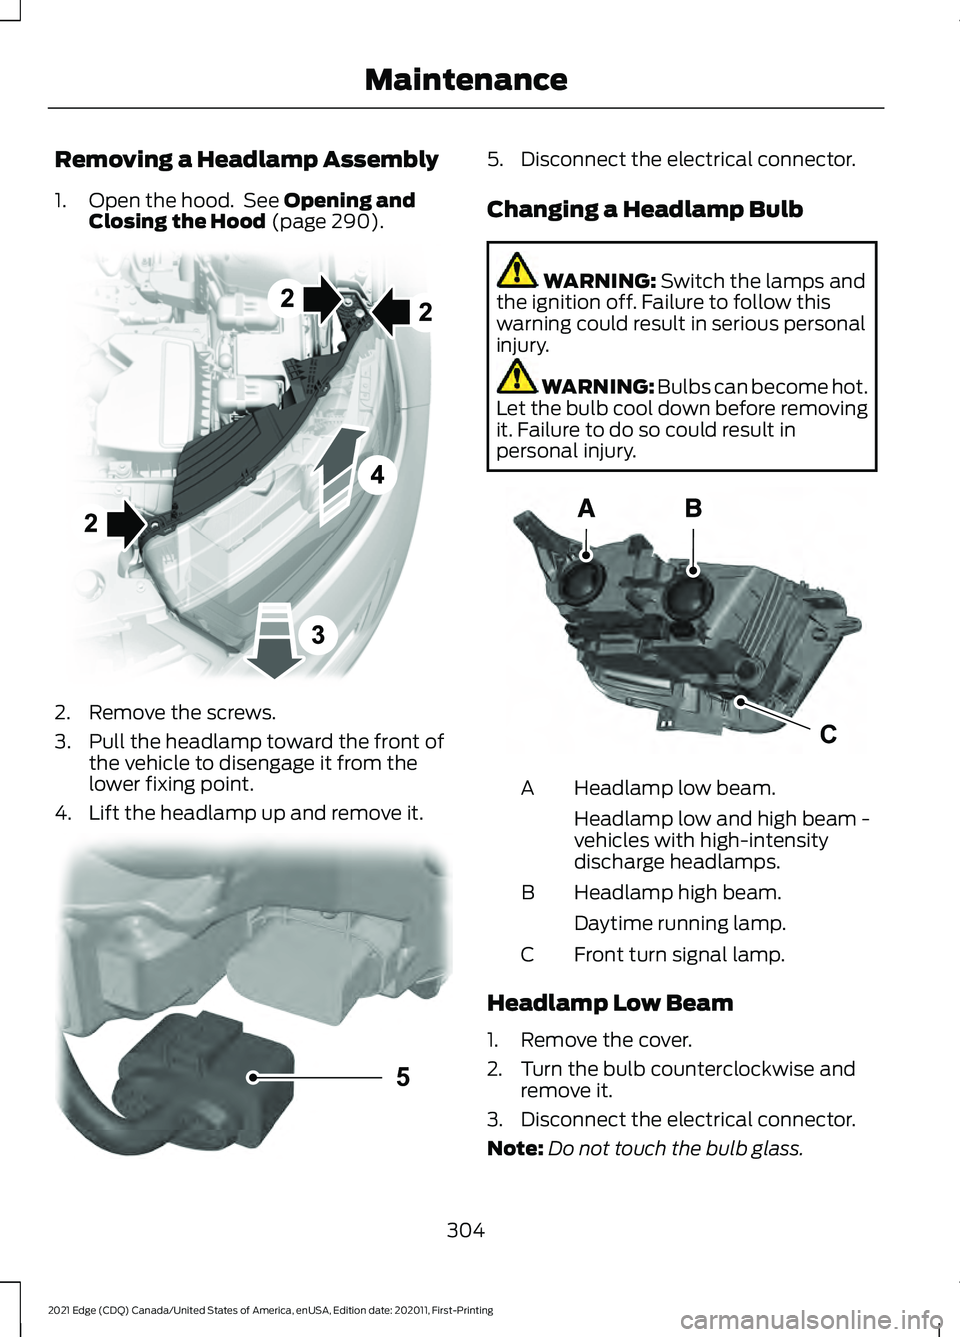
Removing a Headlamp Assembly
1. Open the hood. See Opening and
Closing the Hood (page 290). 2. Remove the screws.
3. Pull the headlamp toward the front of
the vehicle to disengage it from the
lower fixing point.
4. Lift the headlamp up and remove it. 5. Disconnect the electrical connector.
Changing a Headlamp Bulb
WARNING:
Switch the lamps and
the ignition off. Failure to follow this
warning could result in serious personal
injury. WARNING: Bulbs can become hot.
Let the bulb cool down before removing
it. Failure to do so could result in
personal injury. Headlamp low beam.
A
Headlamp low and high beam -
vehicles with high-intensity
discharge headlamps.
Headlamp high beam.
B
Daytime running lamp.
Front turn signal lamp.
C
Headlamp Low Beam
1. Remove the cover.
2. Turn the bulb counterclockwise and remove it.
3. Disconnect the electrical connector.
Note: Do not touch the bulb glass.
304
2021 Edge (CDQ) Canada/United States of America, enUSA, Edition date: 202011, First-Printing Maintenance E194758 5E133750 CE188959
Page 309 of 500
Note:
You cannot separate the bulb from
the bulb holder.
Headlamp High Beam
1. Remove the cover.
2. Turn the bulb counterclockwise and remove it.
3. Disconnect the electrical connector.
Note: Do not touch the bulb glass.
Note: You cannot separate the bulb from
the bulb holder.
High-Intensity Discharge
Headlamps
These lamps operate at a high voltage.
See an authorized dealer if they fail.
Daytime Running Lamp
1. Remove the cover.
2. Turn the bulb counterclockwise and remove it.
3. Disconnect the electrical connector.
Note: Do not touch the bulb glass.
Note: You cannot separate the bulb from
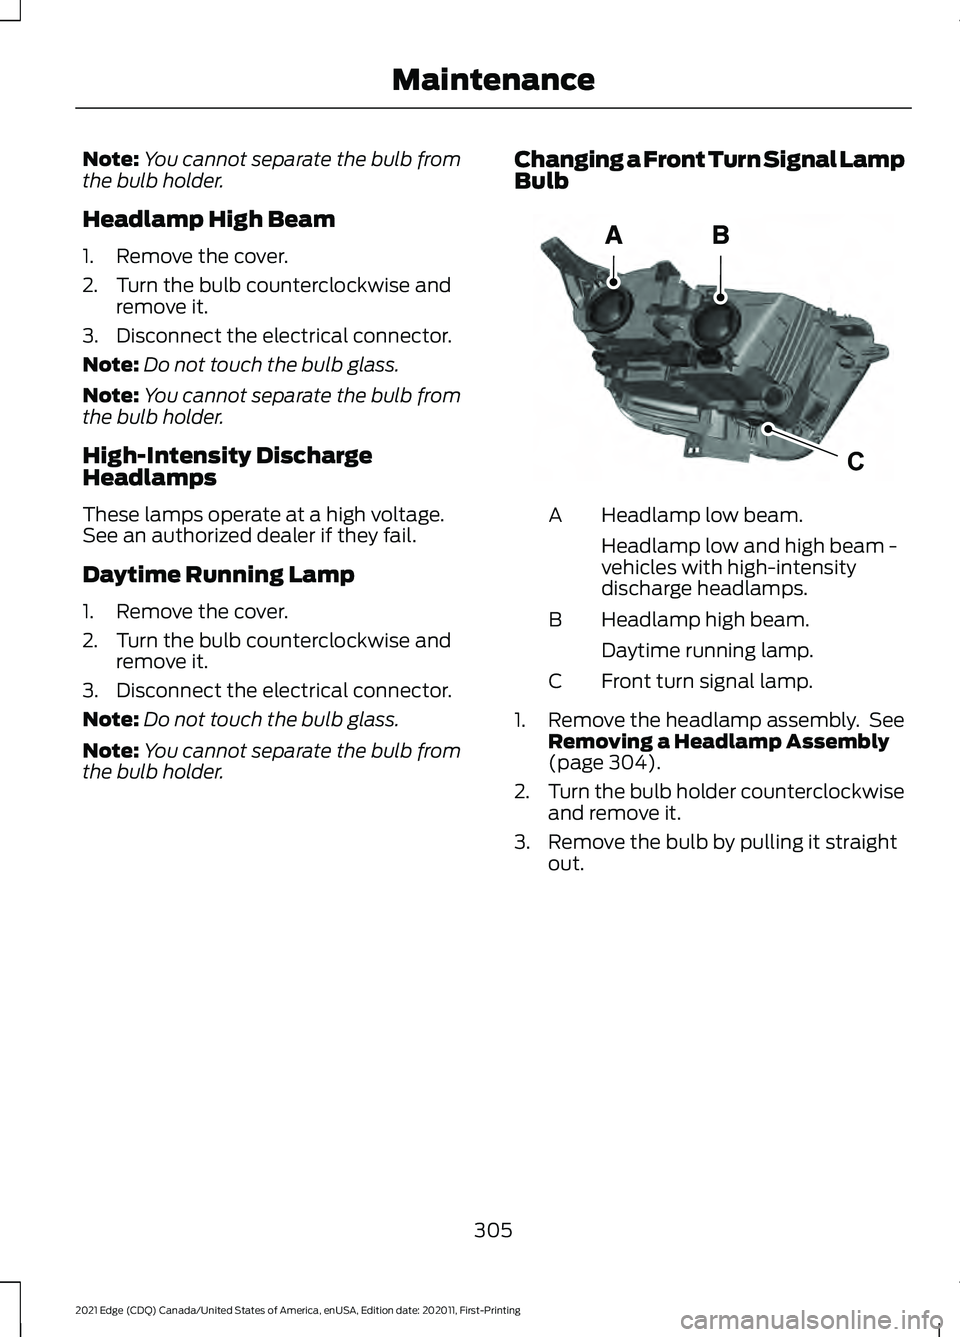
the bulb holder. Changing a Front Turn Signal Lamp
Bulb Headlamp low beam.
A
Headlamp low and high beam -
vehicles with high-intensity
discharge headlamps.
Headlamp high beam.
B
Daytime running lamp.
Front turn signal lamp.
C
1. Remove the headlamp assembly. See
Removing a Headlamp Assembly
(page 304).
2. Turn the bulb holder counterclockwise
and remove it.
3. Remove the bulb by pulling it straight out.
305
2021 Edge (CDQ) Canada/United States of America, enUSA, Edition date: 202011, First-Printing MaintenanceCE188959
Page 310 of 500
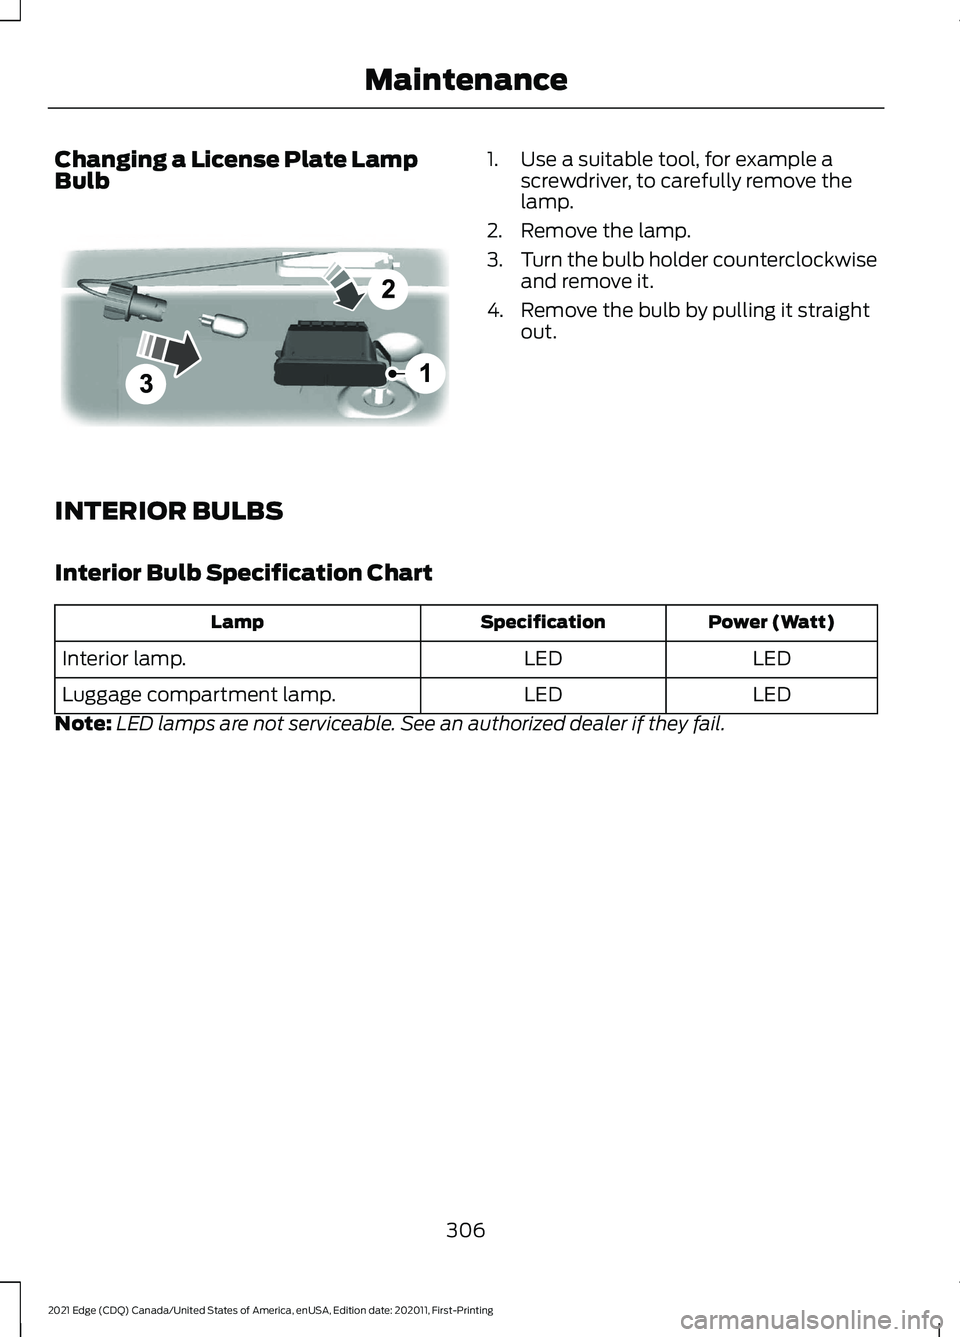
Changing a License Plate Lamp
Bulb 1. Use a suitable tool, for example a
screwdriver, to carefully remove the
lamp.
2. Remove the lamp.
3. Turn the bulb holder counterclockwise
and remove it.
4. Remove the bulb by pulling it straight out.
INTERIOR BULBS
Interior Bulb Specification Chart Power (Watt)
Specification
Lamp
LED
LED
Interior lamp.
LED
LED
Luggage compartment lamp.
Note: LED lamps are not serviceable. See an authorized dealer if they fail.
306
2021 Edge (CDQ) Canada/United States of America, enUSA, Edition date: 202011, First-Printing Maintenance E72789