clock FORD EDGE 2021 User Guide
[x] Cancel search | Manufacturer: FORD, Model Year: 2021, Model line: EDGE, Model: FORD EDGE 2021Pages: 500, PDF Size: 8.52 MB
Page 336 of 500
•
In the first stage, the tire will be
reinflated with a sealing compound
and air. After the tire has been inflated,
you will need to drive the vehicle a
short distance approximately 4 mi
(6 km) to distribute the sealant in the
tire.
• In the second stage, you will need to
check the tire pressure and adjust, if
necessary, to the vehicle's specified
tire inflation pressure.
First Stage: Reinflating the Tire
with sealing compound and air WARNING:
Do not stand directly
over the kit while inflating the tire. If you
notice any unusual bulges or
deformations in the tire's sidewall during
inflation, stop and call roadside
assistance. WARNING:
If the tire does not
inflate to the recommended tire pressure
within 15 minutes, stop and call roadside
assistance.
Park the vehicle in a safe, level and secure
area, away from moving traffic.
Turn the hazard lights on. Apply the parking
brake and power off the vehicle. Inspect
the flat tire for visible damage.
If a puncture is located in the tire sidewall,
stop and call roadside assistance.
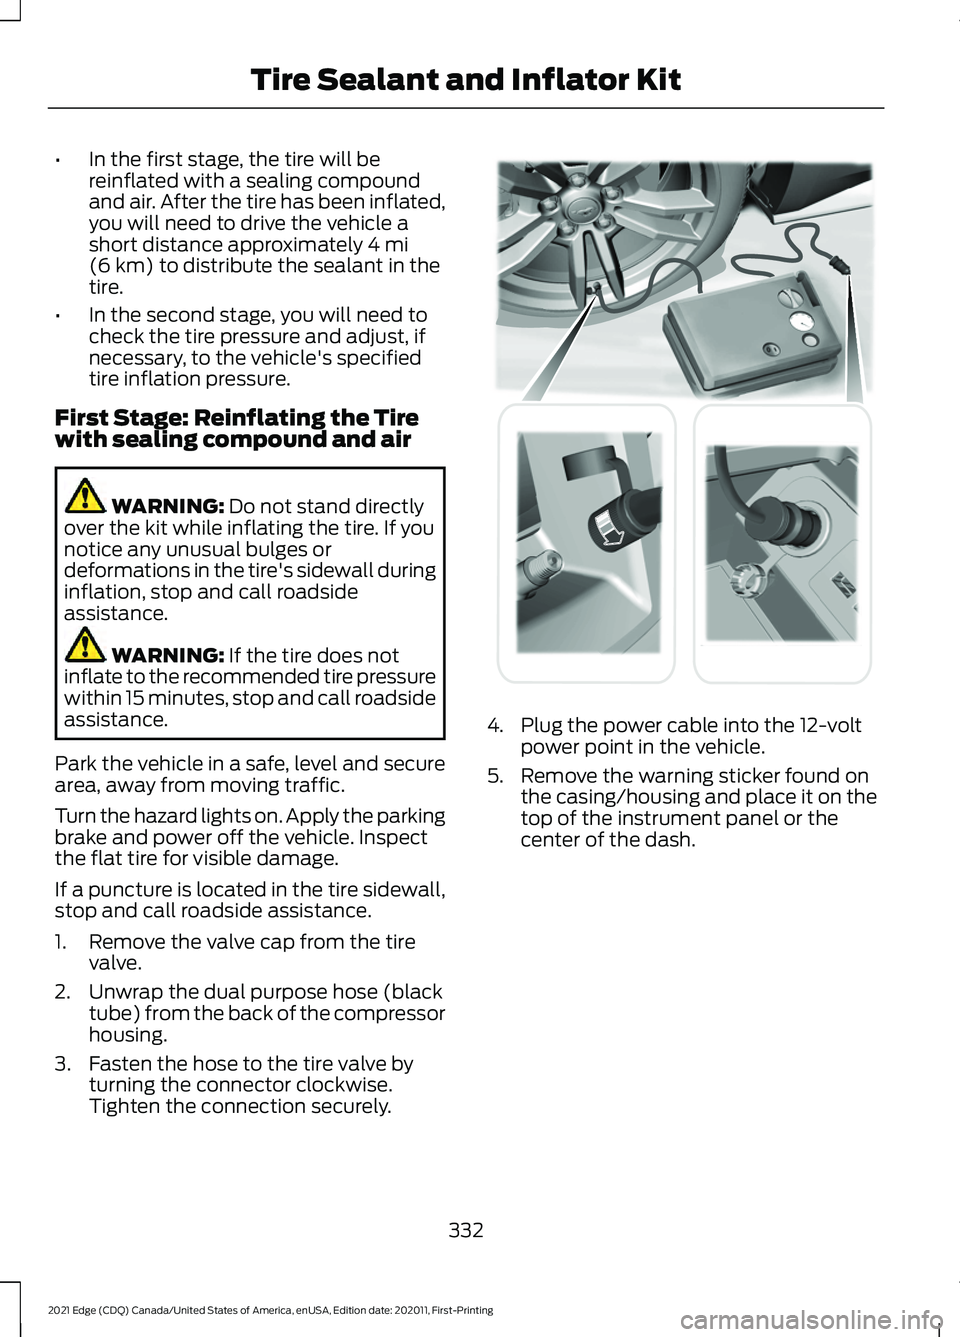
1. Remove the valve cap from the tire valve.
2. Unwrap the dual purpose hose (black tube) from the back of the compressor
housing.
3. Fasten the hose to the tire valve by turning the connector clockwise.
Tighten the connection securely. 4. Plug the power cable into the 12-volt
power point in the vehicle.
5. Remove the warning sticker found on the casing/housing and place it on the
top of the instrument panel or the
center of the dash.
332
2021 Edge (CDQ) Canada/United States of America, enUSA, Edition date: 202011, First-Printing Tire Sealant and Inflator Kit E175979
Page 337 of 500
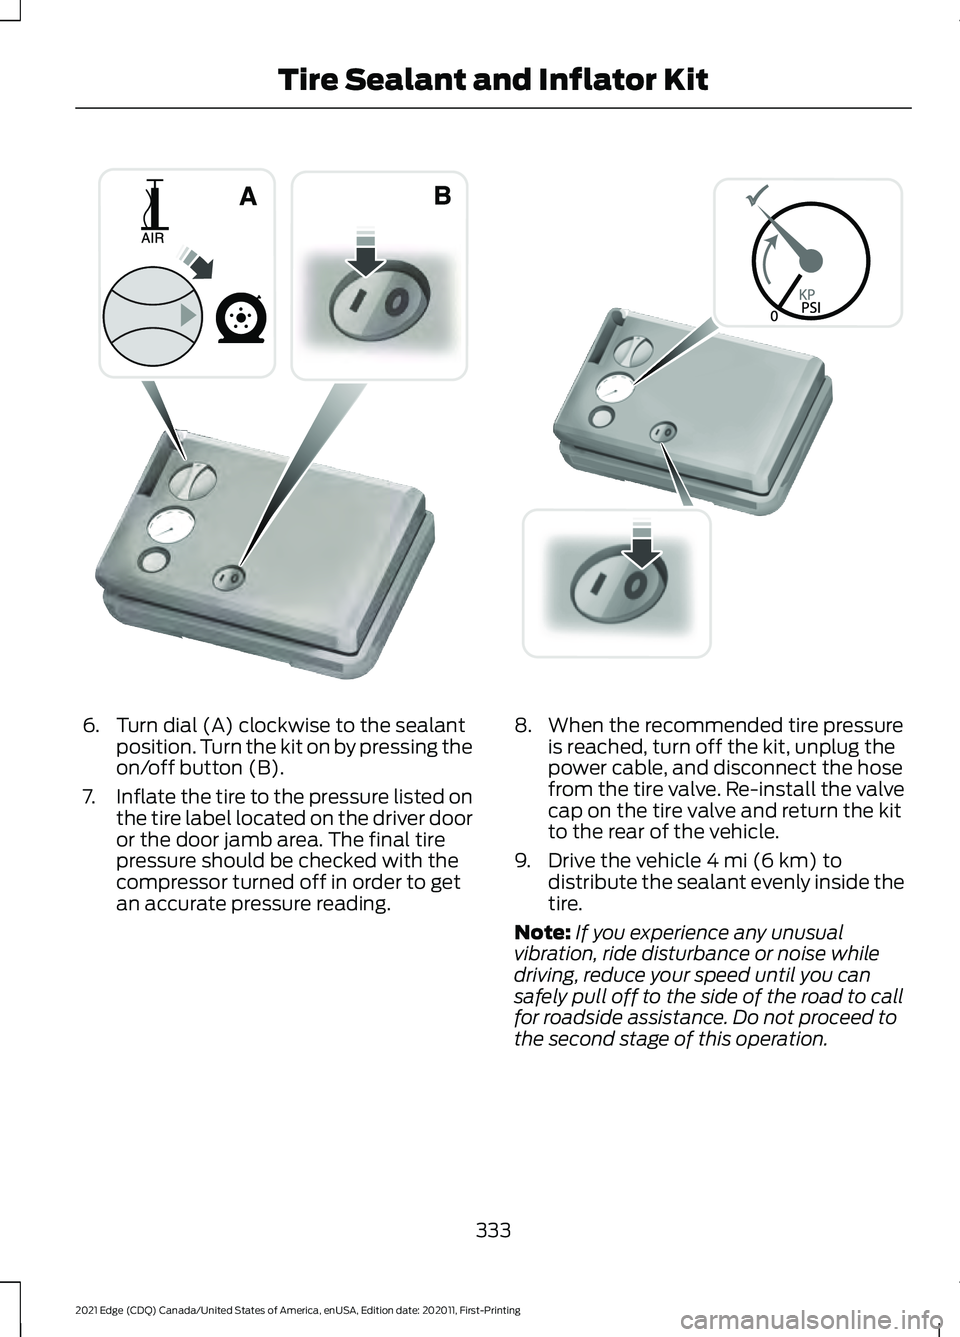
6. Turn dial (A) clockwise to the sealant
position. Turn the kit on by pressing the
on/off button (B).
7. Inflate the tire to the pressure listed on
the tire label located on the driver door
or the door jamb area. The final tire
pressure should be checked with the
compressor turned off in order to get
an accurate pressure reading. 8. When the recommended tire pressure
is reached, turn off the kit, unplug the
power cable, and disconnect the hose
from the tire valve. Re-install the valve
cap on the tire valve and return the kit
to the rear of the vehicle.
9. Drive the vehicle 4 mi (6 km) to
distribute the sealant evenly inside the
tire.
Note: If you experience any unusual
vibration, ride disturbance or noise while
driving, reduce your speed until you can
safely pull off to the side of the road to call
for roadside assistance. Do not proceed to
the second stage of this operation.
333
2021 Edge (CDQ) Canada/United States of America, enUSA, Edition date: 202011, First-Printing Tire Sealant and Inflator KitE175981 E175982
Page 338 of 500
Second Stage: Checking the tire
pressure with the inflator kit
WARNING: If the tire does not
inflate to the recommended tire pressure
within 15 minutes, stop and call roadside
assistance. WARNING:
The power plug may
get hot after use and should be handled
carefully when unplugging.
Check the air pressure of your tires as
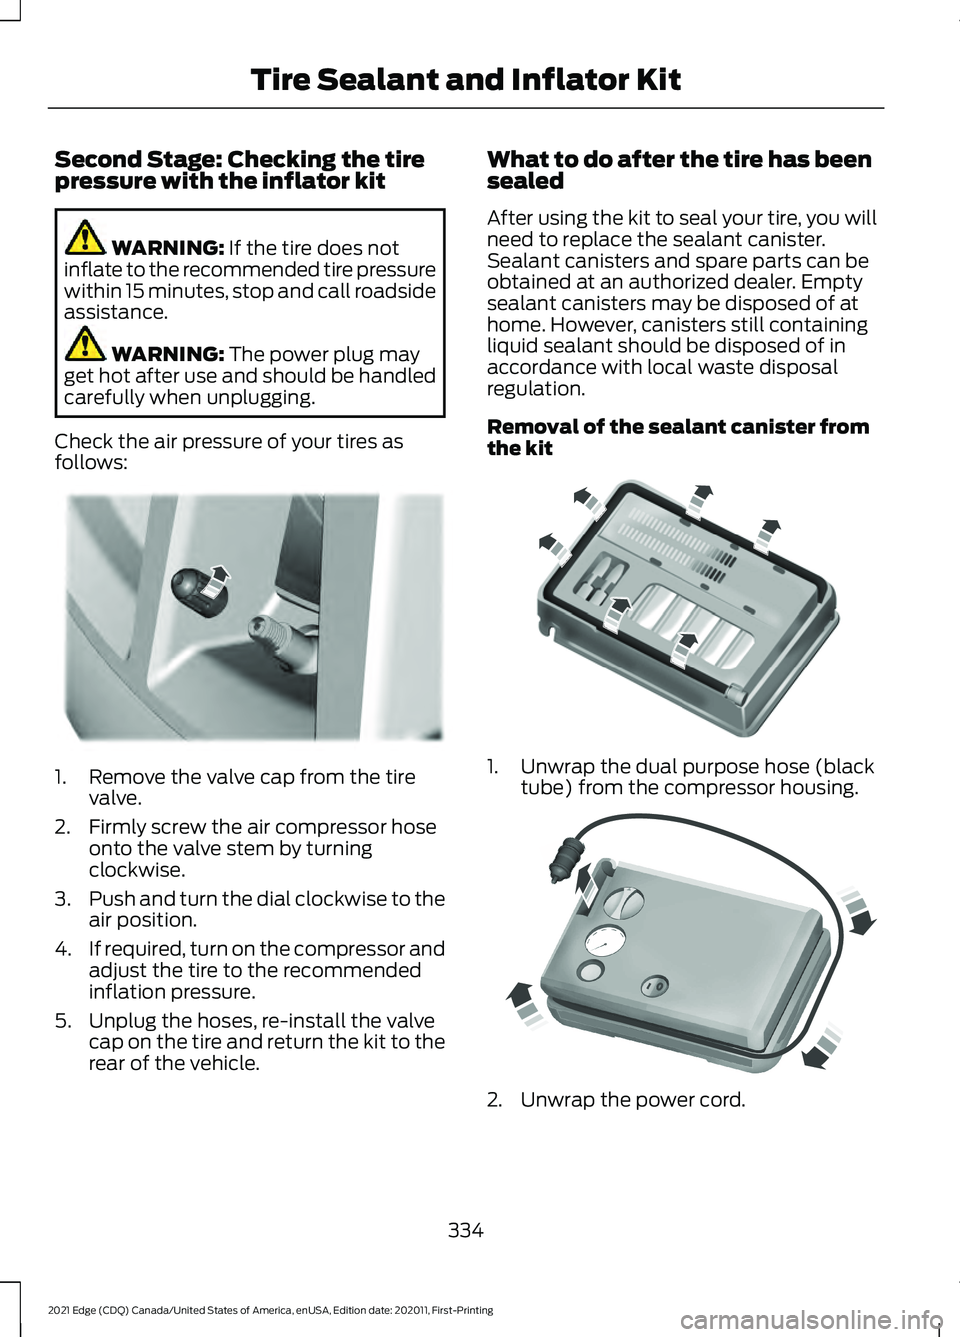
follows: 1. Remove the valve cap from the tire
valve.
2. Firmly screw the air compressor hose onto the valve stem by turning
clockwise.
3. Push and turn the dial clockwise to the
air position.
4. If required, turn on the compressor and
adjust the tire to the recommended
inflation pressure.
5. Unplug the hoses, re-install the valve cap on the tire and return the kit to the
rear of the vehicle. What to do after the tire has been
sealed
After using the kit to seal your tire, you will
need to replace the sealant canister.
Sealant canisters and spare parts can be
obtained at an authorized dealer. Empty
sealant canisters may be disposed of at
home. However, canisters still containing
liquid sealant should be disposed of in
accordance with local waste disposal
regulation.
Removal of the sealant canister from
the kit
1. Unwrap the dual purpose hose (black
tube) from the compressor housing. 2. Unwrap the power cord.
334
2021 Edge (CDQ) Canada/United States of America, enUSA, Edition date: 202011, First-Printing Tire Sealant and Inflator KitE175983 E175984 E175985
Page 347 of 500
WARNING: Do not get under a
vehicle that is only supported by a
vehicle jack. WARNING:
Do not attempt to
change a tire on the side of the vehicle
close to moving traffic. Pull far enough
off the road to avoid the danger of being
hit when operating the jack or changing
the wheel. WARNING:
Use only the specified
jacking points. If you use other positions,
you may damage the body, steering,
suspension, engine, braking system or
the fuel lines. WARNING:
Always use the jack
provided as original equipment with your
vehicle. If using a jack other than the one
provided, make sure the jack capacity is
adequate for the vehicle weight,
including any vehicle cargo or
modifications. If you are unsure if the jack
capacity is adequate, contact the
authorized dealer. WARNING:
The jack supplied with
this vehicle is only intended for changing
wheels. Do not use the vehicle jack other
than when you are changing a wheel in
an emergency. WARNING:
Make sure there is no
grease or oil on the threads or the
surface between the wheel lugs and
nuts. This can cause the lug nuts to
loosen while driving. Note:
The jack does not require
maintenance or additional lubrication over
the service life of your vehicle.
Note: Passengers should not remain in your
vehicle when the vehicle is being jacked.
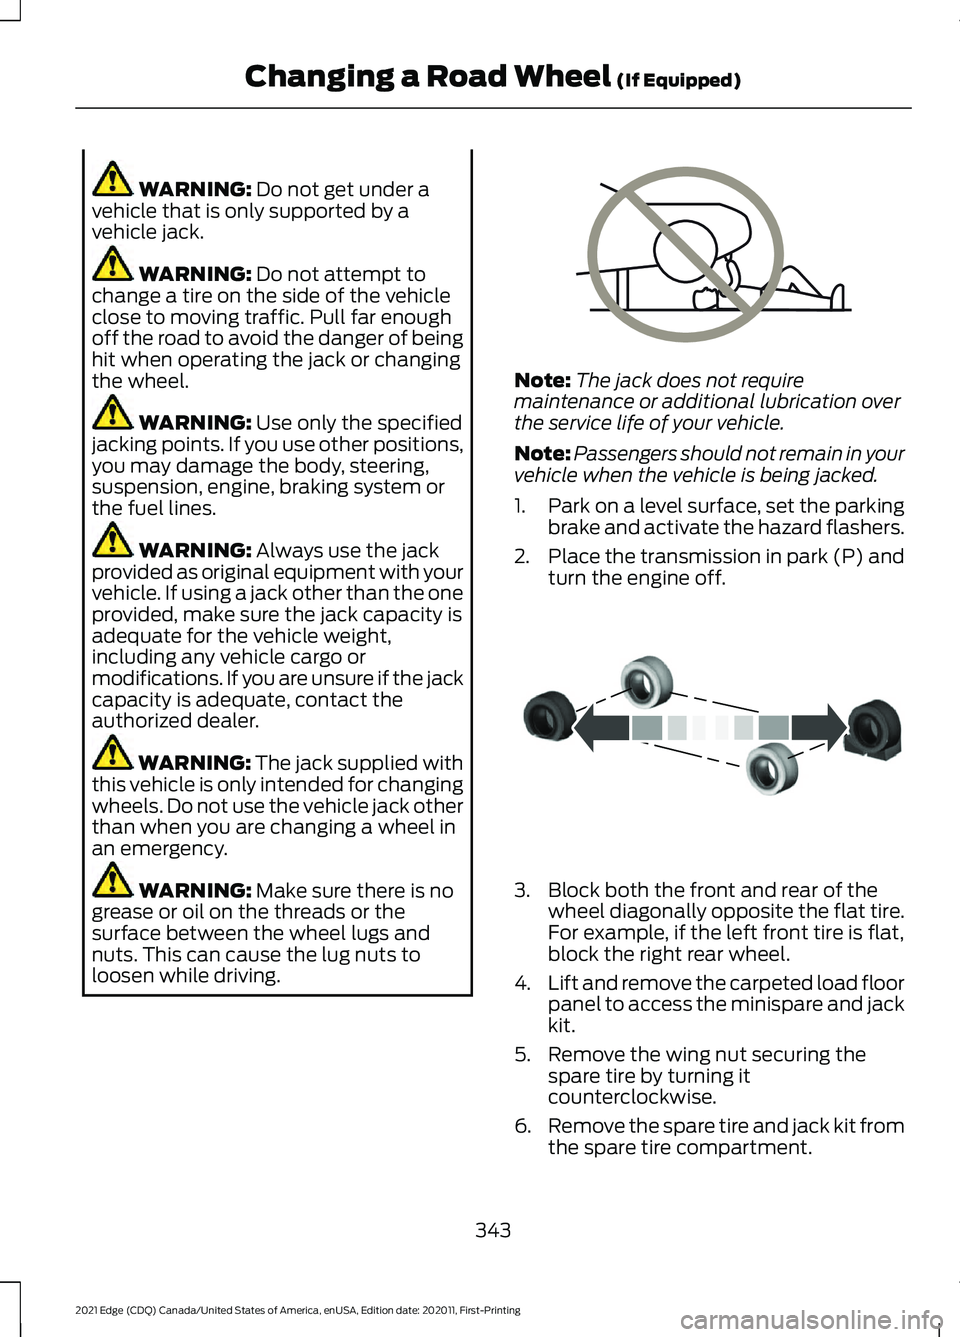
1. Park on a level surface, set the parking
brake and activate the hazard flashers.
2. Place the transmission in park (P) and
turn the engine off. 3. Block both the front and rear of the
wheel diagonally opposite the flat tire.
For example, if the left front tire is flat,
block the right rear wheel.
4. Lift and remove the carpeted load floor
panel to access the minispare and jack
kit.
5. Remove the wing nut securing the spare tire by turning it
counterclockwise.
6. Remove the spare tire and jack kit from
the spare tire compartment.
343
2021 Edge (CDQ) Canada/United States of America, enUSA, Edition date: 202011, First-Printing Changing a Road Wheel
(If Equipped)E166722 E175447
Page 348 of 500
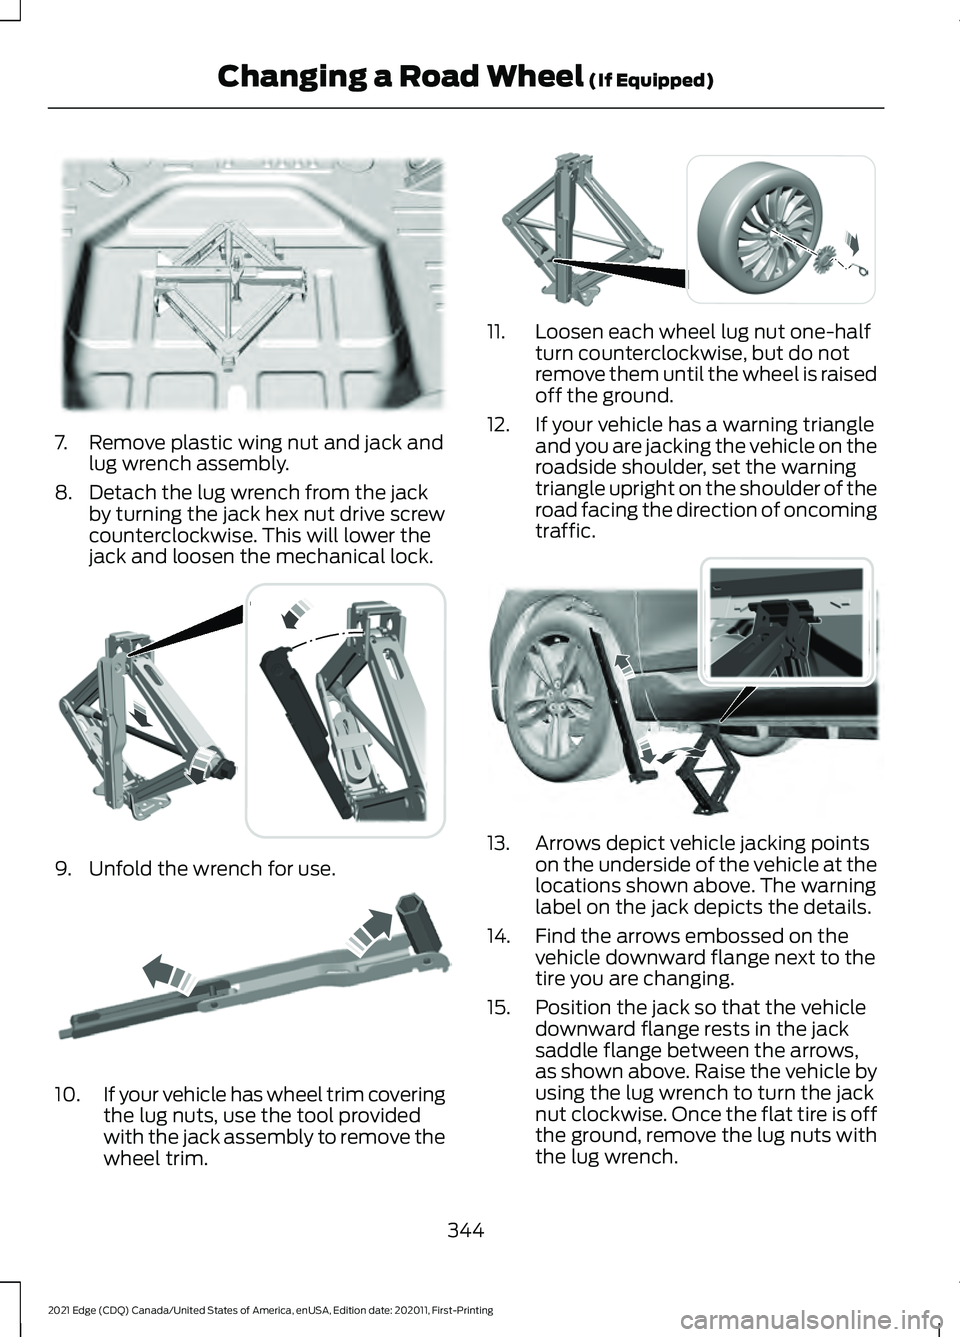
7. Remove plastic wing nut and jack and
lug wrench assembly.
8. Detach the lug wrench from the jack by turning the jack hex nut drive screw
counterclockwise. This will lower the
jack and loosen the mechanical lock. 9. Unfold the wrench for use.
10.
If your vehicle has wheel trim covering
the lug nuts, use the tool provided
with the jack assembly to remove the
wheel trim. 11. Loosen each wheel lug nut one-half
turn counterclockwise, but do not
remove them until the wheel is raised
off the ground.
12. If your vehicle has a warning triangle and you are jacking the vehicle on the
roadside shoulder, set the warning
triangle upright on the shoulder of the
road facing the direction of oncoming
traffic. 13. Arrows depict vehicle jacking points
on the underside of the vehicle at the
locations shown above. The warning
label on the jack depicts the details.
14. Find the arrows embossed on the vehicle downward flange next to the
tire you are changing.
15. Position the jack so that the vehicle downward flange rests in the jack
saddle flange between the arrows,
as shown above. Raise the vehicle by
using the lug wrench to turn the jack
nut clockwise. Once the flat tire is off
the ground, remove the lug nuts with
the lug wrench.
344
2021 Edge (CDQ) Canada/United States of America, enUSA, Edition date: 202011, First-Printing Changing a Road Wheel (If Equipped)E178186 E294117 E181744 E294584 E336095
Page 349 of 500
16. Replace the flat tire with the spare
tire, making sure the valve stem is
facing outward. Reinstall the lug nuts
until the wheel is snug against the
hub. Do not fully tighten the lug nuts
until the wheel has been lowered.
17. Lower the wheel by turning the jack handle counterclockwise.
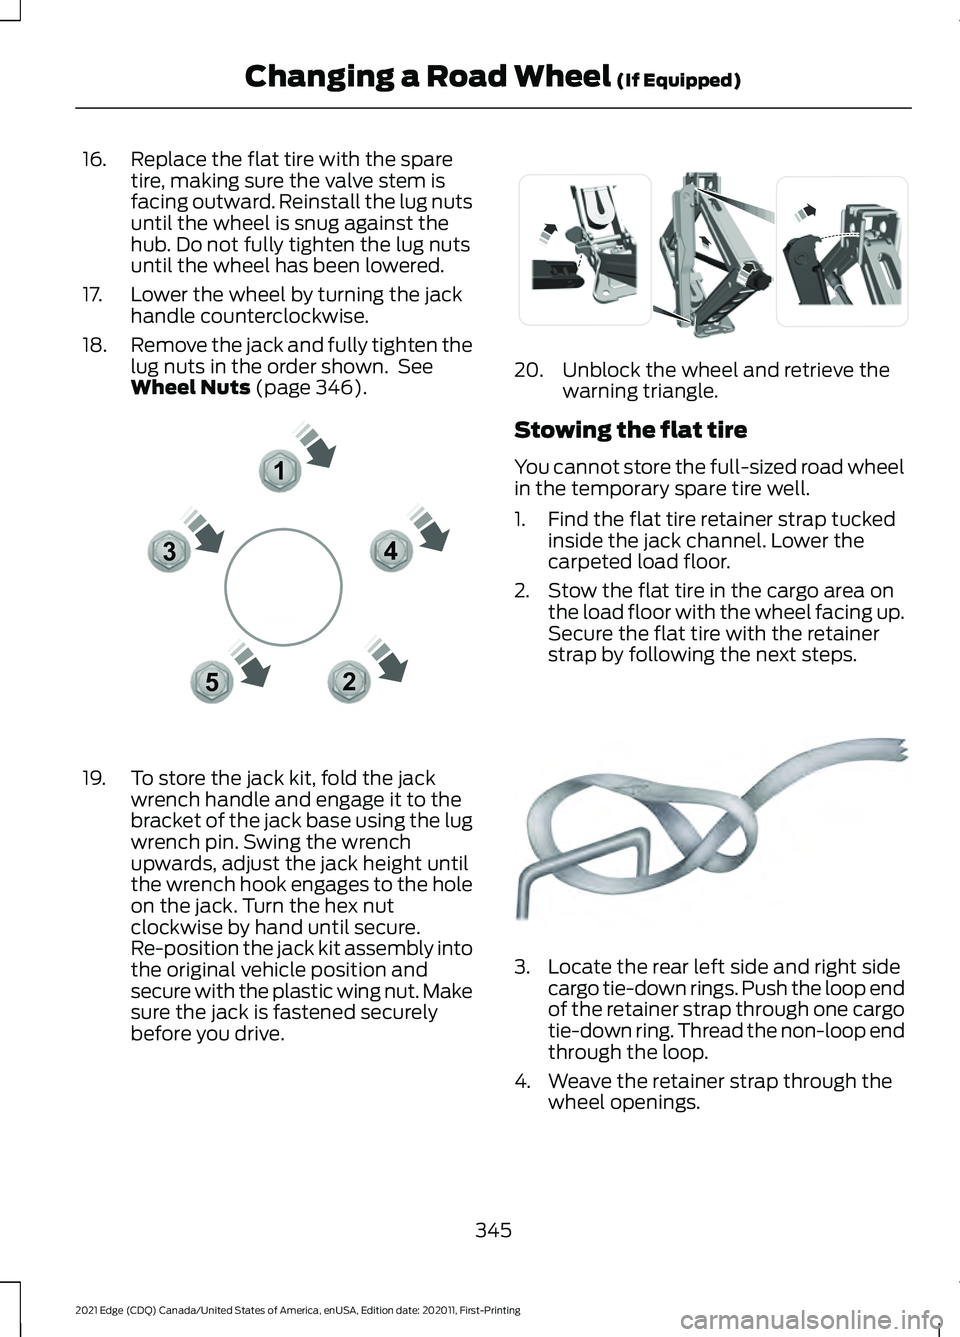
18. Remove the jack and fully tighten the
lug nuts in the order shown. See
Wheel Nuts (page 346). 19. To store the jack kit, fold the jack
wrench handle and engage it to the
bracket of the jack base using the lug
wrench pin. Swing the wrench
upwards, adjust the jack height until
the wrench hook engages to the hole
on the jack. Turn the hex nut
clockwise by hand until secure.
Re-position the jack kit assembly into
the original vehicle position and
secure with the plastic wing nut. Make
sure the jack is fastened securely
before you drive. 20. Unblock the wheel and retrieve the
warning triangle.
Stowing the flat tire
You cannot store the full-sized road wheel
in the temporary spare tire well.
1. Find the flat tire retainer strap tucked inside the jack channel. Lower the
carpeted load floor.
2. Stow the flat tire in the cargo area on the load floor with the wheel facing up.
Secure the flat tire with the retainer
strap by following the next steps. 3. Locate the rear left side and right side
cargo tie-down rings. Push the loop end
of the retainer strap through one cargo
tie-down ring. Thread the non-loop end
through the loop.
4. Weave the retainer strap through the wheel openings.
345
2021 Edge (CDQ) Canada/United States of America, enUSA, Edition date: 202011, First-Printing Changing a Road Wheel
(If Equipped)12
3
4
5E306781 E294121 E142906
Page 371 of 500
SWITCHING REPEAT MODE ON
AND OFF
Press the button on the
touchscreen to switch repeat
mode on or off.
Note: Not all sources have repeat mode.
SETTING A MEMORY PRESET
1. Select a station or channel.
2. Press and hold a memory preset button
on the touchscreen.
Note: The audio mutes briefly while the
system saves the preset and returns once it
is stored.
Note: You can save presets from multiple
sources to the memory preset bar.
MUTING THE AUDIO Press the button on the steering
wheel to mute the audio.
Press to mute the signal. Press
again to restore the signal.
ADJUSTING THE SOUND
SETTINGS
Balance and Fade (If Equipped)
1. Access the vehicle drawer on the touchscreen.
2. Press
SETTINGS.
3. Press
Sound.
4. Press
Balance / Fade.
5. Press the arrows to adjust the settings. Tone Settings
1. Access the vehicle drawer on the
touchscreen.
2. Press
SETTINGS.
3. Press
Sound.
4. Press
Tone Settings.
5. Use the slider bar to adjust the settings.
Speed Compensated Volume
1. Access the vehicle drawer on the touchscreen.
2. Press
SETTINGS.
3. Press
Sound.
4. Press
Speed Compensated Volume.
5. Press a setting.
Occupancy Mode
(If Equipped)
1. Access the vehicle drawer on the touchscreen.
2. Press
SETTINGS.
3. Press
Sound.
4. Press
Occupancy Mode.
5. Press a setting.
Sound Mode
(If Equipped)
1. Access the vehicle drawer on the touchscreen.
2. Press
SETTINGS.
3. Press
Sound.
4. Press
Sound Mode.
5. Press a setting.
SETTING THE CLOCK AND
DATE
1. Access the vehicle drawer on the touchscreen.
2. Press
SETTINGS.
367
2021 Edge (CDQ) Canada/United States of America, enUSA, Edition date: 202011, First-Printing Audio System
Page 372 of 500
3. Press Clock.
4. Set the time.
Note: The
AM and PM options are not
available if 24-hour mode is on.
5. Press the arrows to adjust the settings.
Switching Automatic Time
Updates On and Off
1. Access the vehicle drawer on the touchscreen.
2. Press
SETTINGS.
3. Press
Clock.
4. Switch
Automatic time zone update
on or off.
AM/FM RADIO
AM/FM Radio Limitations
The further you travel from an AM or FM
station, the weaker the signal and the
weaker the reception.
Hills, mountains, tall buildings, bridges,
tunnels, freeway overpasses, parking
garages, dense tree foliage and
thunderstorms can interfere with the
reception.
When you pass a ground-based broadcast
repeating tower, a stronger signal may
overtake a weaker one and result in the
audio system muting. Selecting a Radio Station
Manually Selecting a Radio
Station
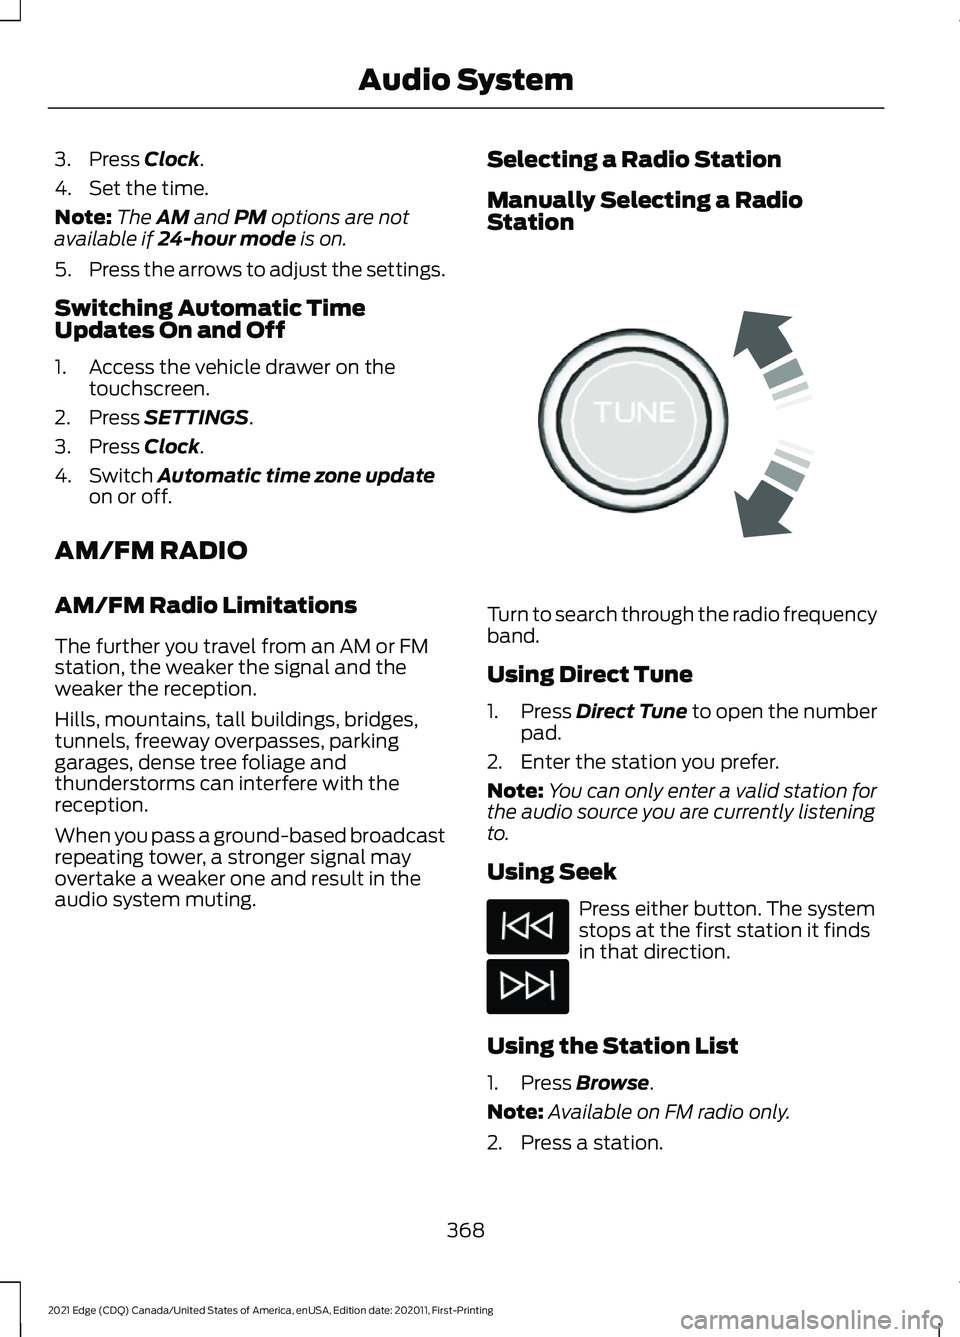
Turn to search through the radio frequency
band.
Using Direct Tune
1.
Press
Direct Tune to open the number
pad.
2. Enter the station you prefer.
Note: You can only enter a valid station for
the audio source you are currently listening
to.
Using Seek Press either button. The system
stops at the first station it finds
in that direction.
Using the Station List
1. Press
Browse.
Note: Available on FM radio only.
2. Press a station.
368
2021 Edge (CDQ) Canada/United States of America, enUSA, Edition date: 202011, First-Printing Audio SystemE270235
Page 492 of 500
Rollover Warning.........................................400
Roof Rack........................................................251 Roof Rack Load Capacities............................. 251
Roof Rack Precautions..................................... 251
Route Guidance...........................................385 Adjusting the Guidance Prompt
Volume............................................................. 385
Canceling Route Guidance............................ 385
Repeating an Instruction................................ 385
Running-In See: Breaking-In................................................. 263
Running Out of Fuel......................................171 Adding Fuel From a Portable Fuel
Container........................................................... 172
Filling a Portable Fuel Container.................... 171
S
Satellite Radio
..............................................370
Locating the Satellite Radio Identification
Number............................................................. 370
Replaying the Audio.......................................... 372
Satellite Radio Limitations............................. 370
Satellite Radio Settings.................................... 371
Selecting a Channel........................................... 371
Setting an Alert................................................... 372
What Is Satellite Radio.................................... 370
Saving a Preset Position............................146
Scheduled Maintenance
............................391
Seatbelt Extensions......................................48
Seatbelt Precautions....................................42
Seatbelt Reminder........................................45 How Does the Seatbelt Reminder
Work..................................................................... 45
Seatbelt Reminder Audible Warnings..........47
Seatbelt Reminder Indicators.......................... 47
Switching the Seatbelt Reminder On and Off........................................................................\
.. 47
Seatbelts...........................................................42 Automatic Locking Mode.................................. 44
Seatbelt Reminder.............................................. 45
Sensitive Locking Mode..................................... 44
Security..............................................................89 Anti-Theft Alarm System................................. 89
Anti-Theft Alarm System Settings...............90
Passive Anti-Theft System.............................. 89
Security – Troubleshooting............................. 90Security – Troubleshooting
.......................90
Security – Frequently Asked
Questions............................................................ 91
Security – Information Messages.................. 90
Selecting the Audio Source.....................366
Sending and Receiving a Text Message.......................................................379
Sensitive Locking Mode...............................44 How Does Sensitive Locking Mode
Work..................................................................... 44
What is Sensitive Locking Mode.................... 44
Service Data
.....................................................23
Setting a Destination.................................384 Setting a Destination Using a Point of
Interest............................................................. 385
Setting a Destination Using a Predictive Destination...................................................... 385
Setting a Destination Using a Recent Destination...................................................... 385
Setting a Destination Using a Saved Destination...................................................... 385
Setting a Destination Using the Map Screen............................................................... 384
Setting a Destination Using the Text Entry Screen............................................................... 384
Setting a Memory Preset..........................367
Settings Data...................................................24 Comfort and Convenience Data..................... 24
Entertainment Data............................................ 24
Setting the Adaptive Cruise Control Gap..................................................................218
Following a Vehicle............................................ 218
Setting the Adaptive Cruise Control Speed..............................................................217
Manually Changing the Set Speed..............218
Setting the Adaptive Cruise Speed from a Complete Stop............................................... 218
Setting the Blower Motor Speed............129
Setting the Clock and Date......................367 Switching Automatic Time Updates On and
Off...................................................................... 368
Setting the Cruise Control Speed
...........212
Changing the Set Speed.................................. 212
Setting the Liftgate Opening Height..............................................................84
Setting the Temperature...........................129 Switching Dual Mode On and Off ...............129
488
2021 Edge (CDQ) Canada/United States of America, enUSA, Edition date: 202011, First-Printing Index