light FORD EDGE 2021 Manual PDF
[x] Cancel search | Manufacturer: FORD, Model Year: 2021, Model line: EDGE, Model: FORD EDGE 2021Pages: 500, PDF Size: 8.52 MB
Page 325 of 500
C.
80: Indicates the aspect ratio
which gives the tire's ratio of
height to width. Numbers of 70 or
lower indicate a short sidewall.
D. D:
Indicates a diagonal type tire.
R:
Indicates a radial type tire.
E. 16:
Indicates the wheel or rim
diameter in inches. If you change
your wheel size, you will have to
purchase new tires to match the
new wheel diameter.
GLOSSARY OF TIRE
TERMINOLOGY
*
Tire label: A label showing the
original equipment tire sizes,
recommended inflation pressure
and the maximum weight the
vehicle can carry.
*
Tire Identification Number
(TIN): A number on the sidewall
of each tire providing information
about the tire brand and
manufacturing plant, tire size and
date of manufacture. Also referred
to as DOT code.
*
Inflation pressure: A measure
of the amount of air in a tire.
*
Standard load: A class of
P-metric or Metric tires designed
to carry a maximum load at set
pressure. For example: For
P-metric tires
35 psi (2.4 bar) and
for Metric tires 36 psi (2.5 bar).
Increasing the inflation pressure
beyond this pressure will not
increase the tire ’s load carrying
capability. *
Extra load: A class of P-metric
or Metric tires designed to carry a
heavier maximum load at
42 psi
(2.9 bar). Increasing the inflation
pressure beyond this pressure will
not increase the tire ’s load
carrying capability.
*
kPa: Kilopascal, a metric unit of
air pressure.
*
PSI: Pounds per square inch, a
standard unit of air pressure.
*
Cold tire pressure: The tire
pressure when the vehicle has
been stationary and out of direct
sunlight for an hour or more and
prior to the vehicle being driven for
1 mi (1.6 km)
.
*
Recommended inflation
pressure: The cold inflation
pressure found on the Safety
Compliance Certification Label
(affixed to either the door hinge
pillar, door-latch post, or the door
edge that meets the door-latch
post, next to the driver's seating
position), or Tire Label located on
the B-Pillar or the edge of the
driver door.
* B-pillar: The structural member
at the side of the vehicle behind
the front door.
*
Bead area of the tire: Area of
the tire next to the rim.
*
Sidewall of the tire: Area
between the bead area and the
tread.
321
2021 Edge (CDQ) Canada/United States of America, enUSA, Edition date: 202011, First-Printing Wheel and Tire Information
Page 336 of 500
•
In the first stage, the tire will be
reinflated with a sealing compound
and air. After the tire has been inflated,
you will need to drive the vehicle a
short distance approximately 4 mi
(6 km) to distribute the sealant in the
tire.
• In the second stage, you will need to
check the tire pressure and adjust, if
necessary, to the vehicle's specified
tire inflation pressure.
First Stage: Reinflating the Tire
with sealing compound and air WARNING:
Do not stand directly
over the kit while inflating the tire. If you
notice any unusual bulges or
deformations in the tire's sidewall during
inflation, stop and call roadside
assistance. WARNING:
If the tire does not
inflate to the recommended tire pressure
within 15 minutes, stop and call roadside
assistance.
Park the vehicle in a safe, level and secure
area, away from moving traffic.
Turn the hazard lights on. Apply the parking
brake and power off the vehicle. Inspect
the flat tire for visible damage.
If a puncture is located in the tire sidewall,
stop and call roadside assistance.
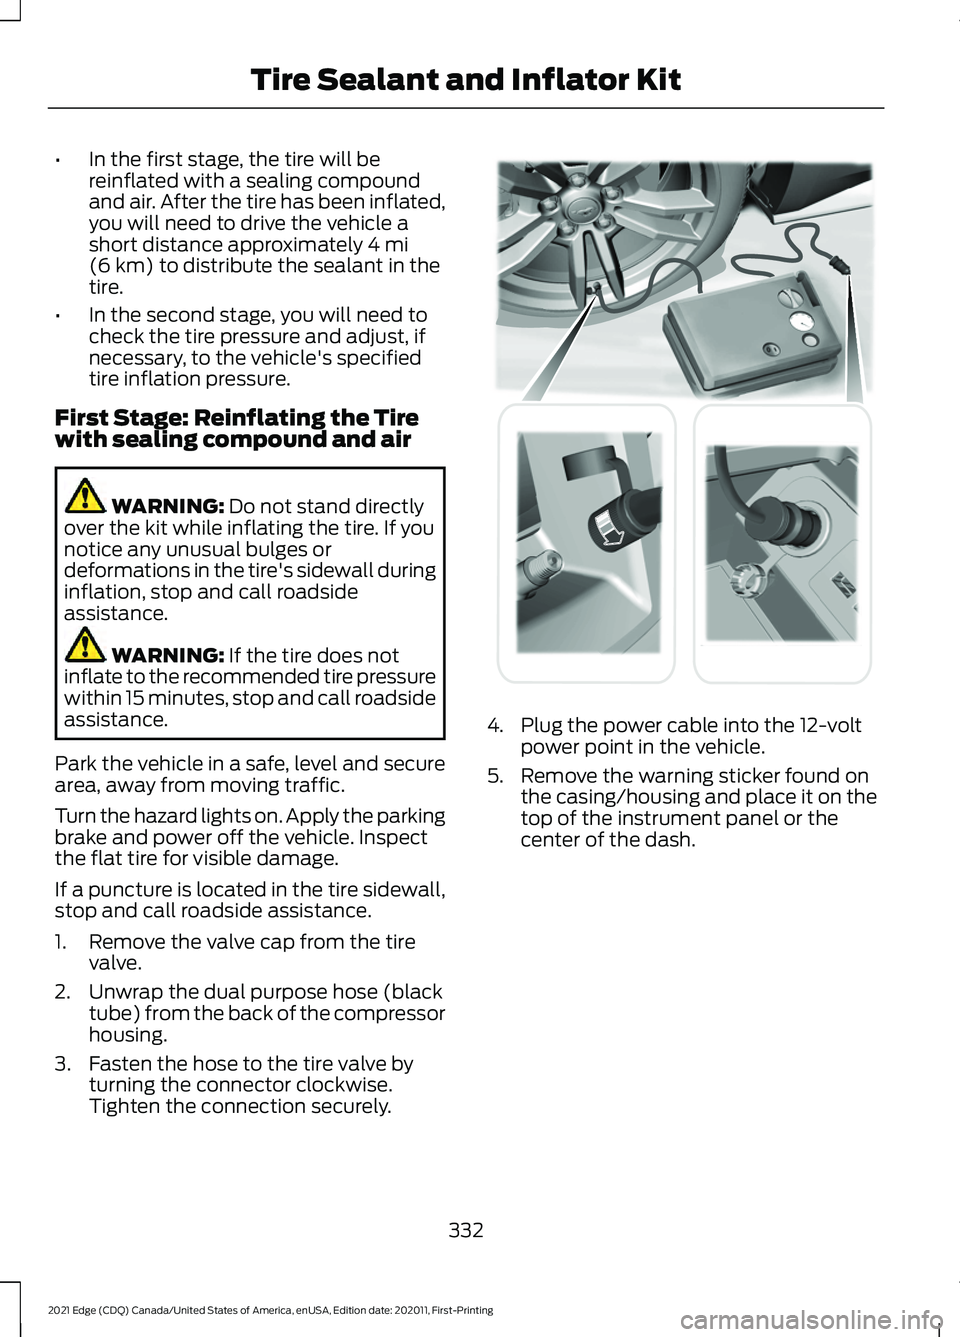
1. Remove the valve cap from the tire valve.
2. Unwrap the dual purpose hose (black tube) from the back of the compressor
housing.
3. Fasten the hose to the tire valve by turning the connector clockwise.
Tighten the connection securely. 4. Plug the power cable into the 12-volt
power point in the vehicle.
5. Remove the warning sticker found on the casing/housing and place it on the
top of the instrument panel or the
center of the dash.
332
2021 Edge (CDQ) Canada/United States of America, enUSA, Edition date: 202011, First-Printing Tire Sealant and Inflator Kit E175979
Page 342 of 500
VIEWING THE TIRE
PRESSURES
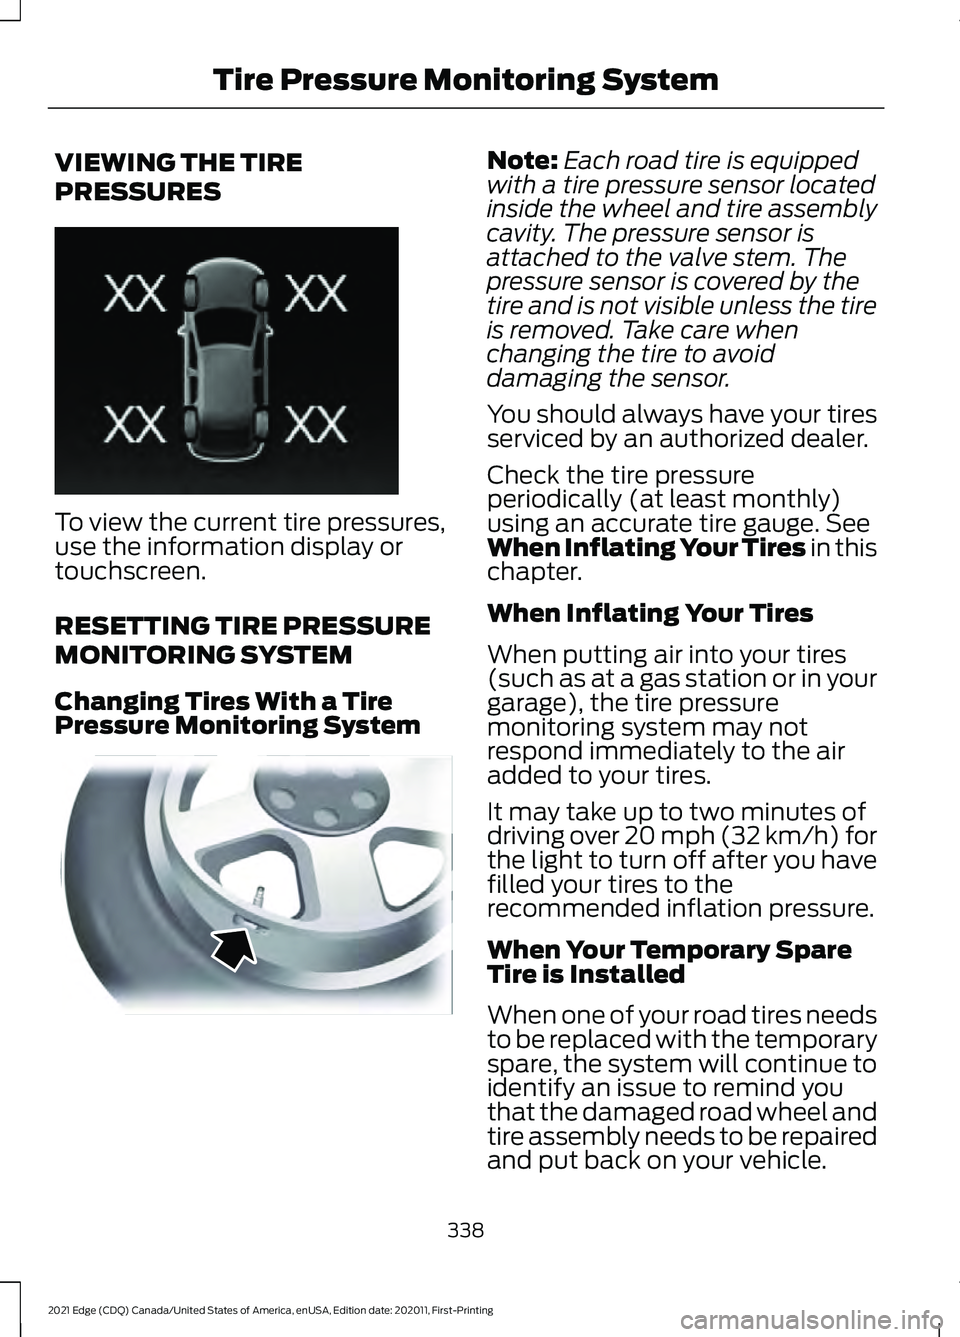
To view the current tire pressures,
use the information display or
touchscreen.
RESETTING TIRE PRESSURE
MONITORING SYSTEM
Changing Tires With a Tire
Pressure Monitoring System Note:
Each road tire is equipped
with a tire pressure sensor located
inside the wheel and tire assembly
cavity. The pressure sensor is
attached to the valve stem. The
pressure sensor is covered by the
tire and is not visible unless the tire
is removed. Take care when
changing the tire to avoid
damaging the sensor.
You should always have your tires
serviced by an authorized dealer.
Check the tire pressure
periodically (at least monthly)
using an accurate tire gauge. See
When Inflating Your Tires in this
chapter.
When Inflating Your Tires
When putting air into your tires
(such as at a gas station or in your
garage), the tire pressure
monitoring system may not
respond immediately to the air
added to your tires.
It may take up to two minutes of
driving over 20 mph (32 km/h) for
the light to turn off after you have
filled your tires to the
recommended inflation pressure.
When Your Temporary Spare
Tire is Installed
When one of your road tires needs
to be replaced with the temporary
spare, the system will continue to
identify an issue to remind you
that the damaged road wheel and
tire assembly needs to be repaired
and put back on your vehicle.
338
2021 Edge (CDQ) Canada/United States of America, enUSA, Edition date: 202011, First-Printing Tire Pressure Monitoring SystemE250820 E142549
Page 343 of 500
To restore the full function of the
tire pressure monitoring system,
have the damaged road wheel
and tire assembly repaired and
remounted on your vehicle.
TIRE PRESSURE MONITORING
SYSTEM –
TROUBLESHOOTING
Tire Pressure Monitoring System
– Warning Lamps The low tire pressure warning
lamp has combined functions,
as it warns you when your tires
need air, and when the system is no longer
capable of functioning as intended. Action Required
Possible Cause
Warning Lamp
After inflating your tires to the manufac-
turer’s recommended pressure as shown
on the Tire Label, on the edge of driver
door or the B-Pillar, drive your vehicle for
at least two minutes over 20 mph
(32 km/h) before the light turns off.
One or more tires are
significantly under inflated
Solid warning lamp
Repair the damaged road wheel and tire
and refit it to your vehicle to restore
operation of the system.
Temporary spare wheel
in use
Solid warning lamp
or flashing warning lamp
If the tires are inflated to the recom-
mended tire pressures and the temporary
spare wheel is not in use, the system
detected a fault that requires service.
Have your vehicle checked as soon as
possible.
Tire pressure monitoring
system malfunction
339
2021 Edge (CDQ) Canada/United States of America, enUSA, Edition date: 202011, First-Printing Tire Pressure Monitoring System
Page 344 of 500
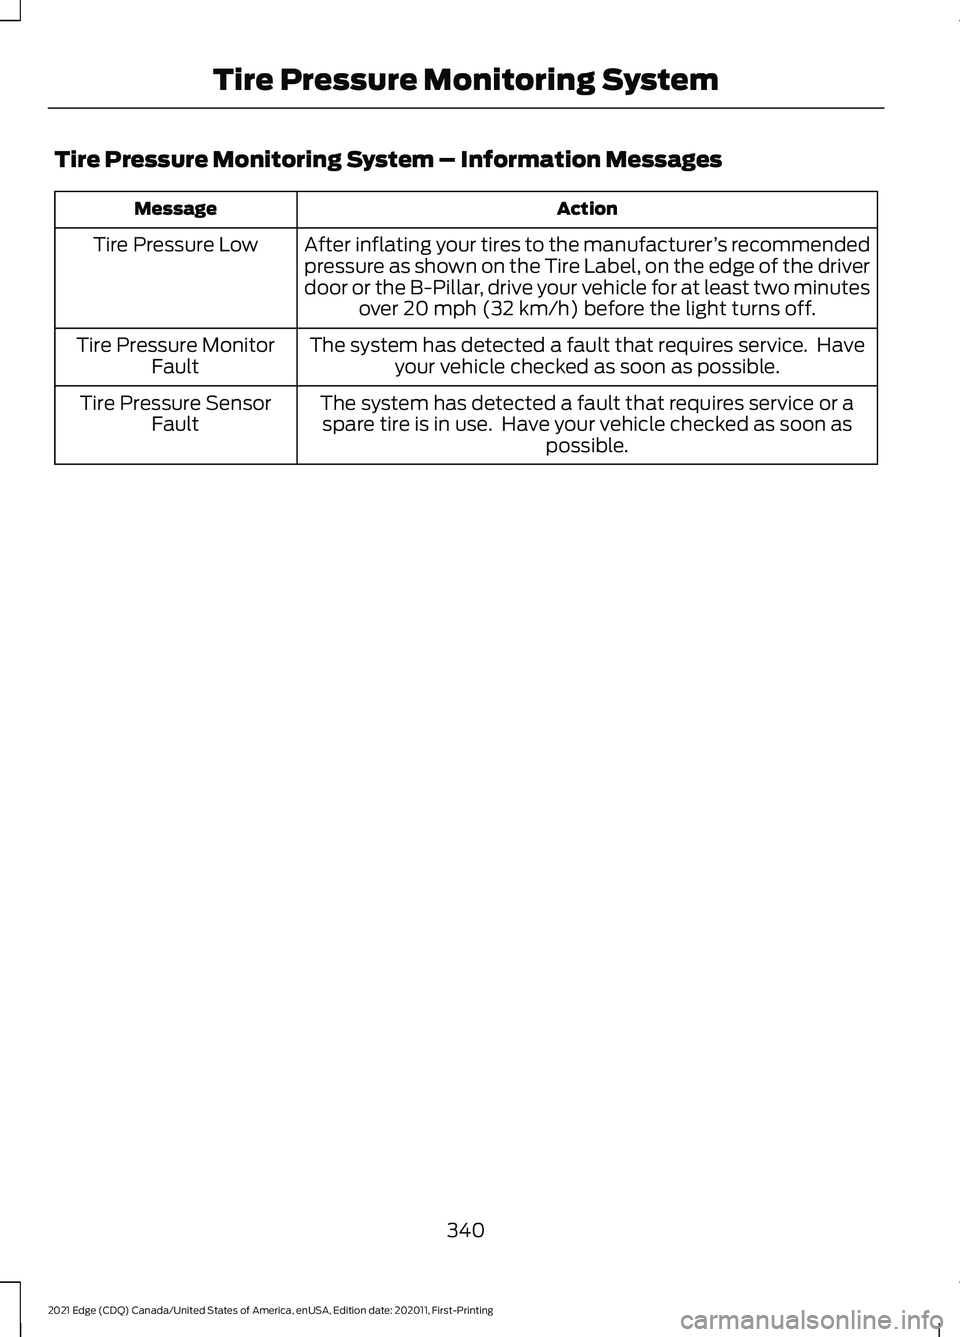
Tire Pressure Monitoring System – Information Messages
Action
Message
After inflating your tires to the manufacturer ’s recommended
pressure as shown on the Tire Label, on the edge of the driver
door or the B-Pillar, drive your vehicle for at least two minutes over 20 mph (32 km/h) before the light turns off.
Tire Pressure Low
The system has detected a fault that requires service. Haveyour vehicle checked as soon as possible.
Tire Pressure Monitor
Fault
The system has detected a fault that requires service or aspare tire is in use. Have your vehicle checked as soon as possible.
Tire Pressure Sensor
Fault
340
2021 Edge (CDQ) Canada/United States of America, enUSA, Edition date: 202011, First-Printing Tire Pressure Monitoring System
Page 345 of 500
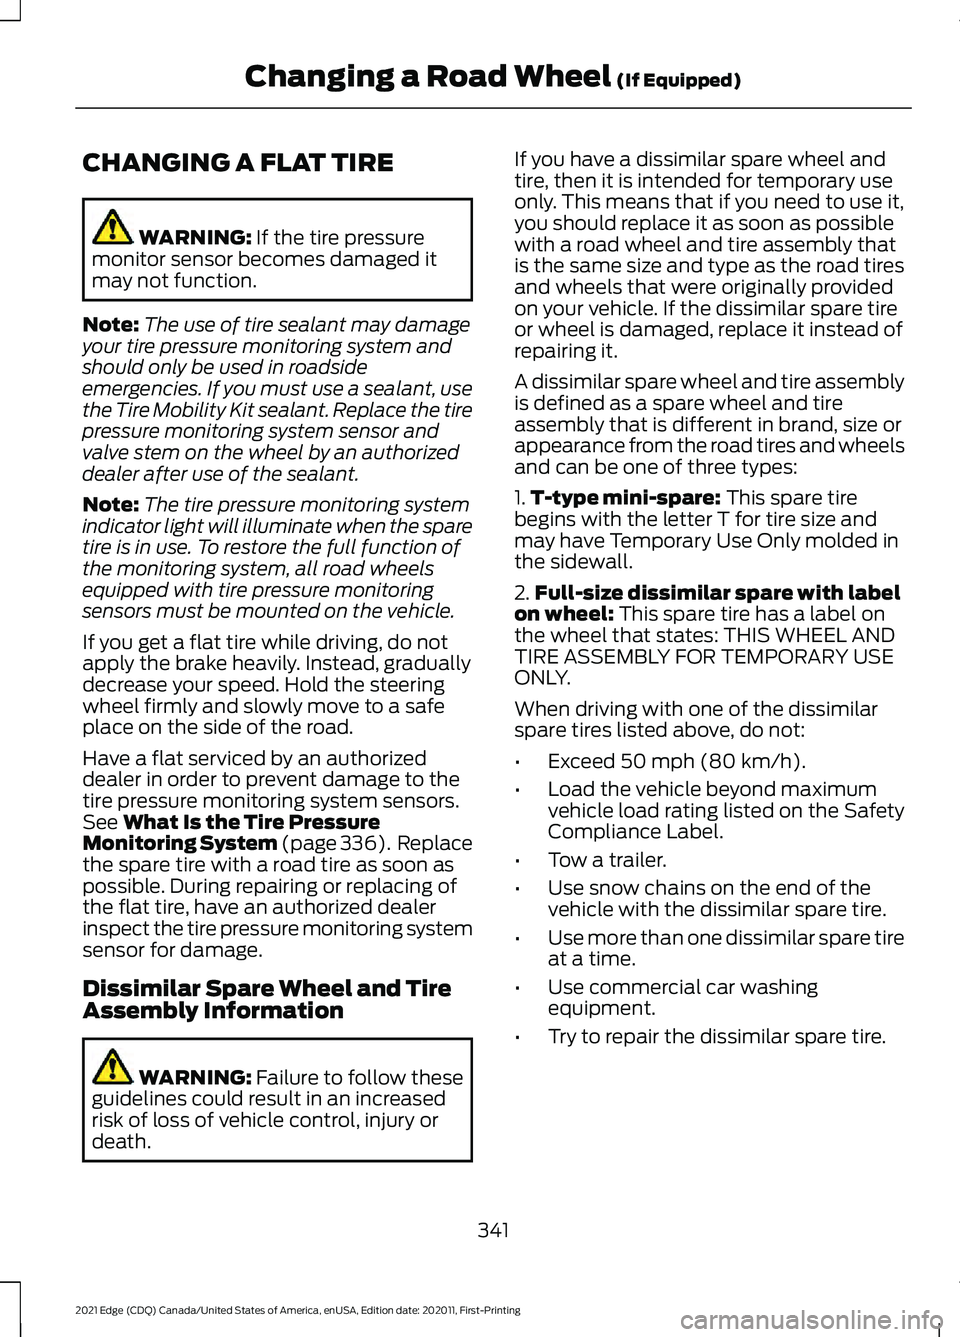
CHANGING A FLAT TIRE
WARNING: If the tire pressure
monitor sensor becomes damaged it
may not function.
Note: The use of tire sealant may damage
your tire pressure monitoring system and
should only be used in roadside
emergencies. If you must use a sealant, use
the Tire Mobility Kit sealant. Replace the tire
pressure monitoring system sensor and
valve stem on the wheel by an authorized
dealer after use of the sealant.
Note: The tire pressure monitoring system
indicator light will illuminate when the spare
tire is in use. To restore the full function of
the monitoring system, all road wheels
equipped with tire pressure monitoring
sensors must be mounted on the vehicle.
If you get a flat tire while driving, do not
apply the brake heavily. Instead, gradually
decrease your speed. Hold the steering
wheel firmly and slowly move to a safe
place on the side of the road.
Have a flat serviced by an authorized
dealer in order to prevent damage to the
tire pressure monitoring system sensors.
See
What Is the Tire Pressure
Monitoring System (page 336). Replace
the spare tire with a road tire as soon as
possible. During repairing or replacing of
the flat tire, have an authorized dealer
inspect the tire pressure monitoring system
sensor for damage.
Dissimilar Spare Wheel and Tire
Assembly Information WARNING:
Failure to follow these
guidelines could result in an increased
risk of loss of vehicle control, injury or
death. If you have a dissimilar spare wheel and
tire, then it is intended for temporary use
only. This means that if you need to use it,
you should replace it as soon as possible
with a road wheel and tire assembly that
is the same size and type as the road tires
and wheels that were originally provided
on your vehicle. If the dissimilar spare tire
or wheel is damaged, replace it instead of
repairing it.
A dissimilar spare wheel and tire assembly
is defined as a spare wheel and tire
assembly that is different in brand, size or
appearance from the road tires and wheels
and can be one of three types:
1.
T-type mini-spare:
This spare tire
begins with the letter T for tire size and
may have Temporary Use Only molded in
the sidewall.
2. Full-size dissimilar spare with label
on wheel:
This spare tire has a label on
the wheel that states: THIS WHEEL AND
TIRE ASSEMBLY FOR TEMPORARY USE
ONLY.
When driving with one of the dissimilar
spare tires listed above, do not:
• Exceed
50 mph (80 km/h).
• Load the vehicle beyond maximum
vehicle load rating listed on the Safety
Compliance Label.
• Tow a trailer.
• Use snow chains on the end of the
vehicle with the dissimilar spare tire.
• Use more than one dissimilar spare tire
at a time.
• Use commercial car washing
equipment.
• Try to repair the dissimilar spare tire.
341
2021 Edge (CDQ) Canada/United States of America, enUSA, Edition date: 202011, First-Printing Changing a Road Wheel
(If Equipped)
Page 373 of 500
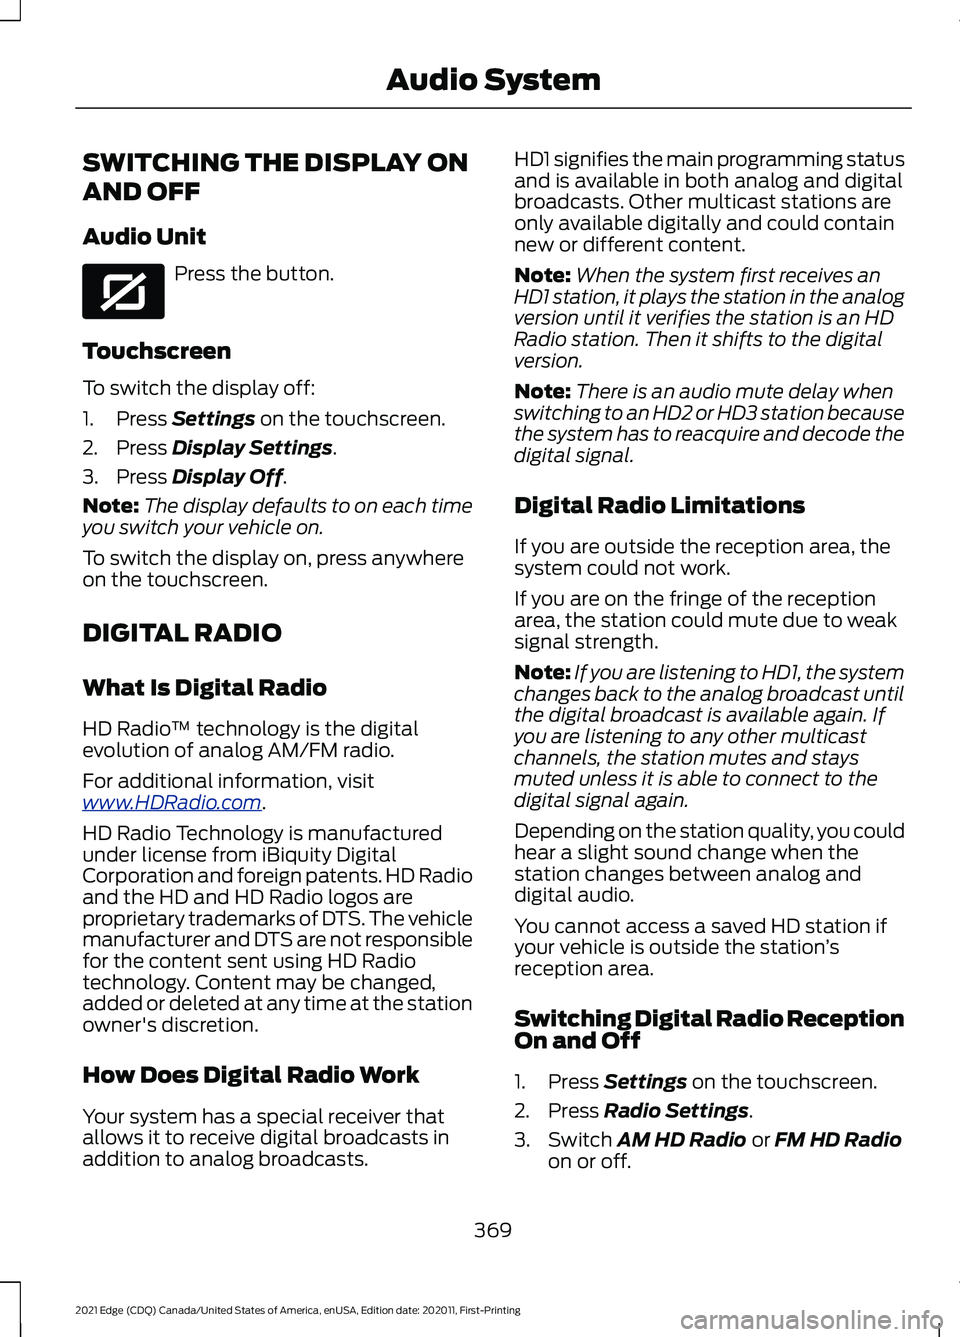
SWITCHING THE DISPLAY ON
AND OFF
Audio Unit
Press the button.
Touchscreen
To switch the display off:
1. Press Settings on the touchscreen.
2. Press
Display Settings.
3. Press
Display Off.
Note: The display defaults to on each time
you switch your vehicle on.
To switch the display on, press anywhere
on the touchscreen.
DIGITAL RADIO
What Is Digital Radio
HD Radio ™ technology is the digital
evolution of analog AM/FM radio.
For additional information, visit
www .HDR a dio . c om .
HD Radio Technology is manufactured
under license from iBiquity Digital
Corporation and foreign patents. HD Radio
and the HD and HD Radio logos are
proprietary trademarks of DTS. The vehicle
manufacturer and DTS are not responsible
for the content sent using HD Radio
technology. Content may be changed,
added or deleted at any time at the station
owner's discretion.
How Does Digital Radio Work
Your system has a special receiver that
allows it to receive digital broadcasts in
addition to analog broadcasts. HD1 signifies the main programming status
and is available in both analog and digital
broadcasts. Other multicast stations are
only available digitally and could contain
new or different content.
Note:
When the system first receives an
HD1 station, it plays the station in the analog
version until it verifies the station is an HD
Radio station. Then it shifts to the digital
version.
Note: There is an audio mute delay when
switching to an HD2 or HD3 station because
the system has to reacquire and decode the
digital signal.
Digital Radio Limitations
If you are outside the reception area, the
system could not work.
If you are on the fringe of the reception
area, the station could mute due to weak
signal strength.
Note: If you are listening to HD1, the system
changes back to the analog broadcast until
the digital broadcast is available again. If
you are listening to any other multicast
channels, the station mutes and stays
muted unless it is able to connect to the
digital signal again.
Depending on the station quality, you could
hear a slight sound change when the
station changes between analog and
digital audio.
You cannot access a saved HD station if
your vehicle is outside the station ’s
reception area.
Switching Digital Radio Reception
On and Off
1. Press
Settings on the touchscreen.
2. Press
Radio Settings.
3. Switch
AM HD Radio or FM HD Radio
on or off.
369
2021 Edge (CDQ) Canada/United States of America, enUSA, Edition date: 202011, First-Printing Audio SystemE272035
Page 374 of 500
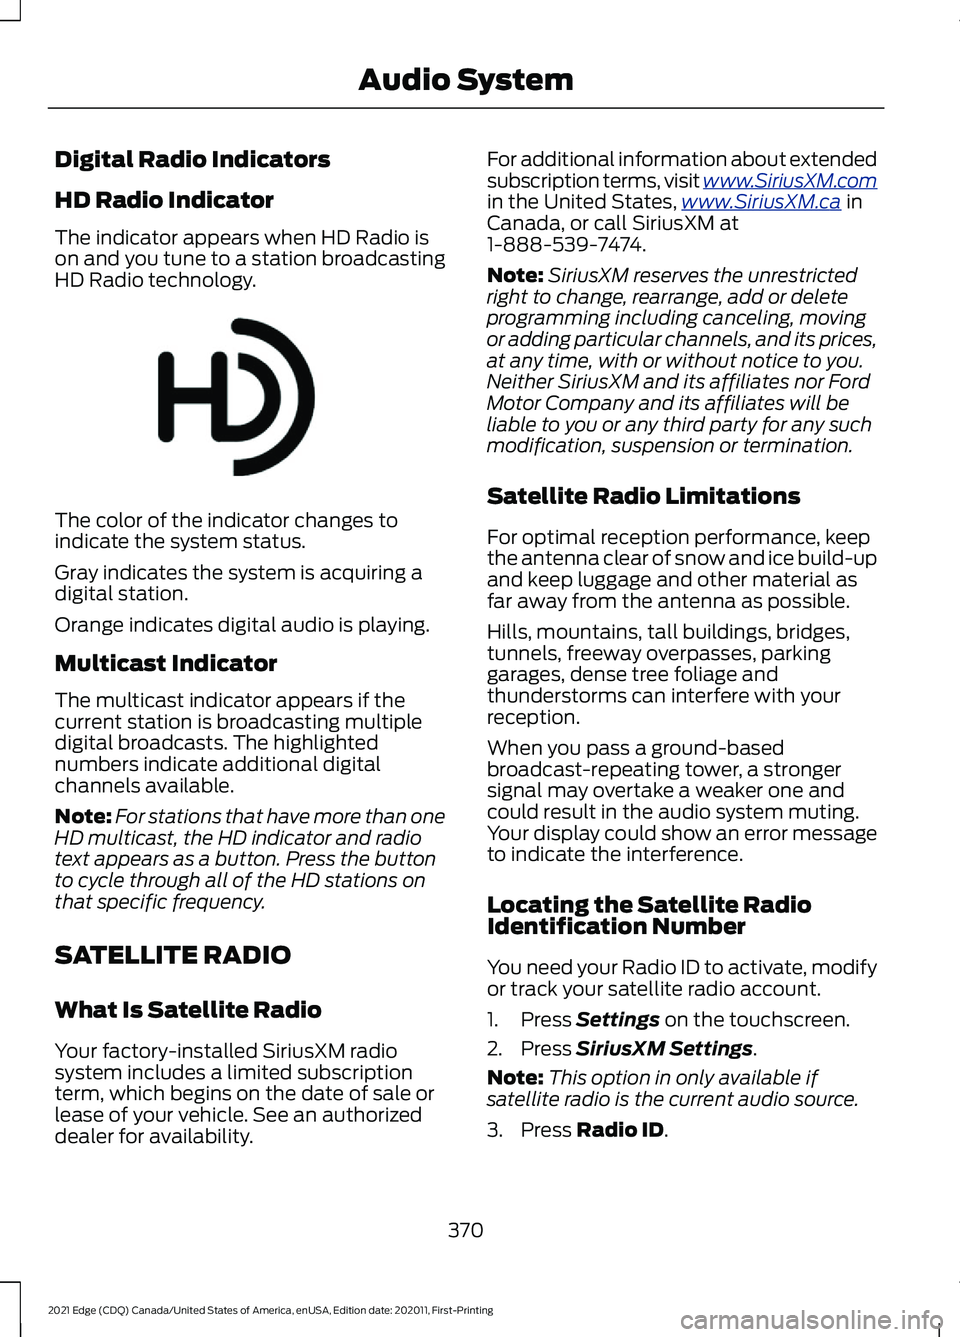
Digital Radio Indicators
HD Radio Indicator
The indicator appears when HD Radio is
on and you tune to a station broadcasting
HD Radio technology.
The color of the indicator changes to
indicate the system status.
Gray indicates the system is acquiring a
digital station.
Orange indicates digital audio is playing.
Multicast Indicator
The multicast indicator appears if the
current station is broadcasting multiple
digital broadcasts. The highlighted
numbers indicate additional digital
channels available.
Note:
For stations that have more than one
HD multicast, the HD indicator and radio
text appears as a button. Press the button
to cycle through all of the HD stations on
that specific frequency.
SATELLITE RADIO
What Is Satellite Radio
Your factory-installed SiriusXM radio
system includes a limited subscription
term, which begins on the date of sale or
lease of your vehicle. See an authorized
dealer for availability. For additional information about extended
subscription terms, visit www .SiriusXM. c om
in the United States,
www .SiriusXM. c a in
Canada, or call SiriusXM at
1-888-539-7474.
Note: SiriusXM reserves the unrestricted
right to change, rearrange, add or delete
programming including canceling, moving
or adding particular channels, and its prices,
at any time, with or without notice to you.
Neither SiriusXM and its affiliates nor Ford
Motor Company and its affiliates will be
liable to you or any third party for any such
modification, suspension or termination.
Satellite Radio Limitations
For optimal reception performance, keep
the antenna clear of snow and ice build-up
and keep luggage and other material as
far away from the antenna as possible.
Hills, mountains, tall buildings, bridges,
tunnels, freeway overpasses, parking
garages, dense tree foliage and
thunderstorms can interfere with your
reception.
When you pass a ground-based
broadcast-repeating tower, a stronger
signal may overtake a weaker one and
could result in the audio system muting.
Your display could show an error message
to indicate the interference.
Locating the Satellite Radio
Identification Number
You need your Radio ID to activate, modify
or track your satellite radio account.
1. Press Settings on the touchscreen.
2. Press
SiriusXM Settings.
Note: This option in only available if
satellite radio is the current audio source.
3. Press
Radio ID.
370
2021 Edge (CDQ) Canada/United States of America, enUSA, Edition date: 202011, First-Printing Audio SystemE142616
Page 390 of 500
UPDATING THE VEHICLE
SYSTEMS WIRELESSLY
Over the air system updates
allow you to update your vehicle
system software wirelessly. To
make sure you receive all updates, set a
recurring schedule and connect to Wi-Fi.
Updates may take longer if not connected
to Wi-Fi, or may not download at all. See
Connected Vehicle (page 360).
Note: Additional over the air update icons
may appear in the status bar. See
Status
Bar (page 373).
Over the Air System Update
Requirements
Before updating, reference this list to make
sure your vehicle is ready be updated. If
these requirements are not met during a
scheduled update, the update will be
canceled and you can reschedule.
• Your vehicle is not running.
• Your vehicle is stopped.
• Your vehicle is parked.
• The hazard indicators are switched off.
• The alarm is not sounding.
• The doors are closed.
• The parking lights are switched off.
• You are not pressing the brake pedal.
• An emergency call is not in progress.
• Your vehicle is not in limp mode.
Scheduling an Over the Air System
Update
Make sure Vehicle Connectivity and
Automatic Updates are switched on.
Using the Settings Menu
1. Open the application drawer.
2. Press the
System Updates button. 3. Press
Schedule Update.
4. Use the controls to set the time and day of the update.
5. Save the schedule.
Note: You can set the updates to occur
every seven days.
Using the Status Bar Icon When an update is available, tap
the notification icon and follow
the prompts on the screen.
Applying an Over the Air System
Update
You can schedule a convenient time for
the update to complete. During scheduled
updates you may not be able to use your
vehicle.
Note: Updates may take up to 30 minutes
to complete.
You can see the progress of the update on
the touchscreen. An update cannot be
canceled once it has been started.
During an update you will not be able to
drive your vehicle, start the vehicle, use
remote controls to lock and unlock the
vehicle. The alarm, central locks, and door
tones are disabled. The electronic door
lock will not function during an update. You
can open the doors using the mechanical
latch if child locks are not on. Pull the
handle until it stops to use the mechanical
latch.
Note: Double locking is switched off and
central locking is switched on during and
after an update.
Note: If your vehicle is plugged in, charging
will stop during an update and resume when
the update is complete.
386
2021 Edge (CDQ) Canada/United States of America, enUSA, Edition date: 202011, First-Printing Vehicle System UpdatesE327789 E327785
Page 396 of 500
It is important to rely upon your dealership
to properly diagnose and repair your
vehicle.
We strongly recommend only using our
genuine or our authorized re-manufactured
replacement parts engineered for your
vehicle.
Additives and Chemicals
We do not recommend using chemicals or
additives not approved by us as part of
your vehicle
’s normal maintenance. Please
consult your warranty information.
Oils, Fluids and Flushing
In many cases, fluid discoloration is a
normal operating characteristic and, by
itself, does not necessarily indicate a
concern or that the fluid needs to be
changed. Have discolored fluids that also
show signs of overheating or foreign
material contamination checked
immediately. Make sure to change the vehicle
’s oils and
fluids at the specified intervals or in
conjunction with a repair. Flushing is a
viable way to change fluid for many vehicle
sub-systems during scheduled
maintenance. It is critical that systems are
flushed only with new fluid that is the same
as that required to fill and operate the
system or using our approved flushing
chemical.
Owner Checks and Services
Make sure you perform the following basic
maintenance checks and inspections. Check Every Month
The air filter restriction gauge. 1
The engine oil level.
Function of all interior and the exterior lights.
The tires including the spare for wear and proper pressure. The windshield washer fluid level.
The fuel and water separator. Drain if necessary or if indicated by the information display. 1
The holes and slots in the tail pipe to make sure they are functional and clear of debris. 1
1 Diesel vehicles only.
392
2021 Edge (CDQ) Canada/United States of America, enUSA, Edition date: 202011, First-Printing Scheduled Maintenance