ESP FORD EDGE 2023 User Guide
[x] Cancel search | Manufacturer: FORD, Model Year: 2023, Model line: EDGE, Model: FORD EDGE 2023Pages: 504, PDF Size: 14.96 MB
Page 63 of 504
REMOTE CONTROL
LIMITATIONS
WARNING: Changes ormodifications not expressively approvedby the party responsible for compliancecould void the user's authority to operatethe equipment. The term "IC:" before theradio certification number only signifiesthat Industry Canada technicalspecifications were met.
This device complies with Part 15 of theFCC Rules and with Industry Canadalicense-exempt RSS standard(s).Operation is subject to the following twoconditions: (1) This device may not causeharmful interference, and (2) This devicemust accept any interference received,including interference that may causeundesired operation.
Make sure a valid remote control is within3 ft (1 m) from the front door handles andrear of vehicle.
The system may not function if:
•The remote control remains stationaryfor about a minute.
•The vehicle battery has no charge.
•The remote control battery has nocharge.
•There is interference causing issueswith the remote control frequencies.
•The remote control is too close tometal objects or electronic devices, forexample keys or a cell phone.
USING THE REMOTE CONTROL
Use your remote control to access variousvehicle systems.
Note:The buttons on your remote may varydepending on the vehicle region or options.
Unlock
Press the button to unlock alldoors. See Unlocking andLocking the Doors Using theRemote Control (page 69).
Lock
Press the button to lock alldoors. See Unlocking andLocking the Doors Using theRemote Control (page 69).
Remote Start (If Equipped)
Press the button to remote start.See Remotely Starting andStopping the Vehicle (page125).
Liftgate (If Equipped)
Press the button to open or closethe liftgate. See Opening theLiftgate (page 82).
Panic Alarm (If Equipped)
Press the button to sound thepanic alarm. See Sounding thePanic Alarm (page 60).
59
2023 Edge (CDQ) Canada/United States of America, enUSA, Edition date: 202207, DOMKeys and Remote ControlsE138629 E138623 E138625 E267940 E138624
Page 68 of 504
WHAT IS MYKEY
MyKey
MyKey allows you to program keys withrestricted driving modes to promote gooddriving habits.
MYKEY SETTINGS
NON-CONFIGURABLE MYKEYSETTINGS
Seatbelt Reminder or Belt-Minder™
MyKey mutes the audio system until thefront seat passengers buckle the front seatbelts.
Note:If your vehicle includes an AM/FMradio or a very basic audio system, then theradio may not mute.
Satellite Radio (If Equipped)
Some Satellite radio channels haverestricted access to adult radio content.
Early Low Fuel
The low fuel level warning lamp turns onearlier.
Driving and Parking Aids
You cannot configure settings for parkingaids, blind spot information system, andcross traffic alert. These systems turn onwhen the vehicle turns on, and you cannotswitch them off with a MyKey.
You cannot configure settings forpre-collision assist and lane keeping. Thesesystems turn on when the vehicle turns on,but you can switch them off with a MyKey.
A new destination in the navigation systemcan only be set using voice commandswhen using a MyKey, and with your vehiclemoving.
Note:MyKey drivers may be able to switchthe lane departure warning feature off, butthis feature turns back on automaticallywith every new key cycle.
CONFIGURABLE MYKEYSETTINGS
You can configure the following settingsafter creating a MyKey. See Creating aMyKey (page 65).
Speed Limit
WARNING: Do not set MyKeymaximum speed limit to a limit that willprevent the driver from maintaining asafe speed considering posted speedlimits and prevailing road conditions. Thedriver is always responsible to drive inaccordance with local laws andprevailing conditions. Failure to do socould result in accident or injury.
You can set a speed limit for your vehicle.Warning messages appear on theinstrument cluster display and a tonesounds if your vehicle reaches the setspeed. You cannot override the set speedwhen using a MyKey.
Speed Minder
You can set a speed reminder for yourvehicle. Warning messages appear on theinstrument cluster display and a tonesounds if your vehicle exceeds the setspeed.
64
2023 Edge (CDQ) Canada/United States of America, enUSA, Edition date: 202207, DOMMyKey™
Page 87 of 504
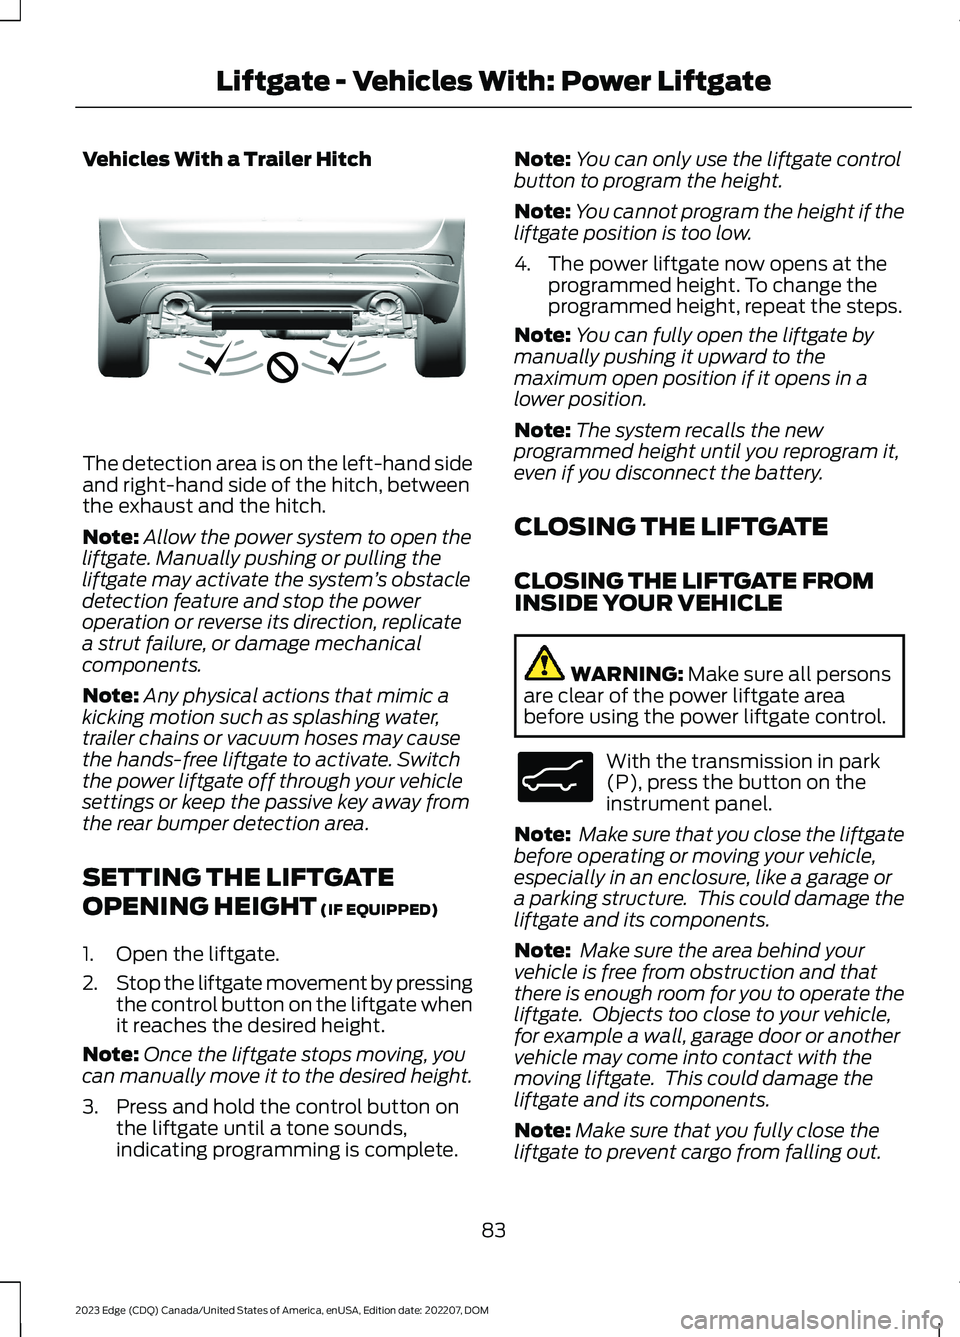
Vehicles With a Trailer Hitch
The detection area is on the left-hand sideand right-hand side of the hitch, betweenthe exhaust and the hitch.
Note:Allow the power system to open theliftgate. Manually pushing or pulling theliftgate may activate the system’s obstacledetection feature and stop the poweroperation or reverse its direction, replicatea strut failure, or damage mechanicalcomponents.
Note:Any physical actions that mimic akicking motion such as splashing water,trailer chains or vacuum hoses may causethe hands-free liftgate to activate. Switchthe power liftgate off through your vehiclesettings or keep the passive key away fromthe rear bumper detection area.
SETTING THE LIFTGATE
OPENING HEIGHT (IF EQUIPPED)
1.Open the liftgate.
2.Stop the liftgate movement by pressingthe control button on the liftgate whenit reaches the desired height.
Note:Once the liftgate stops moving, youcan manually move it to the desired height.
3.Press and hold the control button onthe liftgate until a tone sounds,indicating programming is complete.
Note:You can only use the liftgate controlbutton to program the height.
Note:You cannot program the height if theliftgate position is too low.
4.The power liftgate now opens at theprogrammed height. To change theprogrammed height, repeat the steps.
Note:You can fully open the liftgate bymanually pushing it upward to themaximum open position if it opens in alower position.
Note:The system recalls the newprogrammed height until you reprogram it,even if you disconnect the battery.
CLOSING THE LIFTGATE
CLOSING THE LIFTGATE FROMINSIDE YOUR VEHICLE
WARNING: Make sure all personsare clear of the power liftgate areabefore using the power liftgate control.
With the transmission in park(P), press the button on theinstrument panel.
Note: Make sure that you close the liftgatebefore operating or moving your vehicle,especially in an enclosure, like a garage ora parking structure. This could damage theliftgate and its components.
Note: Make sure the area behind yourvehicle is free from obstruction and thatthere is enough room for you to operate theliftgate. Objects too close to your vehicle,for example a wall, garage door or anothervehicle may come into contact with themoving liftgate. This could damage theliftgate and its components.
Note:Make sure that you fully close theliftgate to prevent cargo from falling out.
83
2023 Edge (CDQ) Canada/United States of America, enUSA, Edition date: 202207, DOMLiftgate - Vehicles With: Power LiftgateE310718 E138633
Page 88 of 504
CLOSING THE LIFTGATE FROMOUTSIDE YOUR VEHICLE
WARNING: Make sure all personsare clear of the power liftgate areabefore using the power liftgate control.
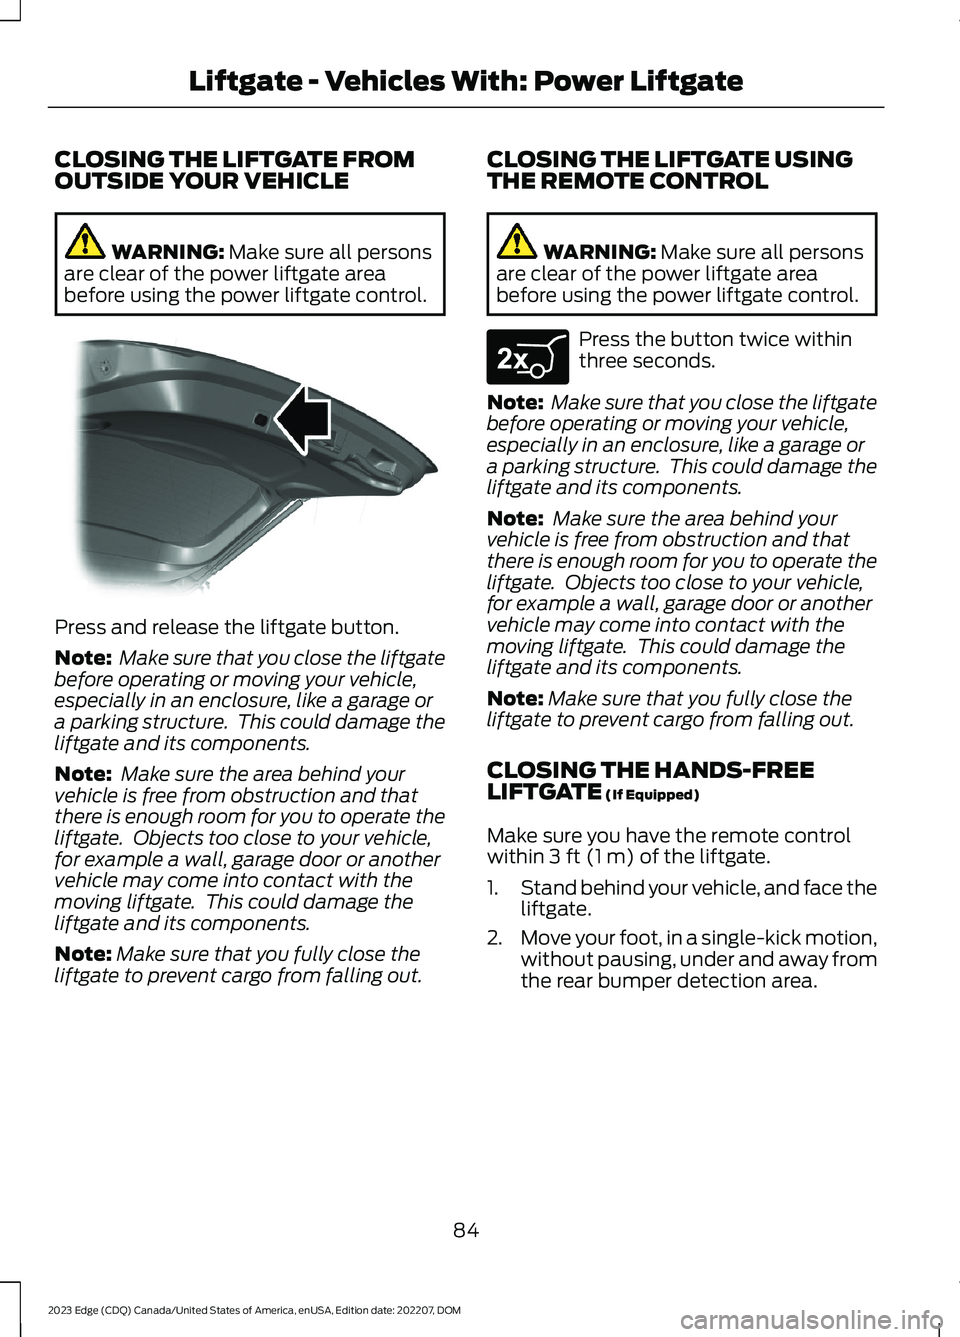
Press and release the liftgate button.
Note: Make sure that you close the liftgatebefore operating or moving your vehicle,especially in an enclosure, like a garage ora parking structure. This could damage theliftgate and its components.
Note: Make sure the area behind yourvehicle is free from obstruction and thatthere is enough room for you to operate theliftgate. Objects too close to your vehicle,for example a wall, garage door or anothervehicle may come into contact with themoving liftgate. This could damage theliftgate and its components.
Note:Make sure that you fully close theliftgate to prevent cargo from falling out.
CLOSING THE LIFTGATE USINGTHE REMOTE CONTROL
WARNING: Make sure all personsare clear of the power liftgate areabefore using the power liftgate control.
Press the button twice withinthree seconds.
Note: Make sure that you close the liftgatebefore operating or moving your vehicle,especially in an enclosure, like a garage ora parking structure. This could damage theliftgate and its components.
Note: Make sure the area behind yourvehicle is free from obstruction and thatthere is enough room for you to operate theliftgate. Objects too close to your vehicle,for example a wall, garage door or anothervehicle may come into contact with themoving liftgate. This could damage theliftgate and its components.
Note:Make sure that you fully close theliftgate to prevent cargo from falling out.
CLOSING THE HANDS-FREELIFTGATE (If Equipped)
Make sure you have the remote controlwithin 3 ft (1 m) of the liftgate.
1.Stand behind your vehicle, and face theliftgate.
2.Move your foot, in a single-kick motion,without pausing, under and away fromthe rear bumper detection area.
84
2023 Edge (CDQ) Canada/United States of America, enUSA, Edition date: 202207, DOMLiftgate - Vehicles With: Power LiftgateE138636 E267940
Page 98 of 504
WIPERS
WIPER PRECAUTIONS
Do not operate the wipers on a drywindshield. This could scratch the glass ordamage the wiper blades. Use thewindshield washers before wiping a drywindshield.
Fully defrost the windshield before youswitch the windshield wipers on.
Switch the windshield wipers off beforeentering a car wash.
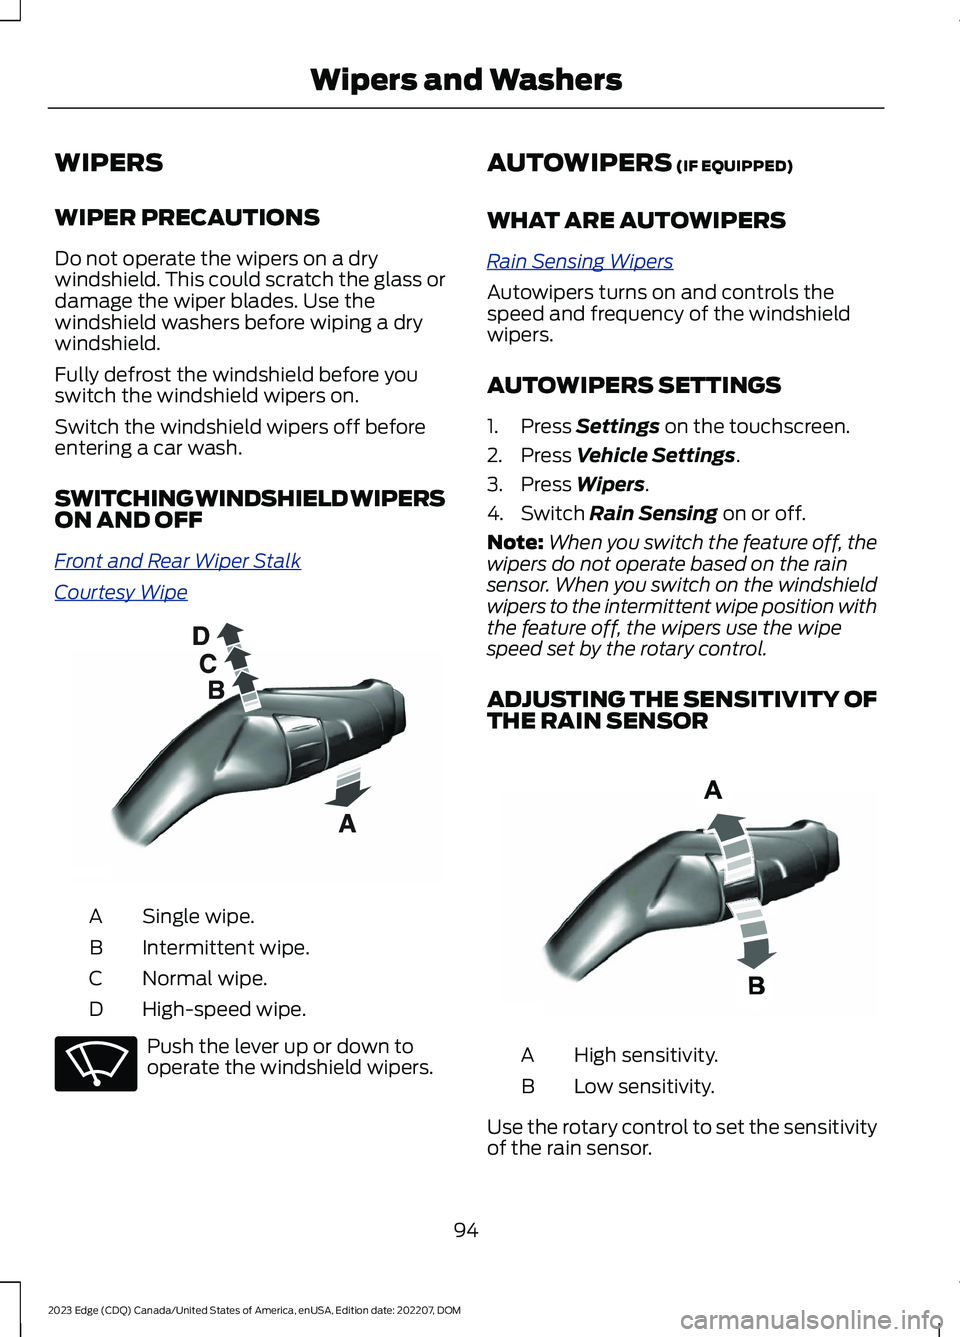
SWITCHING WINDSHIELD WIPERSON AND OFF
Front and Rear Wiper Stalk
Courtesy Wipe
Single wipe.A
Intermittent wipe.B
Normal wipe.C
High-speed wipe.D
Push the lever up or down tooperate the windshield wipers.
AUTOWIPERS (IF EQUIPPED)
WHAT ARE AUTOWIPERS
Rain Sensing Wipers
Autowipers turns on and controls thespeed and frequency of the windshieldwipers.
AUTOWIPERS SETTINGS
1.Press Settings on the touchscreen.
2.Press Vehicle Settings.
3.Press Wipers.
4.Switch Rain Sensing on or off.
Note:When you switch the feature off, thewipers do not operate based on the rainsensor. When you switch on the windshieldwipers to the intermittent wipe position withthe feature off, the wipers use the wipespeed set by the rotary control.
ADJUSTING THE SENSITIVITY OFTHE RAIN SENSOR
High sensitivity.A
Low sensitivity.B
Use the rotary control to set the sensitivityof the rain sensor.
94
2023 Edge (CDQ) Canada/United States of America, enUSA, Edition date: 202207, DOMWipers and WashersE197525 E270969 E331276
Page 103 of 504
HEADLAMPS –
TROUBLESHOOTING
HEADLAMPS – FREQUENTLYASKED QUESTIONS
Why is there condensation in theheadlamps?
•Headlamps have vents toaccommodate normal changes in airpressure. Condensation can be anatural by-product of this design.When moist air enters the lampassembly through the vents, there is apossibility that condensation can occurwhen the temperature is cold. Whennormal condensation occurs, a finemist can form on the interior of thelens. The fine mist eventually clearsand exits through the vents duringnormal operation.
How much condensation isacceptable?
•The presence of a fine mist, forexample no streaks, drip marks or largedroplets. A fine mist covers less than50% of the lens.
How long may it take for theacceptable condensation to becleared?
•Clearing time may take as long as 48hours under dry weather conditions.
How much condensation isunacceptable?
•A water puddle inside the lamp.Streaks, drip marks or large dropletspresent on the interior of the lens.
What should I do if unacceptablecondensation is present?
•Have your vehicle checked as soon aspossible.
Why do my headlamps turn offwhen I have them switched onwhen I switch my vehicle off?
•The battery saver turns the headlampsoff after a short period of time after youswitch your vehicle off.
AUTOLAMPS
WHAT ARE AUTOLAMPS
Automatic headlamps with wiper-activatedheadlamp feature
WARNING: The system does notrelieve you of your responsibility to drivewith due care and attention. You mayneed to override the system if it does notturn the headlamps on in low visibilityconditions, for example daytime fog.
Autolamps turn the headlamps on in lowlight situations or when the windshieldwipers operate.
AUTOLAMP SETTINGS
1.Using the instrument cluster controlson the steering wheel, select Settings.
2.Select Vehicle.
3.Select Lighting.
4.Select Autolamp Delay.
5.Select a setting and press the OKbutton.
99
2023 Edge (CDQ) Canada/United States of America, enUSA, Edition date: 202207, DOMExterior Lighting
Page 106 of 504

Without automatic high beamcontrol.A
With automatic high beamcontrol.B
AUTOMATIC HIGH BEAMCONTROL PRECAUTIONS
WARNING: The system does notrelieve you of your responsibility to drivewith due care and attention. You mayneed to override the system if it does notturn the high beams on or off.
WARNING: The system may notswitch the high beams off if the lights ofoncoming vehicles are hidden byobstacles, for example guard rails.
WARNING: Do not use the systemin poor visibility, for example fog, heavyrain, spray or snow.
WARNING: You may need tooverride the system when approachingother road users.
WARNING: You may need tooverride the system during inclementweather.
AUTOMATIC HIGH BEAMCONTROL REQUIREMENTS
The system turns the high beams on if allof the following occur:
•You switch the system on.
•You set the lighting control to theautolamps position.
•The ambient light level is low enoughthat you require high beams.
•There is no traffic in front of yourvehicle.
•The vehicle speed is greater thanapproximately 25 mph (40 km/h).
AUTOMATIC HIGH BEAMCONTROL LIMITATIONS
The system turns the high beams off if anyof the following occur:
•You switch the system off.
•You set the lighting control to anyposition except autolamps.
•The ambient light level is high enoughthat you do not require high beams.
102
2023 Edge (CDQ) Canada/United States of America, enUSA, Edition date: 202207, DOMExterior Lighting E327596
Page 118 of 504
FUEL GAUGE LIMITATIONS
The fuel gauge may not provide anaccurate reading when your vehicle is onan incline.
LOCATING THE FUEL FILLERDOOR
The arrow adjacent to the fuel pumpsymbol indicates on which side of yourvehicle the fuel filler door is located.
WHAT IS THE LOW FUELREMINDER
A low fuel level reminder displays andsounds when the distance to emptyreaches 75 mi (120 km) to empty forMyKey, and at 50 mi (80 km),25 mi(40 km),12 mi (20 km) and 0 mi (0 km)for all vehicle keys.
Note:The low fuel reminder can appear atdifferent fuel gauge positions depending onfuel economy conditions. This variation isnormal.
WHAT IS DISTANCE TO EMPTY
Indicates the approximate distance yourvehicle can travel on the fuel remaining inthe tank. Changes in driving pattern cancause the value to not only decrease butalso increase or stay constant for periodsof time.
ENGINE COOLANT
TEMPERATURE GAUGE
Indicates the engine coolant temperature.
TURBO BOOST GAUGE
Indicates the amount of manifold airpressure in the engine.
Note:This is a configurable gauge.
WHAT ARE THE INSTRUMENT
CLUSTER WARNING LAMPS
Warning lamps alert you to a vehiclecondition that could become serious.Some lamps illuminate when you startyour vehicle to make sure they work. If anylamps remain on after starting your vehicle,refer to the respective system warninglamp for further information.
INSTRUMENT CLUSTER
WARNING LAMPS
Anti-Lock Brake System
If it illuminates when you aredriving, this indicates the systemrequires service. Your vehiclecontinues to have normal braking withoutthe anti-lock brake system function. Haveyour vehicle checked as soon as possible.
Battery
It illuminates when you switchthe ignition on.
If it illuminates when the engineis running, this indicates your vehiclerequires service. Have your vehiclechecked as soon as possible.
Brake System
It illuminates when you apply theparking brake and the ignition ison. If it illuminates when yourvehicle is moving, make sure theparking brake is released. If theparking brake is released, thisindicates low brake fluid level or the brakesystem requires service. Have your vehiclechecked as soon as possible.
114
2023 Edge (CDQ) Canada/United States of America, enUSA, Edition date: 202207, DOMInstrument ClusterE67020 E67021 E270480 E67024
Page 121 of 504
USING THE INSTRUMENT
CLUSTER DISPLAY CONTROLS
WARNING: Driving while distractedcan result in loss of vehicle control, crashand injury. We strongly recommend thatyou use extreme caution when using anydevice that may take your focus off theroad. Your primary responsibility is thesafe operation of your vehicle. Werecommend against the use of anyhand-held device while driving andencourage the use of voice-operatedsystems when possible. Make sure youare aware of all applicable local lawsthat may affect the use of electronicdevices while driving.
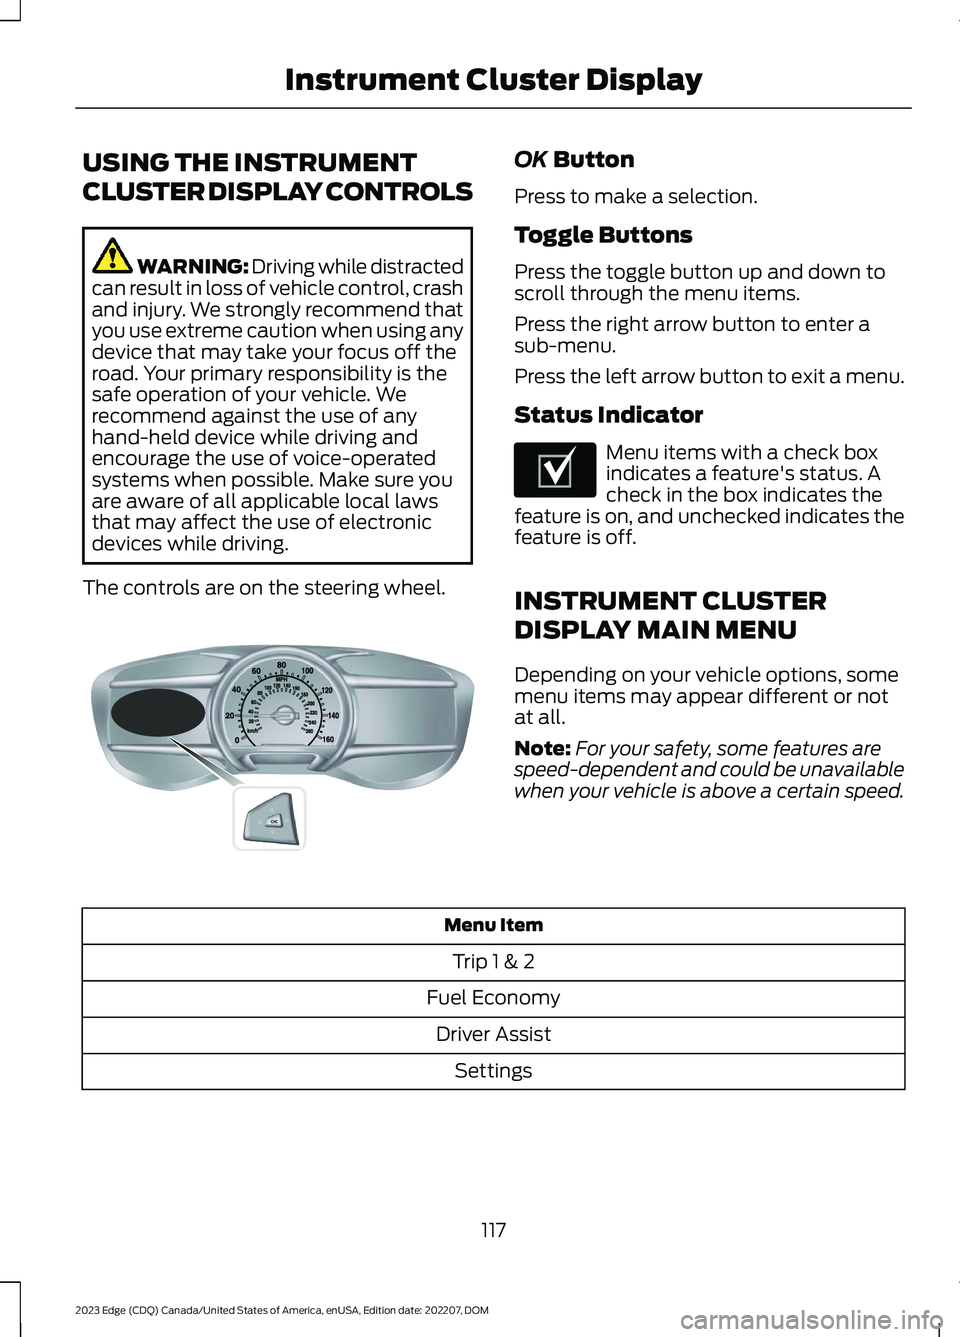
The controls are on the steering wheel.
OK Button
Press to make a selection.
Toggle Buttons
Press the toggle button up and down toscroll through the menu items.
Press the right arrow button to enter asub-menu.
Press the left arrow button to exit a menu.
Status Indicator
Menu items with a check boxindicates a feature's status. Acheck in the box indicates thefeature is on, and unchecked indicates thefeature is off.
INSTRUMENT CLUSTER
DISPLAY MAIN MENU
Depending on your vehicle options, somemenu items may appear different or notat all.
Note:For your safety, some features arespeed-dependent and could be unavailablewhen your vehicle is above a certain speed.
Menu Item
Trip 1 & 2
Fuel Economy
Driver Assist
Settings
117
2023 Edge (CDQ) Canada/United States of America, enUSA, Edition date: 202207, DOMInstrument Cluster DisplayE144638 E204495
Page 142 of 504
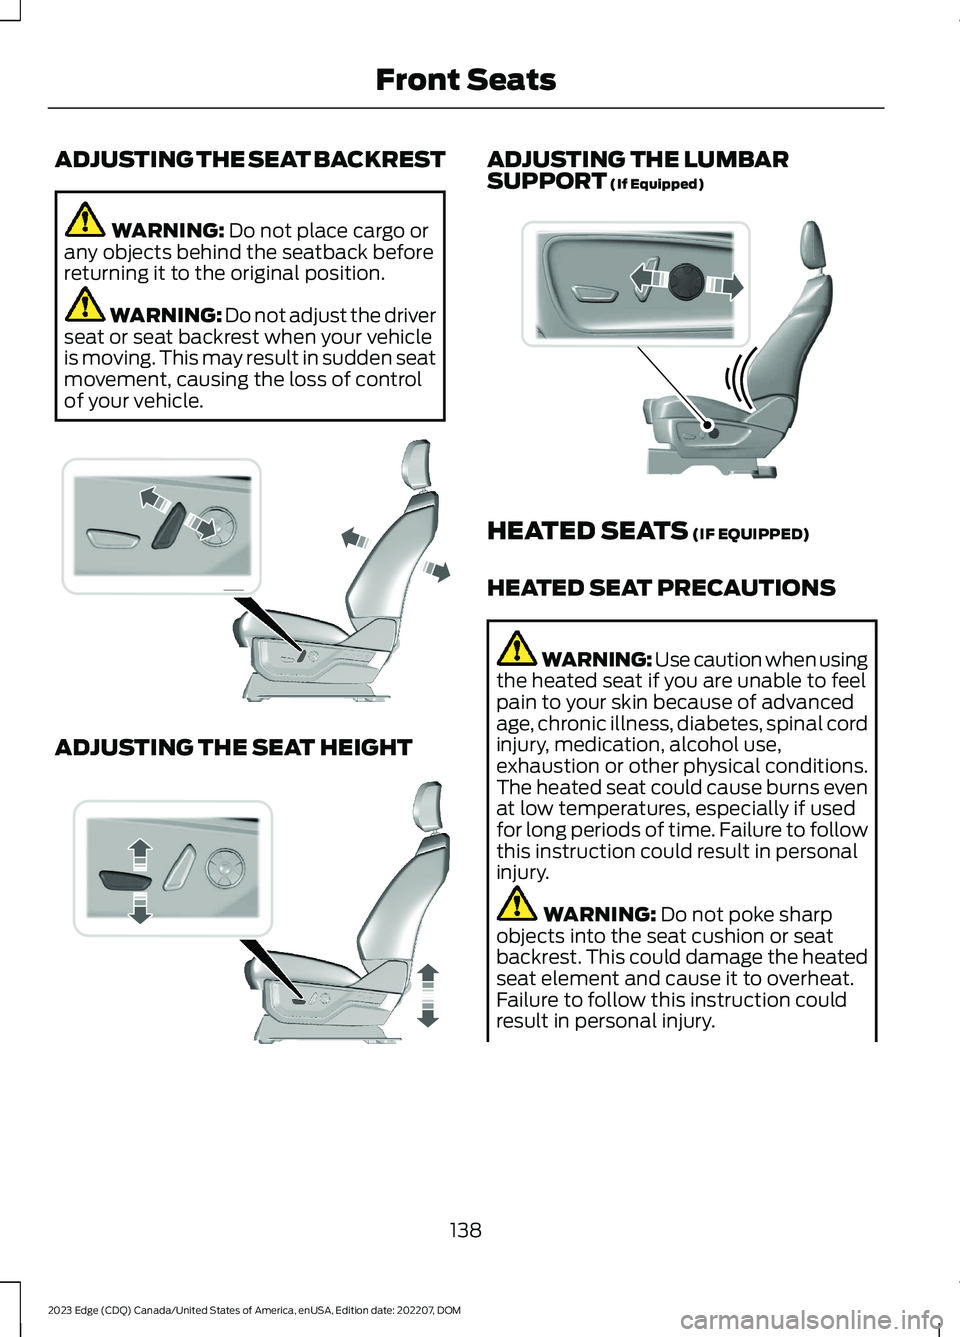
ADJUSTING THE SEAT BACKREST
WARNING: Do not place cargo orany objects behind the seatback beforereturning it to the original position.
WARNING: Do not adjust the driverseat or seat backrest when your vehicleis moving. This may result in sudden seatmovement, causing the loss of controlof your vehicle.
ADJUSTING THE SEAT HEIGHT
ADJUSTING THE LUMBARSUPPORT (If Equipped)
HEATED SEATS (IF EQUIPPED)
HEATED SEAT PRECAUTIONS
WARNING: Use caution when usingthe heated seat if you are unable to feelpain to your skin because of advancedage, chronic illness, diabetes, spinal cordinjury, medication, alcohol use,exhaustion or other physical conditions.The heated seat could cause burns evenat low temperatures, especially if usedfor long periods of time. Failure to followthis instruction could result in personalinjury.
WARNING: Do not poke sharpobjects into the seat cushion or seatbackrest. This could damage the heatedseat element and cause it to overheat.Failure to follow this instruction couldresult in personal injury.
138
2023 Edge (CDQ) Canada/United States of America, enUSA, Edition date: 202207, DOMFront SeatsE308338 E308337 E298774