headlamp FORD ESCAPE 2001 1.G User Guide
[x] Cancel search | Manufacturer: FORD, Model Year: 2001, Model line: ESCAPE, Model: FORD ESCAPE 2001 1.GPages: 280, PDF Size: 2.65 MB
Page 182 of 280
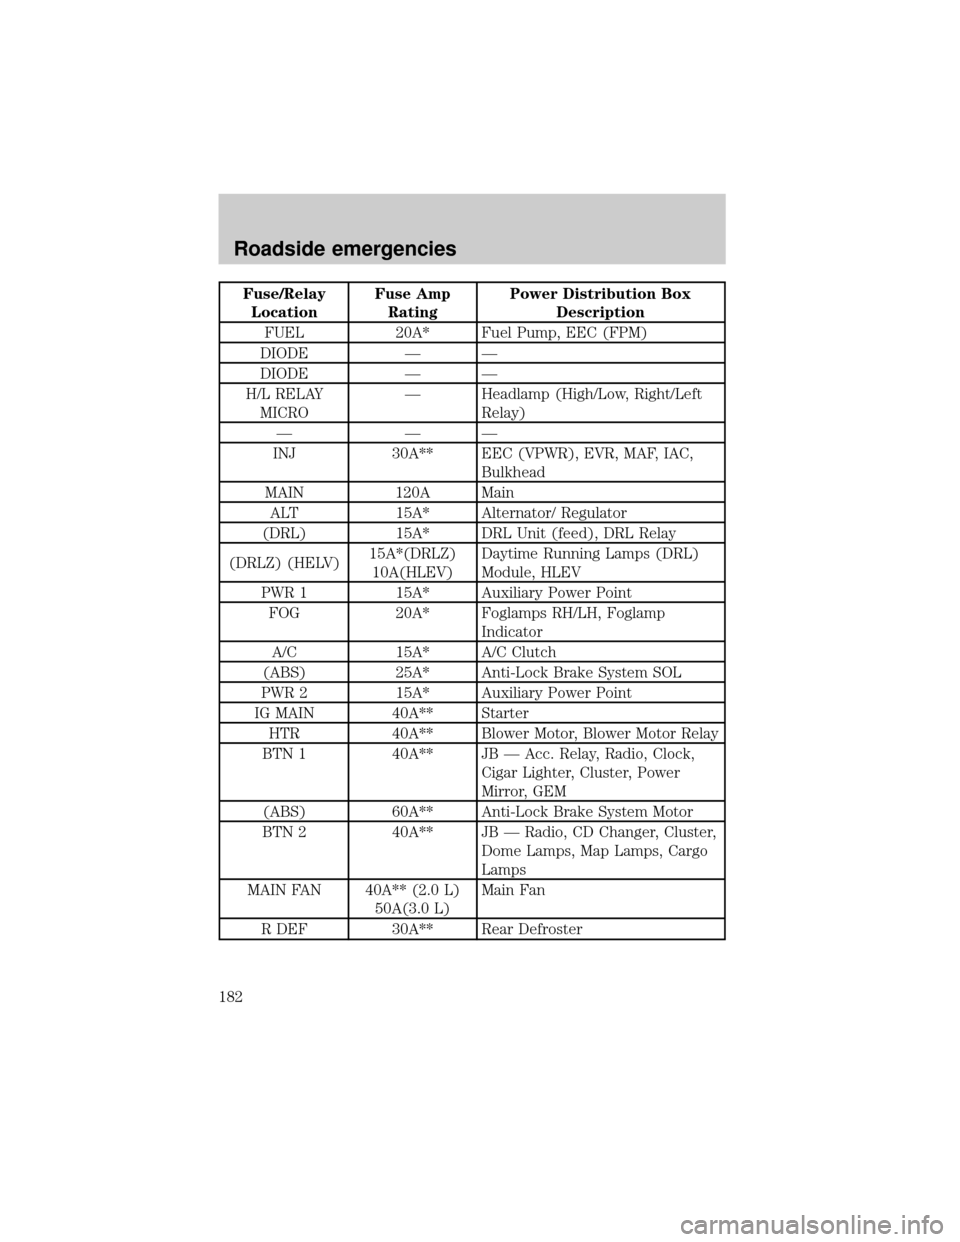
Fuse/Relay
LocationFuse Amp
RatingPower Distribution Box
Description
FUEL 20A* Fuel Pump, EEC (FPM)
DIODE Ð Ð
DIODE Ð Ð
H/L RELAY
MICROÐ Headlamp (High/Low, Right/Left
Relay)
ÐÐÐ
INJ 30A** EEC (VPWR), EVR, MAF, IAC,
Bulkhead
MAIN 120A Main
ALT 15A* Alternator/ Regulator
(DRL) 15A* DRL Unit (feed), DRL Relay
(DRLZ) (HELV)15A*(DRLZ)
10A(HLEV)Daytime Running Lamps (DRL)
Module, HLEV
PWR 1 15A* Auxiliary Power Point
FOG 20A* Foglamps RH/LH, Foglamp
Indicator
A/C 15A* A/C Clutch
(ABS) 25A* Anti-Lock Brake System SOL
PWR 2 15A* Auxiliary Power Point
IG MAIN 40A** Starter
HTR 40A** Blower Motor, Blower Motor Relay
BTN 1 40A** JB Ð Acc. Relay, Radio, Clock,
Cigar Lighter, Cluster, Power
Mirror, GEM
(ABS) 60A** Anti-Lock Brake System Motor
BTN 2 40A** JB Ð Radio, CD Changer, Cluster,
Dome Lamps, Map Lamps, Cargo
Lamps
MAIN FAN 40A** (2.0 L)
50A(3.0 L)Main Fan
R DEF 30A** Rear Defroster
Roadside emergencies
182
Page 235 of 280
Allow the vehicle to sit for at least eight hours without starting the
engine. Then, start the engine and complete the above driving cycle. The
engine must warm up to its normal operating temperature. Once started,
do not turn off the engine until the above driving cycle is complete.
BULBS
Replacing exterior bulbs
Check the operation of the following lamps frequently:
²Headlamps
²Foglamps
²High-mount brakelamp
²Brakelamps
²Turn signals
²License plate lamp
²Tail lamps
²Back-up lamps
Do not remove lamp bulbs unless they can be replaced immediately with
new ones. If a bulb is removed for an extended period of time,
contaminants may enter the lamp housings and affect lamp performance.
Replacing headlamp bulbs
1. Make sure that the headlamp control is in the OFF position.
2. Open the hood.
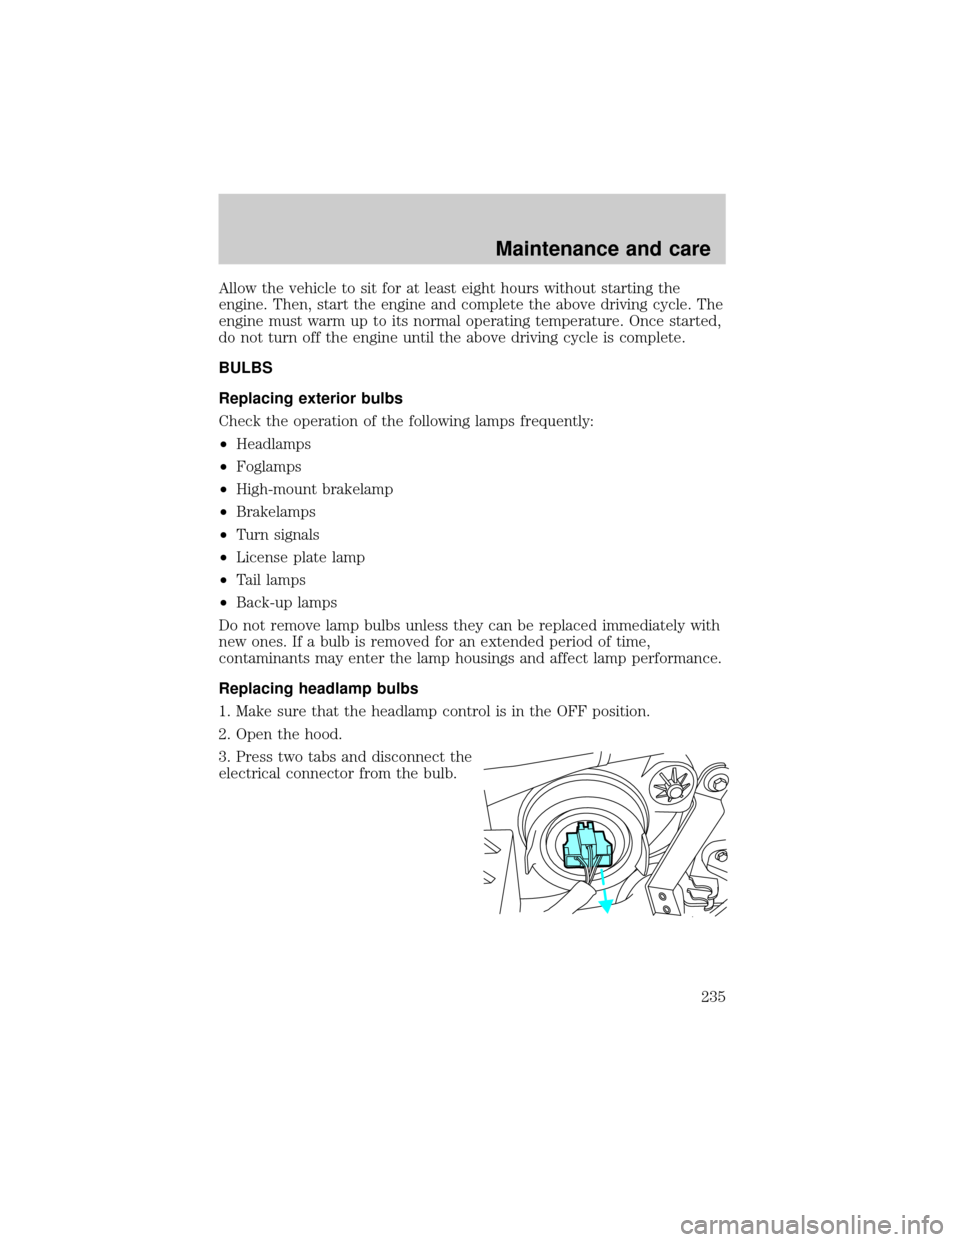
3. Press two tabs and disconnect the
electrical connector from the bulb.
Maintenance and care
235
Page 236 of 280
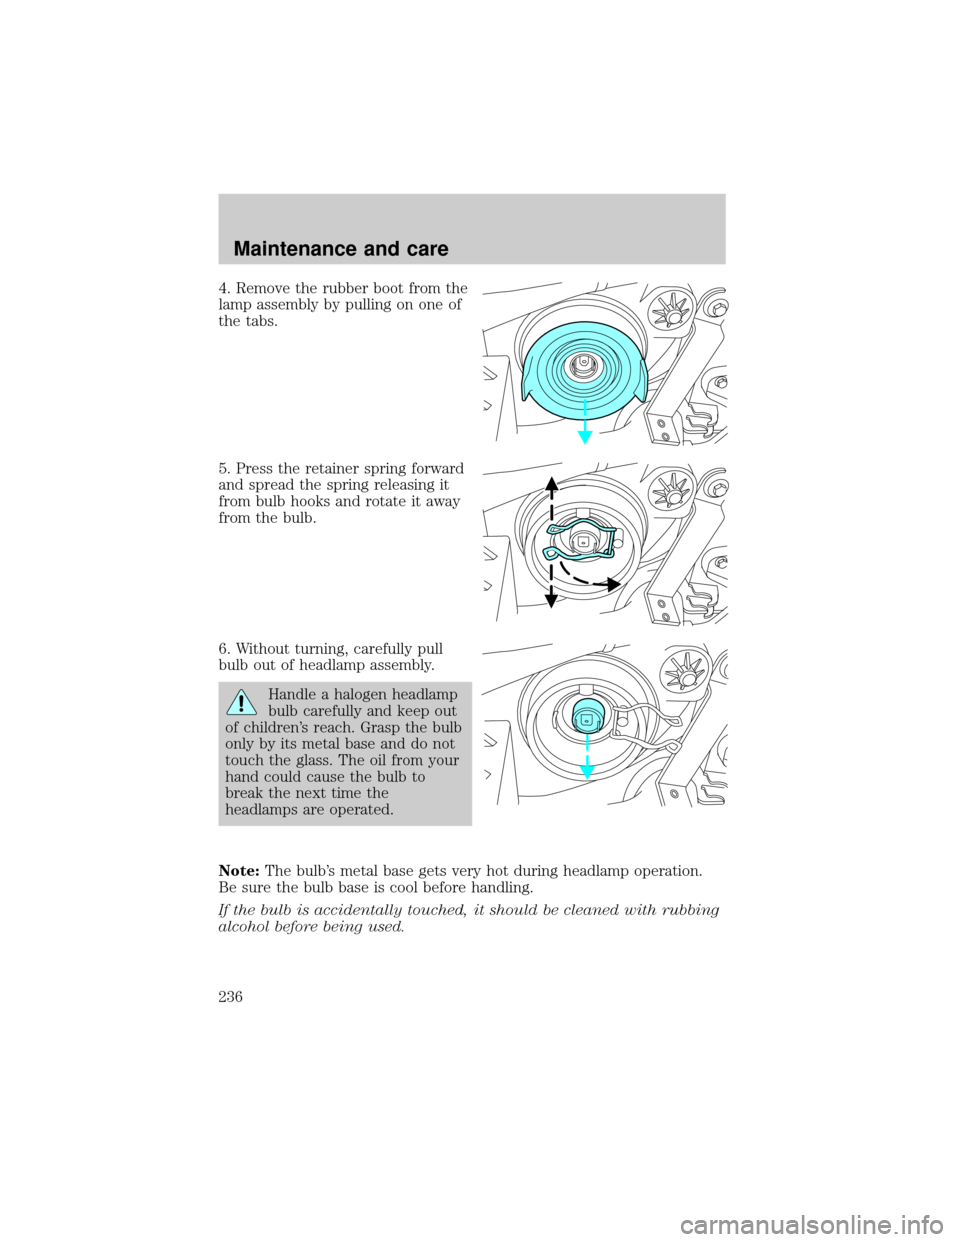
4. Remove the rubber boot from the
lamp assembly by pulling on one of
the tabs.
5. Press the retainer spring forward
and spread the spring releasing it
from bulb hooks and rotate it away
from the bulb.
6. Without turning, carefully pull
bulb out of headlamp assembly.
Handle a halogen headlamp
bulb carefully and keep out
of children's reach. Grasp the bulb
only by its metal base and do not
touch the glass. The oil from your
hand could cause the bulb to
break the next time the
headlamps are operated.
Note:The bulb's metal base gets very hot during headlamp operation.
Be sure the bulb base is cool before handling.
If the bulb is accidentally touched, it should be cleaned with rubbing
alcohol before being used.
Maintenance and care
236
Page 237 of 280
7. Insert the glass end of the new bulb into the headlamp assembly.
When the bulb's three metal tabs are aligned with the grooves in the
plastic base, push the bulb into the lamp assembly until the bulb's metal
base contacts the plastic base.
8. Rotate the retainer spring over the bulb metal base and secure it on
the bulb hooks.
9. Install rubber boot on the lamp assembly. Be sure to press firmly
around the perimeter of the boot and around the bulb to ensure the
proper seal of the bulb.
10. Connect the electrical connector into the rear of the bulb until it
ªsnaps.º
Replacing brake/tail/turn/backup/rear fog lamp bulbs
The brake/tail/turn/backup/rear fog lamp bulbs are located in the tail
lamp assembly, one just below the other. Follow the same steps to
replace either bulb:
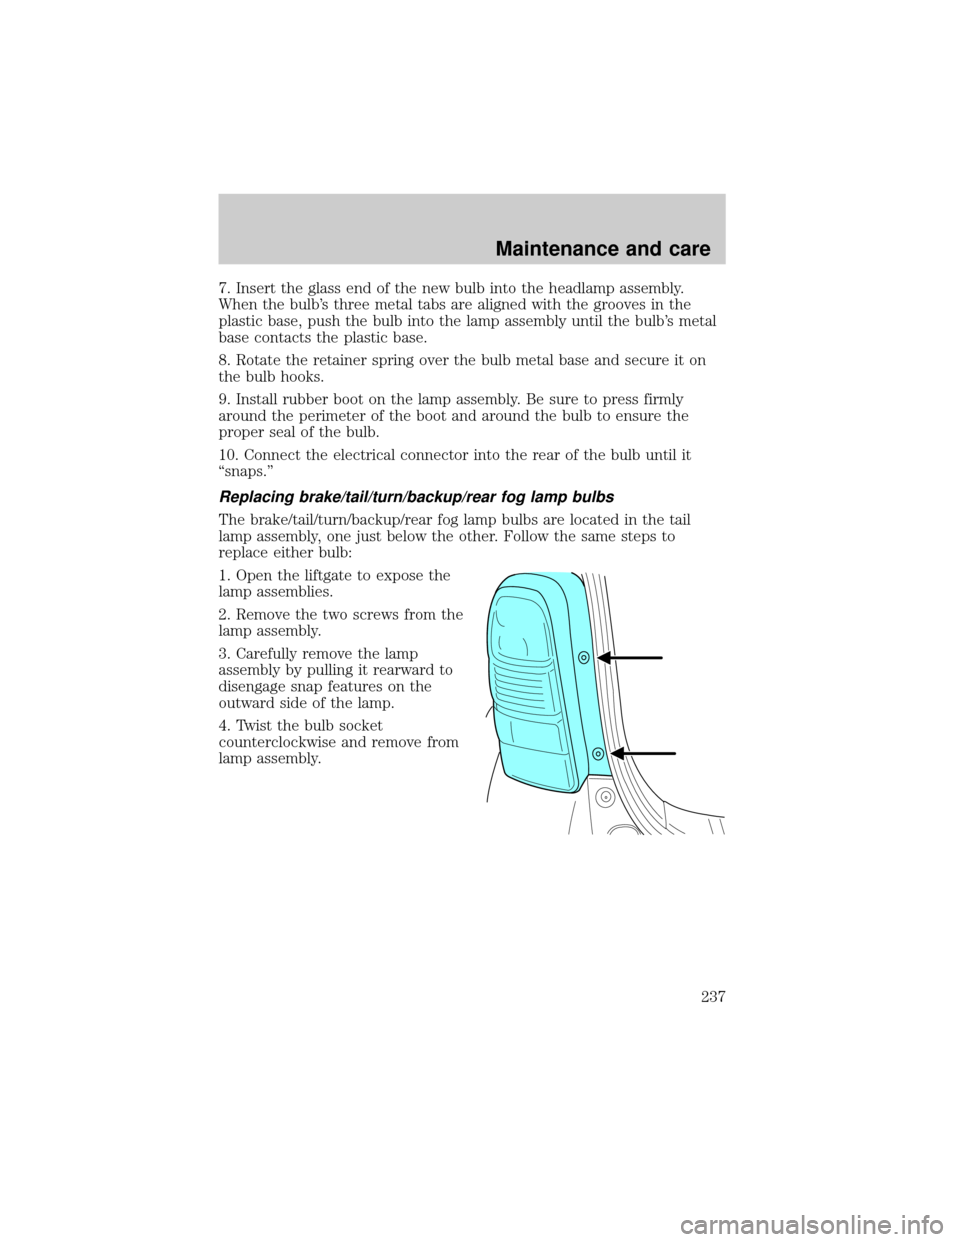
1. Open the liftgate to expose the
lamp assemblies.
2. Remove the two screws from the
lamp assembly.
3. Carefully remove the lamp
assembly by pulling it rearward to
disengage snap features on the
outward side of the lamp.
4. Twist the bulb socket
counterclockwise and remove from
lamp assembly.
Maintenance and care
237
Page 239 of 280
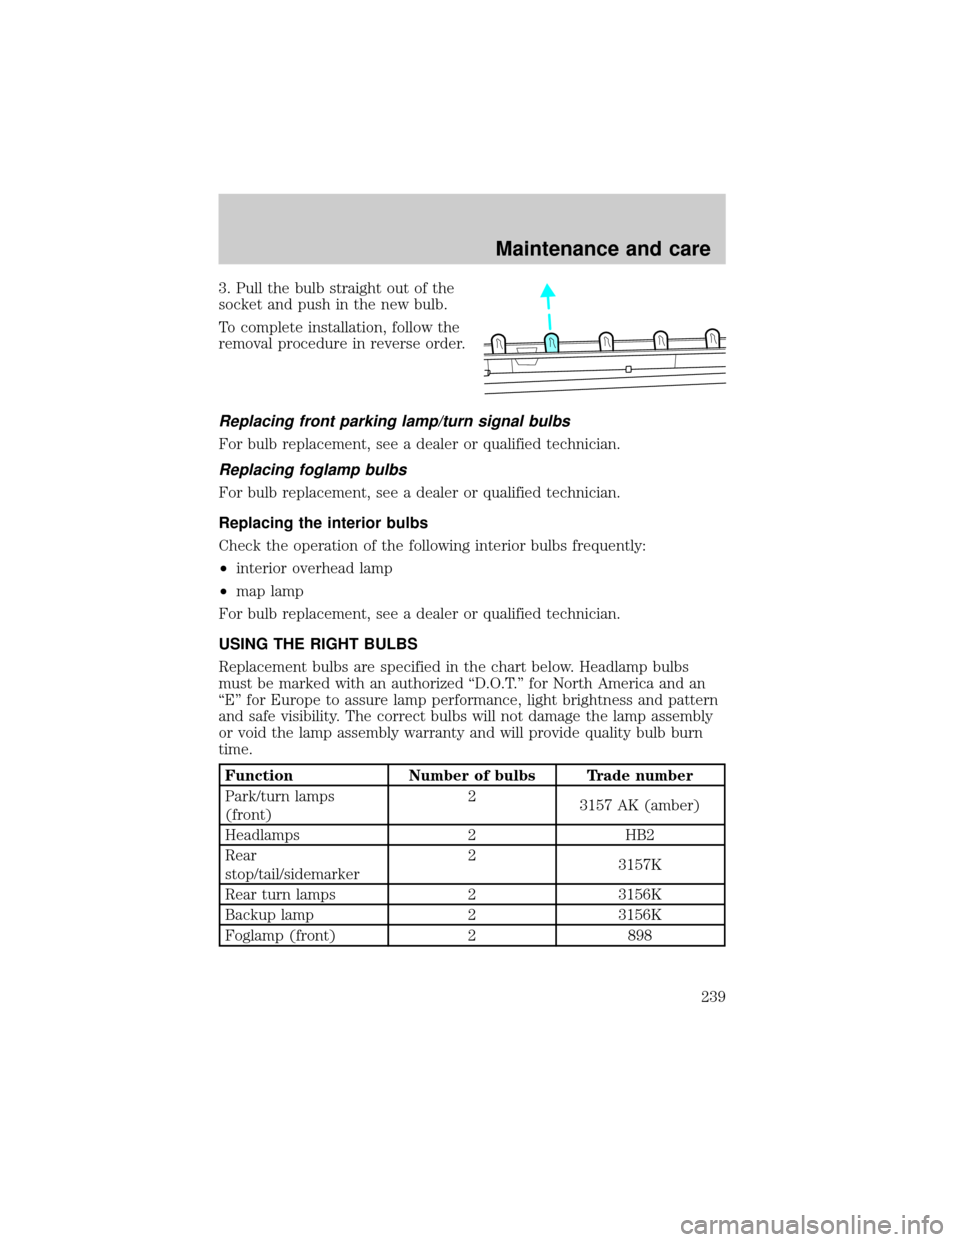
3. Pull the bulb straight out of the
socket and push in the new bulb.
To complete installation, follow the
removal procedure in reverse order.
Replacing front parking lamp/turn signal bulbs
For bulb replacement, see a dealer or qualified technician.
Replacing foglamp bulbs
For bulb replacement, see a dealer or qualified technician.
Replacing the interior bulbs
Check the operation of the following interior bulbs frequently:
²interior overhead lamp
²map lamp
For bulb replacement, see a dealer or qualified technician.
USING THE RIGHT BULBS
Replacement bulbs are specified in the chart below. Headlamp bulbs
must be marked with an authorized ªD.O.T.º for North America and an
ªEº for Europe to assure lamp performance, light brightness and pattern
and safe visibility. The correct bulbs will not damage the lamp assembly
or void the lamp assembly warranty and will provide quality bulb burn
time.
Function Number of bulbs Trade number
Park/turn lamps
(front)2
3157 AK (amber)
Headlamps 2 HB2
Rear
stop/tail/sidemarker2
3157K
Rear turn lamps 2 3156K
Backup lamp 2 3156K
Foglamp (front) 2 898
Maintenance and care
239
Page 240 of 280
Function Number of bulbs Trade number
Center High-mount
stop lamp5
168
Rear license plate
lamp2
W5W
All replacement bulbs are clear in color except where noted.
To replace all instrument panel lights - see your dealer.
AIMING THE HEADLAMPS
The headlamps on your vehicle are properly aimed at the assembly plant.
If your vehicle has been in an accident the alignment of your headlamps
should be checked by a qualified service technician.
VERTICAL AIM ADJUSTMENT
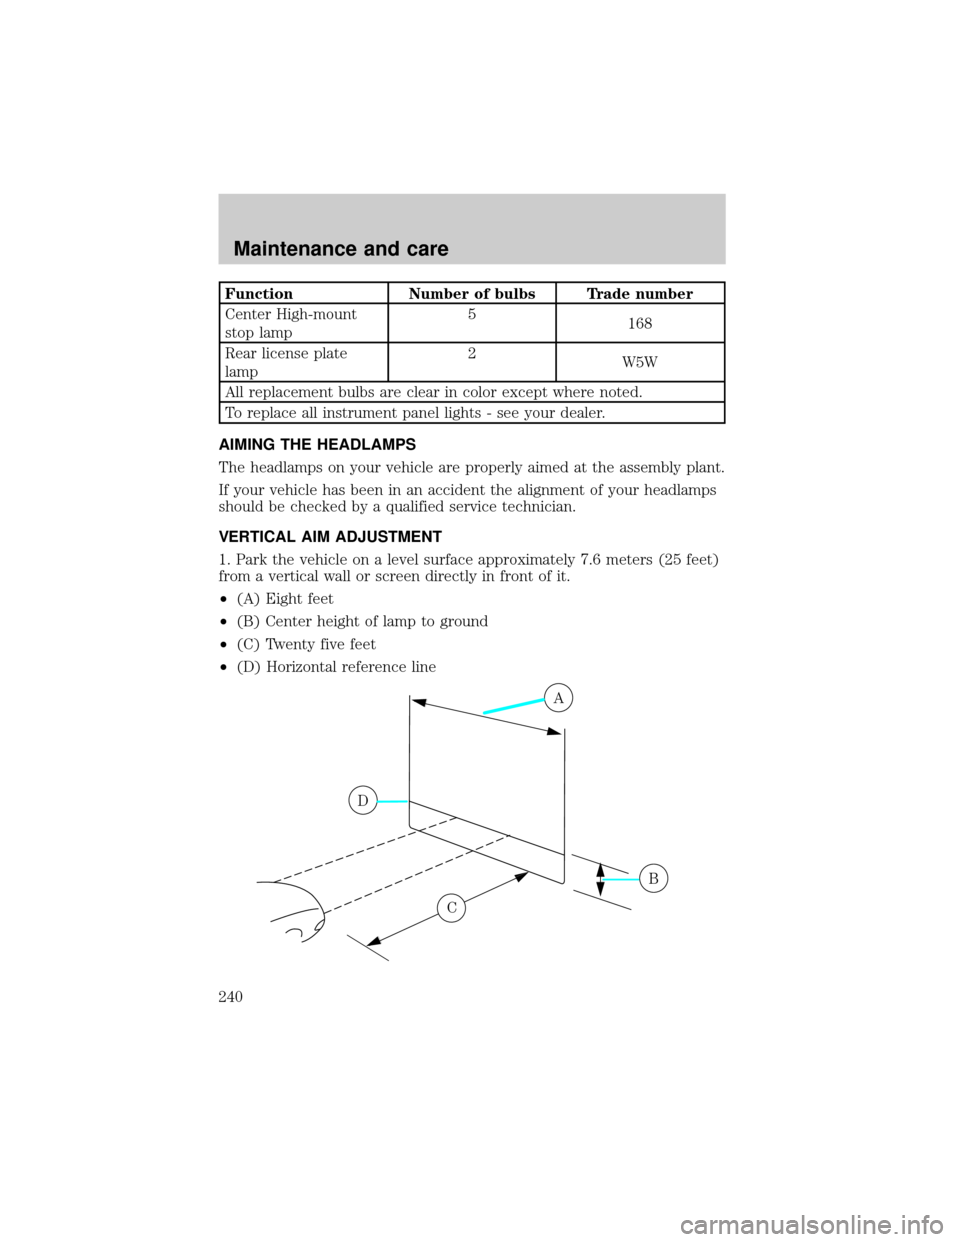
1. Park the vehicle on a level surface approximately 7.6 meters (25 feet)
from a vertical wall or screen directly in front of it.
²(A) Eight feet
²(B) Center height of lamp to ground
²(C) Twenty five feet
²(D) Horizontal reference line
A
D
B
C
Maintenance and care
240
Page 241 of 280
2. Measure the height from the center of your headlamp to the ground
and mark a 2.4 meter (8 foot) horizontal reference line on the vertical
wall or screen at this height (a piece of masking tape works well). The
center of the lamp is marked by a 3.0 mm circle on the headlamp lens.
3. Turn on the low beam headlamps to illuminate the wall or screen and
open the hood. Cover the left-hand headlamp with an opaque cloth.
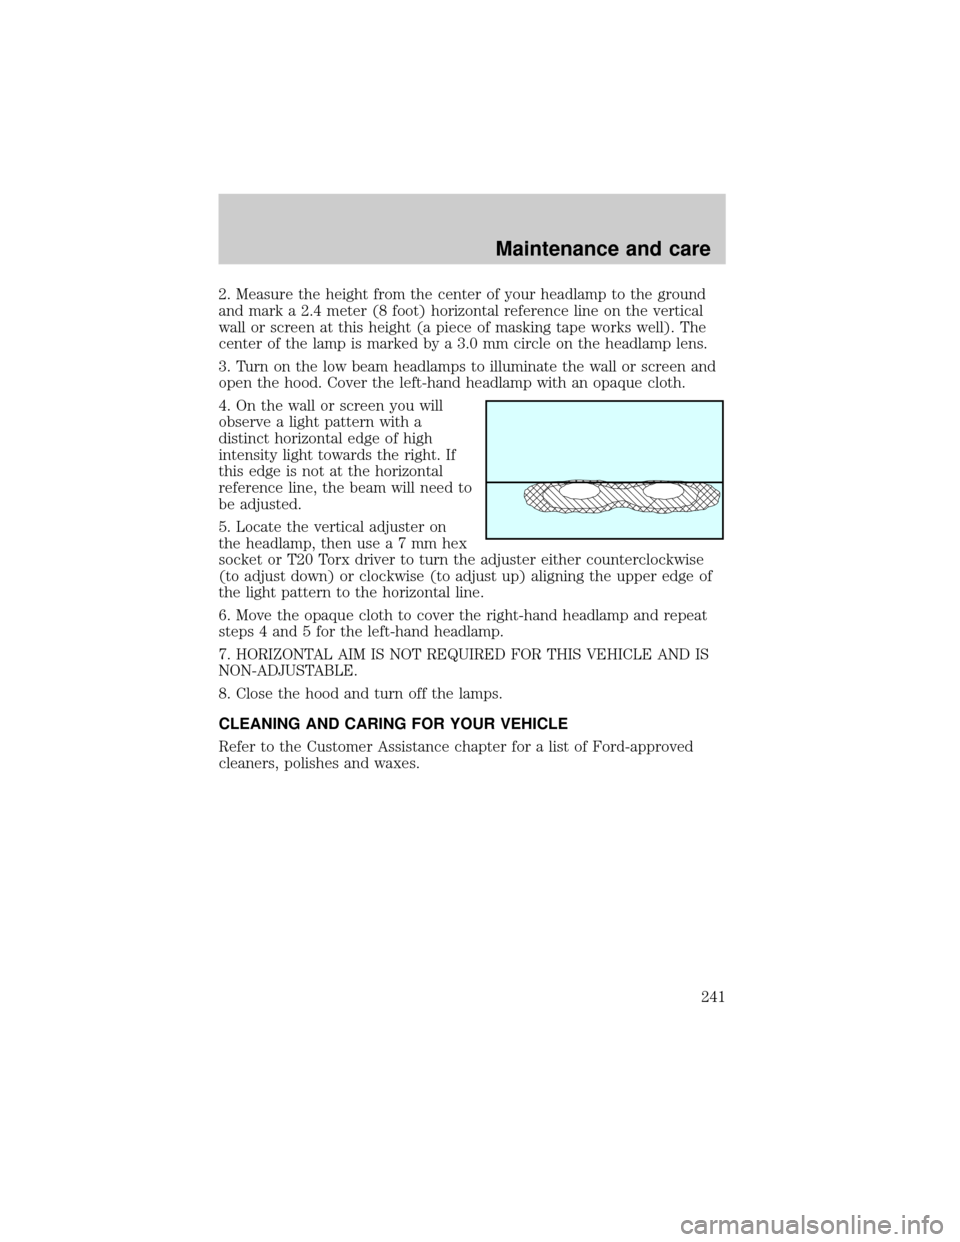
4. On the wall or screen you will
observe a light pattern with a
distinct horizontal edge of high
intensity light towards the right. If
this edge is not at the horizontal
reference line, the beam will need to
be adjusted.
5. Locate the vertical adjuster on
the headlamp, then usea7mmhex
socket or T20 Torx driver to turn the adjuster either counterclockwise
(to adjust down) or clockwise (to adjust up) aligning the upper edge of
the light pattern to the horizontal line.
6. Move the opaque cloth to cover the right-hand headlamp and repeat
steps 4 and 5 for the left-hand headlamp.
7. HORIZONTAL AIM IS NOT REQUIRED FOR THIS VEHICLE AND IS
NON-ADJUSTABLE.
8. Close the hood and turn off the lamps.
CLEANING AND CARING FOR YOUR VEHICLE
Refer to the Customer Assistance chapter for a list of Ford-approved
cleaners, polishes and waxes.
Maintenance and care
241
Page 265 of 280
Engine block heaters
Floor cargo net
Tire step
Travel equipment
Auto headlamps with DRL (Daytime Running Lights)
Console
Daytime running lights
Factory luggage rack adaptors
Fog lights
Framed luggage covers
Heavy-duty battery
Hitch mounted bike rack
Interior mount bike rack
Mirror I/S electrochromic compass with and without temperature display
Pet guard
Removable luggage rack (Track riders)
Removable luggage rack adapters
Reverse parking aid
Running boards and running bars
Soft luggage cover
Speed control
Trailer hitch (Class II)
Trailer hitch bars and balls
Trailer hitch wiring adaptor
Customer assistance
265
Page 273 of 280

Headlamps ...................................81
aiming ......................................240
bulb specifications ..................239
daytime running lights .............81
flash to pass ..............................82
high beam ...........................13, 81
replacing bulbs .......................235
turning on and off ....................81
warning chime ..........................15
Heating ........................................21
heater only system ...................21
heating and air conditioning
system .......................................22
Hood ..........................................197
I
Ignition .................................71, 252
Infant seats
(see Safety seats) .....................128
Inspection/maintenance (I/M)
testing ........................................234
Instrument panel
cleaning ...................................245
cluster ................................10, 246
lighting up panel and
interior .......................................19
location of components ............10
J
Jack ............................................183
positioning ...............................183
storage .....................................183
Jump-starting your vehicle ......188K
Keys .......................................93±94
key in ignition chime ...............15
positions of the ignition ...........71
L
Lamps
bulb replacement
specifications chart ................239
cargo lamps ...............................19
daytime running light ...............81
fog lamps ...................................82
headlamps .................................81
headlamps, flash to pass ..........82
instrument panel, dimming .....19
interior lamps .............79±80, 239
replacing bulbs .......235, 237±239
Lane change indicator (see
Turn signal) .................................71
Liftgate ........................................89
Lights, warning and indicator ....10
air bag ........................................11
anti-lock brakes (ABS) ....12, 142
anti-theft ...................................13
brake ..........................................12
charging system ........................13
cruise indicator .........................13
door ajar ....................................14
fuel cap light .............................15
high beam .................................13
low coolant ................................14
low fuel ......................................11
oil pressure ...............................13
overdrive off ..............................14
safety belt .................................12
service engine soon ..................10
turn signal indicator .................12
Index
273