headlamp FORD ESCAPE 2001 1.G Owners Manual
[x] Cancel search | Manufacturer: FORD, Model Year: 2001, Model line: ESCAPE, Model: FORD ESCAPE 2001 1.GPages: 280, PDF Size: 2.65 MB
Page 8 of 280
E CMPH
4x4H
F
60
408 7 6
5
4
3
2
1
2020 406080100
120
140
160
180
80
100
120km/h
RPM X 1000
RSM
SET
ACC
CST ON
OFF
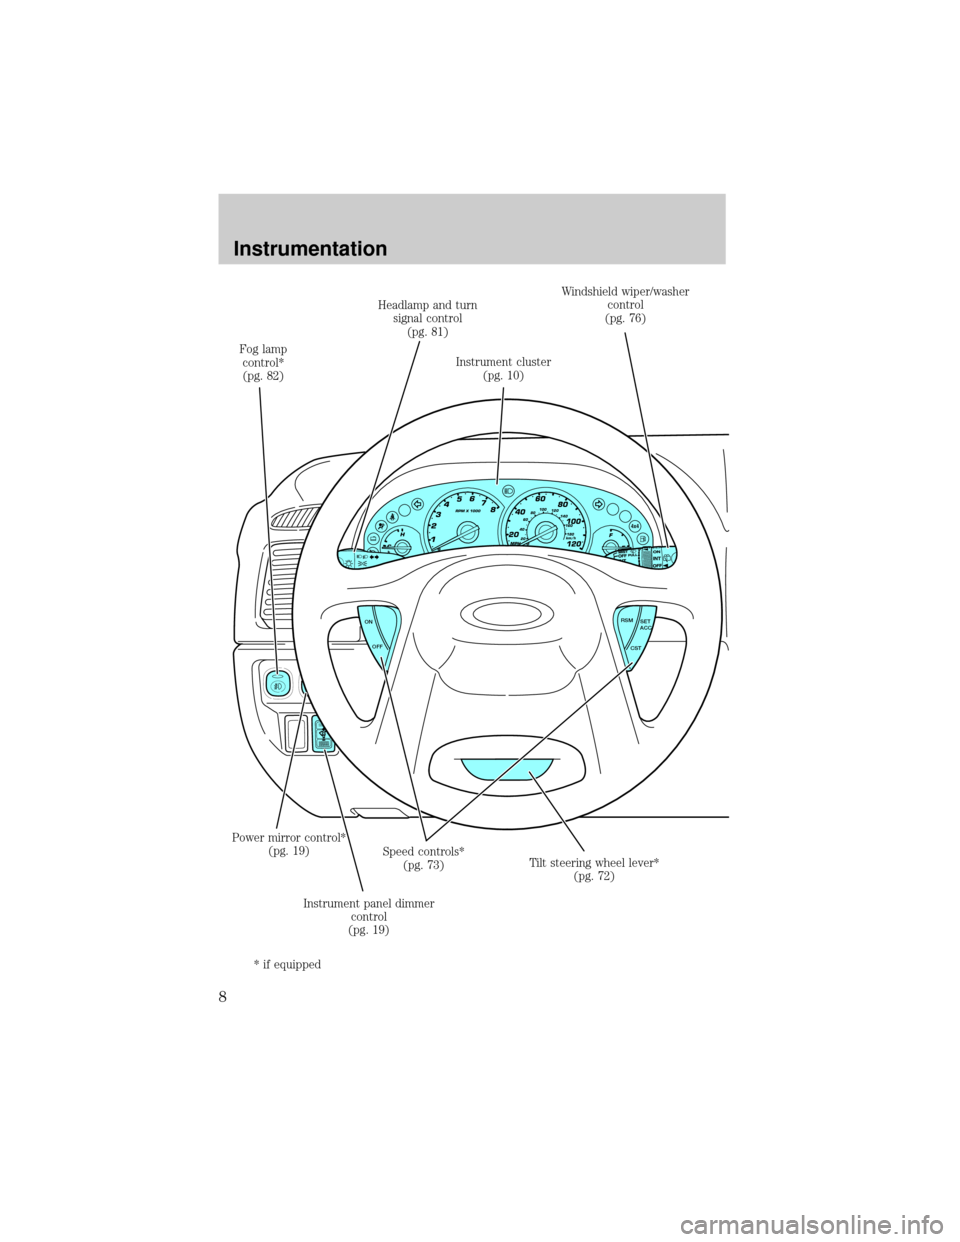
Instrument cluster
(pg. 10)Windshield wiper/washer
control
(pg. 76)
Tilt steering wheel lever*
(pg. 72) Speed controls*
(pg. 73)
Instrument panel dimmer
control
(pg. 19) Power mirror control*
(pg. 19) Fog lamp
control*
(pg. 82)Headlamp and turn
signal control
(pg. 81)
* if equipped
Instrumentation
8
Page 13 of 280
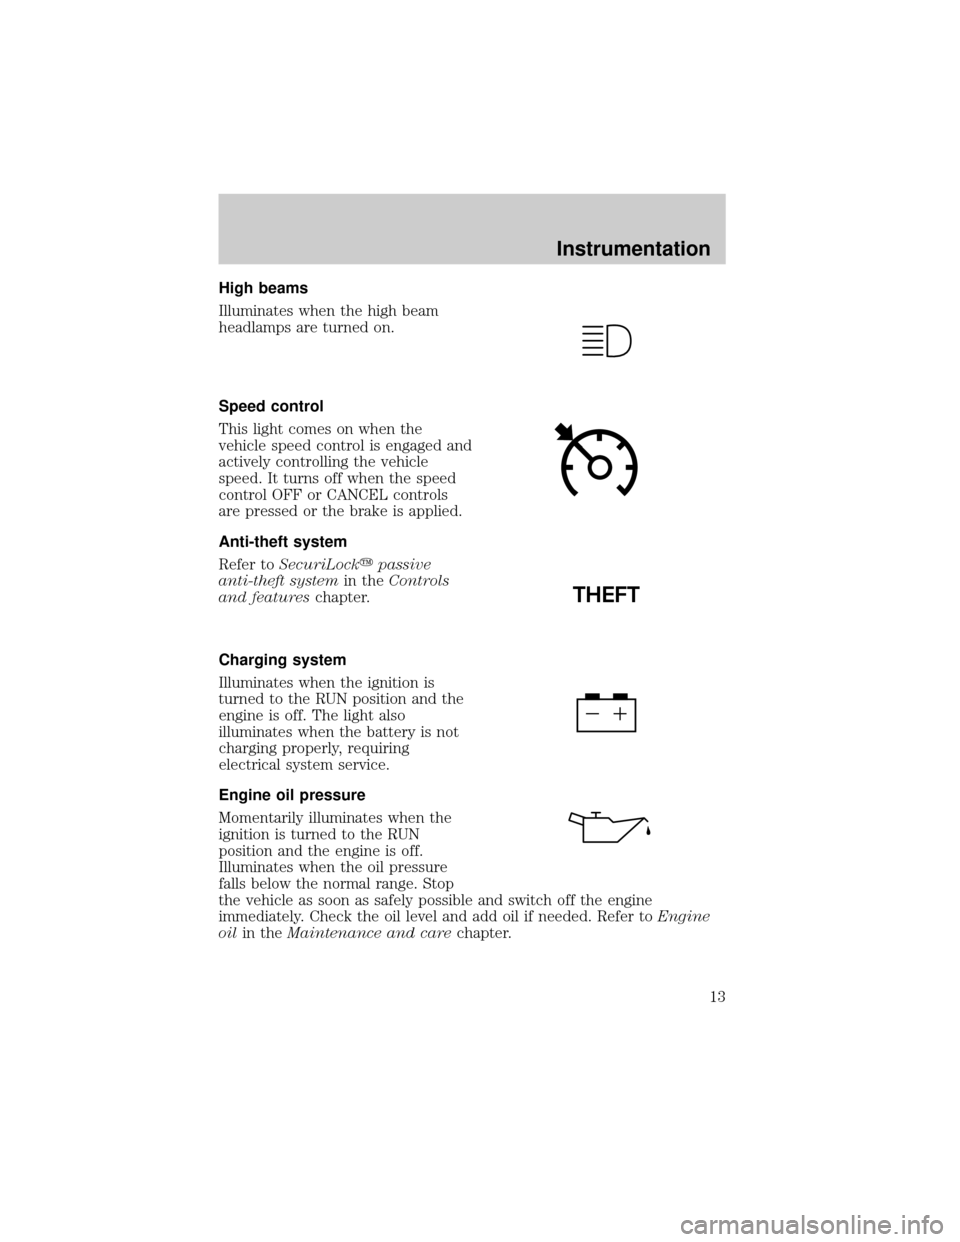
High beams
Illuminates when the high beam
headlamps are turned on.
Speed control
This light comes on when the
vehicle speed control is engaged and
actively controlling the vehicle
speed. It turns off when the speed
control OFF or CANCEL controls
are pressed or the brake is applied.
Anti-theft system
Refer toSecuriLockypassive
anti-theft systemin theControls
and featureschapter.
Charging system
Illuminates when the ignition is
turned to the RUN position and the
engine is off. The light also
illuminates when the battery is not
charging properly, requiring
electrical system service.
Engine oil pressure
Momentarily illuminates when the
ignition is turned to the RUN
position and the engine is off.
Illuminates when the oil pressure
falls below the normal range. Stop
the vehicle as soon as safely possible and switch off the engine
immediately. Check the oil level and add oil if needed. Refer toEngine
oilin theMaintenance and carechapter.
THEFT
Instrumentation
13
Page 15 of 280

Check fuel cap
Momentarily illuminates when the
ignition is turned to the ON position
to ensure your bulb is working.
When this light turns on, check the
fuel filler cap. Continuing to operate
the vehicle with the check fuel cap light on, can activate theService
Engine Soon/Check Enginewarning light. When the fuel filler cap is
properly re-installed, the light(s) will turn off after a period of normal
driving. This period will vary depending on driving conditions.
It may take a long period of time for the system to detect an
improperly installed fuel filler cap.
For more information, refer toFuel filler capin theMaintenance and
carechapter.
Safety belt warning chime
Sounds to remind you to fasten your safety belts.
For information on the safety belt warning chime, refer to theSeating
and safety restraintschapter.
BeltMinder chime
Sounds intermittently to remind you to fasten your safety belts.
For information on the safety belt minder chime, refer to theSeating
and safety restraintschapter.
Supplemental restraint system (SRS) warning chime
For information on the SRS warning chime, refer to theSeating and
safety restraintschapter.
Key-in-ignition warning chime
Sounds when the key is left in the ignition in the OFF/LOCK or ACC
position and any door, liftgate or liftgate window is opened.
Headlamps on warning chime
Sounds when the headlamps or parking lamps are on, the ignition is off
(and the key is not in the ignition) and the driver's door is opened.
CHECK
FUEL
CAP
Instrumentation
15
Page 80 of 280
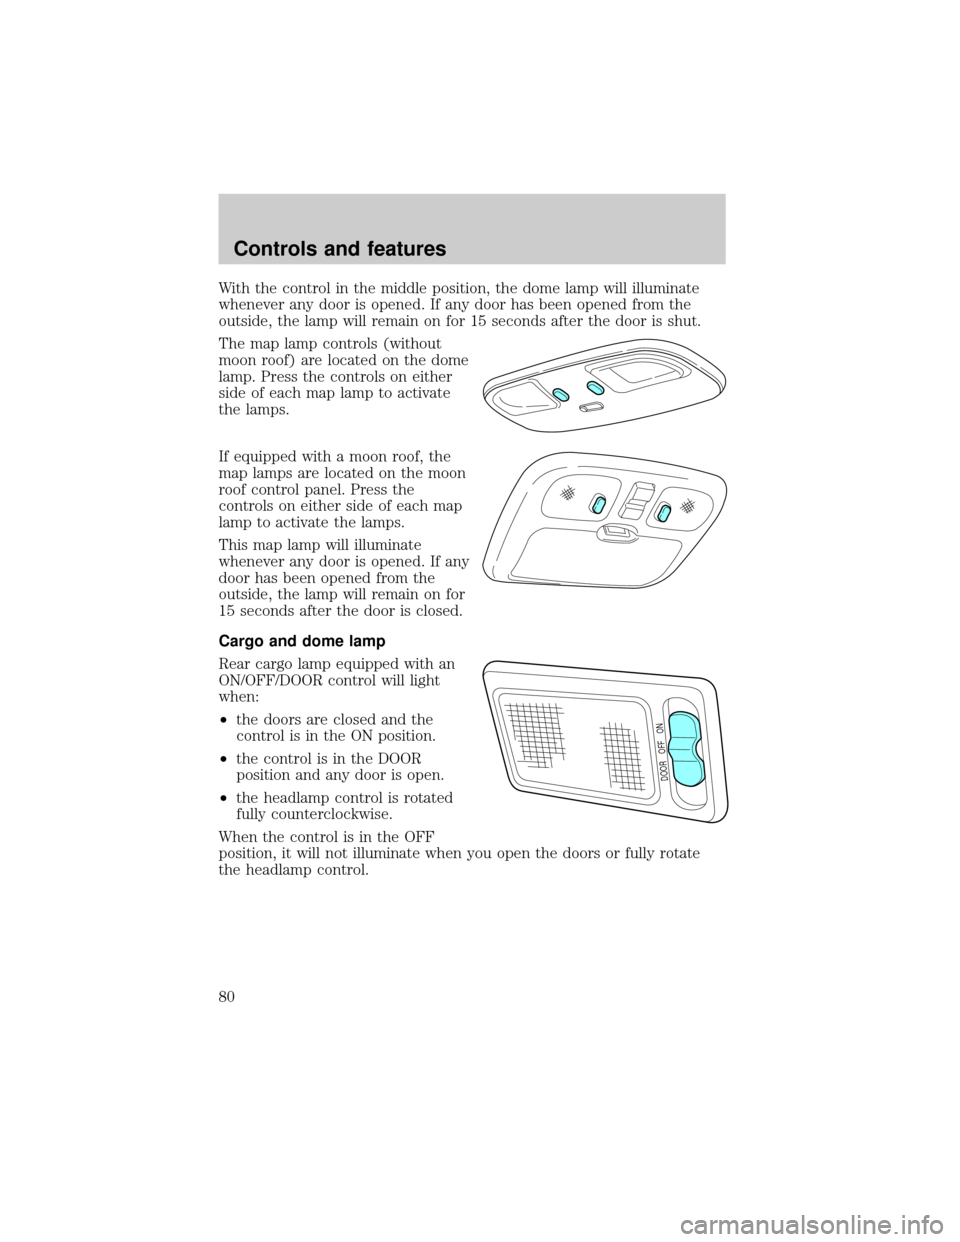
With the control in the middle position, the dome lamp will illuminate
whenever any door is opened. If any door has been opened from the
outside, the lamp will remain on for 15 seconds after the door is shut.
The map lamp controls (without
moon roof) are located on the dome
lamp. Press the controls on either
side of each map lamp to activate
the lamps.
If equipped with a moon roof, the
map lamps are located on the moon
roof control panel. Press the
controls on either side of each map
lamp to activate the lamps.
This map lamp will illuminate
whenever any door is opened. If any
door has been opened from the
outside, the lamp will remain on for
15 seconds after the door is closed.
Cargo and dome lamp
Rear cargo lamp equipped with an
ON/OFF/DOOR control will light
when:
²the doors are closed and the
control is in the ON position.
²the control is in the DOOR
position and any door is open.
²the headlamp control is rotated
fully counterclockwise.
When the control is in the OFF
position, it will not illuminate when you open the doors or fully rotate
the headlamp control.
DOOR OFF ON
Controls and features
80
Page 81 of 280
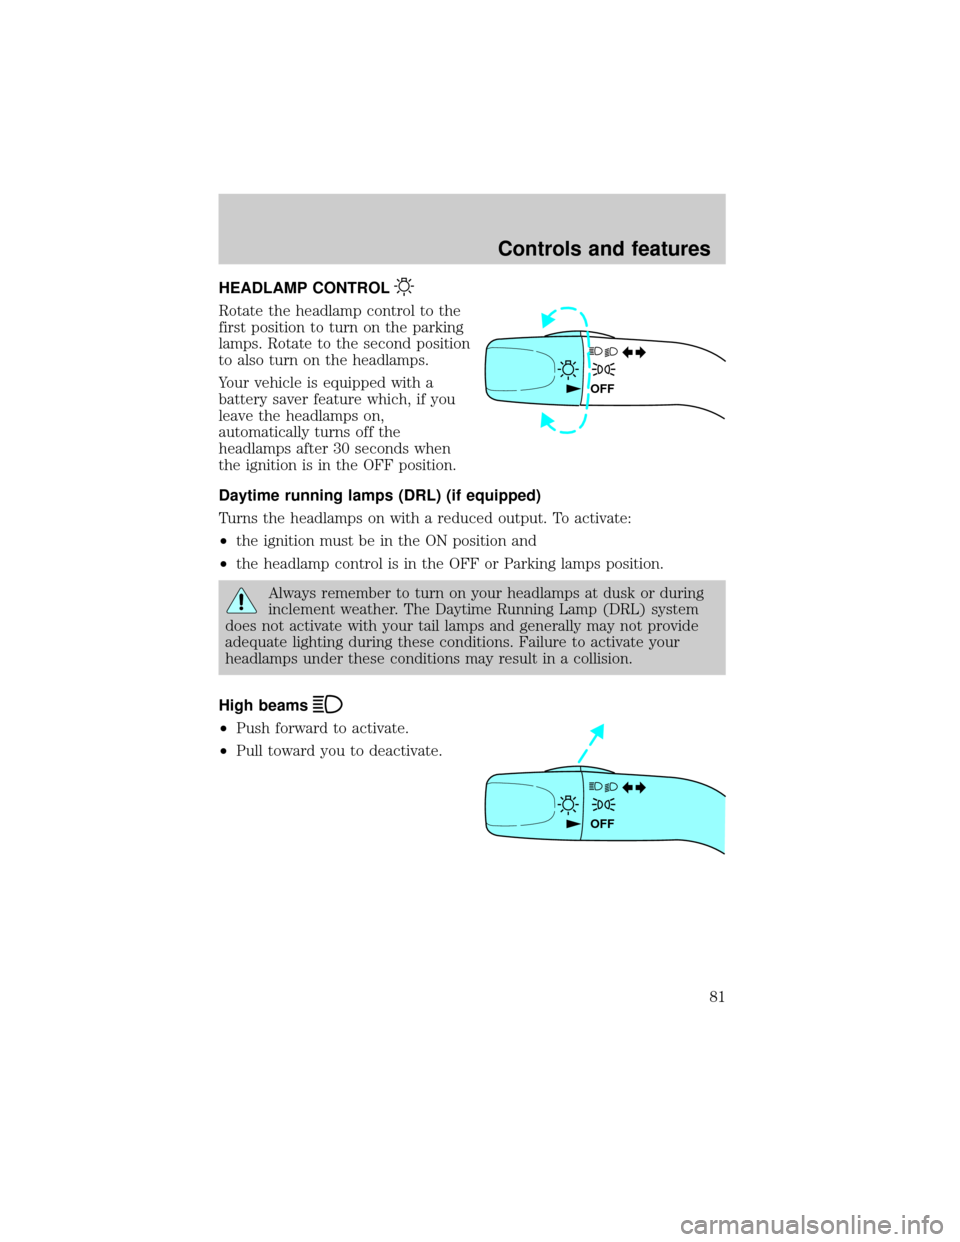
HEADLAMP CONTROL
Rotate the headlamp control to the
first position to turn on the parking
lamps. Rotate to the second position
to also turn on the headlamps.
Your vehicle is equipped with a
battery saver feature which, if you
leave the headlamps on,
automatically turns off the
headlamps after 30 seconds when
the ignition is in the OFF position.
Daytime running lamps (DRL) (if equipped)
Turns the headlamps on with a reduced output. To activate:
²the ignition must be in the ON position and
²the headlamp control is in the OFF or Parking lamps position.
Always remember to turn on your headlamps at dusk or during
inclement weather. The Daytime Running Lamp (DRL) system
does not activate with your tail lamps and generally may not provide
adequate lighting during these conditions. Failure to activate your
headlamps under these conditions may result in a collision.
High beams
²Push forward to activate.
²Pull toward you to deactivate.
OFF
OFF
Controls and features
81
Page 96 of 280
If there is any potential perimeter anti-theft problem with your vehicle,
ensureALL key fobs(remote entry transmitters) are brought to the
dealership, to aid in troubleshooting.
Arming the system
When armed, this system will help protect your vehicle from
unauthorized entry. When unauthorized entry occurs, the system will
flash the headlamps, parking lamps and will sound the horn.
The system is ready to arm whenever the key is removed from the
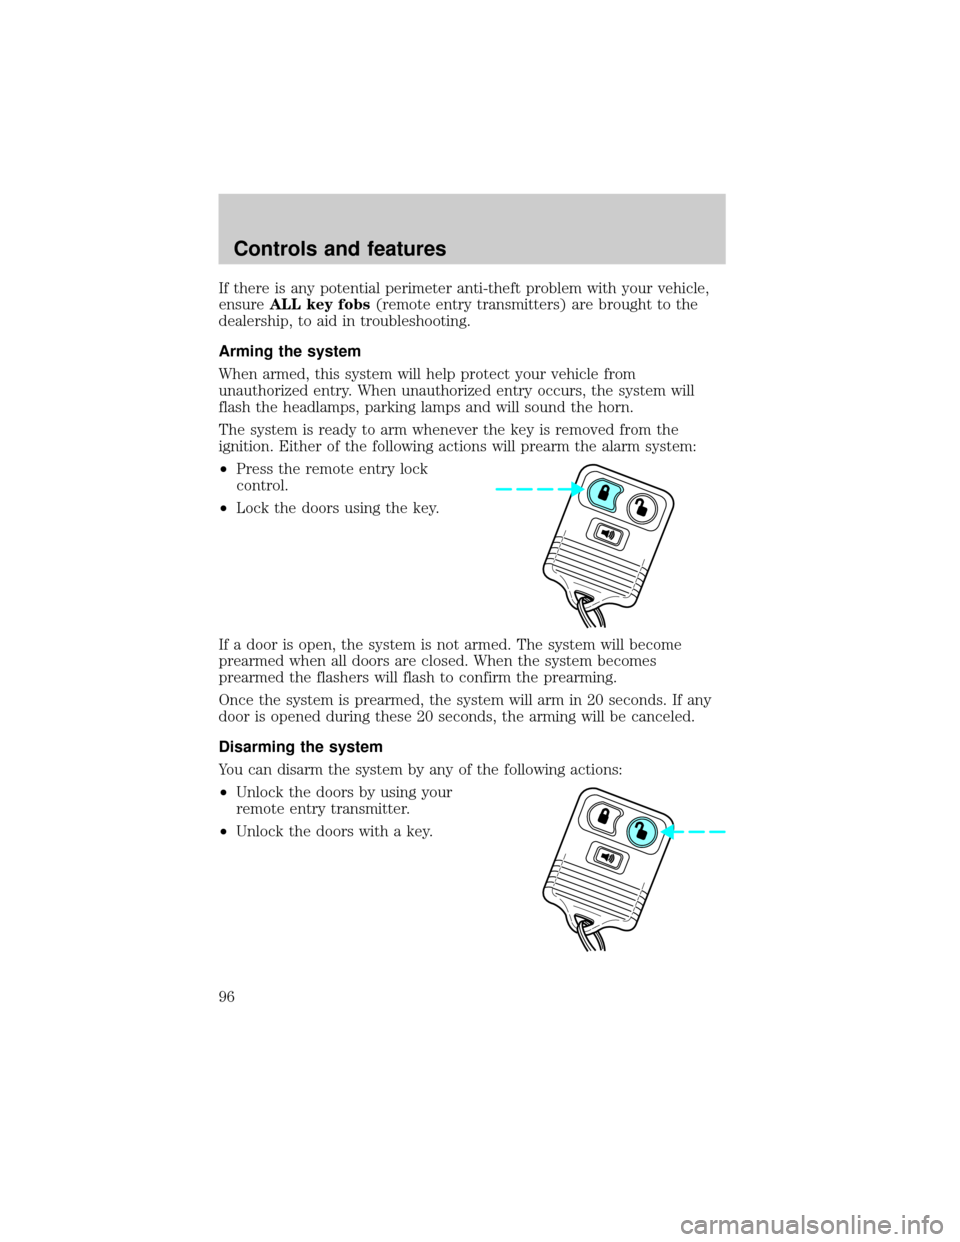
ignition. Either of the following actions will prearm the alarm system:
²Press the remote entry lock
control.
²Lock the doors using the key.
If a door is open, the system is not armed. The system will become
prearmed when all doors are closed. When the system becomes
prearmed the flashers will flash to confirm the prearming.
Once the system is prearmed, the system will arm in 20 seconds. If any
door is opened during these 20 seconds, the arming will be canceled.
Disarming the system
You can disarm the system by any of the following actions:
²Unlock the doors by using your
remote entry transmitter.
²Unlock the doors with a key.
Controls and features
96
Page 116 of 280
Do not sit on top of a buckled safety belt to avoid the Belt
Minder chime. Sitting on the safety belt will increase the risk of
injury in an accident. To disable (one-time) or deactivate the Belt
Minder feature please follow the directions stated below.
One time disable
Any time the safety belt is buckled and then unbuckled during an
ignition ON cycle, BeltMinder will be disabled for that ignition cycle only.
Deactivating/activating the BeltMinderfeature
Read steps1-9thoroughly before proceeding with the
deactivation/activation programming procedure.
The BeltMinderfeature can be deactivated/activated by performing the
following procedure:
Before following the procedure, make sure that:
²the parking brake is set
²the gearshift is in P (Park) (automatic transmission) or the neutral
position (manual transmission).
²the ignition switch is in the OFF position
²all vehicle doors are closed
²the driver's safety belt is unbuckled
²the parklamps/headlamps are in OFF position (If vehicle is equipped
with Autolamps, this will not affect the procedure.)
To reduce the risk of injury, do not deactivate/activate the Belt
Minder feature while driving the vehicle.
1. Turn the ignition switch to the RUN (or ON) position. (DO NOT
START THE ENGINE)
2. Wait until the safety belt warning light turns off. (Approximately 1±2
minutes)
²Steps 3±5 must be completed within 60 seconds or the procedure will
have to be repeated.
3. Uncoil then retract the safety belt three times, ending with the safety
belt retracted. This can be done before or during BeltMinderwarning
activation.
Seating and safety restraints
116
Page 117 of 280

4. Turn on the parklamps/headlamps, turn off the parklamps/headlamps.
5. Uncoil then retract the safety belt three times, ending with the safety
belt retracted.
²After step 5 the safety belt warning light will be turned on for three
seconds.
6. Within seven seconds of the safety belt warning light turning off,
uncoil then retract the safety belt.
²This will disable BeltMinderif it is currently enabled, or enable
BeltMinder if it is currently disabled.
7. Confirmation of disabling BeltMinderis provided by flashing the safety
belt warning light four times per second for three seconds.
8. Confirmation of enabling BeltMinderis provided by flashing the safety
belt warning light four times per second for three seconds, followed by
three seconds with the safety belt warning light off, then followed by
flashing the safety belt warning light four times per second for three
seconds again.
9. After receiving confirmation, the deactivation/activation procedure is
complete.
Safety belt maintenance
Inspect the safety belt systems periodically to make sure they work
properly and are not damaged. Inspect the safety belts to make sure
there are no nicks, tears or cuts. Replace if necessary. All safety belt
assemblies, including retractors, buckles, front seat belt buckle
assemblies, buckle support assemblies (slide bar-if equipped), shoulder
belt height adjusters (if equipped), shoulder belt guide on seatback (if
equipped), child safety seat tether bracket assemblies (if equipped),
LATCH child seat tether anchors and lower anchors (if equipped), and
attaching hardware, should be inspected after a collision. Ford Motor
Company recommends that all safety belt assemblies used in vehicles
involved in a collision be replaced. However, if the collision was minor
and a qualified technician finds that the belts do not show damage and
continue to operate properly, they do not need to be replaced. Safety
belt assemblies not in use during a collision should also be inspected and
replaced if either damage or improper operation is noted.
Seating and safety restraints
117
Page 138 of 280

2. Make sure the headlamps and vehicle accessories are off.
If starting a vehicle with an
automatic transmission:
²Make sure the parking brake is
set.
²Make sure the gearshift is in P
(Park).
If starting a vehicle with a manual
transmission:
²Make sure the parking brake is
set.
²Push the clutch pedal to the
floor.
R D 2 1ODO
Starting
138
Page 181 of 280
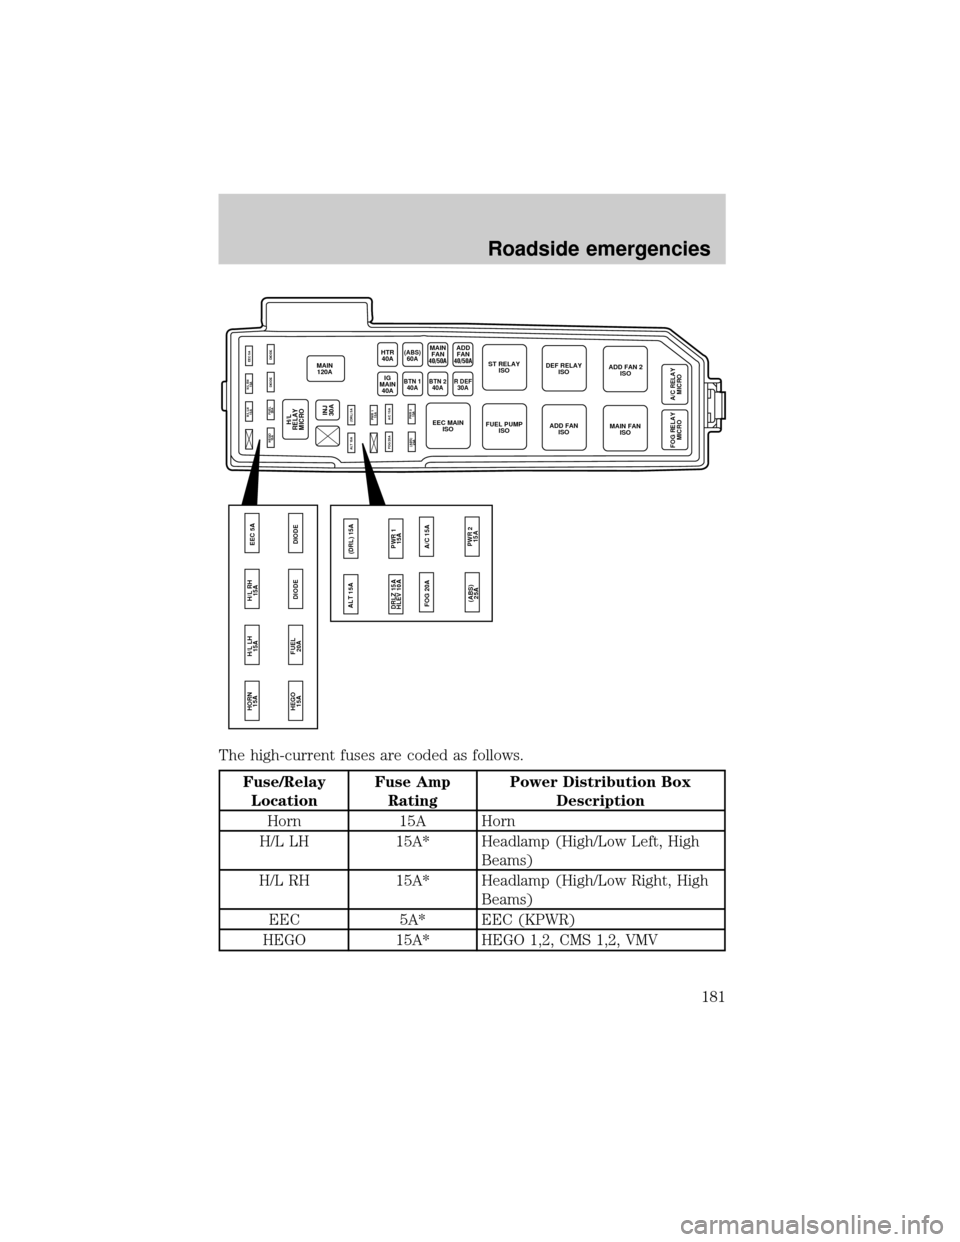
The high-current fuses are coded as follows.
Fuse/Relay
LocationFuse Amp
RatingPower Distribution Box
Description
Horn 15A Horn
H/L LH 15A* Headlamp (High/Low Left, High
Beams)
H/L RH 15A* Headlamp (High/Low Right, High
Beams)
EEC 5A* EEC (KPWR)
HEGO 15A* HEGO 1,2, CMS 1,2, VMV
MAIN
120A
HEGO
15A
ALT 15A
FOG 20A(DRL) 5A
PWR 1
15A
(ABS)
25APWR 2
15A A/C 15AFUEL
20ADIODE DIODE H/L LH
15AH/L RH
15AEEC 5A
HEGO
15A HORN
15A
FUEL
20ADIODE DIODE H/L LH
15AH/L RH
15AEEC 5A
INJ
30A
HTR
40A
BTN 1
40ABTN 240AR DEF30AIG
MAIN
40A
H/L
RELAY
MICRO
MAIN
FAN(ABS)
60AST RELAY
ISODEF RELAY
ISOADD FAN 2
ISO
A/C RELAY
MICRO FOG RELAY
MICRO
MAIN FAN
ISO ADD FAN
ISO EEC MAIN
ISOFUEL PUMP
ISO
ALT 15A
FOG 20A(DRL) 15A
PWR 1
15A DRLZ 15A
HLEV 10A
(ABS)
25APWR 2
15A A/C 15A
40/50AADD
FAN
40/50A
Roadside emergencies
181