cap FORD ESCAPE 2001 1.G Owner's Manual
[x] Cancel search | Manufacturer: FORD, Model Year: 2001, Model line: ESCAPE, Model: FORD ESCAPE 2001 1.GPages: 280, PDF Size: 2.65 MB
Page 163 of 280
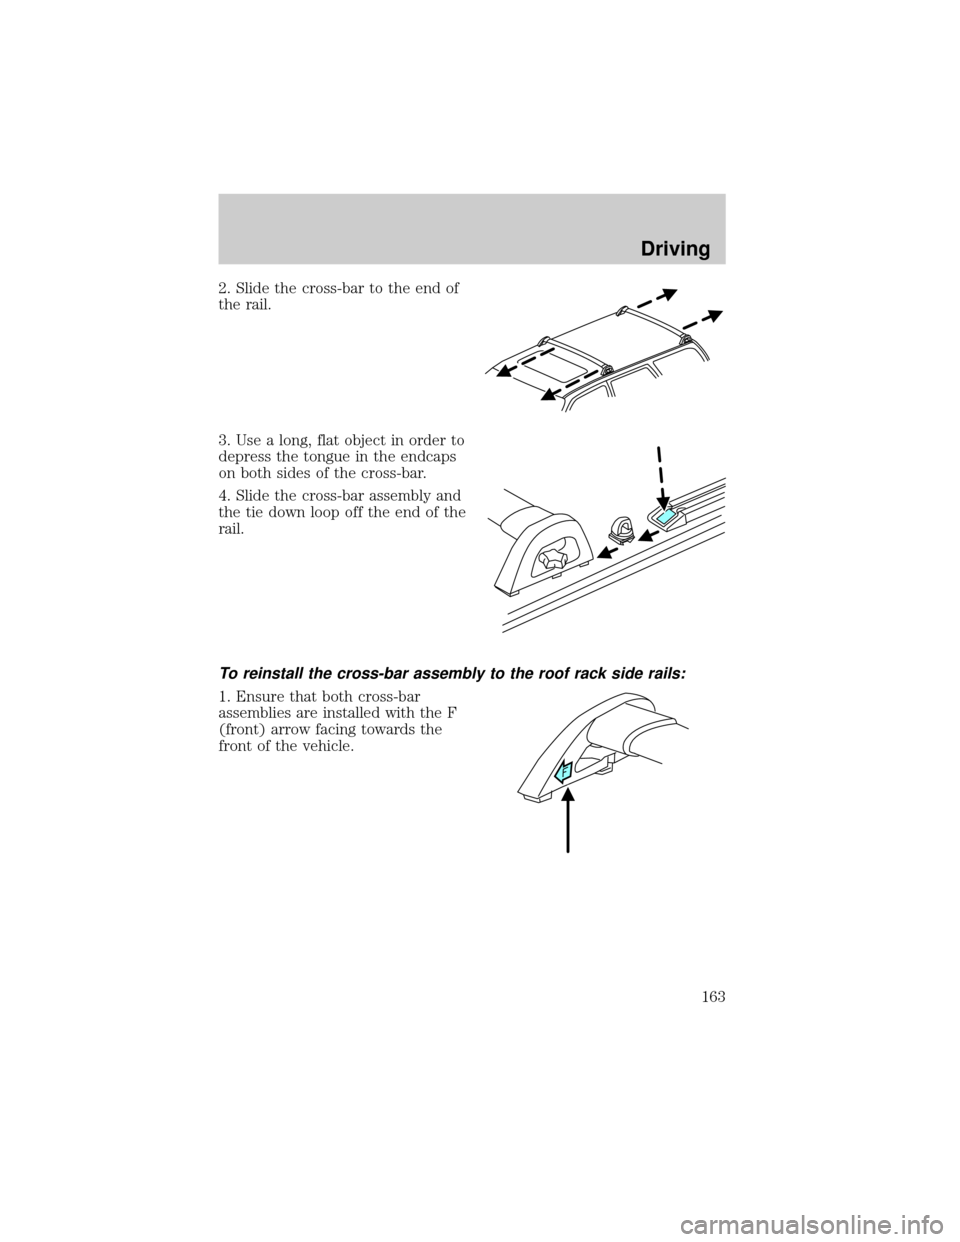
2. Slide the cross-bar to the end of
the rail.
3. Use a long, flat object in order to
depress the tongue in the endcaps
on both sides of the cross-bar.
4. Slide the cross-bar assembly and
the tie down loop off the end of the
rail.
To reinstall the cross-bar assembly to the roof rack side rails:
1. Ensure that both cross-bar
assemblies are installed with the F
(front) arrow facing towards the
front of the vehicle.
Driving
163
Page 164 of 280
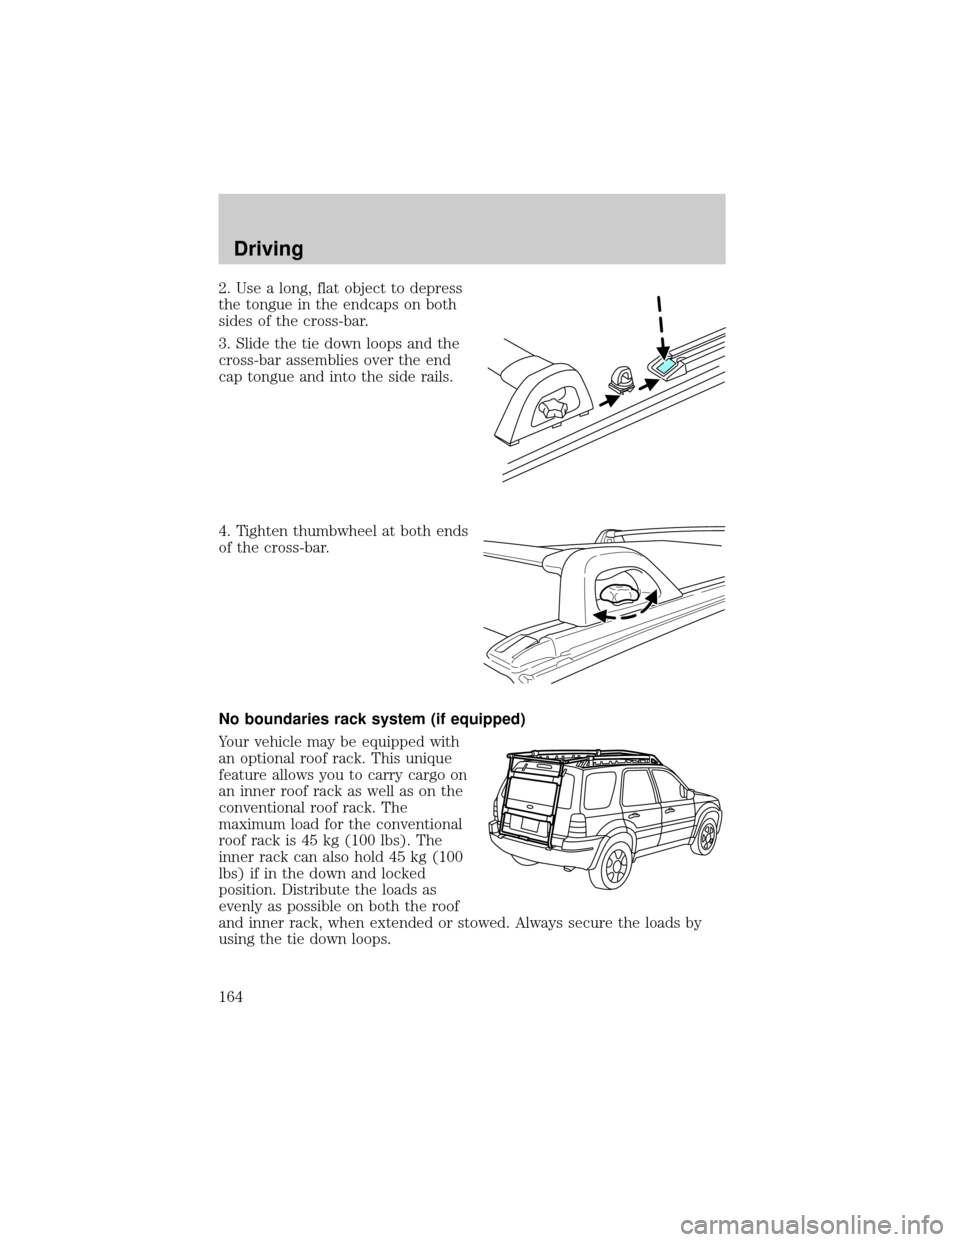
2. Use a long, flat object to depress
the tongue in the endcaps on both
sides of the cross-bar.
3. Slide the tie down loops and the
cross-bar assemblies over the end
cap tongue and into the side rails.
4. Tighten thumbwheel at both ends
of the cross-bar.
No boundaries rack system (if equipped)
Your vehicle may be equipped with
an optional roof rack. This unique
feature allows you to carry cargo on
an inner roof rack as well as on the
conventional roof rack. The
maximum load for the conventional
roof rack is 45 kg (100 lbs). The
inner rack can also hold 45 kg (100
lbs) if in the down and locked
position. Distribute the loads as
evenly as possible on both the roof
and inner rack, when extended or stowed. Always secure the loads by
using the tie down loops.
Driving
164
Page 188 of 280
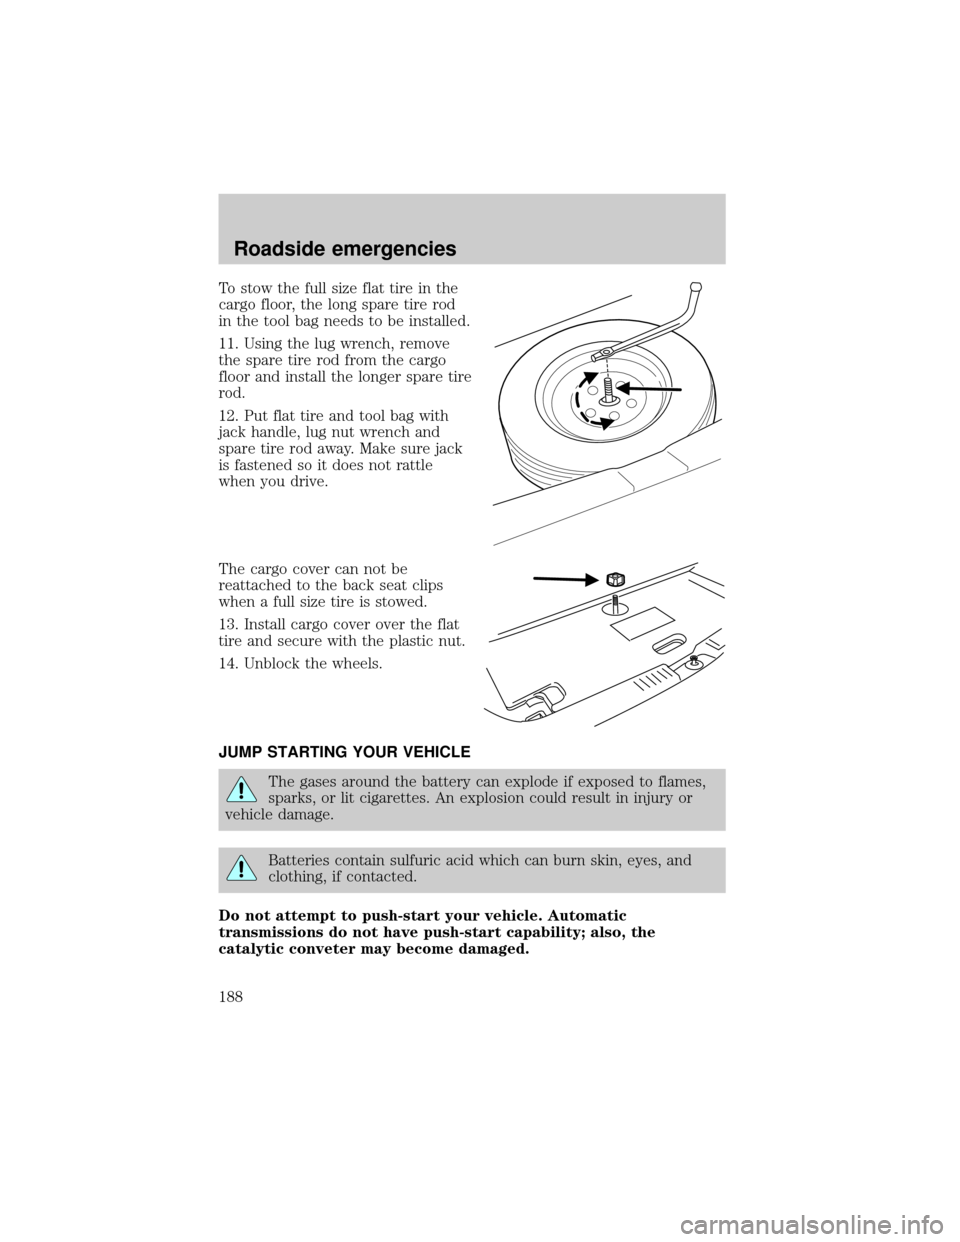
To stow the full size flat tire in the
cargo floor, the long spare tire rod
in the tool bag needs to be installed.
11. Using the lug wrench, remove
the spare tire rod from the cargo
floor and install the longer spare tire
rod.
12. Put flat tire and tool bag with
jack handle, lug nut wrench and
spare tire rod away. Make sure jack
is fastened so it does not rattle
when you drive.
The cargo cover can not be
reattached to the back seat clips
when a full size tire is stowed.
13. Install cargo cover over the flat
tire and secure with the plastic nut.
14. Unblock the wheels.
JUMP STARTING YOUR VEHICLE
The gases around the battery can explode if exposed to flames,
sparks, or lit cigarettes. An explosion could result in injury or
vehicle damage.
Batteries contain sulfuric acid which can burn skin, eyes, and
clothing, if contacted.
Do not attempt to push-start your vehicle. Automatic
transmissions do not have push-start capability; also, the
catalytic conveter may become damaged.
Roadside emergencies
188
Page 189 of 280
Preparing your vehicle
When the battery is disconnected or a new battery is installed, the
transmission must relearn its adaptive strategy. As a result of this, the
transmission may shift firmly. This operation is considered normal and
will not affect function or durability of the transmission. Over time, the
adaptive learning process will fully update transmission operation to its
optimum shift feel.
1.Use only a 12±volt supply to start your vehicle.
2. Do not disconnect the battery of the disabled vehicle as this could
damage the vehicle's electrical system.
3. Park the booster vehicle close to the hood of the disabled vehicle
making sure the two vehiclesdo nottouch. Set the parking brake on
both vehicles and stay clear of the engine cooling fan and other moving
parts.
4. Check all battery terminals and remove any excessive corrosion before
you attach the battery cables. Ensure that vent caps are tight and level.
5. Turn the heater fan on in both vehicles to protect any electrical
surges. Turn all other accessories off.
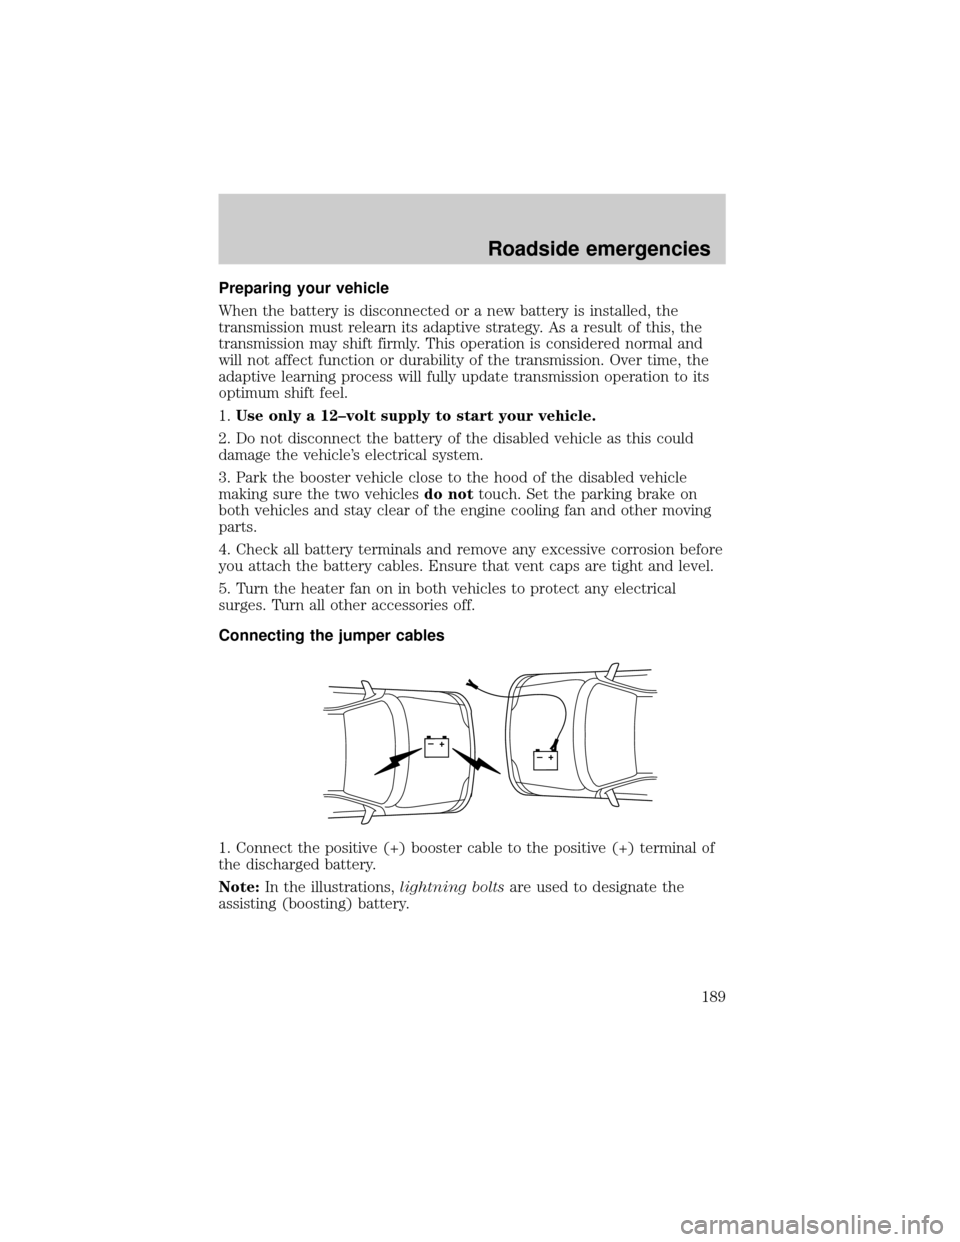
Connecting the jumper cables
1. Connect the positive (+) booster cable to the positive (+) terminal of
the discharged battery.
Note:In the illustrations,lightning boltsare used to designate the
assisting (boosting) battery.
+–+–
Roadside emergencies
189
Page 199 of 280
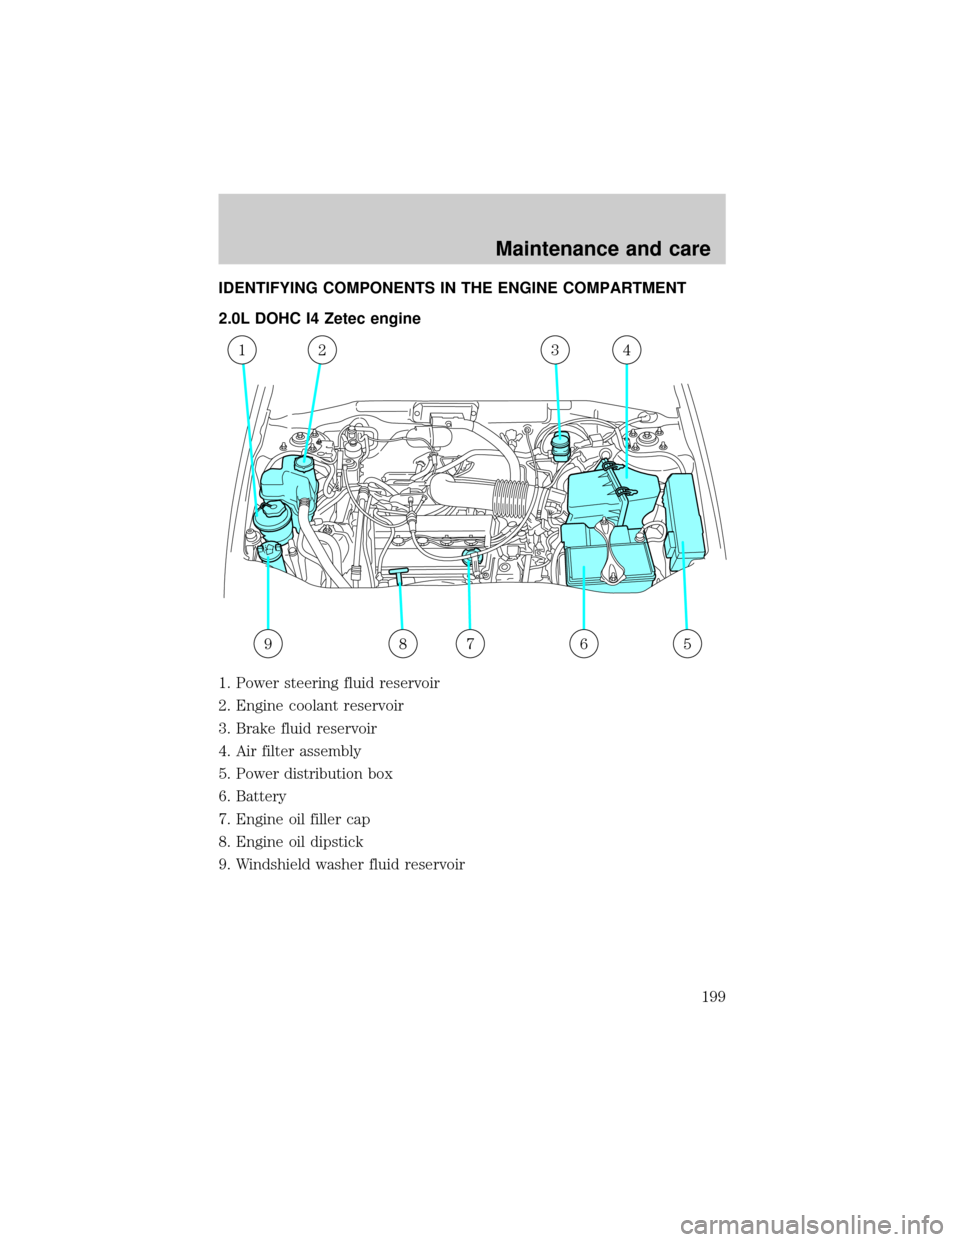
IDENTIFYING COMPONENTS IN THE ENGINE COMPARTMENT
2.0L DOHC I4 Zetec engine
1. Power steering fluid reservoir
2. Engine coolant reservoir
3. Brake fluid reservoir
4. Air filter assembly
5. Power distribution box
6. Battery
7. Engine oil filler cap
8. Engine oil dipstick
9. Windshield washer fluid reservoir
5678
1234
9
Maintenance and care
199
Page 200 of 280
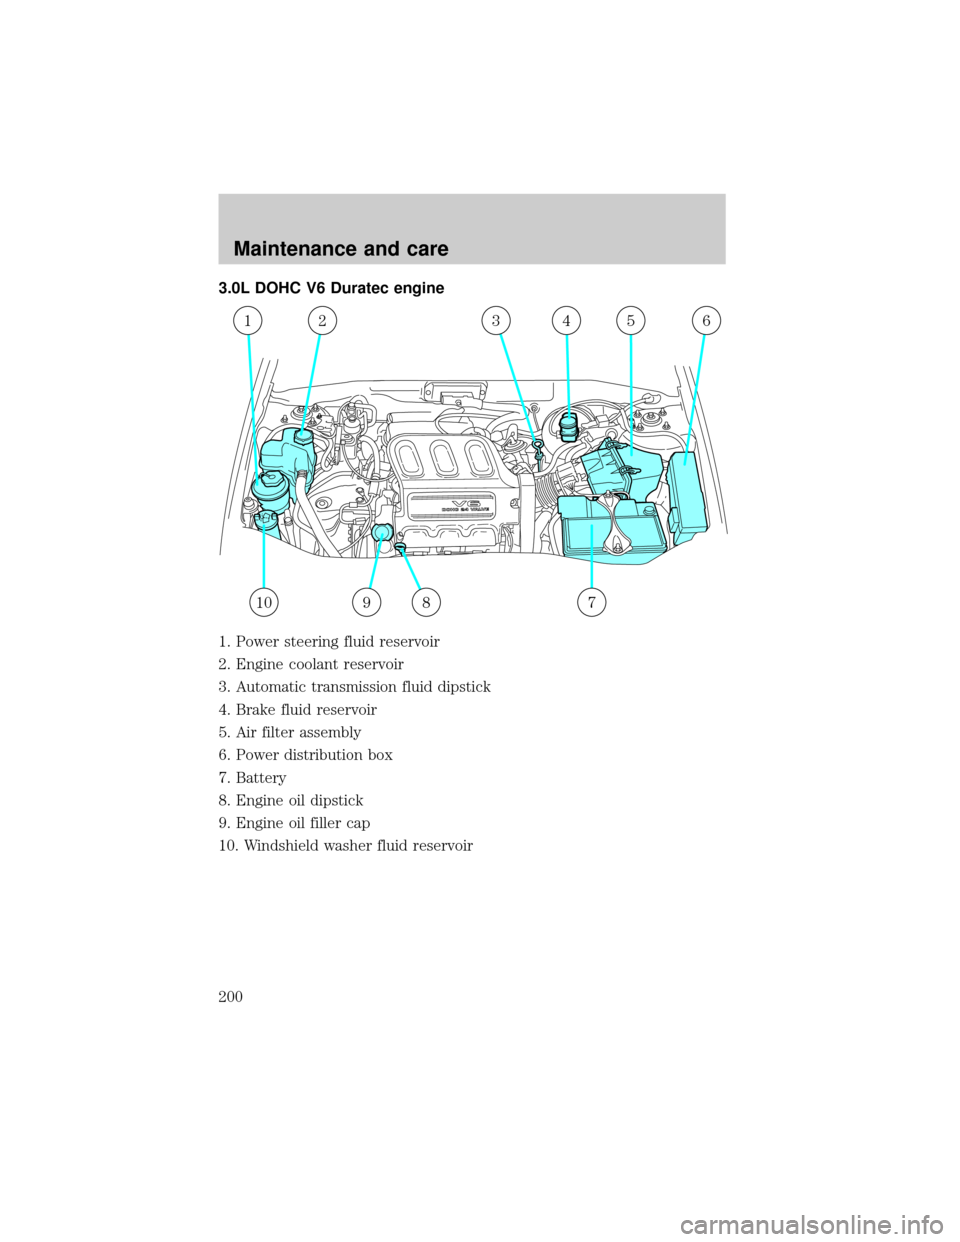
3.0L DOHC V6 Duratec engine
1. Power steering fluid reservoir
2. Engine coolant reservoir
3. Automatic transmission fluid dipstick
4. Brake fluid reservoir
5. Air filter assembly
6. Power distribution box
7. Battery
8. Engine oil dipstick
9. Engine oil filler cap
10. Windshield washer fluid reservoir
10987
123456
Maintenance and care
200
Page 203 of 280
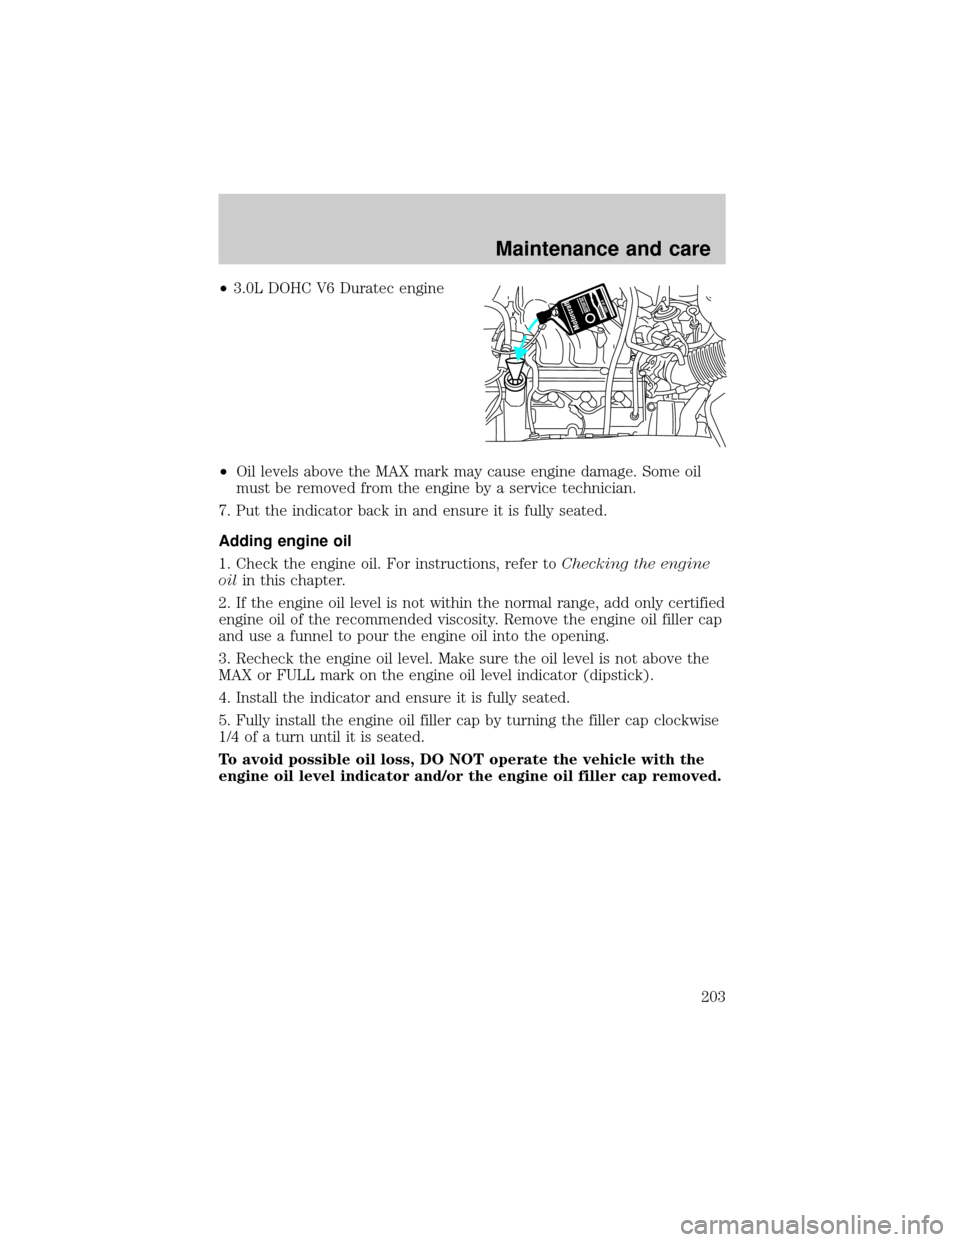
²3.0L DOHC V6 Duratec engine
²Oil levels above the MAX mark may cause engine damage. Some oil
must be removed from the engine by a service technician.
7. Put the indicator back in and ensure it is fully seated.
Adding engine oil
1. Check the engine oil. For instructions, refer toChecking the engine
oilin this chapter.
2. If the engine oil level is not within the normal range, add only certified
engine oil of the recommended viscosity. Remove the engine oil filler cap
and use a funnel to pour the engine oil into the opening.
3. Recheck the engine oil level. Make sure the oil level is not above the
MAX or FULL mark on the engine oil level indicator (dipstick).
4. Install the indicator and ensure it is fully seated.
5. Fully install the engine oil filler cap by turning the filler cap clockwise
1/4 of a turn until it is seated.
To avoid possible oil loss, DO NOT operate the vehicle with the
engine oil level indicator and/or the engine oil filler cap removed.
Maintenance and care
203
Page 205 of 280
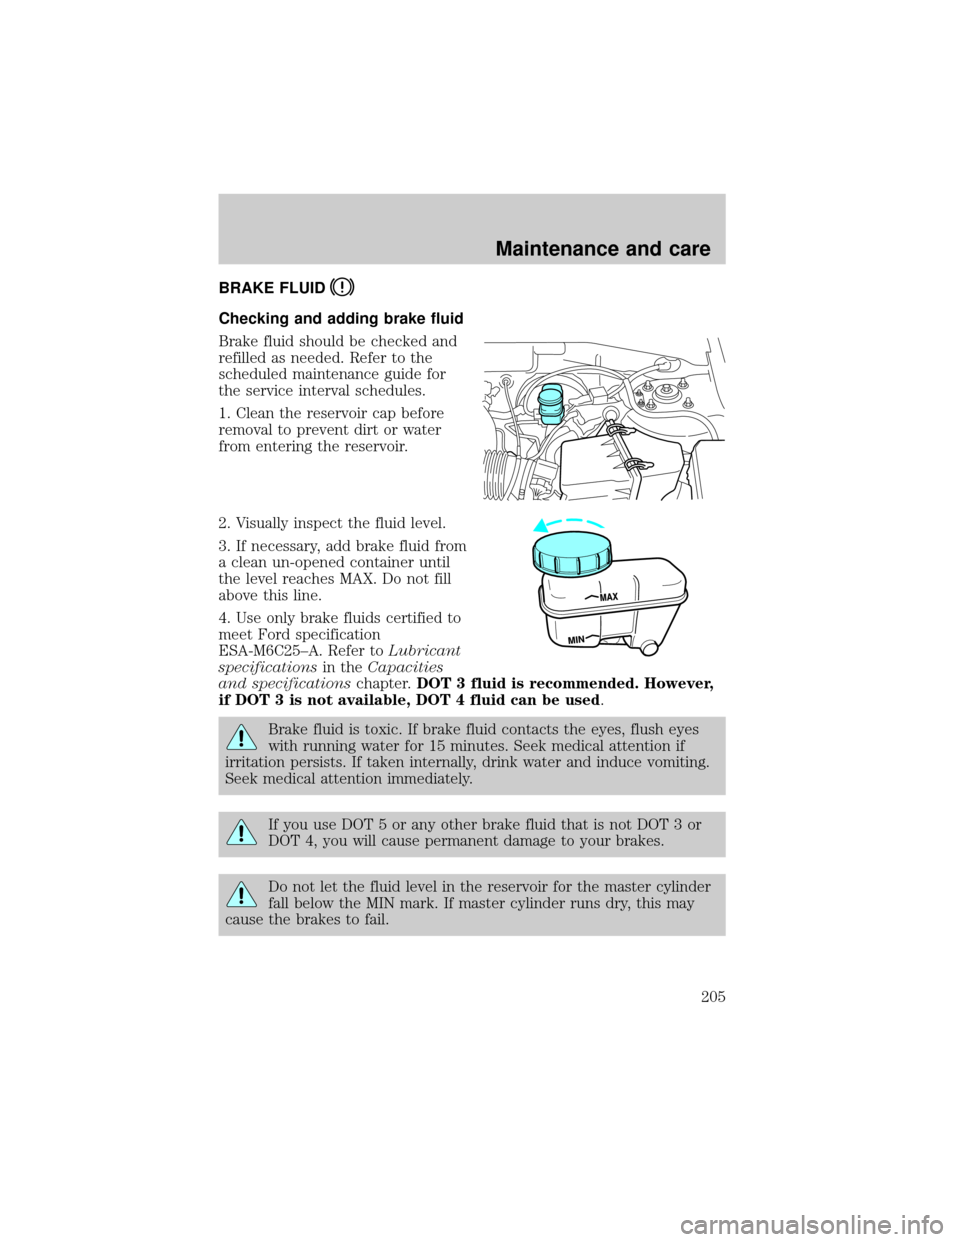
BRAKE FLUID
Checking and adding brake fluid
Brake fluid should be checked and
refilled as needed. Refer to the
scheduled maintenance guide for
the service interval schedules.
1. Clean the reservoir cap before
removal to prevent dirt or water
from entering the reservoir.
2. Visually inspect the fluid level.
3. If necessary, add brake fluid from
a clean un-opened container until
the level reaches MAX. Do not fill
above this line.
4. Use only brake fluids certified to
meet Ford specification
ESA-M6C25±A. Refer toLubricant
specificationsin theCapacities
and specificationschapter.DOT 3 fluid is recommended. However,
if DOT 3 is not available, DOT 4 fluid can be used.
Brake fluid is toxic. If brake fluid contacts the eyes, flush eyes
with running water for 15 minutes. Seek medical attention if
irritation persists. If taken internally, drink water and induce vomiting.
Seek medical attention immediately.
If you use DOT 5 or any other brake fluid that is not DOT 3 or
DOT 4, you will cause permanent damage to your brakes.
Do not let the fluid level in the reservoir for the master cylinder
fall below the MIN mark. If master cylinder runs dry, this may
cause the brakes to fail.
Maintenance and care
205
Page 206 of 280
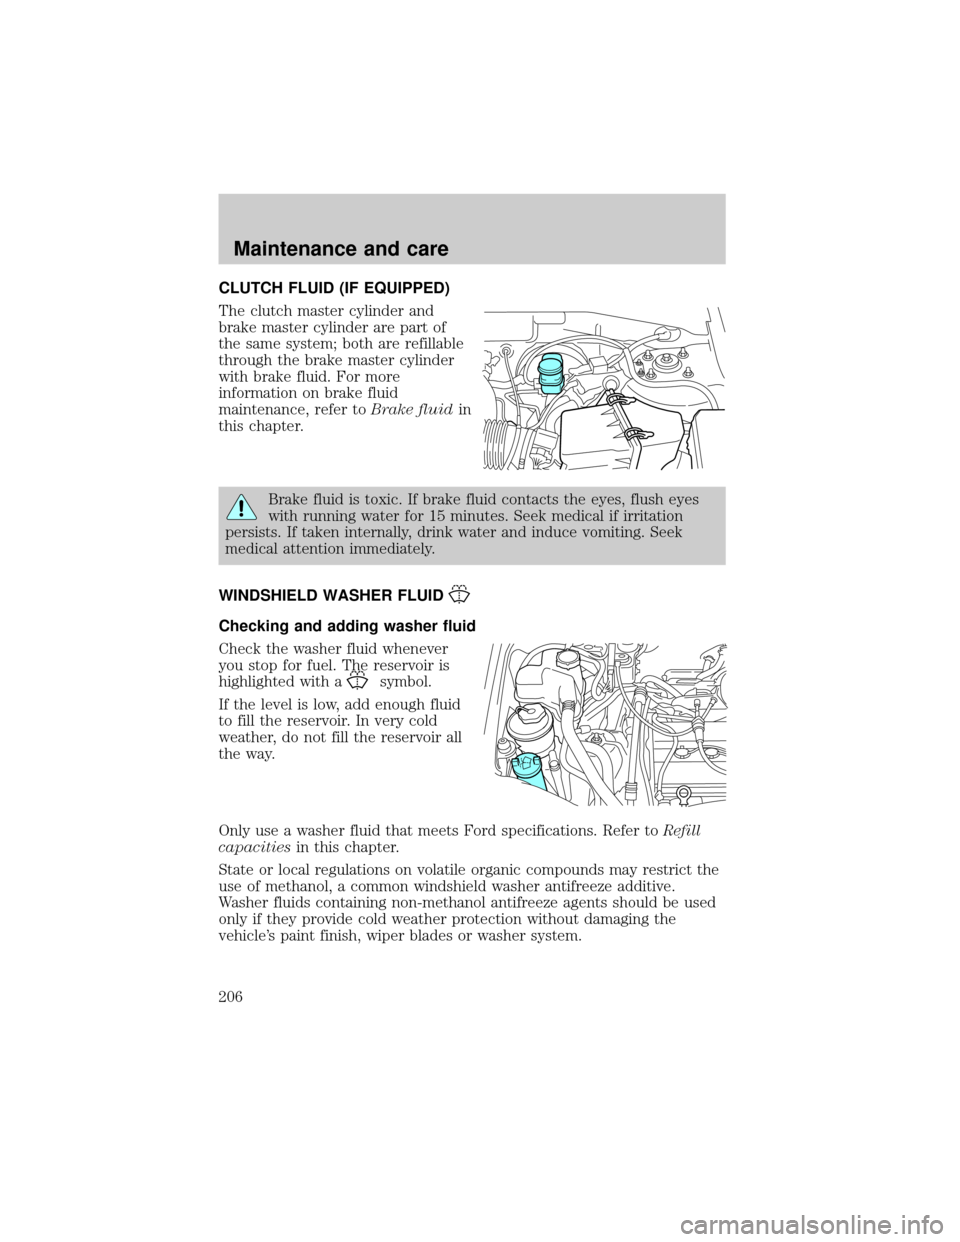
CLUTCH FLUID (IF EQUIPPED)
The clutch master cylinder and
brake master cylinder are part of
the same system; both are refillable
through the brake master cylinder
with brake fluid. For more
information on brake fluid
maintenance, refer toBrake fluidin
this chapter.
Brake fluid is toxic. If brake fluid contacts the eyes, flush eyes
with running water for 15 minutes. Seek medical if irritation
persists. If taken internally, drink water and induce vomiting. Seek
medical attention immediately.
WINDSHIELD WASHER FLUID
Checking and adding washer fluid
Check the washer fluid whenever
you stop for fuel. The reservoir is
highlighted with a
symbol.
If the level is low, add enough fluid
to fill the reservoir. In very cold
weather, do not fill the reservoir all
the way.
Only use a washer fluid that meets Ford specifications. Refer toRefill
capacitiesin this chapter.
State or local regulations on volatile organic compounds may restrict the
use of methanol, a common windshield washer antifreeze additive.
Washer fluids containing non-methanol antifreeze agents should be used
only if they provide cold weather protection without damaging the
vehicle's paint finish, wiper blades or washer system.
Maintenance and care
206
Page 210 of 280

The cooling system in your vehicle is filled with either green-colored
Motorcraft Premium Engine Coolant meeting Ford specification
ESE-M97B44±A or yellow-colored Motorcraft Premium Gold Engine
Coolant meeting Ford Specification WSS-M97B51±A1. To determine your
vehicle's coolant type (color), check your coolant reservoir.
²Add Motorcraft Premium Engine Coolant (green-colored),
VC-4±A (U.S.) or CXC-10 (Canada) or Motorcraft Premium
Gold Engine Coolant (yellow-colored), VC-7±A, depending on
the type of coolant originally equipped in your vehicle.If you
are unsure which type of coolant your vehicle requires, check your
coolant reservoir or contact your local dealer.
²Do not add/mix an orange-colored, extended life coolant such
as Motorcraft Speciality Orange Engine Coolant, VC-2 (US) or
CXC-209 (Canada), meeting Ford specification WSS-M97B44±D
with the factory-filled coolant.Mixing Motorcraft Speciality Orange
Engine Coolant or any orange-colored extended life product with your
factory filled coolant can result in degraded corrosion protection.
²A large amount of water without engine coolant may be added, in case
of emergency, to reach a vehicle service location. In this instance, the
cooling system must be drained and refilled with a 50/50 mixture of
engine coolant and distilled water as soon as possible. Water alone
(without engine coolant) can cause engine damage from corrosion,
overheating or freezing.
²Do not use alcohol, methanol or brine or any engine coolants
mixed with alcohol or methanol antifreeze (coolant).Alcohol
and other liquids can cause engine damage from overheating or
freezing.
²Do not add extra inhibitors or additives to the coolant.These
can be harmful and compromise the corrosion protection of the engine
coolant.
²Do not mix with recycled coolant unless from a Ford-approved
recycling process (seeUse of Recycled Engine Coolantsection).
For vehicles with overflow coolant systems with a non-pressurized cap
on the coolant recovery system, add coolant to the coolant recovery
reservoir when the engine is cool. Add the proper mixture of coolant and
water to the ªcold fullº level. For all other vehicles, which have a coolant
degas system with a pressurized cap, or if it is necessary to remove the
coolant pressure relief cap on the radiator of a vehicle with an overflow
system, follow these steps to add engine coolant.
Maintenance and care
210