engine FORD ESCAPE 2002 1.G Service Manual
[x] Cancel search | Manufacturer: FORD, Model Year: 2002, Model line: ESCAPE, Model: FORD ESCAPE 2002 1.GPages: 280, PDF Size: 2.75 MB
Page 201 of 280
Preparing your vehicle
When the battery is disconnected or a new battery is installed, the
transmission must relearn its adaptive strategy. As a result of this, the
transmission may shift firmly. This operation is considered normal and
will not affect function or durability of the transmission. Over time, the
adaptive learning process will fully update transmission operation to its
optimum shift feel.
1.Use only a 12±volt supply to start your vehicle.
2. Do not disconnect the battery of the disabled vehicle as this could
damage the vehicle's electrical system.
3. Park the booster vehicle close to the hood of the disabled vehicle
making sure the two vehiclesdo nottouch. Set the parking brake on
both vehicles and stay clear of the engine cooling fan and other moving
parts.
4. Check all battery terminals and remove any excessive corrosion before
you attach the battery cables. Ensure that vent caps are tight and level.
5. Turn the heater fan on in both vehicles to protect any electrical
surges. Turn all other accessories off.
Connecting the jumper cables
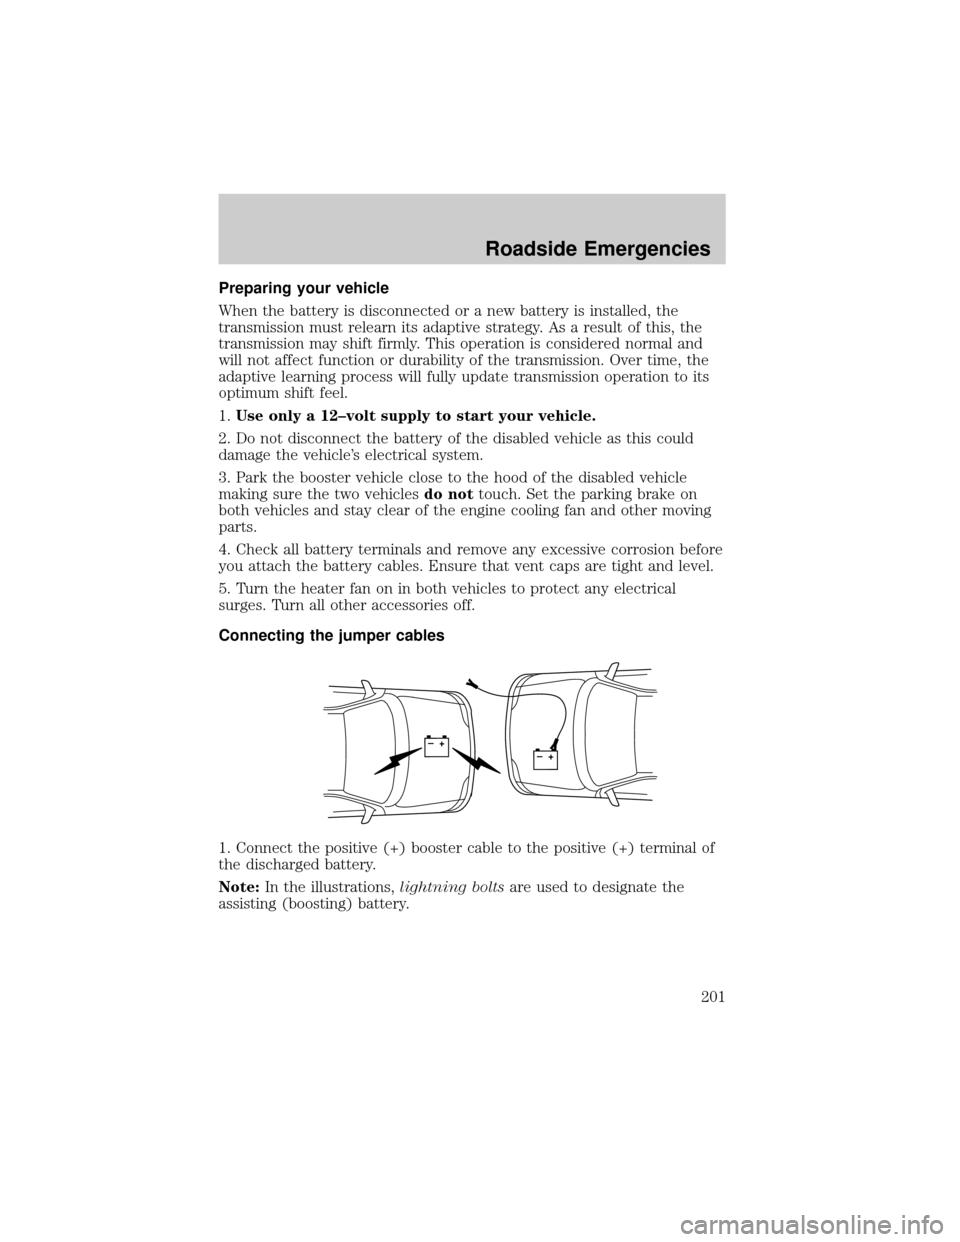
1. Connect the positive (+) booster cable to the positive (+) terminal of
the discharged battery.
Note:In the illustrations,lightning boltsare used to designate the
assisting (boosting) battery.
+–+–
Roadside Emergencies
201
Page 203 of 280
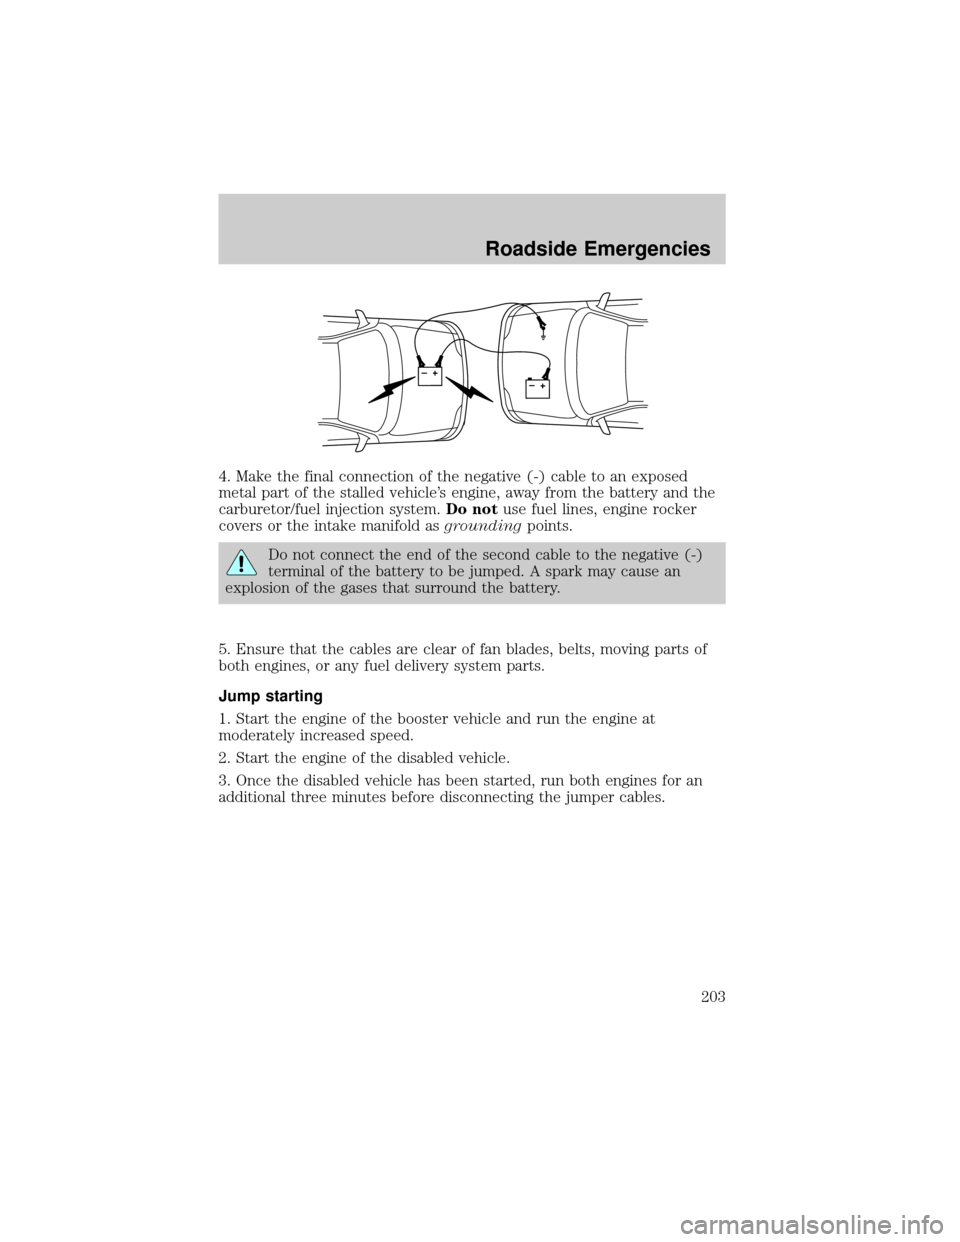
4. Make the final connection of the negative (-) cable to an exposed
metal part of the stalled vehicle's engine, away from the battery and the
carburetor/fuel injection system.Do notuse fuel lines, engine rocker
covers or the intake manifold asgroundingpoints.
Do not connect the end of the second cable to the negative (-)
terminal of the battery to be jumped. A spark may cause an
explosion of the gases that surround the battery.
5. Ensure that the cables are clear of fan blades, belts, moving parts of
both engines, or any fuel delivery system parts.
Jump starting
1. Start the engine of the booster vehicle and run the engine at
moderately increased speed.
2. Start the engine of the disabled vehicle.
3. Once the disabled vehicle has been started, run both engines for an
additional three minutes before disconnecting the jumper cables.
+–+–
Roadside Emergencies
203
Page 205 of 280
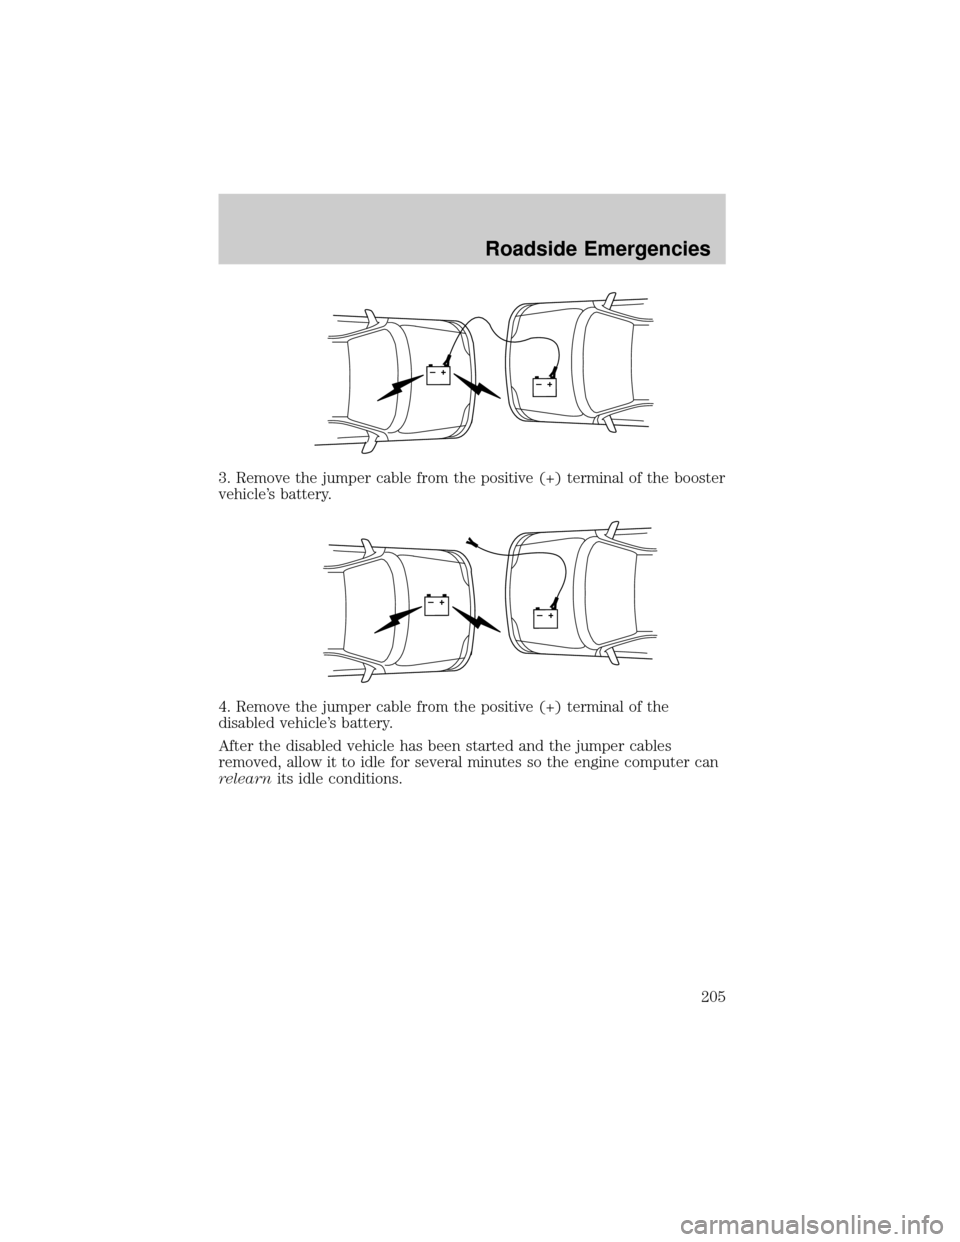
3. Remove the jumper cable from the positive (+) terminal of the booster
vehicle's battery.
4. Remove the jumper cable from the positive (+) terminal of the
disabled vehicle's battery.
After the disabled vehicle has been started and the jumper cables
removed, allow it to idle for several minutes so the engine computer can
relearnits idle conditions.
+–+–
+–+–
Roadside Emergencies
205
Page 214 of 280
UTILIZING THE MEDIATION/ARBITRATION PROGRAM
(CANADA ONLY)
In those cases where you continue to feel that the efforts by Ford and
the dealer to resolve a factory-related vehicle service concern have been
unsatisfactory, Ford of Canada participates in an impartial third party
mediation/arbitration program administered by the Canadian Motor
Vehicle Arbitration Plan (CAMVAP).
The CAMVAP program is a straight-forward and relatively speedy
alternative to resolve a disagreement when all other efforts to produce a
settlement have failed. This procedure is without cost to you and is
designed to eliminate the need for lengthy and expensive legal
proceedings.
In the CAMVAP program, impartial third-party arbitrators conduct
hearings at mutually convenient times and places in an informal
environment. These impartial arbitrators review the positions of the
parties, make decisions and, when appropriate, render awards to resolve
disputes. CAMVAP decisions are fast, fair, and final; the arbitrator's
award is binding both to you and Ford of Canada.
CAMVAP services are available in all territories and provinces. For more
information, without charge or obligation, call your CAMVAP Provincial
Administrator directly at 1-800-207-0685.
GETTING ASSISTANCE OUTSIDE THE U.S. AND CANADA
Before exporting your vehicle to a foreign country, contact the
appropriate foreign embassy or consulate. These officials can inform you
of local vehicle registration regulations and where to find unleaded fuel.
If you cannot find unleaded fuel or can only get fuel with an anti-knock
index lower than is recommended for your vehicle, contact a district or
owner relations/customer relationship office.
The use of leaded fuel in your vehicle without proper conversion may
damage the effectiveness of your emission control system and may cause
engine knocking or serious engine damage. Ford Motor Company/Ford of
Canada is not responsible for any damage caused by use of improper
fuel.
In the United States, using leaded fuel may also result in difficulty
importing your vehicle back into the U.S.
Customer Assistance
214
Page 219 of 280
REPAIRING PAINT CHIPS
Remove particles such as bird droppings, tree sap, insect deposits, tar
spots, road salt and industrial fallout before repairing paint chips.
Minor scratches or paint damage from road debris may be repaired using
the Ultra Touch Prep and Finishing Kit (F7AZ-19K507±BA), which is
available at your authorized Ford, Lincoln or Mercury dealer. This kit
contains:
²Lacquer Touch-Up Paint (ALBZ-19500±XXXXA)
²Exterior Acrylic Spray Lacquer (ALAZ-19500±XXXXA)
Please note that the part numbers (shown as XXXX above) will vary with
your vehicle's specific coloring.Carefully observe the application
instructions on the products.
CLEANING THE WHEEL RIMS AND COVERS
Aluminum wheel rims or covers are coated with a clearcoat paint
finish.
Some automatic car washes may cause damage to the finish on your
wheel rims or covers. Chemical-strength cleaners, or cleaning chemicals,
in combination with brush agitation to remove brake dust and dirt, could
wear away the clearcoat finish over time.
Do not use hydrofluoric acid-based or high caustic-based wheel
cleaners, steel wool, fuels or strong household detergents for
soiled wheel rims and covers.
Never apply any cleaning chemical to hot or warm wheel rims or covers.
Clean wheel rims and covers with Detail Wash (ZC-3±A), which is
available from your authorized Ford, Lincoln or Mercury dealer. Spray
cleaner on cool wheel rims or covers and allow to set for 2±5 minutes.
Agitate the area with a sponge and rinse off with plenty of water.
Use Extra Strength Tar and Road Oil Removal (B7A-19520±AA),
available from your authorized Ford, Lincoln or Mercury dealer, in order
to remove tar and grease from wheel rims and covers.
CLEANING THE ENGINE
Engines are more efficient when they are clean because grease and dirt
buildup keep the engine warmer than normal. When washing:
²The engine must be cool to the touch before spraying with water.
Cleaning
219
Page 220 of 280
²Never spray a hot engine with cold water, as damage to the
engine block or engine components may occur.
²Use caution when using a self-serve power washer (1000psi maximum
pressure) to clean the engine, as the high-pressure fluid could
penetrate the sealed parts and cause damage.
²Never apply anything to any exposed belts in the engine
compartment, including belt dressing.
For general cleaning of the engine and engine compartment, spray
Engine Shampoo and Degreaser (F4AZ-19A536±A) on all parts that
require cleaning and pressure rinse the area with cool water.
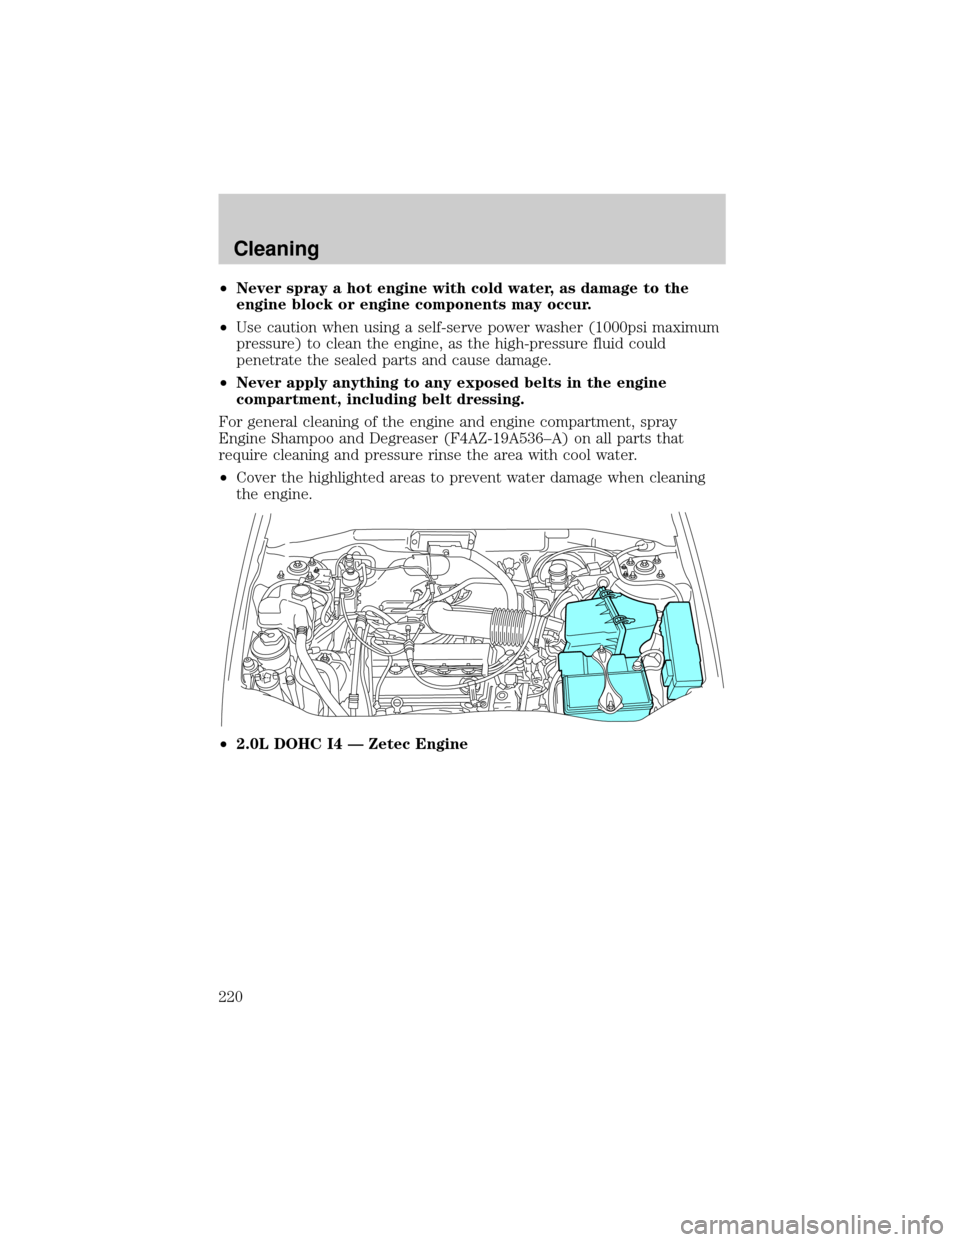
²Cover the highlighted areas to prevent water damage when cleaning
the engine.
²2.0L DOHC I4 Ð Zetec Engine
Cleaning
220
Page 221 of 280
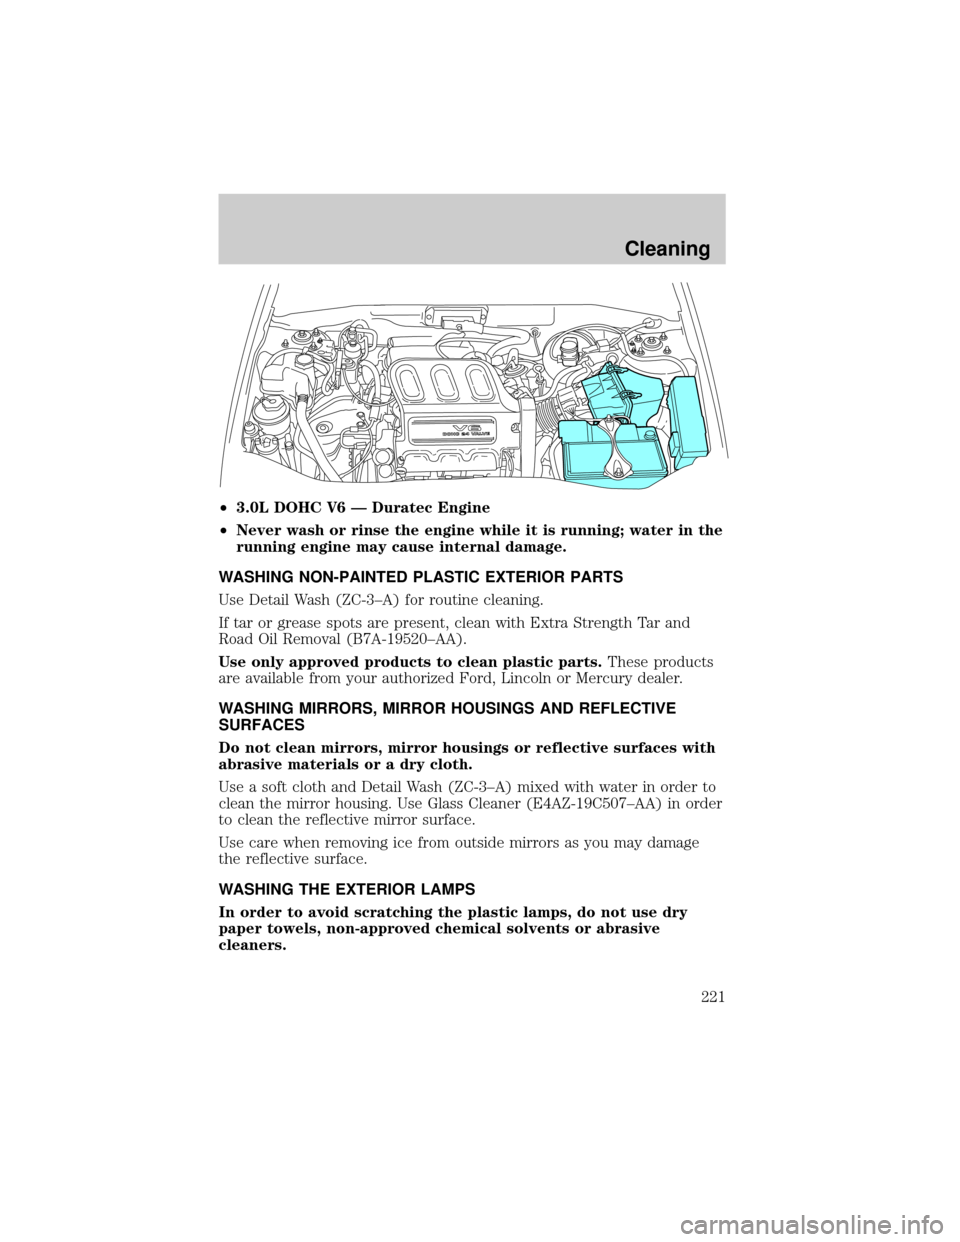
²3.0L DOHC V6 Ð Duratec Engine
²Never wash or rinse the engine while it is running; water in the
running engine may cause internal damage.
WASHING NON-PAINTED PLASTIC EXTERIOR PARTS
Use Detail Wash (ZC-3±A) for routine cleaning.
If tar or grease spots are present, clean with Extra Strength Tar and
Road Oil Removal (B7A-19520±AA).
Use only approved products to clean plastic parts.These products
are available from your authorized Ford, Lincoln or Mercury dealer.
WASHING MIRRORS, MIRROR HOUSINGS AND REFLECTIVE
SURFACES
Do not clean mirrors, mirror housings or reflective surfaces with
abrasive materials or a dry cloth.
Use a soft cloth and Detail Wash (ZC-3±A) mixed with water in order to
clean the mirror housing. Use Glass Cleaner (E4AZ-19C507±AA) in order
to clean the reflective mirror surface.
Use care when removing ice from outside mirrors as you may damage
the reflective surface.
WASHING THE EXTERIOR LAMPS
In order to avoid scratching the plastic lamps, do not use dry
paper towels, non-approved chemical solvents or abrasive
cleaners.
Cleaning
221
Page 225 of 280
FORD, LINCOLN AND MERCURY CAR CARE PRODUCTS
Your Ford, Lincoln or Mercury dealer has many quality products available
to clean your vehicle and protect its finishes. These quality products
have been specifically engineered to fulfill your automotive needs; they
are custom designed to complement the style and appearance of your
vehicle. Each product is made from high quality materials that meet or
exceed rigid specifications. For best results, use the following or
products of equivalent quality:
Ford Custom Clearcoat Polish*
Ford Custom Silicone Gloss Polish
Ford Custom Vinyl Protectant* (not available in Canada)
Motorcraft Vinyl Conditioner (Canada only)
Ford Deluxe Leather and Vinyl Cleaner (not available in Canada)
Motorcraft Vinyl Cleaner (Canada only)
Ford Extra Strength Tar and Road Oil Remover* (not available in
Canada)
Ford Extra Strength Upholstery Cleaner (not available in Canada)
Ford Custom Bright Metal Cleaner
Motorcraft Premium Car Wash Concentrate
Motorcraft Carlite Glass Cleaner (Canada only)
Ford Spot and Stain Remover*
Ford Super Premium Tire and Trim Dressing
Ford Triple Clean
Ford Ultra-Clear Spray Glass Cleaner (not available in Canada)
Ford Engine Shampoo and Degreaser
* May be sold with the Motorcraft name
Cleaning
225
Page 226 of 280
SERVICE RECOMMENDATIONS
To help you service your vehicle:
²We highlight do-it-yourself items in the engine compartment for easy
location.
²We provide a scheduled maintenance guide which makes tracking
routine service easy.
If your vehicle requires professional service, your dealership can provide
the necessary parts and service. Check yourWarranty Guideto find out
which parts and services are covered.
Use only recommended fuels, lubricants, fluids and service parts
conforming to specifications. Motorcraft parts are designed and built to
provide the best performance in your vehicle.
PRECAUTIONS WHEN SERVICING YOUR VEHICLE
Be especially careful when inspecting or servicing your vehicle.
²Do not work on a hot engine.
²When the engine is running, make sure that loose clothing, jewelry or
long hair does not get caught up in moving parts.
²Do not work on a vehicle with the engine running in an enclosed
space, unless you are sure you have enough ventilation.
²Keep all lit cigarettes, open flames and other lit material away from
the battery and all fuel related parts.
If you disconnect the battery, the engine must ªrelearnº its idle
conditions before your vehicle will drive properly, as explained in the
Batterysection of this chapter.
Working with the engine off
²Automatic transmission:
1. Set the parking brake and ensure the gearshift is securely latched in P
(Park).
2. Turn off the engine and remove the key.
3. Block the wheels to prevent the vehicle from moving unexpectedly.
²Manual transmission:
1. Set the parking brake.
2. Depress the clutch and place the gearshift in 1 (First).
Maintenance and Specifications
226
Page 227 of 280
3. Turn off the engine and remove the key.
4. Block the wheels to prevent the vehicle from moving unexpectedly.
Working with the engine on
²Automatic transmission:
1. Set the parking brake and ensure the gearshift is securely latched in P
(Park).
2. Block the wheels to prevent the vehicle from moving unexpectedly.
Note:Do not start your engine with the air cleaner removed and do not
remove it while the engine is running.
²Manual transmission:
1. Set the parking brake, depress the clutch and place the gearshift in
neutral.
2. Block the wheels to prevent the vehicle from moving unexpectedly.
Note:Do not start your engine with the air cleaner removed and do not
remove it while the engine is running.
The cooling fan is automatic and may come on at any time.
Always disconnect the negative terminal of the battery before
working near the fan.
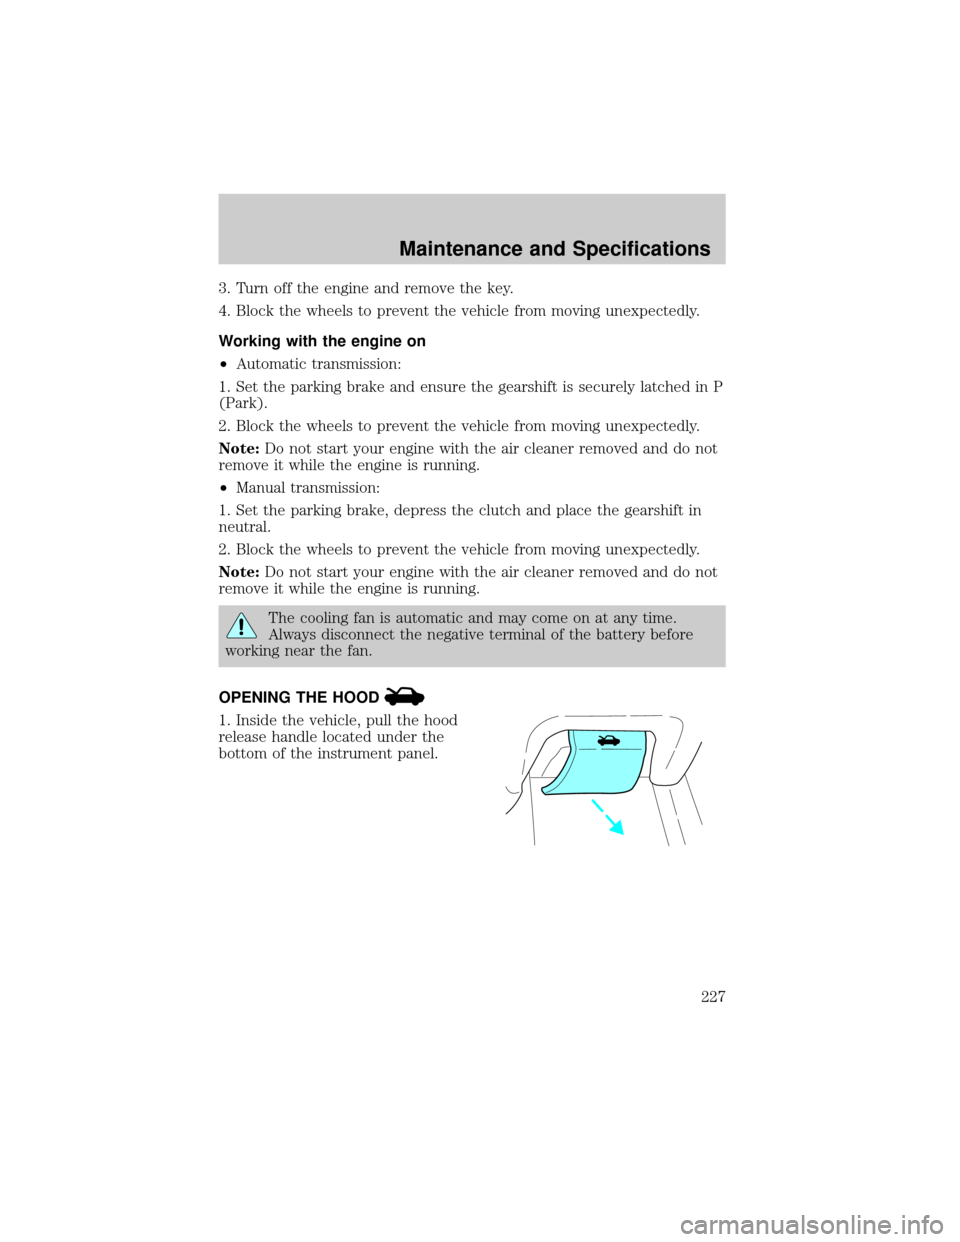
OPENING THE HOOD
1. Inside the vehicle, pull the hood
release handle located under the
bottom of the instrument panel.
Maintenance and Specifications
227