capacities FORD ESCAPE 2013 3.G Owners Manual
[x] Cancel search | Manufacturer: FORD, Model Year: 2013, Model line: ESCAPE, Model: FORD ESCAPE 2013 3.GPages: 423, PDF Size: 4.59 MB
Page 4 of 423
Customer Assistance
Getting the Services You Need...............201
In California (U.S. Only)............................202
The Better Business Bureau (BBB) AutoLine Program (U.S. Only).....................203
Utilizing the Mediation/Arbitration Program (Canada Only).......................203
Getting Assistance Outside the U.S. and Canada.......................................................204
Ordering Additional Owner's Literature....................................................205
Reporting Safety Defects (U.S. Only)............................................................205
Reporting Safety Defects (Canada Only)............................................................206
Fuses
Changing a Fuse...........................................207
Fuse Specification Chart..........................208
Maintenance
General Information.....................................217
Opening and Closing the Hood................217
Under Hood Overview - 1.6L EcoBoost®..................................................218
Under Hood Overview - 2.0L EcoBoost®..................................................219
Under Hood Overview - 2.5L...................220
Engine Oil Dipstick - 1.6L EcoBoost®..................................................221
Engine Oil Dipstick - 2.5L/2.0L EcoBoost®..................................................221
Engine Oil Check...........................................221
Engine Coolant Check................................222
Automatic Transmission Fluid Check ............................................................225
Brake Fluid Check........................................225
Power Steering Fluid Check.....................225
Fuel Filter........................................................225
Washer Fluid Check....................................225
Changing the Vehicle Battery.................226
Checking the Wiper Blades......................227 Changing the Wiper Blades......................227
Changing the Engine Air Filter.................228
Adjusting the Headlamps.........................229
Removing a Headlamp...............................231
Changing a Bulb............................................231
Bulb Specification Chart...........................235
Vehicle Care
General Information...................................236
Cleaning Products.......................................236
Cleaning the Exterior..................................236
Repairing Minor Paint Damage...............237
Waxing..............................................................237
Cleaning the Engine....................................237
Cleaning the Windows and Wiper
Blades..........................................................238
Cleaning the Interior...................................238
Cleaning the Instrument Panel and Instrument Cluster Lens.......................239
Cleaning Leather Seats.............................239
Cleaning the Alloy Wheels.......................240
Vehicle Storage............................................240
Wheels and Tires
General Information...................................243
Tire Care..........................................................245
Using Snow Chains.....................................256
Tire Pressure Monitoring System...........257
Changing a Road Wheel...........................260
Technical Specifications...........................265
Capacities and Specific- ations
Engine Specifications.................................267
Motorcraft Parts...........................................267
Vehicle Identification Number...............269
Vehicle Certification Label.......................270
Transmission Code Designation............270
Technical Specifications............................271
4
Table of Contents
Page 184 of 423
WARNING
Exceeding the Safety Compliance
Certification Label vehicle weight
rating limits could result in
substandard vehicle handling or
performance, engine, transmission and/or
structural damage, serious damage to the
vehicle, loss of control and personal injury.
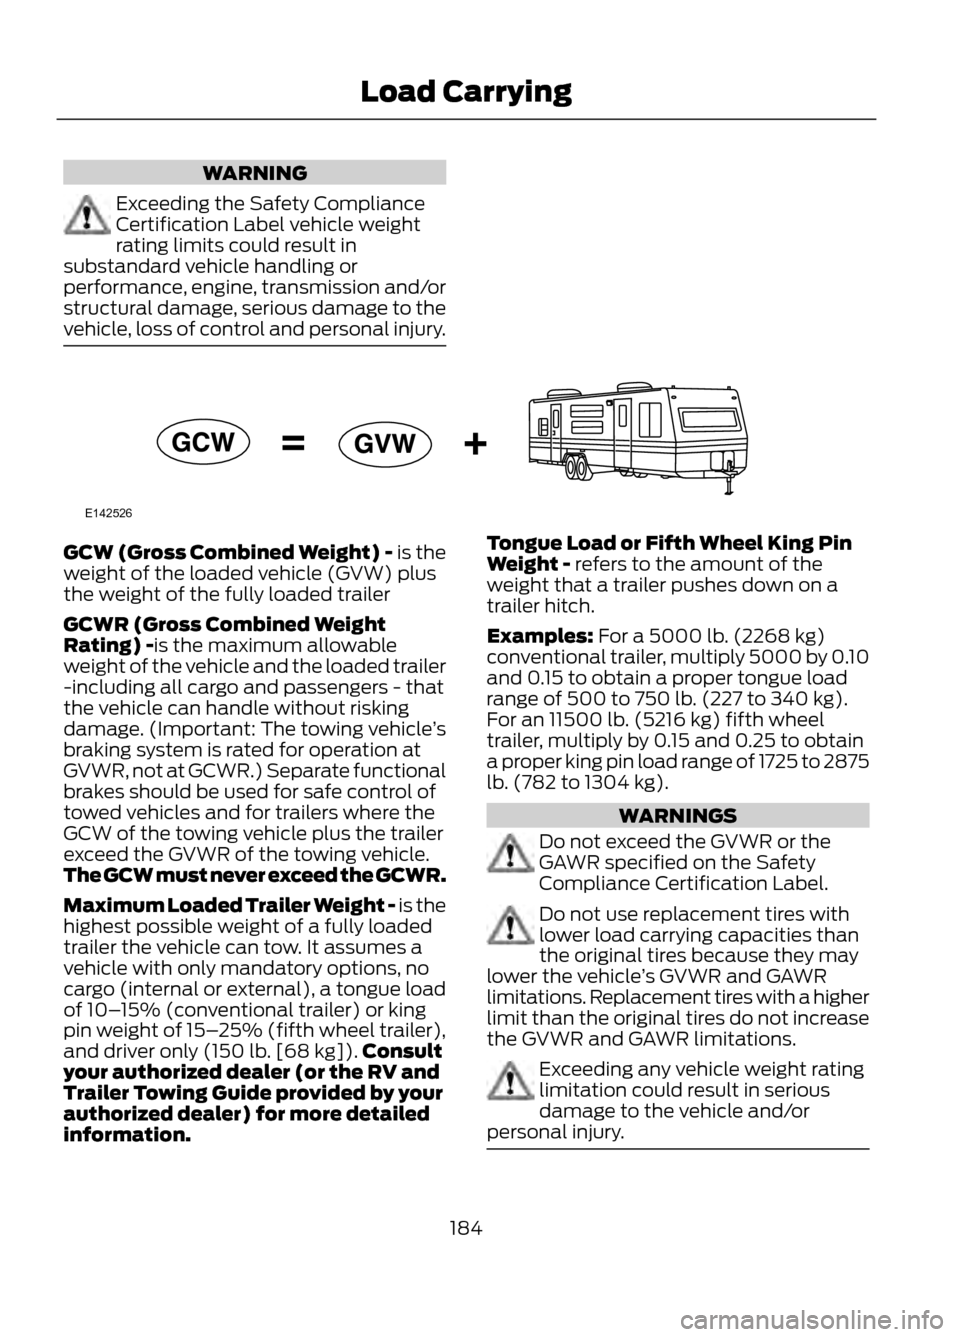
GCW (Gross Combined Weight) - is the
weight of the loaded vehicle (GVW) plus
the weight of the fully loaded trailer
GCWR (Gross Combined Weight
Rating) -is the maximum allowable
weight of the vehicle and the loaded trailer
-including all cargo and passengers - that
the vehicle can handle without risking
damage. (Important: The towing vehicle ’s
braking system is rated for operation at
GVWR, not at GCWR.) Separate functional
brakes should be used for safe control of
towed vehicles and for trailers where the
GCW of the towing vehicle plus the trailer
exceed the GVWR of the towing vehicle.
The GCW must never exceed the GCWR.
Maximum Loaded Trailer Weight - is the
highest possible weight of a fully loaded
trailer the vehicle can tow. It assumes a
vehicle with only mandatory options, no
cargo (internal or external), a tongue load
of 10– 15% (conventional trailer) or king
pin weight of 15– 25% (fifth wheel trailer),
and driver only (150 lb. [68 kg]). Consult
your authorized dealer (or the RV and
Trailer Towing Guide provided by your
authorized dealer) for more detailed
information. Tongue Load or Fifth Wheel King Pin
Weight - refers to the amount of the
weight that a trailer pushes down on a
trailer hitch.
Examples: For a 5000 lb. (2268 kg)
conventional trailer, multiply 5000 by 0.10
and 0.15 to obtain a proper tongue load
range of 500 to 750 lb. (227 to 340 kg).
For an 11500 lb. (5216 kg) fifth wheel
trailer, multiply by 0.15 and 0.25 to obtain
a proper king pin load range of 1725 to 2875
lb. (782 to 1304 kg).
WARNINGS
Do not exceed the GVWR or the
GAWR specified on the Safety
Compliance Certification Label.
Do not use replacement tires with
lower load carrying capacities than
the original tires because they may
lower the vehicle ’s GVWR and GAWR
limitations. Replacement tires with a higher
limit than the original tires do not increase
the GVWR and GAWR limitations.
Exceeding any vehicle weight rating
limitation could result in serious
damage to the vehicle and/or
personal injury.
184
Load Carrying
E142526
Page 222 of 423
1. Remove the filler cap.
2. Add engine oil that meets the Fordspecifications. See Capacities and
Specifications (page 267).
3. Replace the filler cap. Turn it until you feel a strong resistance.
Resetting the Oil Life Monitoring
System
Note: Reset the oil life monitoring only after
an oil change.
1. Turn the ignition key to the on position.
Do not start the engine. For vehicles
with push-button start, press and hold
the start button for two seconds
without pressing the brake pedal. Do
not attempt to start the engine.
2. Press both the accelerator and brake pedals at the same time.
3. Keep both pedals fully pressed.
4. After three seconds, the Service: Oil reset in prog. message will be
displayed.
5. After 25 seconds, the Service: Oil reset
complete message will be displayed.
6. Release both the accelerator and brake
pedals.
7. The Service: Oil reset complete message will no longer be displayed.
8. Rotate the key to the off position. For vehicles with push-button start, press
the start button to turn the vehicle off
completely.
ENGINE COOLANT CHECK
Checking the Engine Coolant
When the engine is cold, check the
concentration and level of the engine
coolant at the intervals listed in the
scheduled maintenance information. See
Scheduled Maintenance (page 396). Note:
Make sure that the level is between
the MIN and MAX marks on the coolant
reservoir.
Note: Coolant expands when it is hot. The
level may extend beyond the MAX mark
Note: If the level is at the MIN mark, below
the MIN mark, or empty, add coolant
immediately. See Adding Engine Coolant
in this chapter.
The coolant concentration should be
maintained at 50%.
Note: For best results, coolant
concentration should be tested with a
refractometer such as Rotunda tool
ROB75240 available from your dealer. Ford
does not recommend the use of
hydrometers or coolant test strips for
measuring coolant concentrations.
Note: Automotive fluids are not
interchangeable. Do not use engine coolant
or antifreeze or windshield washer fluid
outside of its specified function and vehicle
location.
Adding Engine Coolant
WARNINGS
Do not add engine coolant when the
engine is hot. Steam and scalding
liquids released from a hot cooling
system can burn you badly. Also, you can
be burned if you spill coolant on hot engine
parts.
Do not put engine coolant in the
windshield washer fluid container. If
sprayed on the windshield, engine
coolant could make it difficult to see
through the windshield.
To reduce the risk of personal injury,
make sure the engine is cool before
unscrewing the coolant pressure
relief cap. The cooling system is under
pressure; steam and hot liquid can come
out forcefully when the cap is loosened
slightly.
222
Maintenance
Page 223 of 423
WARNINGS
Do not add coolant further than the
MAX mark.
Note:Do not use stop leak pellets, cooling
system sealants, or additives as they can
cause damage to the engine cooling or
heating systems. This damage would not
be covered under your vehicle ’s warranty.
Note: During normal vehicle operation, the
engine coolant may change color from
orange to pink or light red. As long as the
engine coolant is clear and uncontaminated,
this color change does not indicate the
engine coolant has degraded nor does it
require the engine coolant to be drained, the
system to be flushed, or the engine coolant
to be replaced.
• Do not mix different colors or types of
coolant in your vehicle. Make sure the
correct coolant is used. Mixing of
engine coolants may harm your
engine ’s cooling system. The use of an
improper coolant may harm engine and
cooling system components and may
void the warranty. Use prediluted
engine coolant meeting the Ford
specification. See Capacities and
Specifications (page 267).
• In case of emergency, a large amount
of water without engine coolant may
be added in order to reach a vehicle
service location. In this instance, the
cooling system must be drained,
chemically cleaned with Motorcraft®
Premium Cooling System Flush, and
refilled with prediluted engine coolant
as soon as possible. Water alone
(without engine coolant) can cause
engine damage from corrosion,
overheating or freezing. •
Do not use alcohol, methanol, brine or
any engine coolants mixed with alcohol
or methanol antifreeze (coolant).
Alcohol and other liquids can cause
engine damage from overheating or
freezing.
• Do not add extra inhibitors or additives
to the coolant. These can be harmful
and compromise the corrosion
protection of the engine coolant.
Unscrew the cap slowly. Any pressure will
escape as you unscrew the cap.
Add prediluted engine coolant meeting the
Ford specification. See Capacities and
Specifications (page 267).
Whenever coolant has been added, the
coolant level in the coolant reservoir
should be checked the next few times you
drive the vehicle. If necessary, add enough
prediluted engine coolant to bring the
coolant level to the proper level.
Recycled Engine Coolant
Ford Motor Company does not recommend
the use of recycled engine coolant since a
Ford-approved recycling process is not yet
available.
Always dispose of used automotive fluids
in a responsible manner. Follow your
community ’s regulations and standards
for recycling and disposing of automotive
fluids.
223
Maintenance
Page 226 of 423
Add fluid to fill the reservoir if the level is
low. Only use a washer fluid that meets
Ford specifications. See Capacities and
Specifications (page 267).
State or local regulations on volatile
organic compounds may restrict the use
of methanol, a common windshield washer
antifreeze additive. Washer fluids
containing non-methanol antifreeze
agents should be used only if they provide
cold weather protection without damaging
the vehicle’s paint finish, wiper blades or
washer system.
CHANGING THE VEHICLE
BATTERY
WARNINGS
Batteries normally produce explosive
gases which can cause personal
injury. Therefore, do not allow
flames, sparks or lighted substances to
come near the battery. When working near
the battery, always shield your face and
protect your eyes. Always provide proper
ventilation.
When lifting a plastic-cased battery,
excessive pressure on the end walls
could cause acid to flow through the
vent caps, resulting in personal injury
and/or damage to the vehicle or battery.
Lift the battery with a battery carrier or
with your hands on opposite corners.
Keep batteries out of reach of
children. Batteries contain sulfuric
acid. Avoid contact with skin, eyes or
clothing. Shield your eyes when working
near the battery to protect against possible
splashing of acid solution. In case of acid
contact with skin or eyes, flush
immediately with water for a minimum of
15 minutes and get prompt medical
attention. If acid is swallowed, call a
physician immediately.
WARNINGS
Battery posts, terminals and related
accessories contain lead and lead
compounds. Wash hands after
handling.
Your vehicle is equipped with a
Motorcraft® maintenance-free battery
which normally does not require additional
water during its life of service.
Note: If your battery has a cover/shield,
make sure it is reinstalled after the battery
has been cleaned or replaced.
For longer, trouble-free operation, keep the
top of the battery clean and dry. Also,
make certain the battery cables are always
tightly fastened to the battery terminals.
If you see any corrosion on the battery or
terminals, remove the cables from the
terminals and clean with a wire brush. You
can neutralize the acid with a solution of
baking soda and water.
It is recommended that the negative
battery cable terminal be disconnected
from the battery if you plan to store your
vehicle for an extended period of time.
To ensure proper operation of the battery
management system (BMS), any electrical
devices that are added to the vehicle
should not have their ground connection
made directly at the negative battery post.
A connection at the negative battery post
can cause inaccurate measurements of
the battery condition and potential
incorrect system operation.
Note: Electrical or electronic accessories
or components added to the vehicle by the
dealer or the owner may adversely affect
battery performance and durability and may
also affect the performance of other
electrical systems in the vehicle.
226
Maintenance
Page 228 of 423
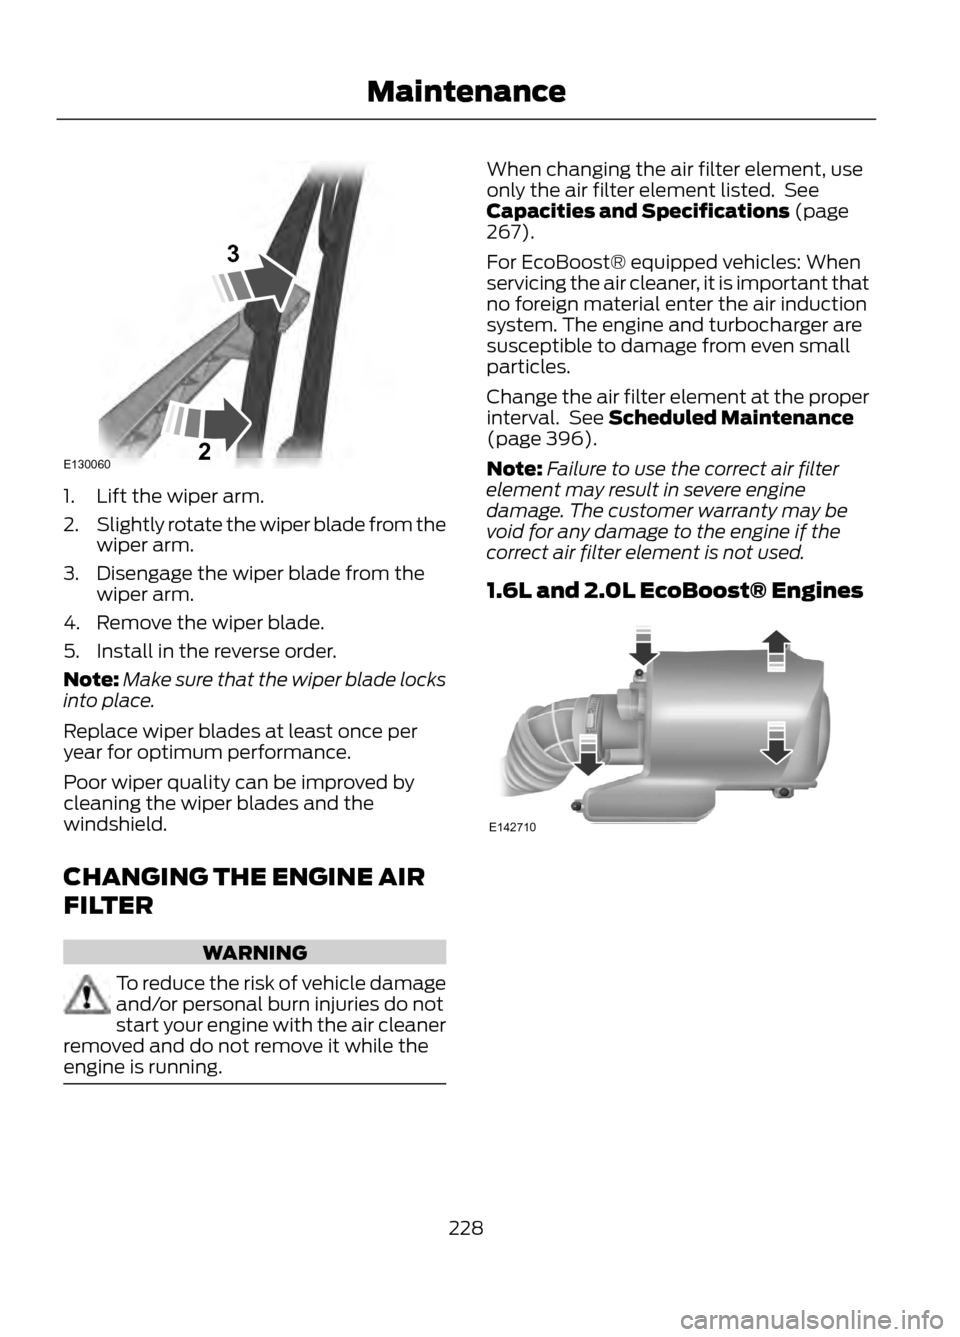
1. Lift the wiper arm.
2.Slightly rotate the wiper blade from the
wiper arm.
3. Disengage the wiper blade from the wiper arm.
4. Remove the wiper blade.
5. Install in the reverse order.
Note: Make sure that the wiper blade locks
into place.
Replace wiper blades at least once per
year for optimum performance.
Poor wiper quality can be improved by
cleaning the wiper blades and the
windshield.
CHANGING THE ENGINE AIR
FILTER
WARNING
To reduce the risk of vehicle damage
and/or personal burn injuries do not
start your engine with the air cleaner
removed and do not remove it while the
engine is running.
When changing the air filter element, use
only the air filter element listed. See
Capacities and Specifications (page
267).
For EcoBoost® equipped vehicles: When
servicing the air cleaner, it is important that
no foreign material enter the air induction
system. The engine and turbocharger are
susceptible to damage from even small
particles.
Change the air filter element at the proper
interval. See Scheduled Maintenance
(page 396).
Note: Failure to use the correct air filter
element may result in severe engine
damage. The customer warranty may be
void for any damage to the engine if the
correct air filter element is not used.
1.6L and 2.0L EcoBoost® Engines
228
Maintenance
E130060
3
2
E142710
Page 267 of 423
ENGINE SPECIFICATIONS
2.5L engine
2.0L EcoBoost engine
1.6L EcoBoost engine
Engine
152
122
98
Cubic inches
Minimum 87 octane
Minimum 87 octane
Minimum 87 octane
Required fuel
9.7:1
9.3:1
10.0:1
Compression
ratio
0.049-0.053 in.(1.25-1.35 mm)
0.027-0.031 in.
(0.70-0.80 mm)
0.027-0.031 in. (0.70-
0.80 mm)
Spark plug gap
Drivebelt Routing
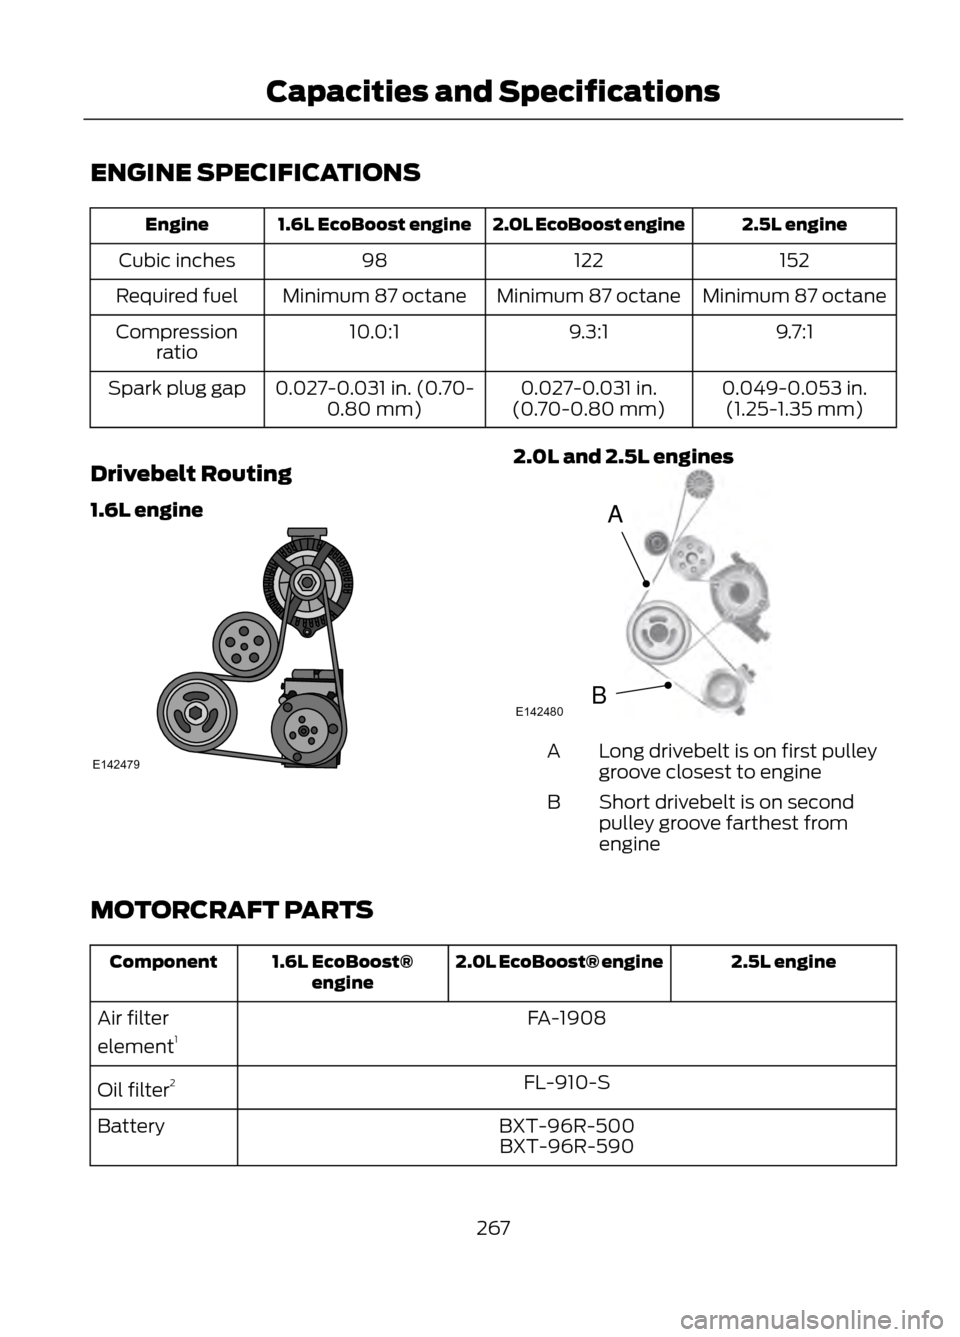
1.6L engine
2.0L and 2.5L engines
Long drivebelt is on first pulley
groove closest to engine
A
Short drivebelt is on second
pulley groove farthest from
engine
B
MOTORCRAFT PARTS
2.5L engine
2.0L EcoBoost® engine
1.6L EcoBoost®
engine
Component
FA-1908
Air filter
element 1
FL-910-S
Oil filter 2
BXT-96R-500
Battery
BXT-96R-590
267
Capacities and Specifications
E142479
A
BE142480
Page 268 of 423
2.5L engine
2.0L EcoBoost® engine
1.6L EcoBoost®
engine
Component
AYFS-32-YR
Spark plugs 3
FP70
Cabin air filter
WW-2750 (driver side)
Windshield
wiper blade WW-2705-WA (passenger side)
1 Failure to use the correct air filter element may result in severe engine damage. The
customer warranty may be void for any damage to the engine if the correct air filter
element is not used.
2 Only use the specified replacement oil filter. The use of a non-specified oil filter can
result in engine damage.
3 For spark plug replacement, see your authorized dealer. Replace the spark plugs at the
appropriate intervals. See Scheduled Maintenance (page 396).
Note: Replace the spark plugs with ones that meet Ford material and design specifications
for your vehicle, such as Motorcraft® or equivalent replacement parts. The customer
warranty may be void for any damage to the engine if such spark plugs are not used.
268
Capacities and Specifications
Page 269 of 423
VEHICLE IDENTIFICATION
NUMBER
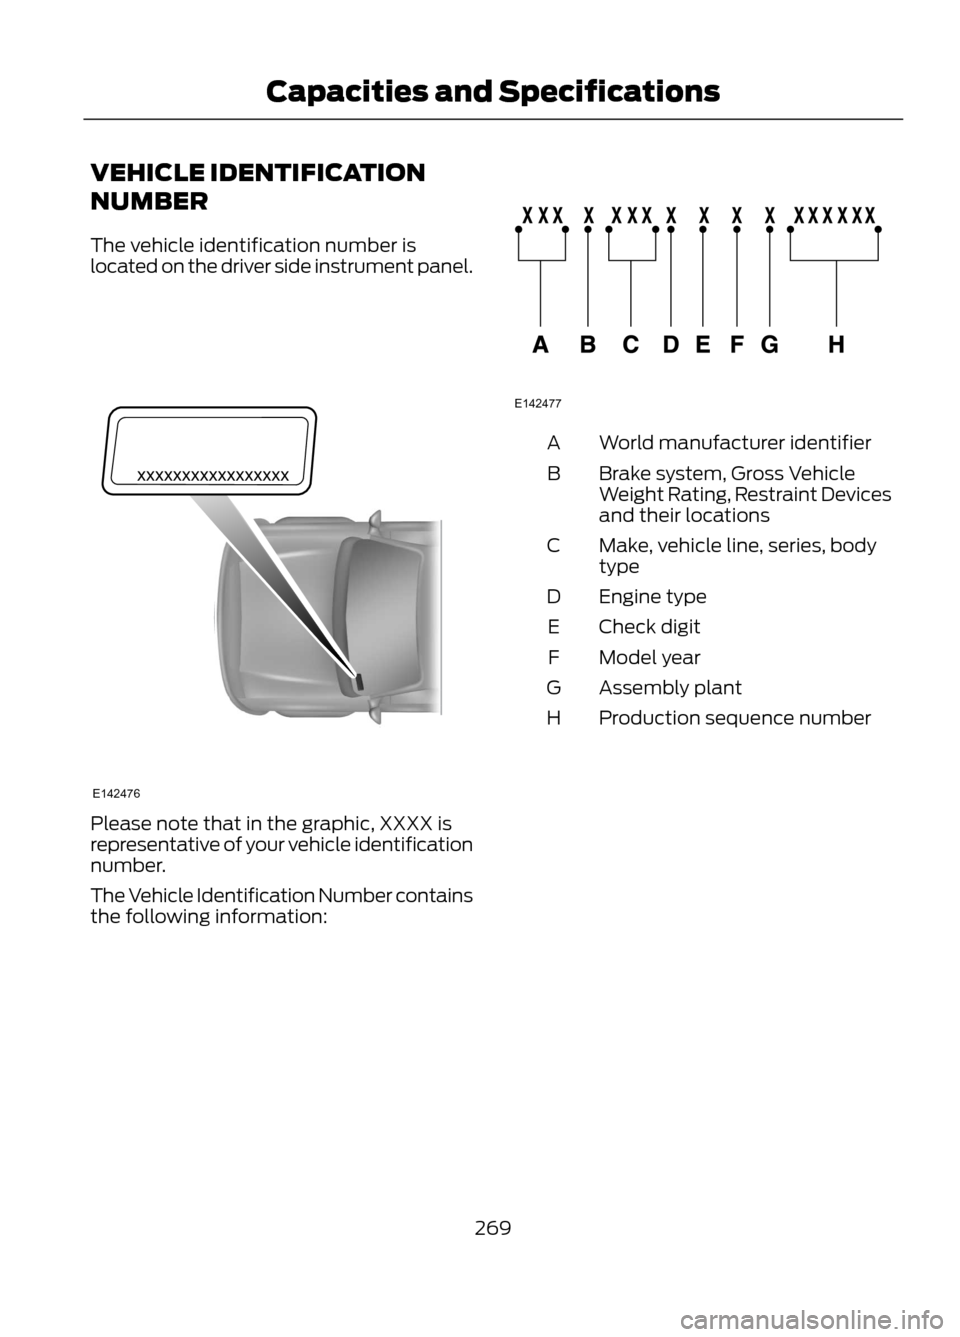
The vehicle identification number is
located on the driver side instrument panel.
Please note that in the graphic, XXXX is
representative of your vehicle identification
number.
The Vehicle Identification Number contains
the following information:
World manufacturer identifier
A
Brake system, Gross Vehicle
Weight Rating, Restraint Devices
and their locations
B
Make, vehicle line, series, body
type
C
Engine type
D
Check digit
E
Model year
F
Assembly plant
G
Production sequence number
H
269
Capacities and Specifications
E142476
E142477
Page 270 of 423
VEHICLE CERTIFICATION
LABEL
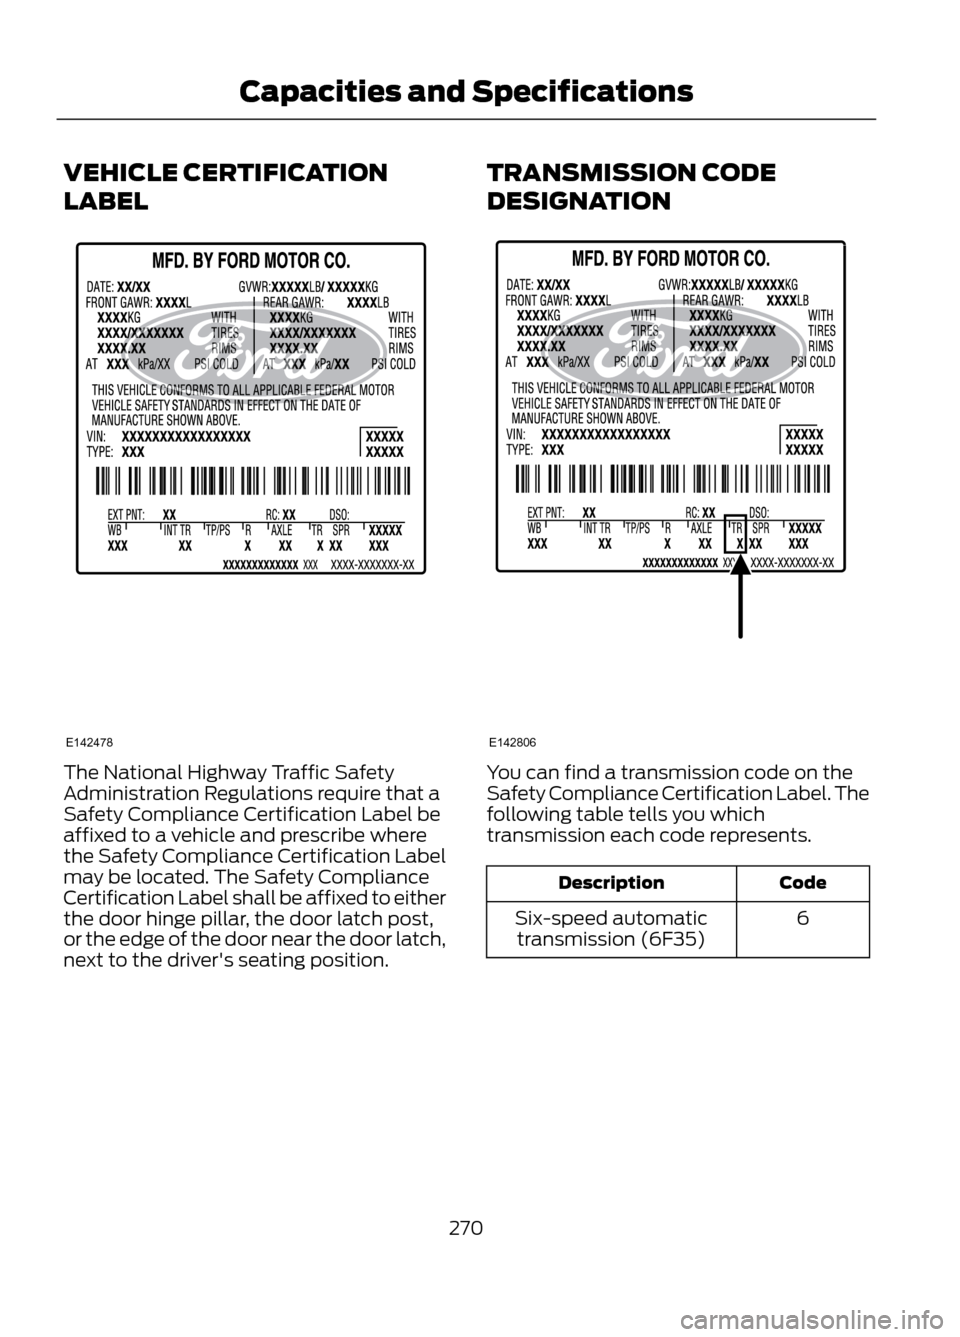
The National Highway Traffic Safety
Administration Regulations require that a
Safety Compliance Certification Label be
affixed to a vehicle and prescribe where
the Safety Compliance Certification Label
may be located. The Safety Compliance
Certification Label shall be affixed to either
the door hinge pillar, the door latch post,
or the edge of the door near the door latch,
next to the driver's seating position.TRANSMISSION CODE
DESIGNATIONYou can find a transmission code on the
Safety Compliance Certification Label. The
following table tells you which
transmission each code represents.
Code
Description
6
Six-speed automatic
transmission (6F35)
270
Capacities and Specifications
E142478
E142806