tow FORD ESCAPE 2013 3.G Quick Reference Guide
[x] Cancel search | Manufacturer: FORD, Model Year: 2013, Model line: ESCAPE, Model: FORD ESCAPE 2013 3.GPages: 10, PDF Size: 1.96 MB
Page 3 of 10

Instrument Panel
1
2
3
4
5
8
6
7
45
9
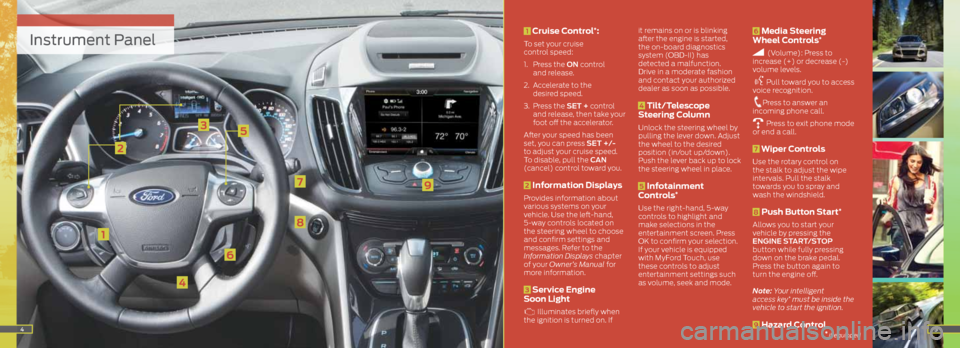
1 Cruise Control*:
To set your cruise
control speed:
1. Press the ON control
and release.
2. Accelerate to the
desired speed.
3. Press the SET + control
and release, then take your
foot off the accelerator.
After your speed has been
set, you can press SET +/-
to adjust your cruise speed.
To disable, pull the CAN
(cancel) control toward you.
2 Information Displays
Provides information about
various systems on your
vehicle. Use the left-hand,
5-way controls located on
the steering wheel to choose
and confirm settings and
messages. Refer to the
Information Displays chapter
of your Owner’s Manual for
more information.
3 Service Engine
Soon Light
Illuminates briefly when
the ignition is turned on. If it remains on or is blinking
after the engine is started,
the on-board diagnostics
system (OBD-II) has
detected a malfunction.
Drive in a moderate fashion
and contact your authorized
dealer as soon as possible.
4 Tilt/Telescope
Steering Column
Unlock the steering wheel by
pulling the lever down. Adjust
the wheel to the desired
position (in/out up/down).
Push the lever back up to lock
the steering wheel in place.
5 Infotainment
Controls*
Use the right-hand, 5-way
controls to highlight and
make selections in the
entertainment screen. Press
OK to confirm your selection.
If your vehicle is equipped
with MyFord Touch, use
these controls to adjust
entertainment settings such
as volume, seek and mode.
6 Media Steering
Wheel Controls*
(Volume): Press to
increase (+) or decrease (-)
volume levels.
Pull toward you to access
voice recognition.
Press to answer an
incoming phone call.
Press to exit phone mode
or end a call.
7 Wiper Controls
Use the rotary control on
the stalk to adjust the wipe
intervals. Pull the stalk
towards you to spray and
wash the windshield.
8 Push Button Start*
Allows you to start your
vehicle by pressing the
ENGINE START/STOP
button while fully pressing
down on the brake pedal.
Press the button again to
turn the engine off.
Note: Your intelligent
access key
* must be inside the
vehicle to start the ignition.
9 Hazard Control* if equipped
Page 5 of 10

89
Phone with SYNC
Make phone calls, send text
messages, view your phone book
and call history by pressing the
yellow corner of your touch screen.
Your phone connects you with many
other features and SYNC services:
• Connect to SYNC Services
for traffic, directions,
business searches and
information favorites.
• Connect to Operator Assist
to help locate a listing
or destination.
• Call for a Vehicle Health Report.
• Connect directly to a 911 operator.
• Transfer calls seamlessly from
SYNC to phone as you
get in or out of your vehicle.
Refer to the SYNC chapter
of your Owner’s Manual for
complete details.
Available voice-
activated navigation*
Get started with your navigation
system by pressing the upper-right
green corner. The available voice-
activated navigation system with
SiriusXM Traffic
™ and SiriusXM Travel
Link™ combines global positioning
system (GPS) technology with 3-D
mapping and provides turn-by-turn
navigation. You get continuously
updated directions, information on
weather, traffic delays and alternate
route suggestions, local gas prices,
movie listings, sports scores and
more. Refer to the MyFord Touch
chapter of your Owner’s Manual for
complete details.
Set a Destination
You can use the touch screen to set
a destination in many ways, like a
street address, a city center, a place
on the map or a point of interest
(POI). The easiest way is by voice.
1. Press the voice button
, then
when prompted say “Destination
street address”.
2. The system will ask you to say the
full address and will display an
example on-screen.
3. You can then speak the address
naturally, such as: “One two three
Main Street, Anytown”
You can also use the touch screen to
enter a destination and narrow your
choices by city or street as you type.
Choose from up to three different
types of routes:
• Fastest: Uses the fastest moving
roads possible.
• Shortest: Uses the shortest
distance possible.
• Eco (EcoRoute): Uses the most
fuel efficient route.
Before you get started:
• Pair your phone to SYNC before using
MyFord Touch (see the Getting started
with your SYNC system section for
instructions on how to do this).
• If you have the navigation SD card, make
sure that it is inserted into the media
port or your navigation will not work.
• The touch screen is sensitive, so make
sure you press the desired button
accurately and firmly.
• If you press the wrong icon and enter
the wrong screen you can always
press the home
icon to return to the
previous screen.
SYNC® with MyFord Touch®*
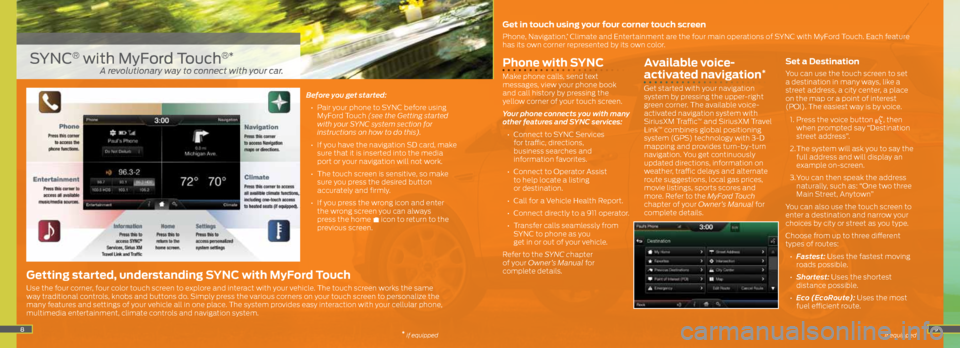
Get in touch using your four corner touch screen
Phone, Navigation,* Climate and Entertainment are the four main operations of SYNC with MyFord Touch. Each feature
has its own corner represented by its own color.
Getting started, understanding SYNC with MyFord Touch
Use the four corner, four color touch screen to explore and interact with your vehicle. The touch screen works the same
way traditional controls, knobs and buttons do. Simply press the various corners on your touch screen to personalize the
many features and settings of your vehicle all in one place. The system provides easy interaction with your cellular phone,
multimedia entertainment, climate controls and navigation system.
* if equipped
A revolutionary way to connect with your car.
* if equipped
Page 8 of 10

Rearview Camera*
This system provides a
visual display of the area
behind the vehicle. The
display automatically
appears in the touch screen
when the vehicle is in R
(Reverse) and uses green,
yellow and red guides to
alert you of your proximity
to objects.
MyKey®
MyKey allows you to
program certain driving
restrictions in order to
promote good driving
habits. You can program
things like: speed
restrictions, limited volume
levels and traction control
always on. For complete
information, refer to the
MyKey
chapter in your
Owner’s Manual.
SecuriCode™ Keyless
Entry Keypad*
Allows you to lock or unlock
the doors, recall memory
features and arm or disarm
the anti-theft alarm. The
keypad, located near the
driver’s window, is invisible
until touched and then it
lights up so you can see and
touch the buttons. To get
started, you will need your
five digit factory code found
on your owner’s wallet card
(located in the glove box).
Entering this code unlocks
the driver’s door. To lock
all of the doors, press and
hold 7•8 and 9•0 at the
same time. For complete
information, refer to the
SecuriCode Keyless Entry
Keypad section in the
Locks chapter of your
Owner’s Manual.
SelectShift
Automatic®
Transmission
To enable, move the
SelectShift gearshift lever
from D (Drive) to S (Sport).
In (S) Sport mode, a
unique downshift schedule
is utilized to keep the
transmission in lower gears
for enhanced performance
and more aggressive engine
braking. When the vehicle is
in (S) Sport mode, manual
gear selection is enabled
by using the thumb toggle
on the side of the gearshift
lever. Press (+) to upshift,
press (–) to downshift.
Return the gearshift lever
to (D) Drive when manual
control is no longer desired.
Blind Spot Information
System (BLIS ®) with
Cross Traffic Alert (CTA)*
BLIS uses radar sensors
to help you determine if a
vehicle may be in your blind
spot zone. The CTA feature
alerts you if a car is coming
toward you when you are
backing out of a parking
space. BLIS and CTA will
display a yellow indicator
light in your exterior mirrors
and the CTA will also sound
tones and display messages
to warn you from which
direction vehicles are
approaching. Refer to
the Driving Aids chapter in
your Owner’s Manual for
more information.
14
Function
* if equipped
Function continued
* if equipped
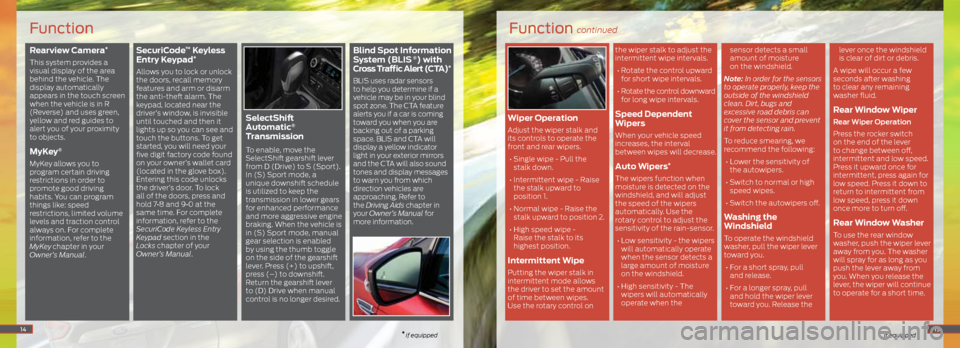
Wiper Operation
Adjust the wiper stalk and
its controls to operate the
front and rear wipers.
• Single wipe - Pull the
stalk down.
• Intermittent wipe - Raise
the stalk upward to
position 1.
• Normal wipe - Raise the
stalk upward to position 2.
• High speed wipe -
Raise the stalk to its
highest position.
Intermittent Wipe
Putting the wiper stalk in
intermittent mode allows
the driver to set the amount
of time between wipes.
Use the rotary control on the wiper stalk to adjust the
intermittent wipe intervals.
• Rotate the control upward
for short wipe intervals.
• Rotate the control downward
for long wipe intervals.
Speed Dependent
Wipers
When your vehicle speed
increases, the interval
between wipes will decrease.
Auto Wipers*
The wipers function when
moisture is detected on the
windshield, and will adjust
the speed of the wipers
automatically. Use the
rotary control to adjust the
sensitivity of the rain-sensor.
• Low sensitivity - the wipers
will automatically operate
when the sensor detects a
large amount of moisture
on the windshield.
• High sensitivity - The
wipers will automatically
operate when the sensor detects a small
amount of moisture
on the windshield.
Note: In order for the sensors
to operate properly, keep the
outside of the windshield
clean. Dirt, bugs and
excessive road debris can
cover the sensor and prevent
it from detecting rain.
To reduce smearing, we
recommend the following: • Lower the sensitivity of
the autowipers.
• Switch to normal or high
speed wipes.
• Switch the autowipers off.
Washing the
Windshield
To operate the windshield
washer, pull the wiper lever
toward you. • For a short spray, pull
and release.
• For a longer spray, pull
and hold the wiper lever
toward you. Release the lever once the windshield
is clear of dirt or debris.
A wipe will occur a few
seconds after washing
to clear any remaining
washer fluid.
Rear Window Wiper
Rear Wiper Operation
Press the rocker switch
on the end of the lever
to change between off,
intermittent and low speed.
Press it upward once for
intermittent, press again for
low speed. Press it down to
return to intermittent from
low speed, press it down
once more to turn off.
Rear Window Washer
To use the rear window
washer, push the wiper lever
away from you. The washer
will spray for as long as you
push the lever away from
you. When you release the
lever, the wiper will continue
to operate for a short time.
15
Page 9 of 10

Manual Liftgate
Note: The liftgate will only operate with the vehicle
in P (Park).
To open the liftgate:
1. Unlock all the vehicle doors.
2. Press the button located inside the liftgate pull
cup handle to unlatch the liftgate.
3. Pull on the outside handle to raise
the liftgate.
Power Liftgate*
Open or close the liftgate with your keyfob by pressing the button twice within three seconds. A chime will sound
when the liftgate is activated. You can also open the
liftgate from inside the vehicle by pressing the
button
on the instrument panel. To open with the outside
liftgate button:
1. Unlock the liftgate with
the keyfob or power
door control. If the
intelligent access key
*
is within 3 feet (1 m) of
the liftgate, the liftgate
will unlock when you
press the liftgate
release button.
2. Press the button located
in the top of the liftgate
pull-cup handle.
3. Allow the power system
to open the liftgate after
pressing the control.
4. To close with the control
on the liftgate, press and
release the button. Obstacle Detection
If the liftgate detects a
problem at any point
during the open or close
request, indicator chimes
will sound and the liftgate
will stop.
The liftgate will not power
open/close when:
• An object has been
detected in the opening/
closing path.
• The 12 volt battery does
not have enough charge
to power the liftgate.
• The vehicle is traveling
over 3 mph/ 5 (km/h).
Note: Entering the vehicle
while the liftgate is closing
could cause the vehicle
to bounce and activate
obstacle detection. Setting the Liftgate
Open Height
Once the power liftgate is
opened, it can be manually
moved to a desired height.
If a lower height than the
fully-opened position has
been programmed, the
liftgate can be fully opened
by manually pushing
it upward. The liftgate can be
programmed to open to a
desired height. To program
the liftgate open height:
1. Open the liftgate.
2. Manually move
the liftgate to the
desired height.
3. Press and hold the
control button on the
liftgate until a chime
is heard, indicating
the new height has
been programmed.
The new open liftgate
height will now be recalled
every time the liftgate
is opened. To change
the programmed height,
repeat the process above.
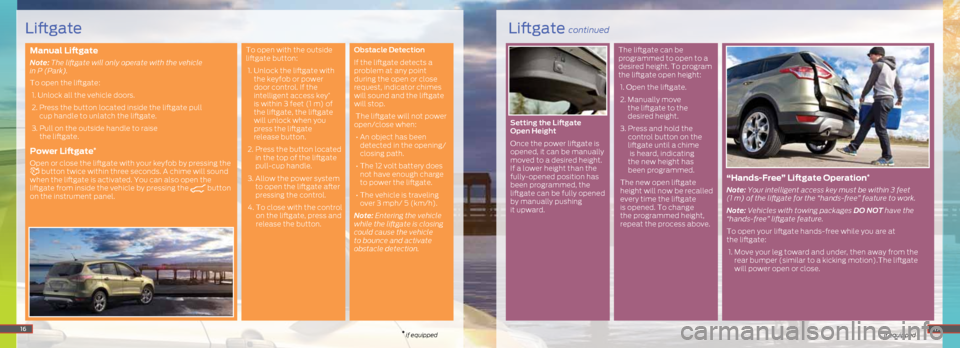
“ Hands-Free” Liftgate Operation*
Note: Your intelligent access key must be within 3 feet
(1 m) of the liftgate for the “hands-free” feature to work.
Note: Vehicles with towing packages DO NOT have the
“hands-free” liftgate feature.
To open your liftgate hands-free while you are at
the liftgate:
1. Move your leg toward and under, then away from the
rear bumper (similar to a kicking motion).The liftgate
will power open or close.
16* if equipped* if equipped17
Liftgate continuedLiftgate