tires FORD ESCAPE 2014 3.G Owners Manual
[x] Cancel search | Manufacturer: FORD, Model Year: 2014, Model line: ESCAPE, Model: FORD ESCAPE 2014 3.GPages: 428, PDF Size: 16.6 MB
Page 7 of 428
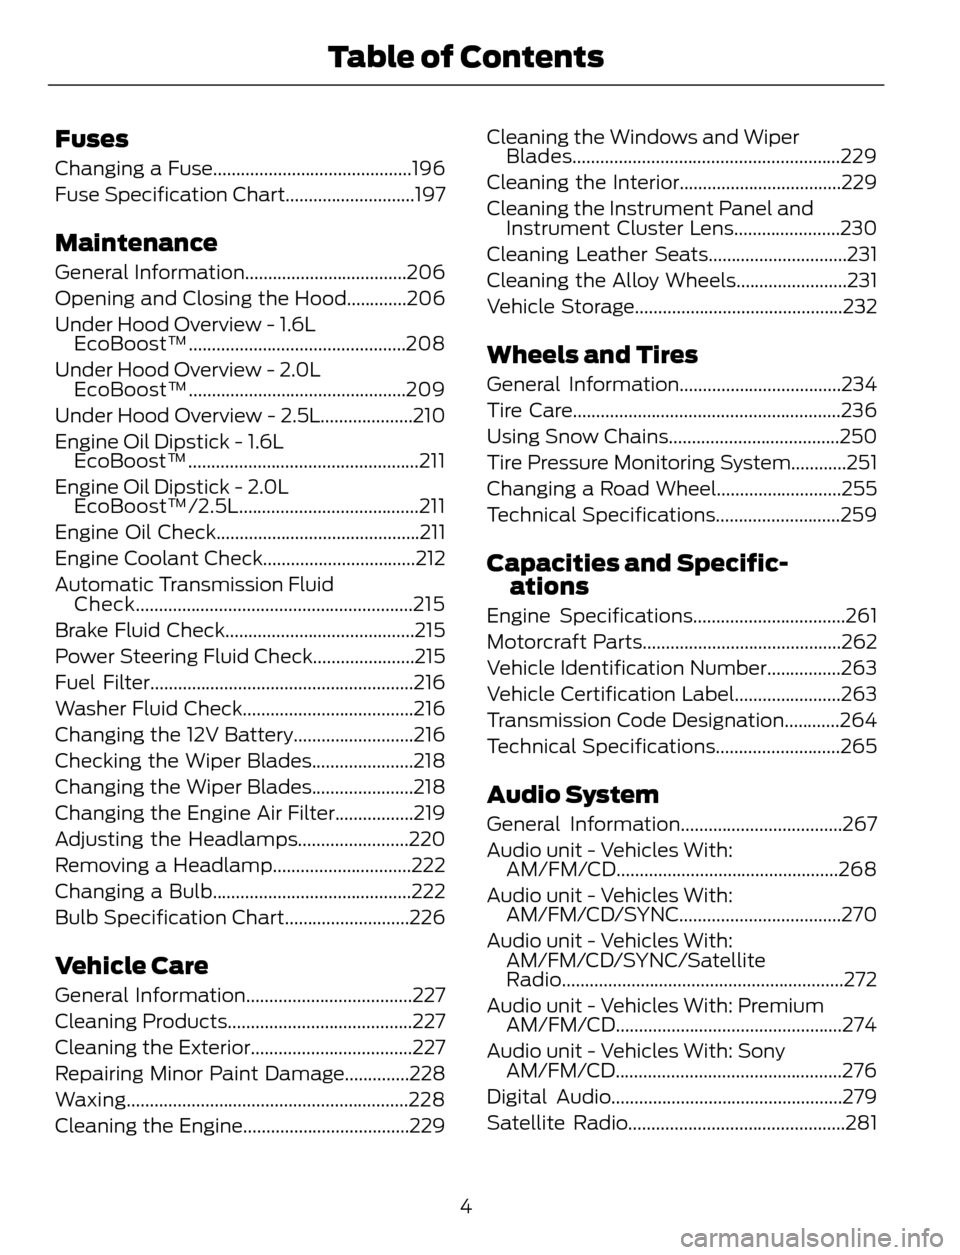
Fuses
Changing a Fuse...........................................196
Fuse Specification Chart............................197
Maintenance
General Information...................................206
Opening and Closing the Hood.............206
Under Hood Overview - 1.6L
EcoBoost™...............................................208
Under Hood Overview - 2.0L
EcoBoost™...............................................209
Under Hood Overview - 2.5L....................210
Engine Oil Dipstick - 1.6L
EcoBoost™..................................................211
Engine Oil Dipstick - 2.0L
EcoBoost™/2.5L.......................................211
Engine Oil Check............................................211
Engine Coolant Check.................................212
Automatic Transmission Fluid
Check............................................................215
Brake Fluid Check.........................................215
Power Steering Fluid Check......................215
Fuel Filter.........................................................216
Washer Fluid Check.....................................216
Changing the 12V Battery..........................216
Checking the Wiper Blades......................218
Changing the Wiper Blades......................218
Changing the Engine Air Filter.................219
Adjusting the Headlamps........................220
Removing a Headlamp..............................222
Changing a Bulb...........................................222
Bulb Specification Chart...........................226
Vehicle Care
General Information....................................227
Cleaning Products........................................227
Cleaning the Exterior...................................227
Repairing Minor Paint Damage..............228
Waxing.............................................................228
Cleaning the Engine....................................229Cleaning the Windows and Wiper
Blades..........................................................229
Cleaning the Interior...................................229
Cleaning the Instrument Panel and
Instrument Cluster Lens.......................230
Cleaning Leather Seats..............................231
Cleaning the Alloy Wheels........................231
Vehicle Storage.............................................232
Wheels and Tires
General Information...................................234
Tire Care..........................................................236
Using Snow Chains.....................................250
Tire Pressure Monitoring System............251
Changing a Road Wheel...........................255
Technical Specifications...........................259
Capacities and Specific-
ations
Engine Specifications.................................261
Motorcraft Parts...........................................262
Vehicle Identification Number................263
Vehicle Certification Label.......................263
Transmission Code Designation............264
Technical Specifications...........................265
Audio System
General Information...................................267
Audio unit - Vehicles With:
AM/FM/CD................................................268
Audio unit - Vehicles With:
AM/FM/CD/SYNC...................................270
Audio unit - Vehicles With:
AM/FM/CD/SYNC/Satellite
Radio.............................................................272
Audio unit - Vehicles With: Premium
AM/FM/CD.................................................274
Audio unit - Vehicles With: Sony
AM/FM/CD.................................................276
Digital Audio..................................................279
Satellite Radio...............................................281
4
Table of Contents
Page 103 of 428
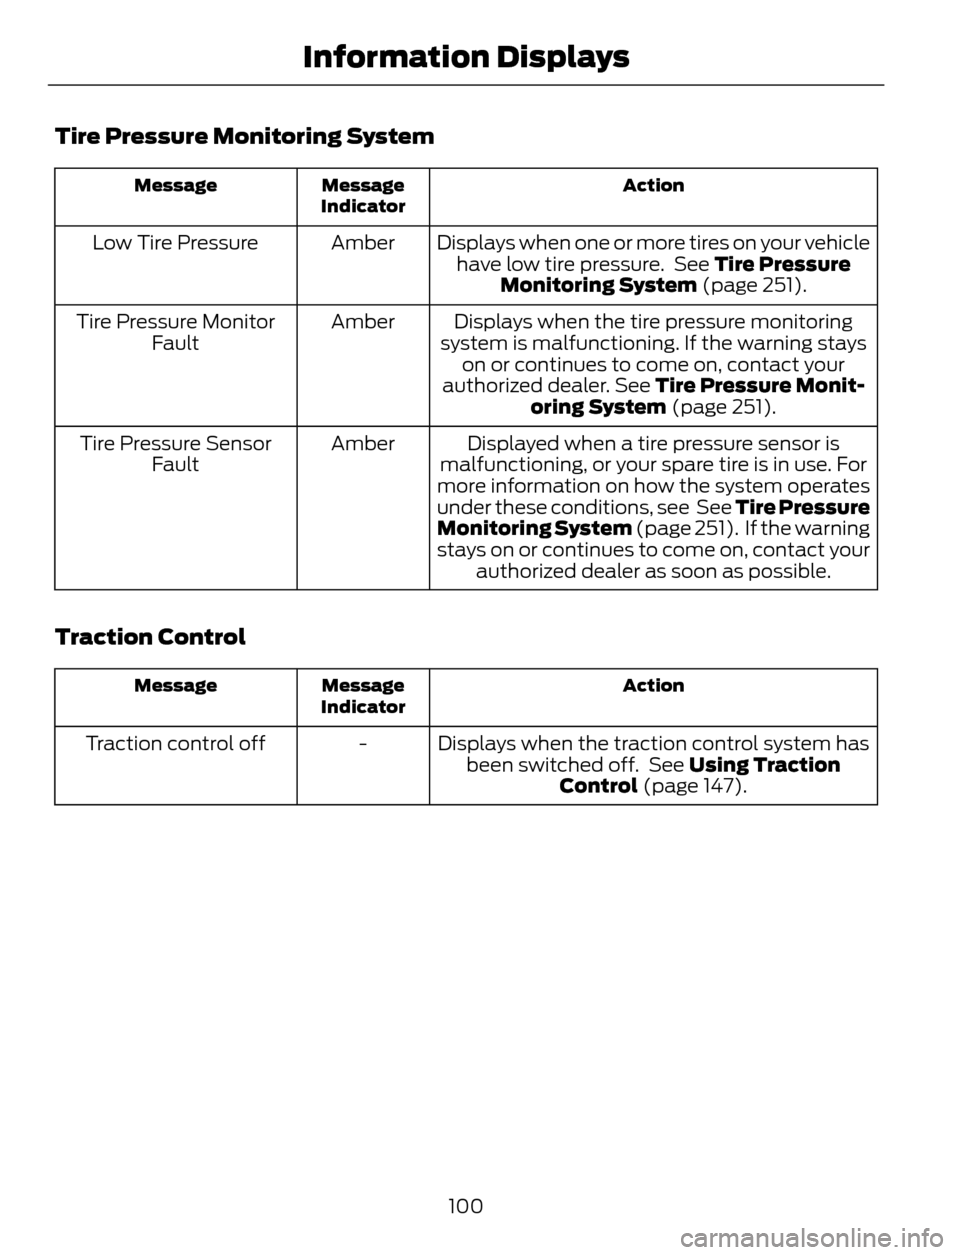
Tire Pressure Monitoring System
Action Message
Indicator Message
Displays when one or more tires on your vehicle
have low tire pressure. See Tire Pressure
Monitoring System (page 251). Amber Low Tire Pressure
Displays when the tire pressure monitoring
system is malfunctioning. If the warning stays
on or continues to come on, contact your
authorized dealer. See Tire Pressure Monit-
oring System (page 251). Amber Tire Pressure Monitor
Fault
Displayed when a tire pressure sensor is
malfunctioning, or your spare tire is in use. For
more information on how the system operates
under these conditions, see See Tire Pressure
Monitoring System (page 251). If the warning
stays on or continues to come on, contact your
authorized dealer as soon as possible. Amber Tire Pressure Sensor
Fault
Traction Control
Action Message
Indicator Message
Displays when the traction control system has
been switched off. See Using Traction
Control (page 147). - Traction control off
100
Information Displays
Page 141 of 428
E142627
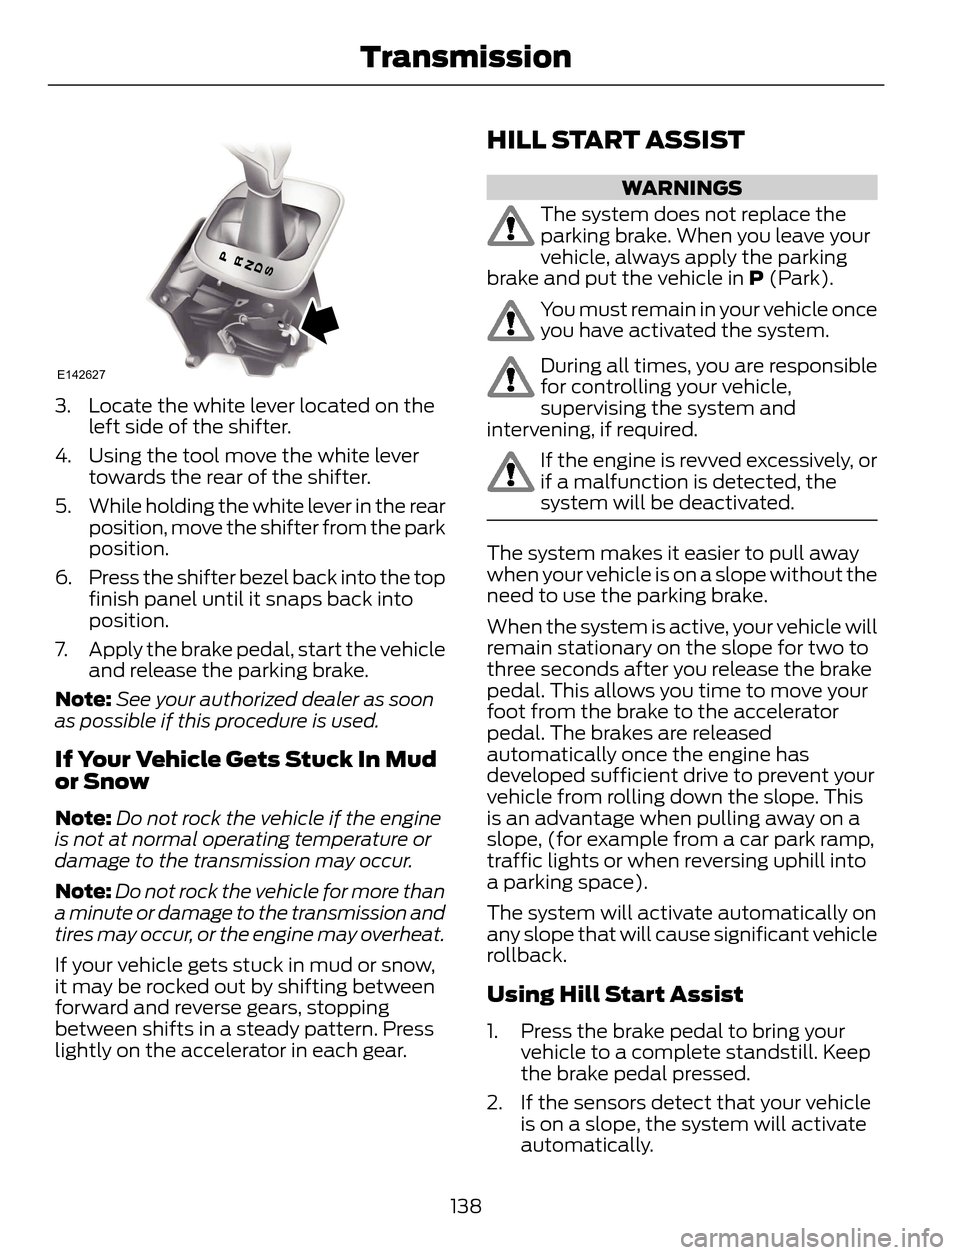
3. Locate the white lever located on the
left side of the shifter.
4. Using the tool move the white lever
towards the rear of the shifter.
5. While holding the white lever in the rear
position, move the shifter from the park
position.
6. Press the shifter bezel back into the top
finish panel until it snaps back into
position.
7. Apply the brake pedal, start the vehicle
and release the parking brake.
Note:See your authorized dealer as soon
as possible if this procedure is used.
If Your Vehicle Gets Stuck In Mud
or Snow
Note:Do not rock the vehicle if the engine
is not at normal operating temperature or
damage to the transmission may occur.
Note:Do not rock the vehicle for more than
a minute or damage to the transmission and
tires may occur, or the engine may overheat.
If your vehicle gets stuck in mud or snow,
it may be rocked out by shifting between
forward and reverse gears, stopping
between shifts in a steady pattern. Press
lightly on the accelerator in each gear.
HILL START ASSIST
WARNINGS
The system does not replace the
parking brake. When you leave your
vehicle, always apply the parking
brake and put the vehicle in P (Park).
You must remain in your vehicle once
you have activated the system.
During all times, you are responsible
for controlling your vehicle,
supervising the system and
intervening, if required.
If the engine is revved excessively, or
if a malfunction is detected, the
system will be deactivated.
The system makes it easier to pull away
when your vehicle is on a slope without the
need to use the parking brake.
When the system is active, your vehicle will
remain stationary on the slope for two to
three seconds after you release the brake
pedal. This allows you time to move your
foot from the brake to the accelerator
pedal. The brakes are released
automatically once the engine has
developed sufficient drive to prevent your
vehicle from rolling down the slope. This
is an advantage when pulling away on a
slope, (for example from a car park ramp,
traffic lights or when reversing uphill into
a parking space).
The system will activate automatically on
any slope that will cause significant vehicle
rollback.
Using Hill Start Assist
1. Press the brake pedal to bring your
vehicle to a complete standstill. Keep
the brake pedal pressed.
2. If the sensors detect that your vehicle
is on a slope, the system will activate
automatically.
138
Transmission
Page 144 of 428
When driving at slow speeds off road under
high load conditions, use a low gear when
possible. Low gear operation will maximize
the engine and transmission cooling
capability.
Under severe operating conditions, the air
conditioning may cycle on and off to
prevent the engine from overheating.
Basic Operating Principles
• Drive slower in strong crosswinds which
can affect the normal steering
characteristics of your vehicle.
• When driving your vehicle on surfaces
made slippery by loose sand, water,
gravel, snow or ice proceed with care.
If Your Vehicle leaves the Road
If your vehicle leaves the road, reduce your
vehicle speed and avoid severe braking.
When your vehicle speed has been reduced
ease your vehicle back onto the road. Do
not turn the steering wheel sharply while
returning your vehicle to the road.
It may be safer to stay on the shoulder of
the road and slow down gradually before
returning to the road. You may lose control
if you do not slow down or if you turn the
steering wheel too sharply or abruptly.
It may be less risky to strike small objects,
such as freeway reflectors, with minor
damage to your vehicle rather than
attempt a sudden return to the road which
could cause your vehicle to slide sideways
out of control or roll over. Remember, your
safety and the safety of others should be
your primary concern.
Emergency Maneuvers
In an unavoidable emergency situation
where a sudden sharp turn must be made,
remember to avoid over-driving your
vehicle (i.e. turn the steering wheel only as
rapidly and as far as required to avoid the
emergency). Excessive steering can resultin loss of vehicle control. Apply smooth
pressure to the accelerator pedal or brake
pedal when changes in vehicle speed are
required. Avoid abrupt steering,
acceleration and braking. This could result
in an increased risk of vehicle roll over, loss
of vehicle control and personal injury. Use
all available road surface to bring your
vehicle to a safe direction of travel.
In the event of an emergency stop, avoid
skidding the tires and do not attempt any
sharp steering wheel movements.
If your vehicle goes from one type of
surface to another (i.e. from concrete to
gravel) there will be a change in the way
your vehicle responds to a maneuver (i.e.
steering, acceleration or braking).
Sand
When driving over sand, try to keep all four
wheels on the most solid area of the trail.
Avoid reducing the tire pressures but shift
to a lower gear and drive steadily through
the terrain. Apply the accelerator slowly
and avoid excessive wheel slip.
Do not drive your vehicle in deep sand for
an extended period of time. This will cause
the system to overheat. A message will be
displayed in the information display. See
Information Messages (page 91).
To resume operation, switch the ignition
off and allow the system to cool down for
a minimum of 15 minutes. After the system
has cooled down, a message will be
displayed briefly in the information display.
See Information Messages (page 91).
When driving at slow speeds in deep sand
under high outside temperatures, use a low
gear when possible. Low gear operation
will maximize the engine and transmission
cooling capability.
141
Four-Wheel Drive (If Equipped)
Page 145 of 428
Avoid driving at excessive speeds, this
causes vehicle momentum to work against
you and your vehicle could become stuck
to the point that assistance may be
required from another vehicle. Remember,
you may be able to back out the way you
came if you proceed with caution.
Mud and Water
Mud
Be cautious of sudden changes in vehicle
speed or direction when you are driving in
mud. Even four-wheel drive vehicles can
lose traction in slick mud. If your vehicle
does slide, steer in the direction of the slide
until you regain control of your vehicle.
After driving through mud, clean off residue
stuck to rotating driveshafts and tires.
Excess mud stuck on tires and rotating
driveshafts can cause an imbalance that
could damage drive components.
Wa t e r
If you must drive through high water, drive
slowly. Traction or brake capability may
be limited.
When driving through water, determine the
depth and avoid water higher than the
bottom of the wheel rims. If the ignition
system gets wet, your vehicle may stall.
Once through water, always try the brakes.
Wet brakes do not stop your vehicle as
effectively as dry brakes. Drying can be
improved by applying light pressure to the
brake pedal while moving slowly.
Note:Driving through deep water may
damage the transmission. If the front or rear
axle is submerged in water, the axle
lubricant and power transfer unit lubricant
should be checked and changed if
necessary.Driving on Hilly or Sloping Terrain
Although natural obstacles may make it
necessary to travel diagonally up or down
a hill or steep incline, you should always
try to drive straight up or straight down.
Note:Avoid turning on steep slopes or hills.
A danger lies in losing traction, slipping
sideways and possible vehicle roll over.
Whenever driving on a hill, determine
beforehand the route you will use. Do not
drive over the crest of a hill without seeing
what conditions are on the other side. Do
not drive in reverse over a hill without the
aid of an observer.
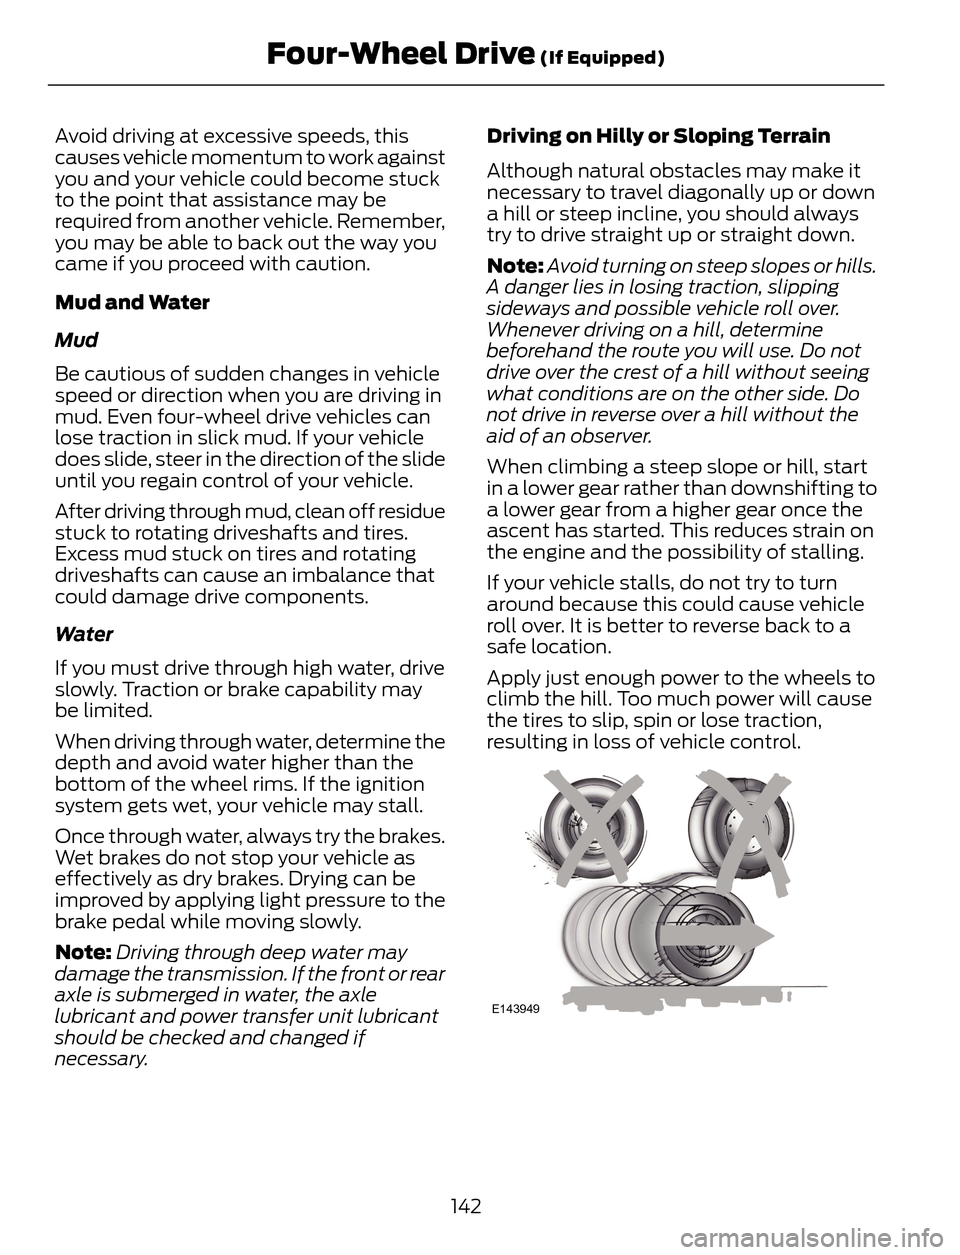
When climbing a steep slope or hill, start
in a lower gear rather than downshifting to
a lower gear from a higher gear once the
ascent has started. This reduces strain on
the engine and the possibility of stalling.
If your vehicle stalls, do not try to turn
around because this could cause vehicle
roll over. It is better to reverse back to a
safe location.
Apply just enough power to the wheels to
climb the hill. Too much power will cause
the tires to slip, spin or lose traction,
resulting in loss of vehicle control.
E143949
142
Four-Wheel Drive (If Equipped)
Page 146 of 428
Descend a hill in the same gear you would
use to climb up the hill to avoid excessive
brake application and brake overheating.
Do not descend in neutral. Disengage
overdrive or move the transmission
selector lever to a lower gear. When
descending a steep hill, avoid sudden hard
braking as you could lose control. The front
wheels have to be turning in order to steer
your vehicle.
Your vehicle has anti-lock brakes, therefore
apply the brakes steadily. Do not pump the
brake pedal.
Driving on Snow and Ice
WARNING
If you are driving in slippery
conditions that require tire chains or
cables, then it is critical that you drive
cautiously. Keep speeds down, allow for
longer stopping distances and avoid
aggressive steering to reduce the chances
of a loss of vehicle control which can lead
to serious injury or death. If the rear end of
your vehicle slides while cornering, steer in
the direction of the slide until you regain
control of your vehicle.
Note:Excessive tire slippage can cause
transmission damage.
Four-wheel drive vehicles have advantages
over two-wheel drive vehicles in snow and
ice but can skid like any other vehicle.
Should you start to slide while driving on
snowy or icy roads, turn the steering wheel
in the direction of the slide until you regain
control.
Avoid sudden applications of power and
quick changes of direction on snow and
ice. Apply the accelerator slowly and
steadily when starting from a full stop.Avoid sudden braking. Although a
four-wheel drive vehicle may accelerate
better than a two-wheel drive vehicle in
snow and ice, it will not stop any faster as
braking occurs at all four wheels. Do not
become overconfident as to road
conditions.
Make sure you allow sufficient distance
between you and other vehicles for
stopping. Drive slower than usual and
consider using one of the lower gears. In
emergency stopping situations, apply the
brake steadily. As your vehicle has a four
wheel anti-lock brake system, do not pump
the brake pedal. See Hints on Driving
With Anti-Lock Brakes (page 145).
If Your Vehicle Gets Stuck In Mud or
Snow
If your vehicle gets stuck in mud or snow,
it may be rocked out by shifting between
forward and reverse gears, stopping
between shifts in a steady pattern. Press
lightly on the accelerator in each gear.
Note:Do not rock your vehicle if the engine
is not at normal operating temperature,
damage to the transmission may occur.
Note:Do not rock your vehicle for more
than a minute, damage to the transmission
and tires may occur or the engine may
overheat.
Maintenance and Modifications
The suspension and steering systems on
your vehicle have been designed and
tested to provide predictable performance
whether loaded or empty. For this reason,
we strongly recommend that you do not
make modifications such as adding or
removing parts (i.e. lift kits or stabilizer
bars) or by using replacement parts not
equivalent to the original factory
equipment.
143
Four-Wheel Drive (If Equipped)
Page 151 of 428
PRINCIPLE OF OPERATION
WARNINGS
Vehicle modifications involving
braking system, aftermarket roof
racks, suspension, steering system,
tire construction and wheel and tire size
may change the handling characteristics
of your vehicle and may adversely affect
the performance of the AdvanceTrac
system. In addition, installing any stereo
loudspeakers may interfere with and
adversely affect the AdvanceTrac system.
Install any aftermarket stereo loudspeaker
as far as possible from the front center
console, the tunnel, and the front seats in
order to minimize the risk of interfering with
the AdvanceTrac sensors. Reducing the
effectiveness of the AdvanceTrac system
could lead to an increased risk of loss of
vehicle control, vehicle rollover, personal
injury and death.
Remember that even advanced
technology cannot defy the laws of
physics. It’s always possible to lose
control of a vehicle due to inappropriate
driver input for the conditions. Aggressive
driving on any road condition can cause
you to lose control of your vehicle
increasing the risk of personal injury or
property damage. Activation of the
AdvanceTrac system is an indication that
at least some of the tires have exceeded
their ability to grip the road; this could
reduce the operator’s ability to control the
vehicle potentially resulting in a loss of
vehicle control, vehicle rollover, personal
injury and death. If your AdvanceTrac
system activates, SLOW DOWN.
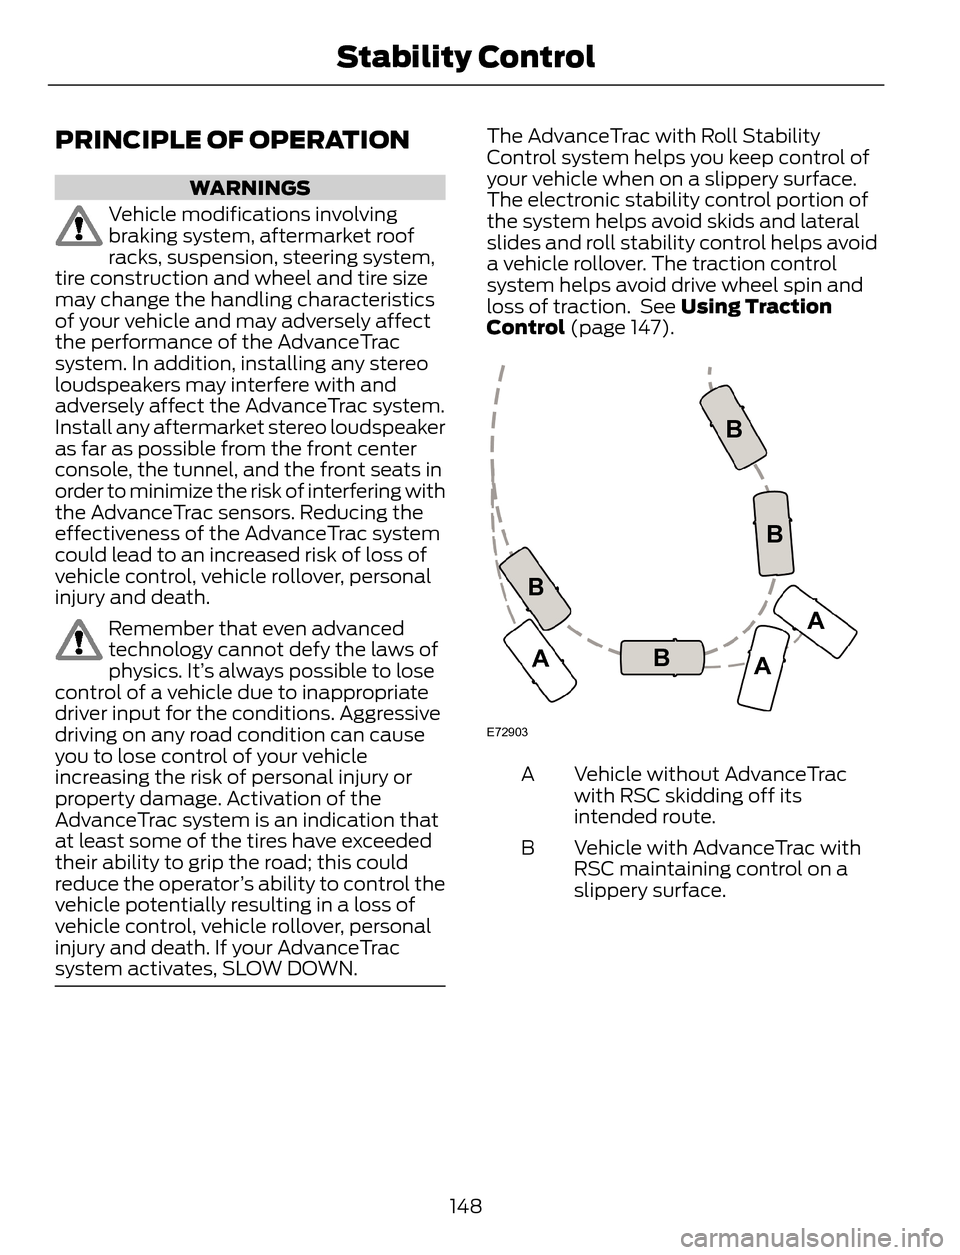
The AdvanceTrac with Roll Stability
Control system helps you keep control of
your vehicle when on a slippery surface.
The electronic stability control portion of
the system helps avoid skids and lateral
slides and roll stability control helps avoid
a vehicle rollover. The traction control
system helps avoid drive wheel spin and
loss of traction. See Using Traction
Control (page 147).
E72903
A
AA B
BB B
Vehicle without AdvanceTrac
with RSC skidding off its
intended route. A
Vehicle with AdvanceTrac with
RSC maintaining control on a
slippery surface. B
148
Stability Control
Page 158 of 428
If a problem occurs with the system, a
warning message is displayed, followed
by a chime. Occasional system messages
may occur in normal operation. Forrecurring or frequent system faults, contact
an authorized dealer to have your vehicle
serviced.
Troubleshooting the System
The system does not look for a space
The traction control system may be off
Any door (except the driver’s) may not be completely closed
The system does not offer a particular space
Something may be contacting the front bumper or side sensors
There is not enough room on both sides of the vehicle in order to park
There is not enough space for the parking maneuver on the opposite side of the parking
space
The vehicle is farther than 6.5 ft (2 m) from the parking space
The vehicle is closer than 16 in. (40 cm) from neighboring parked vehicles
The transmission is in R (Reverse); the vehicle must be moving forward to detect a
parking space
The system does not position the vehicle where I want in the space
The vehicle is rolling in the opposite direction of the transmission (i.e. rolling forward
when R [Reverse] is selected)
The transmission is in R (Reverse); the vehicle must be moving forward to detect a
parking space
An irregular curb along the parking space prevents the system from aligning the vehicle
properly
Vehicles or objects bordering the space may not be positioned correctly
The vehicle was pulled too far past the parking space. The system performs best when
you drive the same distance past the parking space
The tires may not be installed or maintained correctly (i.e. not inflated correctly, improper
size, or of different sizes)
A repair or alteration has changed detection capabilities
155
Parking Aids
Page 177 of 428
WARNINGS
Do not use replacement tires
with lower load carrying
capacities than the original tires
because they may lower the
vehicle’s GVWR and GAWR
limitations. Replacement tires
with a higher limit than the original
tires do not increase the GVWR
and GAWR limitations.
Exceeding any vehicle weight
rating limitation could result
in serious damage to the vehicle
and/or personal injury.
Steps for determining the
correct load limit:
1. Locate the statement "The
combined weight of occupants
and cargo should never exceed
XXX kg or XXX lb." on your
vehicle’s placard.
2. Determine the combined
weight of the driver and
passengers that will be riding
in your vehicle.
3. Subtract the combined weight
of the driver and passengers
from XXX kg or XXX lb.4. The resulting figure equals the
available amount of cargo and
luggage load capacity. For
example, if the “XXX” amount
equals 1,400 lb. and there will
be five 150 lb. passengers in
your vehicle, the amount of
available cargo and luggage
load capacity is 650 lb.
(1400-750 (5 x 150) = 650 lb.)
5. Determine the combined
weight of luggage and cargo
being loaded on the vehicle.
That weight may not safely
exceed the available cargo and
luggage load capacity
calculated in Step 4.
6. If your vehicle will be towing a
trailer, load from your trailer
will be transferred to your
vehicle. Consult this manual to
determine how this reduces the
available cargo and luggage
load capacity of your vehicle.
The following gives you a few
examples on how to calculate the
available amount of cargo and
luggage load capacity:
*Suppose your vehicle has a
1400-pound (635-kilogram) cargo
and luggage capacity. You decide
to go golfing. Is there enough load
capacity to carry you, four of your
friends and all the golf bags? You
and four friends average 220
pounds (99 kilograms) each and
the golf bags weigh approximately
30 pounds (13.5 kilograms) each.
The calculation would be: 1400 -
(5 x 220) - (5 x 30) = 1400 - 1100
174
Load Carrying
Page 179 of 428
TOWING A TRAILER
WARNINGS
Do not exceed the GVWR or
the GAWR specified on the
certification label.
Towing trailers beyond the
maximum recommended
gross trailer weight exceeds the
limit of the vehicle and could
result in engine damage,
transmission damage, structural
damage, loss of vehicle control,
vehicle rollover and personal
injury.
Your vehicle may have electrical
items, such as fuses or relays,
related to towing. See the Fuses
chapter.
Your vehicle's load capacity
designation is by weight, not by
volume, so you cannot necessarily
use all available space when
loading a vehicle.
Towing a trailer places an extra
load on your vehicle's engine,
transmission, axle, brakes, tires
and suspension. Inspect these
components periodically during,
and after, any towing operation.Load Placement
To help minimize how trailer
movement affects your vehicle
when driving:
• Load the heaviest items closest
to the trailer floor.
• Load the heaviest items
centered between the left and
right side trailer tires.
• Load the heaviest items above
the trailer axles or just slightly
forward toward the trailer
tongue. Do not allow the final
trailer tongue weight to go
above or below 10-15% of the
loaded trailer weight.
• Select a tow bar with the
correct rise or drop. When both
the loaded vehicle and trailer
are connected, the trailer frame
should be level, or slightly
angled down toward your
vehicle, when viewed from the
side.
When driving with a trailer or
payload, a slight takeoff vibration
or shudder may be present due to
the increased payload weight.
Additional information regarding
proper trailer loading and setting
your vehicle up for towing is
located in another chapter of this
manual. See Load Limit (page
168). You can also find the
information in the RV & Trailer
Towing Guide, available at an
authorized dealer.
176
Towing