headlamp FORD ESCAPE 2017 3.G User Guide
[x] Cancel search | Manufacturer: FORD, Model Year: 2017, Model line: ESCAPE, Model: FORD ESCAPE 2017 3.GPages: 486, PDF Size: 6.34 MB
Page 102 of 486
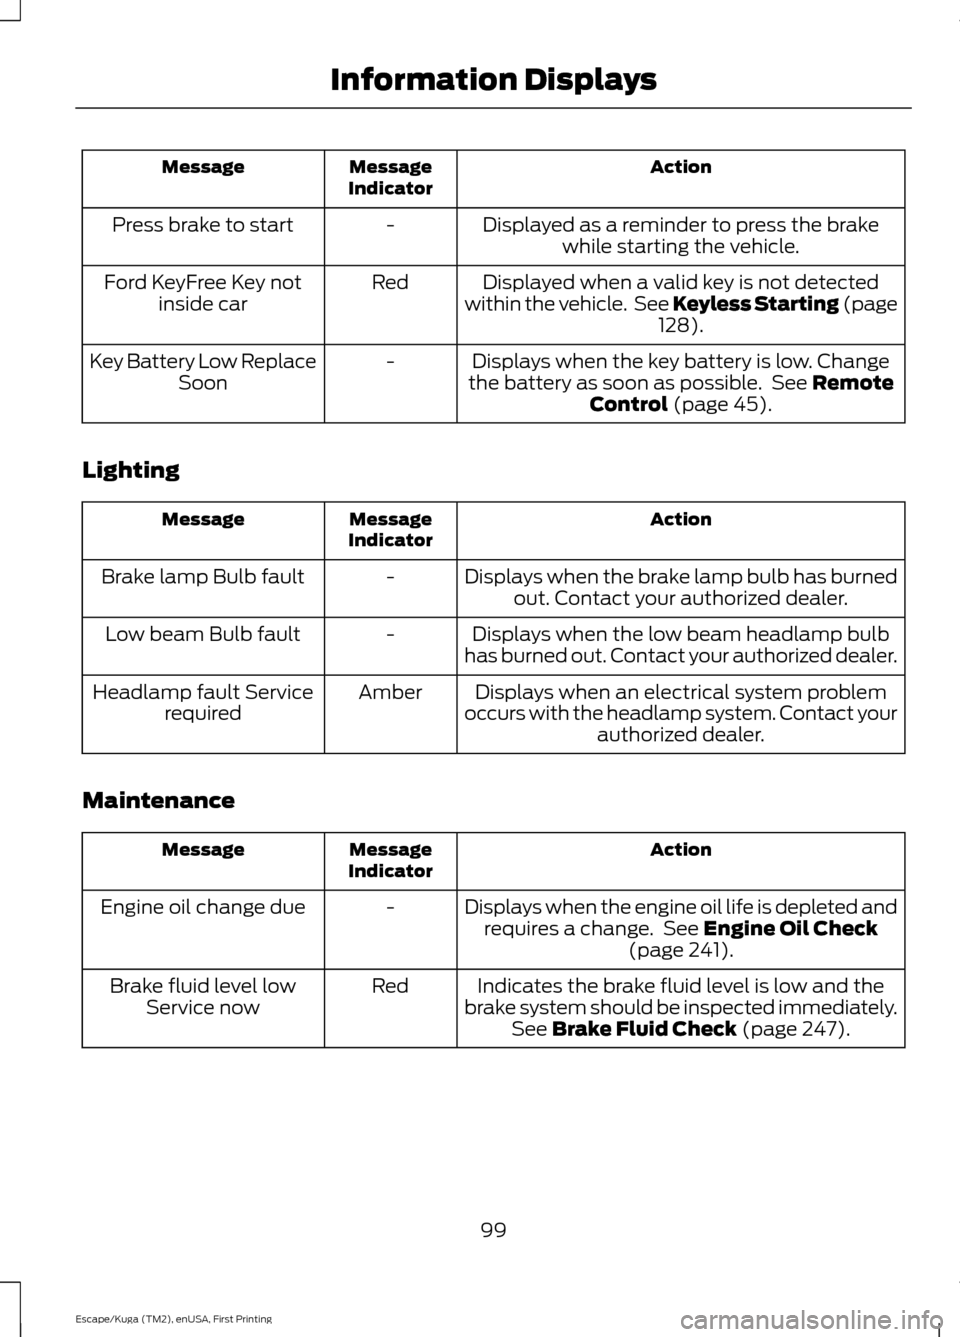
Action
Message
Indicator
Message
Displayed as a reminder to press the brakewhile starting the vehicle.
-
Press brake to start
Displayed when a valid key is not detected
within the vehicle. See Keyless Starting (page 128).
Red
Ford KeyFree Key not
inside car
Displays when the key battery is low. Change
the battery as soon as possible. See
Remote
Control (page 45).
-
Key Battery Low Replace
Soon
Lighting Action
Message
Indicator
Message
Displays when the brake lamp bulb has burnedout. Contact your authorized dealer.
-
Brake lamp Bulb fault
Displays when the low beam headlamp bulb
has burned out. Contact your authorized dealer.
-
Low beam Bulb fault
Displays when an electrical system problem
occurs with the headlamp system. Contact your authorized dealer.
Amber
Headlamp fault Service
required
Maintenance Action
Message
Indicator
Message
Displays when the engine oil life is depleted andrequires a change. See
Engine Oil Check
(page 241).
-
Engine oil change due
Indicates the brake fluid level is low and the
brake system should be inspected immediately. See
Brake Fluid Check (page 247).
Red
Brake fluid level low
Service now
99
Escape/Kuga (TM2), enUSA, First Printing Information Displays
Page 132 of 486
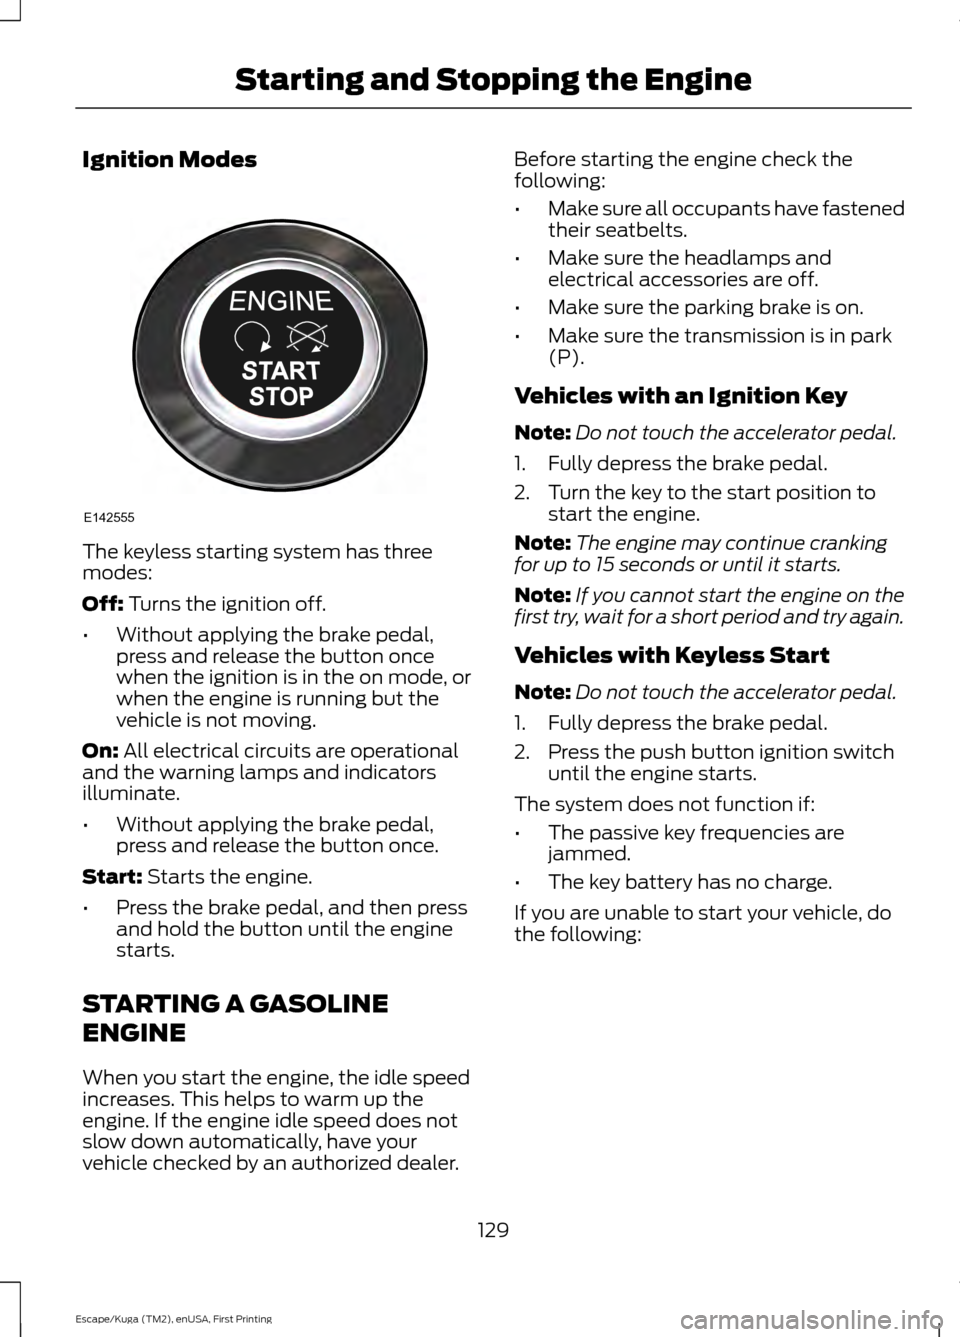
Ignition Modes
The keyless starting system has three
modes:
Off: Turns the ignition off.
• Without applying the brake pedal,
press and release the button once
when the ignition is in the on mode, or
when the engine is running but the
vehicle is not moving.
On:
All electrical circuits are operational
and the warning lamps and indicators
illuminate.
• Without applying the brake pedal,
press and release the button once.
Start:
Starts the engine.
• Press the brake pedal, and then press
and hold the button until the engine
starts.
STARTING A GASOLINE
ENGINE
When you start the engine, the idle speed
increases. This helps to warm up the
engine. If the engine idle speed does not
slow down automatically, have your
vehicle checked by an authorized dealer. Before starting the engine check the
following:
•
Make sure all occupants have fastened
their seatbelts.
• Make sure the headlamps and
electrical accessories are off.
• Make sure the parking brake is on.
• Make sure the transmission is in park
(P).
Vehicles with an Ignition Key
Note: Do not touch the accelerator pedal.
1. Fully depress the brake pedal.
2. Turn the key to the start position to start the engine.
Note: The engine may continue cranking
for up to 15 seconds or until it starts.
Note: If you cannot start the engine on the
first try, wait for a short period and try again.
Vehicles with Keyless Start
Note: Do not touch the accelerator pedal.
1. Fully depress the brake pedal.
2. Press the push button ignition switch until the engine starts.
The system does not function if:
• The passive key frequencies are
jammed.
• The key battery has no charge.
If you are unable to start your vehicle, do
the following:
129
Escape/Kuga (TM2), enUSA, First Printing Starting and Stopping the EngineE142555
Page 186 of 486
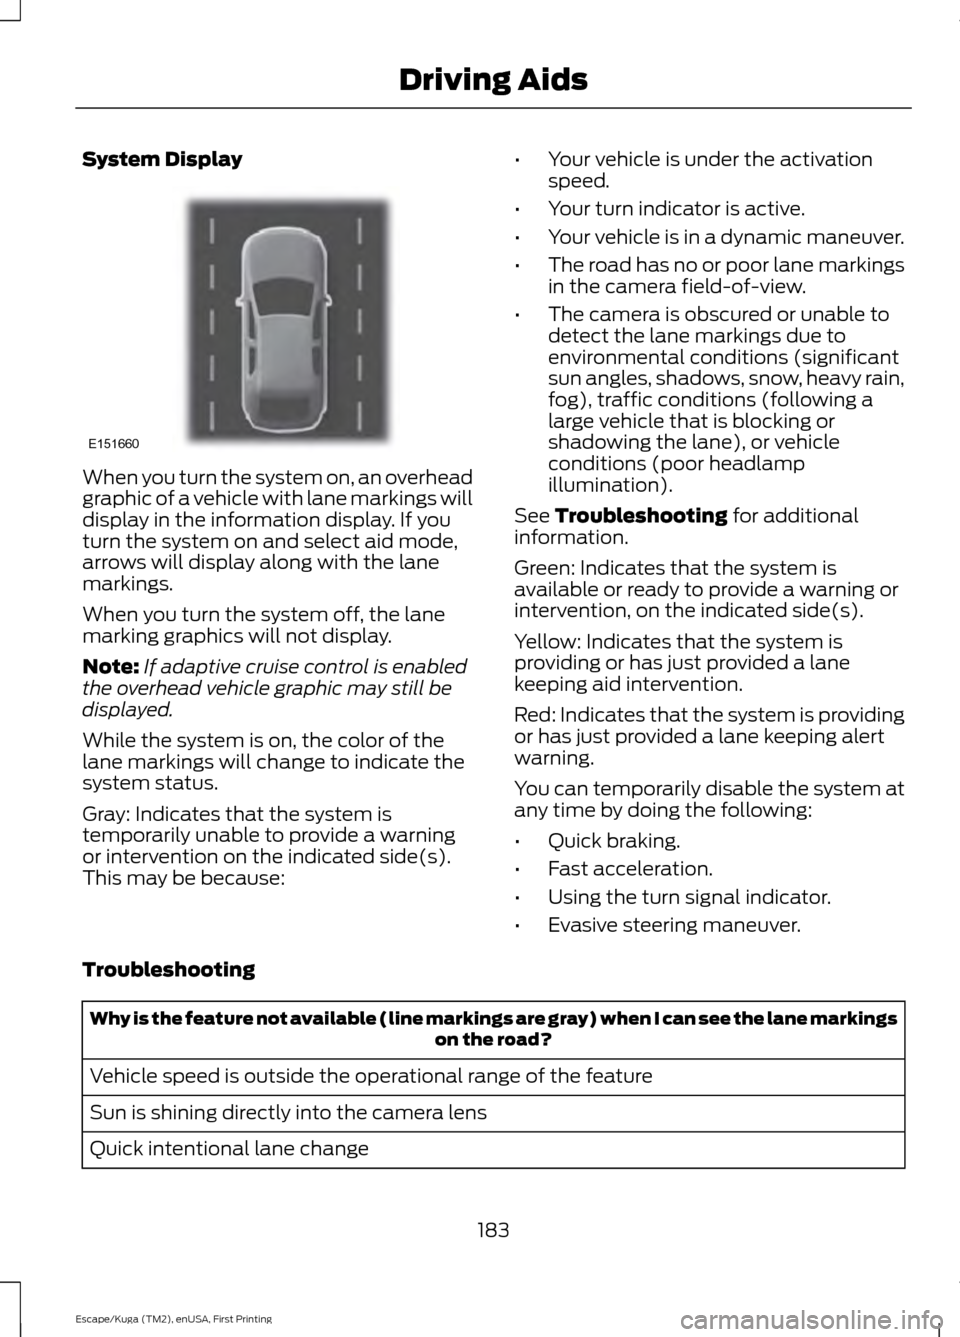
System Display
When you turn the system on, an overhead
graphic of a vehicle with lane markings will
display in the information display. If you
turn the system on and select aid mode,
arrows will display along with the lane
markings.
When you turn the system off, the lane
marking graphics will not display.
Note:
If adaptive cruise control is enabled
the overhead vehicle graphic may still be
displayed.
While the system is on, the color of the
lane markings will change to indicate the
system status.
Gray: Indicates that the system is
temporarily unable to provide a warning
or intervention on the indicated side(s).
This may be because: •
Your vehicle is under the activation
speed.
• Your turn indicator is active.
• Your vehicle is in a dynamic maneuver.
• The road has no or poor lane markings
in the camera field-of-view.
• The camera is obscured or unable to
detect the lane markings due to
environmental conditions (significant
sun angles, shadows, snow, heavy rain,
fog), traffic conditions (following a
large vehicle that is blocking or
shadowing the lane), or vehicle
conditions (poor headlamp
illumination).
See Troubleshooting for additional
information.
Green: Indicates that the system is
available or ready to provide a warning or
intervention, on the indicated side(s).
Yellow: Indicates that the system is
providing or has just provided a lane
keeping aid intervention.
Red: Indicates that the system is providing
or has just provided a lane keeping alert
warning.
You can temporarily disable the system at
any time by doing the following:
• Quick braking.
• Fast acceleration.
• Using the turn signal indicator.
• Evasive steering maneuver.
Troubleshooting Why is the feature not available (line markings are gray) when I can see the lane markings
on the road?
Vehicle speed is outside the operational range of the feature
Sun is shining directly into the camera lens
Quick intentional lane change
183
Escape/Kuga (TM2), enUSA, First Printing Driving AidsE151660
Page 198 of 486
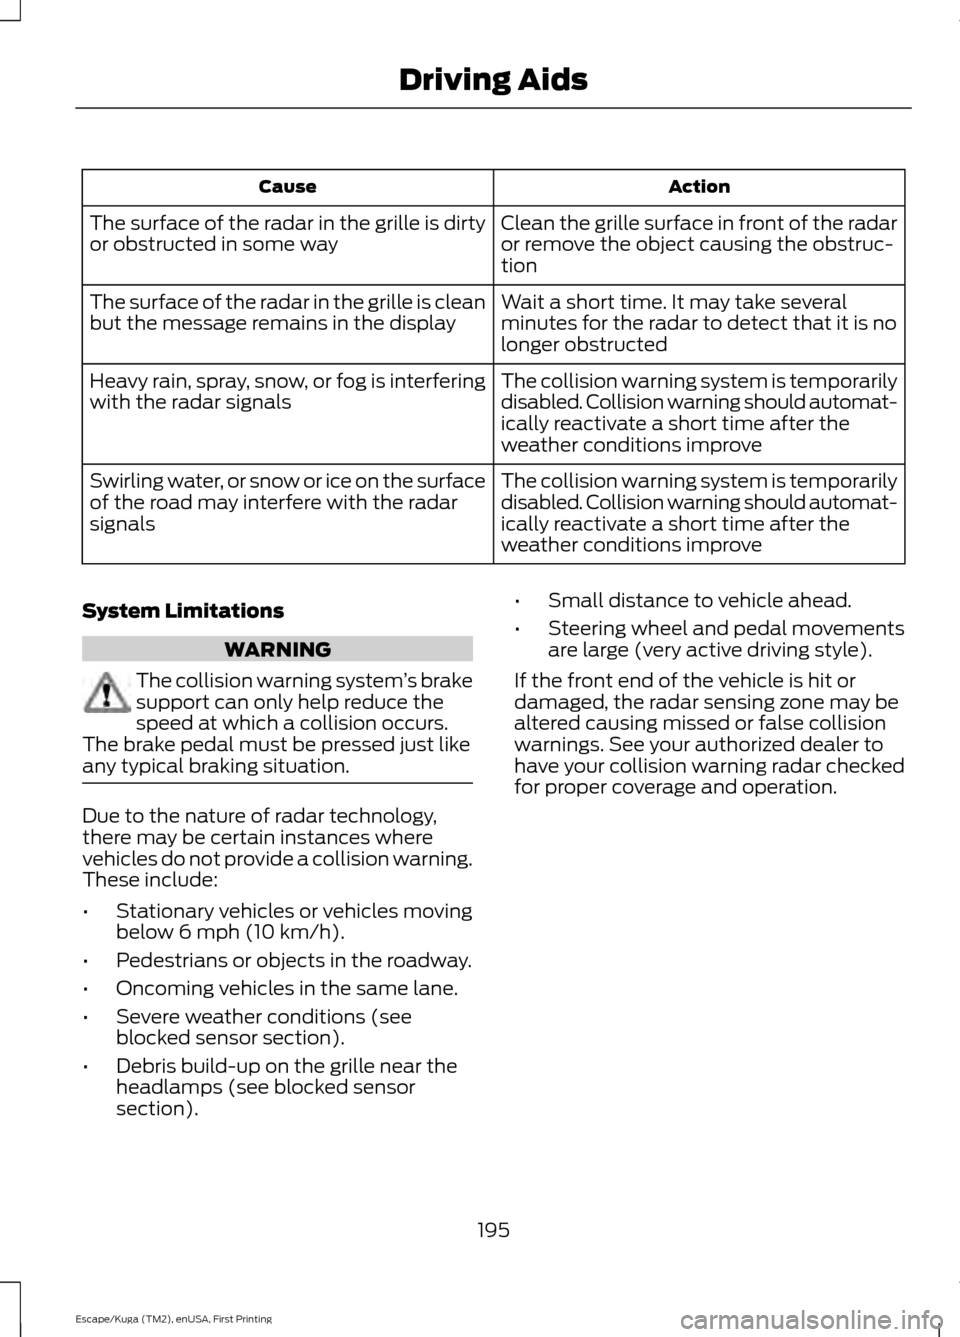
Action
Cause
Clean the grille surface in front of the radar
or remove the object causing the obstruc-
tion
The surface of the radar in the grille is dirty
or obstructed in some way
Wait a short time. It may take several
minutes for the radar to detect that it is no
longer obstructed
The surface of the radar in the grille is clean
but the message remains in the display
The collision warning system is temporarily
disabled. Collision warning should automat-
ically reactivate a short time after the
weather conditions improve
Heavy rain, spray, snow, or fog is interfering
with the radar signals
The collision warning system is temporarily
disabled. Collision warning should automat-
ically reactivate a short time after the
weather conditions improve
Swirling water, or snow or ice on the surface
of the road may interfere with the radar
signals
System Limitations WARNING
The collision warning system
’s brake
support can only help reduce the
speed at which a collision occurs.
The brake pedal must be pressed just like
any typical braking situation. Due to the nature of radar technology,
there may be certain instances where
vehicles do not provide a collision warning.
These include:
•
Stationary vehicles or vehicles moving
below 6 mph (10 km/h).
• Pedestrians or objects in the roadway.
• Oncoming vehicles in the same lane.
• Severe weather conditions (see
blocked sensor section).
• Debris build-up on the grille near the
headlamps (see blocked sensor
section). •
Small distance to vehicle ahead.
• Steering wheel and pedal movements
are large (very active driving style).
If the front end of the vehicle is hit or
damaged, the radar sensing zone may be
altered causing missed or false collision
warnings. See your authorized dealer to
have your collision warning radar checked
for proper coverage and operation.
195
Escape/Kuga (TM2), enUSA, First Printing Driving Aids
Page 230 of 486
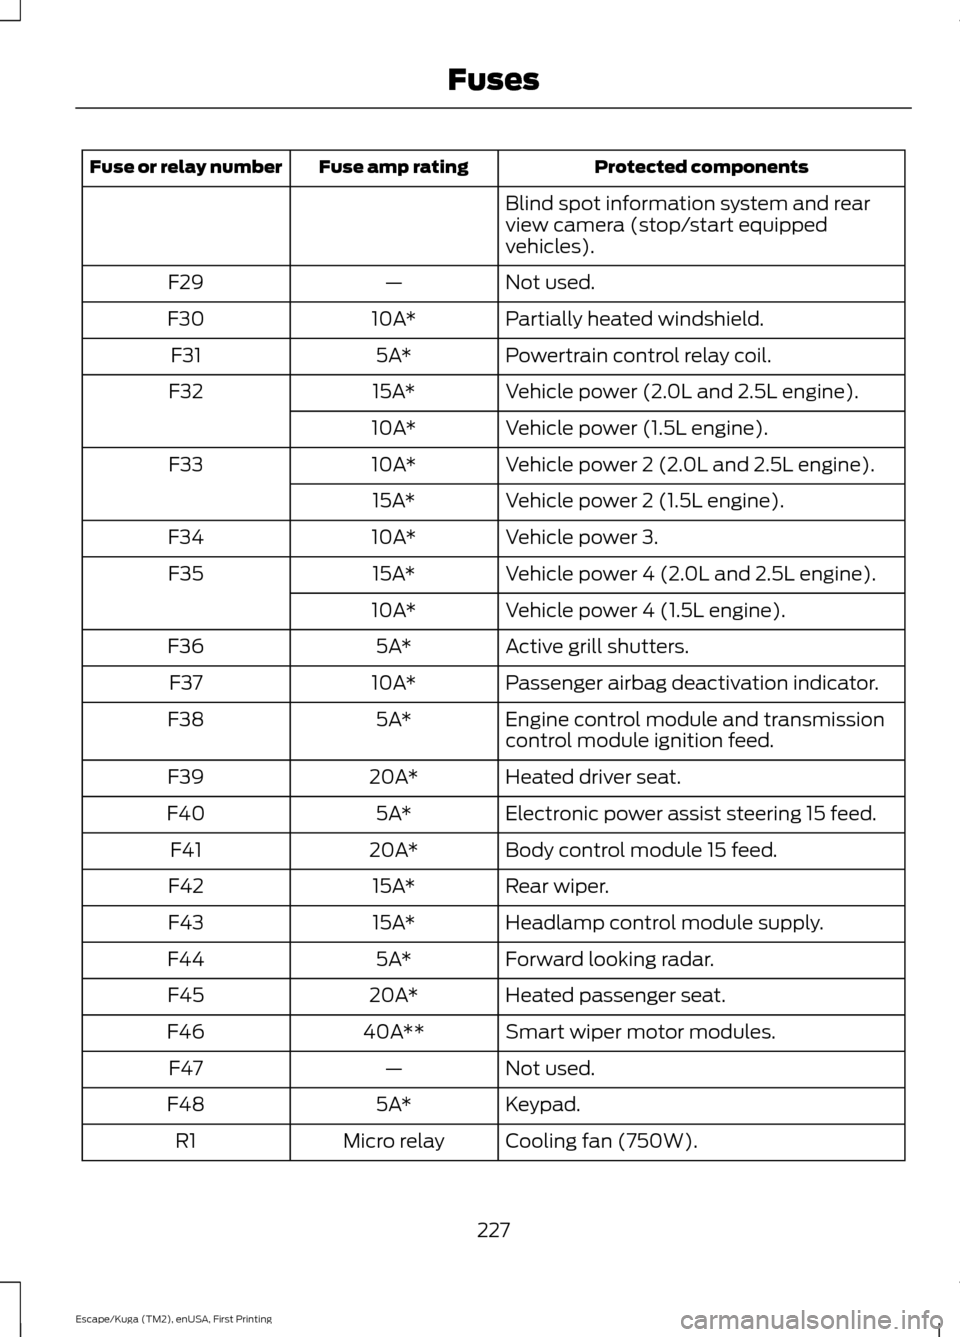
Protected components
Fuse amp rating
Fuse or relay number
Blind spot information system and rear
view camera (stop/start equipped
vehicles).
Not used.
—
F29
Partially heated windshield.
10A*
F30
Powertrain control relay coil.
5A*
F31
Vehicle power (2.0L and 2.5L engine).
15A*
F32
Vehicle power (1.5L engine).
10A*
Vehicle power 2 (2.0L and 2.5L engine).
10A*
F33
Vehicle power 2 (1.5L engine).
15A*
Vehicle power 3.
10A*
F34
Vehicle power 4 (2.0L and 2.5L engine).
15A*
F35
Vehicle power 4 (1.5L engine).
10A*
Active grill shutters.
5A*
F36
Passenger airbag deactivation indicator.
10A*
F37
Engine control module and transmission
control module ignition feed.
5A*
F38
Heated driver seat.
20A*
F39
Electronic power assist steering 15 feed.
5A*
F40
Body control module 15 feed.
20A*
F41
Rear wiper.
15A*
F42
Headlamp control module supply.
15A*
F43
Forward looking radar.
5A*
F44
Heated passenger seat.
20A*
F45
Smart wiper motor modules.
40A**
F46
Not used.
—
F47
Keypad.
5A*
F48
Cooling fan (750W).
Micro relay
R1
227
Escape/Kuga (TM2), enUSA, First Printing Fuses
Page 233 of 486
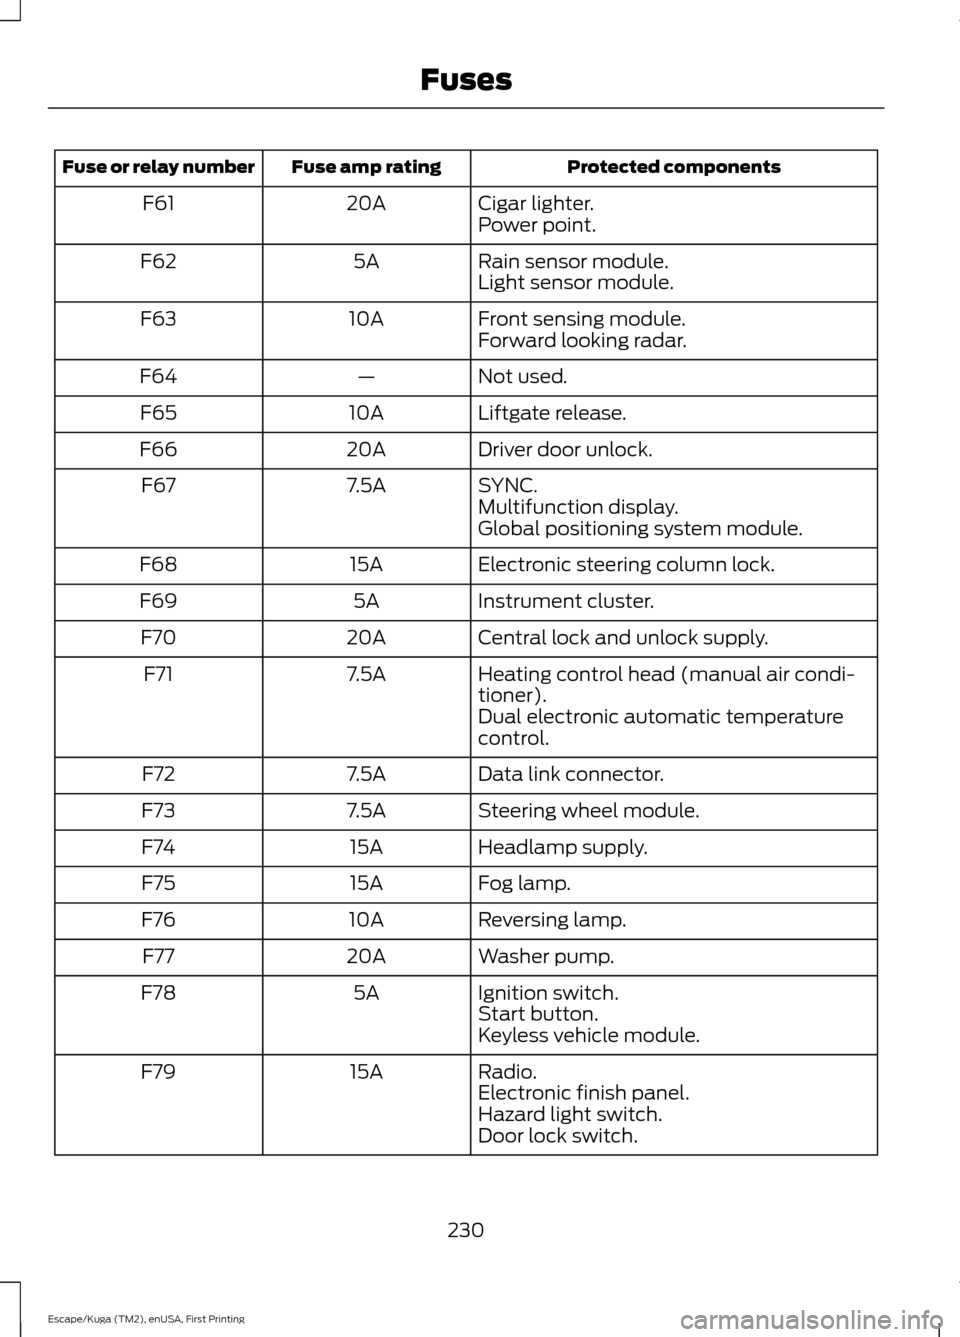
Protected components
Fuse amp rating
Fuse or relay number
Cigar lighter.
20A
F61
Power point.
Rain sensor module.
5A
F62
Light sensor module.
Front sensing module.
10A
F63
Forward looking radar.
Not used.
—
F64
Liftgate release.
10A
F65
Driver door unlock.
20A
F66
SYNC.
7.5A
F67
Multifunction display.
Global positioning system module.
Electronic steering column lock.
15A
F68
Instrument cluster.
5A
F69
Central lock and unlock supply.
20A
F70
Heating control head (manual air condi-
tioner).
7.5A
F71
Dual electronic automatic temperature
control.
Data link connector.
7.5A
F72
Steering wheel module.
7.5A
F73
Headlamp supply.
15A
F74
Fog lamp.
15A
F75
Reversing lamp.
10A
F76
Washer pump.
20A
F77
Ignition switch.
5A
F78
Start button.
Keyless vehicle module.
Radio.
15A
F79
Electronic finish panel.
Hazard light switch.
Door lock switch.
230
Escape/Kuga (TM2), enUSA, First Printing Fuses
Page 254 of 486
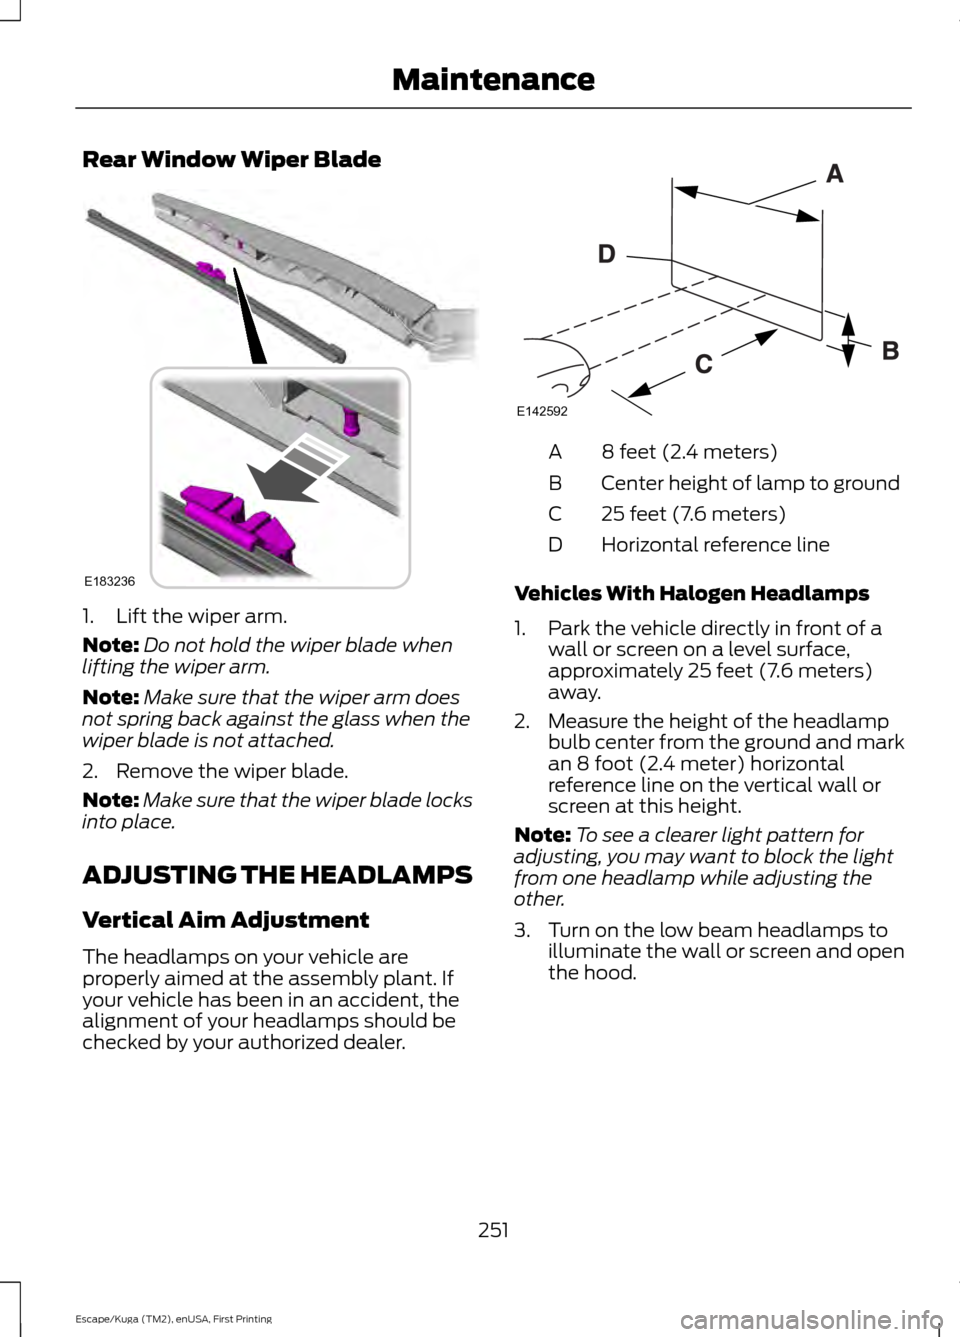
Rear Window Wiper Blade
1. Lift the wiper arm.
Note:
Do not hold the wiper blade when
lifting the wiper arm.
Note: Make sure that the wiper arm does
not spring back against the glass when the
wiper blade is not attached.
2. Remove the wiper blade.
Note: Make sure that the wiper blade locks
into place.
ADJUSTING THE HEADLAMPS
Vertical Aim Adjustment
The headlamps on your vehicle are
properly aimed at the assembly plant. If
your vehicle has been in an accident, the
alignment of your headlamps should be
checked by your authorized dealer. 8 feet (2.4 meters)
A
Center height of lamp to ground
B
25 feet (7.6 meters)
C
Horizontal reference line
D
Vehicles With Halogen Headlamps
1. Park the vehicle directly in front of a wall or screen on a level surface,
approximately 25 feet (7.6 meters)
away.
2. Measure the height of the headlamp bulb center from the ground and mark
an 8 foot (2.4 meter) horizontal
reference line on the vertical wall or
screen at this height.
Note: To see a clearer light pattern for
adjusting, you may want to block the light
from one headlamp while adjusting the
other.
3. Turn on the low beam headlamps to illuminate the wall or screen and open
the hood.
251
Escape/Kuga (TM2), enUSA, First Printing MaintenanceE183236 E142592
Page 255 of 486
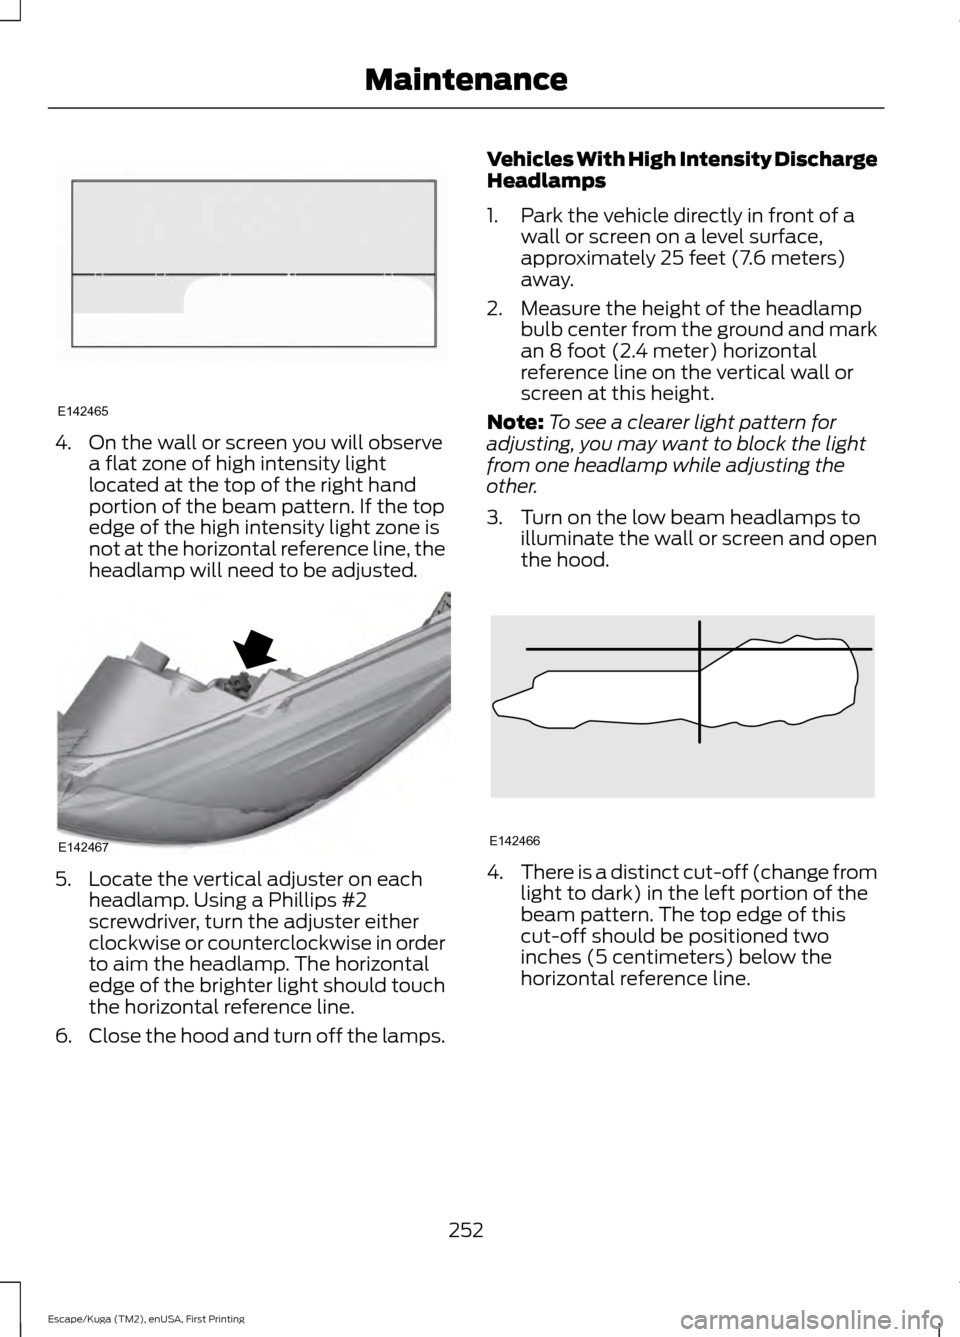
4. On the wall or screen you will observe
a flat zone of high intensity light
located at the top of the right hand
portion of the beam pattern. If the top
edge of the high intensity light zone is
not at the horizontal reference line, the
headlamp will need to be adjusted. 5. Locate the vertical adjuster on each
headlamp. Using a Phillips #2
screwdriver, turn the adjuster either
clockwise or counterclockwise in order
to aim the headlamp. The horizontal
edge of the brighter light should touch
the horizontal reference line.
6. Close the hood and turn off the lamps. Vehicles With High Intensity Discharge
Headlamps
1. Park the vehicle directly in front of a
wall or screen on a level surface,
approximately 25 feet (7.6 meters)
away.
2. Measure the height of the headlamp bulb center from the ground and mark
an 8 foot (2.4 meter) horizontal
reference line on the vertical wall or
screen at this height.
Note: To see a clearer light pattern for
adjusting, you may want to block the light
from one headlamp while adjusting the
other.
3. Turn on the low beam headlamps to illuminate the wall or screen and open
the hood. 4.
There is a distinct cut-off (change from
light to dark) in the left portion of the
beam pattern. The top edge of this
cut-off should be positioned two
inches (5 centimeters) below the
horizontal reference line.
252
Escape/Kuga (TM2), enUSA, First Printing MaintenanceE142465 E142467 E142466
Page 256 of 486
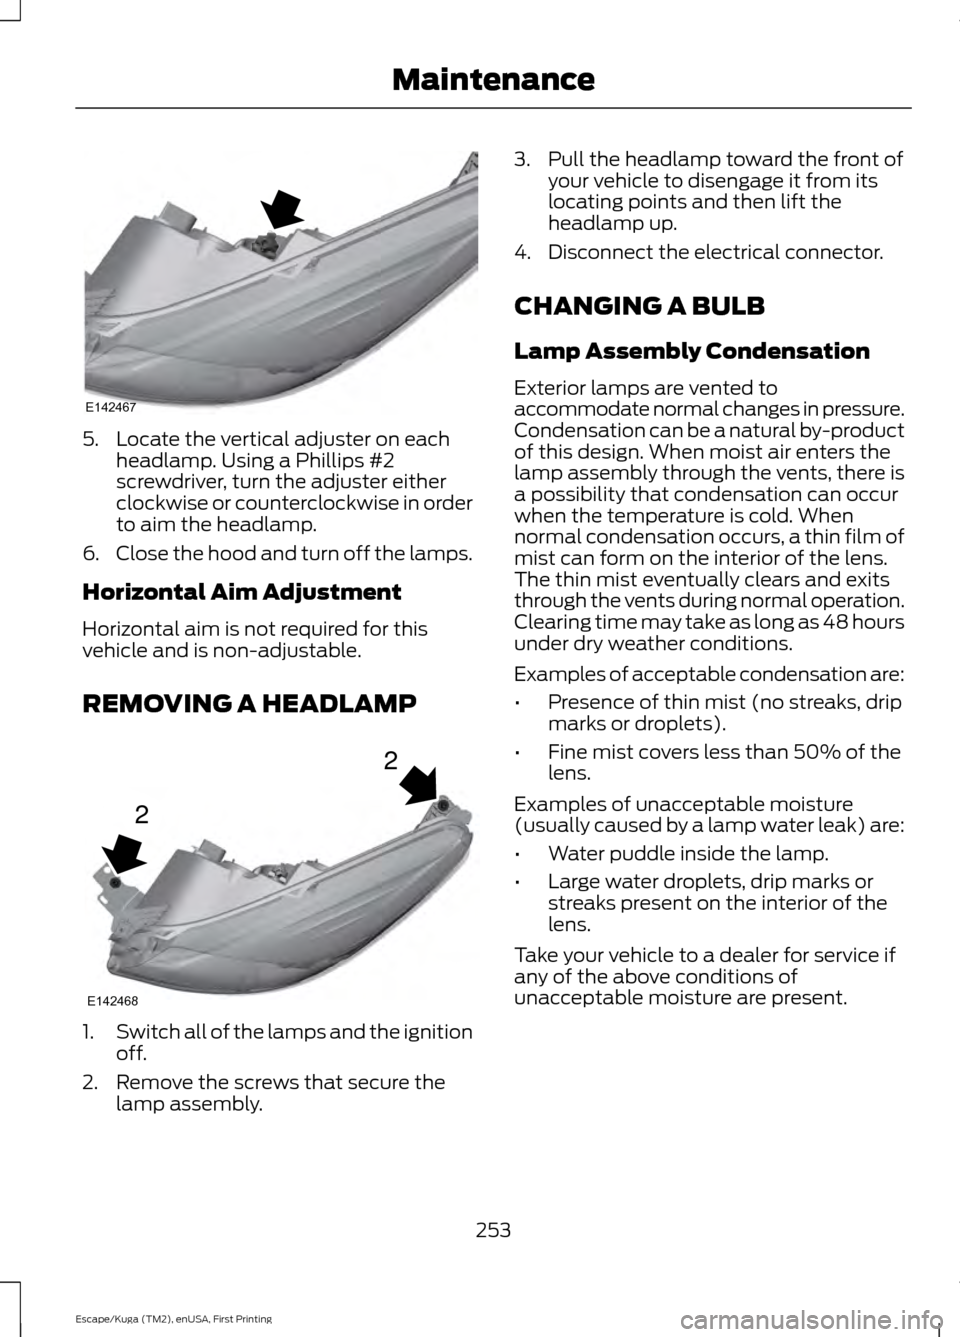
5. Locate the vertical adjuster on each
headlamp. Using a Phillips #2
screwdriver, turn the adjuster either
clockwise or counterclockwise in order
to aim the headlamp.
6. Close the hood and turn off the lamps.
Horizontal Aim Adjustment
Horizontal aim is not required for this
vehicle and is non-adjustable.
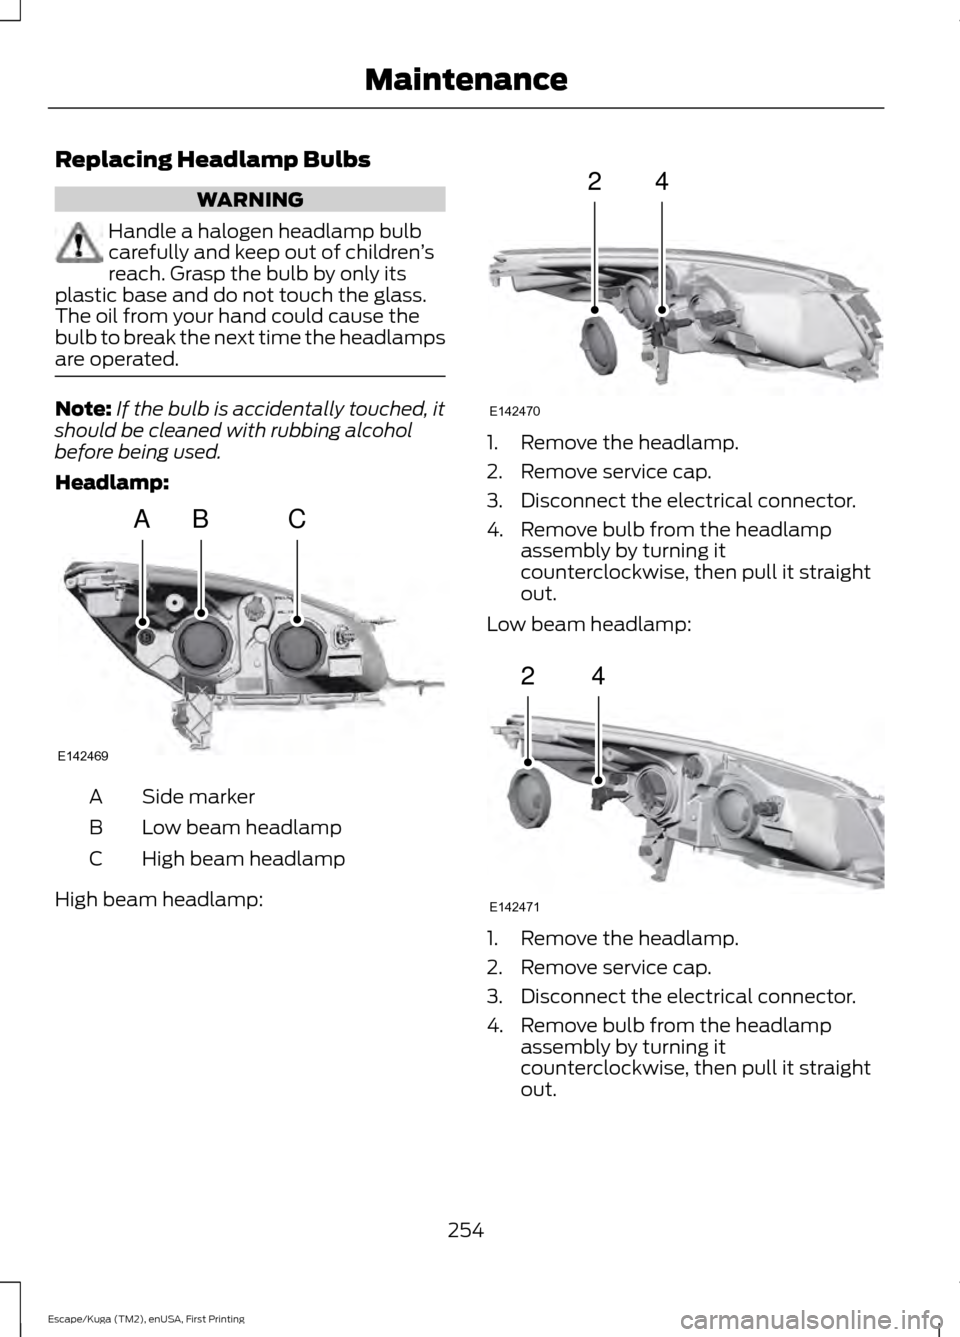
REMOVING A HEADLAMP 1.
Switch all of the lamps and the ignition
off.
2. Remove the screws that secure the lamp assembly. 3. Pull the headlamp toward the front of
your vehicle to disengage it from its
locating points and then lift the
headlamp up.
4. Disconnect the electrical connector.
CHANGING A BULB
Lamp Assembly Condensation
Exterior lamps are vented to
accommodate normal changes in pressure.
Condensation can be a natural by-product
of this design. When moist air enters the
lamp assembly through the vents, there is
a possibility that condensation can occur
when the temperature is cold. When
normal condensation occurs, a thin film of
mist can form on the interior of the lens.
The thin mist eventually clears and exits
through the vents during normal operation.
Clearing time may take as long as 48 hours
under dry weather conditions.
Examples of acceptable condensation are:
• Presence of thin mist (no streaks, drip
marks or droplets).
• Fine mist covers less than 50% of the
lens.
Examples of unacceptable moisture
(usually caused by a lamp water leak) are:
• Water puddle inside the lamp.
• Large water droplets, drip marks or
streaks present on the interior of the
lens.
Take your vehicle to a dealer for service if
any of the above conditions of
unacceptable moisture are present.
253
Escape/Kuga (TM2), enUSA, First Printing MaintenanceE142467 2
2
E142468
Page 257 of 486
Replacing Headlamp Bulbs
WARNING
Handle a halogen headlamp bulb
carefully and keep out of children
’s
reach. Grasp the bulb by only its
plastic base and do not touch the glass.
The oil from your hand could cause the
bulb to break the next time the headlamps
are operated. Note:
If the bulb is accidentally touched, it
should be cleaned with rubbing alcohol
before being used.
Headlamp: Side marker
A
Low beam headlamp
B
High beam headlamp
C
High beam headlamp: 1. Remove the headlamp.
2. Remove service cap.
3. Disconnect the electrical connector.
4. Remove bulb from the headlamp
assembly by turning it
counterclockwise, then pull it straight
out.
Low beam headlamp: 1. Remove the headlamp.
2. Remove service cap.
3. Disconnect the electrical connector.
4. Remove bulb from the headlamp
assembly by turning it
counterclockwise, then pull it straight
out.
254
Escape/Kuga (TM2), enUSA, First Printing MaintenanceABC
E142469 24
E142470 24
E142471