Rear seat remove FORD ESCAPE 2018 Owners Manual
[x] Cancel search | Manufacturer: FORD, Model Year: 2018, Model line: ESCAPE, Model: FORD ESCAPE 2018Pages: 517, PDF Size: 6.62 MB
Page 24 of 517

2. Pull down on the shoulder belt and
then grasp the shoulder belt and lap
belt together. 3.
While holding the shoulder and lap belt
portions together, route the tongue
through the child restraint according
to the child restraint manufacturer's
instructions. Be sure the belt webbing
is not twisted. 4. Insert the belt tongue into the proper
buckle (the buckle closest to the
direction the tongue is coming from)
for that seating position until you hear
a snap and feel the latch engage. Make
sure the tongue is latched securely by
pulling on it. 5. To put the retractor in the automatic
locking mode, grasp the shoulder
portion of the belt and pull downward
until you pull all of the belt out.
Note: The automatic locking mode is
available on the front passenger and rear
seats.
6. Allow the belt to retract to remove slack. The belt clicks as it retracts to
indicate it is in the automatic locking
mode.
21
Escape (TM2) Canada/United States of America, JJ5J 19A321 AC enUSA, Edition date: 201706, Fourth-Printing Child SafetyE142529 E142530 E142531 E142875
Page 28 of 517
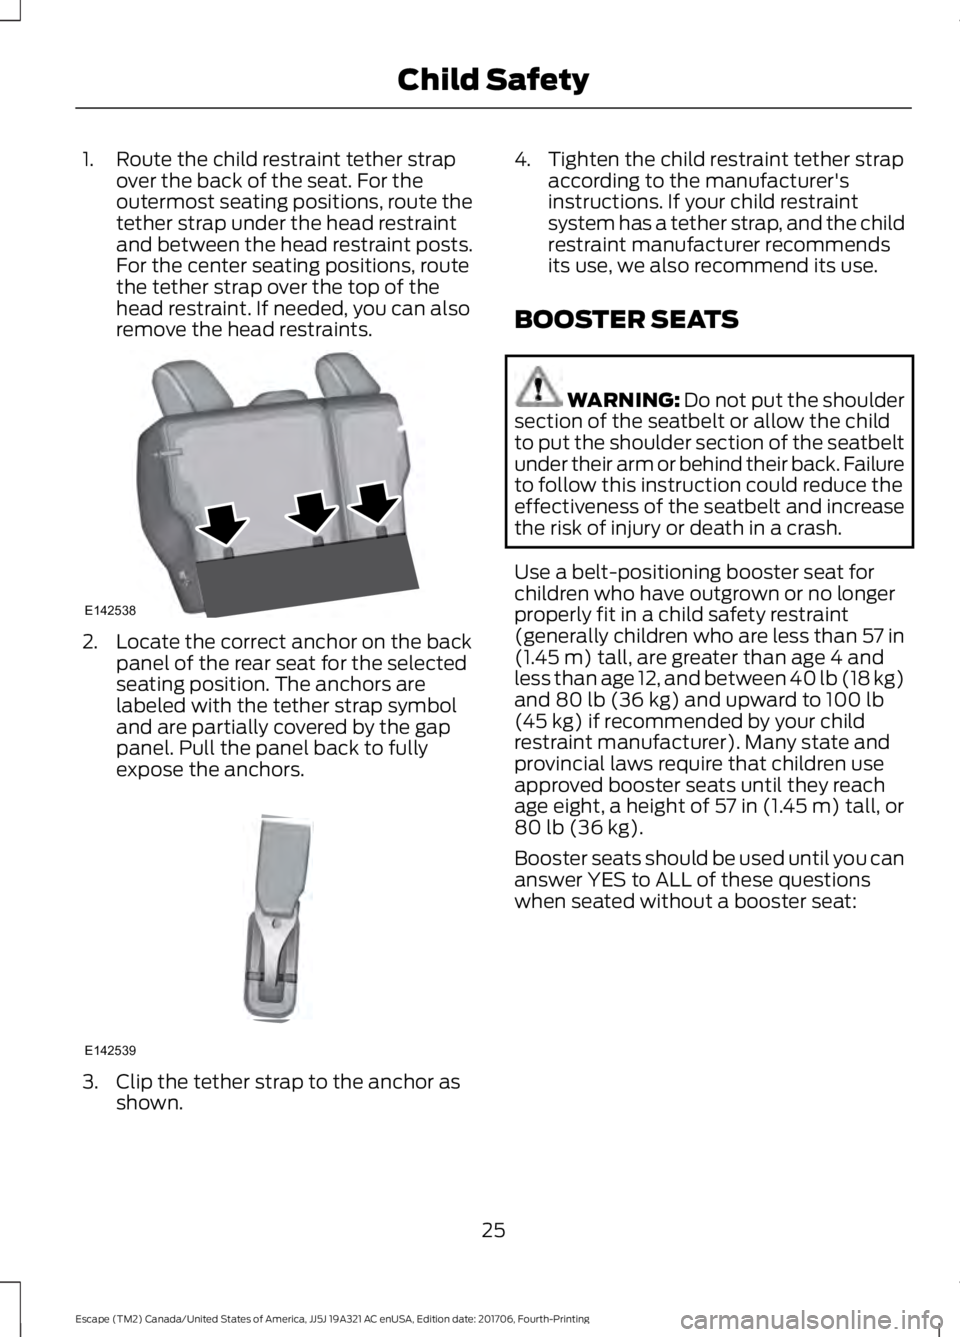
1. Route the child restraint tether strap
over the back of the seat. For the
outermost seating positions, route the
tether strap under the head restraint
and between the head restraint posts.
For the center seating positions, route
the tether strap over the top of the
head restraint. If needed, you can also
remove the head restraints. 2. Locate the correct anchor on the back
panel of the rear seat for the selected
seating position. The anchors are
labeled with the tether strap symbol
and are partially covered by the gap
panel. Pull the panel back to fully
expose the anchors. 3. Clip the tether strap to the anchor as
shown. 4. Tighten the child restraint tether strap
according to the manufacturer's
instructions. If your child restraint
system has a tether strap, and the child
restraint manufacturer recommends
its use, we also recommend its use.
BOOSTER SEATS WARNING: Do not put the shoulder
section of the seatbelt or allow the child
to put the shoulder section of the seatbelt
under their arm or behind their back. Failure
to follow this instruction could reduce the
effectiveness of the seatbelt and increase
the risk of injury or death in a crash.
Use a belt-positioning booster seat for
children who have outgrown or no longer
properly fit in a child safety restraint
(generally children who are less than
57 in
(1.45 m) tall, are greater than age 4 and
less than age 12, and between 40 lb (18 kg)
and
80 lb (36 kg) and upward to 100 lb
(45 kg) if recommended by your child
restraint manufacturer). Many state and
provincial laws require that children use
approved booster seats until they reach
age eight, a height of
57 in (1.45 m) tall, or
80 lb (36 kg).
Booster seats should be used until you can
answer YES to ALL of these questions
when seated without a booster seat:
25
Escape (TM2) Canada/United States of America, JJ5J 19A321 AC enUSA, Edition date: 201706, Fourth-Printing Child SafetyE142538 E142539
Page 32 of 517
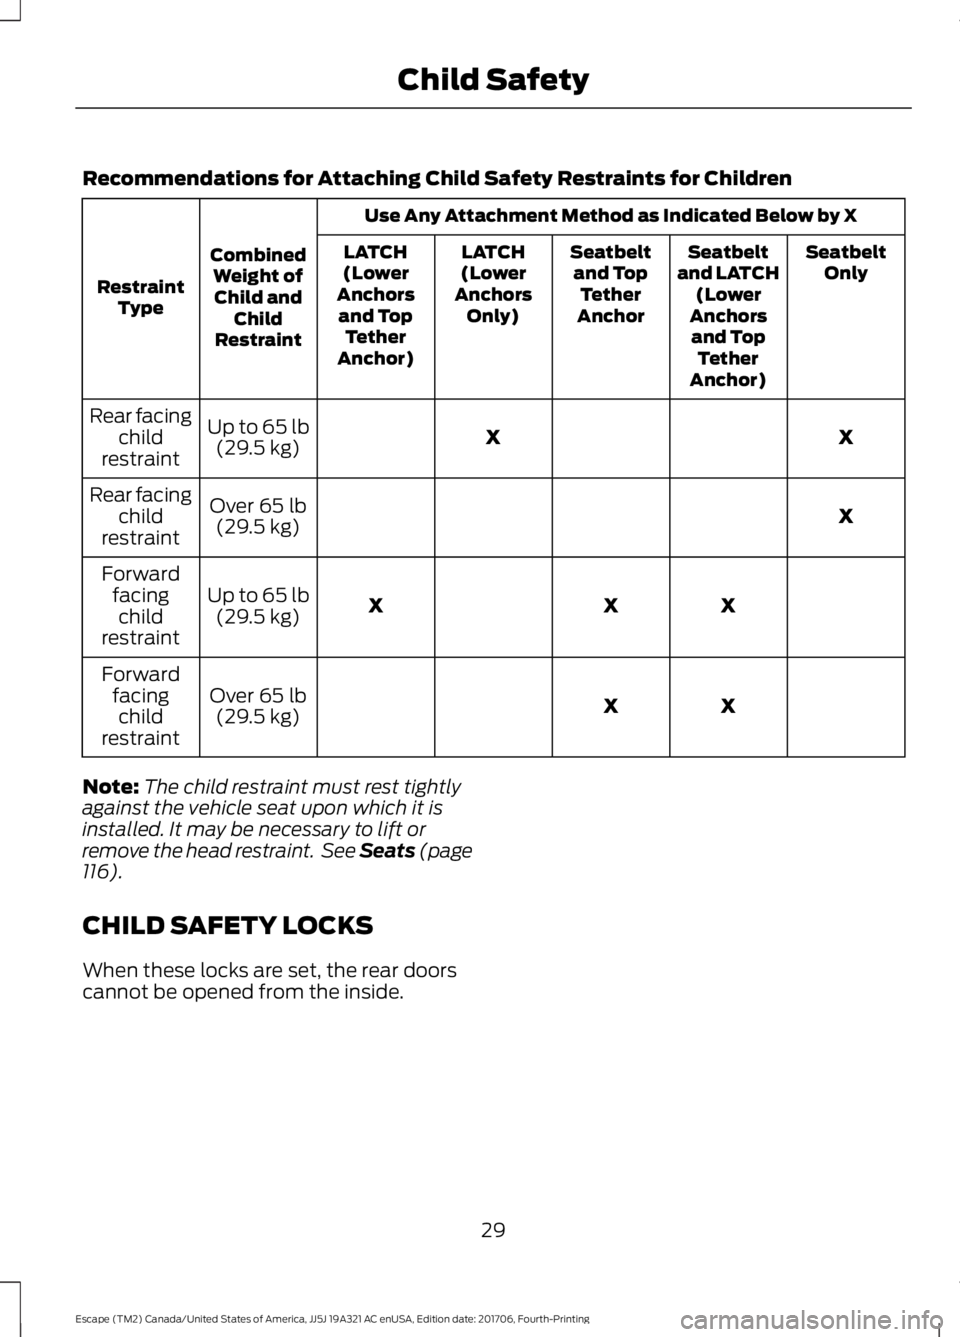
Recommendations for Attaching Child Safety Restraints for Children
Use Any Attachment Method as Indicated Below by X
Combined Weight ofChild and Child
Restraint
Restraint
Type Seatbelt
Only
Seatbelt
and LATCH (Lower
Anchors and Top Tether
Anchor)
Seatbelt
and Top Tether
Anchor
LATCH
(Lower
Anchors Only)
LATCH
(Lower
Anchors and Top Tether
Anchor)
X
X
Up to 65 lb
(29.5 kg)
Rear facing
child
restraint
X
Over
65 lb
(29.5 kg)
Rear facing
child
restraint
X
X
X
Up to
65 lb
(29.5 kg)
Forward
facingchild
restraint
X
X
Over
65 lb
(29.5 kg)
Forward
facingchild
restraint
Note: The child restraint must rest tightly
against the vehicle seat upon which it is
installed. It may be necessary to lift or
remove the head restraint. See Seats (page
116
).
CHILD SAFETY LOCKS
When these locks are set, the rear doors
cannot be opened from the inside.
29
Escape (TM2) Canada/United States of America, JJ5J 19A321 AC enUSA, Edition date: 201706, Fourth-Printing Child Safety
Page 35 of 517
•
retractor and anchor pretensioner at
the front outboard seating positions
• belt tension sensor at the front
outboard passenger seating position •
safety belt warning light and chime •
crash sensors and monitoring system
with readiness indicator.
The safety belt pretensioners are designed
to activate in frontal, near-frontal and side
crashes, and in rollovers. The safety belt
pretensioners on the retractor and anchor
at the front seating positions are designed
to tighten the safety belts firmly against
the occupant's body when activated. This
helps increase the effectiveness of the
safety belts. In frontal crashes, the safety
belt pretensioners can be activated alone
or, if the crash is of sufficient severity,
together with the front airbags.
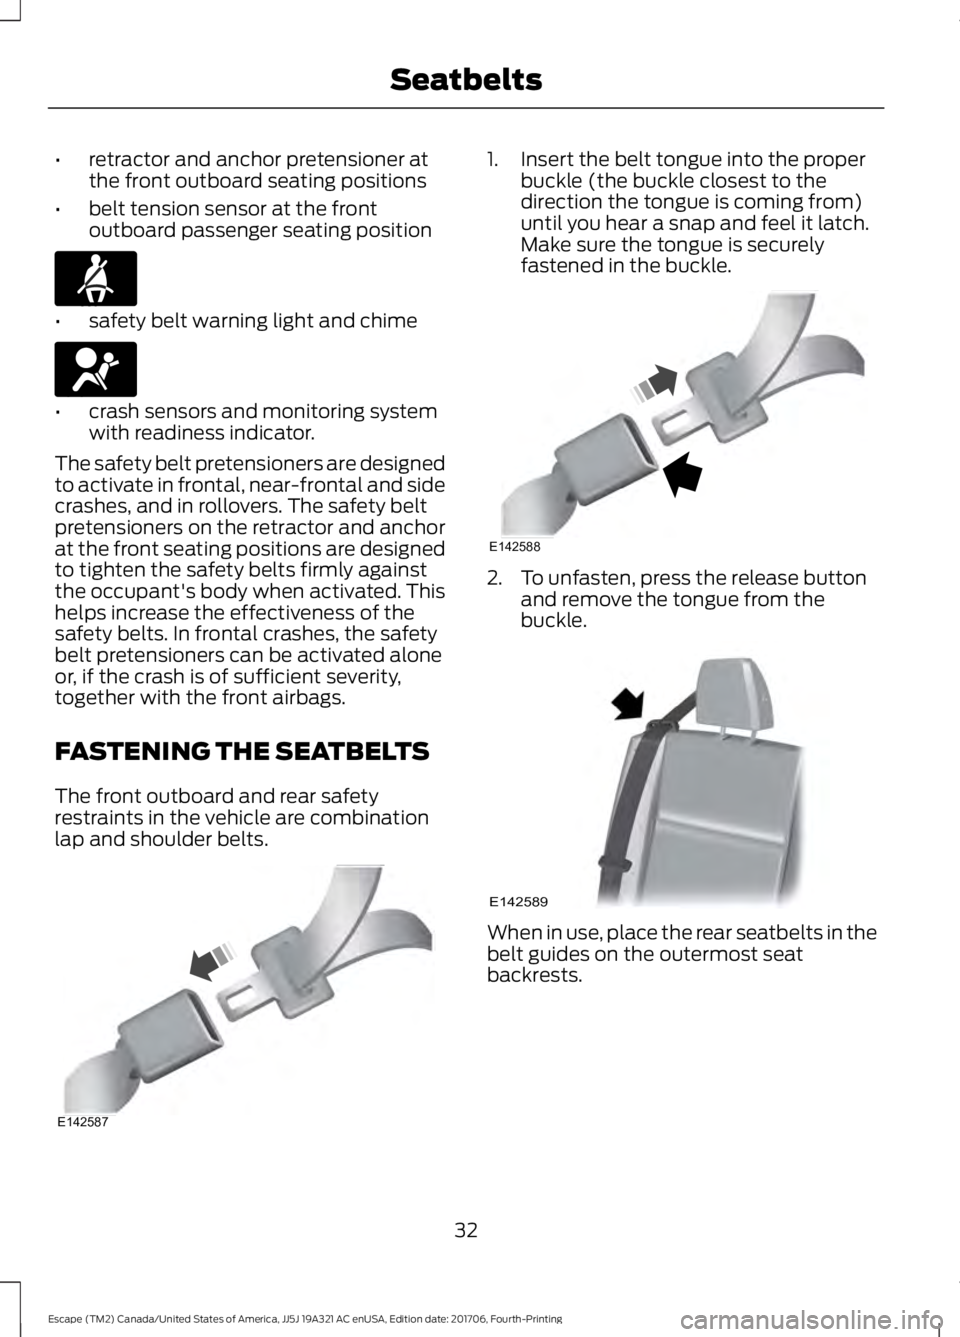
FASTENING THE SEATBELTS
The front outboard and rear safety
restraints in the vehicle are combination
lap and shoulder belts. 1. Insert the belt tongue into the proper
buckle (the buckle closest to the
direction the tongue is coming from)
until you hear a snap and feel it latch.
Make sure the tongue is securely
fastened in the buckle. 2. To unfasten, press the release button
and remove the tongue from the
buckle. When in use, place the rear seatbelts in the
belt guides on the outermost seat
backrests.
32
Escape (TM2) Canada/United States of America, JJ5J 19A321 AC enUSA, Edition date: 201706, Fourth-Printing SeatbeltsE71880 E67017 E142587 E142588 E142589
Page 36 of 517
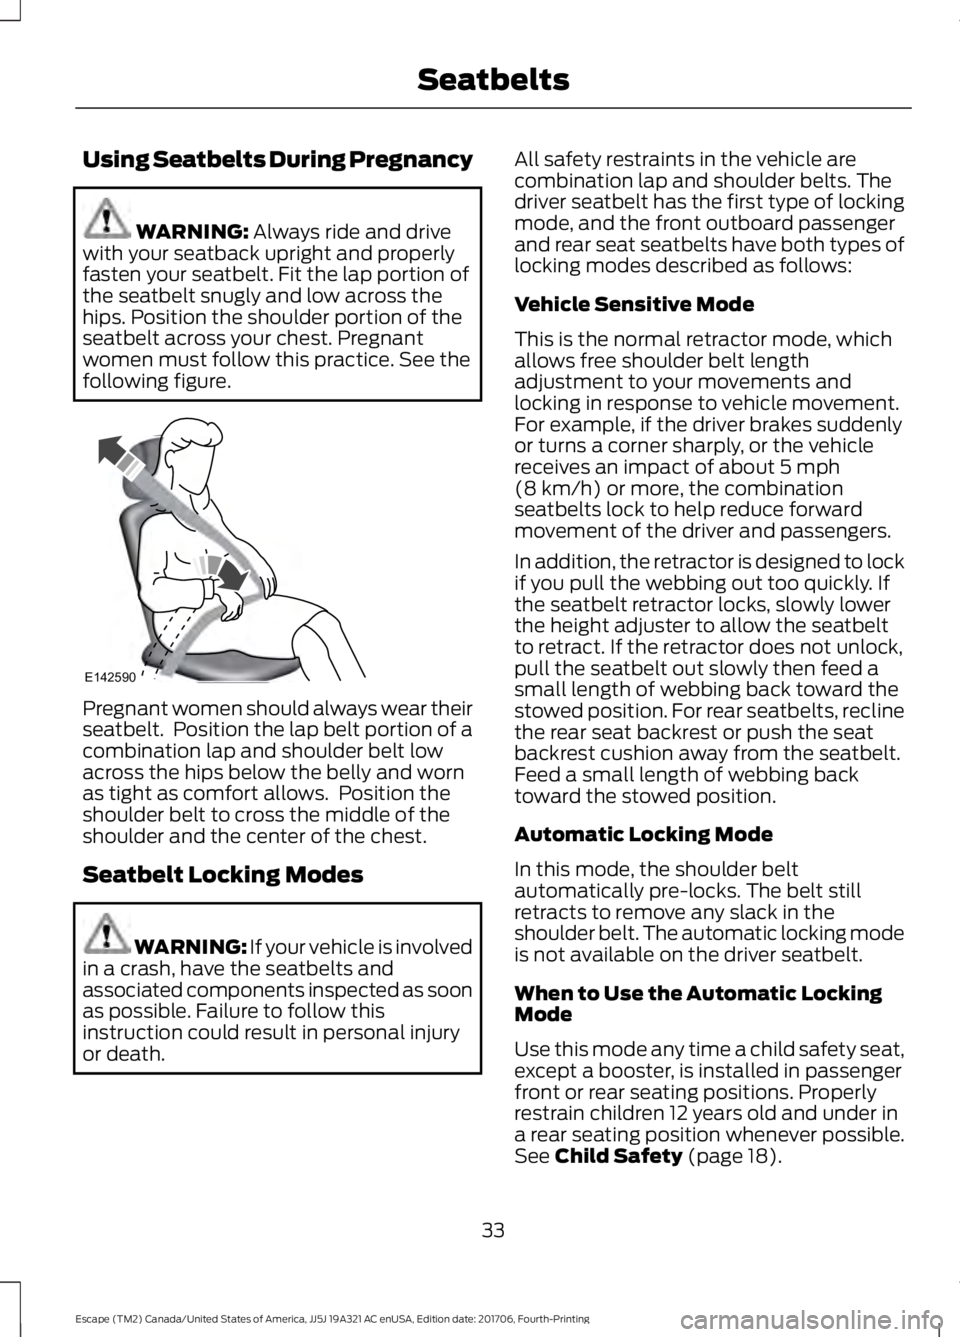
Using Seatbelts During Pregnancy
WARNING: Always ride and drive
with your seatback upright and properly
fasten your seatbelt. Fit the lap portion of
the seatbelt snugly and low across the
hips. Position the shoulder portion of the
seatbelt across your chest. Pregnant
women must follow this practice. See the
following figure. Pregnant women should always wear their
seatbelt. Position the lap belt portion of a
combination lap and shoulder belt low
across the hips below the belly and worn
as tight as comfort allows. Position the
shoulder belt to cross the middle of the
shoulder and the center of the chest.
Seatbelt Locking Modes
WARNING: If your vehicle is involved
in a crash, have the seatbelts and
associated components inspected as soon
as possible. Failure to follow this
instruction could result in personal injury
or death. All safety restraints in the vehicle are
combination lap and shoulder belts. The
driver seatbelt has the first type of locking
mode, and the front outboard passenger
and rear seat seatbelts have both types of
locking modes described as follows:
Vehicle Sensitive Mode
This is the normal retractor mode, which
allows free shoulder belt length
adjustment to your movements and
locking in response to vehicle movement.
For example, if the driver brakes suddenly
or turns a corner sharply, or the vehicle
receives an impact of about
5 mph
(8 km/h) or more, the combination
seatbelts lock to help reduce forward
movement of the driver and passengers.
In addition, the retractor is designed to lock
if you pull the webbing out too quickly. If
the seatbelt retractor locks, slowly lower
the height adjuster to allow the seatbelt
to retract. If the retractor does not unlock,
pull the seatbelt out slowly then feed a
small length of webbing back toward the
stowed position. For rear seatbelts, recline
the rear seat backrest or push the seat
backrest cushion away from the seatbelt.
Feed a small length of webbing back
toward the stowed position.
Automatic Locking Mode
In this mode, the shoulder belt
automatically pre-locks. The belt still
retracts to remove any slack in the
shoulder belt. The automatic locking mode
is not available on the driver seatbelt.
When to Use the Automatic Locking
Mode
Use this mode any time a child safety seat,
except a booster, is installed in passenger
front or rear seating positions. Properly
restrain children 12 years old and under in
a rear seating position whenever possible.
See
Child Safety (page 18).
33
Escape (TM2) Canada/United States of America, JJ5J 19A321 AC enUSA, Edition date: 201706, Fourth-Printing SeatbeltsE142590
Page 45 of 517
The front passenger sensing system uses
passenger airbag status indicators that
illuminate indicating that the front
passenger frontal airbag is either on
(enabled) or off (disabled).
Note:
The indicators illuminate briefly when
you first switch the ignition on to confirm
they are functional.
The front passenger sensing system is
designed to disable (will not inflate) the
front passenger frontal airbag when the
front passenger seat is unoccupied, or a
rear facing infant seat, a forward-facing
child restraint, or a booster seat is
detected. Even with this technology,
parents are strongly encouraged to
always properly restrain children in the rear
seat. The sensor also switches off the
passenger front airbag and seat-mounted
side airbag when the passenger seat is
empty.
• When the front passenger sensing
system disables (will not inflate) the
front passenger frontal airbag, the
passenger airbag status off indicator
illuminates and stays lit to remind you
that the front passenger frontal airbag
is disabled.
• If you have installed the child restraint
and the passenger airbag status on
indicator illuminates, then switch the
vehicle off, remove the child restraint
from the vehicle and reinstall the
restraint following the child restraint
manufacturer's instructions. The front passenger sensing system is
designed to enable (may inflate) the front
passenger frontal airbag anytime the
system senses that a person of adult size
is sitting properly in the front passenger
seat.
•
When the front passenger sensing
system enables the front passenger
frontal airbag (may inflate), the
passenger airbag status on indicator
illuminates and remains illuminated.
If a person of adult size is sitting in the front
passenger seat, but the passenger airbag
is disabled, it is possible that the person is
not sitting properly in the seat. If this
happens:
• Switch the vehicle off and ask the
person to place the seat backrest in
the full upright position.
• Have the person sit upright in the seat,
centered on the seat cushion, with the
person's legs comfortably extended.
• Restart the vehicle and have the person
remain in this position for about two
minutes. This allows the system to
detect that person and enables the
passenger frontal airbag.
• If the passenger airbag status off
indicator remains lit even after this,
advise the person to ride in the rear
seat. Passenger Airbag
Passenger Airbag Status
Indicator
Occupant
Disabled
OFF: Lit
Empty ON: Unlit
Disabled
OFF: Lit
Child
42
Escape (TM2) Canada/United States of America, JJ5J 19A321 AC enUSA, Edition date: 201706, Fourth-Printing Supplementary Restraints System
Page 115 of 517
Note:
Do not place objects under the front
seats as this may interfere with the airflow
to the rear seats.
Note: Remove any snow, ice or leaves from
the air intake area at the base of the
windshield.
Note: To improve the time to reach a
comfortable temperature in hot weather,
drive with the windows open until you feel
cold air through the air vents.
Manual Climate Control
Note: To reduce fogging of the windshield
during humid weather, adjust the air
distribution control to the windshield air
vents position. Automatic Climate Control
Note:
Adjusting the settings when your
vehicle interior is extremely hot or cold is
not necessary. The system automatically
adjusts to heat or cool the interior to your
selected temperature as quickly as possible.
For the system to function efficiently, the
instrument panel and side air vents should
be fully open.
Note: If you select AUTO during cold
temperatures, the system directs airflow to
the windshield and side window vents. In
addition, the fan may run at a slower speed
until the engine warms up.
Note: If you select
AUTO during hot
temperatures and the inside of the vehicle
is hot, the system automatically uses
recirculated air to maximize interior cooling.
Fan speed may also reduce until the air
cools.
Quickly Heating the Interior Automatic climate control
Manual climate control
Press
AUTO.
Adjust the fan speed to the highest
setting.
1
Adjust the temperature control to the
desired setting.
Adjust the temperature control to the
full heat setting.
2
Direct air to the footwell using the air
distribution buttons.
3
112
Escape (TM2) Canada/United States of America, JJ5J 19A321 AC enUSA, Edition date: 201706, Fourth-Printing Climate Control
Page 120 of 517
WARNING: The head restraint is a
safety device. Whenever possible it should
be installed and properly adjusted when
the seat is occupied. Failure to adjust the
head restraint properly could reduce its
effectiveness during certain impacts. WARNING:
Adjust the head
restraints for all passengers before you
drive your vehicle. This will help minimize
the risk of neck injury in the event of a
crash. Do not adjust the head restraints
when your vehicle is moving.
Note: Adjust the seatback to an upright
driving position before adjusting the head
restraint. Adjust the head restraint so that
the top of it is level with the top of your head
and as far forward as possible. Make sure
that you remain comfortable. If you are
extremely tall, adjust the head restraint to
its highest position.
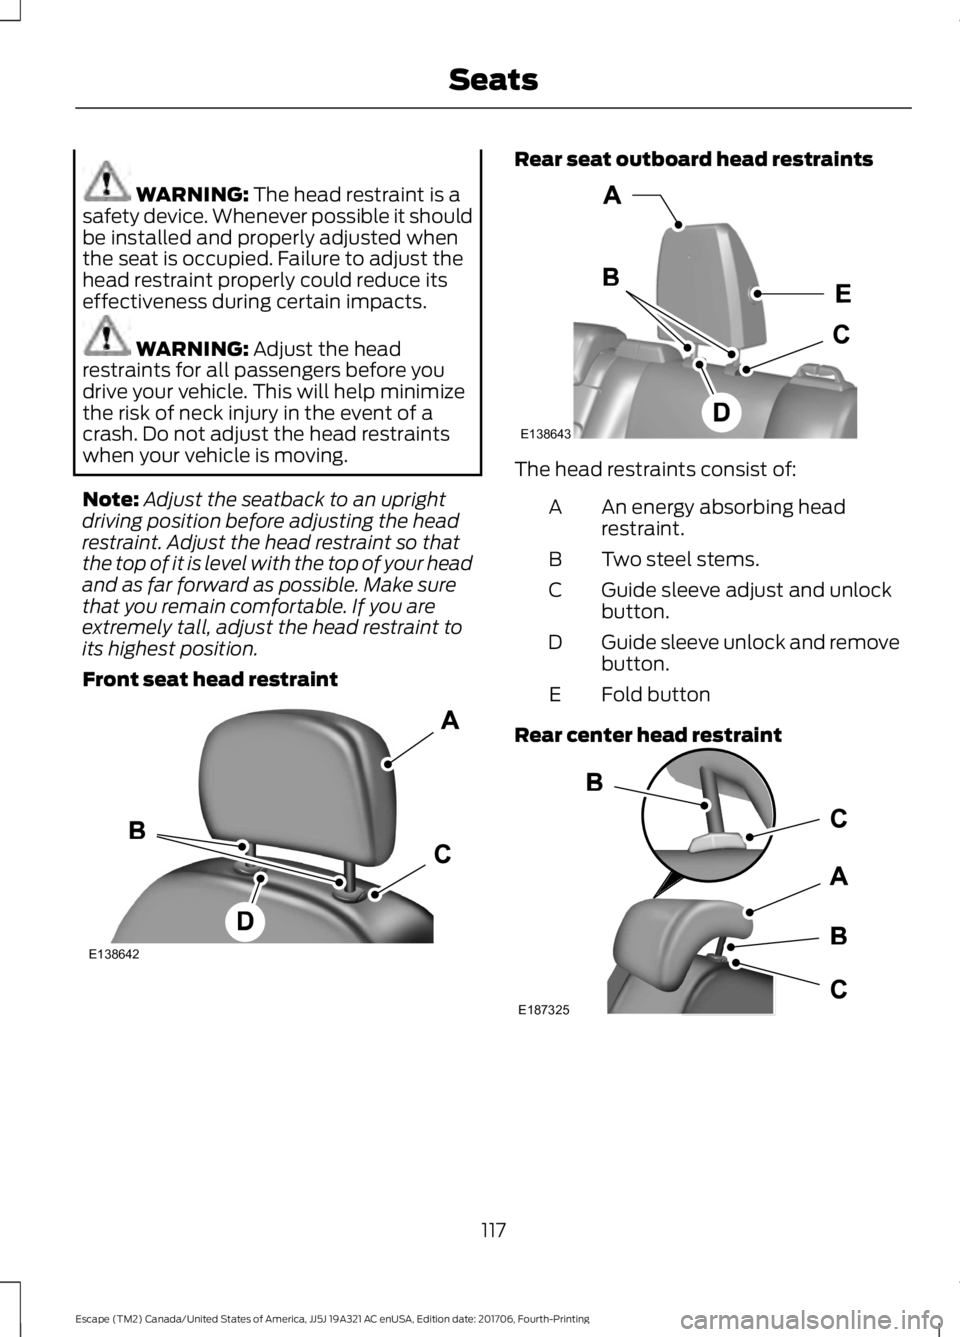
Front seat head restraint Rear seat outboard head restraints
The head restraints consist of:
An energy absorbing head
restraint.
A
Two steel stems.
B
Guide sleeve adjust and unlock
button.
C
Guide sleeve unlock and remove
button.
D
Fold button
E
Rear center head restraint 117
Escape (TM2) Canada/United States of America, JJ5J 19A321 AC enUSA, Edition date: 201706, Fourth-Printing SeatsE138642 E138643 E187325
Page 121 of 517
The rear center head restraint consists of:
An energy absorbing head
restraint.
A
Two steel stems.
B
Guide sleeve unlock and remove
button.
C
Adjusting the Head Restraint
Raising the Head Restraint
Pull the head restraint up.
Lowering the Head Restraint
1. Press and hold button C.
2. Push the head restraint down.
Removing the Head Restraint
1. Pull the head restraint up until it reaches its highest position.
2. Press and hold buttons C and D.
3. Pull the head restraint up.
Installing the Head Restraint
Align the steel stems into the guide sleeves
and push the head restraint down until it
locks.
Folding the Head Restraint
1. Press and hold button E.
2. Pull the head restraint back up to reset.
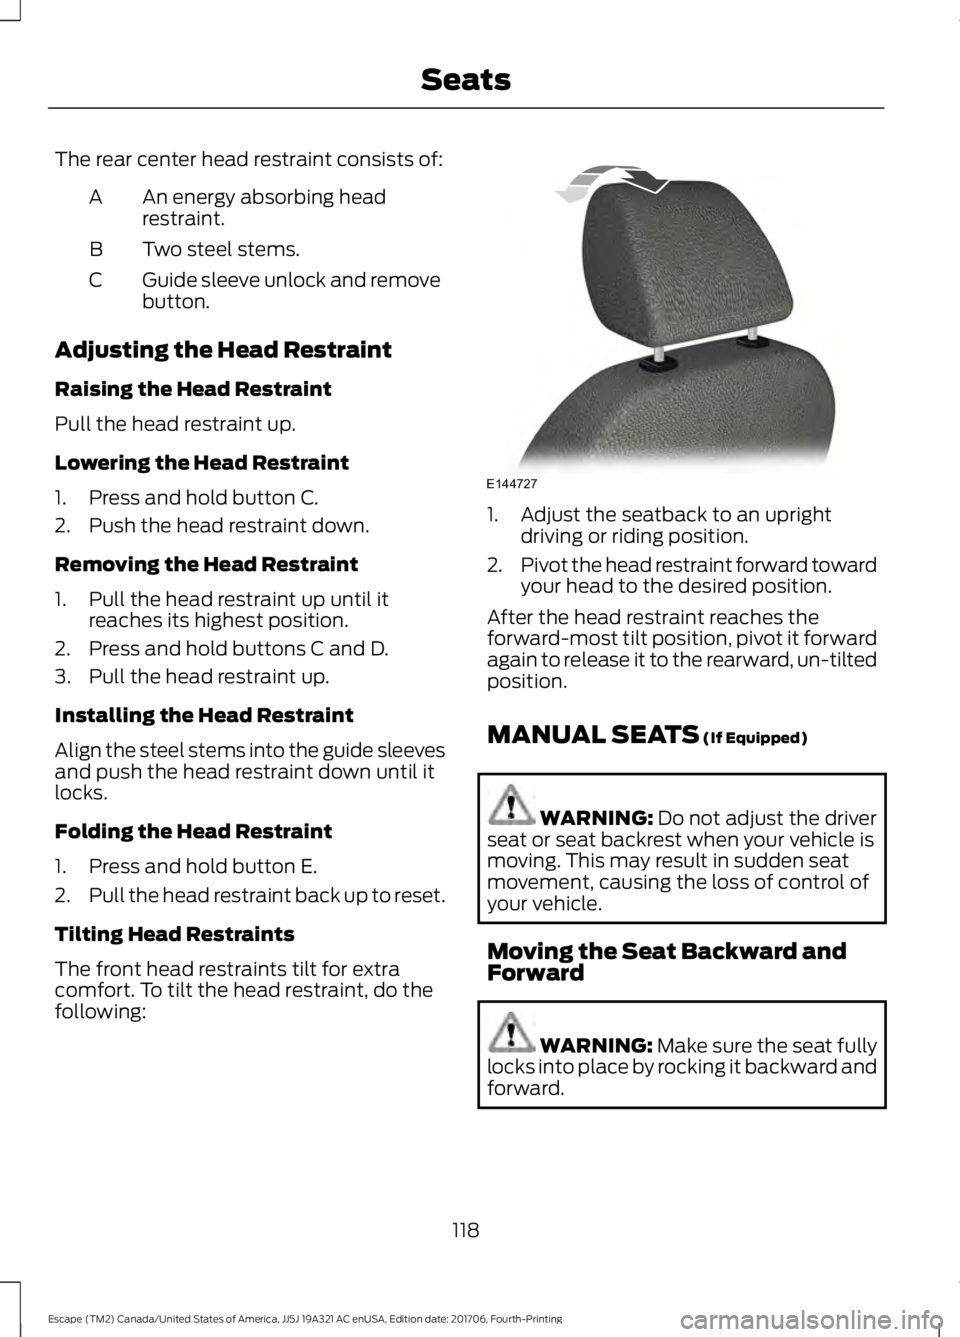
Tilting Head Restraints
The front head restraints tilt for extra
comfort. To tilt the head restraint, do the
following: 1. Adjust the seatback to an upright
driving or riding position.
2. Pivot the head restraint forward toward
your head to the desired position.
After the head restraint reaches the
forward-most tilt position, pivot it forward
again to release it to the rearward, un-tilted
position.
MANUAL SEATS (If Equipped) WARNING:
Do not adjust the driver
seat or seat backrest when your vehicle is
moving. This may result in sudden seat
movement, causing the loss of control of
your vehicle.
Moving the Seat Backward and
Forward WARNING: Make sure the seat fully
locks into place by rocking it backward and
forward.
118
Escape (TM2) Canada/United States of America, JJ5J 19A321 AC enUSA, Edition date: 201706, Fourth-Printing SeatsE144727
Page 211 of 517
Suppose your vehicle has a
1400-pound (635-kilogram) cargo
and luggage capacity. You and
one of your friends decide to pick
up cement from the local home
improvement store to finish that
patio you have been planning for
the past two years. Measuring the
inside of the vehicle with the rear
seat folded down, you have room
for twelve 100-pound
(45-kilogram) bags of cement. Do
you have enough load capacity to
transport the cement to your
home? If you and your friend each
weigh 220 pounds (99 kilograms),
the calculation would be: 1400 -
(2 x 220) - (12 x 100) = 1400 - 440
- 1200 = - 240 pounds. No, you do
not have enough cargo capacity
to carry that much weight. In
metric units, the calculation would
be: 635 kilograms - (2 x 99
kilograms) - (12 x 45 kilograms) =
635 - 198 - 540 = -103 kilograms.
You will need to reduce the load
weight by at least 240 pounds
(104 kilograms). If you remove
three 100-pound (45-kilogram)
cement bags, then the load
calculation would be:1400 - (2 x
220) - (9 x 100) = 1400 - 440 -
900 = 60 pounds. Now you have
the load capacity to transport the
cement and your friend home. In
metric units, the calculation would
be: 635 kilograms - (2 x 99
kilograms) - (9 x 45 kilograms) =
635 - 198 - 405 = 32 kilograms.
The above calculations also
assume that the loads are
positioned in your vehicle in a
manner that does not overload
the front or the rear gross axle
weight rating specified for your
vehicle on the Safety Compliance
Certification label.
Special Loading Instructions
for Owners of Pick-up Trucks
and Utility-type Vehicles
WARNING: When loading
the roof racks, we recommend you
evenly distribute the load, as well
as maintain a low center of
gravity. Loaded vehicles, with
higher centers of gravity, may
handle differently than unloaded
vehicles. Take extra precautions,
such as slower speeds and
increased stopping distance, when
driving a heavily loaded vehicle.
208
Escape (TM2) Canada/United States of America, JJ5J 19A321 AC enUSA, Edition date: 201706, Fourth-Printing Load Carrying