booster FORD ESCAPE 2020 User Guide
[x] Cancel search | Manufacturer: FORD, Model Year: 2020, Model line: ESCAPE, Model: FORD ESCAPE 2020Pages: 553, PDF Size: 7.73 MB
Page 186 of 553
Some fuel stations, particularly those in
high altitude areas, offer fuels posted as
regular unleaded gasoline with an octane
rating below 87. The use of these fuels
could result in engine damage that will not
be covered by the vehicle warranty.
For best overall vehicle and engine
performance, premium fuel with an octane
rating of 91 or higher is recommended. The
performance gained by using premium fuel
is most noticeable in hot weather as well
as other conditions, for example when
towing a trailer. See Towing (page 276).
Do not be concerned if the engine
sometimes knocks lightly. However, if the
engine knocks heavily while using fuel with
the recommended octane rating, contact
an authorized dealer to prevent any engine
damage.
We recommend Top Tier detergent
gasolines, where available to help minimize
engine deposits and maintain optimal
vehicle and engine performance. For
additional information, refer to
www.toptiergas.com.
Note: Use of any fuel for which the vehicle
was not designed can impair the emission
control system, cause loss of vehicle
performance, and cause damage to the
engine which may not be covered by the
vehicle Warranty.
Do not use:
• Diesel fuel.
• Fuels containing kerosene or paraffin.
• Fuel containing more than 15% ethanol
or E85 fuel.
• Fuels containing methanol.
• Fuels containing metallic-based
additives, including manganese-based
compounds. •
Fuels containing the octane booster
additive, methylcyclopentadienyl
manganese tricarbonyl (MMT).
• Leaded fuel, using leaded fuel is
prohibited by law.
The use of fuels with metallic compounds
such as methylcyclopentadienyl
manganese tricarbonyl (commonly known
as MMT), which is a manganese-based
fuel additive, will impair engine
performance and affect the emission
control system.
FUEL FILLER FUNNEL
LOCATION
The fuel filler funnel is under the luggage
compartment floor covering.
RUNNING OUT OF FUEL
Running out of fuel can cause damage not
covered by the vehicle Warranty.
If your vehicle runs out of fuel:
• Add a minimum of
1.3 gal (5 L) of fuel
to restart the engine.
• You may need to switch the ignition
from off to on several times after
refueling to allow the fuel system to
pump the fuel from the tank to the
engine. When restarting, cranking time
takes a few seconds longer than
normal.
Note: If your vehicle is on a steep slope,
more fuel may be required.
Filling a Portable Fuel Container WARNING:
Flow of fuel through a
fuel pump nozzle can produce static
electricity. This can cause a fire if you are
filling an ungrounded fuel container.
183
Escape (CTC) Canada/United States of America, Vehicles Built From: 17-06-2019, enUSA, Edition date: 201906, Third-Printing- Fuel and Refueling
Page 196 of 553
•
Incorrect fuel for climatic conditions.
• Incorrect engine oil viscosity for
climactic conditions.
Note: Some vehicles have a lifetime fuel
filter that is integrated with the fuel tank.
Regular maintenance or replacement is not
needed.
Note: If these checks do not help you
correct the concern, have your vehicle
checked as soon as possible.
Noise Emissions Warranty,
Prohibited Tampering Acts and
Maintenance
On January 1, 1978, Federal regulation
became effective governing the noise
emission on trucks over 10,000 lb
(4,536 kg) Gross Vehicle Weight Rating
(GVWR). The preceding statements
concerning prohibited tampering acts and
maintenance, and the noise warranty
found in the Warranty Guide, are
applicable to complete chassis cabs over
10,000 lb (4,536 kg)
GVWR.
CATALYTIC CONVERTER WARNING:
Do not park, idle or
drive your vehicle on dry grass or other
dry ground cover. The emission system
heats up the engine compartment and
exhaust system, creating the risk of fire. WARNING:
The normal operating
temperature of the exhaust system is
very high. Never work around or attempt
to repair any part of the exhaust system
until it has cooled. Use special care when
working around the catalytic converter.
The catalytic converter heats up to a very
high temperature after only a short
period of engine operation and stays hot
after the engine is switched off. WARNING:
Exhaust leaks may
result in entry of harmful and potentially
lethal fumes into the passenger
compartment. If you smell exhaust
fumes inside your vehicle, have your
vehicle inspected immediately. Do not
drive if you smell exhaust fumes.
Your vehicle has various emission control
components and a catalytic converter that
enables it to comply with applicable
exhaust emission standards.
To make sure that the catalytic converter
and other emission control components
continue to work properly:
• Do not crank the engine for more than
10 seconds at a time.
• Do not run the engine with a spark plug
lead disconnected.
• Do not push-start or tow-start your
vehicle. Use booster cables. See Jump
Starting the Vehicle
(page 289).
• Use only the specified fuel listed.
• Do not switch the ignition off when your
vehicle is moving.
• Avoid running out of fuel.
• Have the items listed in scheduled
maintenance information performed
according to the specified schedule.
Note: Resulting component damage may
not be covered by the vehicle Warranty.
The scheduled maintenance items listed
in scheduled maintenance information are
essential to the life and performance of
your vehicle and to its emissions system.
If you use anything other than Ford,
Motorcraft or Ford-authorized parts for
maintenance replacements or for service
of components affecting emission control,
such non-Ford parts should be equivalent
to genuine Ford Motor Company parts in
performance and durability.
193
Escape (CTC) Canada/United States of America, Vehicles Built From: 17-06-2019, enUSA, Edition date: 201906, Third-Printing- Engine Emission Control
Page 222 of 553
The electric parking brake continues to
slow your vehicle down unless you release
the switch.
Manually Releasing the Electric
Parking Brake
Switch the ignition on.
Press and hold the brake pedal.
Push the switch downward.
The red warning lamp turns off.
If it remains illuminated or flashes, the
system has malfunctioned. Have your
vehicle checked as soon as possible.
Pulling Away on a Hill When Towing a
Trailer
Press and hold the brake pedal.
Pull the switch upward and hold
it.
Shift into gear.
Press the accelerator pedal until engine
has developed sufficient torque to prevent
your vehicle from rolling down the hill. Release the switch and pull
away in a normal manner.
Automatically Releasing the
Electric Parking Brake
Close the driver door.
Shift into gear. Press the accelerator pedal and pull away
in a normal manner. The red warning lamp turns off.
If it remains illuminated or flashes, the
electric parking brake has not released.
Manually release the parking brake.
Releasing the Electric Parking
Brake if the Vehicle Battery is
Running Out of Charge
Note:
The electric parking brake does not
apply or release if the battery is low or has
no charge.
Connect a booster battery to the vehicle
battery to release the electric parking brake
if the vehicle battery is running out of
charge. See Jump Starting the Vehicle
(page 289).
HILL START ASSIST WARNING:
The system does not
replace the parking brake. When you
leave your vehicle, always apply the
parking brake. WARNING:
You must remain in
your vehicle when the system turns on.
At all times, you are responsible for
controlling your vehicle, supervising the
system and intervening, if required.
Failure to take care may result in the loss
of control of your vehicle, serious
personal injury or death.
219
Escape (CTC) Canada/United States of America, Vehicles Built From: 17-06-2019, enUSA, Edition date: 201906, Third-Printing- Brakes E267156 E270480 E267156 E267156 E270480
Page 292 of 553
4. You can attempt to start the vehicle
by pressing the brake pedal and
START/STOP, or press START/STOP
without pressing the brake pedal.
5. If the vehicle does not start, repeat steps 1 through 4.
JUMP STARTING THE VEHICLE
- EXCLUDING: HYBRID
ELECTRIC VEHICLE (HEV)/
PLUG-IN HYBRID ELECTRIC
VEHICLE (PHEV) WARNING:
Batteries normally
produce explosive gases which can
cause personal injury. Therefore, do not
allow flames, sparks or lighted
substances to come near the battery.
When working near the battery, always
shield your face and protect your eyes.
Always provide correct ventilation. WARNING:
Keep batteries out of
reach of children. Batteries contain
sulfuric acid. Avoid contact with skin,
eyes or clothing. Shield your eyes when
working near the battery to protect
against possible splashing of acid
solution. In case of acid contact with skin
or eyes, flush immediately with water for
a minimum of 15 minutes and get prompt
medical attention. If acid is swallowed,
call a physician immediately. WARNING:
Use only adequately
sized cables with insulated clamps. WARNING:
Make sure that the
cables are clear of any moving parts and
fuel delivery system parts. Note:
Do not attempt to push-start your
automatic transmission vehicle. Attempting
to push-start a vehicle with an automatic
transmission may cause transmission
damage.
Note: Do not disconnect the battery of the
disabled vehicle as this could damage the
vehicle electrical system.
Preparing Your Vehicle
Note: Use only a 12-volt supply to start your
vehicle.
Park the booster vehicle close to the hood
of the disabled vehicle, making sure the
two vehicles do not touch.
Connecting the Jumper Cables WARNING:
Do not connect the
negative jumper cable to any other part
of your vehicle. Use the ground point.
Note: If you are using a jump pack or
booster box, follow that manufacturer's
instructions.
Note: In the illustration that follows, the
bottom vehicle represents the booster
vehicle.
289
Escape (CTC) Canada/United States of America, Vehicles Built From: 17-06-2019, enUSA, Edition date: 201906, Third-Printing- Roadside Emergencies
Page 293 of 553
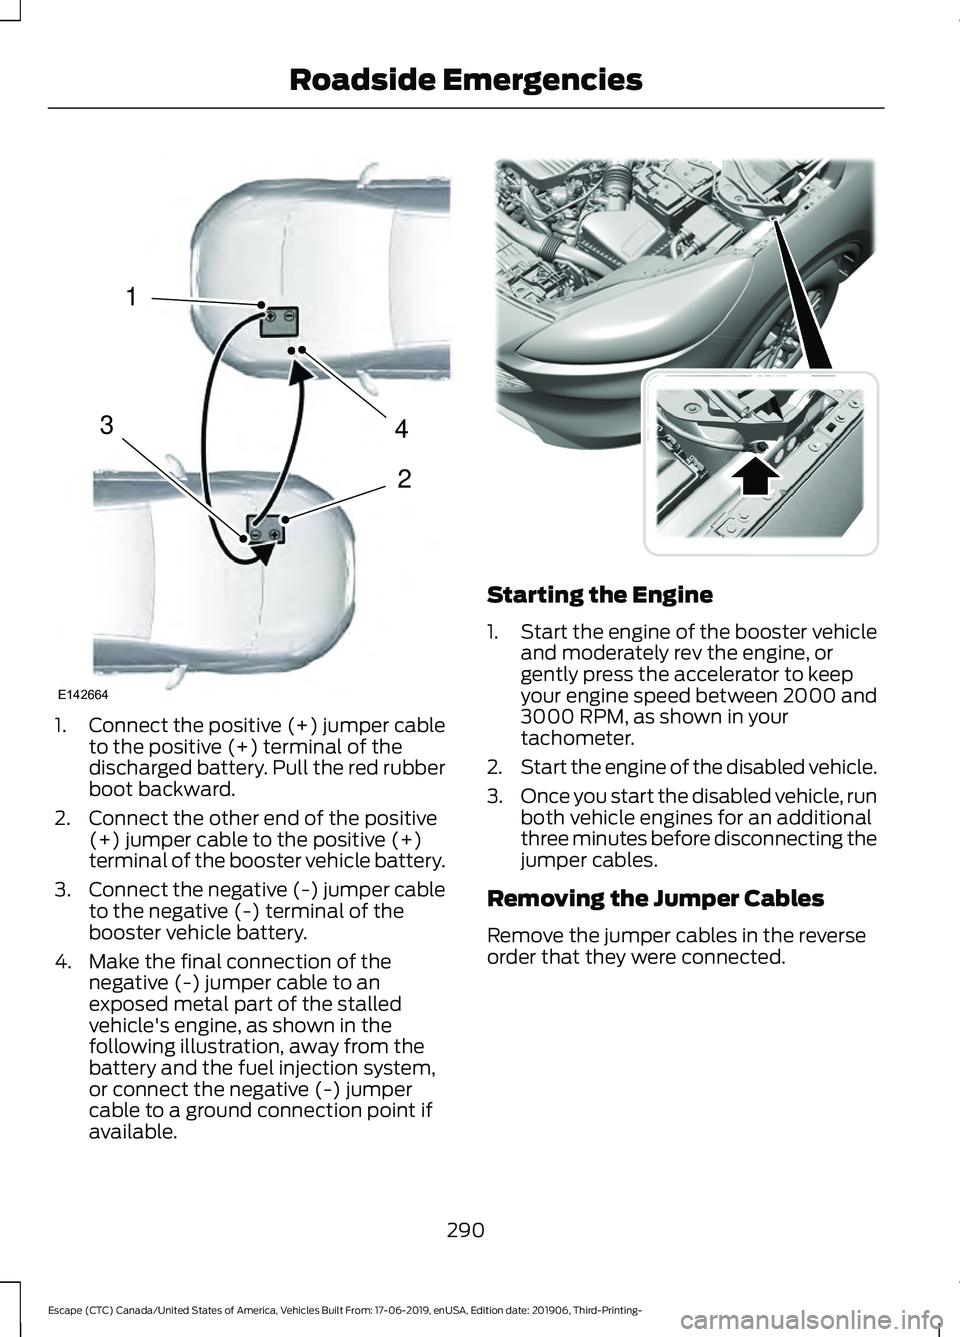
1.
Connect the positive (+) jumper cable
to the positive (+) terminal of the
discharged battery. Pull the red rubber
boot backward.
2. Connect the other end of the positive (+) jumper cable to the positive (+)
terminal of the booster vehicle battery.
3. Connect the negative (-) jumper cable
to the negative (-) terminal of the
booster vehicle battery.
4. Make the final connection of the negative (-) jumper cable to an
exposed metal part of the stalled
vehicle's engine, as shown in the
following illustration, away from the
battery and the fuel injection system,
or connect the negative (-) jumper
cable to a ground connection point if
available. Starting the Engine
1.
Start the engine of the booster vehicle
and moderately rev the engine, or
gently press the accelerator to keep
your engine speed between 2000 and
3000 RPM, as shown in your
tachometer.
2. Start the engine of the disabled vehicle.
3. Once you start the disabled vehicle, run
both vehicle engines for an additional
three minutes before disconnecting the
jumper cables.
Removing the Jumper Cables
Remove the jumper cables in the reverse
order that they were connected.
290
Escape (CTC) Canada/United States of America, Vehicles Built From: 17-06-2019, enUSA, Edition date: 201906, Third-Printing- Roadside Emergencies4
2
1
3
E142664 E309225
Page 294 of 553
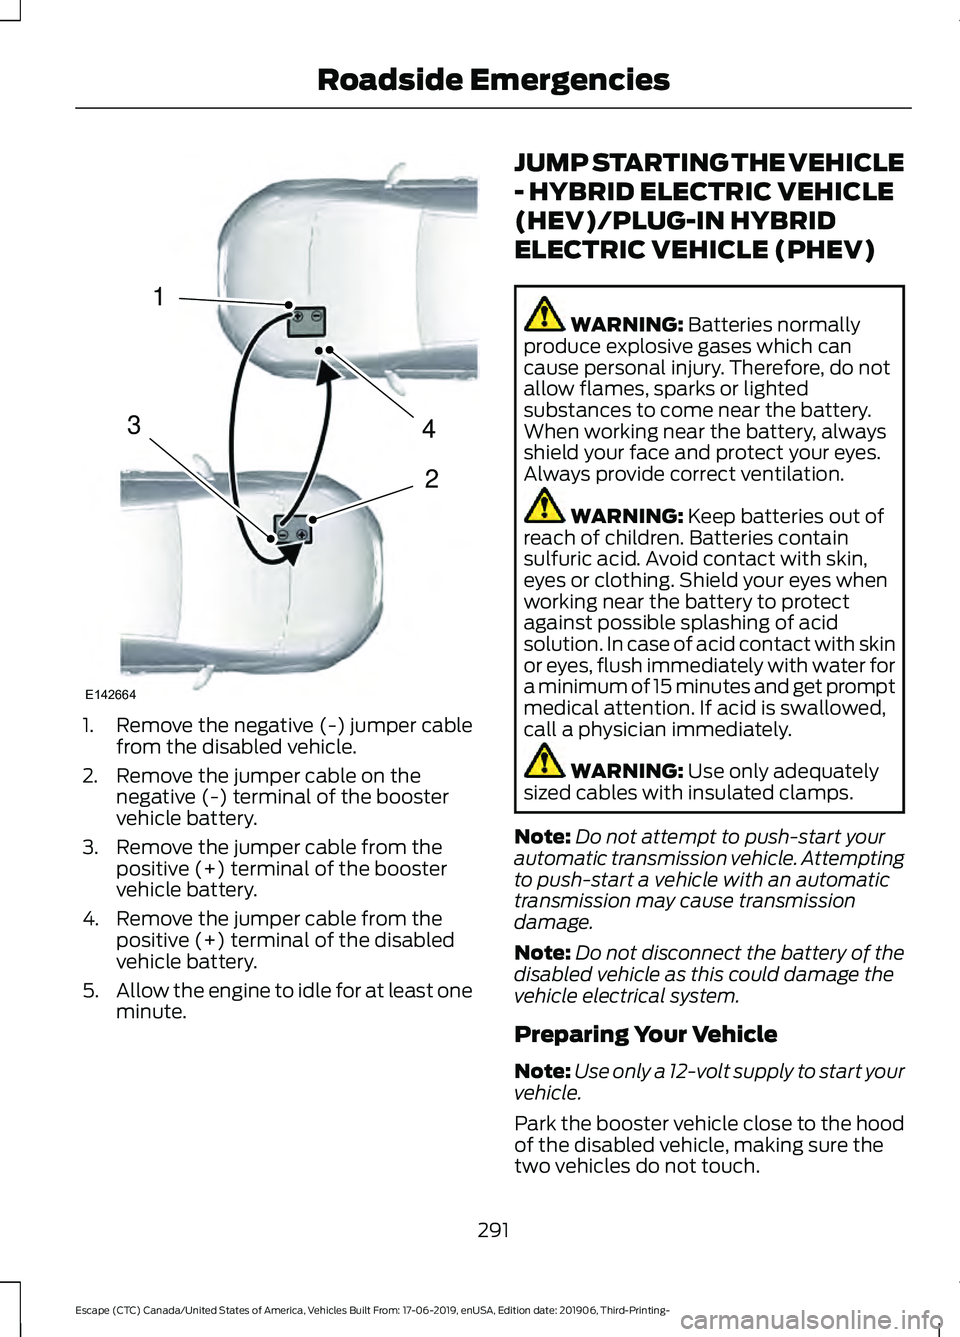
1. Remove the negative (-) jumper cable
from the disabled vehicle.
2. Remove the jumper cable on the negative (-) terminal of the booster
vehicle battery.
3. Remove the jumper cable from the positive (+) terminal of the booster
vehicle battery.
4. Remove the jumper cable from the positive (+) terminal of the disabled
vehicle battery.
5. Allow the engine to idle for at least one
minute. JUMP STARTING THE VEHICLE
- HYBRID ELECTRIC VEHICLE
(HEV)/PLUG-IN HYBRID
ELECTRIC VEHICLE (PHEV) WARNING: Batteries normally
produce explosive gases which can
cause personal injury. Therefore, do not
allow flames, sparks or lighted
substances to come near the battery.
When working near the battery, always
shield your face and protect your eyes.
Always provide correct ventilation. WARNING:
Keep batteries out of
reach of children. Batteries contain
sulfuric acid. Avoid contact with skin,
eyes or clothing. Shield your eyes when
working near the battery to protect
against possible splashing of acid
solution. In case of acid contact with skin
or eyes, flush immediately with water for
a minimum of 15 minutes and get prompt
medical attention. If acid is swallowed,
call a physician immediately. WARNING:
Use only adequately
sized cables with insulated clamps.
Note: Do not attempt to push-start your
automatic transmission vehicle. Attempting
to push-start a vehicle with an automatic
transmission may cause transmission
damage.
Note: Do not disconnect the battery of the
disabled vehicle as this could damage the
vehicle electrical system.
Preparing Your Vehicle
Note: Use only a 12-volt supply to start your
vehicle.
Park the booster vehicle close to the hood
of the disabled vehicle, making sure the
two vehicles do not touch.
291
Escape (CTC) Canada/United States of America, Vehicles Built From: 17-06-2019, enUSA, Edition date: 201906, Third-Printing- Roadside Emergencies4
2
1
3
E142664
Page 295 of 553
Connecting the Jumper Cables
WARNING: Do not connect the
negative jumper cable to any other part
of your vehicle. Use the ground point.
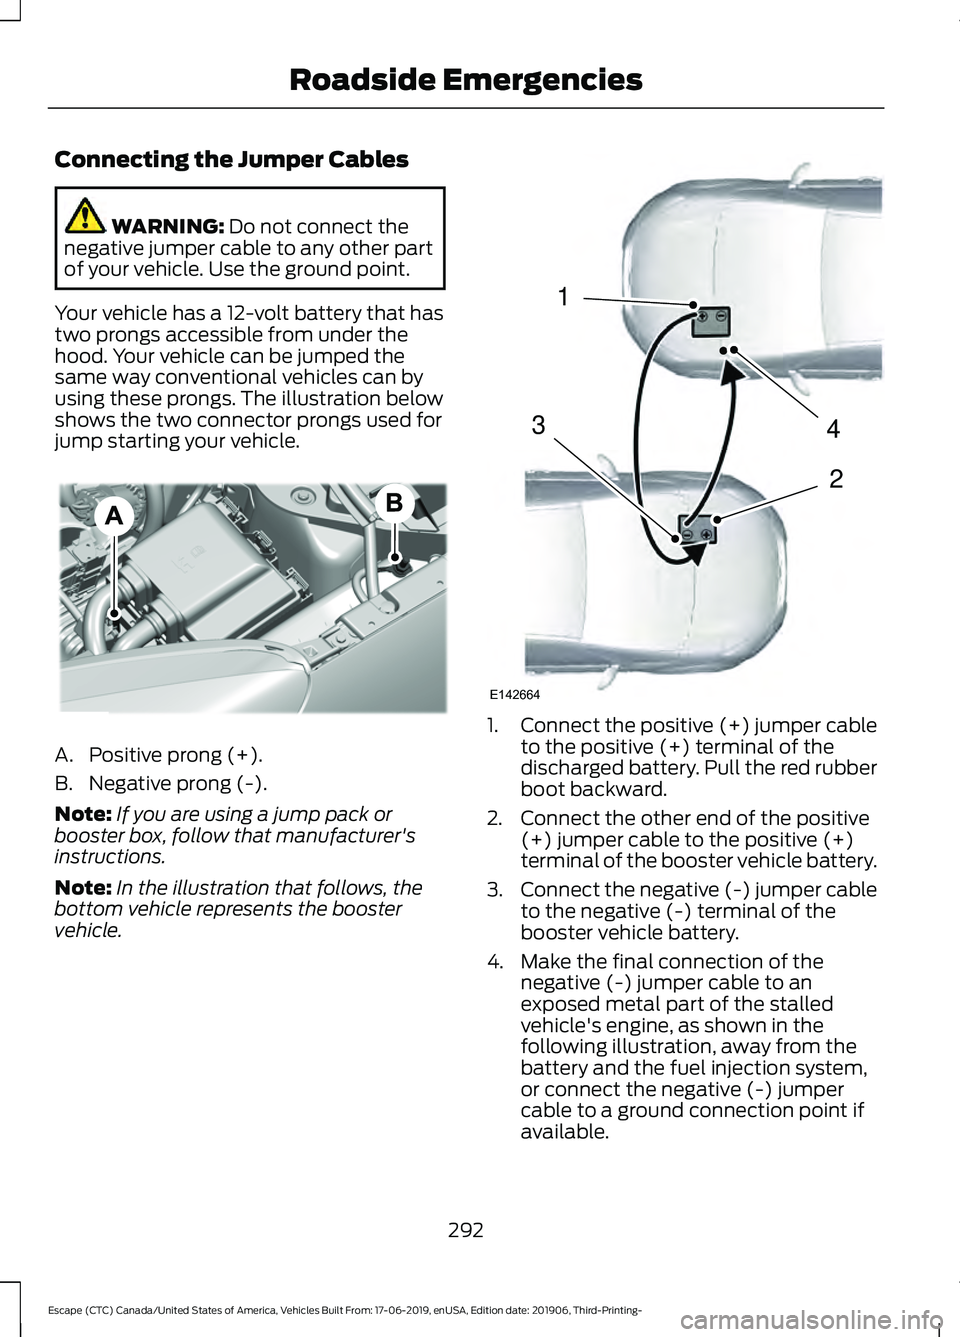
Your vehicle has a 12-volt battery that has
two prongs accessible from under the
hood. Your vehicle can be jumped the
same way conventional vehicles can by
using these prongs. The illustration below
shows the two connector prongs used for
jump starting your vehicle. A. Positive prong (+).
B. Negative prong (-).
Note:
If you are using a jump pack or
booster box, follow that manufacturer's
instructions.
Note: In the illustration that follows, the
bottom vehicle represents the booster
vehicle. 1.
Connect the positive (+) jumper cable
to the positive (+) terminal of the
discharged battery. Pull the red rubber
boot backward.
2. Connect the other end of the positive (+) jumper cable to the positive (+)
terminal of the booster vehicle battery.
3. Connect the negative (-) jumper cable
to the negative (-) terminal of the
booster vehicle battery.
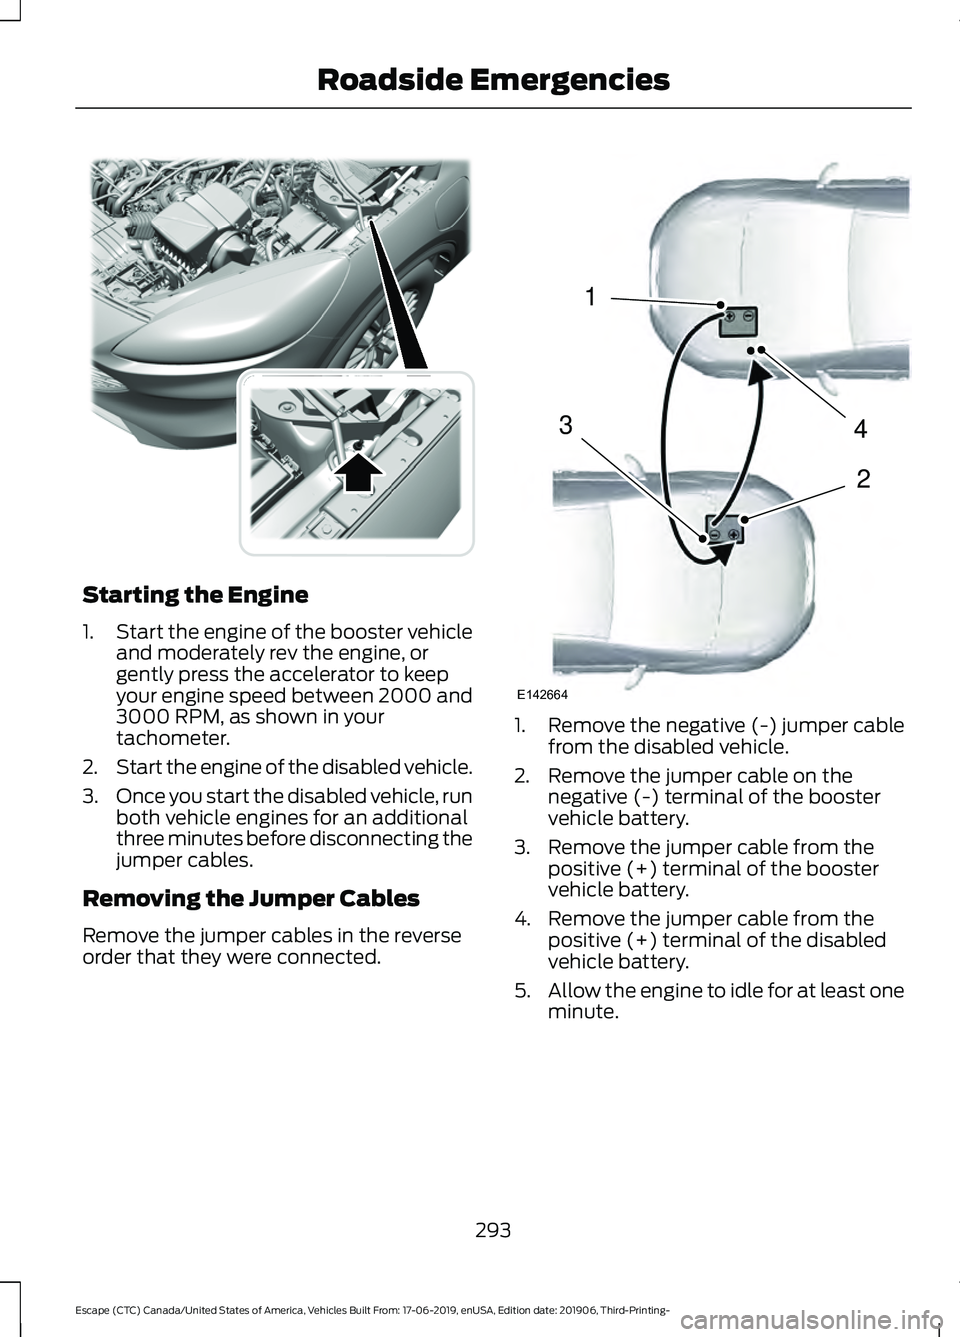
4. Make the final connection of the negative (-) jumper cable to an
exposed metal part of the stalled
vehicle's engine, as shown in the
following illustration, away from the
battery and the fuel injection system,
or connect the negative (-) jumper
cable to a ground connection point if
available.
292
Escape (CTC) Canada/United States of America, Vehicles Built From: 17-06-2019, enUSA, Edition date: 201906, Third-Printing- Roadside EmergenciesE309691 4
2
1
3
E142664
Page 296 of 553
Starting the Engine
1.
Start the engine of the booster vehicle
and moderately rev the engine, or
gently press the accelerator to keep
your engine speed between 2000 and
3000 RPM, as shown in your
tachometer.
2. Start the engine of the disabled vehicle.
3. Once you start the disabled vehicle, run
both vehicle engines for an additional
three minutes before disconnecting the
jumper cables.
Removing the Jumper Cables
Remove the jumper cables in the reverse
order that they were connected. 1. Remove the negative (-) jumper cable
from the disabled vehicle.
2. Remove the jumper cable on the negative (-) terminal of the booster
vehicle battery.
3. Remove the jumper cable from the positive (+) terminal of the booster
vehicle battery.
4. Remove the jumper cable from the positive (+) terminal of the disabled
vehicle battery.
5. Allow the engine to idle for at least one
minute.
293
Escape (CTC) Canada/United States of America, Vehicles Built From: 17-06-2019, enUSA, Edition date: 201906, Third-Printing- Roadside EmergenciesE309226 4
2
1
3
E142664
Page 540 of 553
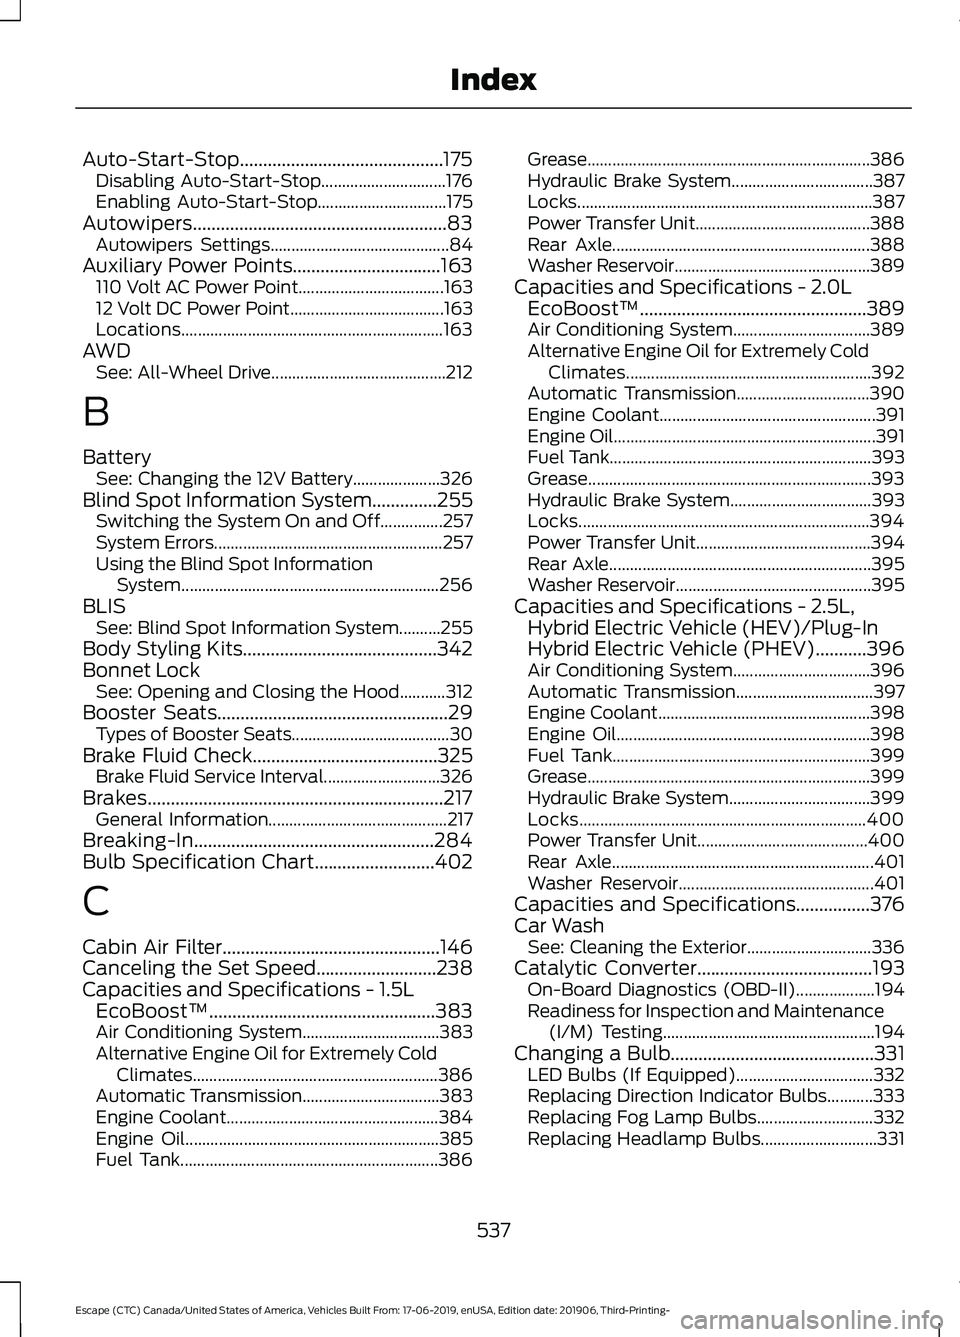
Auto-Start-Stop............................................175
Disabling Auto-Start-Stop.............................. 176
Enabling Auto-Start-Stop............................... 175
Autowipers.......................................................83 Autowipers Settings........................................... 84
Auxiliary Power Points................................163 110 Volt AC Power Point................................... 163
12 Volt DC Power Point..................................... 163
Locations............................................................... 163
AWD See: All-Wheel Drive.......................................... 212
B
Battery See: Changing the 12V Battery..................... 326
Blind Spot Information System..............255
Switching the System On and Off...............257
System Errors....................................................... 257
Using the Blind Spot Information System.............................................................. 256
BLIS See: Blind Spot Information System..........255
Body Styling Kits
..........................................342
Bonnet Lock See: Opening and Closing the Hood...........312
Booster Seats
..................................................29
Types of Booster Seats...................................... 30
Brake Fluid Check........................................325 Brake Fluid Service Interval............................ 326
Brakes................................................................217 General Information........................................... 217
Breaking-In....................................................284
Bulb Specification Chart..........................402
C
Cabin Air Filter...............................................146
Canceling the Set Speed..........................238
Capacities and Specifications - 1.5L EcoBoost™.................................................383
Air Conditioning System................................. 383
Alternative Engine Oil for Extremely Cold Climates........................................................... 386
Automatic Transmission................................. 383
Engine Coolant................................................... 384
Engine Oil............................................................. 385
Fuel Tank.............................................................. 386Grease....................................................................386
Hydraulic Brake System..................................
387
Locks....................................................................... 387
Power Transfer Unit.......................................... 388
Rear Axle.............................................................. 388
Washer Reservoir...............................................389
Capacities and Specifications - 2.0L EcoBoost™
.................................................389
Air Conditioning System................................. 389
Alternative Engine Oil for Extremely Cold Climates........................................................... 392
Automatic Transmission................................ 390
Engine Coolant.................................................... 391
Engine Oil............................................................... 391
Fuel Tank............................................................... 393
Grease.................................................................... 393
Hydraulic Brake System.................................. 393
Locks...................................................................... 394
Power Transfer Unit.......................................... 394
Rear Axle............................................................... 395
Washer Reservoir............................................... 395
Capacities and Specifications - 2.5L, Hybrid Electric Vehicle (HEV)/Plug-In
Hybrid Electric Vehicle (PHEV)...........396
Air Conditioning System................................. 396
Automatic Transmission................................. 397
Engine Coolant................................................... 398
Engine Oil............................................................. 398
Fuel Tank.............................................................. 399
Grease.................................................................... 399
Hydraulic Brake System.................................. 399
Locks..................................................................... 400
Power Transfer Unit......................................... 400
Rear Axle............................................................... 401
Washer Reservoir............................................... 401
Capacities and Specifications
................376
Car Wash See: Cleaning the Exterior.............................. 336
Catalytic Converter......................................193 On-Board Diagnostics (OBD-II)................... 194
Readiness for Inspection and Maintenance (I/M) Testing................................................... 194
Changing a Bulb
............................................331
LED Bulbs (If Equipped)................................. 332
Replacing Direction Indicator Bulbs...........333
Replacing Fog Lamp Bulbs............................ 332
Replacing Headlamp Bulbs............................ 331
537
Escape (CTC) Canada/United States of America, Vehicles Built From: 17-06-2019, enUSA, Edition date: 201906, Third-Printing- Index