FORD ESCAPE 2020 Owners Manual
Manufacturer: FORD, Model Year: 2020, Model line: ESCAPE, Model: FORD ESCAPE 2020Pages: 553, PDF Size: 7.73 MB
Page 311 of 553
Protected Component
Fuse
Rating
Fuse
Location
Not used.
—
77
Air conditioning clutch.
10 A
78
Not used (spare).
10 A
79
Fuel pump.
20 A
80
Rear window washer pump.
10 A
81
Power inverter.
40 A
82
Not used.
—
83
Driveline control module.
40 A
84
Rain sensor.
5 A
85
Not used.
—
86
Not used.
—
87
Not used.
—
88
Note: Spare fuse amperage may vary.
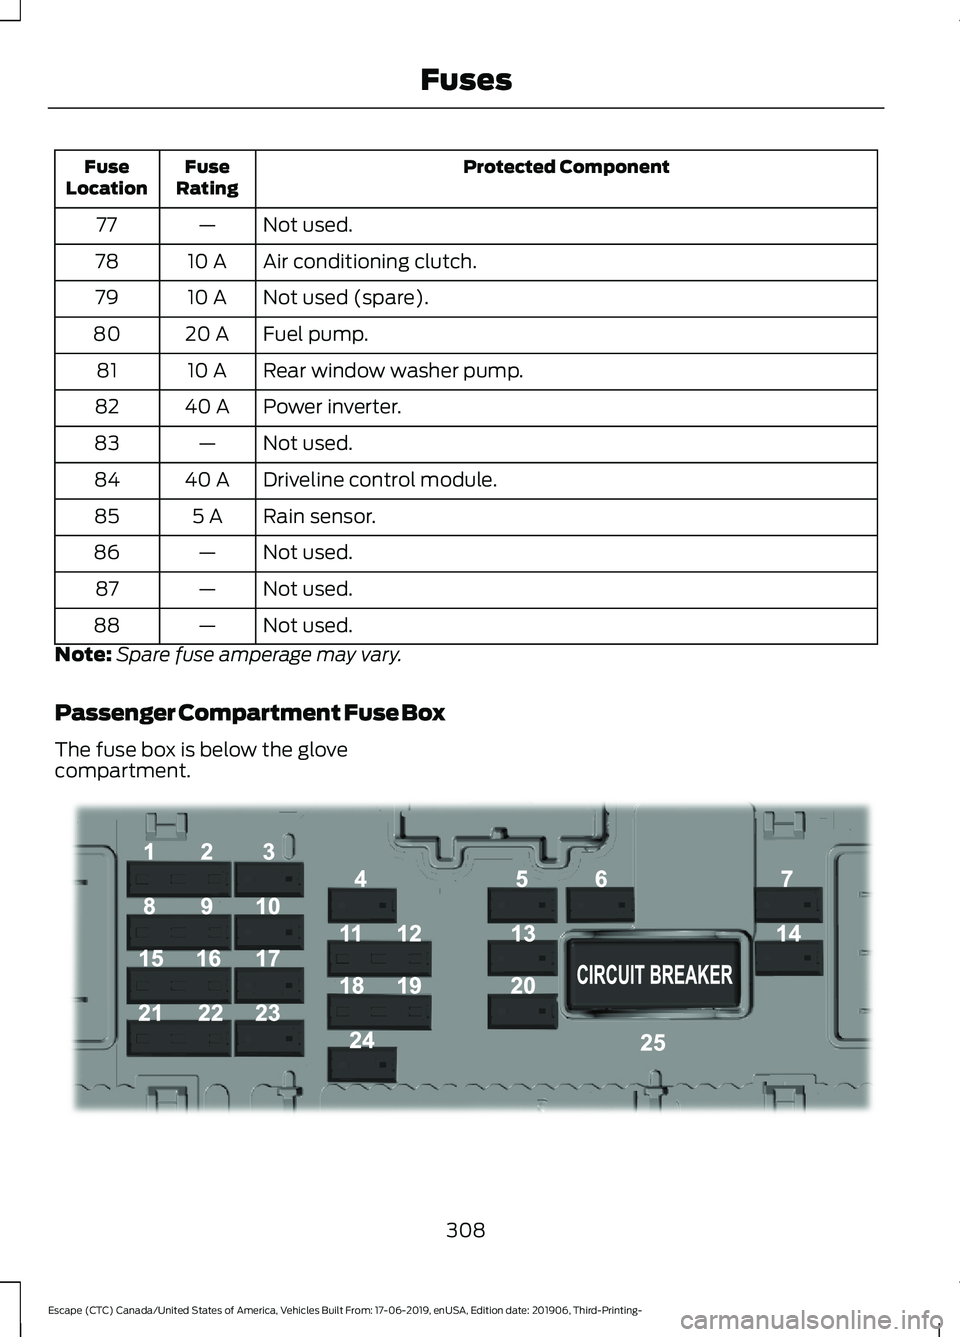
Passenger Compartment Fuse Box
The fuse box is below the glove
compartment. 308
Escape (CTC) Canada/United States of America, Vehicles Built From: 17-06-2019, enUSA, Edition date: 201906, Third-Printing- FusesE293328
Page 312 of 553
Protected Component
Fuse
Rating
Fuse
Location
Not used (spare).
5 A
1
Not used (spare).
5 A
2
Not used (spare).
10 A
3
Ignition switch.
10 A
4
Lock.
20 A
5
Unlock.
Moonroof.
10 A
6
DC inverter.
Passenger door module.
30 A
7
Parking assist control module.
5 A
8
Electrochromatic mirror.
5 A
9
Image processing module A.
Extended power module.
10 A
10
Power liftgate.
5 A
11
Hands-free liftgate actuation module.
Telematics control unit module.
Head up display module.
5 A
12
Keyless keypad switch.
Driver door lock.
15 A
13
Driver door module.
30 A
14
Extended power module.
15 A
15
Not used (spare).
15 A
16
SYNC.
15 A
17
Receiver transceiver module.
Integrated control panel.
Wireless accessory charging module.
7.5 A
18
Headlamp switch pack.
7.5 A
19
Not used (spare).
10 A
20
Climate control.
7.5 A
21
309
Escape (CTC) Canada/United States of America, Vehicles Built From: 17-06-2019, enUSA, Edition date: 201906, Third-Printing- Fuses
Page 313 of 553
Protected Component
Fuse
Rating
Fuse
Location
E-shifter module.
Instrument cluster.
7.5 A
22
Gateway module.
Steering column control module.
Audio unit.
20 A
23
Not used (spare).
20 A
24
Power windows.
30 A
25
Exterior mirrors.
Note: Spare fuse amperage may vary.
CHANGING A FUSE
General Information If electrical components in the vehicle are
not working, a fuse may have blown. Blown
fuses are identified by a broken wire within
the fuse.
Engine Compartment Fuse Box
WARNING: Always replace a fuse
with one that has the specified
amperage rating. Using a fuse with a
higher amperage rating can cause severe
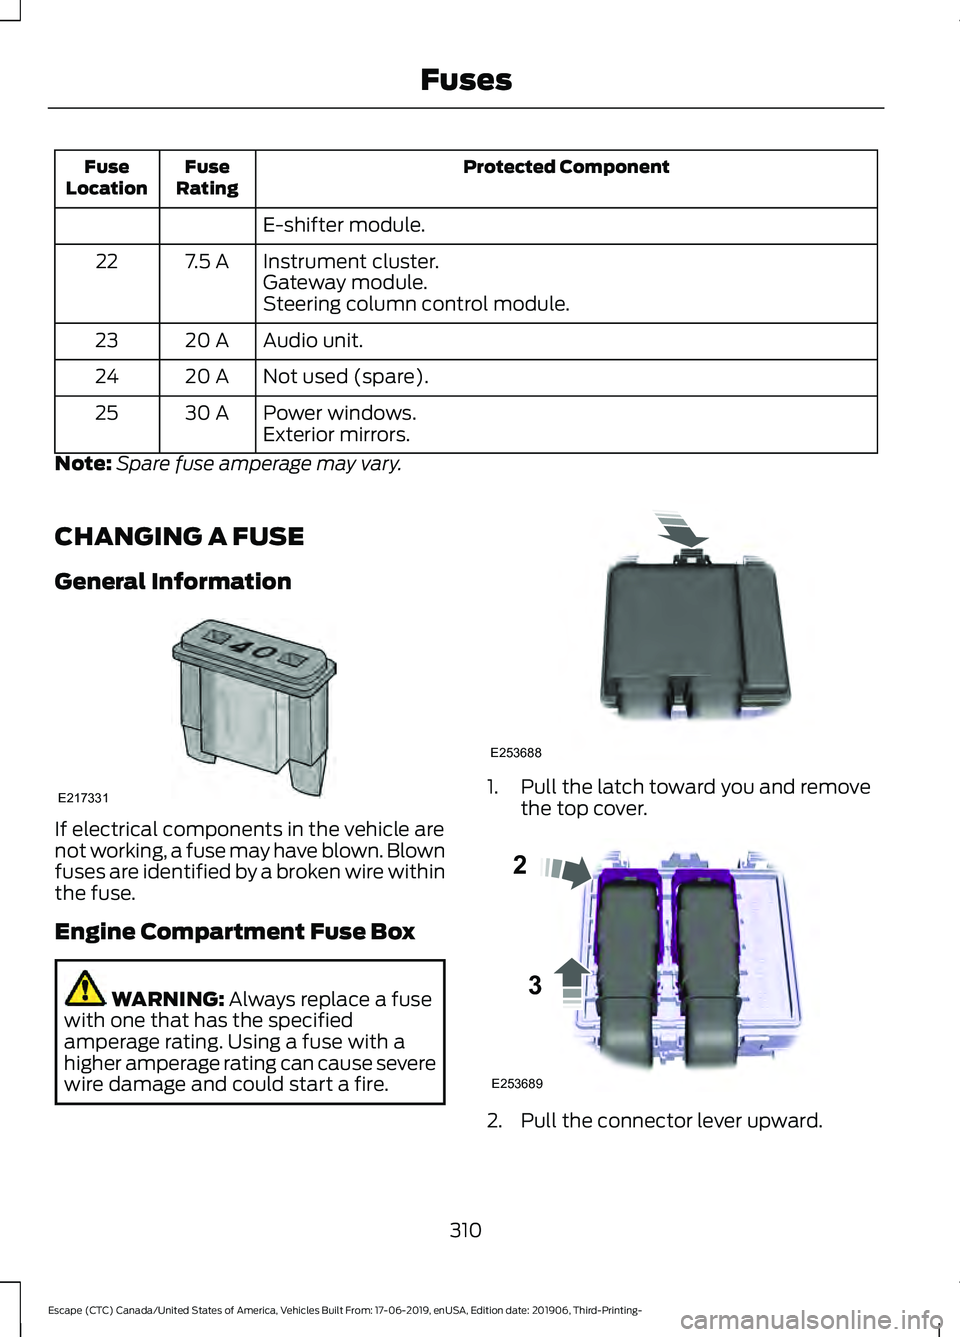
wire damage and could start a fire. 1. Pull the latch toward you and remove
the top cover. 2. Pull the connector lever upward.
310
Escape (CTC) Canada/United States of America, Vehicles Built From: 17-06-2019, enUSA, Edition date: 201906, Third-Printing- FusesE217331 E253688 E253689
2
3
Page 314 of 553

3. Pull the connector upward to remove
it. 4. Pull both latches toward you and
remove the fuse box.
5. Turn the fuse box over and open the lid.
Fuse Types Micro 2.
A
Micro 3.
B
Maxi.
C
Mini.
D
M Case.
E
J Case.
F
J Case Low Profile.
G
Slotted M Case.
H
311
Escape (CTC) Canada/United States of America, Vehicles Built From: 17-06-2019, enUSA, Edition date: 201906, Third-Printing- FusesE253693 E267379
Page 315 of 553
GENERAL INFORMATION
Have your vehicle serviced regularly to help
maintain its roadworthiness and resale
value. There is a large network of
authorized dealers that are there to help
you with their professional servicing
expertise. We believe that their specially
trained technicians are best qualified to
service your vehicle properly and expertly.
They are supported by a wide range of
highly specialized tools developed
specifically for servicing your vehicle.
If your vehicle requires professional service,
an authorized dealer can provide the
necessary parts and service. Check your
warranty information to find out which
parts and services are covered.
Use only recommended fuels, lubricants,
fluids and service parts conforming to
specifications. Motorcraft® parts are
designed and built to provide the best
performance in your vehicle.
Precautions
•
Do not work on a hot engine.
• Make sure that nothing gets caught in
moving parts.
• Do not work on a vehicle with the
engine running in an enclosed space,
unless you are sure you have enough
ventilation.
• Keep all open flames and other burning
material (such as cigarettes) away
from the battery and all fuel related
parts.
Working with the Engine Off
1. Set the parking brake and shift the transmission to park (P).
2. Switch off the engine.
3. Block the wheels. Working with the Engine On WARNING: To reduce the risk of
vehicle damage and personal burn
injuries, do not start your engine with the
air cleaner removed and do not remove
it while the engine is running.
1. Set the parking brake and shift the transmission to park (P).
2. Block the wheels.
OPENING AND CLOSING THE
HOOD
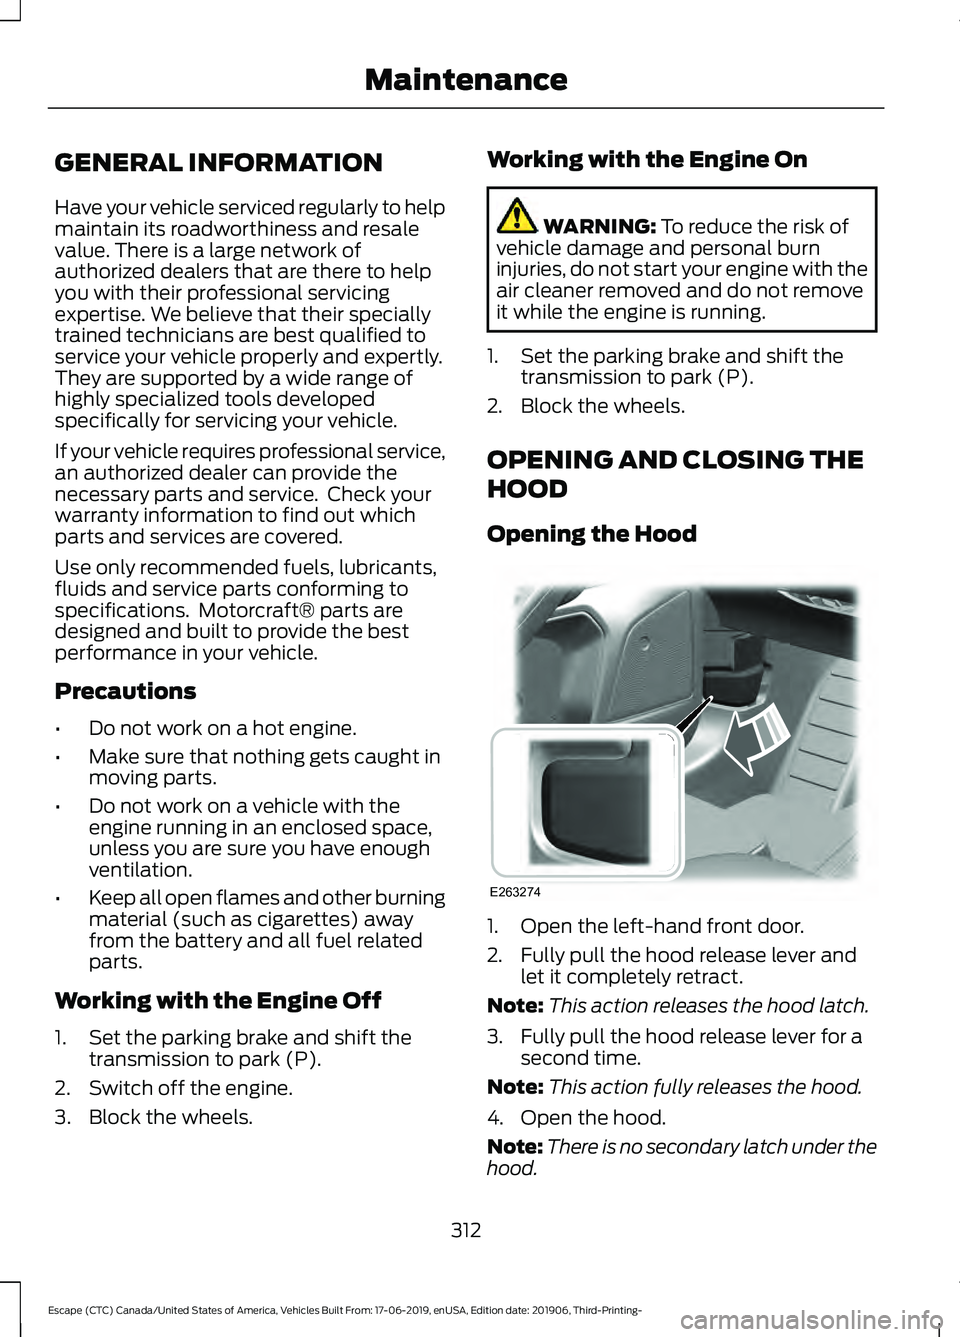
Opening the Hood 1. Open the left-hand front door.
2. Fully pull the hood release lever and
let it completely retract.
Note: This action releases the hood latch.
3. Fully pull the hood release lever for a second time.
Note: This action fully releases the hood.
4. Open the hood.
Note: There is no secondary latch under the
hood.
312
Escape (CTC) Canada/United States of America, Vehicles Built From: 17-06-2019, enUSA, Edition date: 201906, Third-Printing- MaintenanceE263274
Page 316 of 553
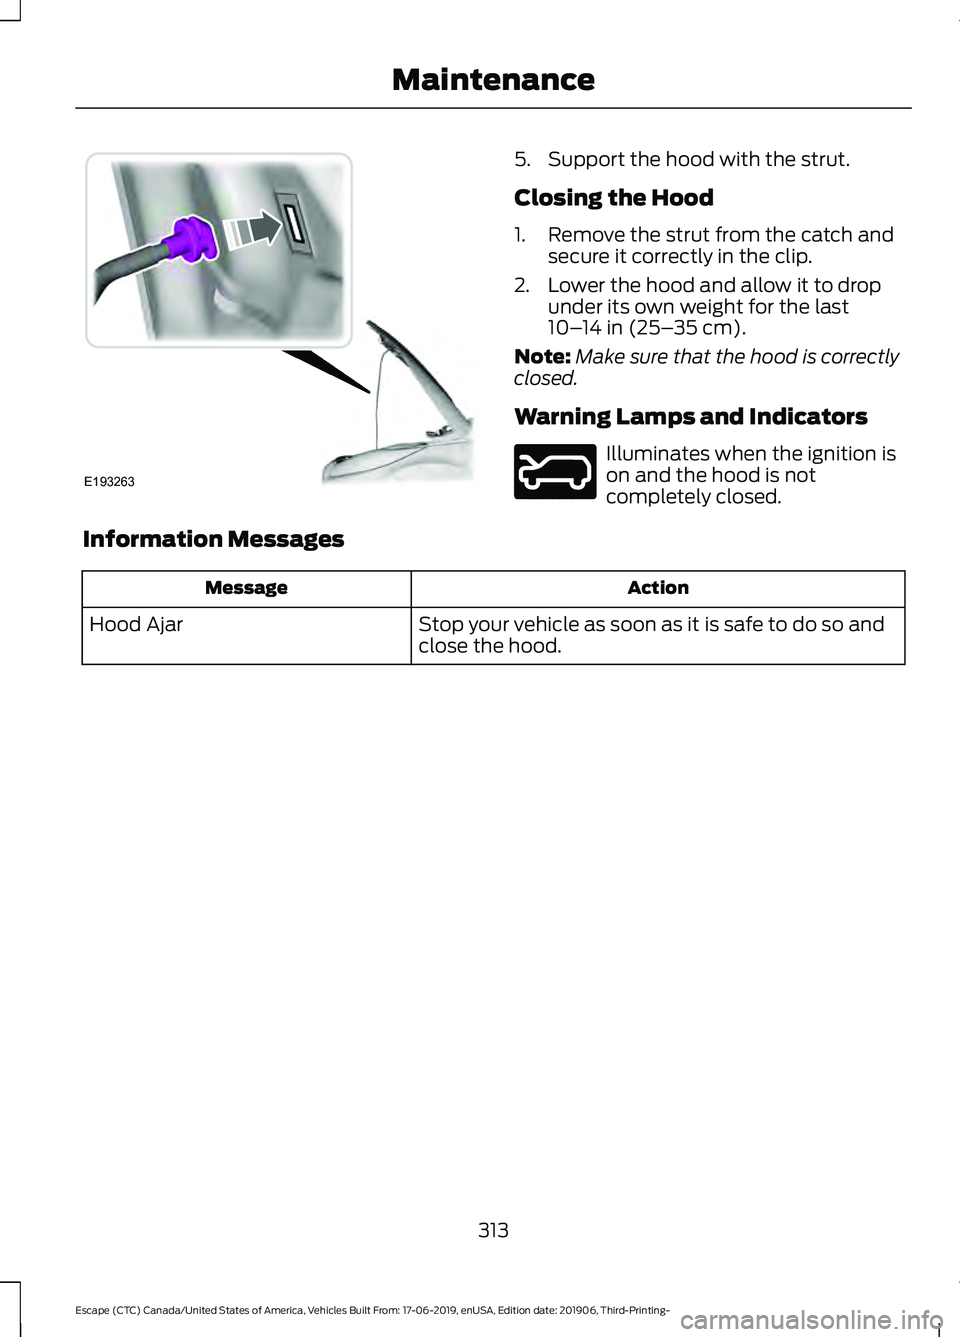
5. Support the hood with the strut.
Closing the Hood
1. Remove the strut from the catch and
secure it correctly in the clip.
2. Lower the hood and allow it to drop under its own weight for the last
10– 14 in (25– 35 cm).
Note: Make sure that the hood is correctly
closed.
Warning Lamps and Indicators Illuminates when the ignition is
on and the hood is not
completely closed.
Information Messages Action
Message
Stop your vehicle as soon as it is safe to do so and
close the hood.
Hood Ajar
313
Escape (CTC) Canada/United States of America, Vehicles Built From: 17-06-2019, enUSA, Edition date: 201906, Third-Printing- MaintenanceE193263 E246598
Page 317 of 553
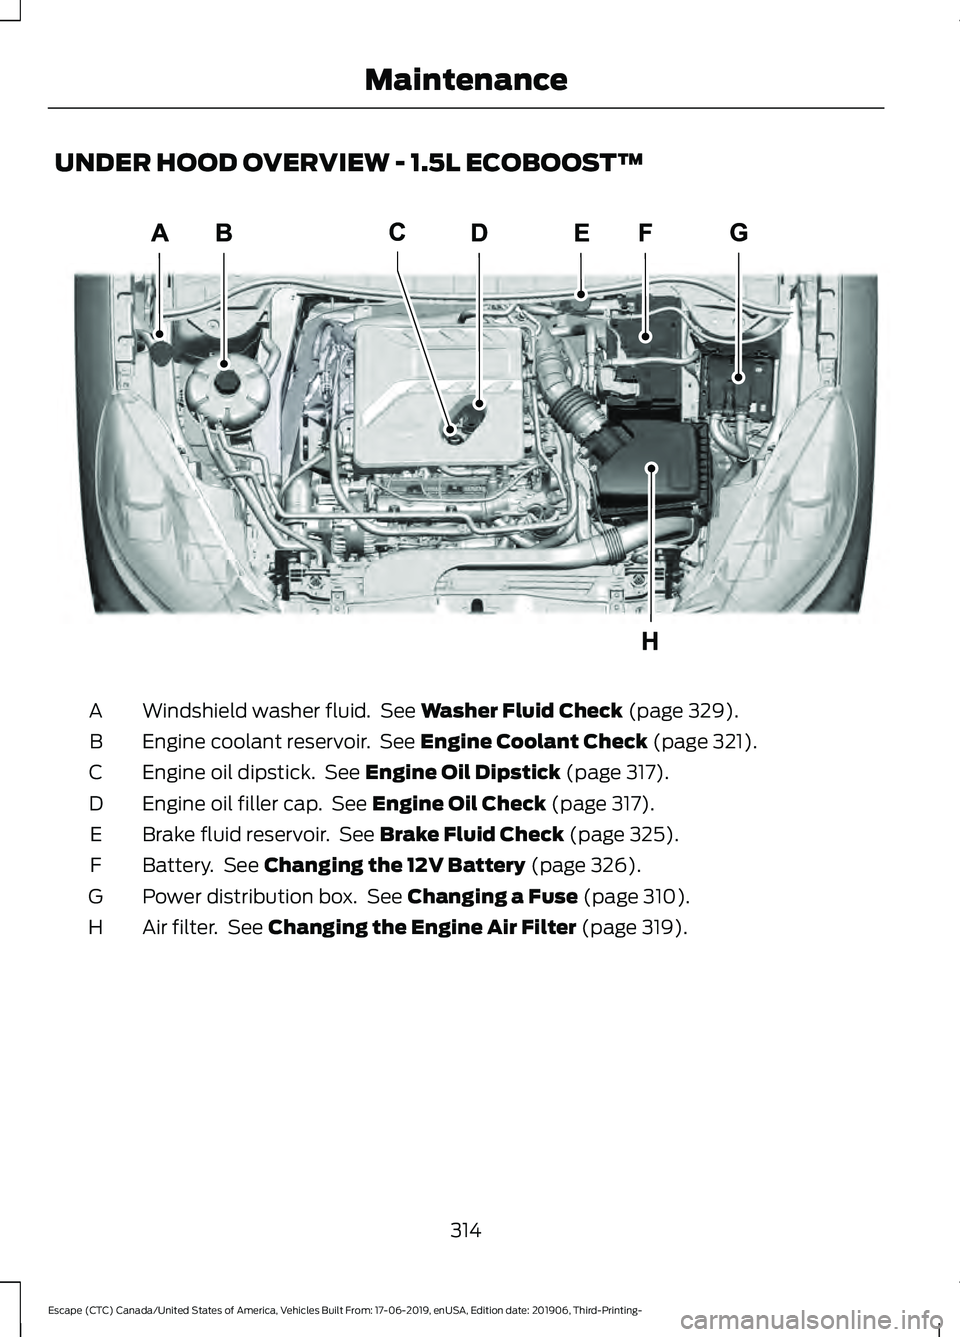
UNDER HOOD OVERVIEW - 1.5L ECOBOOST™
Windshield washer fluid. See Washer Fluid Check (page 329).
A
Engine coolant reservoir. See
Engine Coolant Check (page 321).
B
Engine oil dipstick. See
Engine Oil Dipstick (page 317).
C
Engine oil filler cap. See
Engine Oil Check (page 317).
D
Brake fluid reservoir. See
Brake Fluid Check (page 325).
E
Battery. See
Changing the 12V Battery (page 326).
F
Power distribution box. See
Changing a Fuse (page 310).
G
Air filter. See
Changing the Engine Air Filter (page 319).
H
314
Escape (CTC) Canada/United States of America, Vehicles Built From: 17-06-2019, enUSA, Edition date: 201906, Third-Printing- MaintenanceE308193
Page 318 of 553
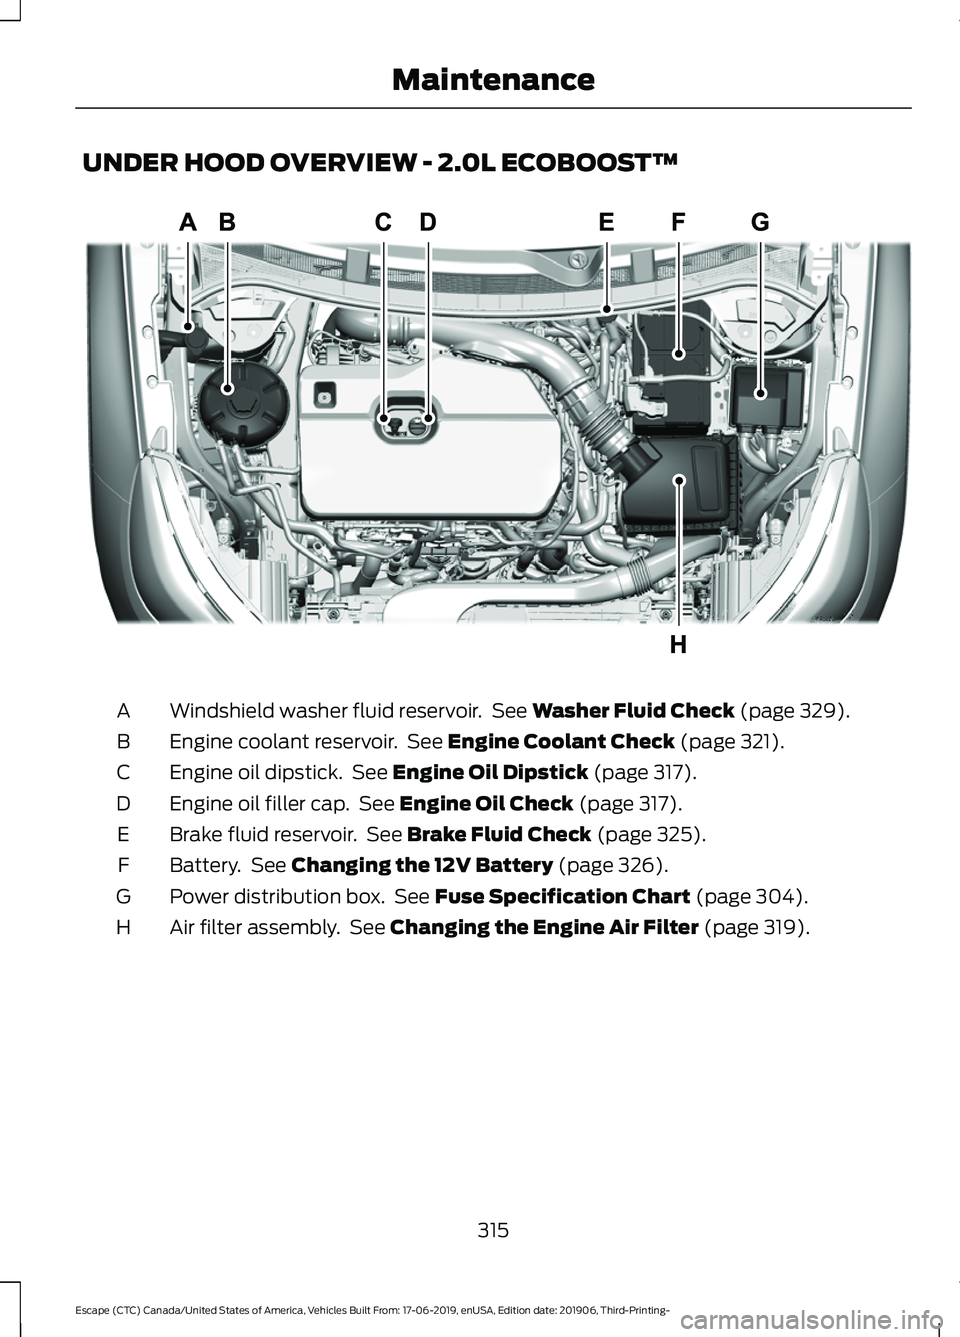
UNDER HOOD OVERVIEW - 2.0L ECOBOOST™
Windshield washer fluid reservoir. See Washer Fluid Check (page 329).
A
Engine coolant reservoir. See
Engine Coolant Check (page 321).
B
Engine oil dipstick. See
Engine Oil Dipstick (page 317).
C
Engine oil filler cap. See
Engine Oil Check (page 317).
D
Brake fluid reservoir. See
Brake Fluid Check (page 325).
E
Battery. See
Changing the 12V Battery (page 326).
F
Power distribution box. See
Fuse Specification Chart (page 304).
G
Air filter assembly. See
Changing the Engine Air Filter (page 319).
H
315
Escape (CTC) Canada/United States of America, Vehicles Built From: 17-06-2019, enUSA, Edition date: 201906, Third-Printing- MaintenanceE307705
Page 319 of 553
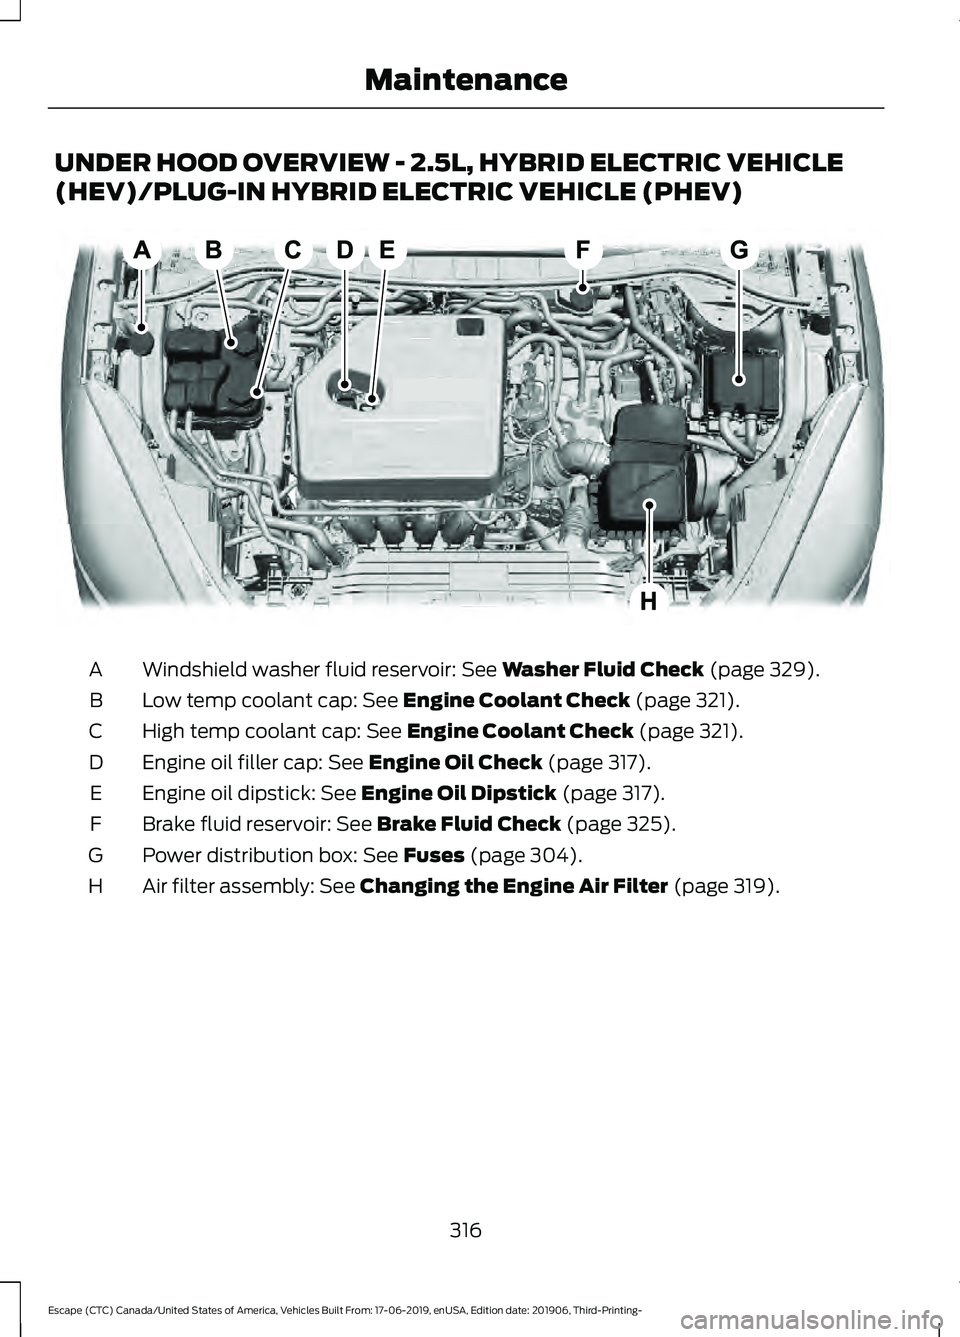
UNDER HOOD OVERVIEW - 2.5L, HYBRID ELECTRIC VEHICLE
(HEV)/PLUG-IN HYBRID ELECTRIC VEHICLE (PHEV)
Windshield washer fluid reservoir: See Washer Fluid Check (page 329).
A
Low temp coolant cap:
See Engine Coolant Check (page 321).
B
High temp coolant cap:
See Engine Coolant Check (page 321).
C
Engine oil filler cap:
See Engine Oil Check (page 317).
D
Engine oil dipstick:
See Engine Oil Dipstick (page 317).
E
Brake fluid reservoir:
See Brake Fluid Check (page 325).
F
Power distribution box:
See Fuses (page 304).
G
Air filter assembly:
See Changing the Engine Air Filter (page 319).
H
316
Escape (CTC) Canada/United States of America, Vehicles Built From: 17-06-2019, enUSA, Edition date: 201906, Third-Printing- MaintenanceE291097
Page 320 of 553

ENGINE OIL DIPSTICK
Minimum.
A
Maximum.
B
ENGINE OIL CHECK
To check the engine oil level consistently
and accurately, do the following:
1. Make sure the parking brake is on. Make
sure the transmission is in park (P) or
neutral (N).
2. Run the engine until it reaches normal operating temperature.
3. Make sure that your vehicle is on level ground.
4. Switch the engine off and wait 15 minutes for the oil to drain into the oil
pan. Checking the engine oil level too
soon after you switch the engine off
may result in an inaccurate reading.
5. Open the hood. See Opening and
Closing the Hood (page 312).
6. Remove the dipstick and wipe it with a clean, lint-free cloth. See
Under
Hood Overview (page 314).
7. Reinstall the dipstick and remove it again to check the oil level. See Under
Hood Overview
(page 314). 8.
Make sure that the oil level is between
the maximum and minimum marks. If
the oil level is at the minimum mark,
add oil immediately. See
Capacities
and Specifications (page 383).
9. If the oil level is correct, replace the dipstick and make sure it is fully seated.
Note: Do not remove the dipstick when the
engine is running.
Note: If the oil level is between the
maximum and minimum marks, the oil level
is acceptable. Do not add oil.
Note: The oil consumption of new engines
reaches its normal level after approximately
3,000 mi (5,000 km)
.
Adding Engine Oil WARNING: Do not remove the filler
cap when the engine is running.
Do not use supplemental engine oil
additives because they are unnecessary
and could lead to engine damage that may
not be covered by the vehicle Warranty. 317
Escape (CTC) Canada/United States of America, Vehicles Built From: 17-06-2019, enUSA, Edition date: 201906, Third-Printing- MaintenanceAB
E264320 E142732