warning light FORD ESCAPE 2020 Workshop Manual
[x] Cancel search | Manufacturer: FORD, Model Year: 2020, Model line: ESCAPE, Model: FORD ESCAPE 2020Pages: 553, PDF Size: 7.73 MB
Page 265 of 553
3. Active Braking
Alert: When active, a flashing visual
warning appears and an audible warning
tone sounds.
Brake support
: The system is designed
to help reduce the impact speed by
preparing the brakes for rapid braking.
Brake support does not automatically
apply the brakes. If you press the brake
pedal, the system could apply additional
braking up to maximum braking force, even
if you lightly press the brake pedal.
Active braking
: Active braking may
activate if the system determines that a
collision is imminent. The system may help
the driver reduce impact damage or avoid
the crash completely.
Note: Brake support and active braking are
active at speeds up to
75 mph (120 km/h).
If the vehicle is equipped with a radar
sensor, included with adaptive cruise
control, then brake support and active
braking are active up to the maximum speed
of the vehicle.
Note: If you perceive pre-collision assist
alerts as being too frequent or disturbing,
then you can reduce the alert sensitivity,
though the manufacturer recommends
using the highest sensitivity setting where
possible. Setting lower sensitivity would
lead to fewer and later system warnings. Note:
The system turns off when you select
the deep snow/sand drive mode.
Distance Indication and Alert
(If
Equipped)
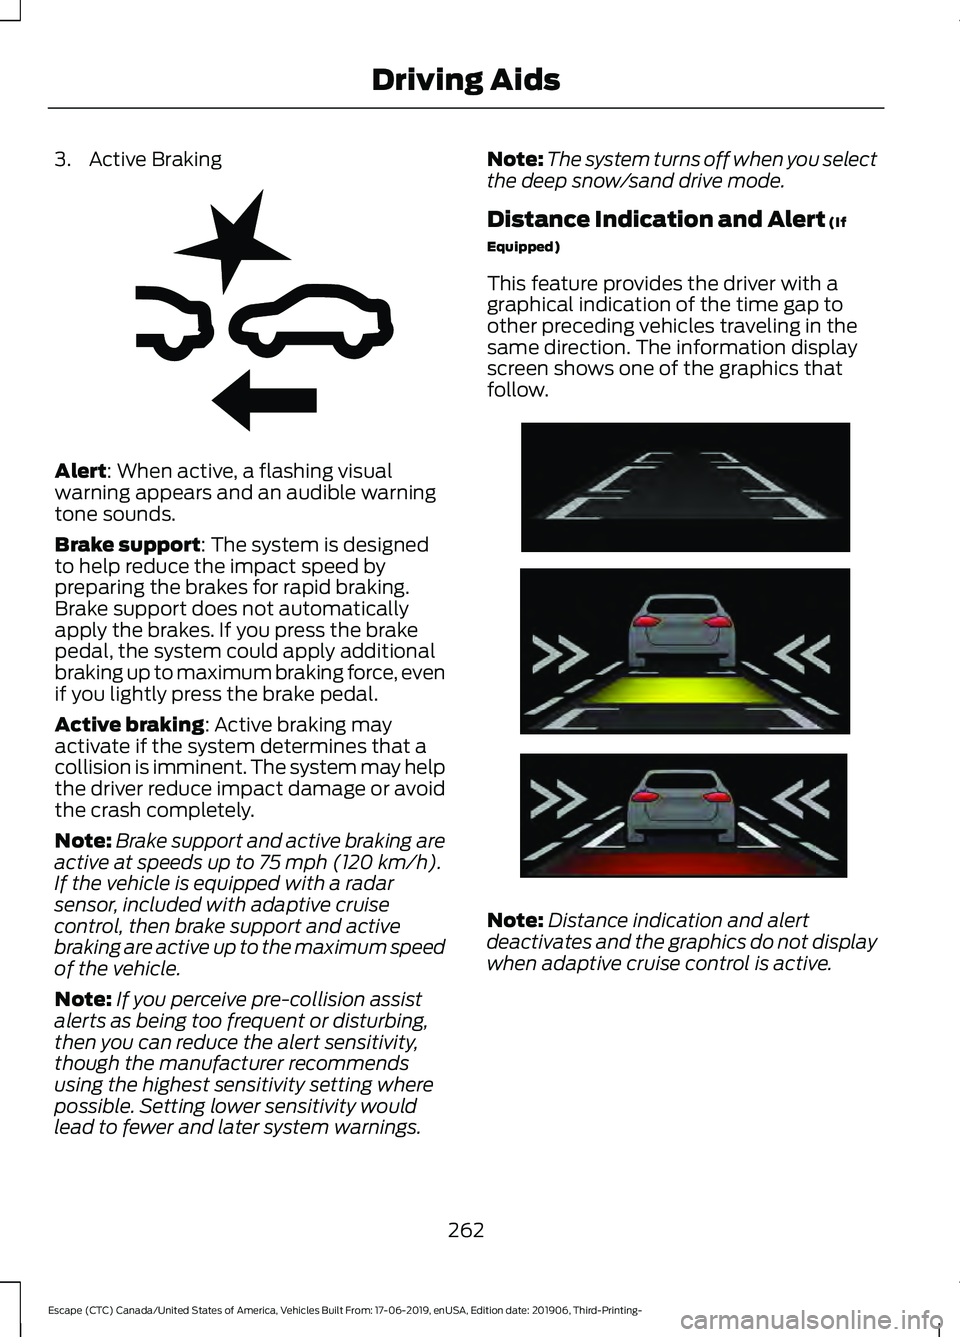
This feature provides the driver with a
graphical indication of the time gap to
other preceding vehicles traveling in the
same direction. The information display
screen shows one of the graphics that
follow. Note:
Distance indication and alert
deactivates and the graphics do not display
when adaptive cruise control is active.
262
Escape (CTC) Canada/United States of America, Vehicles Built From: 17-06-2019, enUSA, Edition date: 201906, Third-Printing- Driving AidsE255268 E254791
Page 279 of 553
TOWING A TRAILER
WARNING: Towing trailers
beyond the maximum
recommended gross trailer
weight exceeds the limit of your
vehicle and could result in engine
damage, transmission damage,
structural damage, loss of
vehicle control, vehicle rollover
and personal injury. WARNING:
Do not exceed
the GVWR or the GAWR
specified on the certification
label.
Note: See
Recommended
Towing Weights (page 277).
Your vehicle may have electrical
items, such as fuses or relays,
related to towing. See
Fuses
(page 304).
Your vehicle's load capacity
designation is by weight, not by
volume, so you cannot necessarily
use all available space when
loading a vehicle or trailer.
Towing a trailer places an extra
load on your vehicle's engine,
transmission, axle, brakes, tires
and suspension. Inspect these
components periodically during,
and after, any towing operation. Load Placement
To help minimize how trailer
movement affects your vehicle
when driving:
•
Load the heaviest items closest
to the trailer floor.
• Load the heaviest items
centered between the left and
right side trailer tires.
• Load the heaviest items above
the trailer axles or just slightly
forward toward the trailer
tongue. Do not allow the final
trailer tongue weight to go
above or below 10-15% of the
loaded trailer weight.
• Select a ball mount with the
correct rise or drop and load
capacity. When both the
loaded vehicle and trailer are
connected, the trailer frame
should be level, or slightly
angled down toward your
vehicle, when viewed from the
side.
When driving with a trailer or
payload, a slight takeoff vibration
or shudder may be present due to
the increased payload weight.
Additional information regarding
proper trailer loading and setting
your vehicle up for towing is
located in another chapter of this
manual. See
Load Limit (page
270).
You can also find information in
the
RV & Trailer Towing Guide
available at your authorized
dealer, or online.
276
Escape (CTC) Canada/United States of America, Vehicles Built From: 17-06-2019, enUSA, Edition date: 201906, Third-Printing- Towing
Page 283 of 553
Trailer Brakes
WARNING: Do not connect a
trailer's hydraulic brake system directly
to your vehicle's brake system. Your
vehicle may not have enough braking
power and your chances of having a
collision greatly increase. WARNING:
Do not tow a trailer
fitted with electric trailer brakes unless
your vehicle is fitted with a compatible
aftermarket electronic trailer brake
controller. Failure to follow this
instruction could result in the loss of
control of your vehicle, personal injury or
death. For additional information and
assistance, we recommend that you
contact an authorized dealer.
Electric brakes and manual, automatic or
surge-type trailer brakes are safe if you
install them properly and adjust them to
the manufacturer's specifications. The
trailer brakes must meet local and federal
regulations.
The rating for the tow vehicle's braking
system operation is at the gross vehicle
weight rating, not the gross combined
weight rating.
Separate functioning brake systems
are required for safe control of towed
vehicles and trailers weighing more
than 1500 lb (680 kg) when loaded. Trailer Lamps WARNING:
Never connect any
trailer lamp wiring to the vehicle's tail
lamp wiring; this may damage the
electrical system resulting in fire. Contact
your authorized dealer as soon as
possible for assistance in proper trailer
tow wiring installation. Additional
electrical equipment may be required.
Trailer lamps are required on most towed
vehicles. Make sure all running lights, brake
lights, turn signals and hazard lights are
working.
Before Towing a Trailer
Practice turning, stopping and backing up
to get the feel of your vehicle-trailer
combination before starting on a trip.
When turning, make wider turns so the
trailer wheels clear curbs and other
obstacles.
When Towing a Trailer
• Do not drive faster than
70 mph
(113 km/h) during the first 500 mi
(800 km).
• Do not make full-throttle starts.
• Check your hitch, electrical connections
and trailer wheel lug nuts thoroughly
after you have traveled 50 mi (80 km).
• When stopped in congested or heavy
traffic during hot weather, place the
transmission in park (P) to aid engine
and transmission cooling and to help
A/C performance.
• Turn off the speed control with heavy
loads or in hilly terrain. The speed
control may turn off automatically
when you are towing on long, steep
grades.
280
Escape (CTC) Canada/United States of America, Vehicles Built From: 17-06-2019, enUSA, Edition date: 201906, Third-Printing- Towing
Page 288 of 553
Avoid driving too fast during the first
1,000 mi (1,600 km). Vary your speed
frequently and change up through the
gears early. Do not labor the engine.
Do not tow during the first
1,000 mi
(1,600 km).
DRIVING THROUGH WATER WARNING:
Do not drive through
flowing or deep water as you may lose
control of your vehicle.
Note: Driving through standing water can
cause vehicle damage.
Note: Engine damage can occur if water
enters the air filter.
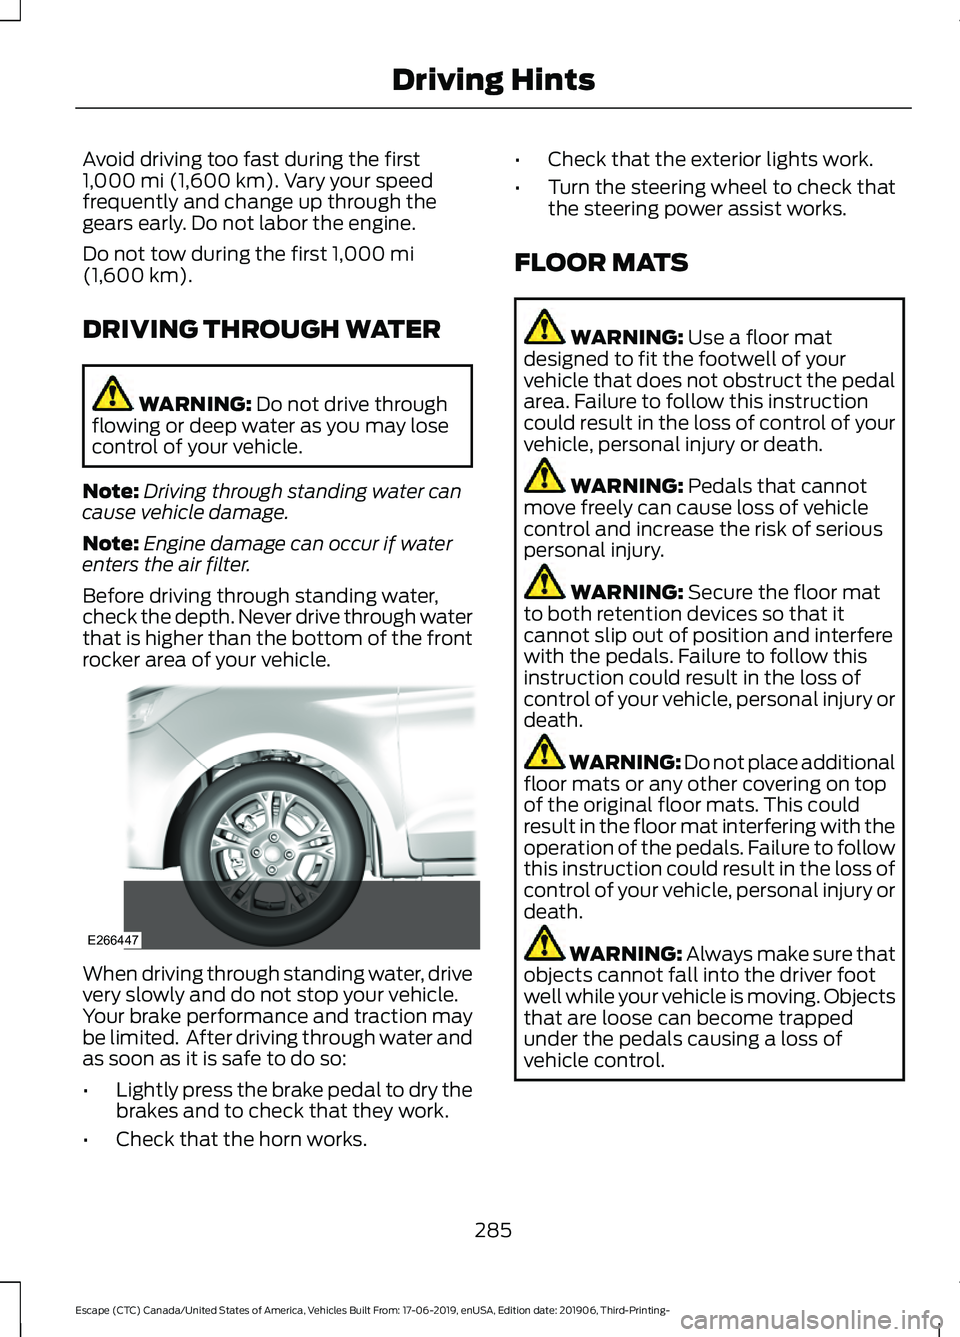
Before driving through standing water,
check the depth. Never drive through water
that is higher than the bottom of the front
rocker area of your vehicle. When driving through standing water, drive
very slowly and do not stop your vehicle.
Your brake performance and traction may
be limited. After driving through water and
as soon as it is safe to do so:
•
Lightly press the brake pedal to dry the
brakes and to check that they work.
• Check that the horn works. •
Check that the exterior lights work.
• Turn the steering wheel to check that
the steering power assist works.
FLOOR MATS WARNING:
Use a floor mat
designed to fit the footwell of your
vehicle that does not obstruct the pedal
area. Failure to follow this instruction
could result in the loss of control of your
vehicle, personal injury or death. WARNING:
Pedals that cannot
move freely can cause loss of vehicle
control and increase the risk of serious
personal injury. WARNING:
Secure the floor mat
to both retention devices so that it
cannot slip out of position and interfere
with the pedals. Failure to follow this
instruction could result in the loss of
control of your vehicle, personal injury or
death. WARNING: Do not place additional
floor mats or any other covering on top
of the original floor mats. This could
result in the floor mat interfering with the
operation of the pedals. Failure to follow
this instruction could result in the loss of
control of your vehicle, personal injury or
death. WARNING:
Always make sure that
objects cannot fall into the driver foot
well while your vehicle is moving. Objects
that are loose can become trapped
under the pedals causing a loss of
vehicle control.
285
Escape (CTC) Canada/United States of America, Vehicles Built From: 17-06-2019, enUSA, Edition date: 201906, Third-Printing- Driving HintsE266447
Page 292 of 553
4. You can attempt to start the vehicle
by pressing the brake pedal and
START/STOP, or press START/STOP
without pressing the brake pedal.
5. If the vehicle does not start, repeat steps 1 through 4.
JUMP STARTING THE VEHICLE
- EXCLUDING: HYBRID
ELECTRIC VEHICLE (HEV)/
PLUG-IN HYBRID ELECTRIC
VEHICLE (PHEV) WARNING:
Batteries normally
produce explosive gases which can
cause personal injury. Therefore, do not
allow flames, sparks or lighted
substances to come near the battery.
When working near the battery, always
shield your face and protect your eyes.
Always provide correct ventilation. WARNING:
Keep batteries out of
reach of children. Batteries contain
sulfuric acid. Avoid contact with skin,
eyes or clothing. Shield your eyes when
working near the battery to protect
against possible splashing of acid
solution. In case of acid contact with skin
or eyes, flush immediately with water for
a minimum of 15 minutes and get prompt
medical attention. If acid is swallowed,
call a physician immediately. WARNING:
Use only adequately
sized cables with insulated clamps. WARNING:
Make sure that the
cables are clear of any moving parts and
fuel delivery system parts. Note:
Do not attempt to push-start your
automatic transmission vehicle. Attempting
to push-start a vehicle with an automatic
transmission may cause transmission
damage.
Note: Do not disconnect the battery of the
disabled vehicle as this could damage the
vehicle electrical system.
Preparing Your Vehicle
Note: Use only a 12-volt supply to start your
vehicle.
Park the booster vehicle close to the hood
of the disabled vehicle, making sure the
two vehicles do not touch.
Connecting the Jumper Cables WARNING:
Do not connect the
negative jumper cable to any other part
of your vehicle. Use the ground point.
Note: If you are using a jump pack or
booster box, follow that manufacturer's
instructions.
Note: In the illustration that follows, the
bottom vehicle represents the booster
vehicle.
289
Escape (CTC) Canada/United States of America, Vehicles Built From: 17-06-2019, enUSA, Edition date: 201906, Third-Printing- Roadside Emergencies
Page 294 of 553
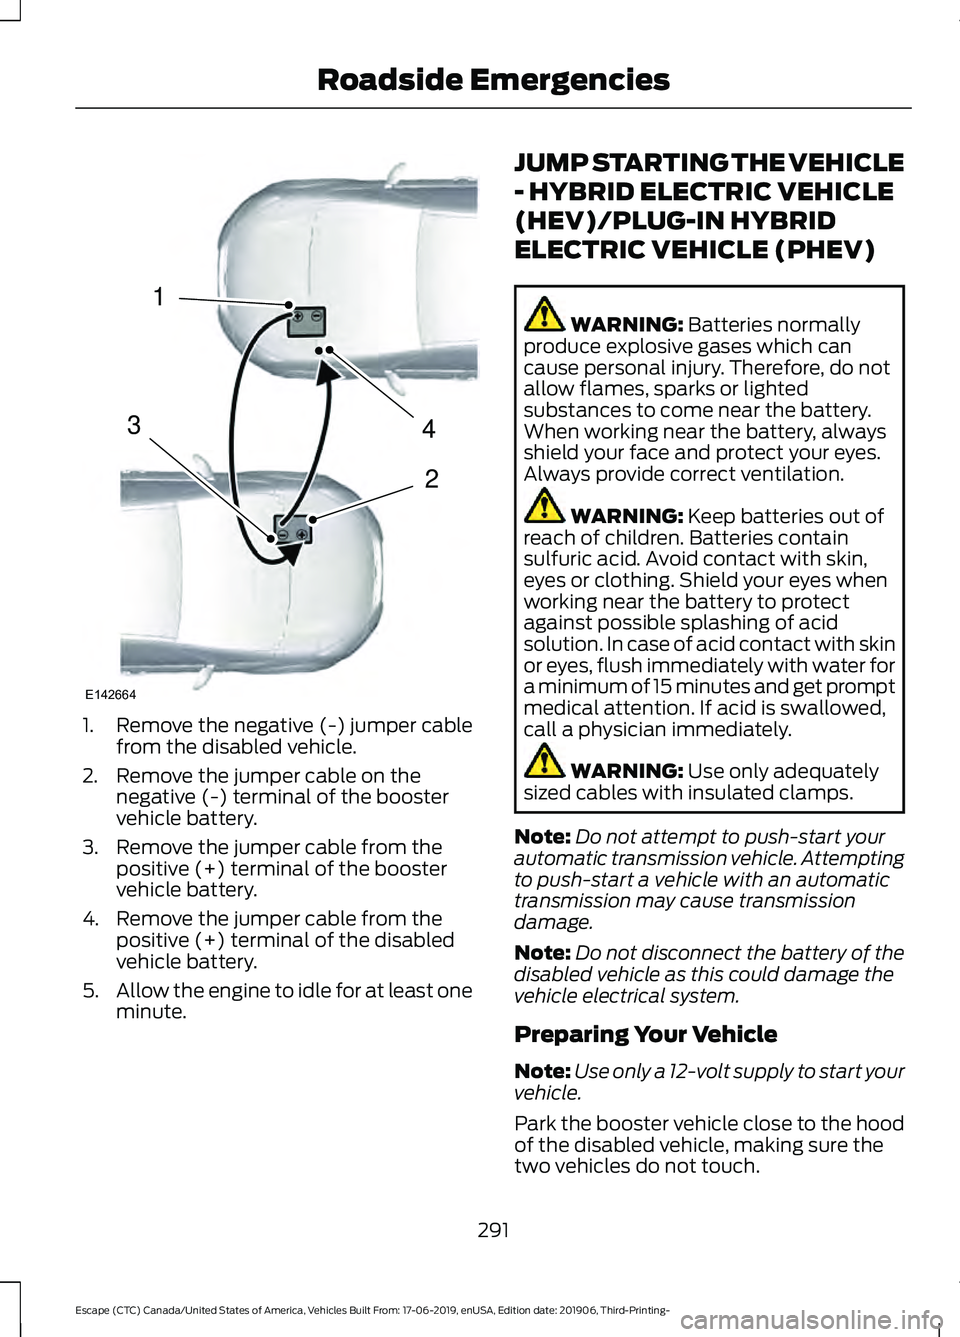
1. Remove the negative (-) jumper cable
from the disabled vehicle.
2. Remove the jumper cable on the negative (-) terminal of the booster
vehicle battery.
3. Remove the jumper cable from the positive (+) terminal of the booster
vehicle battery.
4. Remove the jumper cable from the positive (+) terminal of the disabled
vehicle battery.
5. Allow the engine to idle for at least one
minute. JUMP STARTING THE VEHICLE
- HYBRID ELECTRIC VEHICLE
(HEV)/PLUG-IN HYBRID
ELECTRIC VEHICLE (PHEV) WARNING: Batteries normally
produce explosive gases which can
cause personal injury. Therefore, do not
allow flames, sparks or lighted
substances to come near the battery.
When working near the battery, always
shield your face and protect your eyes.
Always provide correct ventilation. WARNING:
Keep batteries out of
reach of children. Batteries contain
sulfuric acid. Avoid contact with skin,
eyes or clothing. Shield your eyes when
working near the battery to protect
against possible splashing of acid
solution. In case of acid contact with skin
or eyes, flush immediately with water for
a minimum of 15 minutes and get prompt
medical attention. If acid is swallowed,
call a physician immediately. WARNING:
Use only adequately
sized cables with insulated clamps.
Note: Do not attempt to push-start your
automatic transmission vehicle. Attempting
to push-start a vehicle with an automatic
transmission may cause transmission
damage.
Note: Do not disconnect the battery of the
disabled vehicle as this could damage the
vehicle electrical system.
Preparing Your Vehicle
Note: Use only a 12-volt supply to start your
vehicle.
Park the booster vehicle close to the hood
of the disabled vehicle, making sure the
two vehicles do not touch.
291
Escape (CTC) Canada/United States of America, Vehicles Built From: 17-06-2019, enUSA, Edition date: 201906, Third-Printing- Roadside Emergencies4
2
1
3
E142664
Page 324 of 553
ENGINE COOLANT CHECK
WARNING: Do not remove the
coolant reservoir cap when the engine is
on or the cooling system is hot. Wait 10
minutes for the cooling system to cool
down. Cover the coolant reservoir cap
with a thick cloth to prevent the
possibility of scalding and slowly remove
the cap. Failure to follow this instruction
could result in personal injury. WARNING:
Do not put coolant in
the windshield washer reservoir. If
sprayed on the windshield, coolant could
make it difficult to see through the
windshield. WARNING:
To reduce the risk of
personal injury, make sure the engine is
cool before unscrewing the coolant
pressure relief cap. The cooling system
is under pressure. Steam and hot liquid
can come out forcefully when you loosen
the cap slightly. WARNING:
Do not add coolant
further than the MAX mark.
Note: For hybrid electric vehicles, your
vehicle has two separate cooling systems.
One for cooling the engine and a separate
system for cooling the inverter system
controller that is specific to the hybrid
operating system. The two systems operate
similarly, with the inverter system controller
cooling system generally operating at a
lower temperature and pressure. The
following instructions apply to all
powertrain types.
When the engine is cold, check the
concentration and level of the coolant at
the intervals listed in the scheduled
maintenance information. See Scheduled
Maintenance
(page 486). Note:
Make sure that the coolant level is
between the
MIN and MAX marks on the
coolant reservoir.
Note: Coolant expands when it is hot. The
level may extend beyond the
MAX mark.
Maintain coolant concentration within
48% to 50%, which equates to a freeze
point between
-29°F (-34°C) and -35°F
(-37°C). Coolant concentration should be
checked using a refractometer. We do not
recommend the use of hydrometers or
coolant test strips for measuring coolant
concentration.
Adding Coolant WARNING:
Do not add engine
coolant when the engine is on or the
cooling system is hot. Failure to follow
this instruction could result in personal
injury. WARNING:
Do not remove the
coolant reservoir cap when the engine is
on or the cooling system is hot. Wait 10
minutes for the cooling system to cool
down. Cover the coolant reservoir cap
with a thick cloth to prevent the
possibility of scalding and slowly remove
the cap. Failure to follow this instruction
could result in personal injury.
Note: Automotive fluids are not
interchangeable. Take care not to put engine
coolant in the windshield washer fluid
reservoir or windshield washer fluid in the
engine coolant reservoir.
Note: Do not use stop leak pellets, cooling
system sealants, or non-specified additives
as they can cause damage to the engine
cooling or heating systems. Resulting
component damage may not be covered by
the vehicle Warranty.
321
Escape (CTC) Canada/United States of America, Vehicles Built From: 17-06-2019, enUSA, Edition date: 201906, Third-Printing- Maintenance
Page 329 of 553
1. Park your vehicle on a level surface.
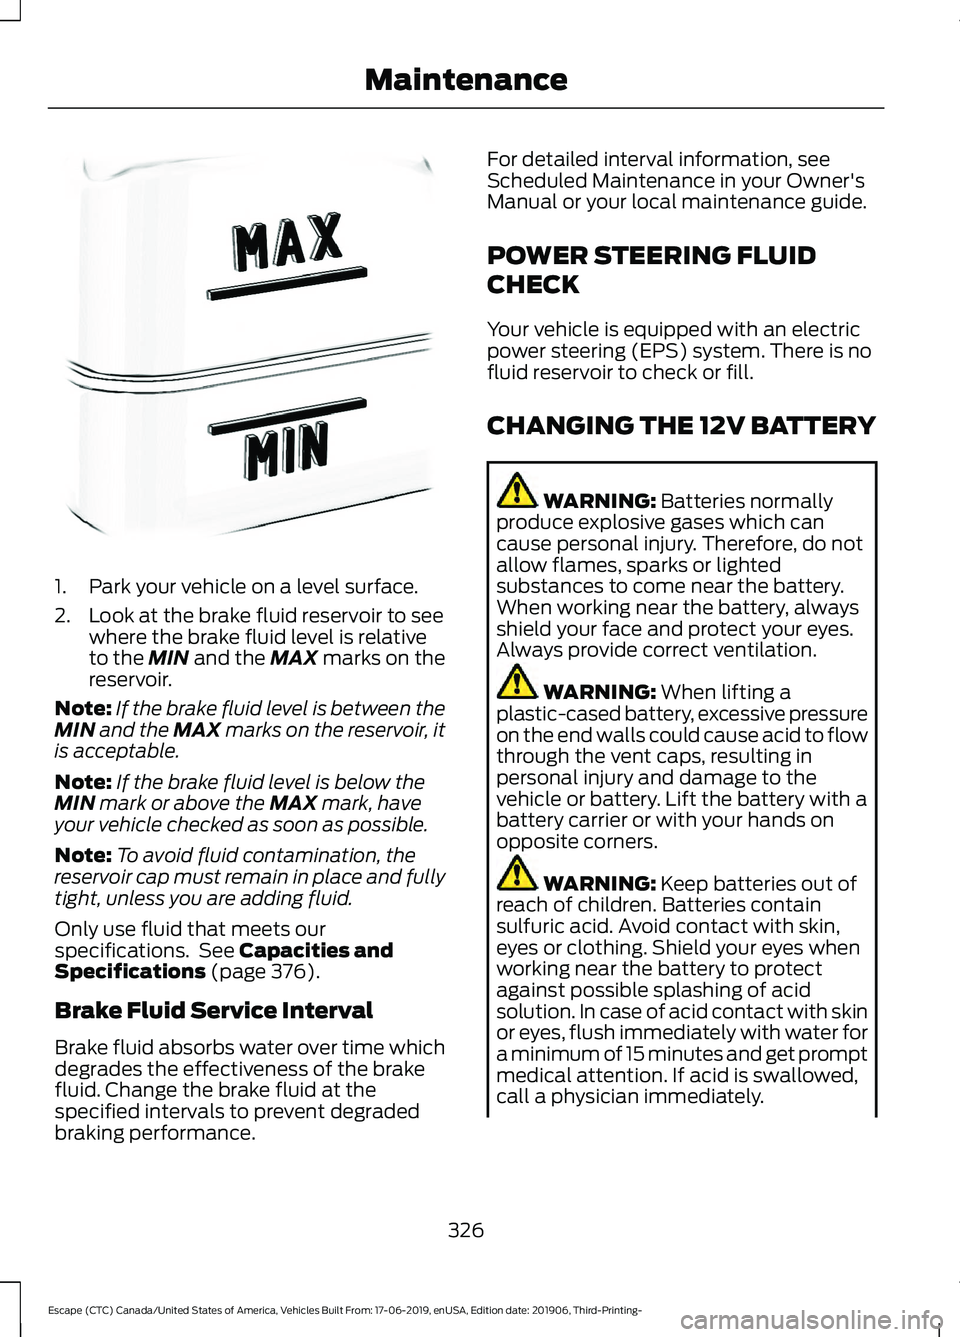
2. Look at the brake fluid reservoir to see
where the brake fluid level is relative
to the MIN and the MAX marks on the
reservoir.
Note: If the brake fluid level is between the
MIN
and the MAX marks on the reservoir, it
is acceptable.
Note: If the brake fluid level is below the
MIN
mark or above the MAX mark, have
your vehicle checked as soon as possible.
Note: To avoid fluid contamination, the
reservoir cap must remain in place and fully
tight, unless you are adding fluid.
Only use fluid that meets our
specifications. See
Capacities and
Specifications (page 376).
Brake Fluid Service Interval
Brake fluid absorbs water over time which
degrades the effectiveness of the brake
fluid. Change the brake fluid at the
specified intervals to prevent degraded
braking performance. For detailed interval information, see
Scheduled Maintenance in your Owner's
Manual or your local maintenance guide.
POWER STEERING FLUID
CHECK
Your vehicle is equipped with an electric
power steering (EPS) system. There is no
fluid reservoir to check or fill.
CHANGING THE 12V BATTERY
WARNING:
Batteries normally
produce explosive gases which can
cause personal injury. Therefore, do not
allow flames, sparks or lighted
substances to come near the battery.
When working near the battery, always
shield your face and protect your eyes.
Always provide correct ventilation. WARNING:
When lifting a
plastic-cased battery, excessive pressure
on the end walls could cause acid to flow
through the vent caps, resulting in
personal injury and damage to the
vehicle or battery. Lift the battery with a
battery carrier or with your hands on
opposite corners. WARNING:
Keep batteries out of
reach of children. Batteries contain
sulfuric acid. Avoid contact with skin,
eyes or clothing. Shield your eyes when
working near the battery to protect
against possible splashing of acid
solution. In case of acid contact with skin
or eyes, flush immediately with water for
a minimum of 15 minutes and get prompt
medical attention. If acid is swallowed,
call a physician immediately.
326
Escape (CTC) Canada/United States of America, Vehicles Built From: 17-06-2019, enUSA, Edition date: 201906, Third-Printing- MaintenanceE170684
Page 330 of 553
WARNING: Battery posts,
terminals and related accessories
contain lead and lead compounds,
chemicals known to the State of
California to cause cancer and
reproductive harm. Wash your hands
after handling
. WARNING:
For vehicles with
Auto-Start-Stop the battery requirement
is different. You must replace the battery
with one of exactly the same
specification.
The battery is in the engine compartment.
See
Under Hood Overview (page 315).
Your vehicle has a maintenance-free
battery. It does not require additional
water during service.
If the vehicle battery has a cover, make
sure you correctly install it after cleaning
or replacing the battery.
For longer, trouble-free operation, keep the
top of the battery clean and dry and the
battery cables tightly fastened to the
battery terminals. If any corrosion is
present on the battery or terminals, remove
the cables from the terminals and clean
with a wire brush. You can neutralize the
acid with a solution of baking soda and
water.
We recommend that you disconnect the
negative battery cable terminal from the
battery if you plan to store your vehicle for
an extended period.
Note: If you only disconnect the negative
battery cable terminal, make sure it is
isolated or placed away from the battery
terminal to avoid unintended connection or
arcing. To maintain correct operation of the
battery management system, if you add
any electrical devices to your vehicle, do
not connect the ground connection directly
to the negative battery terminal. A
connection at the negative battery terminal
can cause inaccurate measurements of
the battery condition and potential
incorrect system operation.
Note:
If you add electrical accessories or
components to your vehicle this may
adversely affect battery performance,
durability and the performance of other
electrical systems on your vehicle.
If you replace the battery make sure it
matches the electrical requirements of
your vehicle.
If you disconnect or replace the battery
and your vehicle has an automatic
transmission, it must relearn its adaptive
strategy. Because of this, the transmission
may shift firmly when first driven. This is
normal operation while the transmission
fully updates its operation to optimum
shift feel.
Remove and Reinstall the Battery
To disconnect or remove the battery, do
the following:
1. Apply the parking brake and switch the
ignition off.
2. Switch all electrical equipment off, for
example lights and radio.
3. Wait a minimum of two minutes before
disconnecting the battery.
Note: The engine management system has
a power hold function and remains powered
for a period of time after you switch the
ignition off. This is to allow diagnostic and
adaptive tables to be stored. Disconnecting
the battery without waiting can cause
damage not covered by the vehicle
Warranty.
327
Escape (CTC) Canada/United States of America, Vehicles Built From: 17-06-2019, enUSA, Edition date: 201906, Third-Printing- Maintenance
Page 331 of 553
4. Disconnect the negative battery cable
terminal.
5. Disconnect the positive battery cable terminal.
6. Remove the battery securing clamp.
7. Remove the battery.
8. To install, reverse the removal procedure.
Note: Before reconnecting the battery,
make sure the ignition remains switched off.
Note: Make sure the battery cable terminals
are fully tightened.
If you disconnect or replace the vehicle
battery, you must reset the following
features:
• Window bounce-back. See Windows
and Mirrors (page 93).
• Clock Settings.
• Pre-set radio stations.
• Steering Angle Sensor.
Note: To calibrate the steering angle
sensor, drive the vehicle above
30 mph
(50 km/h) for a minimum of 1.2 mi (2 km).
Make sure to drive straight ahead for a
minimum of 30 seconds. Several vehicle
functions are disabled and a warning light
could appear until the sensor is calibrated.
Note: For flexible fuel vehicles, if you are
operating on E85, you could experience poor
starts or an inability to start the engine, and
driveability problems until the fuel trim and
ethanol content have been relearned. Drive
the vehicle at least
10 mi (16 km) to
completely relearn the idle trim and fuel
trim strategy.
Battery Disposal Make sure that you dispose of
old batteries in an
environmentally friendly way.
Seek advice from your local authority
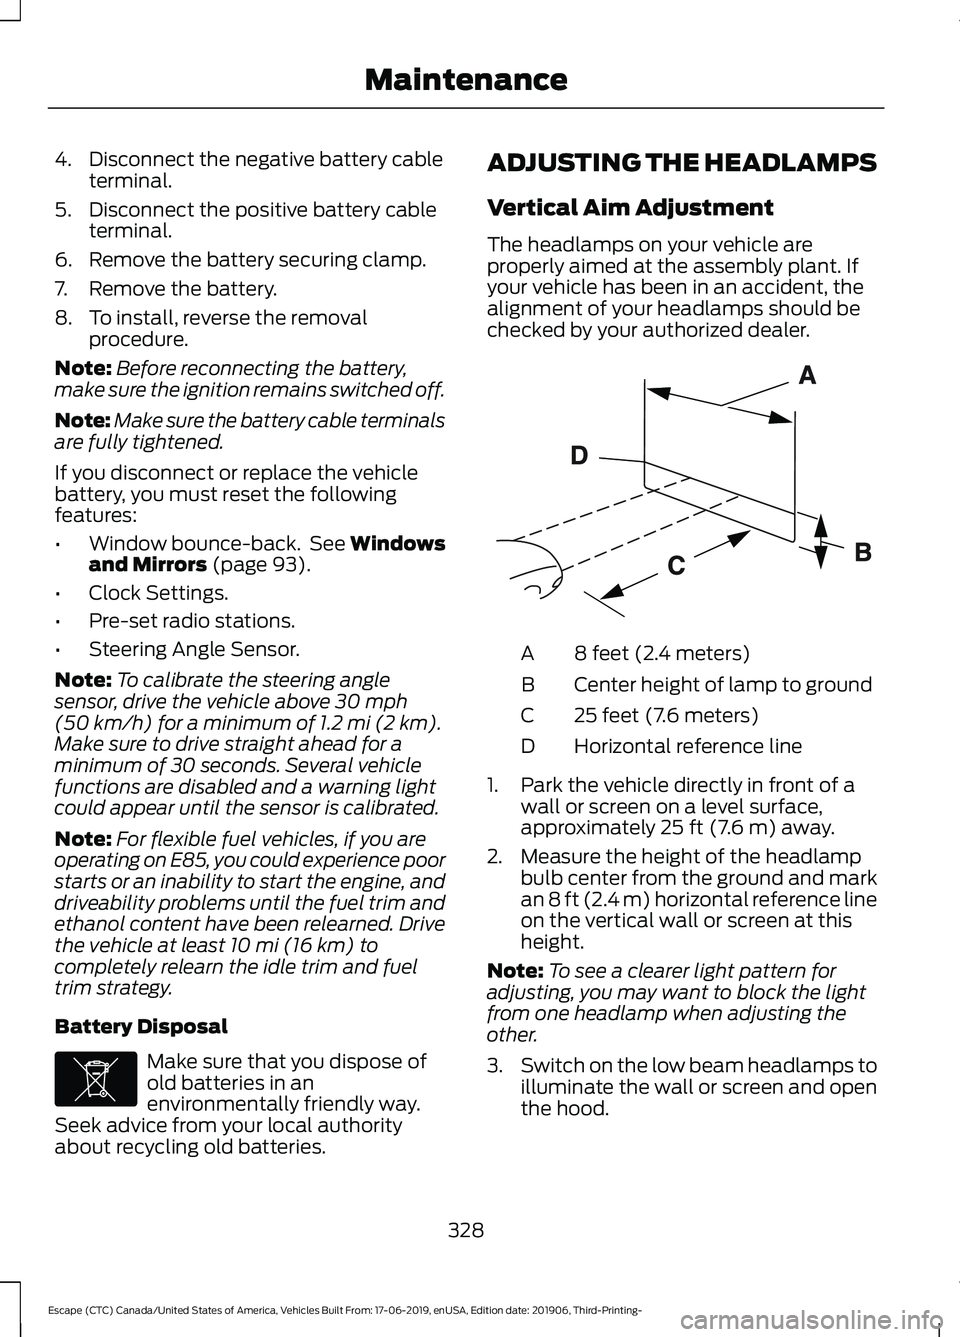
about recycling old batteries. ADJUSTING THE HEADLAMPS
Vertical Aim Adjustment
The headlamps on your vehicle are
properly aimed at the assembly plant. If
your vehicle has been in an accident, the
alignment of your headlamps should be
checked by your authorized dealer.
8 feet (2.4 meters)
A
Center height of lamp to ground
B
25 feet (7.6 meters)
C
Horizontal reference line
D
1. Park the vehicle directly in front of a wall or screen on a level surface,
approximately
25 ft (7.6 m) away.
2. Measure the height of the headlamp bulb center from the ground and mark
an
8 ft (2.4 m) horizontal reference line
on the vertical wall or screen at this
height.
Note: To see a clearer light pattern for
adjusting, you may want to block the light
from one headlamp when adjusting the
other.
3. Switch on the low beam headlamps to
illuminate the wall or screen and open
the hood.
328
Escape (CTC) Canada/United States of America, Vehicles Built From: 17-06-2019, enUSA, Edition date: 201906, Third-Printing- MaintenanceE107998 E142592