open FORD ESCAPE 2020 Owners Manual
[x] Cancel search | Manufacturer: FORD, Model Year: 2020, Model line: ESCAPE, Model: FORD ESCAPE 2020Pages: 553, PDF Size: 7.73 MB
Page 6 of 553
Climate Control
Manual Climate Control
............................137
Automatic Climate Control - Vehicles With: Dual Automatic Temperature
Control (DATC) ........................................
138
Automatic Climate Control - Vehicles With: Electronic Automatic
Temperature Control (EATC) ...............
141
Hints on Controlling the Interior Climate - Vehicles With: Automatic
Temperature Control .............................
144
Hints on Controlling the Interior Climate - Vehicles With: Manual Temperature
Control .........................................................
145
Heated Windshield .....................................
146
Heated Rear Window .................................
146
Heated Exterior Mirrors .............................
146
Cabin Air Filter ..............................................
146
Remote Start .................................................
147
Seats
Sitting in the Correct Position .................
148
Head Restraints ...........................................
148
Manual Seats .................................................
151
Power Seats ...................................................
152
Memory Function .........................................
153
Rear Seats ......................................................
154
Heated Seats .................................................
155
Rear Occupant Alert System
What is the Rear Occupant Alert System ........................................................................\
.
157
How Does the Rear Occupant Alert System Work .............................................
157
Rear Occupant Alert System Precautions ........................................................................\
.
157
Rear Occupant Alert System Limitations ........................................................................\
.
157
Switching Rear Occupant Alert System On and Off - Vehicles With: SYNC
........................................................................\
.
157 Switching Rear Occupant Alert System
On and Off - Vehicles With: SYNC 3
........................................................................\
.
157
Rear Occupant Alert System Indicators - Vehicles With: SYNC ...........................
158
Rear Occupant Alert System Indicators - Vehicles With: SYNC 3 ........................
158
Rear Occupant Alert System Audible Warnings .....................................................
158
Garage Door Opener
Universal Garage Door Opener ..............
159
Auxiliary Power Points
Auxiliary Power Points ...............................
163
Wireless Accessory Charger ....................
164
Storage Compartments
Rear Seat Armrest ......................................
166
Starting and Stopping the Engine
General Information ...................................
167
Ignition Switch ..............................................
167
Keyless Starting ............................................
167
Starting a Gasoline Engine ......................
168
Starting a Hybrid Electric Vehicle System ........................................................................\
..
171
Engine Block Heater ....................................
173
Unique Driving Characteristics
Auto-Start-Stop ...........................................
175
Hybrid Vehicle Operation ..........................
176
Plug-In Hybrid Vehicle Operation ..........
178
Hybrid Vehicle Frequently Asked Questions ...................................................
180
Fuel and Refueling
Safety Precautions ......................................
182
Fuel Quality ....................................................
182
3
Escape (CTC) Canada/United States of America, Vehicles Built From: 17-06-2019, enUSA, Edition date: 201906, Third-Printing- Table of Contents
Page 9 of 553

........................................................................\
302
Reporting Safety Defects (Canada Only) ..............................................")
Reporting Safety Defects (U.S. Only)
........................................................................\
302
Reporting Safety Defects (Canada Only) ........................................................................\
302
Fuses
Fuse Specification Chart .........................
304
Changing a Fuse ..........................................
310
Maintenance
General Information ...................................
312
Opening and Closing the Hood ..............
312
Under Hood Overview - 1.5L EcoBoost™ ........................................................................\
.
314
Under Hood Overview - 2.0L EcoBoost™ ........................................................................\
.
315
Under Hood Overview - 2.5L, Hybrid Electric Vehicle (HEV)/Plug-In Hybrid
Electric Vehicle (PHEV) ........................
316
Engine Oil Dipstick .......................................
317
Engine Oil Check ..........................................
317
Oil Change Indicator Reset ......................
318
Changing the Engine Air Filter - Excluding: Hybrid Electric Vehicle
(HEV)/Plug-In Hybrid Electric Vehicle
(PHEV) ........................................................
319
Changing the Engine Air Filter - 2.5L, Hybrid Electric Vehicle (HEV)/Plug-In
Hybrid Electric Vehicle (PHEV) .........
320
Engine Coolant Check ................................
321
Automatic Transmission Fluid Check ........................................................................\
325
Brake Fluid Check .......................................
325
Power Steering Fluid Check ....................
326
Changing the 12V Battery ........................
326
Adjusting the Headlamps ........................
328
Washer Fluid Check ...................................
329
Fuel Filter .......................................................
329
Checking the Wiper Blades ....................
330
Changing the Wiper Blades ....................
330
Changing a Bulb ...........................................
331Vehicle Care
General Information
..................................
335
Cleaning Products ......................................
335
Cleaning the Exterior .................................
336
Waxing .............................................................
337
Cleaning the Engine ...................................
337
Cleaning the Windows and Wiper Blades ........................................................................\
337
Cleaning the Interior ..................................
338
Cleaning the Instrument Panel and Instrument Cluster Lens ......................
338
Cleaning Leather Seats ............................
339
Repairing Minor Paint Damage .............
340
Cleaning the Wheels .................................
340
Vehicle Storage ...........................................
340
Body Styling Kits .........................................
342
Wheels and Tires
General Information ..................................
343
Tire Sealant and Inflator Kit ...................
345
Tire Care ..........................................................
351
Using Summer Tires ..................................
364
Using Snow Chains ....................................
364
Tire Pressure Monitoring System .........
365
Changing a Road Wheel ..........................
369
Technical Specifications ..........................
375
Capacities and Specifications
Engine Specifications - 1.5L EcoBoost™ ........................................................................\
376
Engine Specifications - 2.0L EcoBoost™ ........................................................................\
376
Engine Specifications - 2.5L, Hybrid Electric Vehicle (HEV)/Plug-In Hybrid
Electric Vehicle (PHEV) ........................
377
Motorcraft Parts - 1.5L EcoBoost™ ......
378
Motorcraft Parts - 2.0L EcoBoost™ .....
379
Motorcraft Parts - 2.5L, Hybrid Electric Vehicle (HEV)/Plug-In Hybrid Electric
Vehicle (PHEV) .......................................
380
6
Escape (CTC) Canada/United States of America, Vehicles Built From: 17-06-2019, enUSA, Edition date: 201906, Third-Printing- Table of Contents
Page 13 of 553
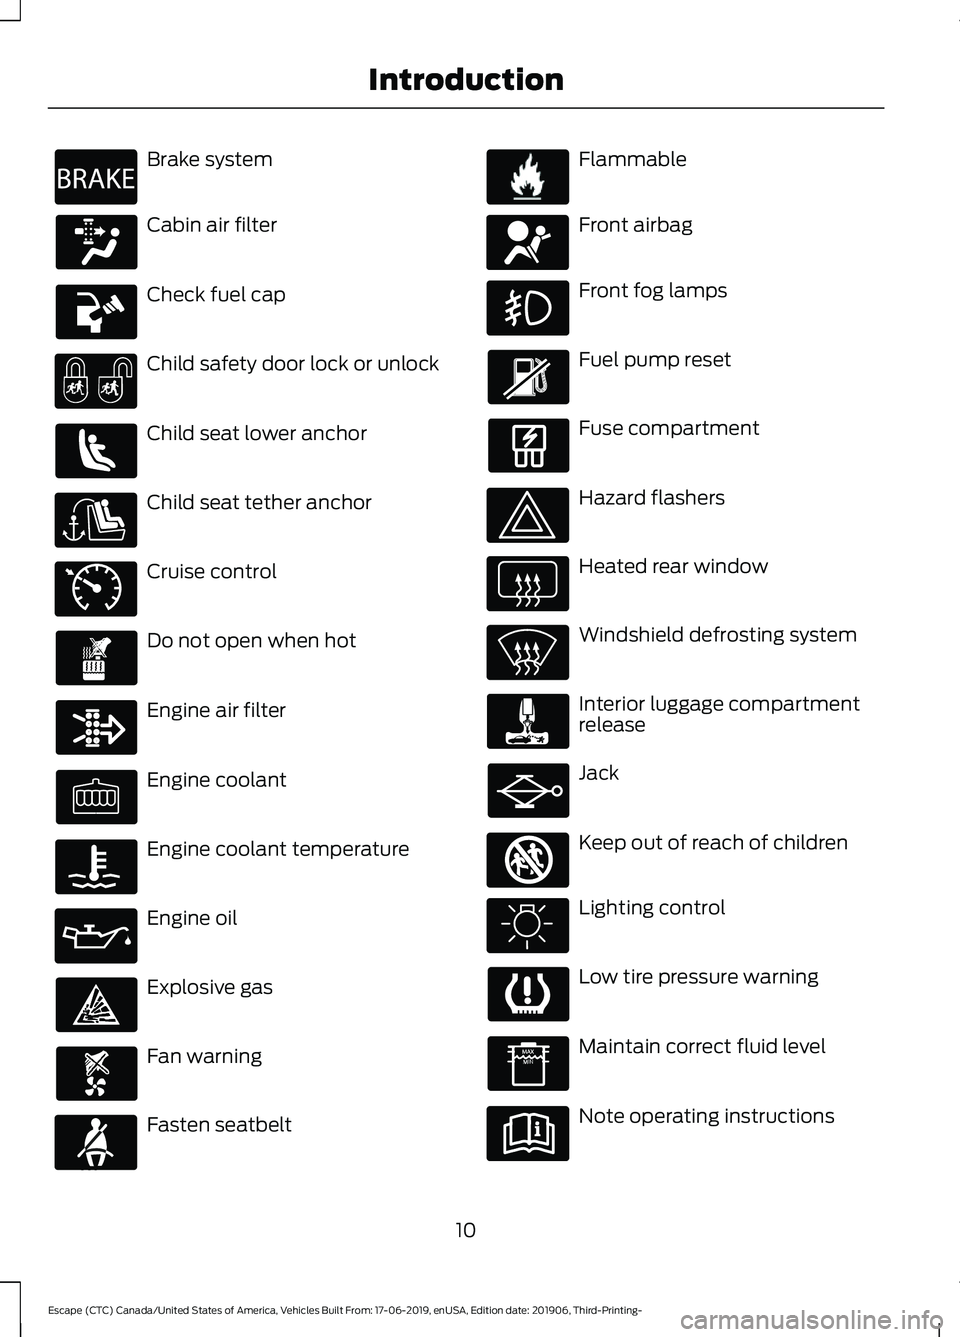
Brake system
Cabin air filter
Check fuel cap
Child safety door lock or unlock
Child seat lower anchor
Child seat tether anchor
Cruise control
Do not open when hot
Engine air filter
Engine coolant
Engine coolant temperature
Engine oil
Explosive gas
Fan warning
Fasten seatbelt Flammable
Front airbag
Front fog lamps
Fuel pump reset
Fuse compartment
Hazard flashers
Heated rear window
Windshield defrosting system
Interior luggage compartment
release
Jack
Keep out of reach of children
Lighting control
Low tire pressure warning
Maintain correct fluid level
Note operating instructions
10
Escape (CTC) Canada/United States of America, Vehicles Built From: 17-06-2019, enUSA, Edition date: 201906, Third-Printing- IntroductionE270480 E71340 E71880 E231160 E67017 E161353
Page 36 of 553
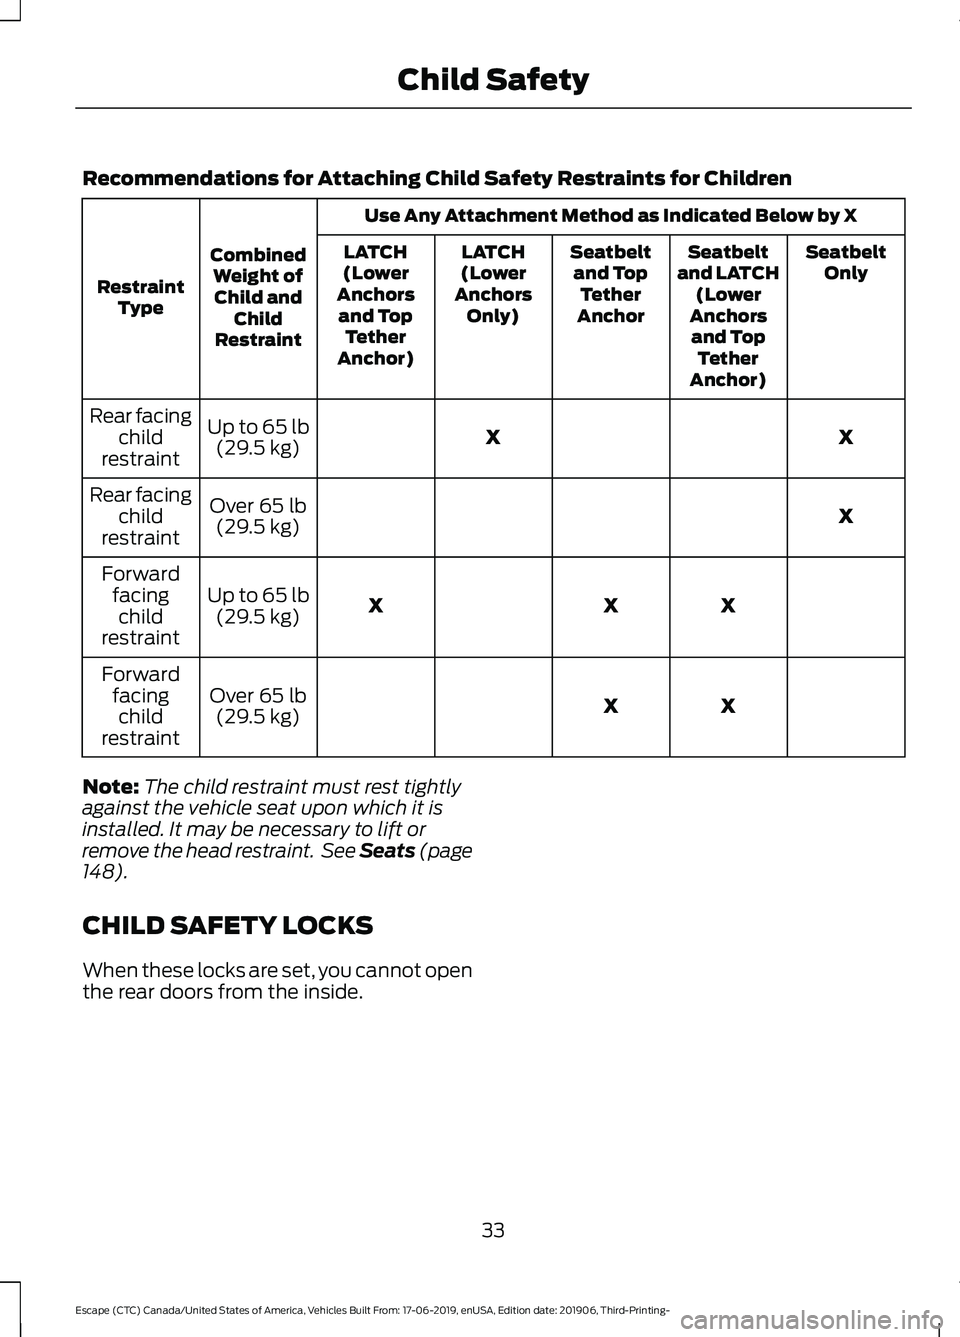
Recommendations for Attaching Child Safety Restraints for Children
Use Any Attachment Method as Indicated Below by X
Combined Weight ofChild and Child
Restraint
Restraint
Type Seatbelt
Only
Seatbelt
and LATCH (Lower
Anchors and Top Tether
Anchor)
Seatbelt
and Top Tether
Anchor
LATCH
(Lower
Anchors Only)
LATCH
(Lower
Anchors and Top Tether
Anchor)
X
X
Up to 65 lb
(29.5 kg)
Rear facing
child
restraint
X
Over
65 lb
(29.5 kg)
Rear facing
child
restraint
X
X
X
Up to
65 lb
(29.5 kg)
Forward
facingchild
restraint
X
X
Over
65 lb
(29.5 kg)
Forward
facingchild
restraint
Note: The child restraint must rest tightly
against the vehicle seat upon which it is
installed. It may be necessary to lift or
remove the head restraint. See Seats (page
148
).
CHILD SAFETY LOCKS
When these locks are set, you cannot open
the rear doors from the inside.
33
Escape (CTC) Canada/United States of America, Vehicles Built From: 17-06-2019, enUSA, Edition date: 201906, Third-Printing- Child Safety
Page 53 of 553
WARNING: Do not attempt to
service, repair, or modify the
supplementary restraint system or
associated components. Failure to
follow this instruction could result in
personal injury or death. WARNING:
All occupants of your
vehicle, including the driver, should
always properly wear their seatbelts,
even when an airbag supplemental
restraint system is provided. Failure to
properly wear your seatbelt could
seriously increase the risk of injury or
death. WARNING:
To reduce risk of injury,
do not obstruct or place objects in the
deployment path of the airbag. WARNING:
If a supplementary
restraint system component has
deployed, it will not function again. Have
the system and associated components
inspected as soon as possible. Failure to
follow this instruction could result in
personal injury or death.
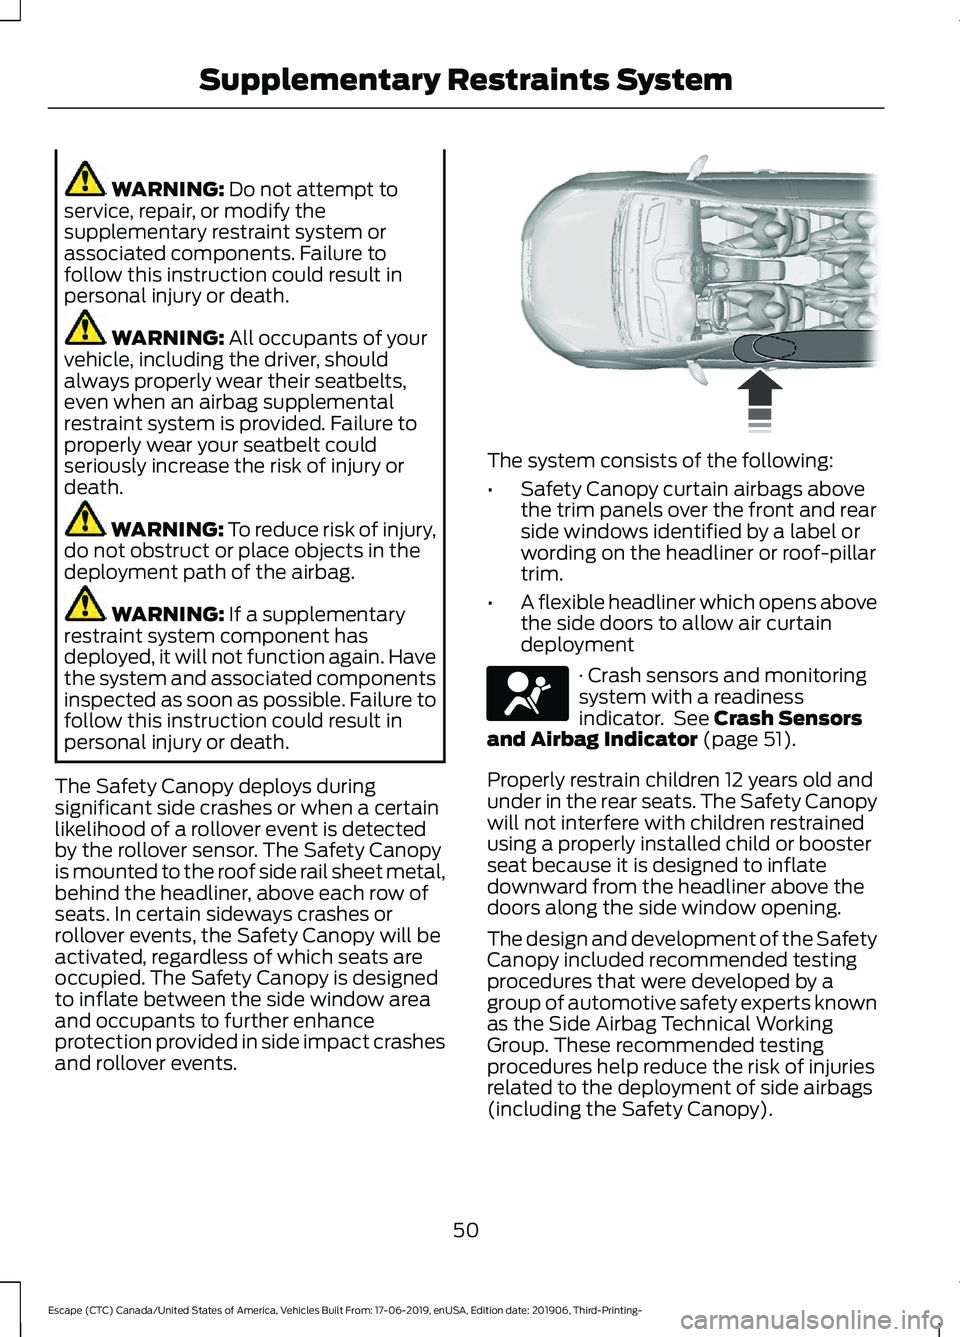
The Safety Canopy deploys during
significant side crashes or when a certain
likelihood of a rollover event is detected
by the rollover sensor. The Safety Canopy
is mounted to the roof side rail sheet metal,
behind the headliner, above each row of
seats. In certain sideways crashes or
rollover events, the Safety Canopy will be
activated, regardless of which seats are
occupied. The Safety Canopy is designed
to inflate between the side window area
and occupants to further enhance
protection provided in side impact crashes
and rollover events. The system consists of the following:
•
Safety Canopy curtain airbags above
the trim panels over the front and rear
side windows identified by a label or
wording on the headliner or roof-pillar
trim.
• A flexible headliner which opens above
the side doors to allow air curtain
deployment · Crash sensors and monitoring
system with a readiness
indicator. See
Crash Sensors
and Airbag Indicator (page 51).
Properly restrain children 12 years old and
under in the rear seats. The Safety Canopy
will not interfere with children restrained
using a properly installed child or booster
seat because it is designed to inflate
downward from the headliner above the
doors along the side window opening.
The design and development of the Safety
Canopy included recommended testing
procedures that were developed by a
group of automotive safety experts known
as the Side Airbag Technical Working
Group. These recommended testing
procedures help reduce the risk of injuries
related to the deployment of side airbags
(including the Safety Canopy).
50
Escape (CTC) Canada/United States of America, Vehicles Built From: 17-06-2019, enUSA, Edition date: 201906, Third-Printing- Supplementary Restraints System E75004 E67017
Page 57 of 553
GENERAL INFORMATION ON
RADIO FREQUENCIES
This device complies with Part 15 of the
FCC Rules and with Industry Canada
license-exempt RSS standard(s).
Operation is subject to the following two
conditions: (1) This device may not cause
harmful interference, and (2) This device
must accept any interference received,
including interference that may cause
undesired operation.
WARNING: Changes or
modifications not expressively approved
by the party responsible for compliance
could void the user's authority to operate
the equipment. The term "IC:" before the
radio certification number only signifies
that Industry Canada technical
specifications were met.
The typical operating range for your
transmitter is approximately
33 ft (10 m).
Vehicles with the remote start feature will
have a greater range.
One of the following could cause a
decrease in operating range:
• Weather conditions.
• Nearby radio towers.
• Structures around the vehicle.
• Other vehicles parked next to your
vehicle.
The radio frequency used by your remote
control can also be used by other radio
transmitters, for example amateur radios,
medical equipment, wireless headphones,
wireless remote controls, cell phones,
battery chargers and alarm systems. If the
frequencies are jammed, you will not be
able to use your remote control. You can
lock and unlock the doors with the key.
Note: Make sure to lock your vehicle before
leaving it unattended. Note:
If you are in range, the remote control
will operate if you press any button
unintentionally.
Note: The remote control contains sensitive
electrical components. Exposure to moisture
or impact may cause permanent damage.
Intelligent Access
(If Equipped)
The system uses a radio frequency signal
to communicate with your vehicle and
authorize your vehicle to unlock when one
of the following conditions are met:
• You activate the front exterior door
handle switch.
• You press the luggage compartment
button.
• You press a button on the transmitter.
If excessive radio frequency interference
is present in the area or if the transmitter
battery is low, you may need to
mechanically unlock your door. You can
use the mechanical key blade in your
intelligent access key to open the driver
door in this situation. See
Remote
Control (page 54).
REMOTE CONTROL
Integrated Keyhead Transmitter
Use the key blade to start your vehicle and
unlock or lock the driver door from outside
your vehicle. The integrated keyhead
transmitter functions as a programmed
ignition key that operates all the locks and
starts your vehicle, as well as a remote
control.
54
Escape (CTC) Canada/United States of America, Vehicles Built From: 17-06-2019, enUSA, Edition date: 201906, Third-Printing- Keys and Remote Controls
Page 62 of 553
Remote Start (If Equipped)
WARNING:
To avoid exhaust
fumes, do not use remote start if your
vehicle is parked indoors or in areas that
are not well ventilated.
Note: Do not use remote start if your fuel
level is low. The remote start button is on the
remote control.
This feature allows you to start your engine
without entering the vehicle. The remote
control has an extended operating range.
If your vehicle has automatic climate
control, you can configure it to operate
when you remote start your vehicle. See
Climate Control
(page 137). A manual
climate control system runs at the setting
it was set to when you switched your
vehicle off.
Many states and provinces have
restrictions for the use of remote start.
Check your local and state or provincial
laws for specific requirements regarding
remote start systems.
The remote start system does not work if:
• The ignition is on.
• The alarm system triggers.
• You disable the feature.
• The hood is open.
• The transmission is not in park (P).
• The vehicle battery voltage is too low.
• The service engine soon light is on.
Remote Control Feedback (If
Equipped)
An LED on the remote control provides
status feedback of remote start or stop
commands. Status
LED
Remote startsuccessful
Solid green
Remote stopsuccessful
Solid red
Request failed or
status not received
Blinking red
Status incomplete
Blinking green
Remote Starting Your Vehicle
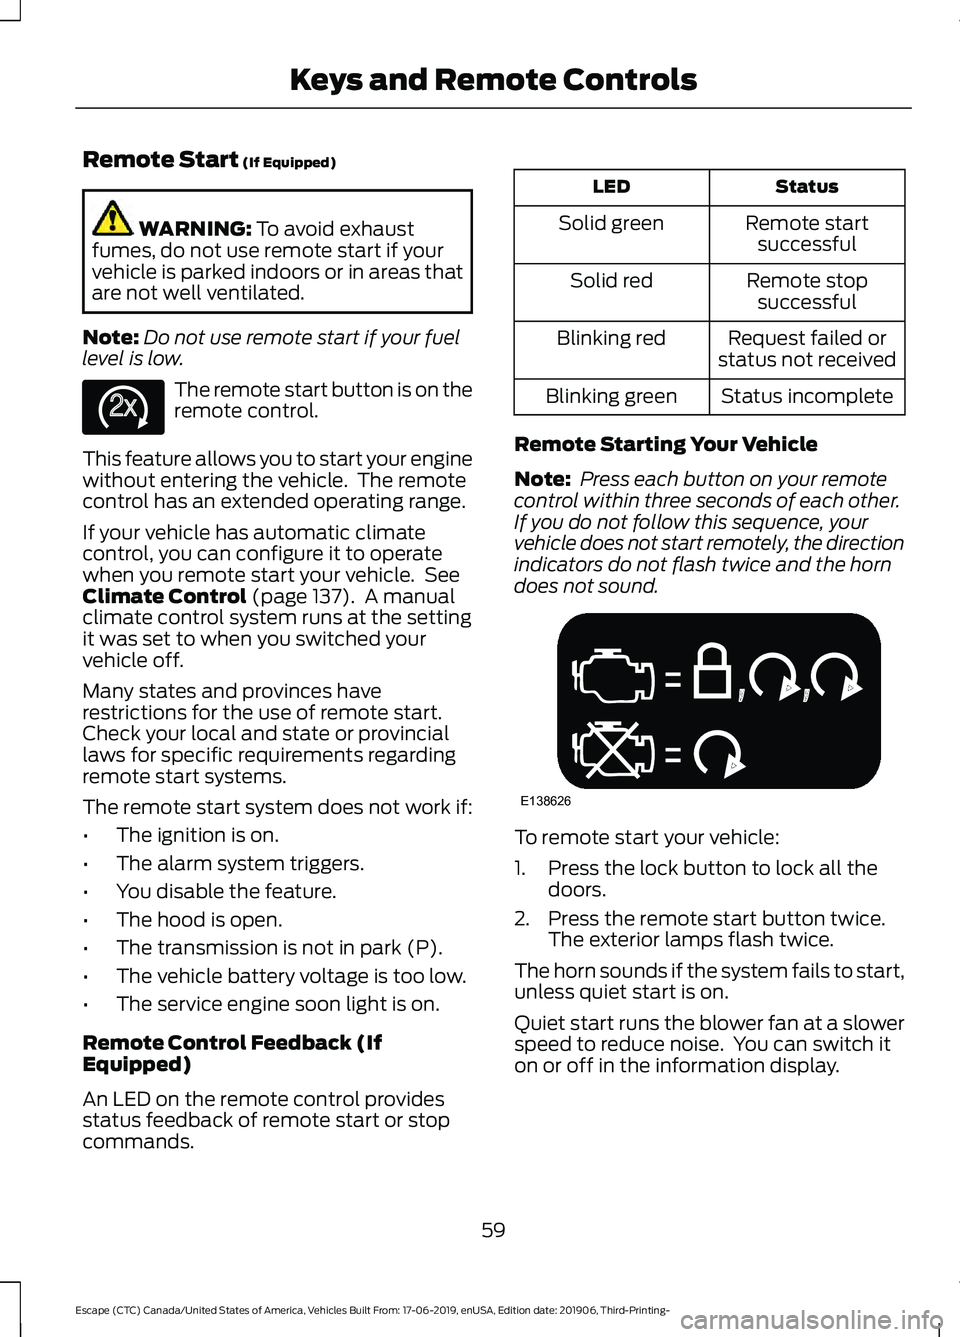
Note: Press each button on your remote
control within three seconds of each other.
If you do not follow this sequence, your
vehicle does not start remotely, the direction
indicators do not flash twice and the horn
does not sound. To remote start your vehicle:
1. Press the lock button to lock all the
doors.
2. Press the remote start button twice. The exterior lamps flash twice.
The horn sounds if the system fails to start,
unless quiet start is on.
Quiet start runs the blower fan at a slower
speed to reduce noise. You can switch it
on or off in the information display.
59
Escape (CTC) Canada/United States of America, Vehicles Built From: 17-06-2019, enUSA, Edition date: 201906, Third-Printing- Keys and Remote ControlsE138625 E138626
Page 66 of 553
4. When Create MyKey prompted, touch
the OK button. When MyKey created
successfully prompted, touch the OK
button to complete the process. The
programmed restrictions apply when
you key off, open and close the driver
door and restart your vehicle with the
programmed key or remote control.
You have successfully created a MyKey.
Make sure you label it so you can
distinguish it from the admin keys.
You can also program configurable
settings for the key(s). See
Programming
and Changing Configurable Settings.
Programming and Changing
Configurable Settings
Use the touchscreen to access your
configurable MyKey settings.
1. Switch the ignition on using an admin key or remote control you want to
program.
2. Access the main menu on the touchscreen and then scroll through
the menus to change the settings of
your MyKey. See
Settings (page 468).
3. Follow the instructions on the touchscreen. The programmed
restrictions apply when you switch the
vehicle off, open and close the driver
door and restart your vehicle with the
programmed key or remote control.
Note: You can clear or change your MyKey
settings at any time during the same key
cycle as you created the MyKey. Once you
have switched the vehicle off, however, you
will need an admin key to change or clear
your MyKey settings. When you make any
changes to your MyKey settings, you change
the settings for every MyKey. You cannot
make individual changes to apply to certain
MyKeys. CLEARING ALL MYKEYS
When you clear your MyKeys, you remove
all restrictions and return all MyKeys to
their original admin key status at once. To
clear all MyKeys of all MyKey settings, use
the touchscreen.
1. Switch the ignition on using an admin
key.
2. Access the main menu in the touchscreen and then scroll through
the menus to begin clearing your
MyKey programming. See
Settings
(page 468).
3. Follow the instructions in the display.
4. A confirmation message appears in the
display after you finish clearing your
MyKeys.
Note: When you clear your MyKeys, you
remove all restrictions and return all MyKeys
to their original admin key status. You
cannot remove the MyKey restrictions
individually.
CHECKING MYKEY SYSTEM
STATUS
You can find information about your
programmed MyKeys by using the
touchscreen. See
Settings (page 468).
MyKey Distance
Tracks the distance when drivers use a
MyKey. The only way to delete the
accumulated distance is by using an admin
key to clear all MyKeys. If the distance does
not accumulate as expected, then the
intended user is not using the MyKey, or an
admin key user recently cleared and then
recreated a MyKey.
63
Escape (CTC) Canada/United States of America, Vehicles Built From: 17-06-2019, enUSA, Edition date: 201906, Third-Printing- MyKey
™
Page 69 of 553
LOCKING AND UNLOCKING
You can use the power door lock control
or the remote control to lock and unlock
your vehicle.
Note:
Always take your keys and lock all
doors when leaving your vehicle.
Power Door Locks
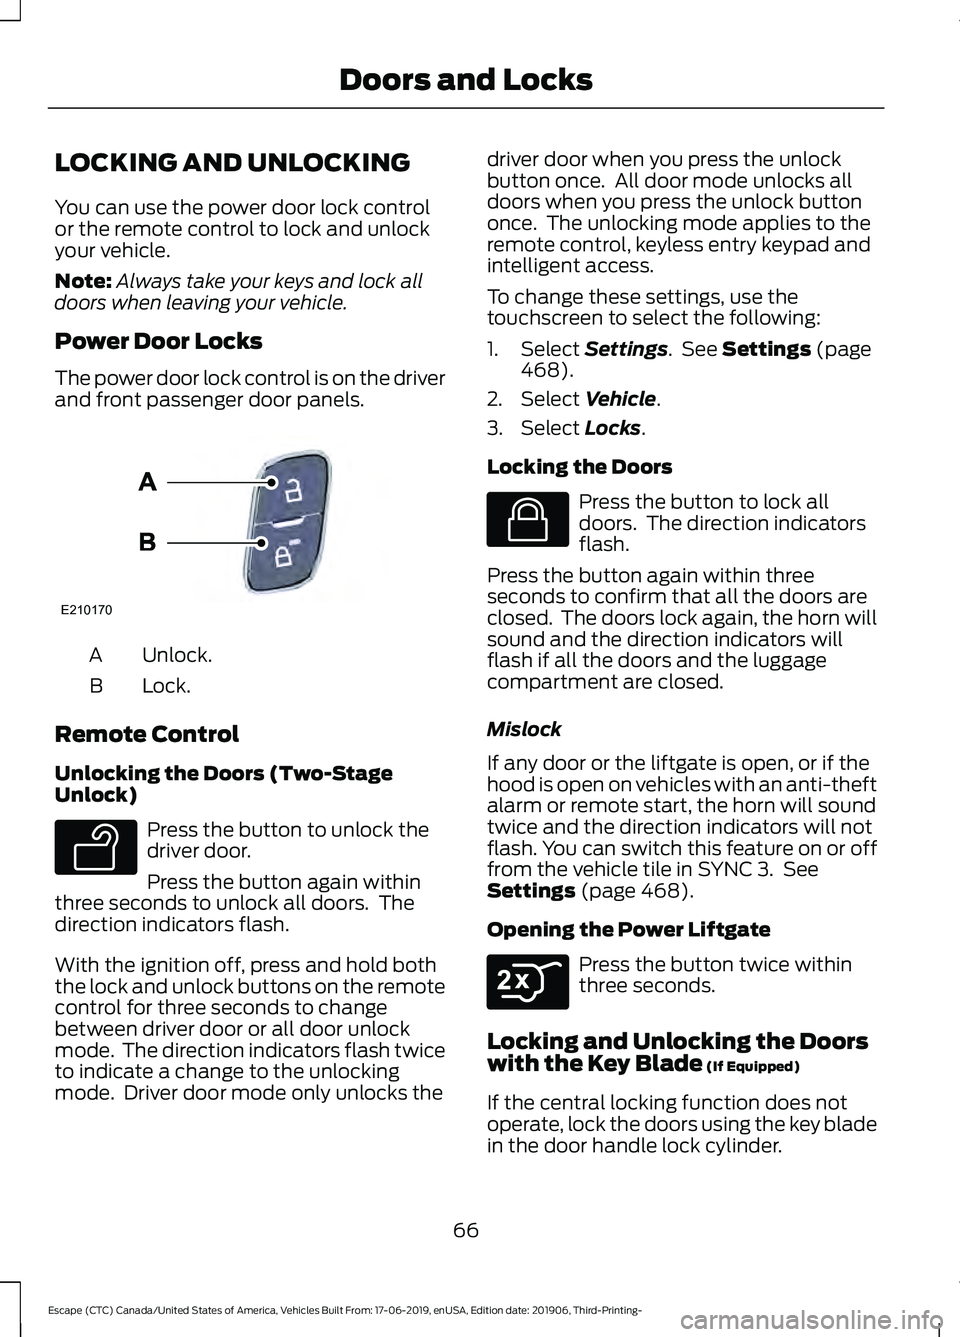
The power door lock control is on the driver
and front passenger door panels. Unlock.
A
Lock.
B
Remote Control
Unlocking the Doors (Two-Stage
Unlock) Press the button to unlock the
driver door.
Press the button again within
three seconds to unlock all doors. The
direction indicators flash.
With the ignition off, press and hold both
the lock and unlock buttons on the remote
control for three seconds to change
between driver door or all door unlock
mode. The direction indicators flash twice
to indicate a change to the unlocking
mode. Driver door mode only unlocks the driver door when you press the unlock
button once. All door mode unlocks all
doors when you press the unlock button
once. The unlocking mode applies to the
remote control, keyless entry keypad and
intelligent access.
To change these settings, use the
touchscreen to select the following:
1. Select Settings. See Settings (page
468).
2. Select
Vehicle.
3. Select
Locks.
Locking the Doors Press the button to lock all
doors. The direction indicators
flash.
Press the button again within three
seconds to confirm that all the doors are
closed. The doors lock again, the horn will
sound and the direction indicators will
flash if all the doors and the luggage
compartment are closed.
Mislock
If any door or the liftgate is open, or if the
hood is open on vehicles with an anti-theft
alarm or remote start, the horn will sound
twice and the direction indicators will not
flash. You can switch this feature on or off
from the vehicle tile in SYNC 3. See
Settings
(page 468).
Opening the Power Liftgate Press the button twice within
three seconds.
Locking and Unlocking the Doors
with the Key Blade
(If Equipped)
If the central locking function does not
operate, lock the doors using the key blade
in the door handle lock cylinder.
66
Escape (CTC) Canada/United States of America, Vehicles Built From: 17-06-2019, enUSA, Edition date: 201906, Third-Printing- Doors and LocksE210170 E138629 E138623 E306276
Page 70 of 553
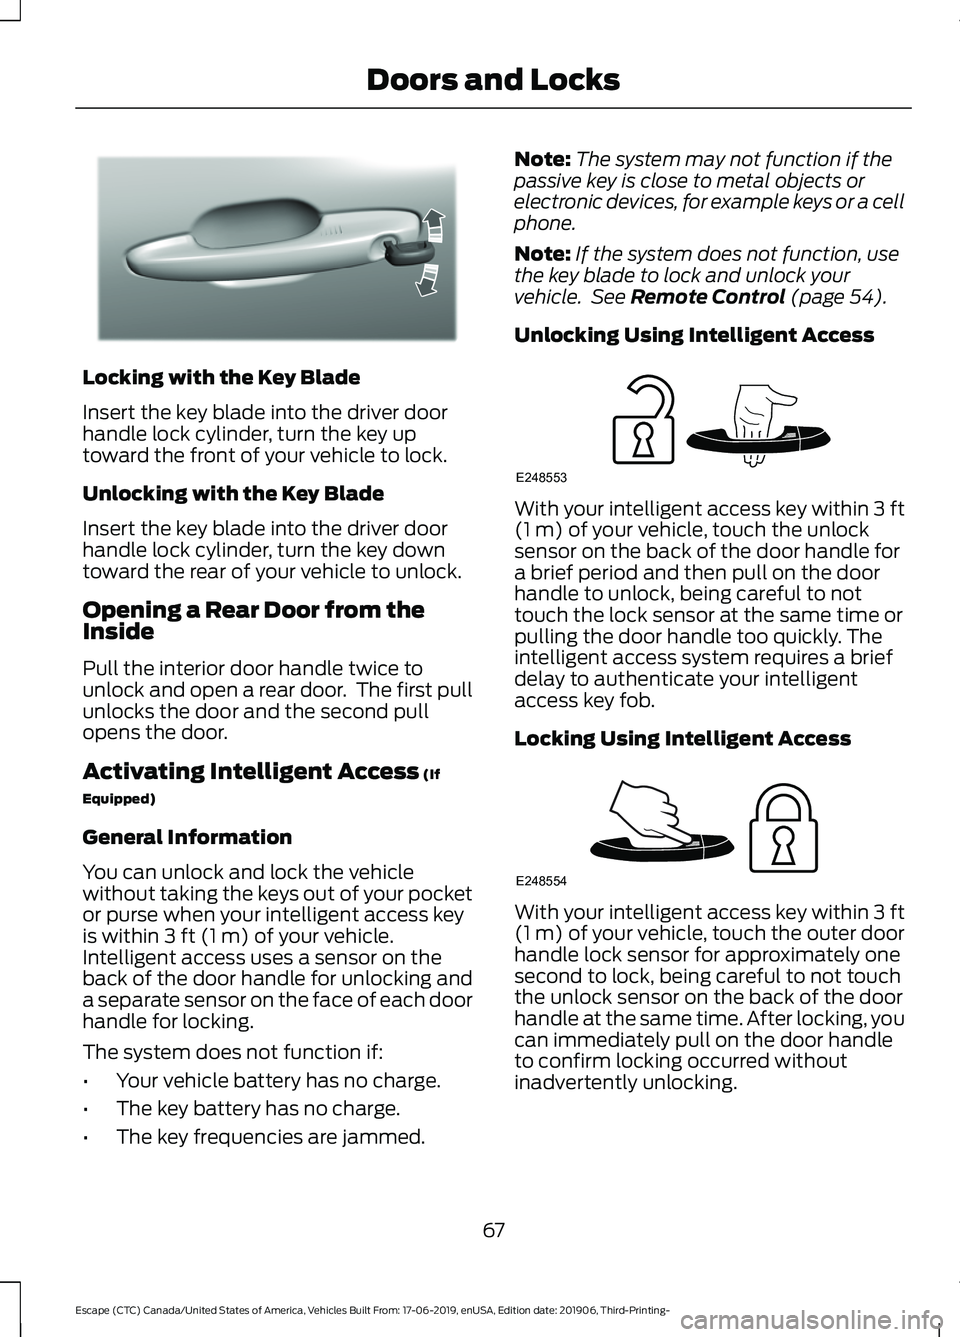
Locking with the Key Blade
Insert the key blade into the driver door
handle lock cylinder, turn the key up
toward the front of your vehicle to lock.
Unlocking with the Key Blade
Insert the key blade into the driver door
handle lock cylinder, turn the key down
toward the rear of your vehicle to unlock.
Opening a Rear Door from the
Inside
Pull the interior door handle twice to
unlock and open a rear door. The first pull
unlocks the door and the second pull
opens the door.
Activating Intelligent Access (If
Equipped)
General Information
You can unlock and lock the vehicle
without taking the keys out of your pocket
or purse when your intelligent access key
is within
3 ft (1 m) of your vehicle.
Intelligent access uses a sensor on the
back of the door handle for unlocking and
a separate sensor on the face of each door
handle for locking.
The system does not function if:
• Your vehicle battery has no charge.
• The key battery has no charge.
• The key frequencies are jammed. Note:
The system may not function if the
passive key is close to metal objects or
electronic devices, for example keys or a cell
phone.
Note: If the system does not function, use
the key blade to lock and unlock your
vehicle. See
Remote Control (page 54).
Unlocking Using Intelligent Access With your intelligent access key within
3 ft
(1 m) of your vehicle, touch the unlock
sensor on the back of the door handle for
a brief period and then pull on the door
handle to unlock, being careful to not
touch the lock sensor at the same time or
pulling the door handle too quickly. The
intelligent access system requires a brief
delay to authenticate your intelligent
access key fob.
Locking Using Intelligent Access With your intelligent access key within
3 ft
(1 m) of your vehicle, touch the outer door
handle lock sensor for approximately one
second to lock, being careful to not touch
the unlock sensor on the back of the door
handle at the same time. After locking, you
can immediately pull on the door handle
to confirm locking occurred without
inadvertently unlocking.
67
Escape (CTC) Canada/United States of America, Vehicles Built From: 17-06-2019, enUSA, Edition date: 201906, Third-Printing- Doors and LocksE310901 E248553 E248554