clock FORD ESCAPE 2022 User Guide
[x] Cancel search | Manufacturer: FORD, Model Year: 2022, Model line: ESCAPE, Model: FORD ESCAPE 2022Pages: 585, PDF Size: 6.15 MB
Page 351 of 585
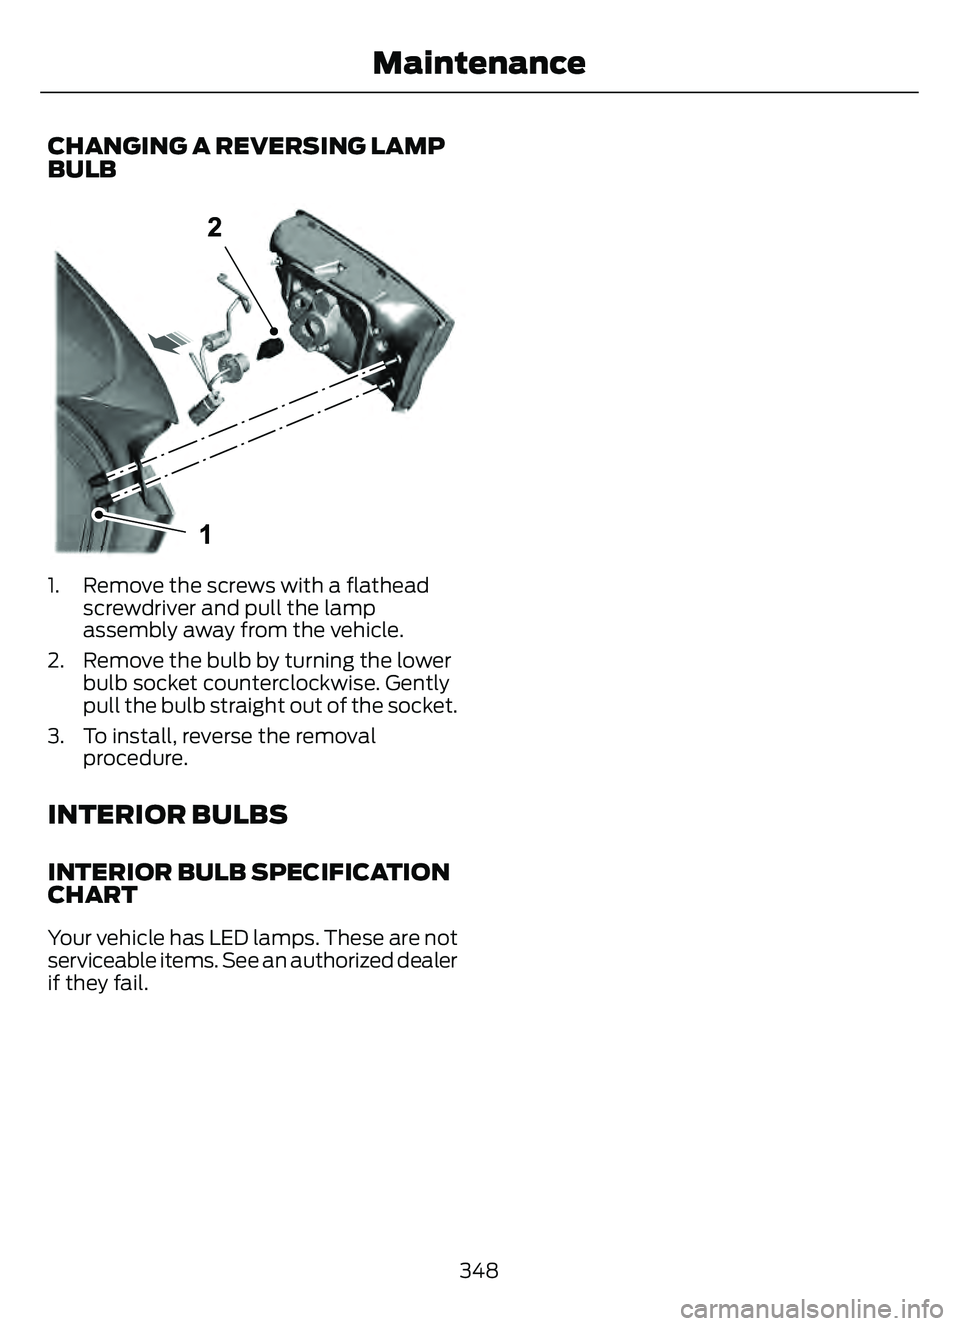
CHANGING A REVERSING LAMP
BULB
E307887E307E307E307E307E307E307E307E307E307E307307777777777E30777E30777E307EE307EE307E30777E307E3077E330E30788788788788878878878788788777887887887887887887887888878788788888778888877887887888878878887887887888788887887887887887887887887
1. Remove the screws with a flatheadscrewdriver and pull the lamp
assembly away from the vehicle.
2. Remove the bulb by turning the lower bulb socket counterclockwise. Gently
pull the bulb straight out of the socket.
3. To install, reverse the removal procedure.
INTERIOR BULBS
INTERIOR BULB SPECIFICATION
CHART
Your vehicle has LED lamps. These are not
serviceable items. See an authorized dealer
if they fail.
348
Maintenance
Page 376 of 585
Accessory power plug
H
Casing/housing
I
Bike/raft/sports ball adapters
J
USING THE TIRE SEALANT
AND INFLATOR KIT
Tips for use of the kit
To ensure safe operation of the kit:
• Before operating the kit, make sure
your vehicle is safely off the road and
away from moving traffic.
• Do not remove any foreign objects, such as nails or screws, from the tire.
• Do not allow the compressor to operate continuously for more than 15
minutes. This will help prevent the
compressor from overheating.
• Only use the kit when the ambient temperature is between -22°F (-30°C)
and 158°F (70°C).
• Only use the sealing compound before the use-by date. The use-by date is on
a label on the sealant canister and can
be seen through the rectangular
viewing window on the bottom of the
compressor. Check the use-by date
regularly and replace the canister when
the sealant expires.
Note: Sealant compound contains latex.
Use appropriate precautions to avoid any
allergic reactions.
E175978
When inflation only is required
for a tire or other objects, the
selector must be in the Air
position.
What to do when a tire is punctured
A tire puncture within the tire's tread area
can be repaired in two stages with the kit. • In the first stage, the tire will be
reinflated with a sealing compound
and air. After the tire has been inflated,
you will need to drive the vehicle a
short distance approximately 4 mi
(6 km) to distribute the sealant in the
tire.
• In the second stage, you will need to check the tire pressure and adjust, if
necessary, to the vehicle's specified
tire inflation pressure.
First Stage: Reinflating the Tire
with sealing compound and air
WARNING: Do not stand directly
over the kit while inflating the tire. If you
notice any unusual bulges or
deformations in the tire's sidewall during
inflation, stop and call roadside
assistance.
WARNING: If the tire does not
inflate to the recommended tire pressure
within 15 minutes, stop and call roadside
assistance.
Park the vehicle in a safe, level and secure
area, away from moving traffic.
Turn the hazard lights on. Apply the parking
brake and power off the vehicle. Inspect
the flat tire for visible damage.
If a puncture is located in the tire sidewall,
stop and call roadside assistance.
1. Remove the valve cap from the tire valve.
2. Unwrap the dual purpose hose (black tube) from the back of the compressor
housing.
3. Fasten the hose to the tire valve by turning the connector clockwise.
Tighten the connection securely.
373
Tire Sealant and Inflator Kit (If Equipped)
Page 377 of 585
E175979E175979
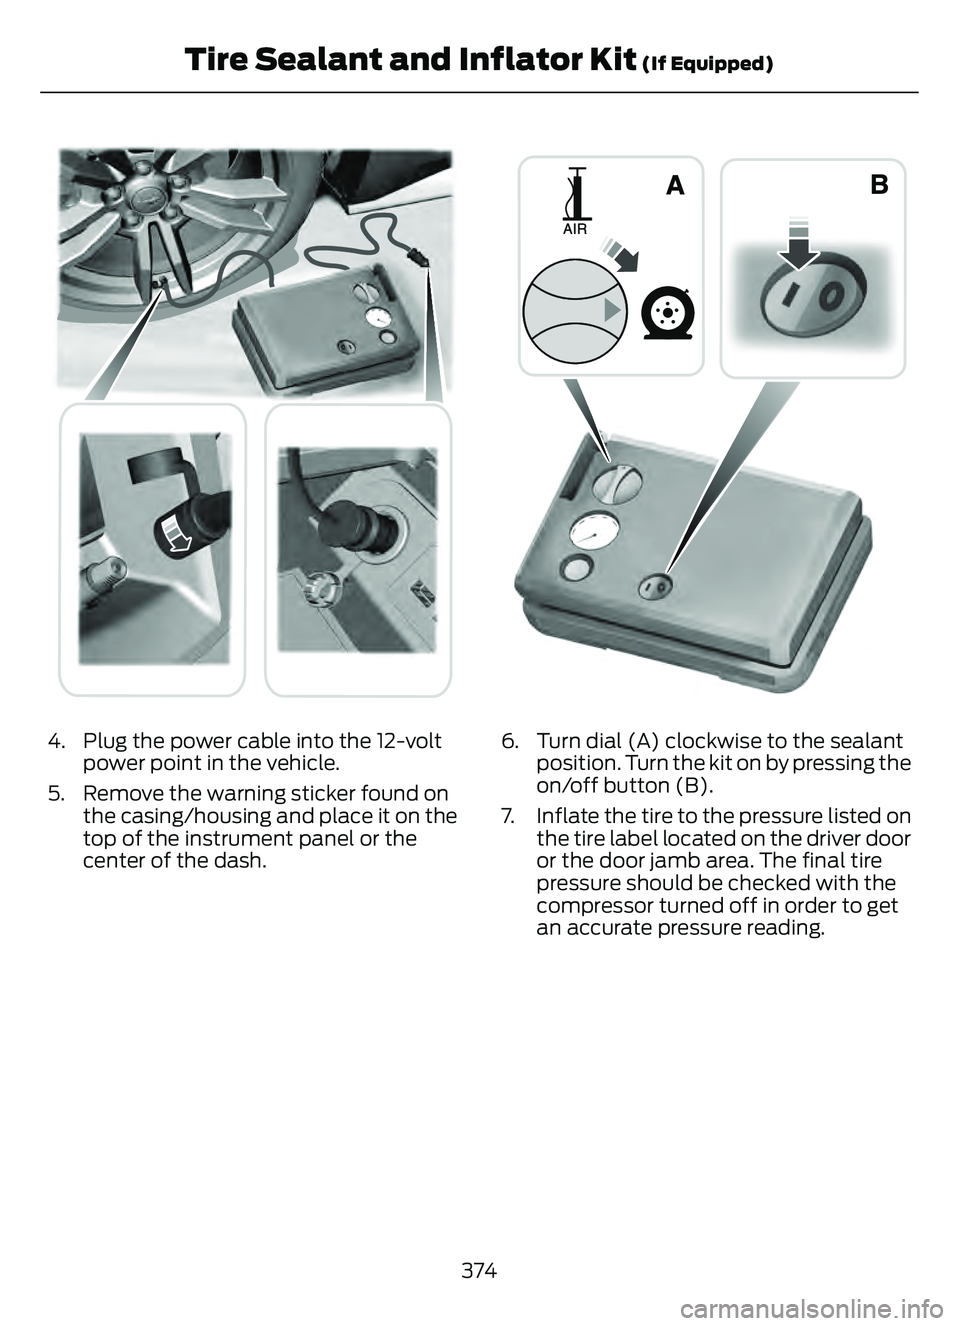
4. Plug the power cable into the 12-voltpower point in the vehicle.
5. Remove the warning sticker found on the casing/housing and place it on the
top of the instrument panel or the
center of the dash.
E175981E175EE981
6. Turn dial (A) clockwise to the sealantposition. Turn the kit on by pressing the
on/off button (B).
7. Inflate the tire to the pressure listed on the tire label located on the driver door
or the door jamb area. The final tire
pressure should be checked with the
compressor turned off in order to get
an accurate pressure reading.
374
Tire Sealant and Inflator Kit (If Equipped)
Page 378 of 585

E175982EE175982E175EE982
8. When the recommended tire pressureis reached, turn off the kit, unplug the
power cable, and disconnect the hose
from the tire valve. Re-install the valve
cap on the tire valve and return the kit
to the rear of the vehicle.
9. Drive the vehicle 4 mi (6 km) to distribute the sealant evenly inside the
tire.
Note: If you experience any unusual
vibration, ride disturbance or noise while
driving, reduce your speed until you can
safely pull off to the side of the road to call
for roadside assistance. Do not proceed to
the second stage of this operation.
Second Stage: Checking the tire
pressure with the inflator kit
WARNING: If the tire does not
inflate to the recommended tire pressure
within 15 minutes, stop and call roadside
assistance.
WARNING: The power plug may
get hot after use and should be handled
carefully when unplugging.
Check the air pressure of your tires as
follows:
E175983E17575757575757575757598983983983983983983983983
1. Remove the valve cap from the tire valve.
2. Firmly screw the air compressor hose onto the valve stem by turning
clockwise.
3. Push and turn the dial clockwise to the air position.
4. If required, turn on the compressor and adjust the tire to the recommended
inflation pressure.
5. Unplug the hoses, re-install the valve cap on the tire and return the kit to the
rear of the vehicle.
375
Tire Sealant and Inflator Kit (If Equipped)
Page 386 of 585

3. Lift and remove the carpeted cargoarea floor to access the spare tire and
jack.
4. Remove the wing nut that secures the spare tire by turning it
counterclockwise.
5. Remove the spare tire and jack kit from the spare tire compartment.
Note: On Plug-in and Full Hybrid Electric
Vehicles you can find the jack and wrench
to the left of the spare tire.
E294118
Note: On Non Plug-in or Full Hybrid Electric
Vehicles, you can find the jack and wrench
under the spare tire.
6. Remove the jack and the flat tire retainer strap from the jack base.
E305308E305308E305308
7. Turn the jack hex nut drive screwcounterclockwise to detach the lug
wrench from the jack. This lowers the
jack and releases the mechanical lock.
E294117
8. Unfold the lug wrench for use.
E181744E181744
9. Block the diagonally opposite wheel.
E142551
10. Loosen each wheel lug nut one-half turn counterclockwise, but do not
remove them until the wheel is raised
off the ground.
383
Changing a Road Wheel (If Equipped)
Page 387 of 585
Note:Jack at the specified locations to
avoid damage to the vehicle.
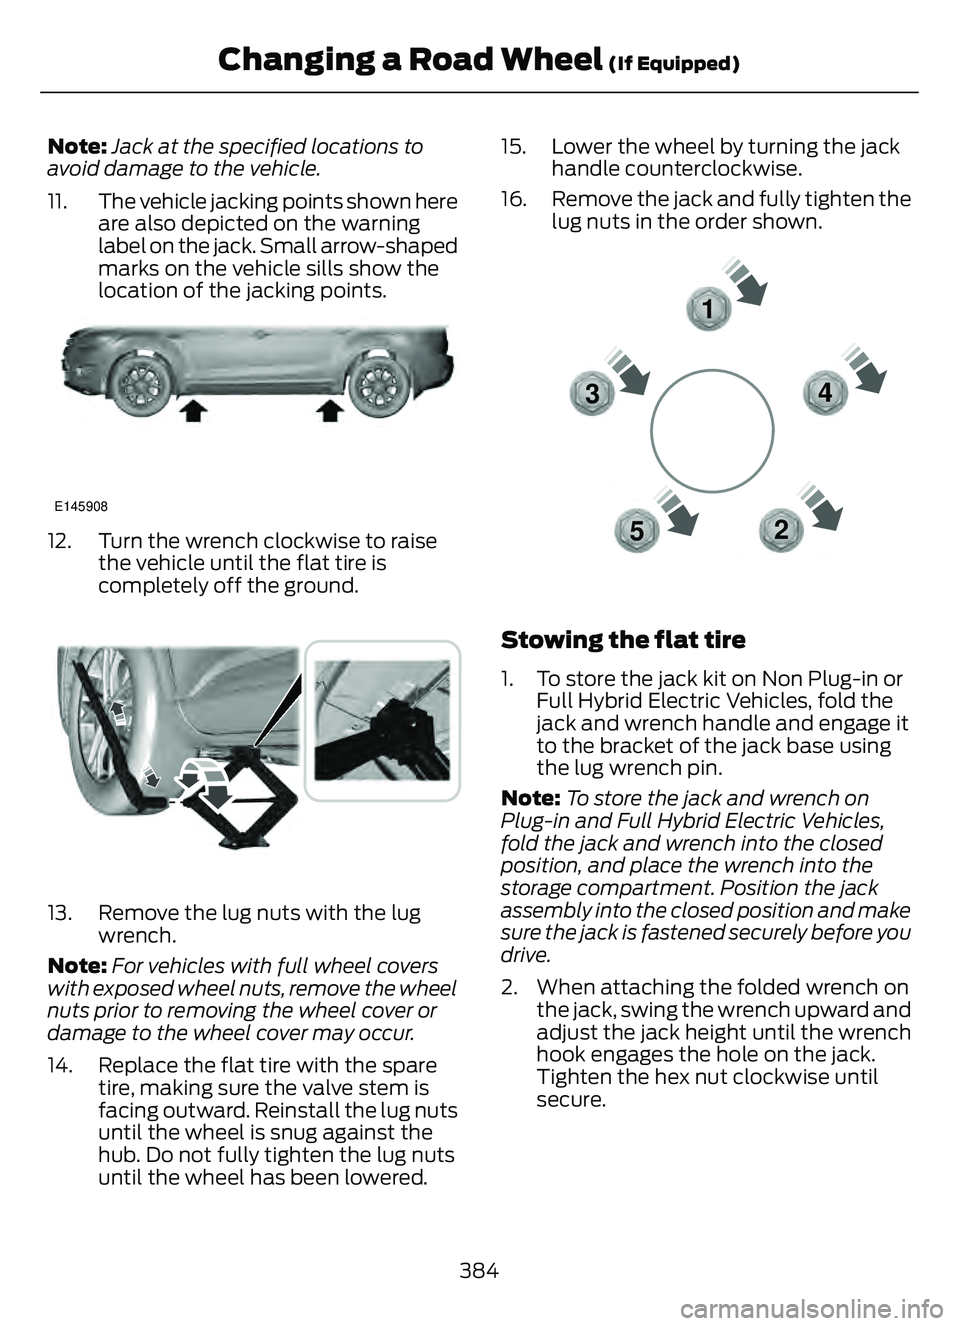
11. The vehicle jacking points shown here are also depicted on the warning
label on the jack. Small arrow-shaped
marks on the vehicle sills show the
location of the jacking points.
E145908
12. Turn the wrench clockwise to raisethe vehicle until the flat tire is
completely off the ground.
E338668E338668
13. Remove the lug nuts with the lugwrench.
Note: For vehicles with full wheel covers
with exposed wheel nuts, remove the wheel
nuts prior to removing the wheel cover or
damage to the wheel cover may occur.
14. Replace the flat tire with the spare tire, making sure the valve stem is
facing outward. Reinstall the lug nuts
until the wheel is snug against the
hub. Do not fully tighten the lug nuts
until the wheel has been lowered. 15. Lower the wheel by turning the jack
handle counterclockwise.
16. Remove the jack and fully tighten the lug nuts in the order shown.
1
2
3
4
5
E306781
Stowing the flat tire
1. To store the jack kit on Non Plug-in or Full Hybrid Electric Vehicles, fold the
jack and wrench handle and engage it
to the bracket of the jack base using
the lug wrench pin.
Note: To store the jack and wrench on
Plug-in and Full Hybrid Electric Vehicles,
fold the jack and wrench into the closed
position, and place the wrench into the
storage compartment. Position the jack
assembly into the closed position and make
sure the jack is fastened securely before you
drive.
2. When attaching the folded wrench on the jack, swing the wrench upward and
adjust the jack height until the wrench
hook engages the hole on the jack.
Tighten the hex nut clockwise until
secure.
384
Changing a Road Wheel (If Equipped)
Page 414 of 585
Note:The audio mutes briefly while the
system saves the preset and returns once it
is stored.
Note: You can save presets from multiple
sources to the memory preset bar.
MUTING THE AUDIO
Press the button on the steering
wheel to mute the audio.
Press to mute the signal. Press
again to restore the signal.
ADJUSTING THE SOUND
SETTINGS
Balance and Fade (If Equipped)
1. Access the vehicle drawer on the touchscreen.
2. Press SETTINGS.
3. Press Sound.
4. Press Balance / Fade.
5. Press the arrows to adjust the settings.
Tone Settings
1. Access the vehicle drawer on the touchscreen.
2. Press SETTINGS.
3. Press Sound.
4. Press Tone Settings .
5. Use the slider bar to adjust the settings.
Speed Compensated Volume
1. Access the vehicle drawer on the touchscreen.
2. Press SETTINGS.
3. Press Sound.
4. Press Speed Compensated Volume .5. Press a setting.
Occupancy Mode (If Equipped)
1. Access the vehicle drawer on the
touchscreen.
2. Press SETTINGS.
3. Press Sound.
4. Press Occupancy Mode .
5. Press a setting.
Sound Mode (If Equipped)
1. Access the vehicle drawer on the touchscreen.
2. Press SETTINGS.
3. Press Sound.
4. Press Sound Mode .
5. Press a setting.
SETTING THE CLOCK AND
DATE
1. Access the vehicle drawer on the touchscreen.
2. Press SETTINGS.
3. Press Clock.
4. Set the time.
Note: The AM and PM options are not
available if 24-hour mode is on.
5. Press the arrows to adjust the settings.
Switching Automatic Time
Updates On and Off
1. Access the vehicle drawer on the touchscreen.
2. Press SETTINGS.
3. Press Clock.
4. Switch Automatic time zone update on or off.
411
Audio System
Page 434 of 585
GENERAL INFORMATION
WARNING: Driving while distracted
can result in loss of vehicle control, crash
and injury. We strongly recommend that
you use extreme caution when using any
device that may take your focus off the
road. Your primary responsibility is the
safe operation of your vehicle. We
recommend against the use of any
hand-held device while driving and
encourage the use of voice-operated
systems when possible. Make sure you
are aware of all applicable local laws
that may affect the use of electronic
devices while driving.
About SYNC
The system allows you to interact with the
entertainment, information and
communication systems on your vehicle
using voice commands and a touchscreen.
The system provides easy interaction with
audio, phone, navigation, mobile apps and
settings.
Note: You can switch the system on and
use it for up to an hour without switching
the ignition on.
Note: You can use the system after you
switch the ignition off for up to 10 minutes
or until you open a door.
Note: For your safety, some features are
speed-dependent. Their use is limited to
when your vehicle speed is less than 3 mph
(5 km/h).
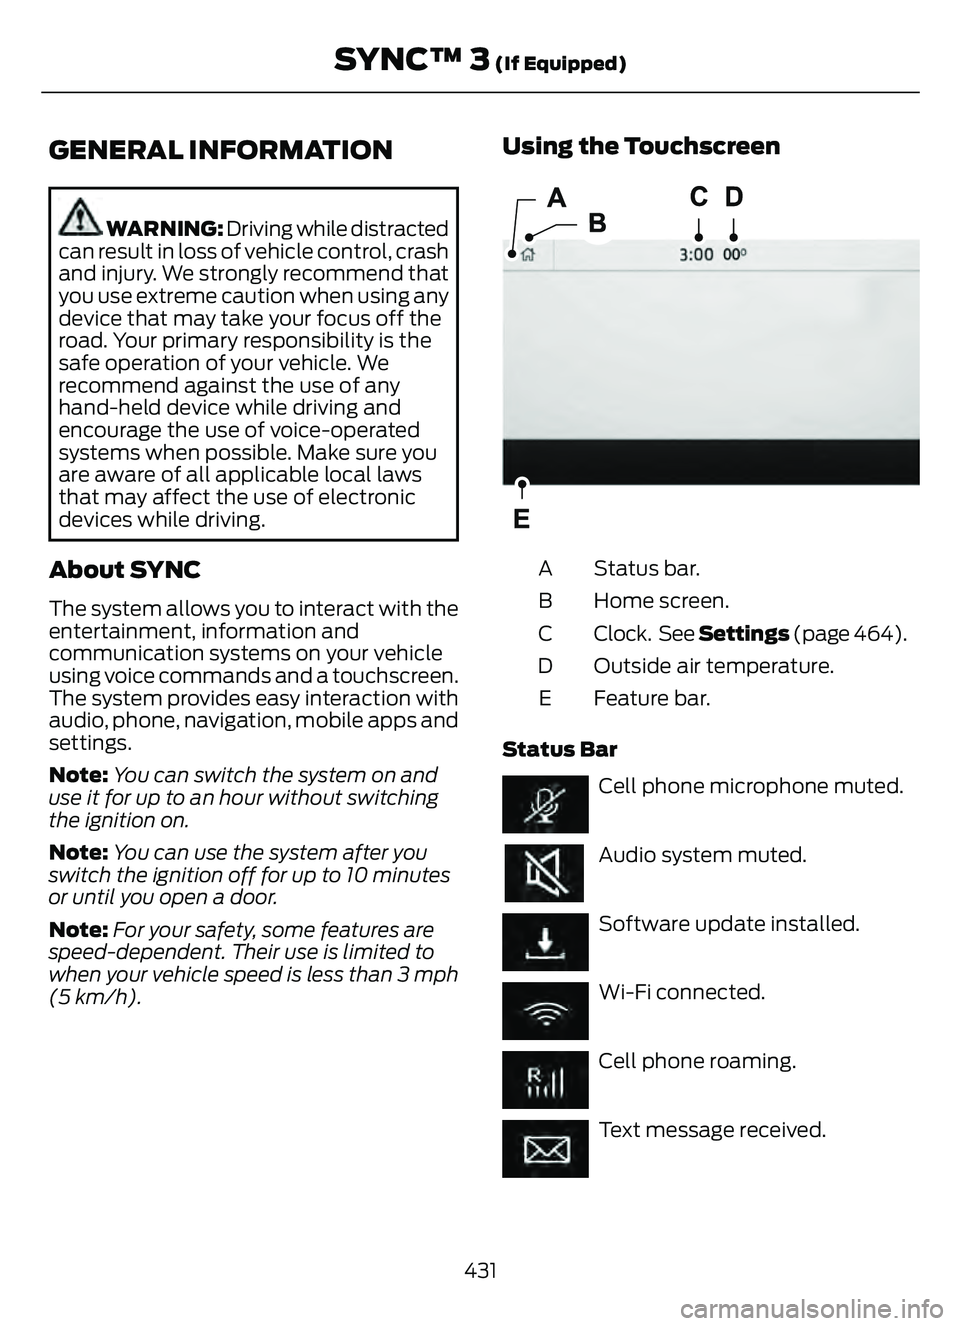
Using the Touchscreen
E293823E293823
Status bar.
A
Home screen.
B
Clock. See Settings (page 464).
C
Outside air temperature.
D
Feature bar.
E
Status Bar
Cell phone microphone muted.
Audio system muted.
Software update installed.
Wi-Fi connected.
Cell phone roaming.
Text message received.
431
SYNC™ 3 (If Equipped)
Page 464 of 585
Departure Times On and Off Switch
This switch is visible when you have at
least one departure time set. Use this
switch to turn all departure times on and
off. Switching departure times off does not
delete your settings.
Next Departure Times and Cabin
Temperature
Displays the next departure time and
associated cabin temperature setting.
Charge Time Settings
Follow these steps to set a preferred
charge time for a charging location.
1. Select Charge Preferences on theCharge Settings screen.
2. Select Charge Time Setup on the Edit Charge Preferences screen.
3. Select Add New Location on the Charge Times screen. You can also edit
settings for previously saved locations
from this screen.
4. Select an address from the Recent Charge Locations screen.
5. On the Confirm Location for Charge Times screen, you can edit the location
name and set a max charge level as
desired. Once you have your desired
location name and max charge level,
select Continue to Schedule.
Note: Charging will stop when your vehicle
reaches the max charge level.
6. Select WEEKDAY or WEEKEND on the Preferred Charge Times screen.
7. On the Select preferred WEEKDAY or WEEKEND Charge Times screen, use
the circular 24 hour clock to select your
charging time windows. You can select
up to two time windows by pressing
and dragging across the hour buttons. When you have selected your preferred
times then press Next to return to the
Preferred Charge Times screen. Repeat
for WEEKEND or WEEKDAY as desired.
Once you are done setting preferred
charge times, press Save.
Note: Selecting all or none of the 24 hours
results in any time of day given equal priority
for charging.
8. Your saved location now shows on the Charge Times screen. Select Done to
return to the main charge settings
screen. Whenever your vehicle is at a
saved charging location the charge
settings screen displays the location
name, and the charging times are
based on your Charge Time settings for
that location plus the next Departure
Time.
Note: Reaching your max charge level by
your next Departure Time is always the
priority. When Charge Times are set,
charging outside your preferred charging
time windows could be necessary in order
to finish by your next Departure Time.
Departure Time Settings
1. Select Charge Preferences on the Charge Settings screen.
2. Select Departure Time Setup on the Edit Charge Preferences screen.
3. Two time settings show for each day of the week on the Departure Times
schedule screen. Select any one.
4. On the Departure Time settings screen, set your desired departure time, cabin
temperature and days of the week to
repeat. Press Save.
5. Your settings are now shown on the Departure Times schedule screen.
Press Back two times to return to the
main charge settings screen. The next
departure time and cabin temperature
setting display.
461
SYNC™ 3 (If Equipped)
Page 467 of 585
Action and Description
Menu Item
Touch this button to view the nearby weather, current weather,
or the five-day forecast for the chosen area.
Weather
Select to see the weather map,
which can show storms, radar
information, charts and winds.
Map
Select to choose from a listing of
weather locations.
Area
Touch this button to view scores and schedules from a variety
of sports. You can also save up to 10 favorite teams for easier
access. The score automatically refreshes when a game is in
progress.
Sports Info
Touch this button to view ski conditions for a specific area.
Ski Conditions
SETTINGS
E280315
Press the button to enter the
settings menu.
E268570
Once you select a tile, press the
button next to a menu item to
view an explanation of the
feature or setting.
Sound
Select this tile to adjust the sound settings.
Clock
Select this tile to adjust the clock settings.
Bluetooth®
Select this tile to switch Bluetooth® on
and off and adjust the settings.
Phone
Select this tile to connect, disconnect, and
manage the connected device settings.
Audio
Select this tile to adjust the audio settings.
Driver Assist (If Equipped)
Select this tile to adjust Driver Assist
features like Parking Aids, Lane Keeping
System, Pedestrian Detection, and
Auto-Start-Stop.
Vehicle
Select this tile to adjust vehicle settings
like windows, alarm, lighting, and MyKey
settings.
FordPass
Select this tile to adjust the FordPass
settings.
General
Select this tile to adjust settings like
language, measurement units, or to reset
the system.
911 Assist (If Equipped)
Select this tile to switch 911 Assist on and
off.
464
SYNC™ 3 (If Equipped)