clock FORD ESCAPE 2022 Owners Manual
[x] Cancel search | Manufacturer: FORD, Model Year: 2022, Model line: ESCAPE, Model: FORD ESCAPE 2022Pages: 585, PDF Size: 6.15 MB
Page 16 of 585
Connecting the Vehicle to a MobileNetwork .....................................................405
Connecting the Vehicle to a Wi-Fi Network .....................................................405
Connected Vehicle – Troubleshooting - Vehicles With: Modem .........................406
Connected Vehicle – Troubleshooting - Vehicles With: SYNC 3 ..........................407
Vehicle Wi-Fi Hotspot
Creating a Vehicle Wi-Fi Hotspot ........409
Changing the Vehicle Wi-Fi HotspotName or Password ................................409
Audio System
Audio System Precautions ......................410
Switching the Audio Unit On and Off........................................................................\
4 1 0
Selecting the Audio Source .....................410
Playing or Pausing the Audio Source ........................................................................\
4 1 0
Adjusting the Volume ................................410
Switching Shuffle Mode On and Off ........................................................................\
4 1 0
Switching Repeat Mode On and Off ........................................................................\
4 1 0
Setting a Memory Preset .........................410
Muting the Audio ..........................................411
Adjusting the Sound Settings ..................411
Setting the Clock and Date .......................411
AM/FM Radio ................................................412
Digital Radio ..................................................412
Satellite Radio ..............................................414
SYNC™
General Information ...................................415
Using Voice Recognition ...........................416
Using SYNC™ With Your Phone ............418
SYNC™ Applications and Services ......419
Using SYNC™ With Your Media Player ........................................................................\
.421
SYNC™ Troubleshooting .........................421
SYNC™ 3
General Information ...................................431
Using Voice Recognition ..........................433
Entertainment .............................................440
Phone .............................................................450
Navigation .....................................................452
Electric Vehicle Information ....................457
Apps ................................................................462
Settings ..........................................................464
SYNC™ 3 Troubleshooting ....................466
Accessories
Accessories ...................................................479
Ford Protect
What Is Ford Protect ................................480
Scheduled Maintenance
General Maintenance Information ......482
Normal Scheduled Maintenance .........485
Special Operating Conditions Scheduled Maintenance ............................................487
Customer Information
Rollover Warning ........................................490
The Better Business Bureau Auto LineProgram .....................................................490
The Mediation and Arbitration Program ........................................................................\
.491
Ordering a Canadian French Owner's Manual ........................................................491
Reporting Safety Defects in the United States .........................................................492
Reporting Safety Defects in Canada ........................................................................\
492
Radio Frequency Certification Labels ........................................................................\
493
Perchlorate ...................................................530
Replacement Parts Recommendation ........................................................................\
530
13
Table of Contents
Page 35 of 585
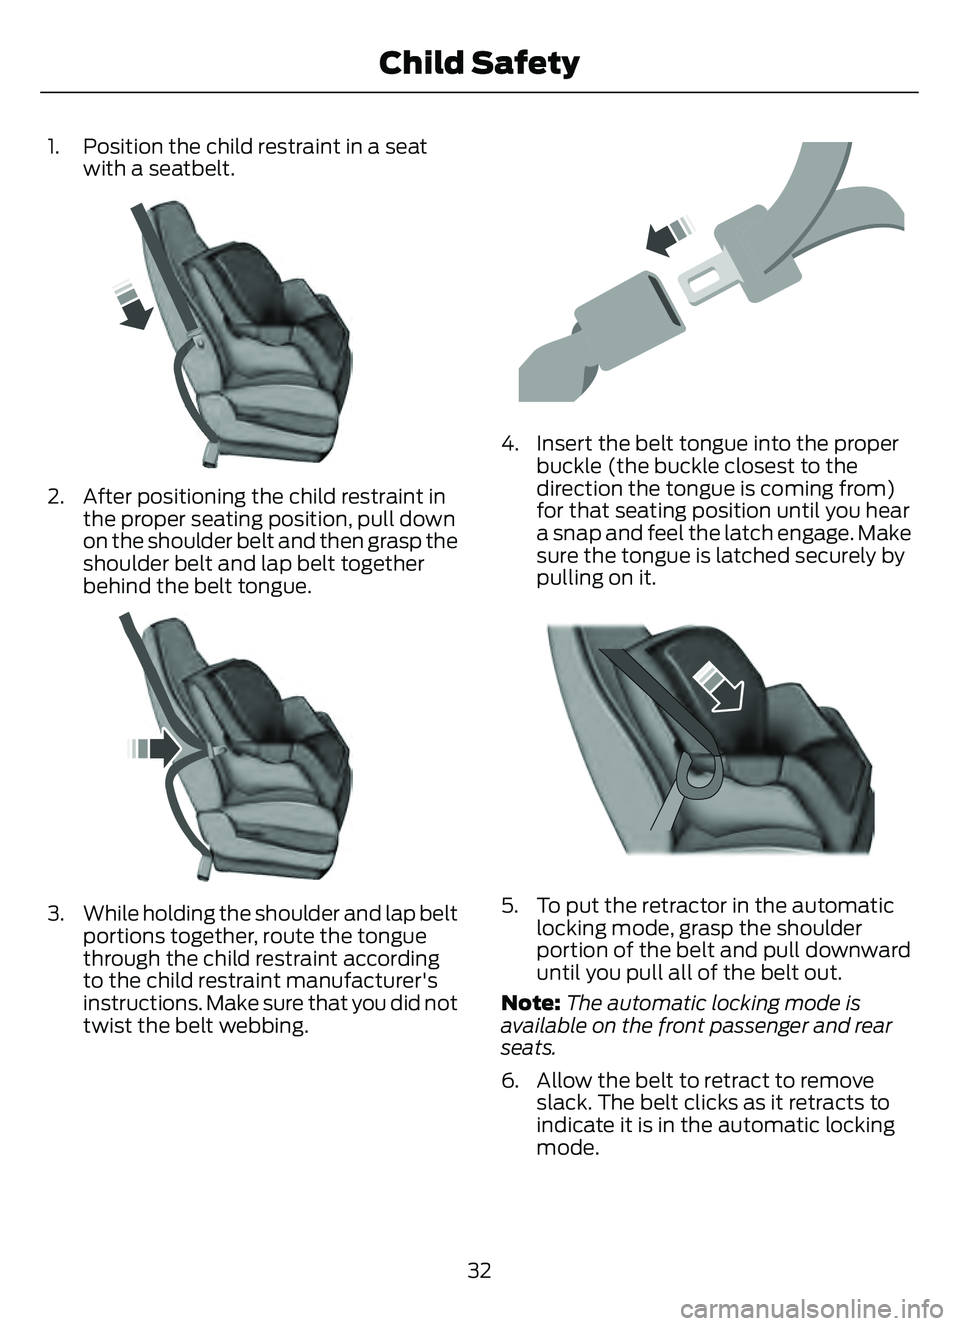
1. Position the child restraint in a seatwith a seatbelt.
E142529
2. After positioning the child restraint inthe proper seating position, pull down
on the shoulder belt and then grasp the
shoulder belt and lap belt together
behind the belt tongue.
E142530
3. While holding the shoulder and lap beltportions together, route the tongue
through the child restraint according
to the child restraint manufacturer's
instructions. Make sure that you did not
twist the belt webbing.
4. Insert the belt tongue into the properbuckle (the buckle closest to the
direction the tongue is coming from)
for that seating position until you hear
a snap and feel the latch engage. Make
sure the tongue is latched securely by
pulling on it.
5. To put the retractor in the automaticlocking mode, grasp the shoulder
portion of the belt and pull downward
until you pull all of the belt out.
Note: The automatic locking mode is
available on the front passenger and rear
seats.
6. Allow the belt to retract to remove slack. The belt clicks as it retracts to
indicate it is in the automatic locking
mode.
32
Child Safety
Page 41 of 585
If the booster seat slides on the vehicle
seat upon which it is being used, placing a
rubberized mesh sold as shelf or carpet
liner under the booster seat may improve
this condition. Do not use any item thicker
than this under the booster seat. Check
with the booster seat manufacturer's
instructions.
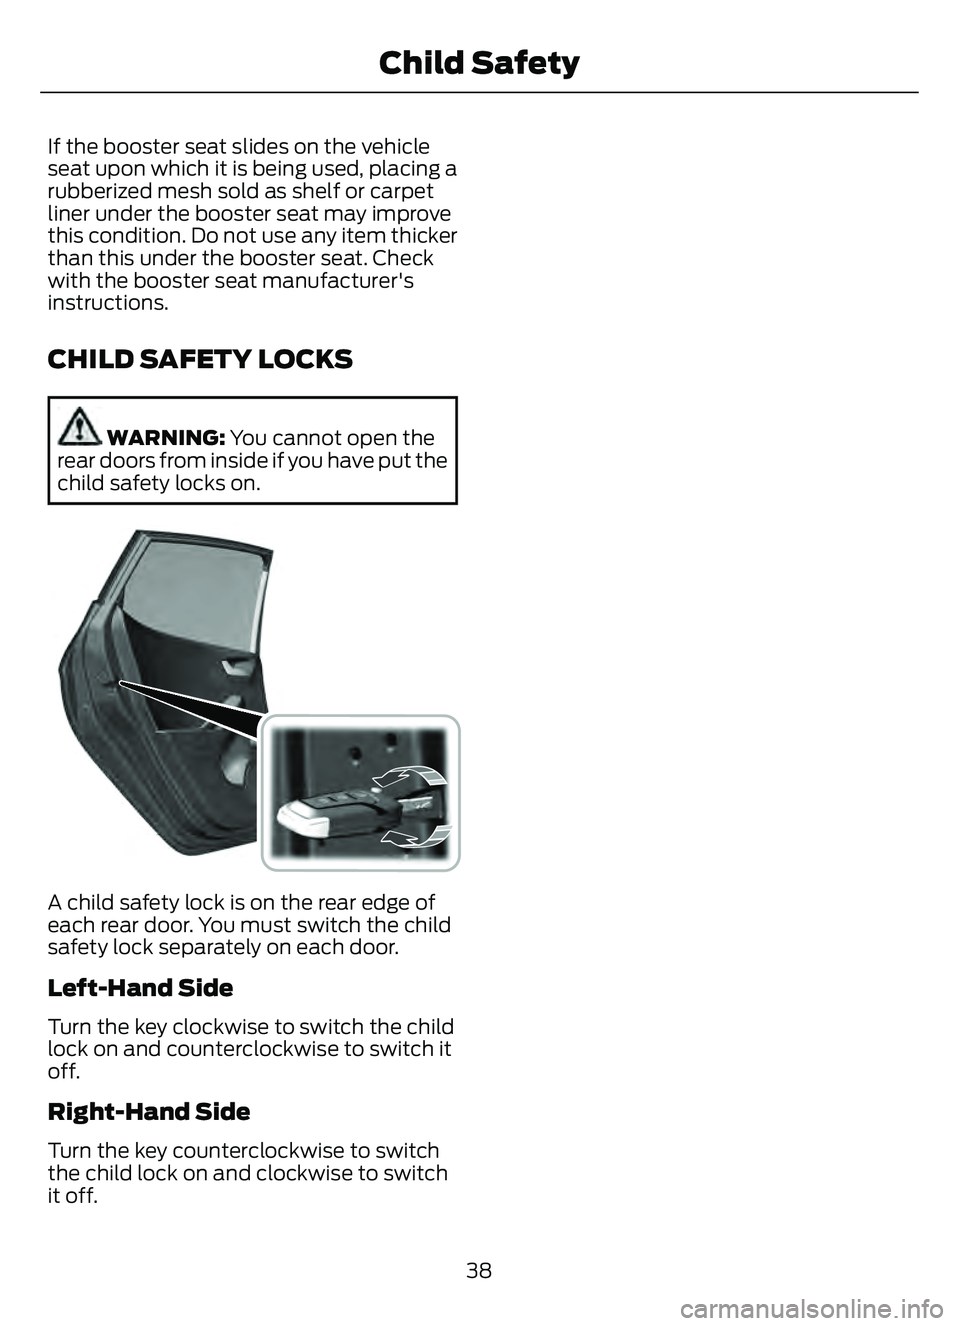
CHILD SAFETY LOCKS
WARNING: You cannot open the
rear doors from inside if you have put the
child safety locks on.
E238364E238364
A child safety lock is on the rear edge of
each rear door. You must switch the child
safety lock separately on each door.
Left-Hand Side
Turn the key clockwise to switch the child
lock on and counterclockwise to switch it
off.
Right-Hand Side
Turn the key counterclockwise to switch
the child lock on and clockwise to switch
it off.
38
Child Safety
Page 141 of 585
Use air conditioning with recirculated air
to improve cooling performance and
efficiency.
Note:In certain conditions, for example,
maximum defrost, the air conditioning
compressor may continue to operate even
though you switch off the air conditioning.
Switching the Climate Control On
and Off
Press and release the button.
Switching Maximum Air
Conditioning On and Off
Turn the temperature control
counterclockwise to the lowest
setting for maximum cooling.
The left-hand and right-hand settings set
to LO, recirculated air flows through the
instrument panel air vents, air conditioning
turns on and the blower motor adjusts to
the highest speed.
Switching Maximum Defrost On
and Off
Turn the temperature control
clockwise to the highest setting
for maximum defrosting.
The left-hand and right-hand settings set
to HI, air flows through the windshield air
vents, and the blower motor adjusts to the
highest speed. You can also use this setting
to defog and clear the windshield of a thin
covering of ice. The heated rear window
also turns on when you select maximum
defrost.
Note: To prevent window fogging, you
cannot select recirculated air when
maximum defrost is on.
Switching Recirculated Air On and
Off
Press and release the button to
switch between outside air and
recirculated air.
The air currently in the passenger
compartment recirculates. This may
reduce the time needed to cool the interior,
when used with A/C, and reduce unwanted
odors from entering your vehicle.
Note: Recirculated air may turn off, or
prevent you from switching on, in all air flow
modes except MAX A/C to reduce the risk
of fogging. Recirculation may also turn on
and off in various air distribution control
combinations during hot weather to improve
cooling efficiency.
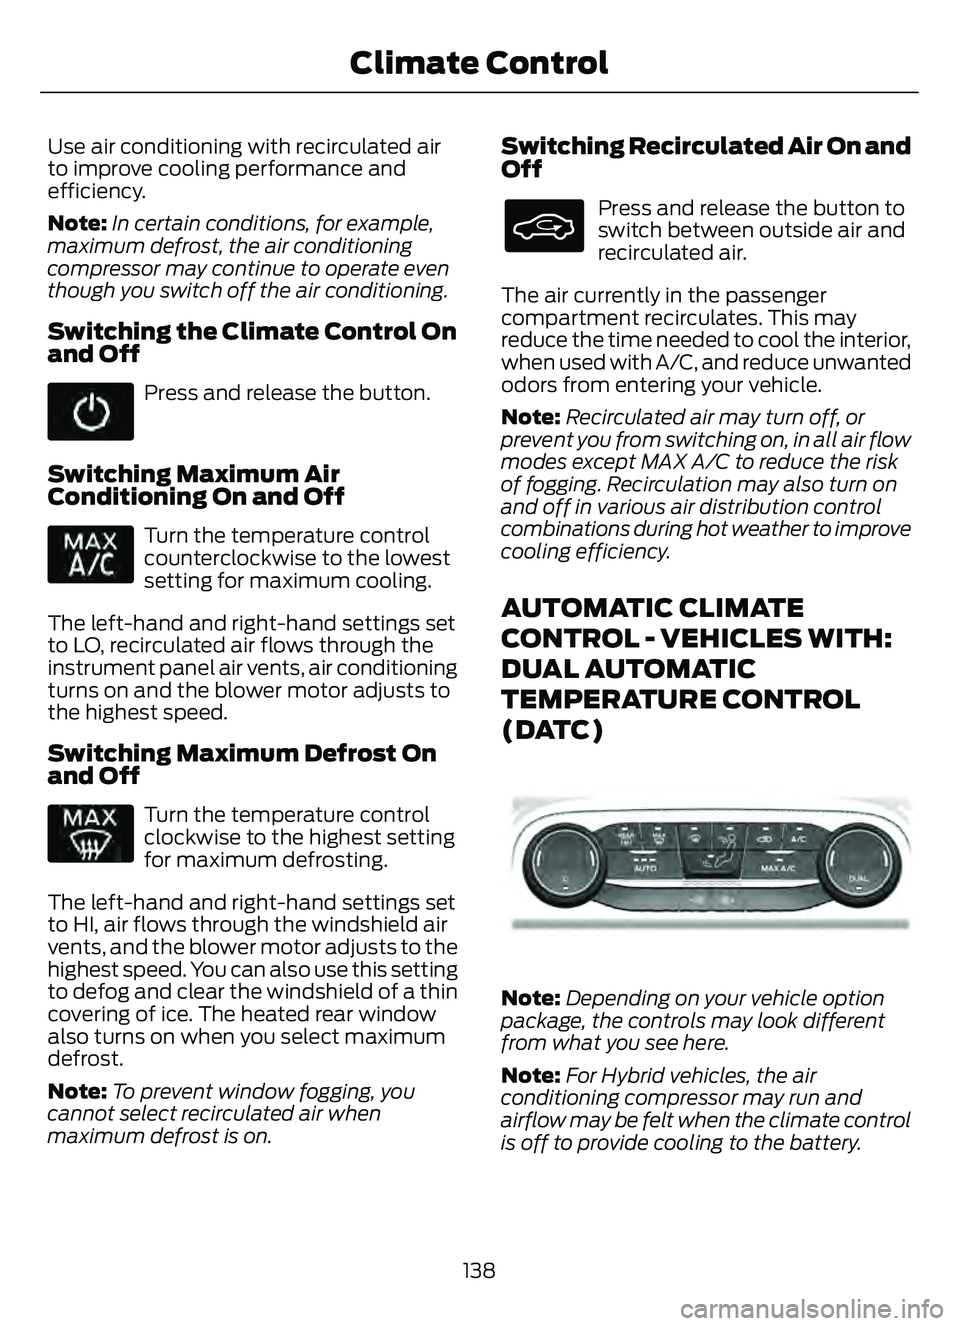
AUTOMATIC CLIMATE
CONTROL - VEHICLES WITH:
DUAL AUTOMATIC
TEMPERATURE CONTROL
(DATC)
E290005E290005
Note: Depending on your vehicle option
package, the controls may look different
from what you see here.
Note: For Hybrid vehicles, the air
conditioning compressor may run and
airflow may be felt when the climate control
is off to provide cooling to the battery.
138
Climate Control
Page 337 of 585
3. Add engine oil that meets ourspecifications. See Capacities and
Specifications (page 387).
4. Reinstall the engine oil filler cap. Turn it clockwise until you feel a strong
resistance.
Note: Do not add oil further than the
maximum mark. Oil levels above the
maximum mark may cause engine damage.
Note: Immediately soak up any oil spillage
with an absorbent cloth.
RESETTING THE ENGINE OIL
CHANGE REMINDER
Use the information display controls on
the steering wheel to reset the oil change
reminder.
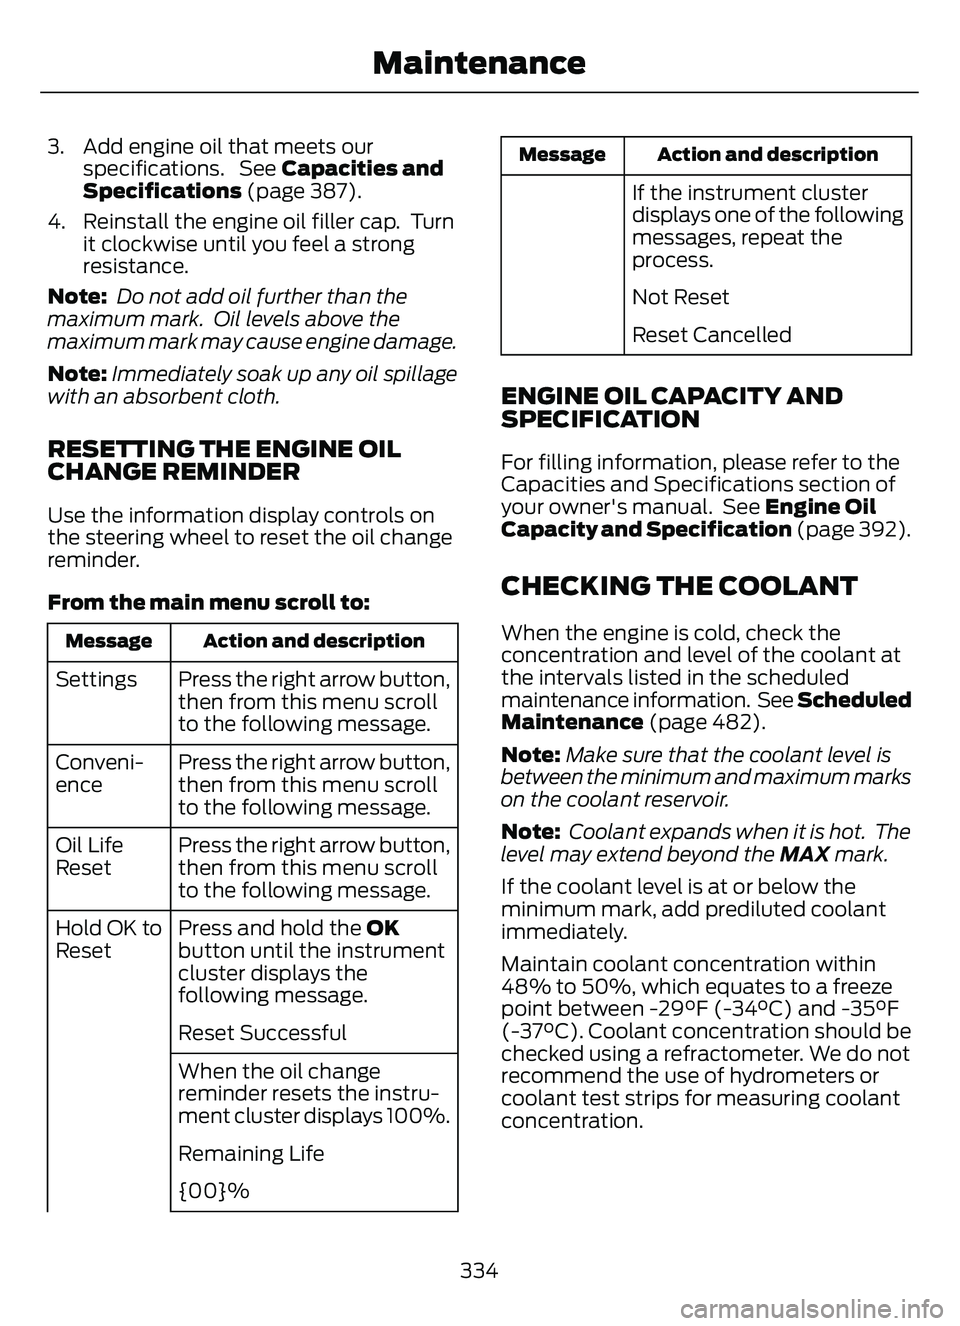
From the main menu scroll to:
Action and description
Message
Press the right arrow button,
then from this menu scroll
to the following message.
Settings
Press the right arrow button,
then from this menu scroll
to the following message.
Conveni-
ence
Press the right arrow button,
then from this menu scroll
to the following message.
Oil Life
Reset
Press and hold the OK
button until the instrument
cluster displays the
following message.
Hold OK to
Reset
Reset Successful
When the oil change
reminder resets the instru-
ment cluster displays 100%.
Remaining Life
{00}%
Action and description
Message
If the instrument cluster
displays one of the following
messages, repeat the
process.
Not Reset
Reset Cancelled
ENGINE OIL CAPACITY AND
SPECIFICATION
For filling information, please refer to the
Capacities and Specifications section of
your owner's manual. See Engine Oil
Capacity and Specification (page 392).
CHECKING THE COOLANT
When the engine is cold, check the
concentration and level of the coolant at
the intervals listed in the scheduled
maintenance information. See Scheduled
Maintenance (page 482).
Note:Make sure that the coolant level is
between the minimum and maximum marks
on the coolant reservoir.
Note: Coolant expands when it is hot. The
level may extend beyond the MAX mark.
If the coolant level is at or below the
minimum mark, add prediluted coolant
immediately.
Maintain coolant concentration within
48% to 50%, which equates to a freeze
point between -29°F (-34°C) and -35°F
(-37°C). Coolant concentration should be
checked using a refractometer. We do not
recommend the use of hydrometers or
coolant test strips for measuring coolant
concentration.
334
Maintenance
Page 338 of 585

Adding Coolant
WARNING: Keep your hands and
clothing clear of the cooling fan.
WARNING: Do not remove the
coolant reservoir cap when the engine is
on or the cooling system is hot. Wait 10
minutes for the cooling system to cool
down. Cover the coolant reservoir cap
with a thick cloth to prevent the
possibility of scalding and slowly remove
the cap. Failure to follow this instruction
could result in personal injury.
WARNING: Do not add engine
coolant when the engine is on or the
cooling system is hot. Failure to follow
this instruction could result in personal
injury.
WARNING: Do not add coolant
further than the MAX mark.
WARNING: Do not put coolant in
the windshield washer reservoir. If
sprayed on the windshield, coolant could
make it difficult to see through the
windshield.
WARNING: Do not allow the fluid
to touch your skin or eyes. If this
happens, rinse the affected areas
immediately with plenty of water and
contact your physician.
Note: Do not use stop leak pellets, cooling
system sealants, or non-specified additives
as they can cause damage to the engine
cooling or heating systems. Resulting
component damage may not be covered by
the vehicle Warranty.
Note: Automotive fluids are not
interchangeable. It is very important to use prediluted
coolant approved to the correct
specification in order to avoid plugging the
small passageways in the engine cooling
system. Do not mix different colors or types
of coolant in your vehicle. Mixing of engine
coolants or using an incorrect coolant may
harm the engine or cooling system
components and could void the vehicle
Warranty.
Note:
If prediluted coolant is not available,
use the approved concentrated coolant
diluting it to 50/50 with deionized or
distilled water. Using water that has not
been deionized may contribute to deposit
formation, corrosion and plugging of the
small cooling system passageways.
To top up the coolant level do the
following:
1. Unscrew the cap slowly. Any pressure escapes as you unscrew the cap.
2. Add enough prediluted coolant to reach the correct level.
Note: We do not recommend the use of
recycled coolant.
3. Replace the coolant reservoir cap. Turn the cap clockwise until it contacts the
hard stop.
4. Check the coolant level in the coolant reservoir the next few times you drive
your vehicle. If necessary, repeat step
2.
If you have to add more than 1.1 qt (1 L) of
engine coolant per month, have your
vehicle checked as soon as possible.
Operating an engine with a low level of
coolant can result in engine overheating
and possible engine damage.
In case of emergency, you can add a large
amount of water without engine coolant
in order to reach a vehicle service location.
Service your vehicle as soon as possible.
335
Maintenance
Page 347 of 585
If you disconnect or replace the vehicle
battery, you must reset the following
features:
• Window bounce-back. See Windows(page 105).
• Clock settings.
• Pre-set radio stations.
• Steering angle sensor.
Note: To calibrate the steering angle
sensor, drive the vehicle above 30 mph
(50 km/h) for a minimum of 1.2 mi (2 km).
Make sure to drive straight ahead for a
minimum of 30 seconds. Several vehicle
functions are disabled and a warning light
could appear until the sensor is calibrated.
ADJUSTING THE HEADLAMPS
Vertical Aim Adjustment
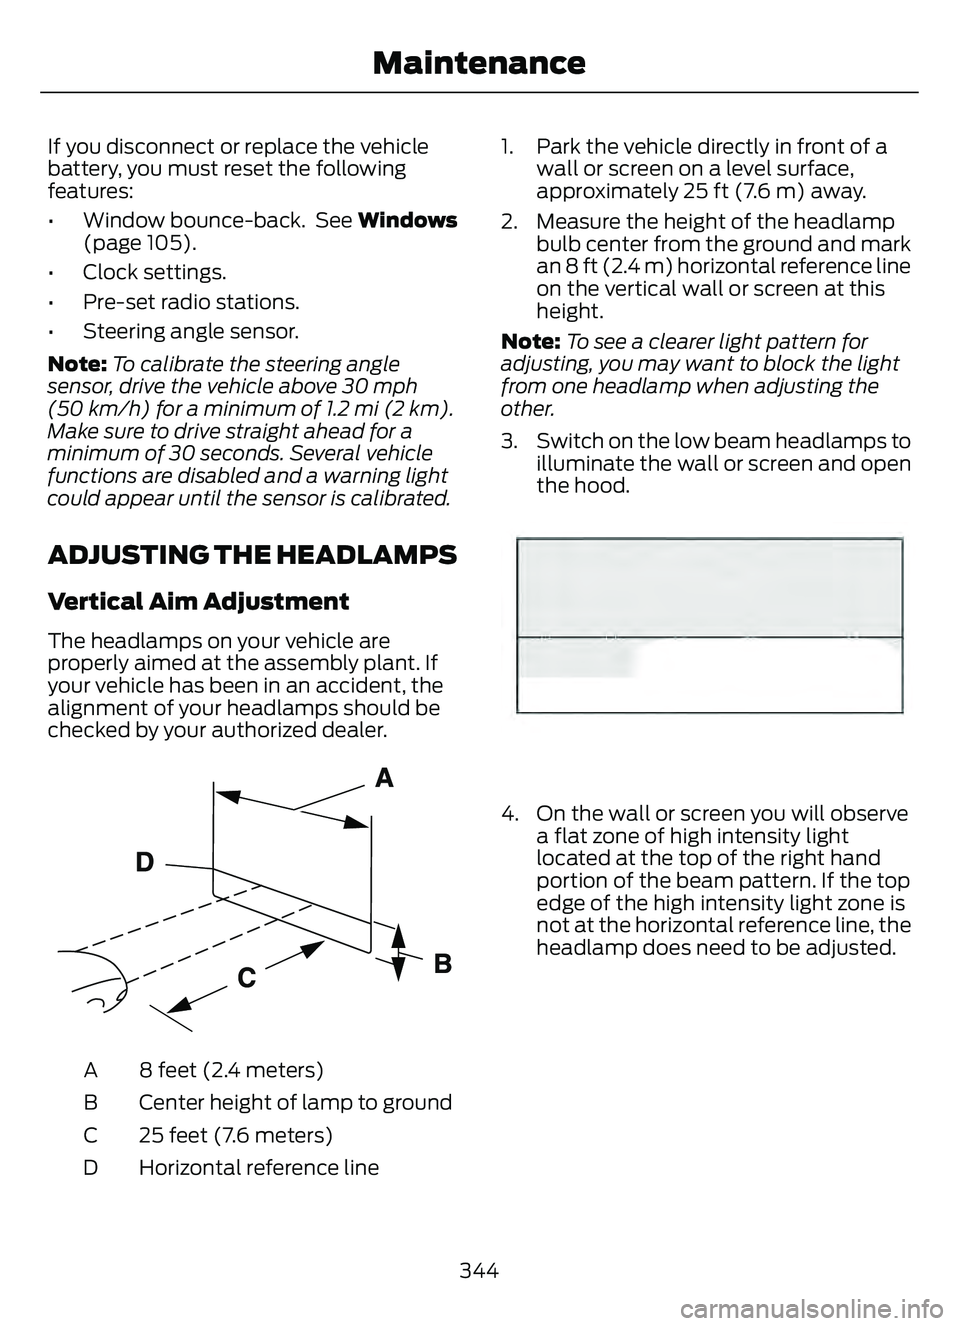
The headlamps on your vehicle are
properly aimed at the assembly plant. If
your vehicle has been in an accident, the
alignment of your headlamps should be
checked by your authorized dealer.
E142592
8 feet (2.4 meters)
A
Center height of lamp to ground
B
25 feet (7.6 meters)
C
Horizontal reference line
D 1. Park the vehicle directly in front of a
wall or screen on a level surface,
approximately 25 ft (7.6 m) away.
2. Measure the height of the headlamp bulb center from the ground and mark
an 8 ft (2.4 m) horizontal reference line
on the vertical wall or screen at this
height.
Note: To see a clearer light pattern for
adjusting, you may want to block the light
from one headlamp when adjusting the
other.
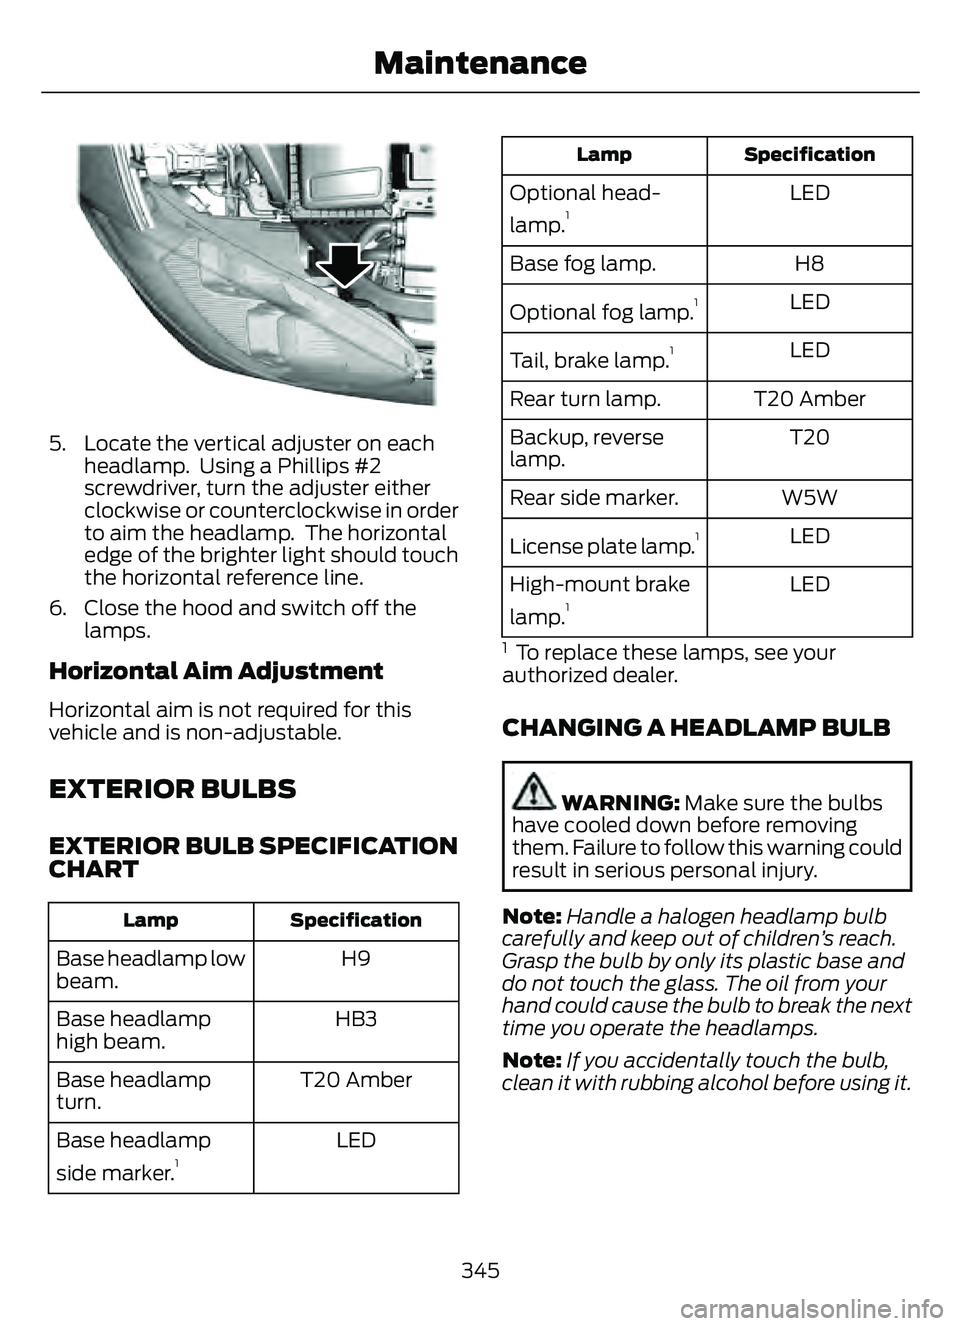
3. Switch on the low beam headlamps to illuminate the wall or screen and open
the hood.
E142465
4. On the wall or screen you will observea flat zone of high intensity light
located at the top of the right hand
portion of the beam pattern. If the top
edge of the high intensity light zone is
not at the horizontal reference line, the
headlamp does need to be adjusted.
344
Maintenance
Page 348 of 585
E3007889E3007889
5. Locate the vertical adjuster on eachheadlamp. Using a Phillips #2
screwdriver, turn the adjuster either
clockwise or counterclockwise in order
to aim the headlamp. The horizontal
edge of the brighter light should touch
the horizontal reference line.
6. Close the hood and switch off the lamps.
Horizontal Aim Adjustment
Horizontal aim is not required for this
vehicle and is non-adjustable.
EXTERIOR BULBS
EXTERIOR BULB SPECIFICATION
CHART
Specification
Lamp
H9
Base headlamp low
beam.
HB3
Base headlamp
high beam.
T20 Amber
Base headlamp
turn.
LED
Base headlamp
side marker.
1
Specification
Lamp
LED
Optional head-
lamp.1
H8
Base fog lamp.
LED
Optional fog lamp.
1
LED
Tail, brake lamp.1
T20 Amber
Rear turn lamp.
T20
Backup, reverse
lamp.
W5W
Rear side marker.
LED
License plate lamp.
1
LED
High-mount brake
lamp.1
1 To replace these lamps, see your
authorized dealer.
CHANGING A HEADLAMP BULB
WARNING: Make sure the bulbs
have cooled down before removing
them. Failure to follow this warning could
result in serious personal injury.
Note: Handle a halogen headlamp bulb
carefully and keep out of children’s reach.
Grasp the bulb by only its plastic base and
do not touch the glass. The oil from your
hand could cause the bulb to break the next
time you operate the headlamps.
Note: If you accidentally touch the bulb,
clean it with rubbing alcohol before using it.
345
Maintenance
Page 349 of 585
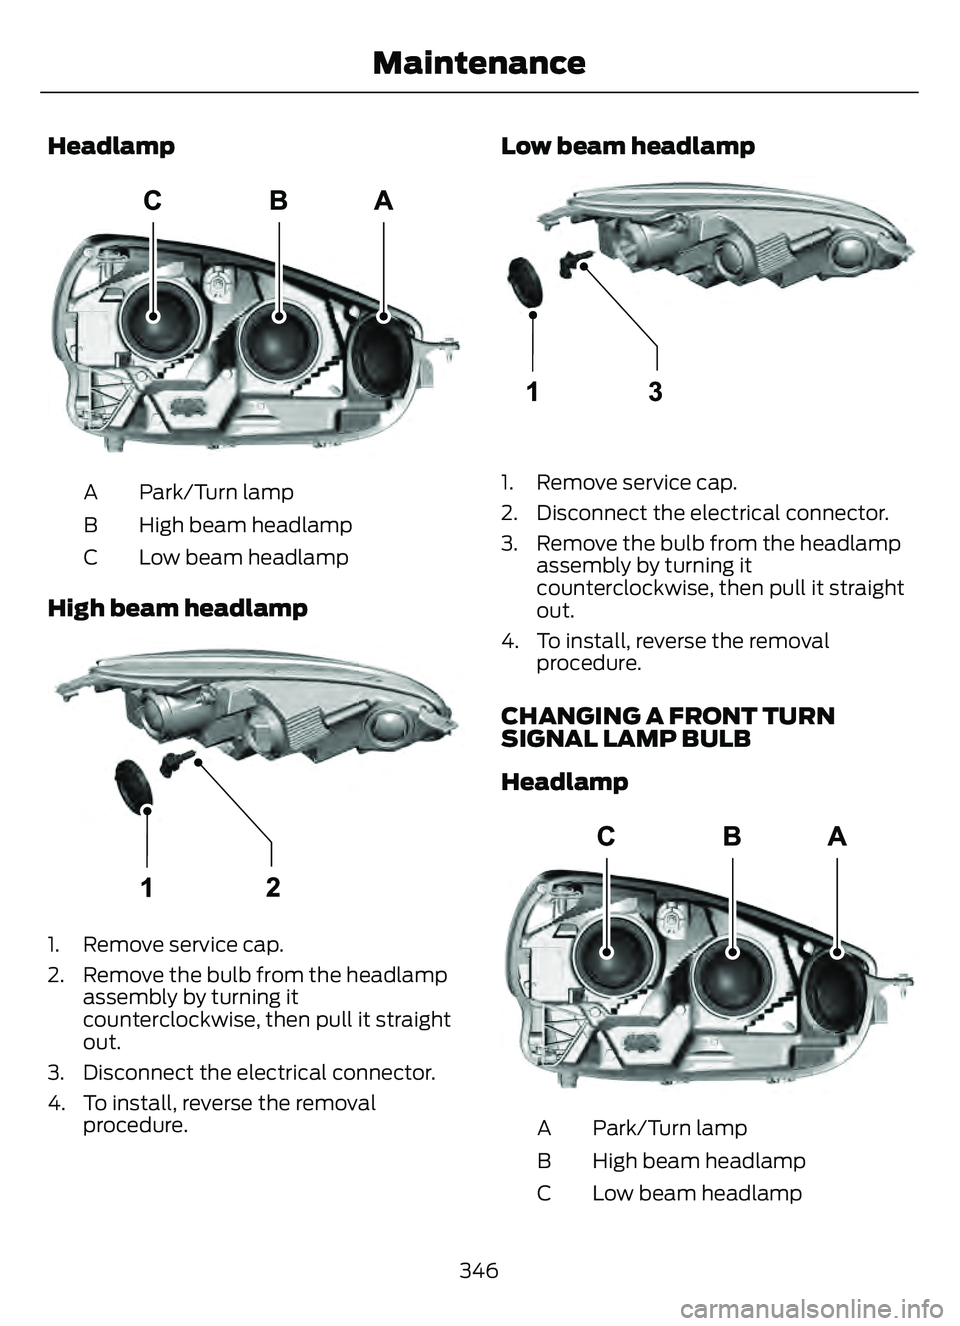
Headlamp
E307881E307881
Park/Turn lamp
A
High beam headlamp
B
Low beam headlamp
C
High beam headlamp
E307882E307882
1. Remove service cap.
2. Remove the bulb from the headlamp
assembly by turning it
counterclockwise, then pull it straight
out.
3. Disconnect the electrical connector.
4. To install, reverse the removal procedure.
Low beam headlamp
E307883E307883
1. Remove service cap.
2. Disconnect the electrical connector.
3. Remove the bulb from the headlampassembly by turning it
counterclockwise, then pull it straight
out.
4. To install, reverse the removal procedure.
CHANGING A FRONT TURN
SIGNAL LAMP BULB
Headlamp
E307881E307881
Park/Turn lamp
A
High beam headlamp
B
Low beam headlamp
C
346
Maintenance
Page 350 of 585
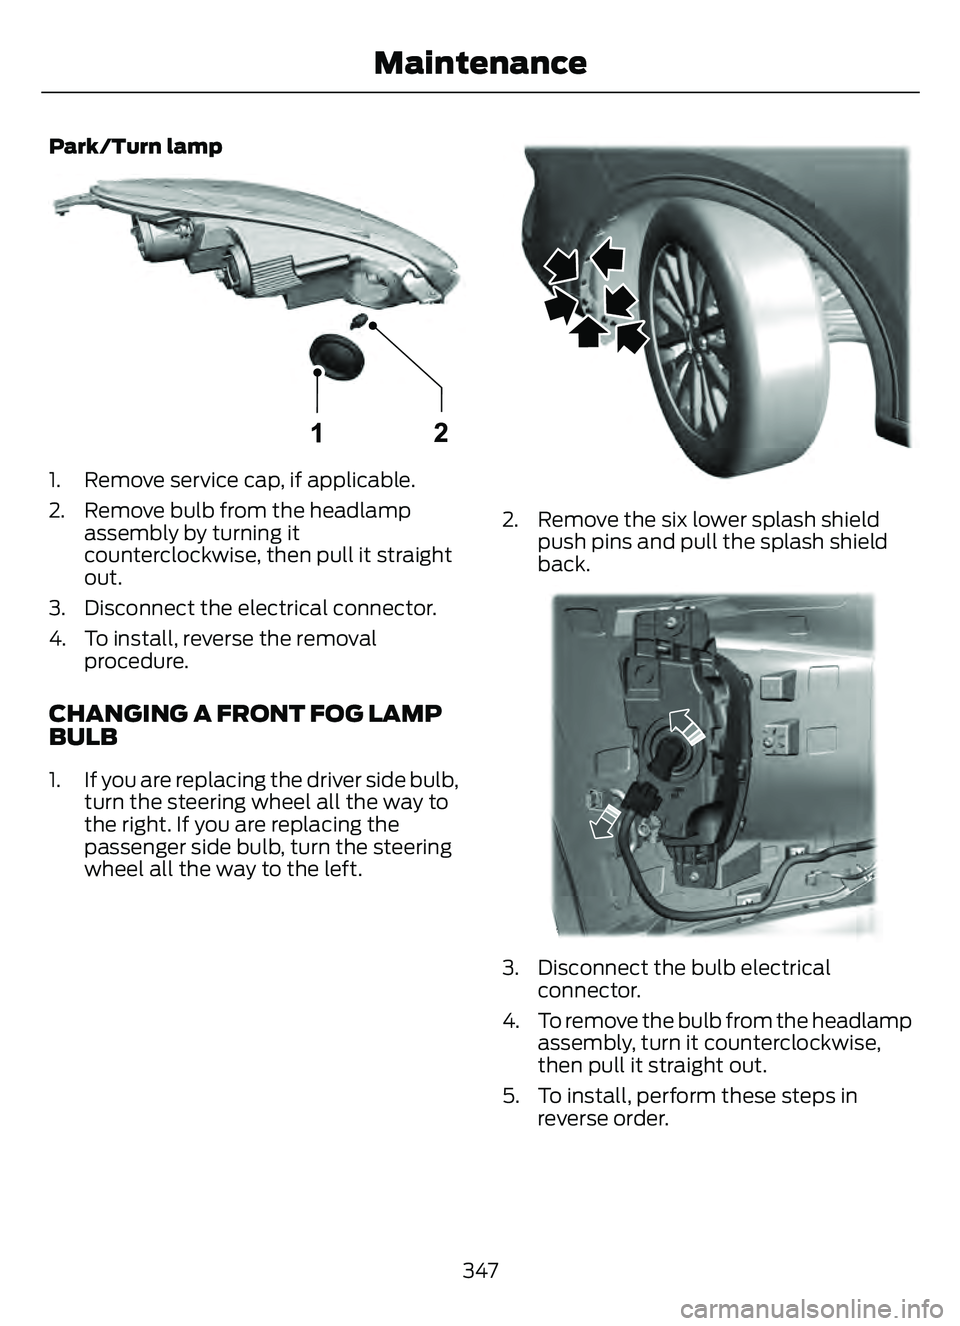
Park/Turn lamp
E307884E307884
1. Remove service cap, if applicable.
2. Remove bulb from the headlampassembly by turning it
counterclockwise, then pull it straight
out.
3. Disconnect the electrical connector.
4. To install, reverse the removal procedure.
CHANGING A FRONT FOG LAMP
BULB
1. If you are replacing the driver side bulb,turn the steering wheel all the way to
the right. If you are replacing the
passenger side bulb, turn the steering
wheel all the way to the left.
E31E3117161716
2. Remove the six lower splash shieldpush pins and pull the splash shield
back.
E31E31177151771555555555555555555555555555
3. Disconnect the bulb electricalconnector.
4. To remove the bulb from the headlamp assembly, turn it counterclockwise,
then pull it straight out.
5. To install, perform these steps in reverse order.
347
Maintenance