MAINT FORD ESCAPE 2022 Manual PDF
[x] Cancel search | Manufacturer: FORD, Model Year: 2022, Model line: ESCAPE, Model: FORD ESCAPE 2022Pages: 585, PDF Size: 6.15 MB
Page 351 of 585
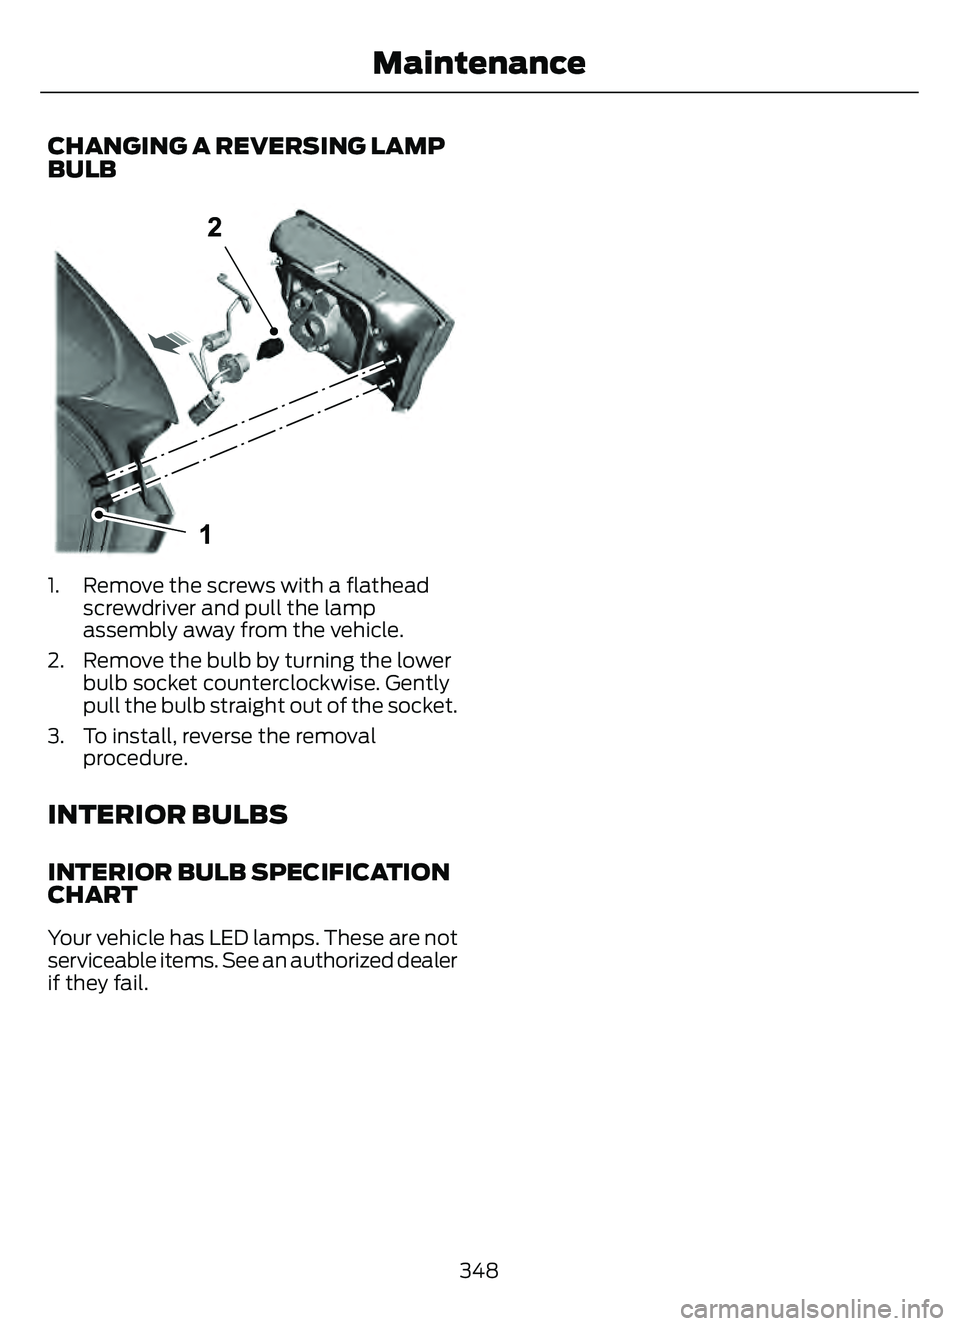
CHANGING A REVERSING LAMP
BULB
E307887E307E307E307E307E307E307E307E307E307E307307777777777E30777E30777E307EE307EE307E30777E307E3077E330E30788788788788878878878788788777887887887887887887887888878788788888778888877887887888878878887887887888788887887887887887887887887
1. Remove the screws with a flatheadscrewdriver and pull the lamp
assembly away from the vehicle.
2. Remove the bulb by turning the lower bulb socket counterclockwise. Gently
pull the bulb straight out of the socket.
3. To install, reverse the removal procedure.
INTERIOR BULBS
INTERIOR BULB SPECIFICATION
CHART
Your vehicle has LED lamps. These are not
serviceable items. See an authorized dealer
if they fail.
348
Maintenance
Page 356 of 585
For heavy stains, spot clean the area. If a
ring forms on the fabric, clean the entire
area immediately, but do not oversaturate
or the ring could set.
We recommend that you only clean your
floor mats in the following way:
1. Remove dust and loose dirt with avacuum cleaner.
2. Wash rubber floor mats using mild soap and lukewarm or cold water.
3. Completely dry the floor mat before placing them back in your vehicle.
CLEANING SEATBELTS
WARNING: Do not use cleaning
solvents, bleach or dye on the vehicle's
seatbelts, as these actions may weaken
the belt webbing.
1. Wipe the surface with a soft, damp cloth and a mild soap and water
solution. Dry the area with a clean, soft
cloth.
CLEANING STORAGE
COMPARTMENTS
1. Remove dust and loose dirt with avacuum cleaner.
2. Wipe the surface with a soft, damp cloth and a mild soap and water
solution. Dry the area with a clean, soft
cloth.
CLEANING MOONROOF TRACKS
1. Remove debris from the tracks with avacuum cleaner.
2. Wipe the bulb seal and mating painted roof metal surface with a soft, damp
cloth and a mild soap and water
solution. Note:
The moonroof rail tracks are greased
to maintain proper functionality. Do not
wipe off the grease.
REPAIRING MINOR PAINT
DAMAGE
Authorized dealers have touch-up paint to
match your vehicle’s color. Your vehicle
color code is printed on a sticker on the
front, left-hand side door jamb. Take your
color code to your authorized dealer to
make sure you get the correct color.
Before repairing minor paint damage, use
a cleaner to remove particles such as bird
droppings, tree sap, insect deposits, tar
spots, road salt and industrial fallout.
Read the instructions before using cleaning
products.
WAXING YOUR VEHICLE
Wax the high-gloss painted surface of your
prewashed vehicle once or twice a year.
We recommend that you only use an
approved quality wax that does not
contain abrasives. Follow the
manufacturer's instructions to apply and
remove the wax. For additional information
and assistance, we recommend that you
contact an authorized dealer.
When washing and waxing, park your
vehicle in a shaded area out of direct
sunlight.
Note: Avoid waxing unpainted or low-gloss
black colored parts, they discolor over time.
353
Vehicle Care
Page 358 of 585
PREPARING YOUR VEHICLE
FOR STORAGE
If you plan on storing your vehicle for 30
days or more, the following maintenance
recommendations ensures your vehicle
stays in good operating condition.
Under various conditions, long-term
storage may lead to degraded engine
performance or failure unless you use
specific precautions to preserve your
vehicle.
General
• Store all vehicles in a dry, ventilatedplace.
• If vehicles are stored outside, they require regular maintenance to protect
against rust and weather damage.
• Make sure all linkages, cables, levers and pins under your vehicle are covered
with grease to prevent rust.
• Move vehicles at least 25 ft (7.5 m) every 15 days to lubricate working parts
and prevent corrosion.
• Fill the fuel tank with high-quality fuel until the first automatic shutoff of the
fuel pump nozzle.
Engine
• Change the engine oil and filter prior tostorage because used engine oil
contains contaminants which may
cause engine damage.
• Start the engine every 15 days for a minimum of 15 minutes. Run at fast
idle with the climate controls set to
defrost until the engine reaches normal
operating temperature.
• With your foot on the brake, shift through all the gears while the engine
is running.
Body
• Wash your vehicle thoroughly toremove dirt, grease, oil, tar or mud from
exterior surfaces, rear-wheel housings
and the underside of front fenders.
• Periodically wash your vehicle if it is stored in exposed locations.
• Touch-up exposed or primed metal to prevent rust.
• Cover chrome and stainless steel parts with a thick coat of auto wax to prevent
discoloration. Re-wax as necessary
when you wash your vehicle.
• Lubricate all hood, door and luggage compartment hinges and latches with
a light grade oil.
• Cover interior trim to prevent fading.
• Keep all rubber parts free from oil and solvents.
Hybrid Battery Systems
We recommend the following actions for
your vehicle:
• When storing your vehicle for greaterthan 30 days the state of charge
should be approximately 50%.
Additionally we recommend
disconnecting the 12V battery which
will reduce system loads on the HV
battery.
12 Volt Battery
• Check and recharge as necessary. Keepconnections clean.
Note: It is necessary to reset memory
features if you disconnect the battery
cables.
Brakes
Make sure the brakes and parking brake
release fully.
355
Storing Your Vehicle
Page 359 of 585
Note:If you intend on parking your vehicle
for an extended period after cleaning the
wheels with a wheel cleaner, drive your
vehicle for a few minutes before doing so to
reduce the risk of increased corrosion of the
brake discs, brake pads and linings.
Tires
• Maintain recommended air pressure.
Note: If you intend on parking your vehicle
for an extended period after cleaning the
wheels with a wheel cleaner, drive your
vehicle for a few minutes before doing so.
This reduces the risk of corrosion of the
brake discs, brake pads and linings.
REMOVING YOUR VEHICLE
FROM STORAGE
When your vehicle is ready to come out of
storage, do the following:
• We recommend that you change the engine oil before you use your vehicle
again.
• Wash your vehicle to remove any dirt or grease film build-up on window
surfaces.
• Check windshield wipers for any deterioration.
• Check under the hood for any foreign material that may have collected
during storage such as mice or squirrel
nests.
• Check the exhaust for any foreign material that may have collected
during storage.
• Check tire pressures and set tire inflation per the Tire Label.
• Check brake pedal operation. Drive your vehicle 15 ft (4.5 m) back and
forth to remove rust build-up. • Check fluid levels (including coolant,
oil and gas) to make sure there are no
leaks, and fluids are at recommended
levels.
• If you remove the battery, clean the battery cable ends and check for
damage.
Contact an authorized dealer if you have
any concerns or issues.
356
Storing Your Vehicle
Page 381 of 585
WHAT IS THE TIRE PRESSURE
MONITORING SYSTEM
The tire pressure monitoring
system measures the vehicle's
tire pressures. A warning lamp
illuminates if one or more tires are
significantly underinflated or if there is a
system malfunction.
TIRE PRESSURE MONITORING
SYSTEM OVERVIEW
WARNING: If the tire pressure
monitor sensor becomes damaged it
may not function.
WARNING: Under-inflation is the
most common cause of tire failures and
may result in severe tire cracking, tread
separation or blowout, with unexpected
loss of vehicle control and increased risk
of injury. Under-inflation increases
sidewall flexing and rolling resistance,
resulting in heat buildup and internal
damage to the tire. It also may result in
unnecessary tire stress, irregular wear,
loss of vehicle control and accidents. A
tire can lose up to half of its air pressure
and not appear to be flat!
WARNING: To determine the
required pressure(s) for your vehicle, see
the Safety Compliance Certification
Label (on the door hinge pillar,
door-latch post or the door edge that
meets the door-latch post, next to the
driver seat) or the Tire Label on the
B-Pillar or the edge of the driver door. Each tire, including the spare (if provided),
should be checked monthly when cold and
inflated to the inflation pressure
recommended by the vehicle manufacturer
on the vehicle placard or tire inflation
pressure label. (If your vehicle has tires of
a different size than the size indicated on
the vehicle placard or tire inflation pressure
label, you should determine the proper tire
inflation pressure for those tires).
As an added safety feature, your vehicle
has been equipped with a Tire Pressure
Monitoring System (TPMS) that
illuminates a low tire pressure telltale
when one or more of your tires is
significantly under-inflated. Accordingly,
when the low tire pressure telltale
illuminates, you should stop and check
your tires as soon as possible, and inflate
them to the proper pressure. Driving on a
significantly under-inflated tire causes the
tire to overheat and can lead to tire failure.
Under-inflation also reduces fuel efficiency
and tire tread life, and may affect the
vehicle’s handling and stopping ability.
Please note that the TPMS is not a
substitute for proper tire maintenance, and
it is the driver’s responsibility to maintain
correct tire pressure, even if under-inflation
has not reached the level to trigger
illumination of the TPMS low tire pressure
telltale.
Your vehicle has also been equipped with
a TPMS malfunction indicator to indicate
when the system is not operating properly.
The TPMS malfunction indicator is
combined with the low tire pressure
telltale. When the system detects a
malfunction, the telltale will flash for
approximately one minute and then remain
continuously illuminated. This sequence
will continue upon subsequent vehicle
start-ups as long as the malfunction exists.
378
Tire Pressure Monitoring System
Page 382 of 585
When the malfunction indicator is
illuminated, the system may not be able
to detect or signal low tire pressure as
intended. TPMS malfunctions may occur
for a variety of reasons, including the
installation of replacement or alternate
tires or wheels on the vehicle that prevent
the TPMS from functioning properly.
Always check the TPMS malfunction
telltale after replacing one or more tires or
wheels on your vehicle to ensure that the
replacement or alternate tires and wheels
allow the TPMS to continue to function
properly.
WARNING: Changes or
modifications not expressively approved
by the party responsible for compliance
could void the user's authority to operate
the equipment. The term "IC:" before the
radio certification number only signifies
that Industry Canada technical
specifications were met.
This device complies with Part 15 of the
FCC Rules and with License exempt RSS
Standards of Industry Canada. Operation
is subject to the following two conditions:
1. This device may not cause harmful interference, and
2. This device must accept any interference received, including
interference that may cause undesired
operation.
TIRE PRESSURE MONITORING
SYSTEM PRECAUTIONS
WARNING: The tire pressure
monitoring system is not a substitute for
manually checking tire pressures. You
should periodically check tire pressures
using a pressure gauge. Failure to
correctly maintain tire pressures could
increase the risk of tire failure, loss of
control, vehicle rollover and personal
injury.
Note: The use of tire sealants can damage
the tire pressure monitoring system.
TIRE PRESSURE MONITORING
SYSTEM LIMITATIONS
When the outside temperature drops
significantly, the tire pressure could
decrease and activate the low tire pressure
warning lamp.
The warning lamp could also illuminate
when you use a spare wheel, or tire sealant
from the inflator kit.
Note: Regularly checking the vehicle tire
pressures can reduce the possibility for the
warning lamp to illuminate due to outside
air temperature changes.
Note: After you inflate the tires to the
recommended pressure it could take up to
two minutes of driving over 20 mph
(32 km/h) for the warning indicator to turn
off.
379
Tire Pressure Monitoring System
Page 385 of 585
CHANGING A FLAT TIRE
WARNING: Never place anything
between the vehicle jack and the ground.
WARNING: Never place anything
between the vehicle jack and your
vehicle.
WARNING: To help prevent your
vehicle from moving when changing a
wheel, shift the transmission into park
(P), set the parking brake and use an
appropriate block or wheel chock to
secure the wheel diagonally opposite to
the wheel being changed. For example,
when changing the front left wheel,
place an appropriate block or wheel
chock on the right rear wheel.
WARNING: It is recommended that
the wheels of the vehicle be chocked,
and that no person should remain in a
vehicle that is being jacked.
WARNING: Always use the jack
provided as original equipment with your
vehicle. If using a jack other than the one
provided, make sure the jack capacity is
adequate for the vehicle weight,
including any vehicle cargo or
modifications. If you are unsure if the jack
capacity is adequate, contact the
authorized dealer.
WARNING: The jack supplied with
this vehicle is only intended for changing
wheels. Do not use the vehicle jack other
than when you are changing a wheel in
an emergency.
WARNING: Check that the vehicle
jack is not damaged or deformed and
the thread is lubricated and clean.
WARNING: The jack should be
used on level firm ground wherever
possible.
WARNING: Use only the specified
jacking points. If you use other positions,
you may damage the body, steering,
suspension, engine, braking system or
the fuel lines.
WARNING: Switch the ignition off
and apply the park brake fully before
lifting vehicle.
WARNING: Park your vehicle so
that you do not obstruct the flow of
traffic or place yourself in any danger and
set up a warning triangle.
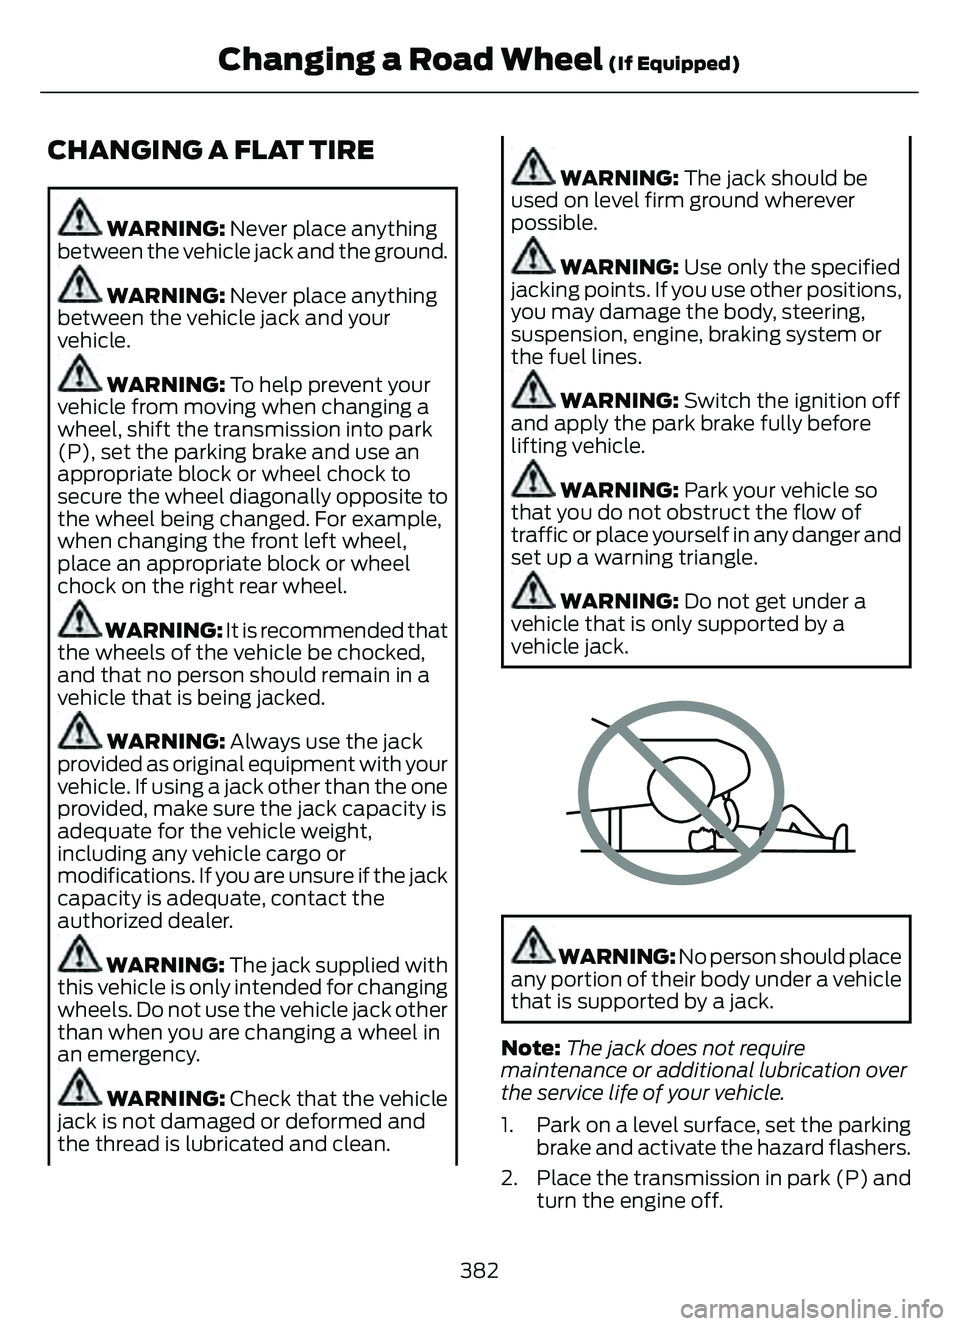
WARNING: Do not get under a
vehicle that is only supported by a
vehicle jack.
E166722E166722
WARNING: No person should place
any portion of their body under a vehicle
that is supported by a jack.
Note: The jack does not require
maintenance or additional lubrication over
the service life of your vehicle.
1. Park on a level surface, set the parking brake and activate the hazard flashers.
2. Place the transmission in park (P) and turn the engine off.
382
Changing a Road Wheel (If Equipped)
Page 461 of 585
• Drive Power: The engine is on due toaccelerator pedal pressure or speed
control activation. Reduce pressure on
the accelerator pedal or switch off the
speed control to return to full electric
mode.
• High Speed: The engine is on because the vehicle speed exceeds the level for
full electric operation. Reduce the
speed to return to electric operation.
• Heater Setting: The engine is on because of the heater setting. Reduce
or turn off the heater setting to return
to electric operation.
• Neutral Gear: The engine is on because the vehicle is in Neutral (N). Shift out
of neutral gear to return to electric
operation.
• Engine Cold: The engine is on because it is cold. The vehicle returns to electric
operation once the engine is sufficiently
warm.
• Battery Charging: The engine is on to charge the high-voltage battery. The
vehicle returns to electric operation
once the battery is charged.
• Low Gear: The engine is on because the vehicle is in low gear. Shift out of
low gear to return to electric operation.
• Normal Operation: The engine is on to optimize vehicle operation. The vehicle
returns to electric operation when
possible.
• Low Use: The engine is on to maintain engine oil quality. The vehicle returns
to electric operation when low engine
use mode is complete. See How Does
Low Engine Use Mode Work (page
182). • Engine Braking Active: The engine is on
to provide increased powertrain
braking. This can occur when you turn
on the grade assist feature, when
speed control is on or when driving with
your foot off the accelerator pedal.
Turning off grade assist or speed
control may allow the vehicle to return
to electric operation.
• Battery Temperature: The engine is on due to high or low high-voltage battery
temperature. This is a normal operating
condition. The vehicle returns to
electric operation when possible.
• Drive Mode: The engine is on due to the drive mode selection. Select an
appropriate drive mode for electric only
operation.
Charge Settings
E304452
The Charge Settings information
for your plug-in hybrid vehicle is
available through the Home
screen or under Vehicle Settings. To
Improve your charging experience, your
vehicle has the following convenience
features.
Charge Times
Once you set up Charge Times for a
specific charging location, your vehicle
prioritizes charging based on your preferred
time settings. You can set two preferred
charging time windows for weekdays and
two for weekends. This feature allows you
to take advantage of electric utility rate
plans that offer lower pricing during certain
times of day. Contact your utility company
to see what plans are available.
Note: You can also set up and use these
features using the FordPass app.
458
SYNC™ 3 (If Equipped)
Page 484 of 585
Less Cost to Properly Maintain Your
Vehicle
The Ford Protect extended service plan
also offers a Premium Maintenance Plan
that covers all scheduled maintenance,
and selected wear items. The coverage is
prepaid, so you never have to worry about
the cost of your vehicle’s maintenance.
Covered maintenance includes:
• Windshield wiper blades.
• Spark plugs.
• The clutch disc (if equipped).
• Brake pads and linings.
• Shock absorbers.
• Struts.
• Engine belts.
• Engine coolant hoses, clamps and o-rings.
• Diesel exhaust fluid replenishment (if equipped).
• Cabin air filter replacement every 20,000 mi (32,000 km) for electric
vehicles only.
Interest Free Finance Options
Just a 5% down payment provides you
with an affordable, no interest, no fee
payment program allowing you all the
security and benefits Ford Protect
extended service plan has to offer while
paying over time. You are pre-approved
with no credit check or hassles. To learn
more, call our Ford Protect extended
service plan specialists at 800-367-3377.
Ford Protect Extended Service Plan
P.O. Box 321067
Detroit, MI 48232Ford Protect Extended Service
Plan (Canada Only)
You can get more protection for your
vehicle by purchasing a Ford Protect
extended service plan. Ford Protect
extended service plan is the only service
contract backed by Ford Motor Company
of Canada, Limited. Depending on the plan
you purchase, Ford Protect extended
service plan provides benefits such as:
• Rental reimbursement.
• Coverage for cert ain maintenance and
wear items.
• Protection against repair costs after your New Vehicle Limited Warranty
Coverage expires.
• Roadside Assistance benefits.
There are several Ford Protect extended
service plans available in various time,
distance and deductible combinations.
Each plan is tailored to fit your own driving
needs, including reimbursement for towing
and rental. When you purchase Ford
Protect extended service plan, you receive
added peace-of-mind protection
throughout Canada, the United States and
Mexico, provided by a network of
participating authorized Ford Motor
Company dealers.
Note: Repairs performed outside of Canada
and the United States are not eligible for
Ford Protect extended service plan
coverage.
This information is subject to change. Visit
your local Ford of Canada dealer or
www.ford.ca to find the Ford Protect
extended service plan that is right for you.
481
Ford Protect
Page 485 of 585
GENERAL MAINTENANCE
INFORMATION
Why Maintain Your Vehicle?
Carefully following the maintenance
schedule helps protect against major repair
expenses resulting from neglect or
inadequate maintenance and may help to
increase the value of your vehicle when
you sell or trade it. Keep all receipts for
completed maintenance with your vehicle.
It is important that you have your vehicle
serviced at the proper times. These
intervals serve two purposes: first is to
maintain the reliability of your vehicle and
the second is to keep the cost of owning
your vehicle down.
It is your responsibility to have all
scheduled maintenance performed and to
make sure that the materials used meet
the specifications identified in this owner's
manual.
Failure to perform scheduled maintenance
and regularly inspect your vehicle may
result in vehicle damage not covered by
the vehicle Warranty.
Why Maintain Your Vehicle at Your
Dealership?
Our Genuine Replacement Parts
Dealerships stock our parts and our
authorized branded re-manufactured
replacement parts. These parts meet or
exceed our specifications. Parts installed
at your dealership carry a nationwide
24-month or unlimited mile (kilometer)
parts and labor limited warranty.
If you do not use our authorized parts they
may not meet our specifications and could
affect emissions compliance.
Protecting Your Investment
Maintenance is an investment that pays
dividends in the form of improved
reliability, durability and resale value. To
maintain the proper performance of your
vehicle and its emission control systems,
make sure you have scheduled
maintenance performed at the designated
intervals.
Your vehicle comes with the Intelligent
Oil-Life Monitor system, a message
appears in the information display at the
proper oil change interval. This interval
may be up to one year or 10,000 mi
(16,000 km), hybrid vehicles could exceed
10,000 mi (16,000 km).
When the oil change message appears in
the information display, it is time for an oil
change. Make sure you perform the oil
change within two weeks or 500 mi
(800 km) of the message appearing. Make
sure to reset the Intelligent Oil-Life Monitor
after each oil change.
If your information display resets
prematurely or becomes inoperative, you
should perform the oil change interval at
six months or 5,000 mi (8,000 km) from
your last oil change. Never exceed one year
or 10,000 mi (16,000 km) between oil
change intervals.
You can drive high performance vehicles
in such a way that may lead to higher oil
consumption including extended time at
high engine speeds, high loads, engine
braking, hard cornering maneuvers, track
and off-road usage. Under these
conditions, oil consumption of
approximately 1 quart per 500 miles (1 liter
per 800 km) is possible. Check the engine
oil level at every refueling and adjust to
maintain proper levels to avoid engine
damage.
It is important to rely upon your dealership
to properly diagnose and repair your
vehicle.
482
Scheduled Maintenance