jump cable FORD ESCORT 1998 7.G Owners Manual
[x] Cancel search | Manufacturer: FORD, Model Year: 1998, Model line: ESCORT, Model: FORD ESCORT 1998 7.GPages: 191, PDF Size: 1.51 MB
Page 119 of 191

2. Do not disconnect the battery of
the disabled vehicle as this could
damage the vehicle's electrical
system.
3. Park the booster vehicle close to
the hood of the disabled vehicle
making sure theydo nottouch.
Set the parking brake on both
vehicles and stay clear of the
engine cooling fan and other
moving parts.
4. Check all battery terminals and
remove any excessive corrosion
before you attach the battery
cables.
5. Turn the heater fan on in both
vehicles to protect any electrical
surges. Turn all other accessories
off.
Connecting the jumper cables
1. Position the vehicles so that
they do not touch one another.
2. Switch off the engine. Switch off
any unnecessary electrical
equipment.
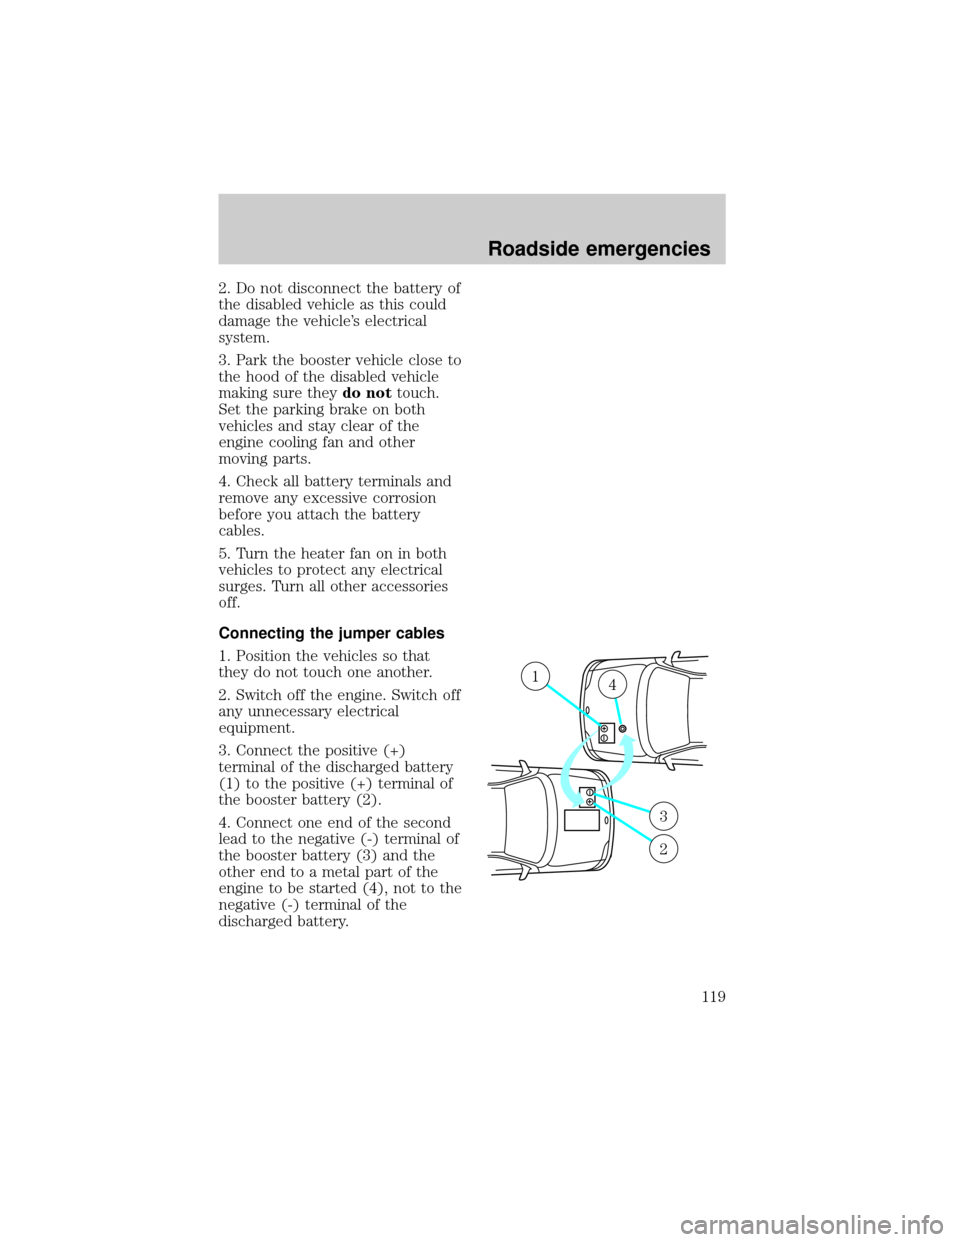
3. Connect the positive (+)
terminal of the discharged battery
(1) to the positive (+) terminal of
the booster battery (2).
4. Connect one end of the second
lead to the negative (-) terminal of
the booster battery (3) and the
other end to a metal part of the
engine to be started (4), not to the
negative (-) terminal of the
discharged battery.
+–
+–
14
3
2
Roadside emergencies
119
Page 120 of 191

5. Make sure that the jump leads
are clear of moving parts of the
engine.
Do not connect the end of
the second cable to the
negative (-) terminal of the
battery to be jumped. A spark
may cause an explosion of the
gases that surround the battery.
Jump starting
1. Start the booster vehicle and
run the engine at moderately
increased speed.
2. Start the engine of the vehicle
with the discharged battery.
3. Once the engine has been
started, run both vehicles for a
further three minutes before
disconnecting the leads.
Removing the jumper cables
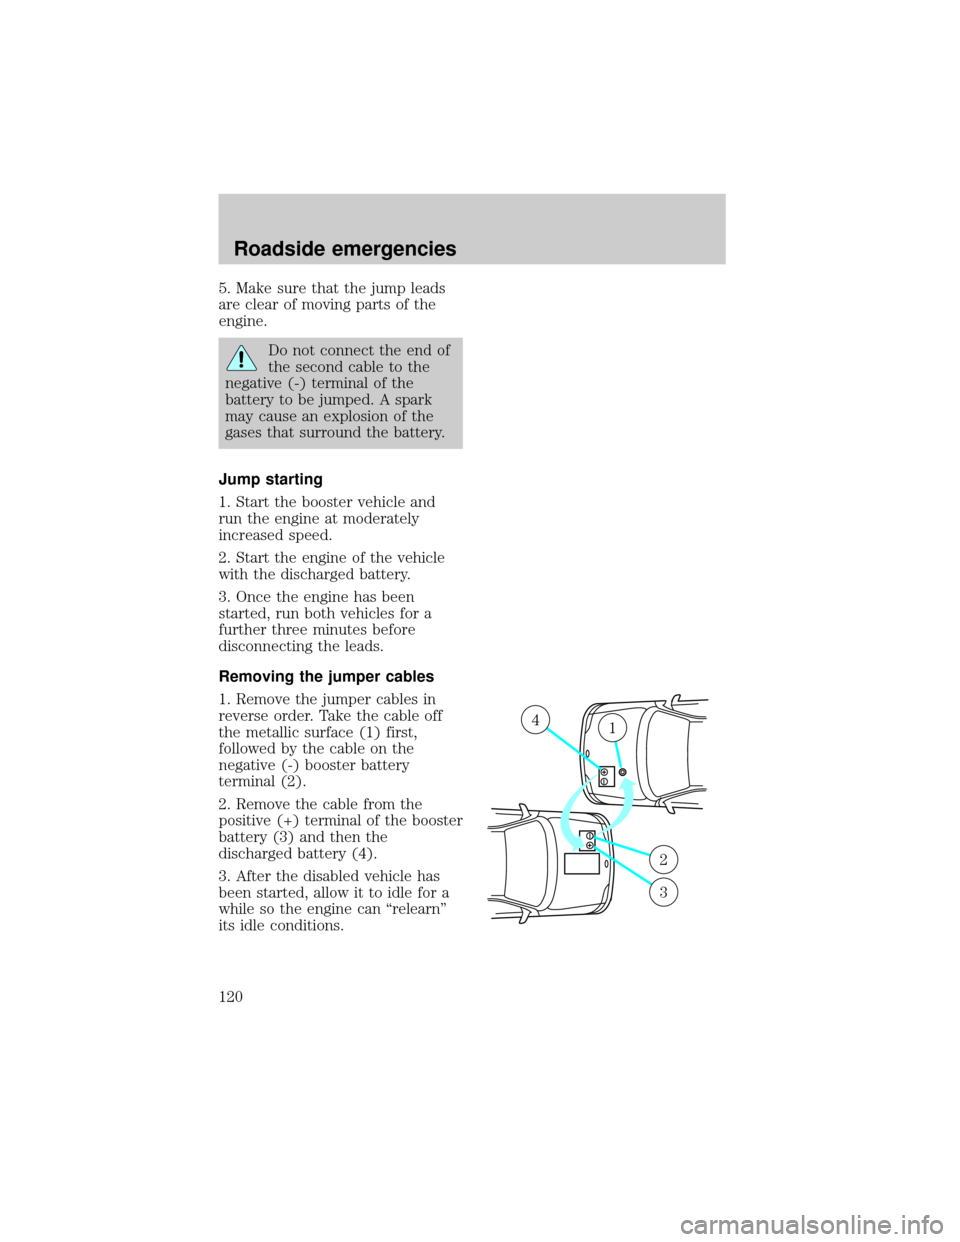
1. Remove the jumper cables in
reverse order. Take the cable off
the metallic surface (1) first,
followed by the cable on the
negative (-) booster battery
terminal (2).
2. Remove the cable from the
positive (+) terminal of the booster
battery (3) and then the
discharged battery (4).
3. After the disabled vehicle has
been started, allow it to idle for a
while so the engine can ªrelearnº
its idle conditions.
+–
+–
41
2
3
Roadside emergencies
120
Page 189 of 191

High beams
indicator light ...........................10
Hood
release lever ............................128
Ignition
positions of the ignition ...........26
Instrument panel
lighting up panel and
interior .......................................17
Jump-starting your
vehicle .................................118,120
attaching cables ......................119
disconnecting cables ..............120
Keys
key in ignition chime ...............12
Lamps
dome lamps ........................36,171
fog lamps .................................167
headlamps ...............................165
high-mount brakelamp ...........167
interior lamps ....................36,171
map lamps ..........................36,172
tail lamps .................................169
License plate lamps ..................171
Lights, warning and indicator
air bag ..........................................9
anti-lock brakes (ABS) ............10
anti-theft ...................................10
brake ..........................................10
charging system ........................11
check coolant ............................11
liftgate ajar ................................11
low fuel ........................................7
oil pressure ...............................11
safety belt ...................................9
service engine soon .................7,8
turn signal indicator .................10
Lubricant specifications ...........181
Luggage rack .............................103
Mirrors
side view mirrors (power) .......17
Moon roof ....................................35Odometer .....................................15
Panic alarm feature, remote
entry system ................................42
Parking brake ..............................89
Parts (see Motorcraft parts) ....180
Power steering
fluid, checking and adding ....142
Rear window
wiper ..........................................35
Refill capacities for fluids ........180
Relays .................................106,113
Remote entry system .................39
illuminated entry ......................44
locking/unlocking doors ......40,41
replacement/additional
transmitters ...............................43
replacing the batteries .............42
Reporting safety defects ..........187
Safety restraints
automatic locking mode
(retractor) ............................53,54
extension assembly ..................56
for children ...............................63
for second row bench
seats ............................73,74,78,79
lap and shoulder belts .............52
maintenance ..............................57
proper use .................................51
warning light and chime .....11,57
Safety seats for children
attaching with tether straps ....70
automatic locking mode
(retractor) .................................67
tether anchorage
hardware ..............................70,71
Seats ............................................47
adjusting the seat, manual .......47
folding rear seats ......................50
head restraints ..........................47
Servicing your vehicle ..............123
precautions when servicing ...123
Index
189