trailer FORD EXCURSION 2000 1.G Owners Manual
[x] Cancel search | Manufacturer: FORD, Model Year: 2000, Model line: EXCURSION, Model: FORD EXCURSION 2000 1.GPages: 232, PDF Size: 2.01 MB
Page 59 of 232
Mode control
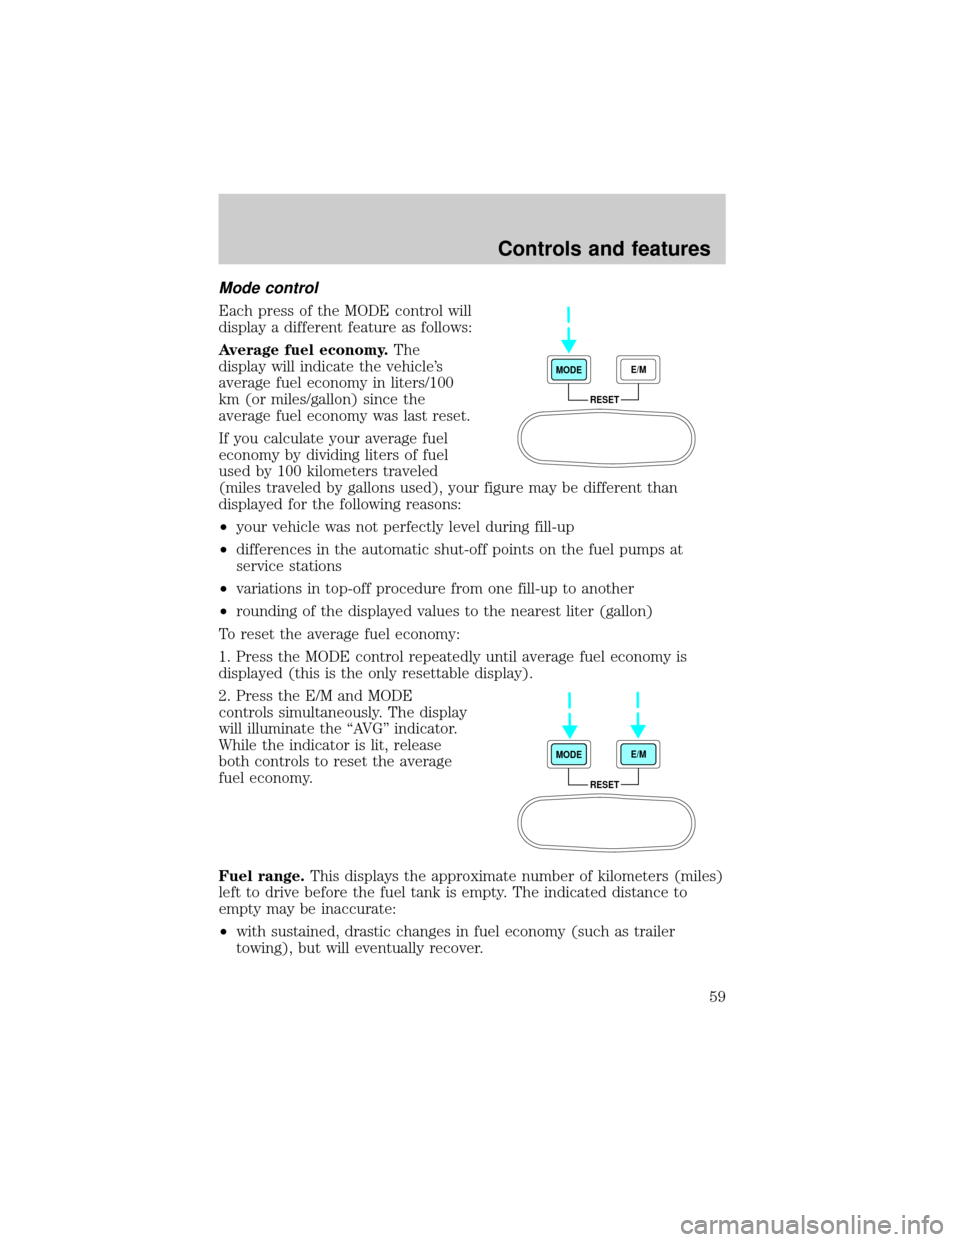
Each press of the MODE control will
display a different feature as follows:
Average fuel economy.The
display will indicate the vehicle's
average fuel economy in liters/100
km (or miles/gallon) since the
average fuel economy was last reset.
If you calculate your average fuel
economy by dividing liters of fuel
used by 100 kilometers traveled
(miles traveled by gallons used), your figure may be different than
displayed for the following reasons:
²your vehicle was not perfectly level during fill-up
²differences in the automatic shut-off points on the fuel pumps at
service stations
²variations in top-off procedure from one fill-up to another
²rounding of the displayed values to the nearest liter (gallon)
To reset the average fuel economy:
1. Press the MODE control repeatedly until average fuel economy is
displayed (this is the only resettable display).
2. Press the E/M and MODE
controls simultaneously. The display
will illuminate the ªAVGº indicator.
While the indicator is lit, release
both controls to reset the average
fuel economy.
Fuel range.This displays the approximate number of kilometers (miles)
left to drive before the fuel tank is empty. The indicated distance to
empty may be inaccurate:
²with sustained, drastic changes in fuel economy (such as trailer
towing), but will eventually recover.
RESET MODEE/M
RESET MODEE/M
Controls and features
59
Page 118 of 232
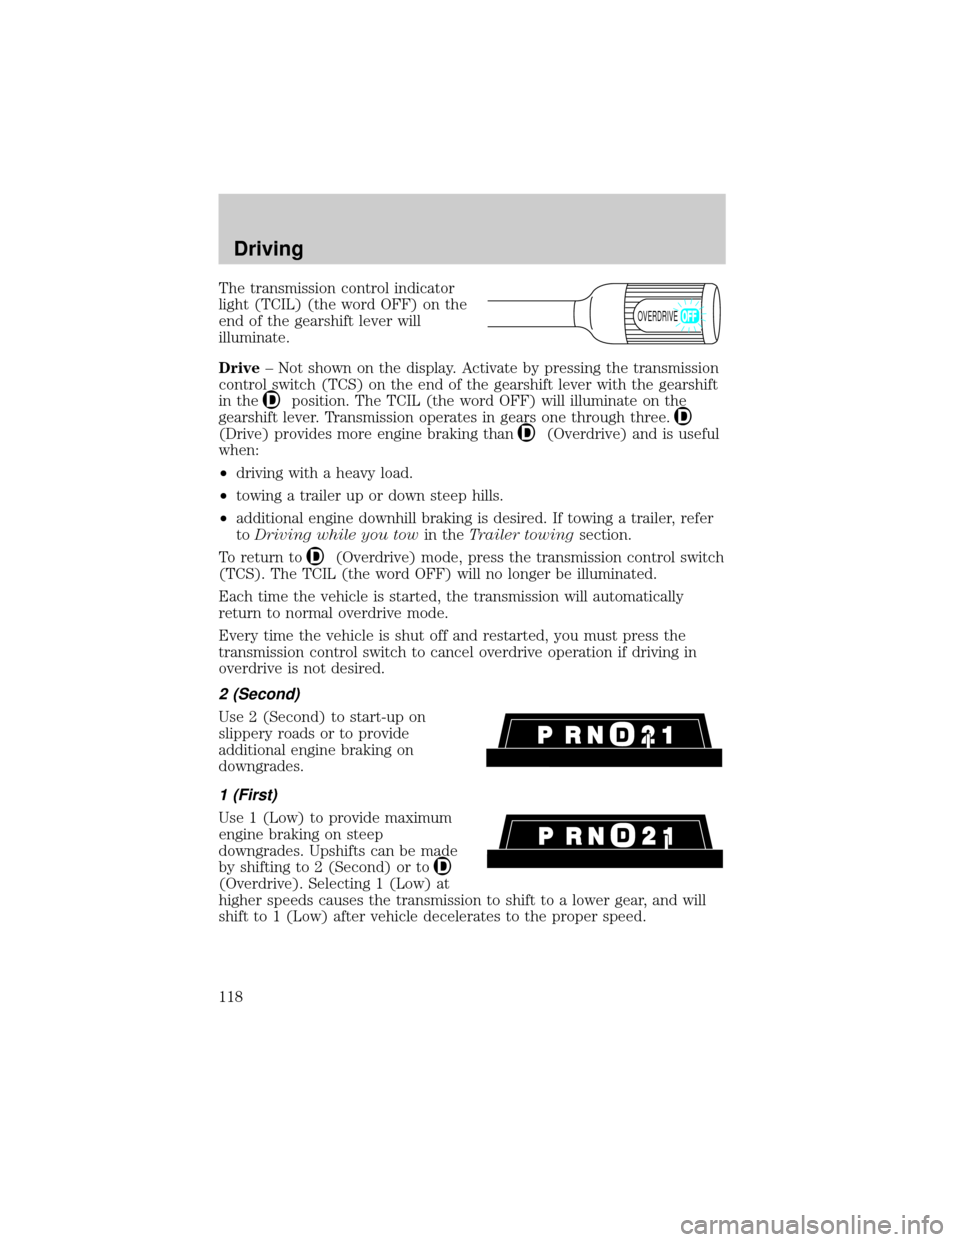
The transmission control indicator
light (TCIL) (the word OFF) on the
end of the gearshift lever will
illuminate.
Drive± Not shown on the display. Activate by pressing the transmission
control switch (TCS) on the end of the gearshift lever with the gearshift
in the
position. The TCIL (the word OFF) will illuminate on the
gearshift lever. Transmission operates in gears one through three.
(Drive) provides more engine braking than(Overdrive) and is useful
when:
²driving with a heavy load.
²towing a trailer up or down steep hills.
²additional engine downhill braking is desired. If towing a trailer, refer
toDriving while you towin theTrailer towingsection.
To return to
(Overdrive) mode, press the transmission control switch
(TCS). The TCIL (the word OFF) will no longer be illuminated.
Each time the vehicle is started, the transmission will automatically
return to normal overdrive mode.
Every time the vehicle is shut off and restarted, you must press the
transmission control switch to cancel overdrive operation if driving in
overdrive is not desired.
2 (Second)
Use 2 (Second) to start-up on
slippery roads or to provide
additional engine braking on
downgrades.
1 (First)
Use 1 (Low) to provide maximum
engine braking on steep
downgrades. Upshifts can be made
by shifting to 2 (Second) or to
(Overdrive). Selecting 1 (Low) at
higher speeds causes the transmission to shift to a lower gear, and will
shift to 1 (Low) after vehicle decelerates to the proper speed.
OVERDRIVE
Driving
118
Page 126 of 232
²GVWR (Gross Vehicle Weight Rating):Maximum total weight of
the base vehicle, passengers, optional equipment and cargo. The
GVWR is specific to each vehicle and is listed on the Safety
Certification Label on the driver's door pillar.
²GAWR (Gross Axle Weight Rating):Carrying capacity for each axle
system. The GAWR is specific to each vehicle and is listed on the
Safety Certification Label on the driver's door pillar.
²GCW (Gross Combined Weight):The combined weight of the
towing vehicle (including passengers and cargo) and the trailer.
²GCWR (Gross Combined Weight Rating):Maximum combined
weight of towing vehicle (including passengers and cargo) and the
trailer. The GCWR indicates the maximum loaded weight that the
vehicle is designed to tow.
²Maximum Trailer Weight Rating:Maximum weight of a trailer the
vehicle is permitted to tow. The maximum trailer weight rating is
determined by subtracting the vehicle curb weight for each
engine/transmission combination, any required option weight for trailer
towing and the weight of the driver from the GCWR for the towing
vehicle.
²Maximum Trailer Weight:Maximum weight of a trailer the loaded
vehicle (including passengers and cargo) is permitted to tow. It is
determined by subtracting the weight of the loaded trailer towing
vehicle from the GCWR for the towing vehicle.
²Trailer Weight Range:Specified weight range that the trailer must
fall within that ranges from zero to the maximum trailer weight rating.
Remember to figure in the tongue load of your loaded trailer when
figuring the total weight.
Do not exceed the GVWR or the GAWR specified on the
certification label.
Do not use replacement tires with lower load carrying capacities than the
originals because they may lower the vehicle's GVWR and GAWR
limitations. Replacement tires with a higher limit than the originals do
not increase the GVWR and GAWR limitations.
The Safety Certification Label, found on the driver's door pillar, lists
several important vehicle weight rating limitations. Before adding any
additional equipment, refer to these limitations. If you are adding weight
Driving
126
Page 128 of 232
3. Subtract your loaded vehicle weight from the maximum GCWR on the
following charts. This is the maximum trailer weight your vehicle can tow
and must fall below the maximum shown under maximum trailer weight
on the chart.
DRIVING THROUGH WATER
Do not drive quickly through standing water, especially if the depth is
unknown. Traction or brake capability may be limited and if the ignition
system gets wet, your engine may stall. Water may also enter your
engine's air intake and severely damage your engine.
If driving through deep or standing water is unavoidable, proceed very
slowly. Never drive through water that is higher than the bottom of the
hubs (for trucks) or the bottom of the wheel rims (for cars).
Once through the water, always try the brakes. Wet brakes do not stop
the vehicle as effectively as dry brakes. Drying can be improved by
moving your vehicle slowly while applying light pressure on the brake
pedal.
Driving through deep water where the transmission vent tube is
submerged may allow water into the transmission and cause
internal transmission damage.
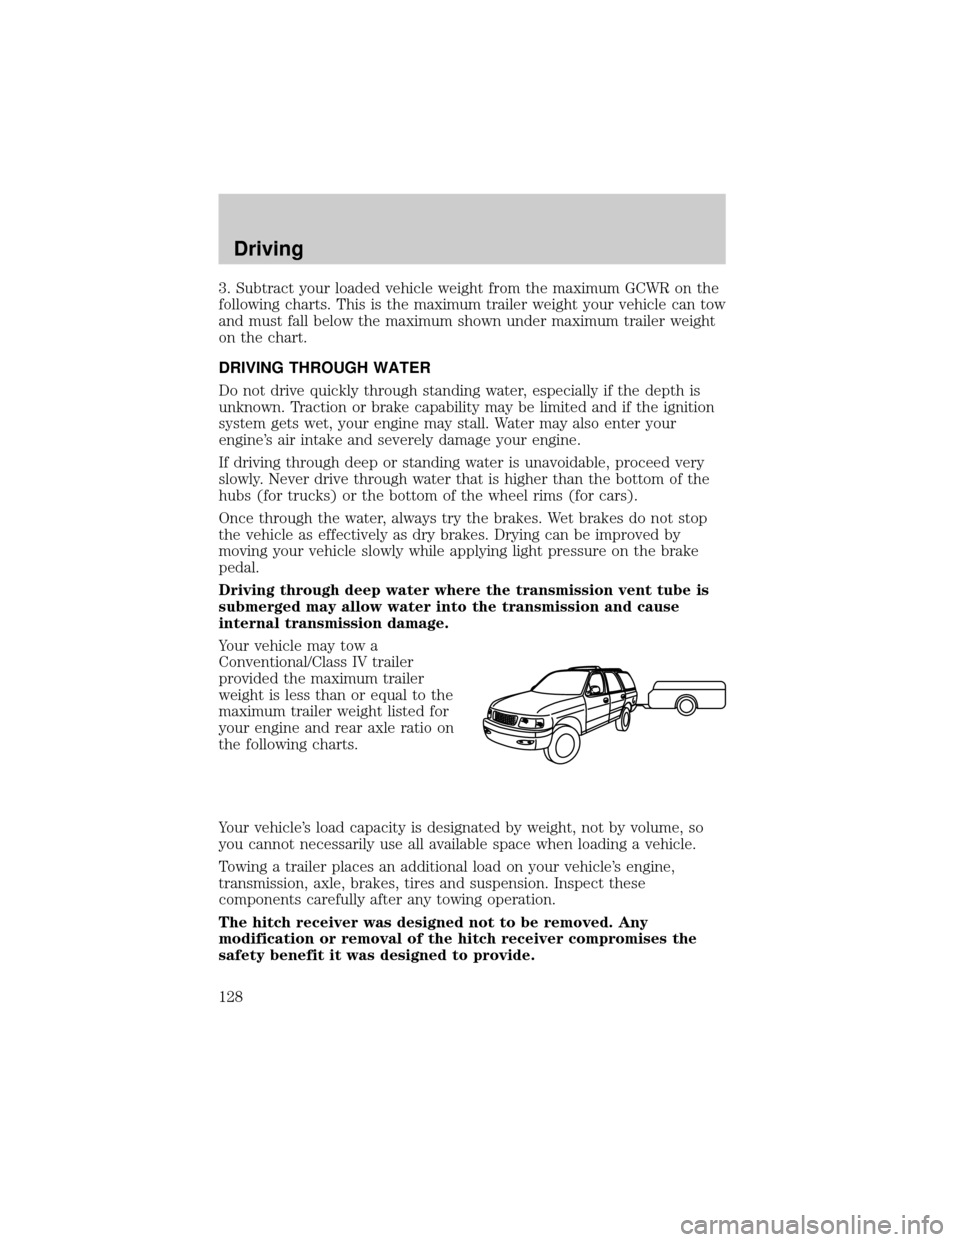
Your vehicle may tow a
Conventional/Class IV trailer
provided the maximum trailer
weight is less than or equal to the
maximum trailer weight listed for
your engine and rear axle ratio on
the following charts.
Your vehicle's load capacity is designated by weight, not by volume, so
you cannot necessarily use all available space when loading a vehicle.
Towing a trailer places an additional load on your vehicle's engine,
transmission, axle, brakes, tires and suspension. Inspect these
components carefully after any towing operation.
The hitch receiver was designed not to be removed. Any
modification or removal of the hitch receiver compromises the
safety benefit it was designed to provide.
Driving
128
Page 129 of 232
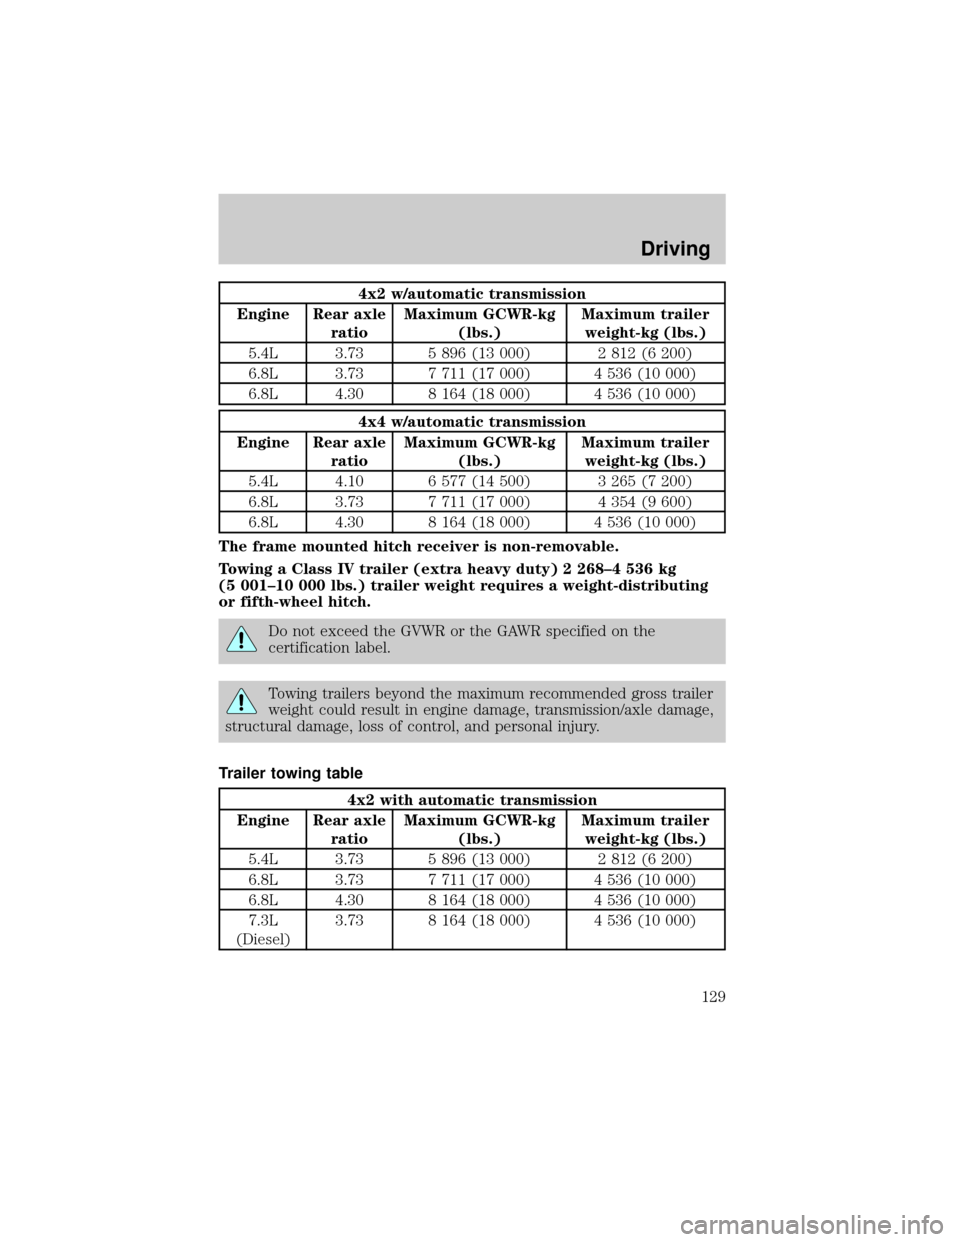
4x2 w/automatic transmission
Engine Rear axle
ratioMaximum GCWR-kg
(lbs.)Maximum trailer
weight-kg (lbs.)
5.4L 3.73 5 896 (13 000) 2 812 (6 200)
6.8L 3.73 7 711 (17 000) 4 536 (10 000)
6.8L 4.30 8 164 (18 000) 4 536 (10 000)
4x4 w/automatic transmission
Engine Rear axle
ratioMaximum GCWR-kg
(lbs.)Maximum trailer
weight-kg (lbs.)
5.4L 4.10 6 577 (14 500) 3 265 (7 200)
6.8L 3.73 7 711 (17 000) 4 354 (9 600)
6.8L 4.30 8 164 (18 000) 4 536 (10 000)
The frame mounted hitch receiver is non-removable.
Towing a Class IV trailer (extra heavy duty) 2 268±4 536 kg
(5 001±10 000 lbs.) trailer weight requires a weight-distributing
or fifth-wheel hitch.
Do not exceed the GVWR or the GAWR specified on the
certification label.
Towing trailers beyond the maximum recommended gross trailer
weight could result in engine damage, transmission/axle damage,
structural damage, loss of control, and personal injury.
Trailer towing table
4x2 with automatic transmission
Engine Rear axle
ratioMaximum GCWR-kg
(lbs.)Maximum trailer
weight-kg (lbs.)
5.4L 3.73 5 896 (13 000) 2 812 (6 200)
6.8L 3.73 7 711 (17 000) 4 536 (10 000)
6.8L 4.30 8 164 (18 000) 4 536 (10 000)
7.3L
(Diesel)3.73 8 164 (18 000) 4 536 (10 000)
Driving
129
Page 130 of 232
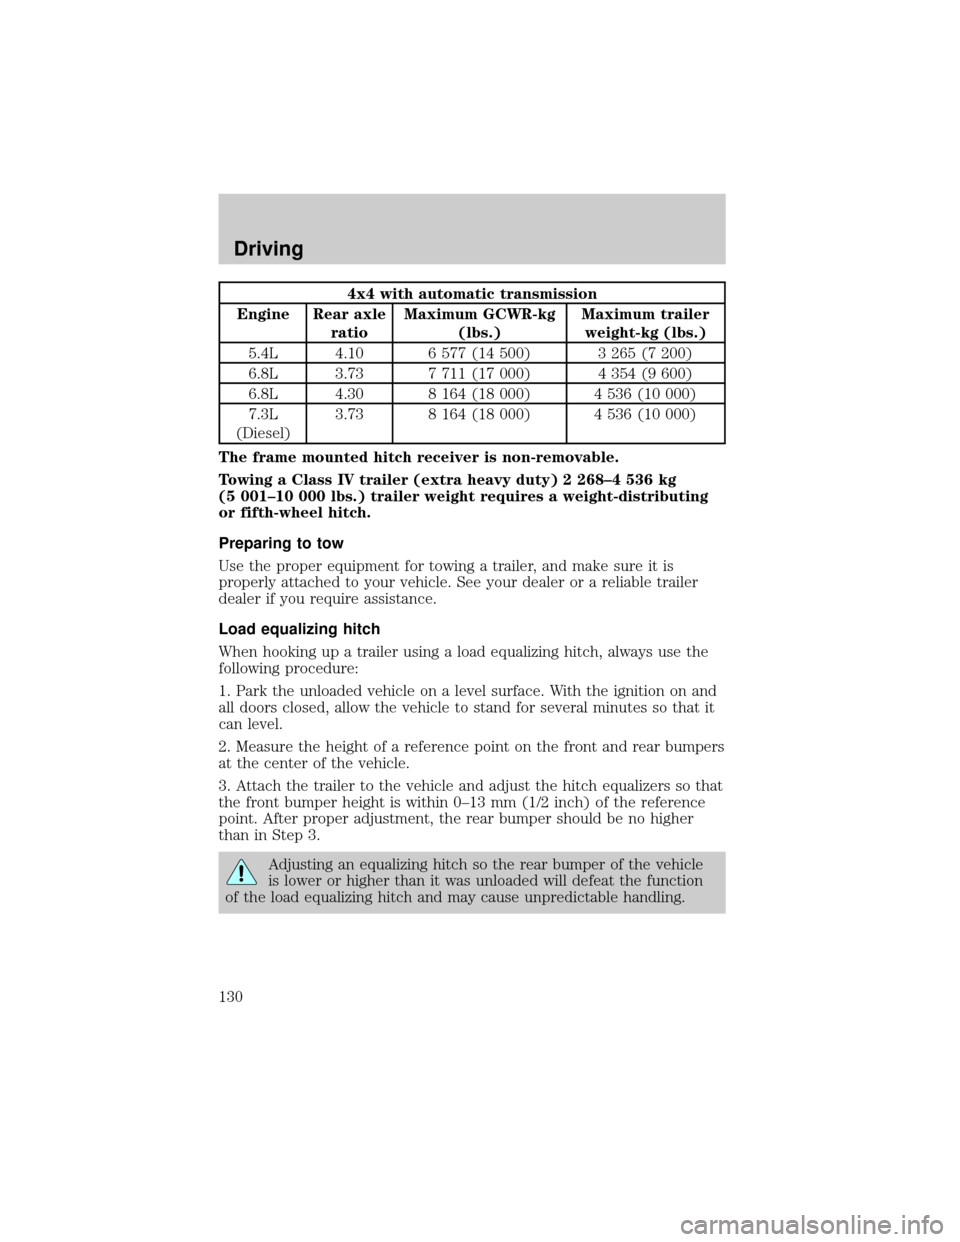
4x4 with automatic transmission
Engine Rear axle
ratioMaximum GCWR-kg
(lbs.)Maximum trailer
weight-kg (lbs.)
5.4L 4.10 6 577 (14 500) 3 265 (7 200)
6.8L 3.73 7 711 (17 000) 4 354 (9 600)
6.8L 4.30 8 164 (18 000) 4 536 (10 000)
7.3L
(Diesel)3.73 8 164 (18 000) 4 536 (10 000)
The frame mounted hitch receiver is non-removable.
Towing a Class IV trailer (extra heavy duty) 2 268±4 536 kg
(5 001±10 000 lbs.) trailer weight requires a weight-distributing
or fifth-wheel hitch.
Preparing to tow
Use the proper equipment for towing a trailer, and make sure it is
properly attached to your vehicle. See your dealer or a reliable trailer
dealer if you require assistance.
Load equalizing hitch
When hooking up a trailer using a load equalizing hitch, always use the
following procedure:
1. Park the unloaded vehicle on a level surface. With the ignition on and
all doors closed, allow the vehicle to stand for several minutes so that it
can level.
2. Measure the height of a reference point on the front and rear bumpers
at the center of the vehicle.
3. Attach the trailer to the vehicle and adjust the hitch equalizers so that
the front bumper height is within 0±13 mm (1/2 inch) of the reference
point. After proper adjustment, the rear bumper should be no higher
than in Step 3.
Adjusting an equalizing hitch so the rear bumper of the vehicle
is lower or higher than it was unloaded will defeat the function
of the load equalizing hitch and may cause unpredictable handling.
Driving
130
Page 131 of 232
Safety chains
Always connect the trailer's safety chains to the frame or hook retainers
of the vehicle. To connect the trailer's safety chains, cross the chains
under the trailer tongue and allow slack for turning corners.
If you use a rental trailer, follow the instructions that the rental agency
gives to you.
Attach safety chains to the hitch, not the bumper.
Trailer brakes
Electric brakes and manual, automatic or surge-type trailer brakes are
safe if installed properly and adjusted to the manufacturer's
specifications. The trailer brakes must meet local and Federal
regulations.
Do not connect a trailer's hydraulic brake system directly to your
vehicle's brake system. Your vehicle may not have enough
braking power and your chances of having a collision greatly increase.
The braking system of the tow vehicle is rated for operation at the
GVWR not GCWR.
Trailer lamps
Trailer lamps are required on most towed vehicles. Make sure your
trailer lamps conform to local and Federal regulations. See your dealer or
trailer rental agency for proper instructions and equipment for hooking
up trailer lamps.
Using a step bumper
The rear bumper is equipped with an integral hitch and requires only a
ball with a 25.4 mm (one inch) shank diameter. The bumper has a
2 270 kg (5 000 lb.) trailer weight and 227 kg (500 lb.) tongue weight
capability.
If it is necessary to relocate the trailer hitch ball position, use the frame
mounted hitch receiver.
Driving while you tow
When towing a trailer:
²Ensure that you turn off your speed control. The speed control may
shut off automatically when you are towing on long, steep grades.
Driving
131
Page 132 of 232

²Consult your local motor vehicle speed regulations for towing a trailer.
²Use a lower gear when towing up or down steep hills. This will
eliminate excessive downshifting and upshifting for optimum fuel
economy and transmission cooling.
²Anticipate stops and brake gradually.
Exceeding the GCWR rating may cause internal transmission
damage and void your warranty coverage.
Servicing after towing
If you tow a trailer for long distances, your vehicle will require more
frequent service intervals. Refer to your scheduled maintenance guide for
more information.
Trailer towing tips
²Practice turning, stopping and backing up before starting on a trip to
get the feel of the vehicle trailer combination. When turning, make
wider turns so the trailer wheels will clear curbs and other obstacles.
²Allow more distance for stopping with a trailer attached.
²The trailer tongue weight should be no more than 10±15% of the
loaded trailer weight.
²After you have traveled 80 km (50 miles), thoroughly check your
hitch, electrical connections and trailer wheel lug nuts.
²When stopped in traffic for long periods of time in hot weather, place
the gearshift in P (Park) (automatic transmissions) or N (Neutral)
(manual transmissions). This aids engine cooling and air conditioner
efficiency.
²Vehicles with trailers should not be parked on a grade. If you must
park on a grade, place wheel chocks under the trailer's wheels.
Launching or retrieving a boat
When backing down a ramp during boat launching or retrieval,
²Do not allow the static water level to rise above the bottom edge of
the rear bumper and
²Do not allow waves to break higher than 15 cm (6 inches) above the
bottom edge of the rear bumper.
²Disconnect the trailer tow electrical connector to prevent blown fuses
caused by water entering into your trailer's electrical wiring.
Driving
132
Page 141 of 232
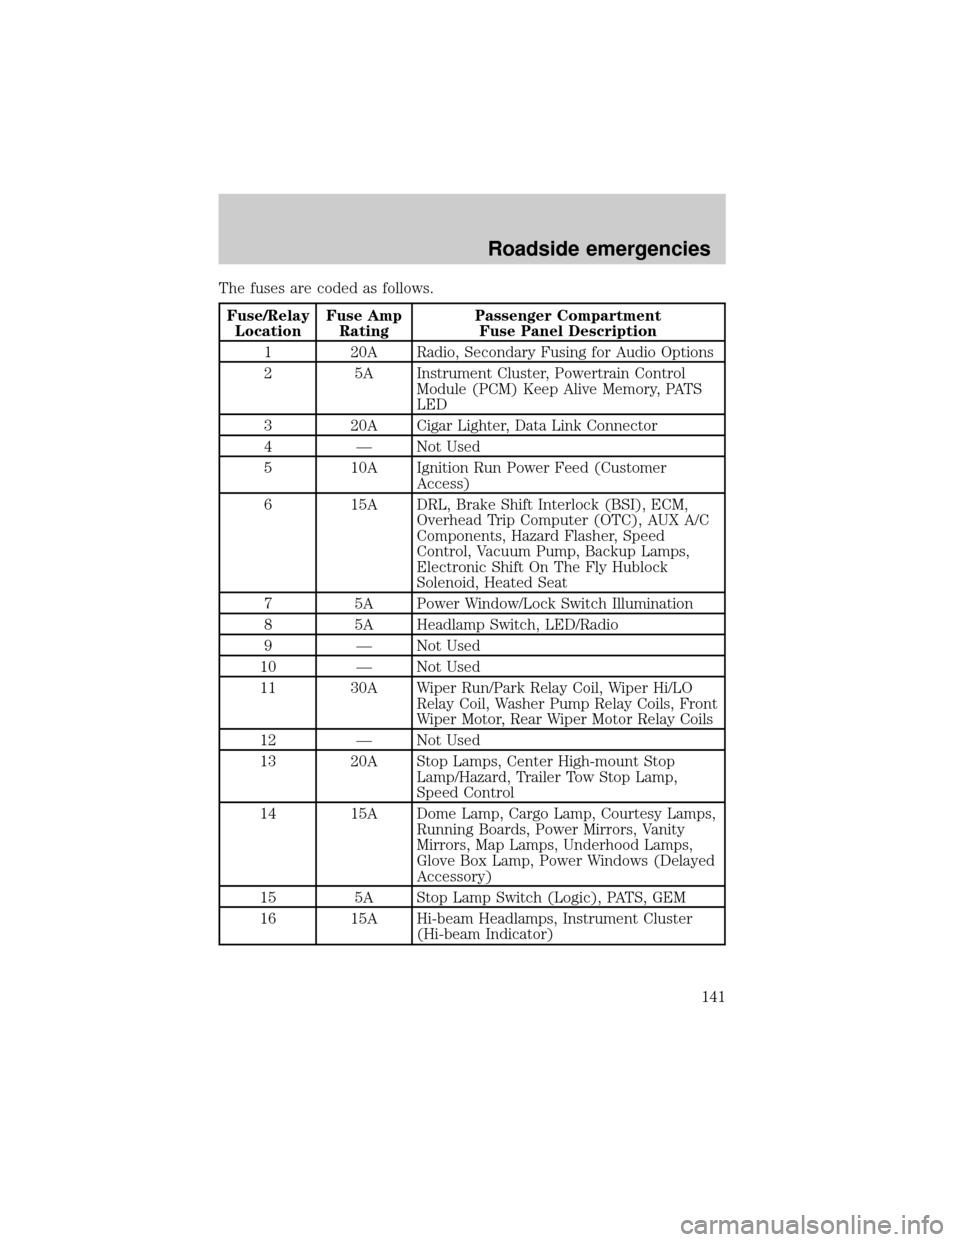
The fuses are coded as follows.
Fuse/Relay
LocationFuse Amp
RatingPassenger Compartment
Fuse Panel Description
1 20A Radio, Secondary Fusing for Audio Options
2 5A Instrument Cluster, Powertrain Control
Module (PCM) Keep Alive Memory, PATS
LED
3 20A Cigar Lighter, Data Link Connector
4 Ð Not Used
5 10A Ignition Run Power Feed (Customer
Access)
6 15A DRL, Brake Shift Interlock (BSI), ECM,
Overhead Trip Computer (OTC), AUX A/C
Components, Hazard Flasher, Speed
Control, Vacuum Pump, Backup Lamps,
Electronic Shift On The Fly Hublock
Solenoid, Heated Seat
7 5A Power Window/Lock Switch Illumination
8 5A Headlamp Switch, LED/Radio
9 Ð Not Used
10 Ð Not Used
11 30A Wiper Run/Park Relay Coil, Wiper Hi/LO
Relay Coil, Washer Pump Relay Coils, Front
Wiper Motor, Rear Wiper Motor Relay Coils
12 Ð Not Used
13 20A Stop Lamps, Center High-mount Stop
Lamp/Hazard, Trailer Tow Stop Lamp,
Speed Control
14 15A Dome Lamp, Cargo Lamp, Courtesy Lamps,
Running Boards, Power Mirrors, Vanity
Mirrors, Map Lamps, Underhood Lamps,
Glove Box Lamp, Power Windows (Delayed
Accessory)
15 5A Stop Lamp Switch (Logic), PATS, GEM
16 15A Hi-beam Headlamps, Instrument Cluster
(Hi-beam Indicator)
Roadside emergencies
141
Page 142 of 232
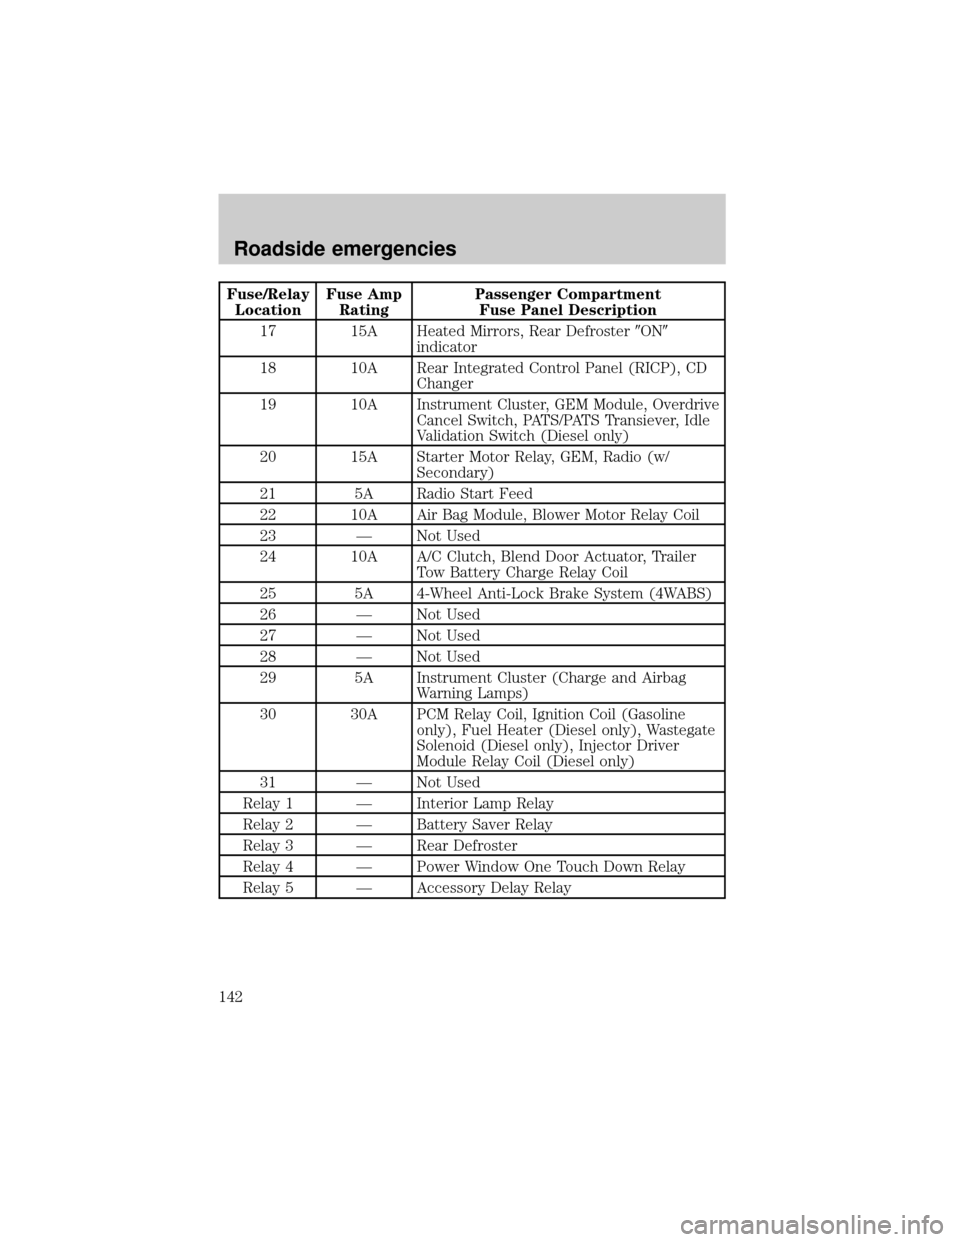
Fuse/Relay
LocationFuse Amp
RatingPassenger Compartment
Fuse Panel Description
17 15A Heated Mirrors, Rear Defroster9ON9
indicator
18 10A Rear Integrated Control Panel (RICP), CD
Changer
19 10A Instrument Cluster, GEM Module, Overdrive
Cancel Switch, PATS/PATS Transiever, Idle
Validation Switch (Diesel only)
20 15A Starter Motor Relay, GEM, Radio (w/
Secondary)
21 5A Radio Start Feed
22 10A Air Bag Module, Blower Motor Relay Coil
23 Ð Not Used
24 10A A/C Clutch, Blend Door Actuator, Trailer
Tow Battery Charge Relay Coil
25 5A 4-Wheel Anti-Lock Brake System (4WABS)
26 Ð Not Used
27 Ð Not Used
28 Ð Not Used
29 5A Instrument Cluster (Charge and Airbag
Warning Lamps)
30 30A PCM Relay Coil, Ignition Coil (Gasoline
only), Fuel Heater (Diesel only), Wastegate
Solenoid (Diesel only), Injector Driver
Module Relay Coil (Diesel only)
31 Ð Not Used
Relay 1 Ð Interior Lamp Relay
Relay 2 Ð Battery Saver Relay
Relay 3 Ð Rear Defroster
Relay 4 Ð Power Window One Touch Down Relay
Relay 5 Ð Accessory Delay Relay
Roadside emergencies
142