remove seats FORD EXPEDITION 2002 1.G Owners Manual
[x] Cancel search | Manufacturer: FORD, Model Year: 2002, Model line: EXPEDITION, Model: FORD EXPEDITION 2002 1.GPages: 280, PDF Size: 2.32 MB
Page 49 of 280

²To reduce humidity buildup inside the vehicle in cold weather
conditions, don't drive with the climate control system in the OFF or
MAX A/C position.
²To reduce humidity buildup inside the vehicle in warm weather
conditions, don't drive with the climate control system in the OFF
position.
²Under normal weather conditions, your vehicle's climate control
system should be left in any position other than the MAX A/C or OFF
when the vehicle is parked. This allows the vehicle to ªbreatheº
through the outside air inlet duct.
²Under snowy or dirty weather conditions, your vehicle's climate
control system should be left in the OFF position when the vehicle is
parked. This allows the climate control system to be free from
contamination of outside pollutants.
²If your vehicle has been parked with the windows closed during warm
weather conditions, the air conditioner will perform more efficiently in
cooling the vehicle if driven for two or three minutes with the
windows open. This will force most of the hot, stale air out of the
vehicle. Once the vehicle has been ªaired outº, operate the climate
control system as desired.
²Do not put objects under the front seat which may interfere with the
airflow to the rear seats (if equipped).
²Remove any snow, ice or leaves from the air intake area (at the
bottom of the windshield and underneath the hood).
²Do not place objects over the defroster outlets. These objects can
block airflow and reduce visibility through your windshield. Avoid
placing small objects on top of the instrument panel. These objects
may fall down into the defroster outlets and block airflow, in addition
to, damaging the climate control system.
To aid in side window defogging/demisting in cold weather conditions:
1. Select the position that distributes air through the Panel and Floor.
2. Set the temperature control to full heat.
3. Set the fan speed to full fan.
4. Direct the outer panel vents towards the side windows.
5. To increase airflow to the outer panel vents, close the central panel
vents.
Climate controls
49
Page 55 of 280
²Under snowy or dirty weather conditions, your vehicle's climate
control system should be left in the OFF position when the vehicle is
parked. This allows the climate control system to be free from
contamination of outside pollutants.
²If your vehicle has been parked with the windows closed during warm
weather conditions, the air conditioner will perform more efficiently in
cooling the vehicle if driven for two or three minutes with the
windows open. This will force most of the hot, stale air out of the
vehicle. Once the vehicle has been ªaired outº, operate the climate
control system as desired.
²Don't put objects under the front seat that will interfere with the
airflow to the rear seats.
²Remove any snow, ice or leaves from the air intake area at the base of
the windshield.
²Do not place objects over the defroster outlets. These objects can
block airflow and reduce your ability to see through your windshield.
Avoid placing small objects on top of the instrument panel. These
objects may fall down into the defroster outlets and block airflow, in
addition to damaging the climate control system.
To aid in side window defogging/demisting in cold weather conditions:
1. Select PNL²FLR
2. Set the temperature control to full heat
3. Set the fan speed control to HI
4. Direct the outer panel vents towards the side windows.
To increase airflow to the outer panel vents, close the central panel
vents.
Do not place objects on top of the instrument panel, as these
objects may become projectiles in a collision or sudden stop.
AUXILIARY A/C-HEATER CONTROLS (IF EQUIPPED)
Depending on your equipment package, your vehicle may be equipped
with auxiliary A/C-heater controls. The auxiliary A/C-heater feature
provides increased capacity to quickly heat or cool the vehicle. Besides
the driver's control panel for the front seat occupants, the second row
auxiliary A/C-heater controls allow the rear passengers to control the
Climate controls
55
Page 66 of 280
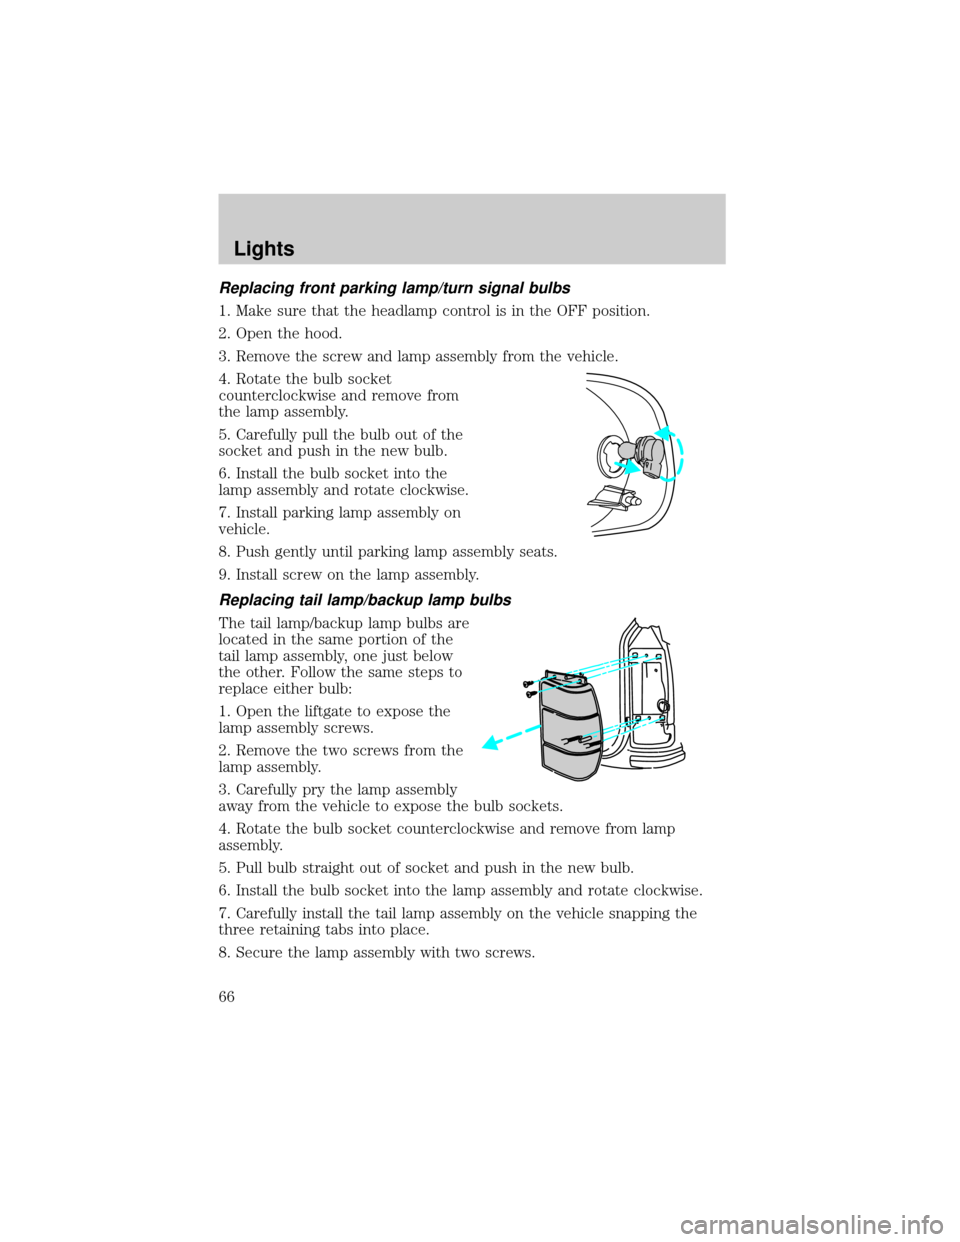
Replacing front parking lamp/turn signal bulbs
1. Make sure that the headlamp control is in the OFF position.
2. Open the hood.
3. Remove the screw and lamp assembly from the vehicle.
4. Rotate the bulb socket
counterclockwise and remove from
the lamp assembly.
5. Carefully pull the bulb out of the
socket and push in the new bulb.
6. Install the bulb socket into the
lamp assembly and rotate clockwise.
7. Install parking lamp assembly on
vehicle.
8. Push gently until parking lamp assembly seats.
9. Install screw on the lamp assembly.
Replacing tail lamp/backup lamp bulbs
The tail lamp/backup lamp bulbs are
located in the same portion of the
tail lamp assembly, one just below
the other. Follow the same steps to
replace either bulb:
1. Open the liftgate to expose the
lamp assembly screws.
2. Remove the two screws from the
lamp assembly.
3. Carefully pry the lamp assembly
away from the vehicle to expose the bulb sockets.
4. Rotate the bulb socket counterclockwise and remove from lamp
assembly.
5. Pull bulb straight out of socket and push in the new bulb.
6. Install the bulb socket into the lamp assembly and rotate clockwise.
7. Carefully install the tail lamp assembly on the vehicle snapping the
three retaining tabs into place.
8. Secure the lamp assembly with two screws.
Lights
66
Page 115 of 280
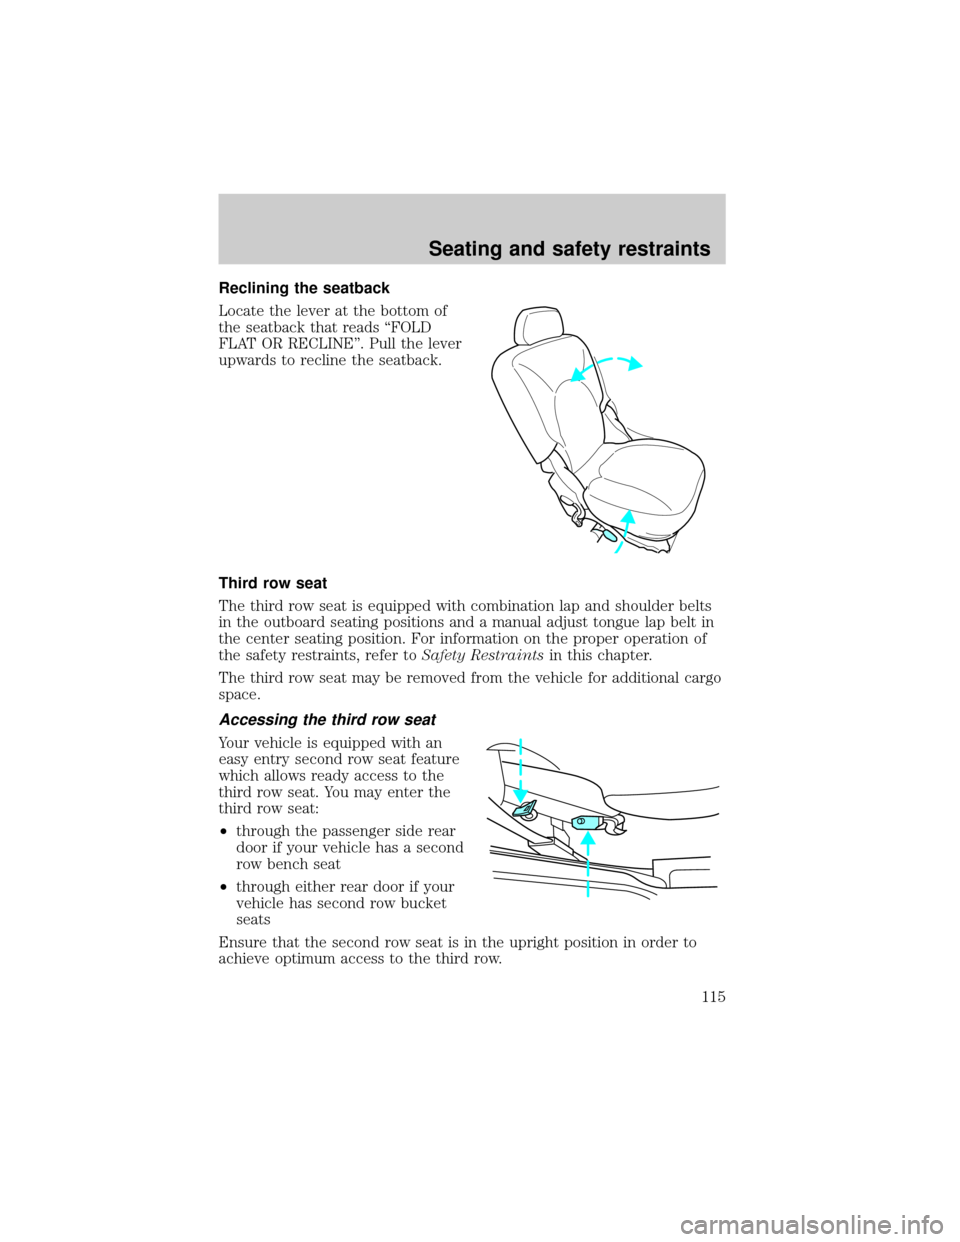
Reclining the seatback
Locate the lever at the bottom of
the seatback that reads ªFOLD
FLAT OR RECLINEº. Pull the lever
upwards to recline the seatback.
Third row seat
The third row seat is equipped with combination lap and shoulder belts
in the outboard seating positions and a manual adjust tongue lap belt in
the center seating position. For information on the proper operation of
the safety restraints, refer toSafety Restraintsin this chapter.
The third row seat may be removed from the vehicle for additional cargo
space.
Accessing the third row seat
Your vehicle is equipped with an
easy entry second row seat feature
which allows ready access to the
third row seat. You may enter the
third row seat:
²through the passenger side rear
door if your vehicle has a second
row bench seat
²through either rear door if your
vehicle has second row bucket
seats
Ensure that the second row seat is in the upright position in order to
achieve optimum access to the third row.
Seating and safety restraints
115
Page 122 of 280
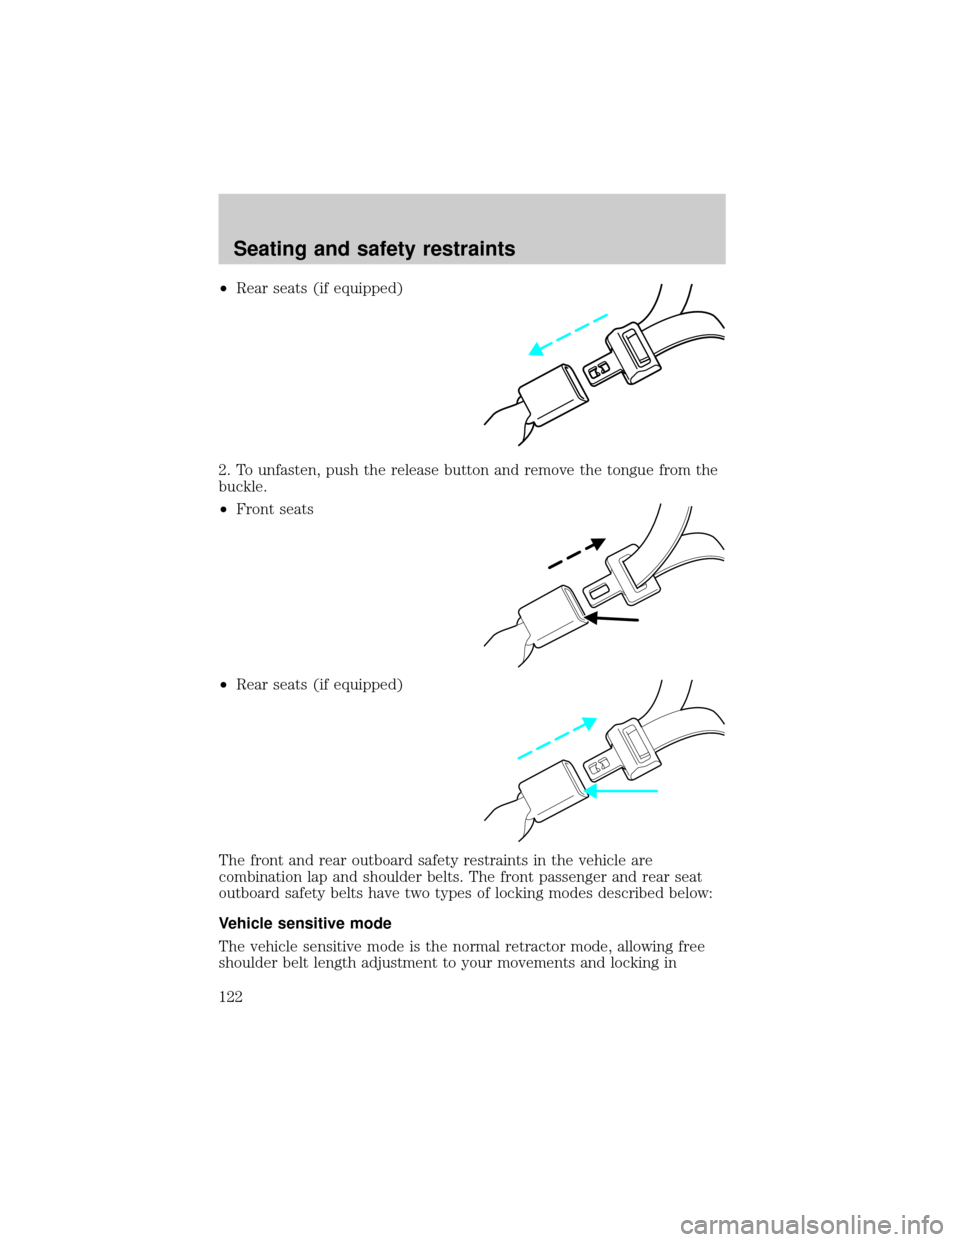
²Rear seats (if equipped)
2. To unfasten, push the release button and remove the tongue from the
buckle.
²Front seats
²Rear seats (if equipped)
The front and rear outboard safety restraints in the vehicle are
combination lap and shoulder belts. The front passenger and rear seat
outboard safety belts have two types of locking modes described below:
Vehicle sensitive mode
The vehicle sensitive mode is the normal retractor mode, allowing free
shoulder belt length adjustment to your movements and locking in
Seating and safety restraints
122
Page 123 of 280
response to vehicle movement. For example, if the driver brakes
suddenly or turns a corner sharply, or the vehicle receives an impact of
approximately 8 km/h (5 mph) or more, the combination safety belts will
lock to help reduce forward movement of the driver and passengers.
The safety belt system can also be made to lock manually by quickly
pulling on the shoulder belt.
Automatic locking mode
In this mode, the shoulder belt is automatically pre-locked. The belt will
still retract to remove any slack in the shoulder belt.
The automatic locking mode is not available on the driver safety belt.
When to use the automatic locking mode
²Any timea child safety seat is installed in a passenger front or
outboard rear seating position (if equipped). Children 12 years old and
under should be properly restrained in the rear seat whenever
possible. Refer toSafety Restraints for ChildrenorSafety Seats for
Childrenlater in this chapter.
How to use the automatic locking mode
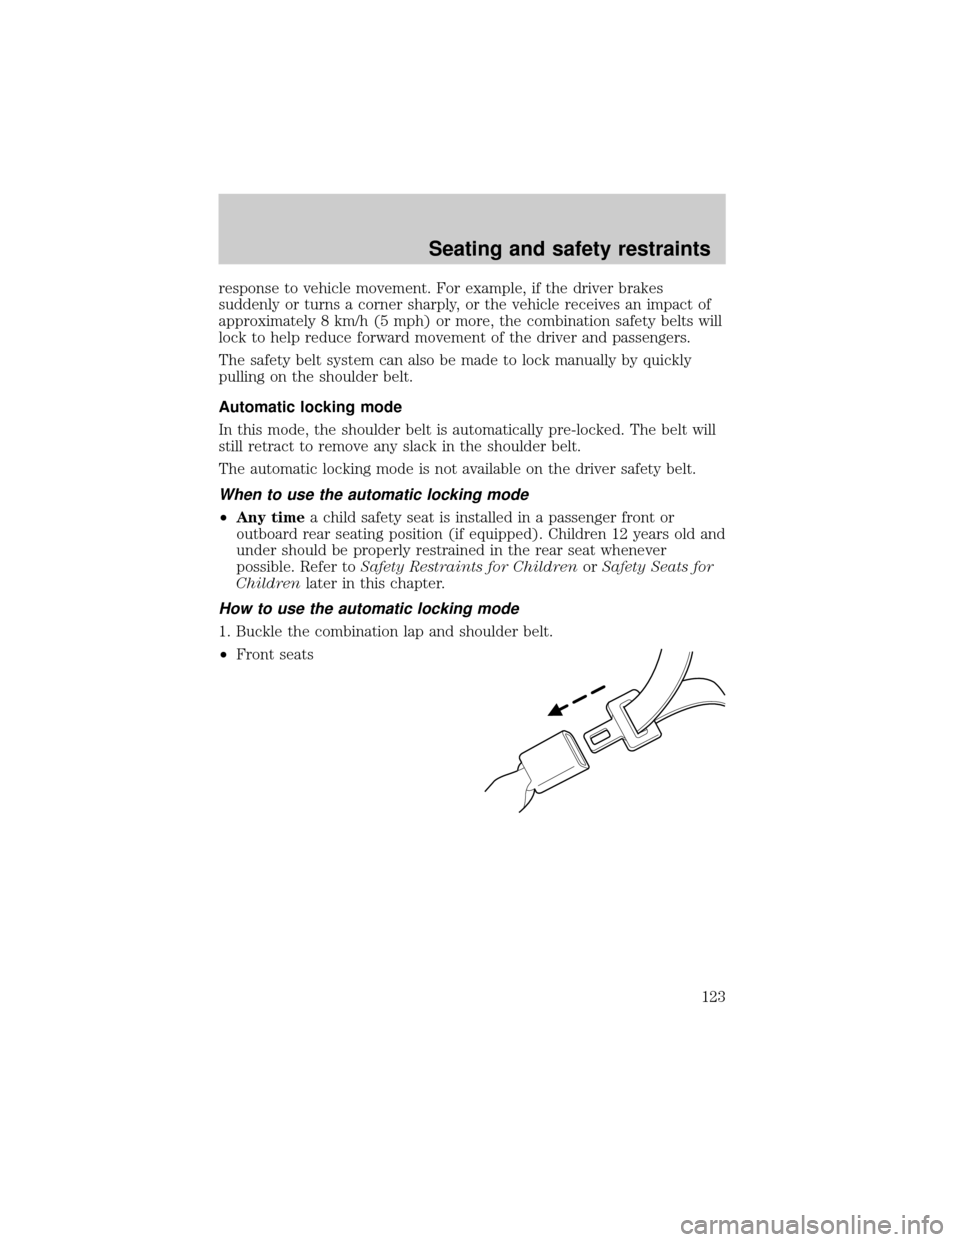
1. Buckle the combination lap and shoulder belt.
²Front seats
Seating and safety restraints
123
Page 125 of 280
Disconnect the combination lap/shoulder belt and allow it to retract
completely to disengage the automatic locking mode and activate the
vehicle sensitive (emergency) locking mode.
After any vehicle collision, the front passenger outboard seat belt
system must be checked by a qualified technician to verify that
the ªautomatic locking retractorº feature for child seats is still
functioning properly. In addition, all seat belts should be checked for
proper function.
BELT AND RETRACTOR ASSEMBLY MUST BE REPLACED if
the seat belt assembly ªautomatic locking retractorº feature or
any other seat belt function is not operating properly when checked
according to the procedures in Workshop Manual.
Failure to replace the Belt and Retractor assembly could
increase the risk of injury in collisions.
Safety belt pretensioner
Your vehicle is equipped with safety belt pretensioners at the driver and
front passenger seating positions.
The safety belt pretensioner is a device which removes excess webbing
from the safety belt system. The safety belt pretensioner uses the same
crash sensor system as the front air bag supplemental restraint system
(SRS). When the safety belt pretensioner deploys, webbing from the lap
and shoulder belt is tightened. The driver and front passenger seat belt
system (including retractors, buckles and height adjusters) must be
replaced if the vehicle is involved in a collision that results in
deployment of front air bags and safety belt pretensioners. Refer to the
Safety belt maintenancesection in this chapter.
Failure to replace the safety belt assembly under the above
conditions could result in severe personal injuries in the event of
a collision.
Seating and safety restraints
125
Page 146 of 280

5. If you have not pulled out enough webbing to reach, allow the
webbing to fully retract before attempting to pull it out again and repeat
steps 2 through 4.
6. Pull the webbing through the child seat toward the buckle while
pushing down with your knee on the child seat.
7. Allow the safety belt to retract to remove any slack in the belt. It will
make a clicking noise while doing this.
8. Before placing the child in the seat, forcibly tilt the seat forward and
back to make sure the seat is securely held in place.
9. Check to make sure the child seat is properly secured before each
use.
Installing child safety seat in the third row center seating position
(if equipped)
1. Place the child safety seat in the center seating position.
2. Route the tongue end through the child seat according to the child
seat manufacturers instructions. If the tongue will not reach the buckle,
lengthen the amount of belt by turning the tongue at a right angle to the
belt and pulling on it until it reaches the buckle. Be sure the belt
webbing is not twisted.
3. Insert the tongue into the correct buckle for that seating position
(buckle closest to the direction the tongue is coming from) until you
hear and feel the buckle engage. To tighten the belt, pull the loose end
of the belt through the tongue until all the slack is removed from the
belt. Make sure the buckle is latched securely by pulling on the webbing.
4. Before placing the child in the seat, forcibly tilt the seat forward and
back to make sure the seat is securely held in place.
5. Check to make sure the child seat is properly secured before each
use.
Attaching safety seats with tether straps
Most forward-facing child safety seats include a tether strap which goes
over the back of the set and hooks to an anchoring point. Tether straps
are available as an accessory for many older safety seats. Contact the
manufacturer of your child safety seat for information about ordering a
tether strap.
Seating and safety restraints
146
Page 190 of 280
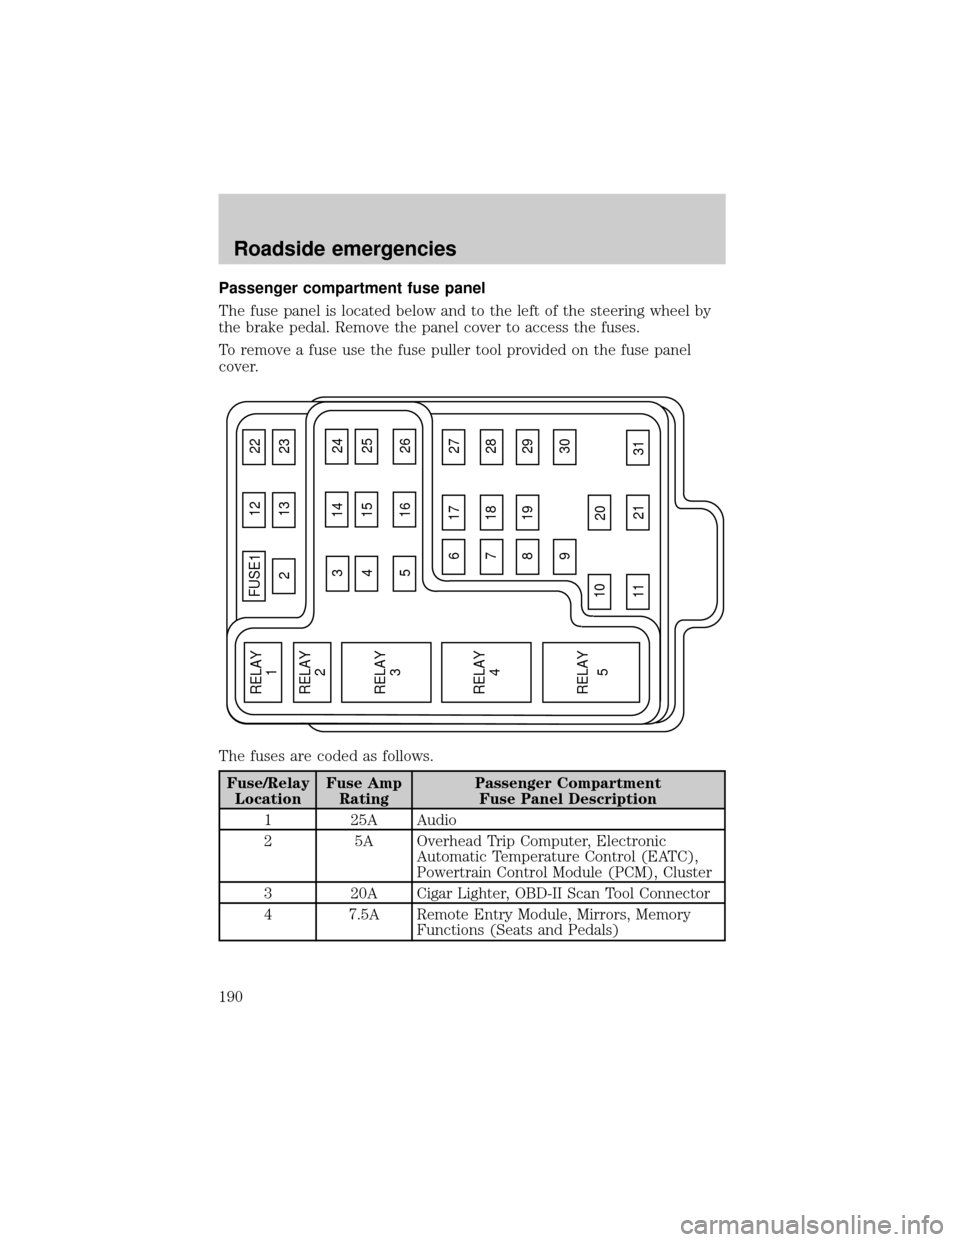
Passenger compartment fuse panel
The fuse panel is located below and to the left of the steering wheel by
the brake pedal. Remove the panel cover to access the fuses.
To remove a fuse use the fuse puller tool provided on the fuse panel
cover.
The fuses are coded as follows.
Fuse/Relay
LocationFuse Amp
RatingPassenger Compartment
Fuse Panel Description
1 25A Audio
2 5A Overhead Trip Computer, Electronic
Automatic Temperature Control (EATC),
Powertrain Control Module (PCM), Cluster
3 20A Cigar Lighter, OBD-II Scan Tool Connector
4 7.5A Remote Entry Module, Mirrors, Memory
Functions (Seats and Pedals)
FUSE1 12 22
21323
617 27
718 28
819 29
930
20
31 21 11 10
RELAY
5 RELAY
4 RELAY
3 RELAY
2 RELAY
1
31424
41525
51626
Roadside emergencies
190
Page 222 of 280
Do not use chemical solvents or strong detergents when cleaning
the steering wheel or instrument panel to avoid contamination of
the air bag system.
CLEANING THE INSTRUMENT CLUSTER LENS
Wipe the cluster area with a soft, damp cotton towel. Dry the area with a
clean, dry towel.
CLEANING SEATS EQUIPPED WITH SIDE AIR BAGS
Remove dust and loose dirt with a vacuum cleaner. In order to remove
stains and soil, clean with Extra Strength Upholstery Cleaner
(E8AZ-19523±AA).
Never saturate the seat covers with any cleaning solution.
Do not use chemical solvents or strong detergents when cleaning
the seat where the side air bag is mounted. Such products could
contaminate the side air bag system and affect performance of the side
air bag in a collision. The air bag may not function correctly and not
provide injury reduction benefits.
CLEANING THE INTERIOR FABRIC, CARPETS AND CLOTH SEATS
Remove dust and loose dirt with a vacuum cleaner. Remove light stains
and soil with Extra Strength Upholstery Cleaner (E8AZ-19523±AA).
Never saturate the seat covers with cleaning solution.
Do not use household cleaning products or glass cleaners, which
can stain and discolor the fabric and affect the flame retardent
abilities of the seat materials.
If grease or tar is present on the material, spot-clean the area first with
Spot and Stain Remover (F3AZ-19521±WA). Follow up by recleaning the
area with Extra Strength Upholstery Cleaner (E8AZ-19523±AA).
CLEANING LEATHER SEATS (IF EQUIPPED)
All Ford, Lincoln and Mercury vehicles with leather seating surfaces have
a clear, protective coating over the leather.
To clean the leather seats, simply use a soft cloth with Deluxe Leather
and Vinyl Cleaner (F2AZ-19521±WA). Dry the area with a soft cloth.
Cleaning
222