spare wheel FORD EXPEDITION 2003 2.G Owners Manual
[x] Cancel search | Manufacturer: FORD, Model Year: 2003, Model line: EXPEDITION, Model: FORD EXPEDITION 2003 2.GPages: 320, PDF Size: 3.67 MB
Page 236 of 320
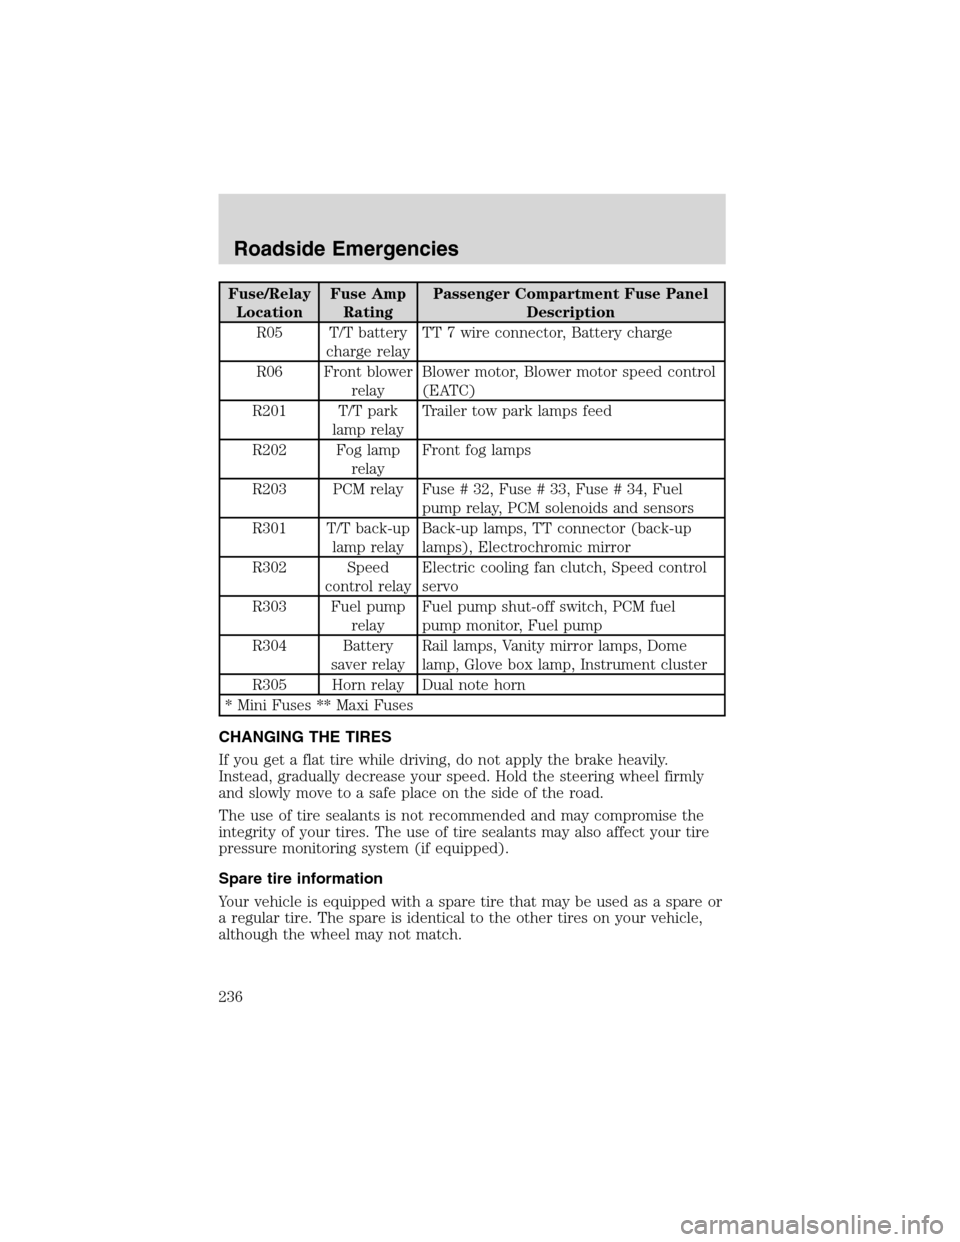
Fuse/Relay
LocationFuse Amp
RatingPassenger Compartment Fuse Panel
Description
R05 T/T battery
charge relayTT 7 wire connector, Battery charge
R06 Front blower
relayBlower motor, Blower motor speed control
(EATC)
R201 T/T park
lamp relayTrailer tow park lamps feed
R202 Fog lamp
relayFront fog lamps
R203 PCM relay Fuse # 32, Fuse # 33, Fuse # 34, Fuel
pump relay, PCM solenoids and sensors
R301 T/T back-up
lamp relayBack-up lamps, TT connector (back-up
lamps), Electrochromic mirror
R302 Speed
control relayElectric cooling fan clutch, Speed control
servo
R303 Fuel pump
relayFuel pump shut-off switch, PCM fuel
pump monitor, Fuel pump
R304 Battery
saver relayRail lamps, Vanity mirror lamps, Dome
lamp, Glove box lamp, Instrument cluster
R305 Horn relay Dual note horn
* Mini Fuses ** Maxi Fuses
CHANGING THE TIRES
If you get a flat tire while driving, do not apply the brake heavily.
Instead, gradually decrease your speed. Hold the steering wheel firmly
and slowly move to a safe place on the side of the road.
The use of tire sealants is not recommended and may compromise the
integrity of your tires. The use of tire sealants may also affect your tire
pressure monitoring system (if equipped).
Spare tire information
Your vehicle is equipped with a spare tire that may be used as a spare or
a regular tire. The spare is identical to the other tires on your vehicle,
although the wheel may not match.
Roadside Emergencies
236
Page 237 of 320
Location of the spare tire and tools
The spare tire and tools for your vehicle are stowed in the following
locations:
Item Location
Spare tire Under the vehicle, just forward of
the rear bumper
Jack tools and jacking instructions Under the access panel located in
the floor compartment behind the
rear seat
Removing the jack and tools
1. Open the liftgate, then locate the access panel behind the rear seat.
Unlatch and remove the panel.
2. Remove the jack and tools assembly tray from the compartment by
turning the T-nut counterclockwise to relieve tension against the jack
assembly tray.
3. Unsnap the wheel lug nut wrench, jack extension and handle from the
plastic tray. Remove the jack and instruction sheet from the tray
assembly.
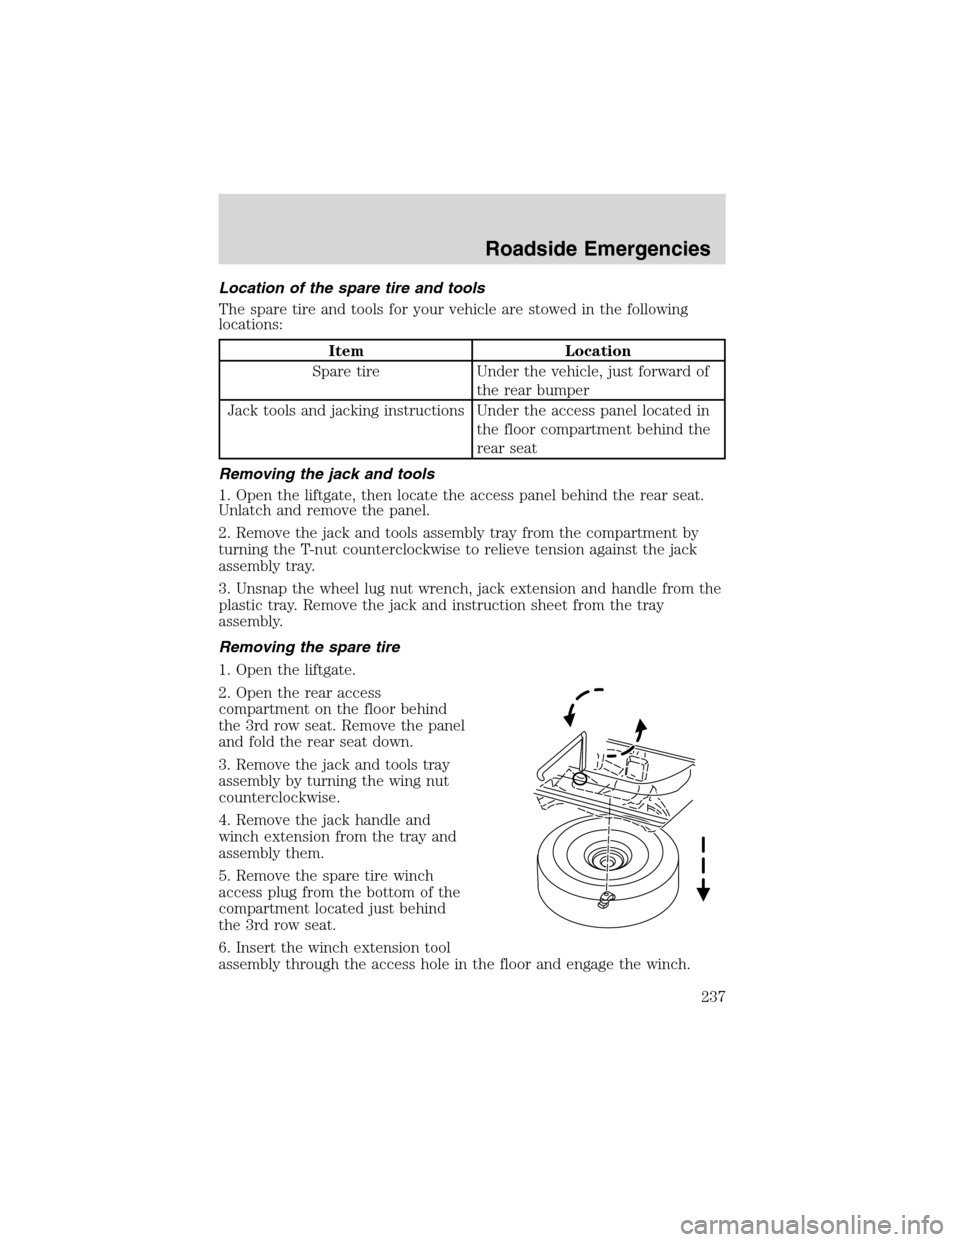
Removing the spare tire
1. Open the liftgate.
2. Open the rear access
compartment on the floor behind
the 3rd row seat. Remove the panel
and fold the rear seat down.
3. Remove the jack and tools tray
assembly by turning the wing nut
counterclockwise.
4. Remove the jack handle and
winch extension from the tray and
assembly them.
5. Remove the spare tire winch
access plug from the bottom of the
compartment located just behind
the 3rd row seat.
6. Insert the winch extension tool
assembly through the access hole in the floor and engage the winch.
Roadside Emergencies
237
Page 238 of 320
7. To remove the spare tire, turn the handle counterclockwise until the
tire is lowered to the ground and the cable is slightly slack.
8. Slide the retainer through the center of the spare tire wheel.
Tire change procedure
To prevent the vehicle from moving when you change a tire, be
sure the parking brake is set, then block (in both directions) the
wheel that is diagonally opposite (other side and end of the vehicle) to
the tire being changed.
If the vehicle slips off the jack, you or someone else could be
seriously injured.
On vehicles equipped with Air Suspension, turn OFF the Air
Suspension switch prior to jacking, hoisting or towing your
vehicle.
Refer to the instruction sheet (located in the rear floor compartment
behind the 3rd row seat with the jack tray tools assembly kit) for
detailed tire change instructions.
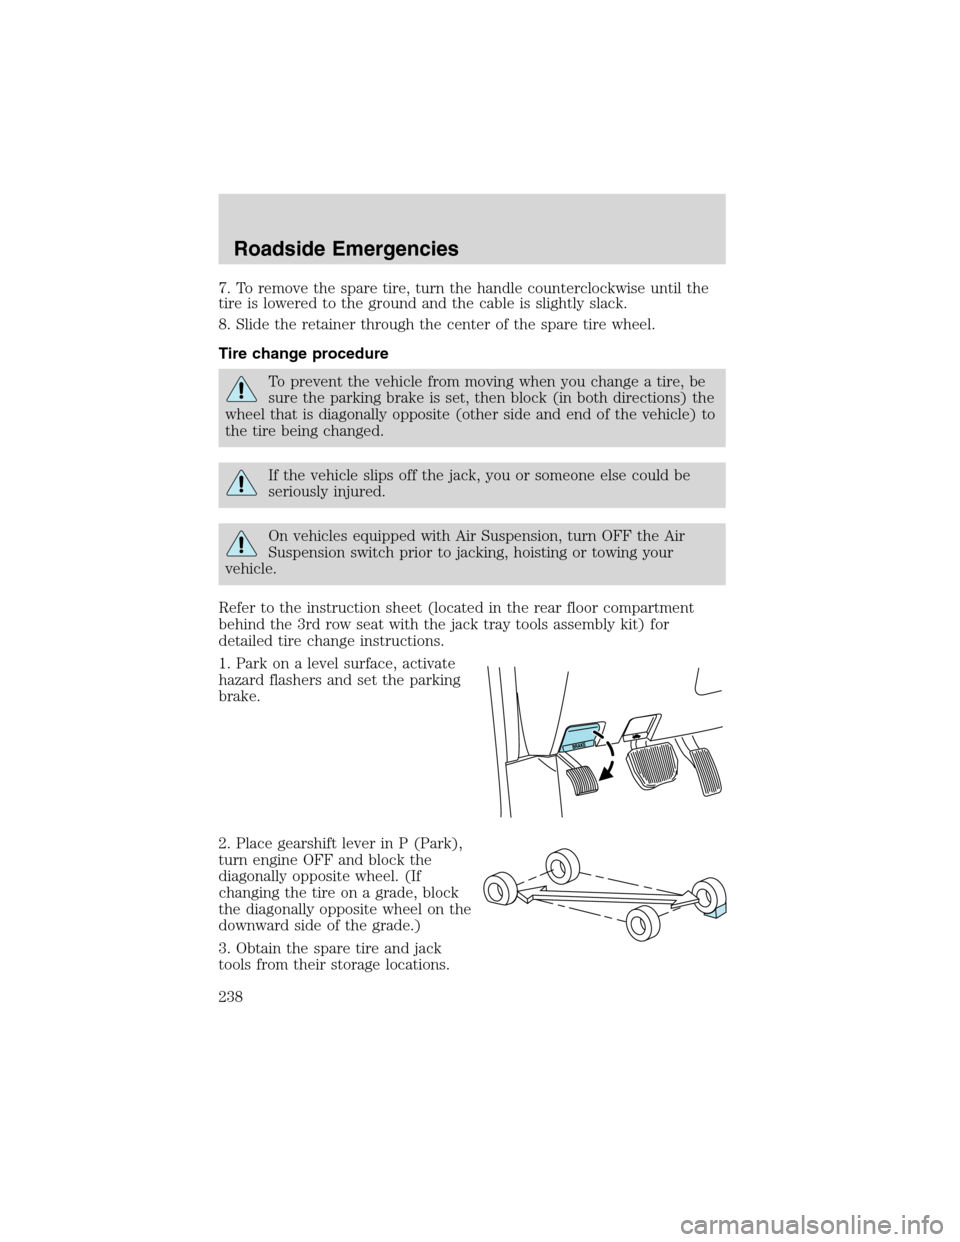
1. Park on a level surface, activate
hazard flashers and set the parking
brake.
2. Place gearshift lever in P (Park),
turn engine OFF and block the
diagonally opposite wheel. (If
changing the tire on a grade, block
the diagonally opposite wheel on the
downward side of the grade.)
3. Obtain the spare tire and jack
tools from their storage locations.
Roadside Emergencies
238
Page 239 of 320
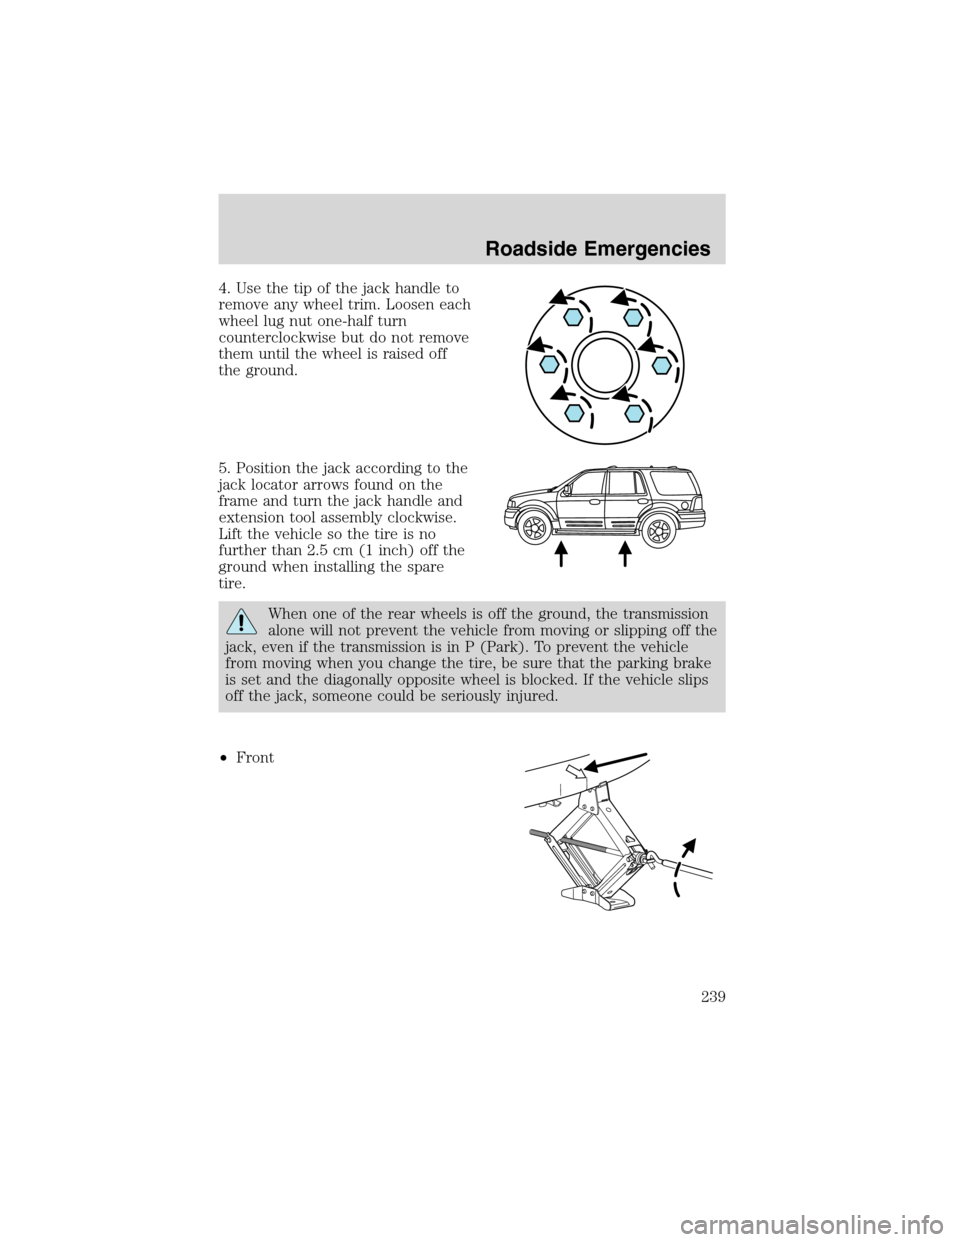
4. Use the tip of the jack handle to
remove any wheel trim. Loosen each
wheel lug nut one-half turn
counterclockwise but do not remove
them until the wheel is raised off
the ground.
5. Position the jack according to the
jack locator arrows found on the
frame and turn the jack handle and
extension tool assembly clockwise.
Lift the vehicle so the tire is no
further than 2.5 cm (1 inch) off the
ground when installing the spare
tire.
When one of the rear wheels is off the ground, the transmission
alone will not prevent the vehicle from moving or slipping off the
jack, even if the transmission is in P (Park). To prevent the vehicle
from moving when you change the tire, be sure that the parking brake
is set and the diagonally opposite wheel is blocked. If the vehicle slips
off the jack, someone could be seriously injured.
•Front
Roadside Emergencies
239
Page 240 of 320
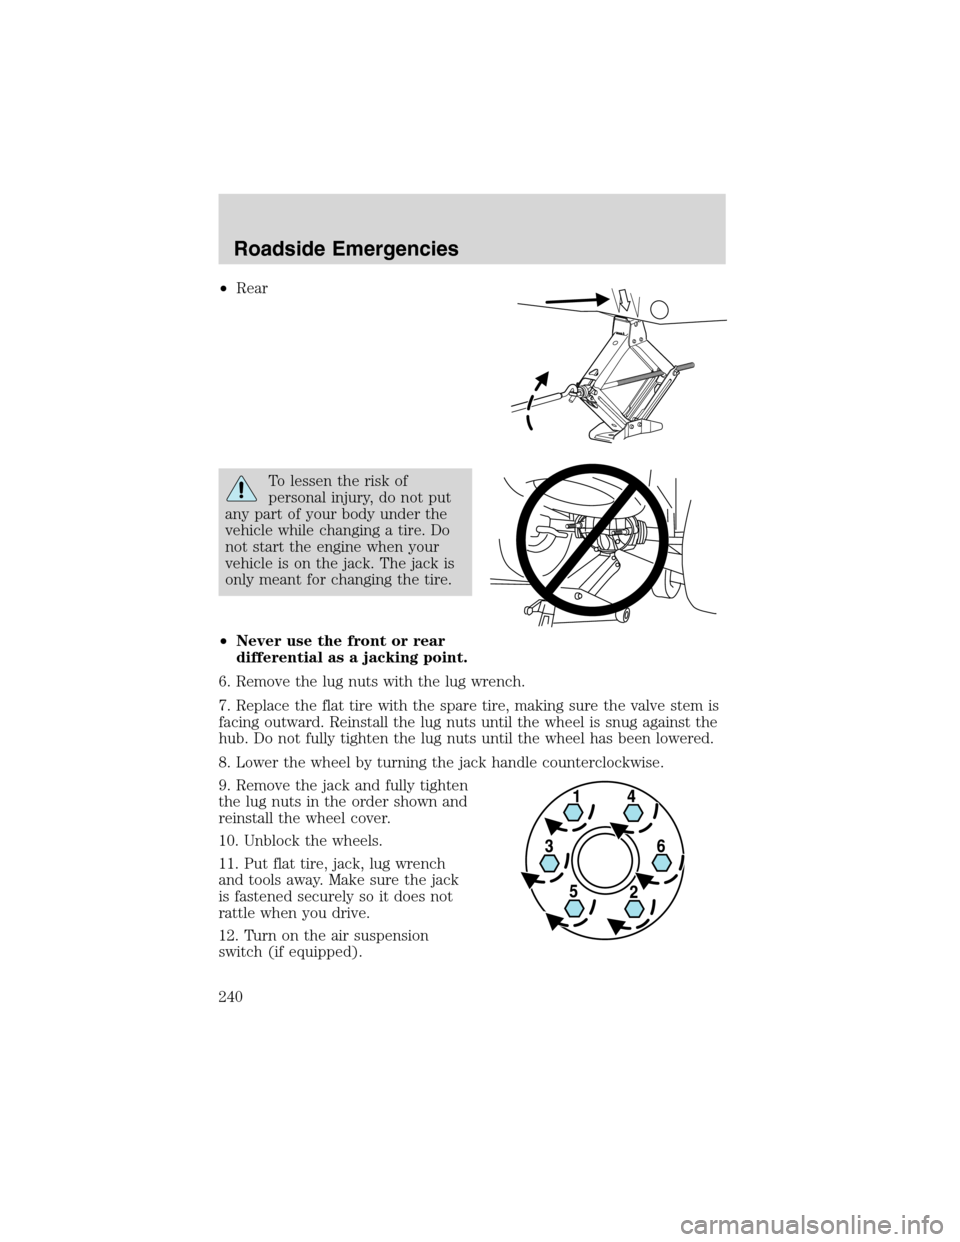
•Rear
To lessen the risk of
personal injury, do not put
any part of your body under the
vehicle while changing a tire. Do
not start the engine when your
vehicle is on the jack. The jack is
only meant for changing the tire.
•Never use the front or rear
differential as a jacking point.
6. Remove the lug nuts with the lug wrench.
7. Replace the flat tire with the spare tire, making sure the valve stem is
facing outward. Reinstall the lug nuts until the wheel is snug against the
hub. Do not fully tighten the lug nuts until the wheel has been lowered.
8. Lower the wheel by turning the jack handle counterclockwise.
9. Remove the jack and fully tighten
the lug nuts in the order shown and
reinstall the wheel cover.
10. Unblock the wheels.
11. Put flat tire, jack, lug wrench
and tools away. Make sure the jack
is fastened securely so it does not
rattle when you drive.
12. Turn on the air suspension
switch (if equipped).
Roadside Emergencies
240
Page 241 of 320
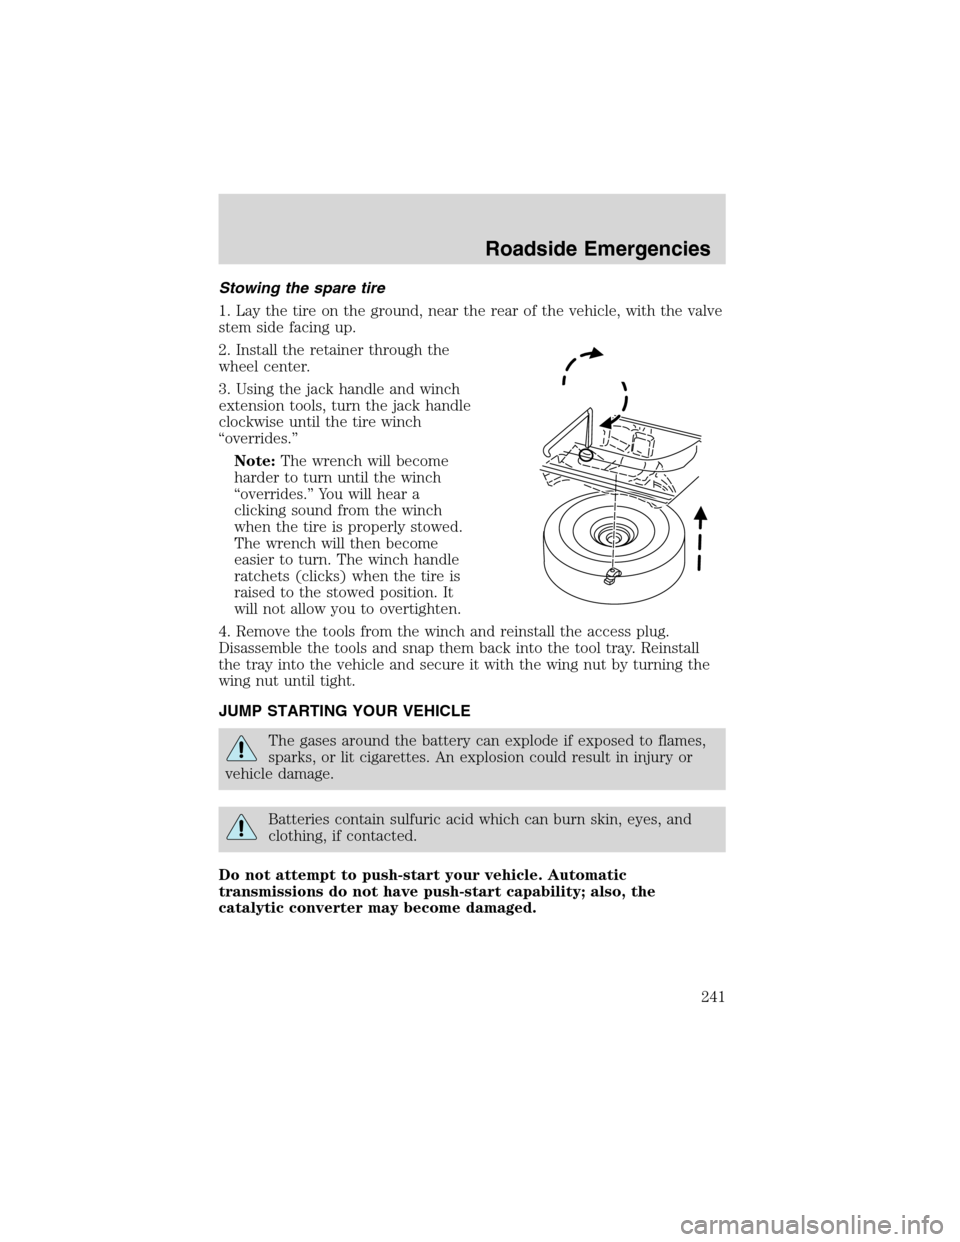
Stowing the spare tire
1. Lay the tire on the ground, near the rear of the vehicle, with the valve
stem side facing up.
2. Install the retainer through the
wheel center.
3. Using the jack handle and winch
extension tools, turn the jack handle
clockwise until the tire winch
“overrides.”
Note:The wrench will become
harder to turn until the winch
“overrides.”You will hear a
clicking sound from the winch
when the tire is properly stowed.
The wrench will then become
easier to turn. The winch handle
ratchets (clicks) when the tire is
raised to the stowed position. It
will not allow you to overtighten.
4. Remove the tools from the winch and reinstall the access plug.
Disassemble the tools and snap them back into the tool tray. Reinstall
the tray into the vehicle and secure it with the wing nut by turning the
wing nut until tight.
JUMP STARTING YOUR VEHICLE
The gases around the battery can explode if exposed to flames,
sparks, or lit cigarettes. An explosion could result in injury or
vehicle damage.
Batteries contain sulfuric acid which can burn skin, eyes, and
clothing, if contacted.
Do not attempt to push-start your vehicle. Automatic
transmissions do not have push-start capability; also, the
catalytic converter may become damaged.
Roadside Emergencies
241
Page 296 of 320
The traction grade assigned to this tire is based on
straight-ahead braking traction tests, and does not include
acceleration, cornering, hydroplaning or peak traction characteristics.
Temperature A B C
The temperature grades are A (the highest), B and C, representing the
tire’s resistance to the generation of heat and its ability to dissipate heat
when tested under controlled conditions on a specified indoor laboratory
test wheel. Sustained high temperature can cause the material of the tire
to degenerate and reduce tire life, and excessive temperature can lead to
sudden tire failure. The grade C corresponds to a level of performance
which all passenger car tires must meet under the Federal Motor Vehicle
Safety Standard No. 109. Grades B and A represent higher levels of
performance on the laboratory test wheel than the minimum required by
law.
The temperature grade for this tire is established for a tire that
is properly inflated and not overloaded. Excessive speed,
underinflation, or excessive loading, either separately or in
combination, can cause heat buildup and possible tire failure.
SERVICING YOUR TIRES
Checking the tire pressure
•Use an accurate tire pressure gauge.
•Check the tire pressure when tires arecold,after the vehicle has
been parked for at least 3 hours or has been driven less than 5 km (3
miles). As you drive, the temperature in the tire warms up, increasing
the tire pressure.
•Adjust tire pressure to recommended specifications found on the
Certification Label. Tire pressure information can also be found on the
Tire Information label located on the inside of the fuel filler door.
•Check tires for proper air pressure monthly. Check spare tire for
proper air pressure every six months.
Improperly inflated tires can affect vehicle handling and can fail
suddenly, possibly resulting in loss of vehicle control.
Maintenance and Specifications
296
Page 318 of 320
opening the trunk ...................130
panic alarm .............................130
replacement/additional
transmitters .............................132
replacing the batteries ...........132
Reverse sensing system ...........206
Roadside assistance ..................227
Roof rack ...................................127
S
Safety belts (see Safety
restraints) ............14, 155, 158–162
Safety Canopy ...........................173
Safety defects, reporting ..........258
Safety restraints ........155, 158–162
belt minder .............................164
extension assembly ................167
for adults .........................159–161
for children .....................176–177
lap belt ....................................163
warning light and
chime ...................12, 14, 163–164
Safety seats for children ..........180
Seat belts
(see Safety restraints) .............155
Seats ..........................................141
child safety seats ....................180
climate control ........................144
memory seat ...................131, 144
SecuriLock passive
anti-theft system ...............137–139
Servicing your vehicle ..............265
Snowplowing .................................7
Spare tire (see Changing
the Tire) ....................................236Spark plugs,
specifications .....................300, 305
Special notice
utility-type vehicles ....................7
Specification chart,
lubricants ...........................303, 305
Speed control ............................103
Speedometer ...............................17
Starting your vehicle ........191–193
jump starting ..........................241
Steering
speed sensitive .......................198
Steering wheel
controls ............................103, 106
T
Tachometer .................................18
Tire warning ..............................298
Tires ...................236, 295–296, 298
changing ..........................236, 238
checking the pressure ............296
replacing ..................................297
rotating ....................................297
snow tires and chains ............299
tire grades ...............................296
treadwear ................................295
Towing .......................................221
recreational towing .................226
trailer towing ..........................221
wrecker ....................................247
Traction control
active light ................................12
Transmission .............................202
fluid, checking and adding
(automatic) .............................291
fluid, refill capacities ..............300
Index
318