headlamp FORD EXPEDITION 2014 3.G User Guide
[x] Cancel search | Manufacturer: FORD, Model Year: 2014, Model line: EXPEDITION, Model: FORD EXPEDITION 2014 3.GPages: 519, PDF Size: 6.9 MB
Page 287 of 519
ADJUSTING THE HEADLAMPS
The headlamps on your vehicle are properly aimed at the assembly plant.
If your vehicle has been in an accident, an authorized dealer should
check the alignment of your headlamps.
Vertical Aim Adjustment
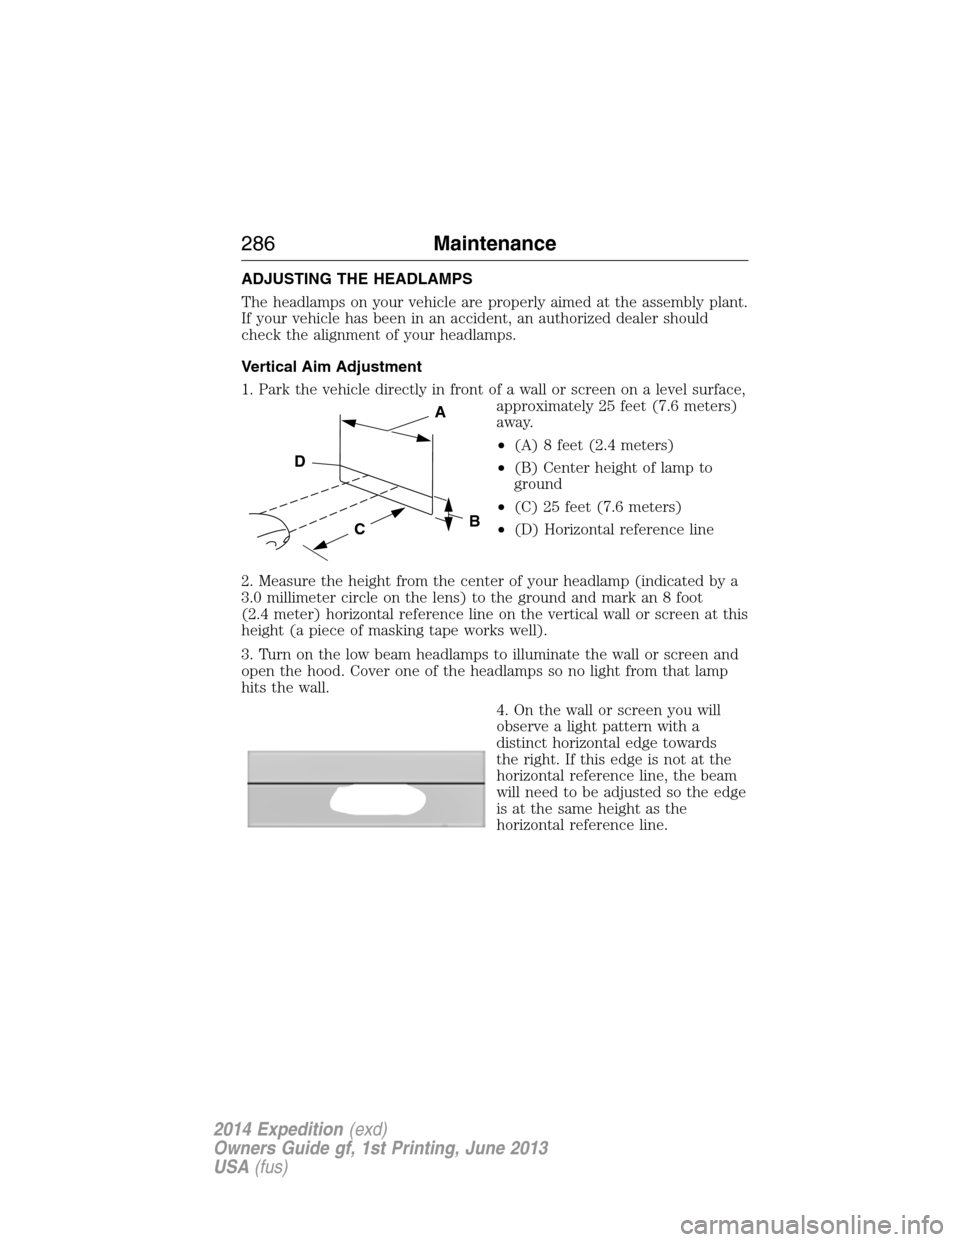
1. Park the vehicle directly in front of a wall or screen on a level surface,
approximately 25 feet (7.6 meters)
away.
•(A) 8 feet (2.4 meters)
•(B) Center height of lamp to
ground
•(C) 25 feet (7.6 meters)
•(D) Horizontal reference line
2. Measure the height from the center of your headlamp (indicated by a
3.0 millimeter circle on the lens) to the ground and mark an 8 foot
(2.4 meter) horizontal reference line on the vertical wall or screen at this
height (a piece of masking tape works well).
3. Turn on the low beam headlamps to illuminate the wall or screen and
open the hood. Cover one of the headlamps so no light from that lamp
hits the wall.
4. On the wall or screen you will
observe a light pattern with a
distinct horizontal edge towards
the right. If this edge is not at the
horizontal reference line, the beam
will need to be adjusted so the edge
is at the same height as the
horizontal reference line.
C
A
B
D
286Maintenance
2014 Expedition(exd)
Owners Guide gf, 1st Printing, June 2013
USA(fus)
Page 288 of 519
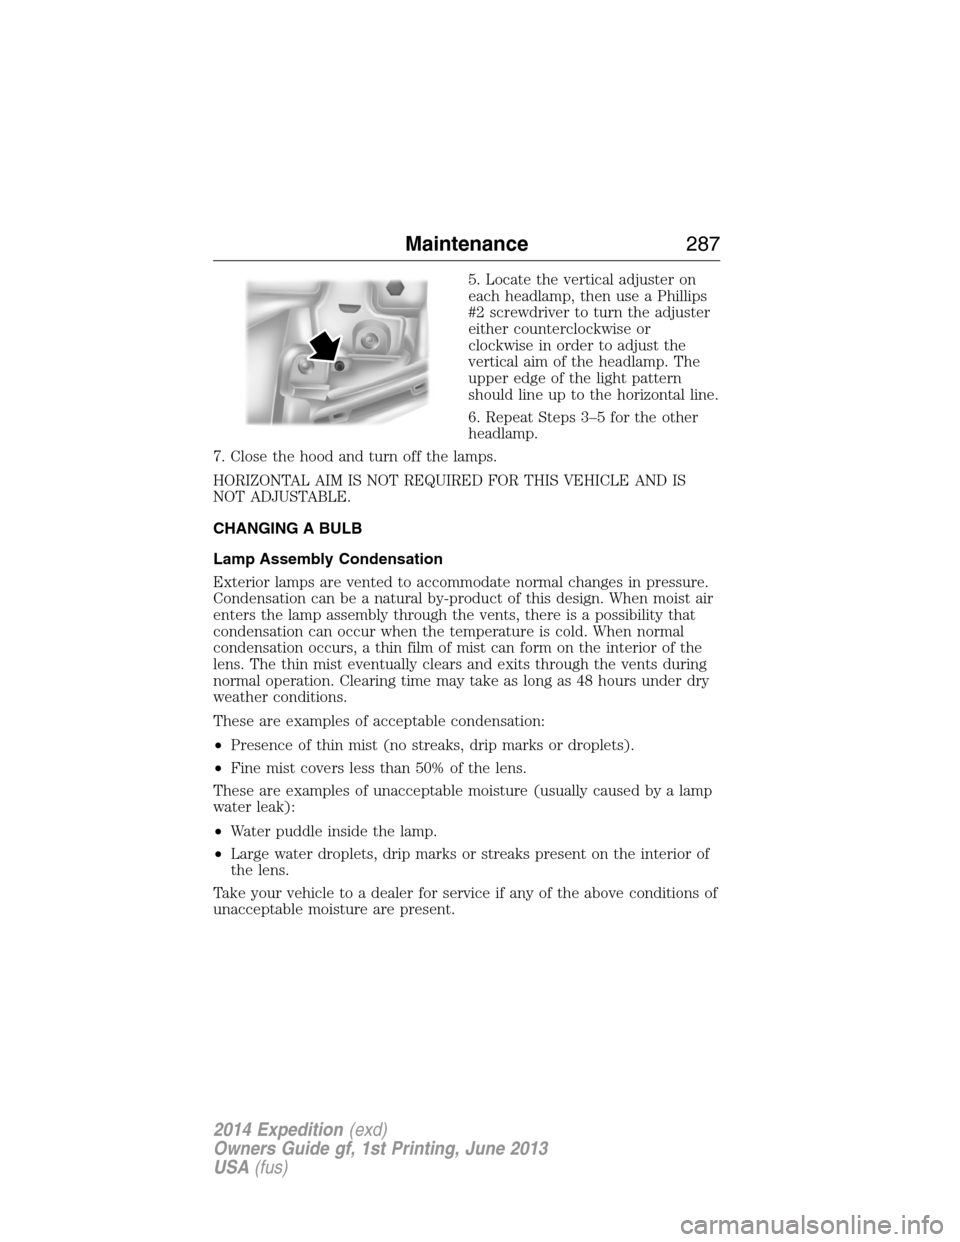
5. Locate the vertical adjuster on
each headlamp, then use a Phillips
#2 screwdriver to turn the adjuster
either counterclockwise or
clockwise in order to adjust the
vertical aim of the headlamp. The
upper edge of the light pattern
should line up to the horizontal line.
6. Repeat Steps 3–5 for the other
headlamp.
7. Close the hood and turn off the lamps.
HORIZONTAL AIM IS NOT REQUIRED FOR THIS VEHICLE AND IS
NOT ADJUSTABLE.
CHANGING A BULB
Lamp Assembly Condensation
Exterior lamps are vented to accommodate normal changes in pressure.
Condensation can be a natural by-product of this design. When moist air
enters the lamp assembly through the vents, there is a possibility that
condensation can occur when the temperature is cold. When normal
condensation occurs, a thin film of mist can form on the interior of the
lens. The thin mist eventually clears and exits through the vents during
normal operation. Clearing time may take as long as 48 hours under dry
weather conditions.
These are examples of acceptable condensation:
•Presence of thin mist (no streaks, drip marks or droplets).
•Fine mist covers less than 50% of the lens.
These are examples of unacceptable moisture (usually caused by a lamp
water leak):
•Water puddle inside the lamp.
•Large water droplets, drip marks or streaks present on the interior of
the lens.
Take your vehicle to a dealer for service if any of the above conditions of
unacceptable moisture are present.
Maintenance287
2014 Expedition(exd)
Owners Guide gf, 1st Printing, June 2013
USA(fus)
Page 289 of 519
Replacing Headlamp Bulbs
WARNING:Handle a halogen headlamp bulb carefully and keep
out of children’s reach. Grasp the bulb only by its plastic base
and do not touch the glass. The oil from your hand could cause the
bulb to break the next time the headlamps are operated.
1. Make sure that the headlamp control is in the off position.
2. Open the hood.
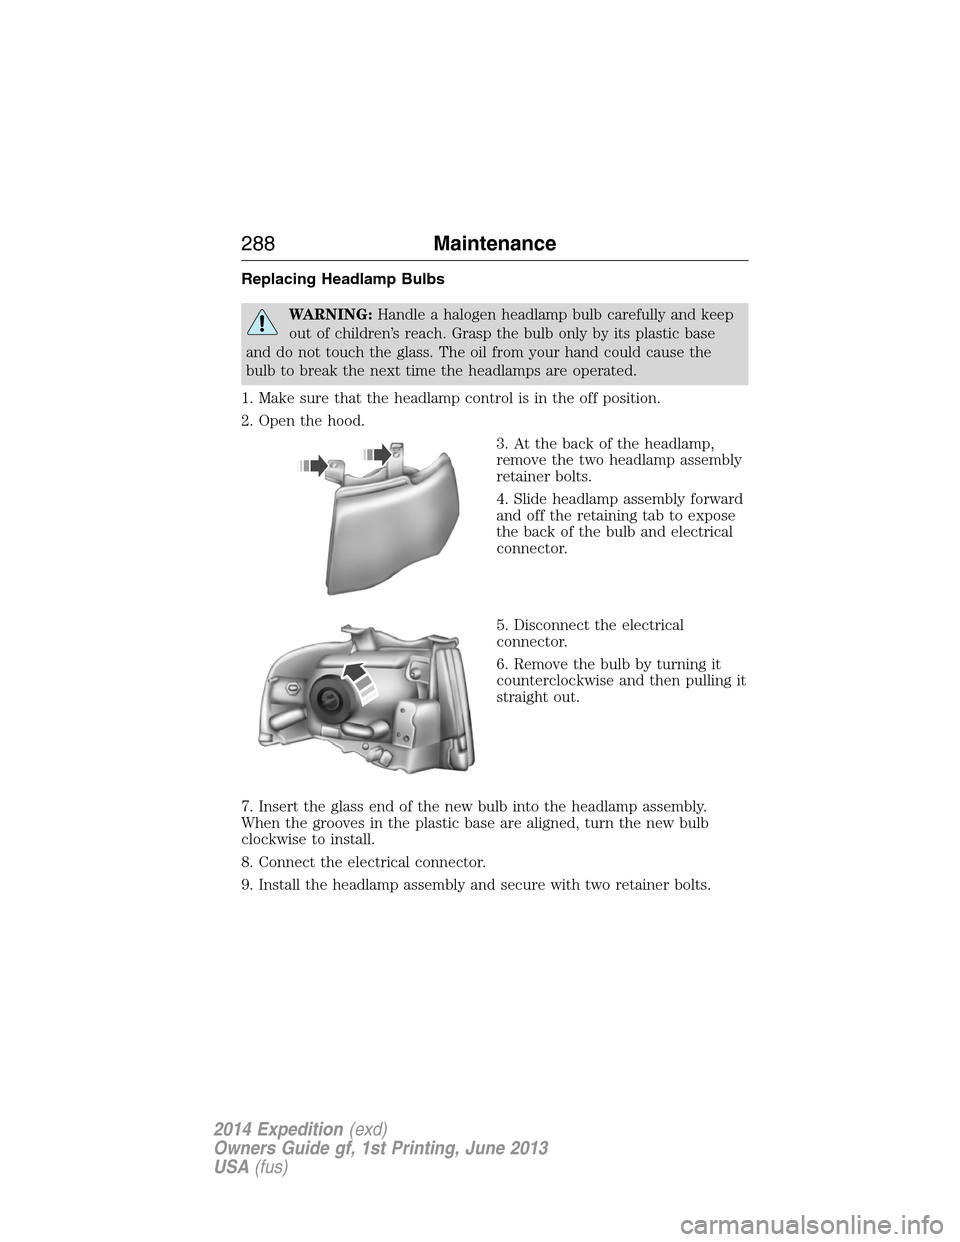
3. At the back of the headlamp,
remove the two headlamp assembly
retainer bolts.
4. Slide headlamp assembly forward
and off the retaining tab to expose
the back of the bulb and electrical
connector.
5. Disconnect the electrical
connector.
6. Remove the bulb by turning it
counterclockwise and then pulling it
straight out.
7. Insert the glass end of the new bulb into the headlamp assembly.
When the grooves in the plastic base are aligned, turn the new bulb
clockwise to install.
8. Connect the electrical connector.
9. Install the headlamp assembly and secure with two retainer bolts.
288Maintenance
2014 Expedition(exd)
Owners Guide gf, 1st Printing, June 2013
USA(fus)
Page 290 of 519
Replacing Front Parking Lamp, Turn Signal, and Side Marker Bulbs
1. Make sure that the headlamp control is in the off position.
2. Open the hood.
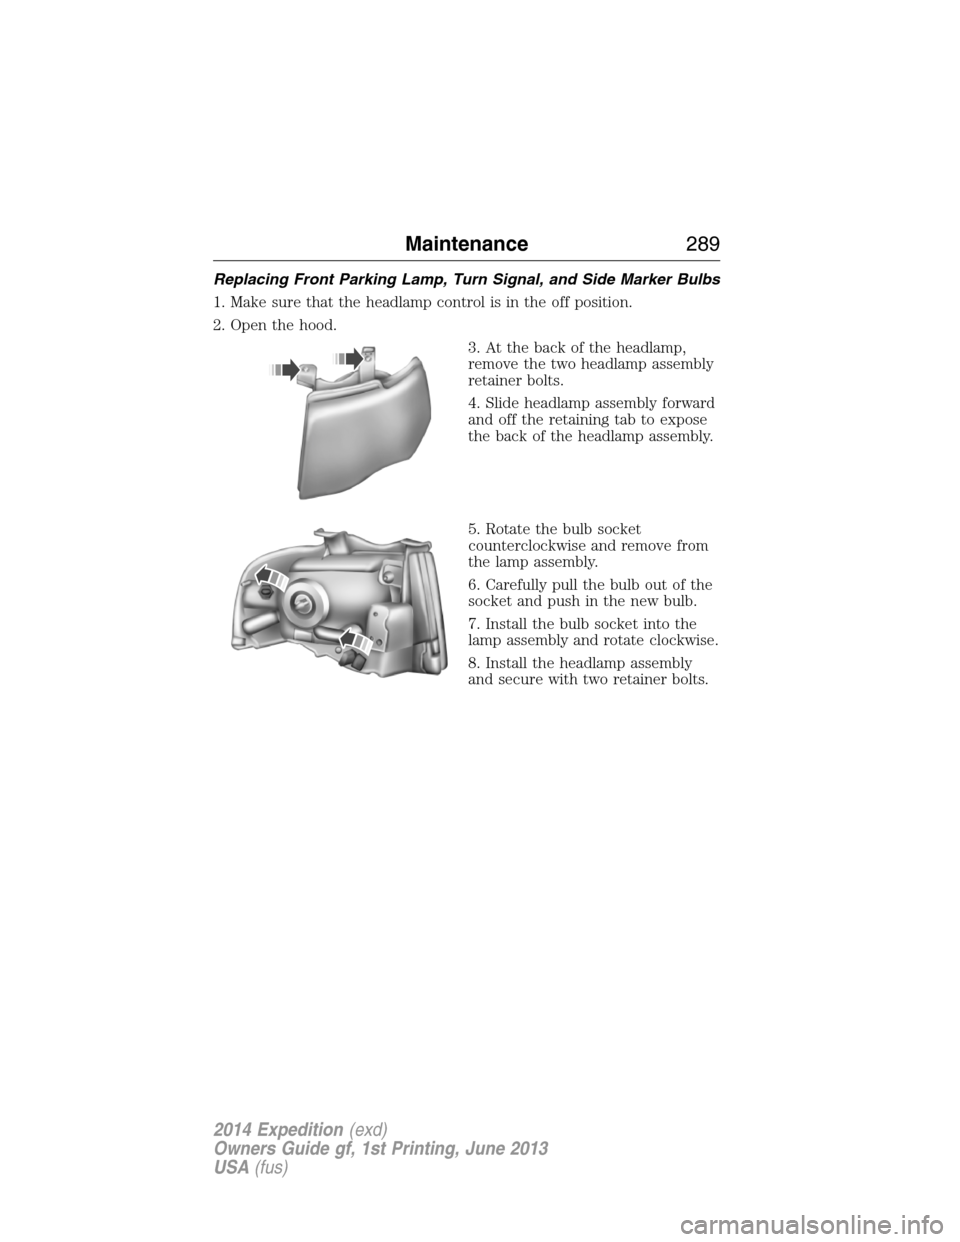
3. At the back of the headlamp,
remove the two headlamp assembly
retainer bolts.
4. Slide headlamp assembly forward
and off the retaining tab to expose
the back of the headlamp assembly.
5. Rotate the bulb socket
counterclockwise and remove from
the lamp assembly.
6. Carefully pull the bulb out of the
socket and push in the new bulb.
7. Install the bulb socket into the
lamp assembly and rotate clockwise.
8. Install the headlamp assembly
and secure with two retainer bolts.
Maintenance289
2014 Expedition(exd)
Owners Guide gf, 1st Printing, June 2013
USA(fus)
Page 291 of 519
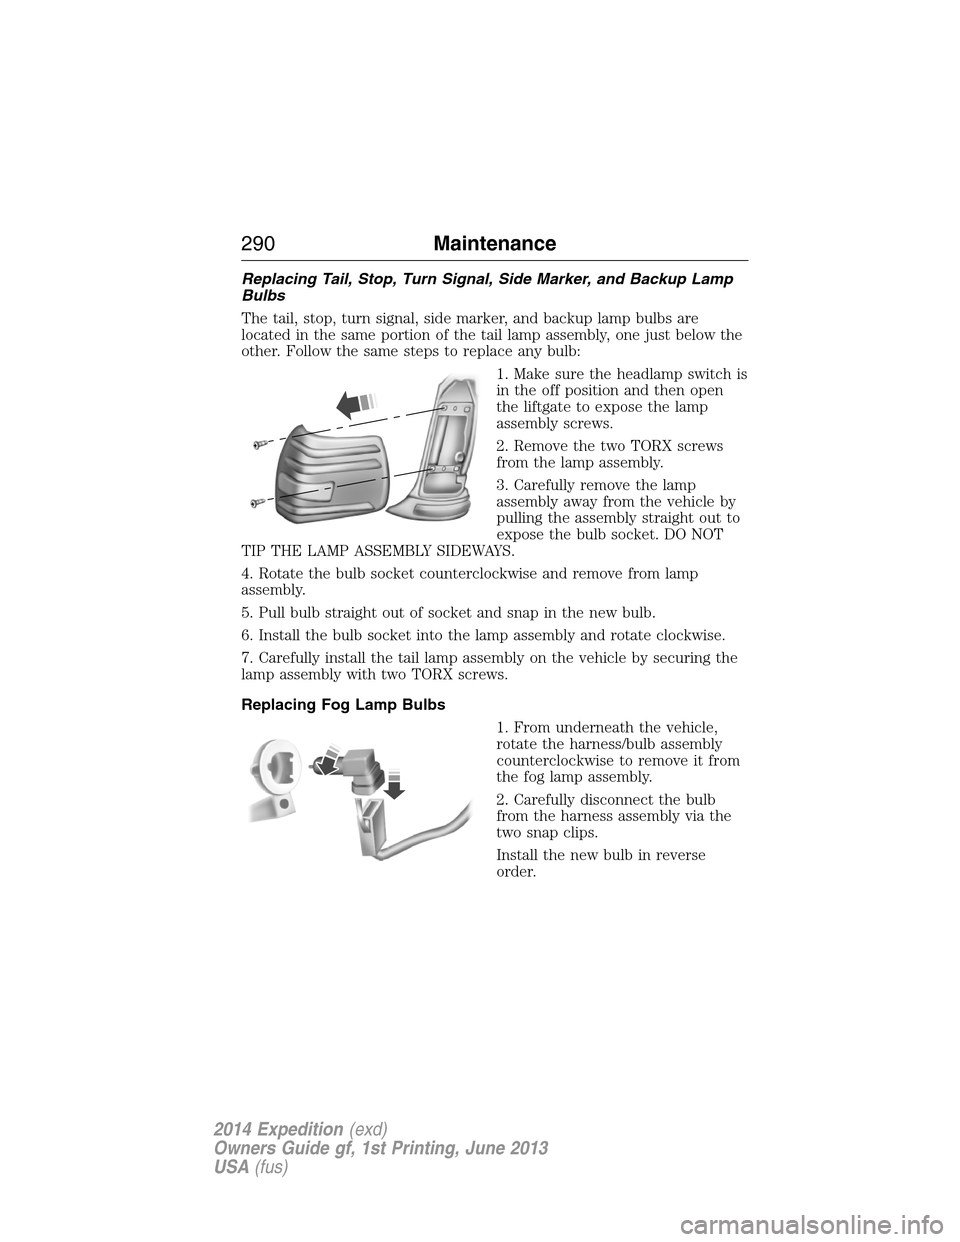
Replacing Tail, Stop, Turn Signal, Side Marker, and Backup Lamp
Bulbs
The tail, stop, turn signal, side marker, and backup lamp bulbs are
located in the same portion of the tail lamp assembly, one just below the
other. Follow the same steps to replace any bulb:
1. Make sure the headlamp switch is
in the off position and then open
the liftgate to expose the lamp
assembly screws.
2. Remove the two TORX screws
from the lamp assembly.
3. Carefully remove the lamp
assembly away from the vehicle by
pulling the assembly straight out to
expose the bulb socket. DO NOT
TIP THE LAMP ASSEMBLY SIDEWAYS.
4. Rotate the bulb socket counterclockwise and remove from lamp
assembly.
5. Pull bulb straight out of socket and snap in the new bulb.
6. Install the bulb socket into the lamp assembly and rotate clockwise.
7. Carefully install the tail lamp assembly on the vehicle by securing the
lamp assembly with two TORX screws.
Replacing Fog Lamp Bulbs
1. From underneath the vehicle,
rotate the harness/bulb assembly
counterclockwise to remove it from
the fog lamp assembly.
2. Carefully disconnect the bulb
from the harness assembly via the
two snap clips.
Install the new bulb in reverse
order.
290Maintenance
2014 Expedition(exd)
Owners Guide gf, 1st Printing, June 2013
USA(fus)
Page 292 of 519
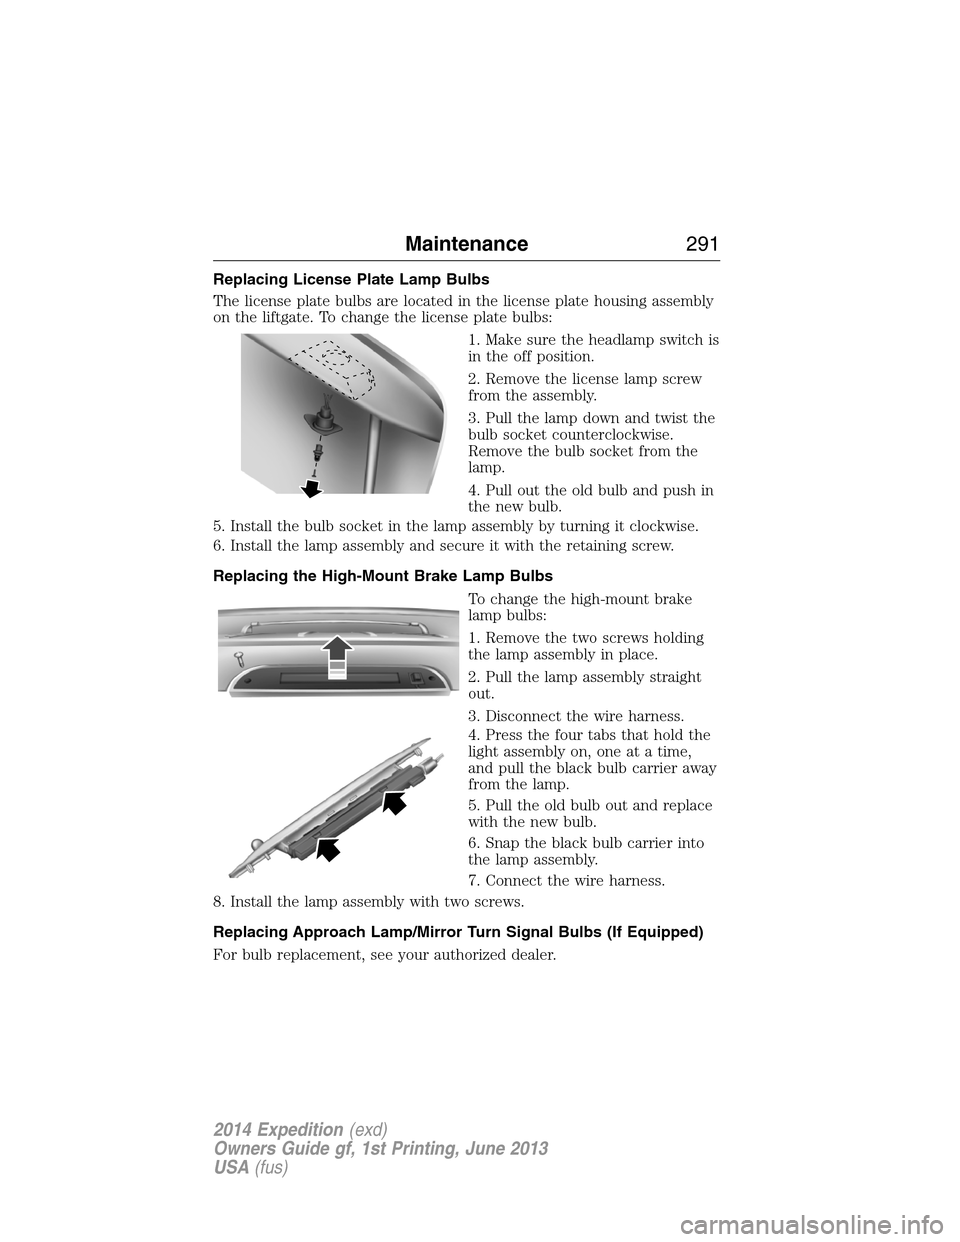
Replacing License Plate Lamp Bulbs
The license plate bulbs are located in the license plate housing assembly
on the liftgate. To change the license plate bulbs:
1. Make sure the headlamp switch is
in the off position.
2. Remove the license lamp screw
from the assembly.
3. Pull the lamp down and twist the
bulb socket counterclockwise.
Remove the bulb socket from the
lamp.
4. Pull out the old bulb and push in
the new bulb.
5. Install the bulb socket in the lamp assembly by turning it clockwise.
6. Install the lamp assembly and secure it with the retaining screw.
Replacing the High-Mount Brake Lamp Bulbs
To change the high-mount brake
lamp bulbs:
1. Remove the two screws holding
the lamp assembly in place.
2. Pull the lamp assembly straight
out.
3. Disconnect the wire harness.
4. Press the four tabs that hold the
light assembly on, one at a time,
and pull the black bulb carrier away
from the lamp.
5. Pull the old bulb out and replace
with the new bulb.
6. Snap the black bulb carrier into
the lamp assembly.
7. Connect the wire harness.
8. Install the lamp assembly with two screws.
Replacing Approach Lamp/Mirror Turn Signal Bulbs (If Equipped)
For bulb replacement, see your authorized dealer.
Maintenance291
2014 Expedition(exd)
Owners Guide gf, 1st Printing, June 2013
USA(fus)
Page 293 of 519
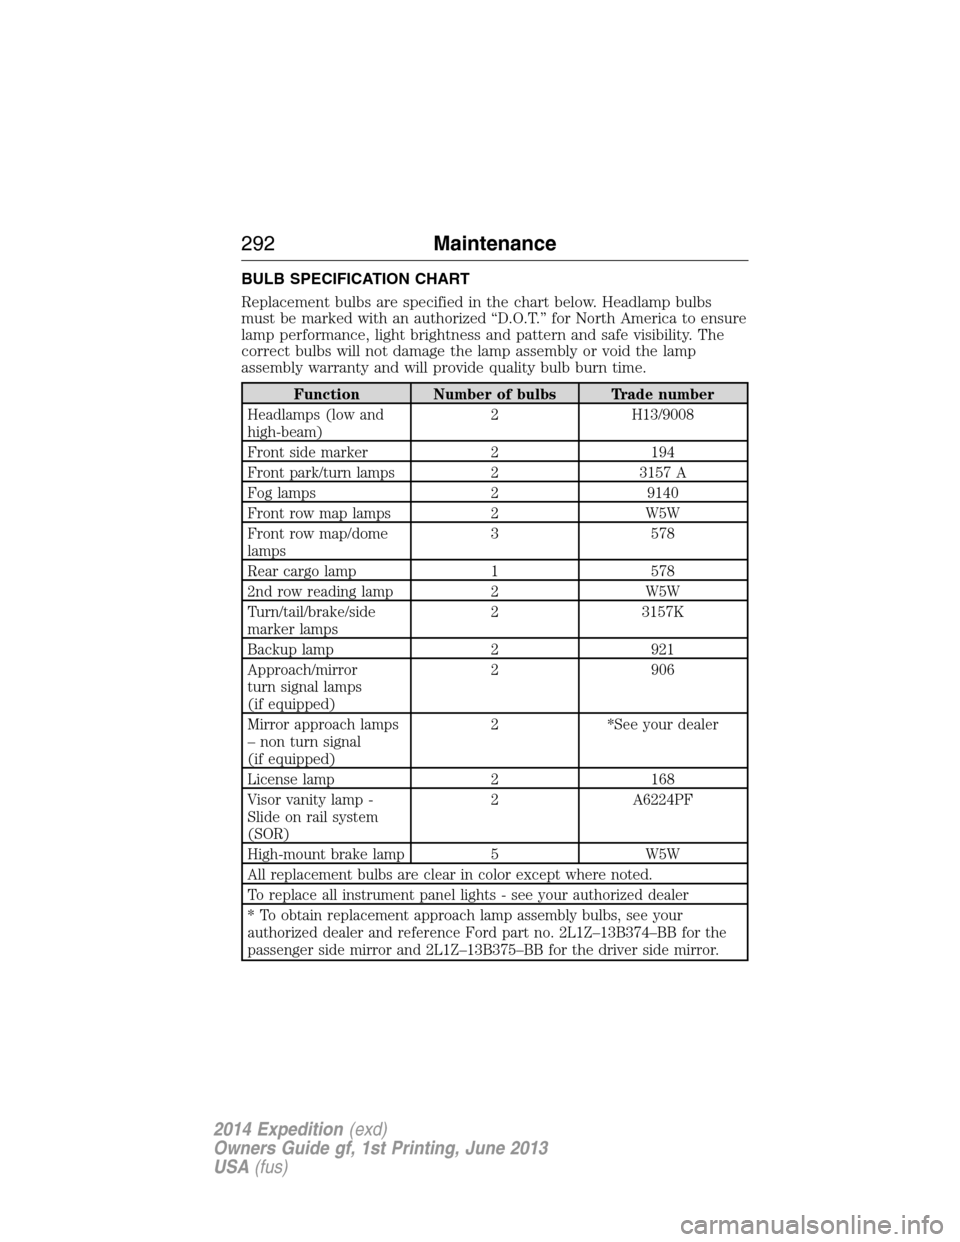
BULB SPECIFICATION CHART
Replacement bulbs are specified in the chart below. Headlamp bulbs
must be marked with an authorized “D.O.T.” for North America to ensure
lamp performance, light brightness and pattern and safe visibility. The
correct bulbs will not damage the lamp assembly or void the lamp
assembly warranty and will provide quality bulb burn time.
Function Number of bulbs Trade number
Headlamps (low and
high-beam)2 H13/9008
Front side marker 2 194
Front park/turn lamps 2 3157 A
Fog lamps 2 9140
Front row map lamps 2 W5W
Front row map/dome
lamps3 578
Rear cargo lamp 1 578
2nd row reading lamp 2 W5W
Turn/tail/brake/side
marker lamps2 3157K
Backup lamp 2 921
Approach/mirror
turn signal lamps
(if equipped)2 906
Mirror approach lamps
– non turn signal
(if equipped)2 *See your dealer
License lamp 2 168
Visor vanity lamp -
Slide on rail system
(SOR)2 A6224PF
High-mount brake lamp 5 W5W
All replacement bulbs are clear in color except where noted.
To replace all instrument panel lights - see your authorized dealer
* To obtain replacement approach lamp assembly bulbs, see your
authorized dealer and reference Ford part no. 2L1Z–13B374–BB for the
passenger side mirror and 2L1Z–13B375–BB for the driver side mirror.
292Maintenance
2014 Expedition(exd)
Owners Guide gf, 1st Printing, June 2013
USA(fus)
Page 434 of 519
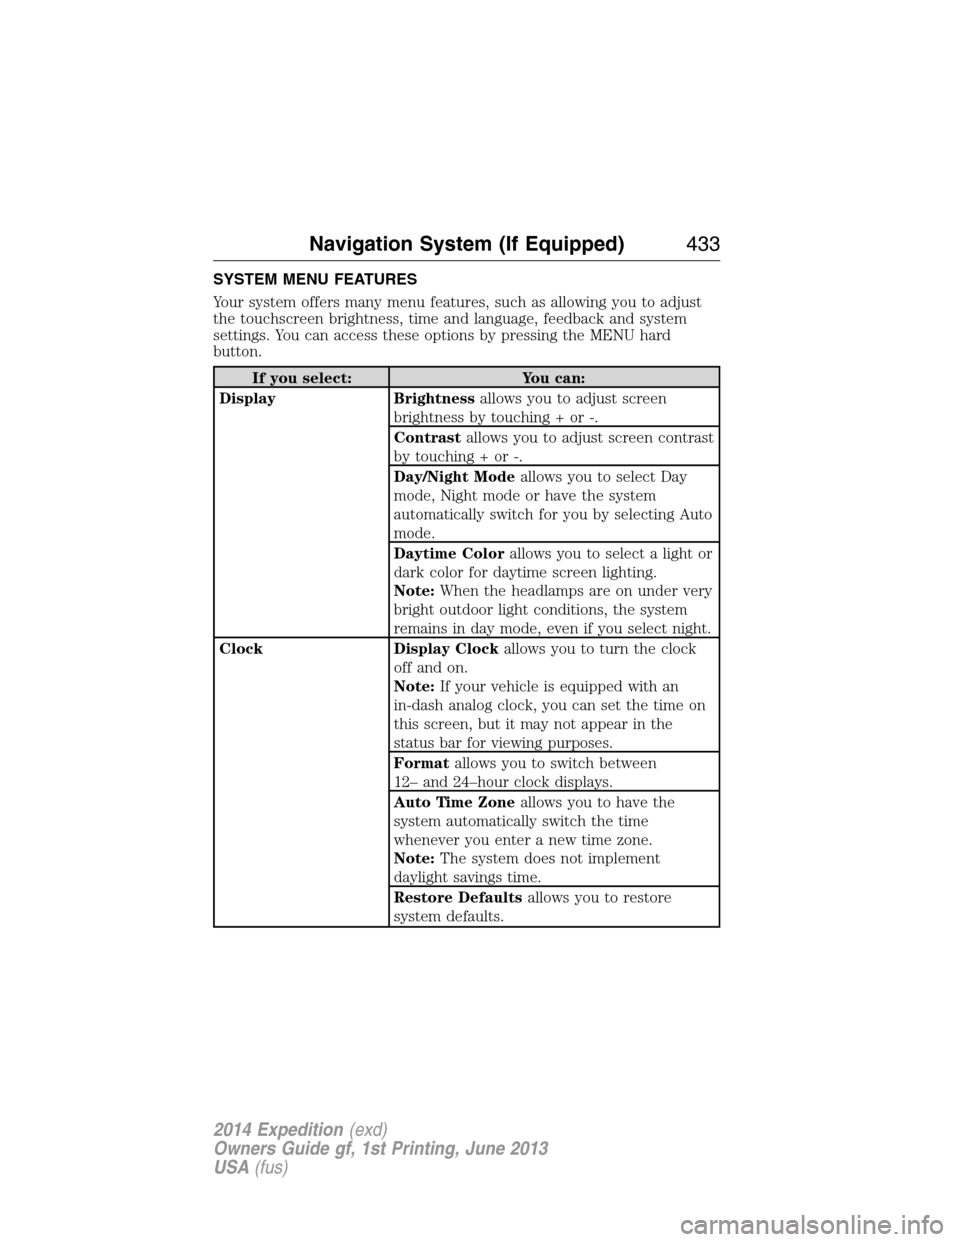
SYSTEM MENU FEATURES
Your system offers many menu features, such as allowing you to adjust
the touchscreen brightness, time and language, feedback and system
settings. You can access these options by pressing the MENU hard
button.
If you select: You can:
Display Brightnessallows you to adjust screen
brightness by touching + or -.
Contrastallows you to adjust screen contrast
by touching + or -.
Day/Night Modeallows you to select Day
mode, Night mode or have the system
automatically switch for you by selecting Auto
mode.
Daytime Colorallows you to select a light or
dark color for daytime screen lighting.
Note:When the headlamps are on under very
bright outdoor light conditions, the system
remains in day mode, even if you select night.
Clock Display Clockallows you to turn the clock
off and on.
Note:If your vehicle is equipped with an
in-dash analog clock, you can set the time on
this screen, but it may not appear in the
status bar for viewing purposes.
Formatallows you to switch between
12– and 24–hour clock displays.
Auto Time Zoneallows you to have the
system automatically switch the time
whenever you enter a new time zone.
Note:The system does not implement
daylight savings time.
Restore Defaultsallows you to restore
system defaults.
Navigation System (If Equipped)433
2014 Expedition(exd)
Owners Guide gf, 1st Printing, June 2013
USA(fus)
Page 515 of 519
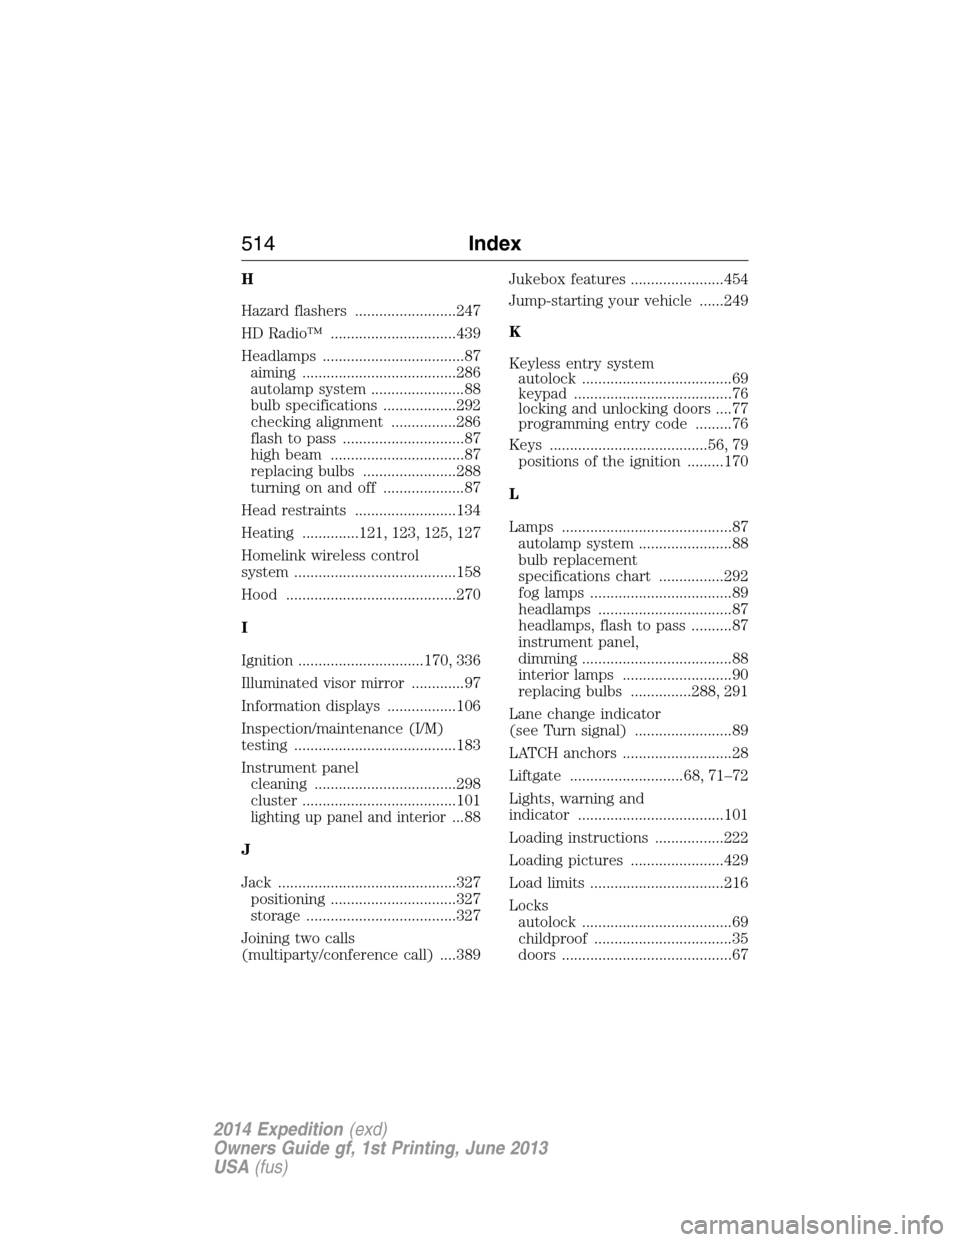
H
Hazard flashers .........................247
HD Radio™ ...............................439
Headlamps ...................................87
aiming ......................................286
autolamp system .......................88
bulb specifications ..................292
checking alignment ................286
flash to pass ..............................87
high beam .................................87
replacing bulbs .......................288
turning on and off ....................87
Head restraints .........................134
Heating ..............121, 123, 125, 127
Homelink wireless control
system ........................................158
Hood ..........................................270
I
Ignition ...............................170, 336
Illuminated visor mirror .............97
Information displays .................106
Inspection/maintenance (I/M)
testing ........................................183
Instrument panel
cleaning ...................................298
cluster ......................................101
lighting up panel and interior...88
J
Jack ............................................327
positioning ...............................327
storage .....................................327
Joining two calls
(multiparty/conference call) ....389Jukebox features .......................454
Jump-starting your vehicle ......249
K
Keyless entry system
autolock .....................................69
keypad .......................................76
locking and unlocking doors ....77
programming entry code .........76
Keys .......................................56, 79
positions of the ignition .........170
L
Lamps ..........................................87
autolamp system .......................88
bulb replacement
specifications chart ................292
fog lamps ...................................89
headlamps .................................87
headlamps, flash to pass ..........87
instrument panel,
dimming .....................................88
interior lamps ...........................90
replacing bulbs ...............288, 291
Lane change indicator
(see Turn signal) ........................89
LATCH anchors ...........................28
Liftgate ............................68, 71–72
Lights, warning and
indicator ....................................101
Loading instructions .................222
Loading pictures .......................429
Load limits .................................216
Locks
autolock .....................................69
childproof ..................................35
doors ..........................................67
514Index
2014 Expedition(exd)
Owners Guide gf, 1st Printing, June 2013
USA(fus)