ECO mode FORD EXPEDITION 2014 3.G Quick Reference Guide
[x] Cancel search | Manufacturer: FORD, Model Year: 2014, Model line: EXPEDITION, Model: FORD EXPEDITION 2014 3.GPages: 8, PDF Size: 0.79 MB
Page 3 of 8

page 5 page 4
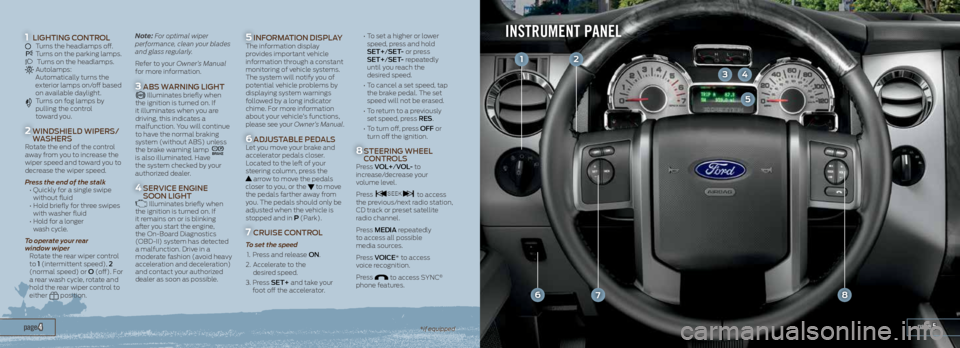
INSTRUMENT PANEL
*if equipped
6
12
34
5
78
1
2
3
4
5
6
7
8
LighTing C
OnTROL Turns the headlamps off. Turns on the parking lamps. Turns on the headlamps. Autolamps:
Automatically turns the
exterior lamps on/off based
on available daylight.
Turns on fog lamps by
pulling the control
toward you.
WinDShiELD WiPERS/
WAShERS
Rotate the end of the control
away from you to increase the
wiper speed and toward you to
decrease the wiper speed.
Press the end of the stalk
• Quickly for a single swipe
without fluid
• Hold briefly for three swipes
with washer fluid
• Hold for a longer
wash cycle.
To operate your rear
window wiper
Rotate the rear wiper control
to 1 (intermittent speed), 2
(normal speed) or O (off). For
a rear wash cycle, rotate and
hold the rear wiper control to
either
position. Note:
For optimal wiper
performance, clean your blades
and glass regularly.
Refer to your Owner’s Manual
for more information.
ABS W ARning LighTIlluminates briefly when
the ignition is turned on. If
it illuminates when you are
driving, this indicates a
malfunction. You will continue
to have the normal braking
system (without ABS) unless
the brake warning lamp
is also illuminated. Have
the system checked by your
authorized dealer.
SERViCE EnginE
SOOn LighT
Illuminates briefly when
the ignition is turned on. If
it remains on or is blinking
after you start the engine,
the On-Board Diagnostics
(OBD-II) system has detected
a malfunction. Drive in a
moderate fashion (avoid heavy
acceleration and deceleration)
and contact your authorized
dealer as soon as possible.
inFORMATiOn DiSPLAYThe information display
provides important vehicle
information through a constant
monitoring of vehicle systems.
The system will notify you of
potential vehicle problems by
displaying system warnings
followed by a long indicator
chime. For more information
about your vehicle’s functions,
please see your Owner’s Manual.
ADJUSTABLE PEDALS
Let you move your brake and
accelerator pedals closer.
Located to the left of your
steering column, press the
arrow to move the pedals
closer to you, or the to move
the pedals farther away from
you. The pedals should only be
adjusted when the vehicle is
stopped and in P (Park).
CRUiSE COnTROL
To set the speed
1. Press and release On.
2. Accelerate to the
desired speed.
3. Press SET+ and take your
foot off the accelerator.
•
To set a higher or lower
speed, press and hold
SET+/SET- or press
SET+/SET- repeatedly
until you reach the
desired speed.
• To cancel a set speed, tap
the brake pedal. The set
speed will not be erased.
• To return to a previously
set speed, press RES .
• To turn off, press OFF or
turn off the ignition.
STEERing WhEEL
COnTROLS
Press VOL+/VOL- to
increase/decrease your
volume level.
Press
to access
the previous/next radio station,
CD track or preset satellite
radio channel.
Press MEDiA repeatedly
to access all possible
media sources.
Press VOiCE* to access
voice recognition.
Press
to access SYNC®
phone features.
Page 4 of 8

page 7page 613*if equipped
910
11
12
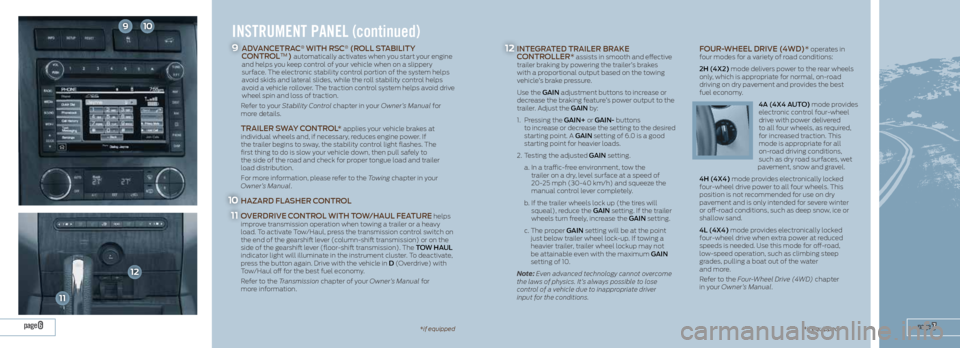
INSTRUMENT PANEL (continued)
ADVAnCETRAC® WiTh RSC® (ROLL STABiLiTY
COnTROL™) automatically activates when you start your engine
and helps you keep control of your vehicle when on a slippery
surface. The electronic stability control portion of the system helps
avoid skids and lateral slides, while the roll stability control helps
avoid a vehicle rollover. The traction control system helps avoid drive
wheel spin and loss of traction.
Refer to your Stability Control chapter in your Owner’s Manual for
more details.
TRAiLER SWAY COnTROL * applies your vehicle brakes at
individual wheels and, if necessary, reduces engine power. If
the trailer begins to sway, the stability control light flashes. The
first thing to do is slow your vehicle down, then pull safely to
the side of the road and check for proper tongue load and trailer
load distribution.
For more information, please refer to the Towing chapter in your
Owner’s Manual.
hAZARD FLAShER COnTROL
OVERDRiVE COnTROL WiTh TOW/hAUL FEATURE helps
improve transmission operation when towing a trailer or a heavy
load. To activate Tow/Haul, press the transmission control switch on
the end of the gearshift lever (column-shift transmission) or on the
side of the gearshift lever (floor-shift transmission). The TOW hAUL
indicator light will illuminate in the instrument cluster. To deactivate,
press the button again. Drive with the vehicle in D (Overdrive) with
Tow/Haul off for the best fuel economy.
Refer to the Transmission chapter of your Owner’s Manual for
more information.
inTE
gRATED TRAiLER BRAKE
COnTROLLER* assists in smooth and effective
trailer braking by powering the trailer’s brakes
with a proportional output based on the towing
vehicle’s brake pressure.
Use the gAin adjustment buttons to increase or
decrease the braking feature’s power output to the
trailer. Adjust the g Ain by:
1. Pressing the gAin+ or g Ain- buttons
to increase or decrease the setting to the desired
starting point. A g Ain setting of 6.0 is a good
starting point for heavier loads.
2. Testing the adjusted g Ain setting.
a. In a traffic-free environment, tow the
trailer on a dry, level surface at a speed of
20-25 mph (30-40 km/h) and squeeze the
manual control lever completely.
b. If the trailer wheels lock up (the tires will
squeal), reduce the g Ain setting. If the trailer
wheels turn freely, increase the g Ain setting.
c. The proper gAin setting will be at the point
just below trailer wheel lock-up. If towing a
heavier trailer, trailer wheel lockup may not
be attainable even with the maximum g Ain
setting of 10.
Note: Even advanced technology cannot overcome
the laws of physics. It’s always possible to lose
control of a vehicle due to inappropriate driver
input for the conditions. FOUR-WhEEL DRiVE (4WD)* operates in
four modes for a variety of road conditions:
2h (4X2) mode delivers power to the rear wheels
only, which is appropriate for normal, on-road
driving on dry pavement and provides the best
fuel economy.
4A (4X4 AUTO) mode provides
electronic control four-wheel
drive with power delivered
to all four wheels, as required,
for increased traction. This
mode is appropriate for all
on-road driving conditions,
such as dry road surfaces, wet
pavement, snow and gravel.
4h (4X4) mode provides electronically locked
four-wheel drive power to all four wheels. This
position is not recommended for use on dry
pavement and is only intended for severe winter
or off-road conditions, such as deep snow, ice or
shallow sand.
4L (4X4) mode provides electronically locked
four-wheel drive when extra power at reduced
speeds is needed. Use this mode for off-road,
low-speed operation, such as climbing steep
grades, pulling a boat out of the water
and more.
Refer to the Four-Wheel Drive (4WD) chapter
in your Owner’s Manual.9
10
11
12
*if equipped
Page 5 of 8

USing mY Phone wiTh SYnc
Note: Enter your phone book contacts
with both first and last names to increase
SYNC’s ability to select the correct contact.
Remember to say the contact name exactly
as it is listed in your phone book.
Making a phone call: Use SYNC to make
a phone call to anyone in your phone book
by pressing the VOiCE button and when
prompted, give a voice command. For
example, you could say “Call Jake Smith
at home”. When the system confirms the
number, say “Dial” to initiate the call.
Note: You can also make phone calls by
pressing the VOICE button. When prompted,
give the voice command “Dial”, and then
verbally say the phone number.
Answering incoming calls: Whenever you
have an incoming call, you will be able to
see the name and number of the person
calling in your display. Press the phone
button to answer an incoming call. You can
hang up at any time by pressing and holding
the phone button.
Do not disturb mode: This feature blocks
incoming calls and text messages, and
saves them for later. You still have access
to outgoing calls when this feature is active.
Say the voice command “Do not disturb on”
to enable and “Do not disturb off”
to disable.
USing SYnc To acceSS digiTaL media
SYNC allows you to plug in your USB-
compatible media devices such as phones
and MP3 players, and use SYNC to play all
of your favorite music.
Note: SYNC indexes all of your music. The
more music that is stored on your device, the
longer it takes SYNC to index.
Using voice commands to play music
1. Plug your media player into your USB port.
2. Press the VOiCE button. When prompted,
say “USB”, then follow-up by saying one
of the voice commands. For a list of voice
commands, say “What can I say?” .
SYnc aPPLink™*
SYNC AppLink allows your voice access to
select mobile applications that you already
have or can download to your Android™,
BlackBerry
® or iPhone®.
Current apps available include Pandora
Internet Radio
®, Stitcher Smart Radio™,
Open Beak (BlackBerry exclusive),
iHeartRadio, Slacker, NPR News, SYNC
Destinations and more. Some services
may not be available in your area. For
more information, visit the website or call
the toll-free number. See the inside front
cover of this guide for details.
page 9
SYNC®
geTTing ST arTed wiTh
YoUr SYnc SYSTem
SYNC is a hands-free, voice recognition
system used for entertainment,
information and communication.
SYNC. Say the Word.
generaL TiPS
• Press the radio system seek down
arrow to exit a current menu.
• For additional support, refer to your
Owner’s Manual, visit the website or
call the toll-free number. See the inside
front cover of this guide for details.
Before you get started
1. Set up your owner account at
SyncMyRide.com (U.S.) or
SyncMyRide.ca (Canada). Register by
following the on-screen instructions.
After registering, you can see what
services you may be eligible for.
2. SYNC uses a wireless connection called
Bluetooth® to communicate with your
phone. Turn Bluetooth mode on in your
phone’s menu options. This lets your
phone find SYNC.
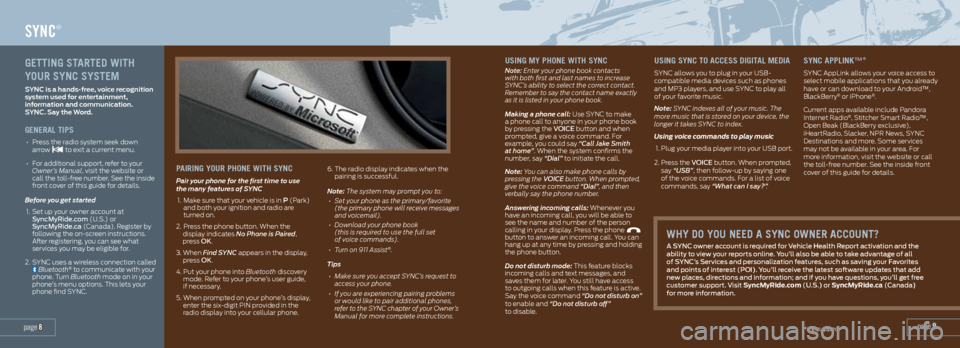
Pairing YoUr Phone wiTh SYnc
Pair your phone for the first time to use
the many features of SYNC
1. Make sure that your vehicle is in P (Park)
and both your ignition and radio are
turned on.
2. Press the phone button. When the
display indicates No Phone is Paired,
press OK.
3. When Find SYNC appears in the display,
press OK.
4. Put your phone into Bluetooth discovery
mode. Refer to your phone’s user guide,
if necessary.
5. When prompted on your phone’s display,
enter the six-digit PIN provided in the
radio display into your cellular phone. 6.
The radio display indicates when the
pairing is successful.
Note: The system may prompt you to:
• Set your phone as the primary/favorite
(the primary phone will receive messages
and voicemail).
• Download your phone book
(this is required to use the full set
of voice commands).
• Turn on 911 Assist
®.
Tips
• Make sure you accept SYNC’s request to
access your phone.
• If you are experiencing pairing problems
or would like to pair additional phones,
refer to the SYNC chapter of your Owner’s
Manual for more complete instructions.
page 8
whY do YoU need a SYnc owner accoUnT?
A SYnC owner account is required for Vehicle health Report activation and the
ability to view your reports online. You’ll also be able to take advantage of all
of SYnC’s Services and personalization features, such as saving your Favorites
and points of interest (POi). You’ll receive the latest software updates that add
new places, directions and information; and if you have questions, you’ll get free
customer support. Visit SyncMyRide.com (U.S.) or SyncMyRide.ca (Canada)
for more information.
*if equipped
Page 6 of 8

CONVENIENCE
mYkeY®
MyKey allows you to program certain
driving restrictions in order to promote
good driving habits. You can program
things such as speed restrictions and
limited volume levels. For complete
information, refer to the MyKey chapter
in your Owner’s Manual.
inTegraTed keYhead TranSmiTTer
Press once to lock all doors. Press
again to confirm all doors are closed.
• Press
once to unlock the driver’s
door. Press again within three
seconds to unlock all doors.
• Press
to activate the panic alarm.
Press again or turn the ignition on
to deactivate.
• Press
twice within three seconds
to unlatch the liftgate window. With a
power liftgate*, however, this button
will open or close the power liftgate
or reverse its movement instead of
the liftgate window.
• Car finder: Press
twice within three
seconds to locate your vehicle. The
horn will chirp and the turn lamps
will flash.
SecUricode™ keYLeSS
enTr Y keYP ad
Lock or unlock the doors, or release the
liftgate glass without using a key. The
keypad can be operated with the factory-
set, 5-digit entry code; this code is located
on the owner’s wallet card in the glove
box. You can also create up to five of your
own 5-digit personal entry codes.
To lock all of the doors and liftgate
Press and hold 7•8 and 9•0 at the same
time. For complete information, refer to
the SecuriCode Keyless Entry Keypad in
the Locks chapter of your Owner’s Manual.
rain-SenSing wiPerS*
If activated, your wipers will automatically
turn on when moisture is present on
the windshield. The wiper speed will
vary based on the amount of moisture
detected and the sensitivity setting. To
deactivate, turn your wiper controls off.
Note: Make sure that this feature is turned
off before entering a car wash.
memor Y feaTUre*
The memory function will save and recall
the positions of the driver seat, power
mirrors and adjustable pedals. Use the
memory controls located on the left side
of the driver’s seat
to program
and then recall memory positions.
To program
1. Switch the ignition on.
2. Move the memory features to your
desired position.
3. Press and hold the 1 button
until
you hear a tone.
Use this same procedure to set the
second position using the 2 button
.
You can now use these controls to recall
the set memory positions.
SoS PoST -craSh aLerT SYSTem™
The SOS Post-Crash Alert System
provides audible and visual alarms in
the event of a crash. The turn signals
will flash and the horn will sound. To
deactivate the system, press the hazard
flasher control, or you can press
on
your remote transmitter.
COMFORT
Sea Ting-To-cargo VerSa TiLiTY
Note: Before folding the second- or third-row
seats, make sure that the head restraints are
fully flipped down by pulling on the strap, and
that all items have been removed from the floor
and seats.
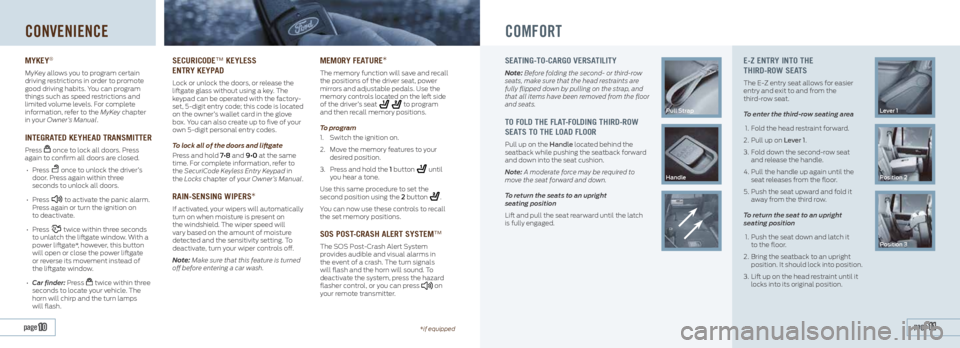
To foLd The fLa T-foLding Third-row
Sea TS To The Load fLoor
Pull up on the handle located behind the
seatback while pushing the seatback forward
and down into the seat cushion.
Note: A moderate force may be required to
move the seat forward and down.
To return the seats to an upright
seating position
Lift and pull the seat rearward until the latch
is fully engaged.
Pull Strap
handle
e-Z enTr Y inTo The
Third-row Sea TS
The E-Z entry seat allows for easier
entry and exit to and from the
third-row seat.
To enter the third-row seating area
1. Fold the head restraint forward.
2. Pull up on Lever 1.
3. Fold down the second-row seat
and release the handle.
4. Pull the handle up again until the
seat releases from the floor.
5. Push the seat upward and fold it
away from the third row.
To return the seat to an upright
seating position
1. Push the seat down and latch it
to the floor.
2. Bring the seatback to an upright
position. It should lock into position.
3. Lift up on the head restraint until it
locks into its original position.
Lever 1
Position 2
Position 3
page 11 page 10*if equipped