automatic FORD EXPEDITION 2020 Workshop Manual
[x] Cancel search | Manufacturer: FORD, Model Year: 2020, Model line: EXPEDITION, Model: FORD EXPEDITION 2020Pages: 542, PDF Size: 6.73 MB
Page 191 of 542
Filling the Fuel Tank
For consistent results when refueling:
•
Turn the ignition off before fueling; an
inaccurate reading results if the engine
is left running.
• Use the same fill rate
(low-medium-high) each time the tank
is filled.
• Allow no more than one automatic
shut-off when refueling.
Results are most accurate when the filling
method is consistent.
Calculating Fuel Economy
Your vehicle calculates fuel economy
figures through the trip computer average
fuel function. See Information Displays
(page 114).
The first
1,000 mi (1,500 km) of driving is
the break-in period of the engine. A more
accurate measurement is obtained after
2,000 mi (3,000 km)
.
1. Completely fill the fuel tank and record
the initial odometer reading.
2. Each time you fill the fuel tank, record the amount of fuel added.
3. After at least three fill ups, fill the fuel tank and record the current odometer
reading.
4. Subtract your initial odometer reading from the current odometer reading.
To calculate L/100 km (liters per 100
kilometers) fuel consumption, multiply the
liters used by 100, then divide by kilometers
traveled. To calculate MPG (miles per
gallon) fuel consumption, divide miles
traveled by gallons used. Keep a record for at least one month and
record the type of driving, for example city
or highway. This provides an accurate
estimate of your vehicle
’s fuel economy
under current driving conditions. Keeping
records during summer and winter shows
how temperature impacts fuel economy.
Conditions
• Heavily loading your vehicle reduces
fuel economy.
• Carrying unnecessary weight in your
vehicle may reduce fuel economy.
• Avoid adding accessories that increase
aerodynamic drag to your vehicle such
as bug deflectors, car top carriers and
ski or bike racks.
• Using fuel blended with alcohol may
lower fuel economy.
• Fuel economy may decrease with lower
temperatures.
• Fuel economy may decrease when
driving short distances.
• You will get better fuel economy when
driving on flat terrain than when driving
on hilly terrain.
188
Expedition (TB8) Canada/United States of America, enUSA, Edition date: 201907, Third-Printing- Fuel and Refueling
Page 196 of 542
AUTOMATIC TRANSMISSION
WARNING: Always fully apply the
parking brake and make sure you shift
into park (P). Failure to follow this
instruction could result in personal injury
or death. WARNING:
Do not use tow/haul
when the road surface is slippery. Failure
to follow this instruction could result in
the loss of control of your vehicle. WARNING:
When your vehicle is
stationary, keep the brake pedal fully
pressed when shifting gears. Failure to
follow this instruction could result in
personal injury, death or property
damage.
Note: You may not be able to shift out of
park (P) unless the intelligent access key is
inside your vehicle. Understanding the Shift Positions
of Your Automatic Transmission
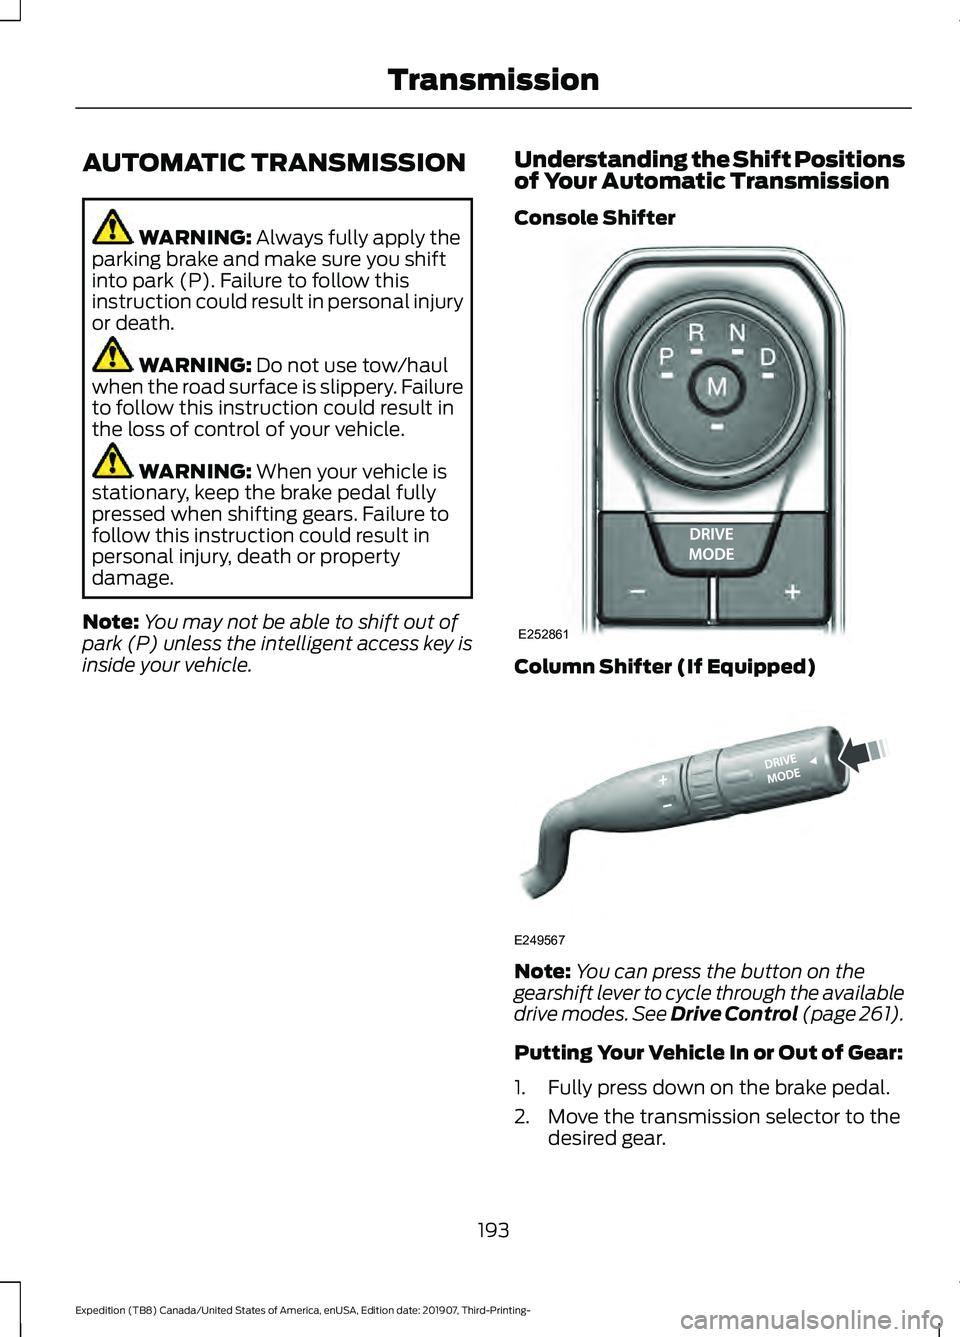
Console Shifter Column Shifter (If Equipped)
Note:
You can press the button on the
gearshift lever to cycle through the available
drive modes.
See Drive Control (page 261).
Putting Your Vehicle In or Out of Gear:
1. Fully press down on the brake pedal.
2. Move the transmission selector to the desired gear.
193
Expedition (TB8) Canada/United States of America, enUSA, Edition date: 201907, Third-Printing- TransmissionE252861 E249567
Page 197 of 542
3. When you finish driving, come to a
complete stop.
4. Move the transmission selector to park
(P).
The instrument cluster displays the current
gear.
Park (P)
With the transmission in park (P), your
vehicle locks the transmission and
prevents the wheels from turning. Always
come to a complete stop before putting
your vehicle into and out of park (P).
On a console shifter, when you switch the
ignition off, your vehicle shifts into park (P).
If you switch the ignition off when the
vehicle is moving, it first shifts into neutral
(N) until it comes to a complete stop. Your
vehicle then shifts into park (P)
automatically.
The electric parking brake may apply when
you shift to park (P) without the brake
pedal fully pressed. The electric parking
brake applies when you shift to park (P)
on large slopes. The electric parking brake
releases with the drive away release
function or manually as described in the
Releasing the Electric Parking Brake
section. See Electric Parking Brake
(page 210).
Automatic Return to Park - Console
Shifter
Note: This feature does not operate when
your vehicle is in Stay in Neutral mode or
neutral tow. Your vehicle has a feature that shifts into
park (P) when any of the following
conditions occur:
•
You turn the vehicle off.
• You open the driver door with your
seatbelt unlatched and the vehicle
stopped.
• You unlatch your seatbelt when the
driver door is open and the vehicle
stopped.
If you turn your vehicle off when moving,
your vehicle first shifts into neutral (N) until
it comes to a complete stop and then shift
into park (P) automatically.
Note: If you have waited an extended
period of time, 2-15 minutes before starting
your vehicle, unlatching your seatbelt can
cause this feature to turn on, even with the
driver door closed.
Note: This feature may not work properly
if the door ajar switch is malfunctioning. If
your door ajar indicator does not illuminate
when you open the driver door or the
indicator illuminates with the driver door
closed, see your authorized dealer.
Reverse (R)
With the selector in reverse (R), your
vehicle moves backward. Always come to
a complete stop before shifting into and
out of reverse (R).
Neutral (N)
With the selector in neutral (N), you can
start your vehicle and it is free to roll. Hold
the brake pedal down when in this position.
194
Expedition (TB8) Canada/United States of America, enUSA, Edition date: 201907, Third-Printing- Transmission
Page 199 of 542
WARNING: When doing this
procedure, you need to take the
transmission out of park (P) which
means your vehicle can roll freely. To
avoid unwanted vehicle movement,
always fully apply the parking brake prior
to doing this procedure. Use wheels
chocks if appropriate.
1. Do not press the brake pedal. Press the
Start/Stop button.
2. Fully press down on the brake pedal. Keep the brakes applied through step
6.
3. Press the accelerator pedal to the floor
and hold through step 6.
4. Rotate transmission selector to Neutral
(N) and press the manual (M) button.
5. Press and release the push to start button, the transmission needs a
minimum of 2 seconds to exit park.
6. When neutral (N) displays, you can release the brake and accelerator
pedals.
To exit Stay in Neutral mode, select a
different gear.
A message appears in your information
display screen when your vehicle has
entered Stay in Neutral mode.
Drive (D)
Drive (D) is the normal driving position for
the best fuel economy. The overdrive
function allows automatic upshifts and
downshifts through gears one through ten. Manual (M)
With the transmission selector in manual
(M) or by placing the shifter column into
the manual position, you can change gears
up or down as preferred. By pushing the
manual (M) button, you have control of
selecting the gear you desire using the +
and - buttons on the transmission selector.
Tow/Haul Mode WARNING:
Do not use tow/haul
when the road surface is slippery. Failure
to follow this instruction could result in
the loss of control of your vehicle. With Column Shifter
To activate tow haul for the
column shifter, press the button
on the gearshift lever to cycle through the
available drive modes until you can select
tow haul mode.
See Drive Control (page
261). The tow haul indicator light
illuminates in the instrument cluster when
the system is active.
With Console Shifter
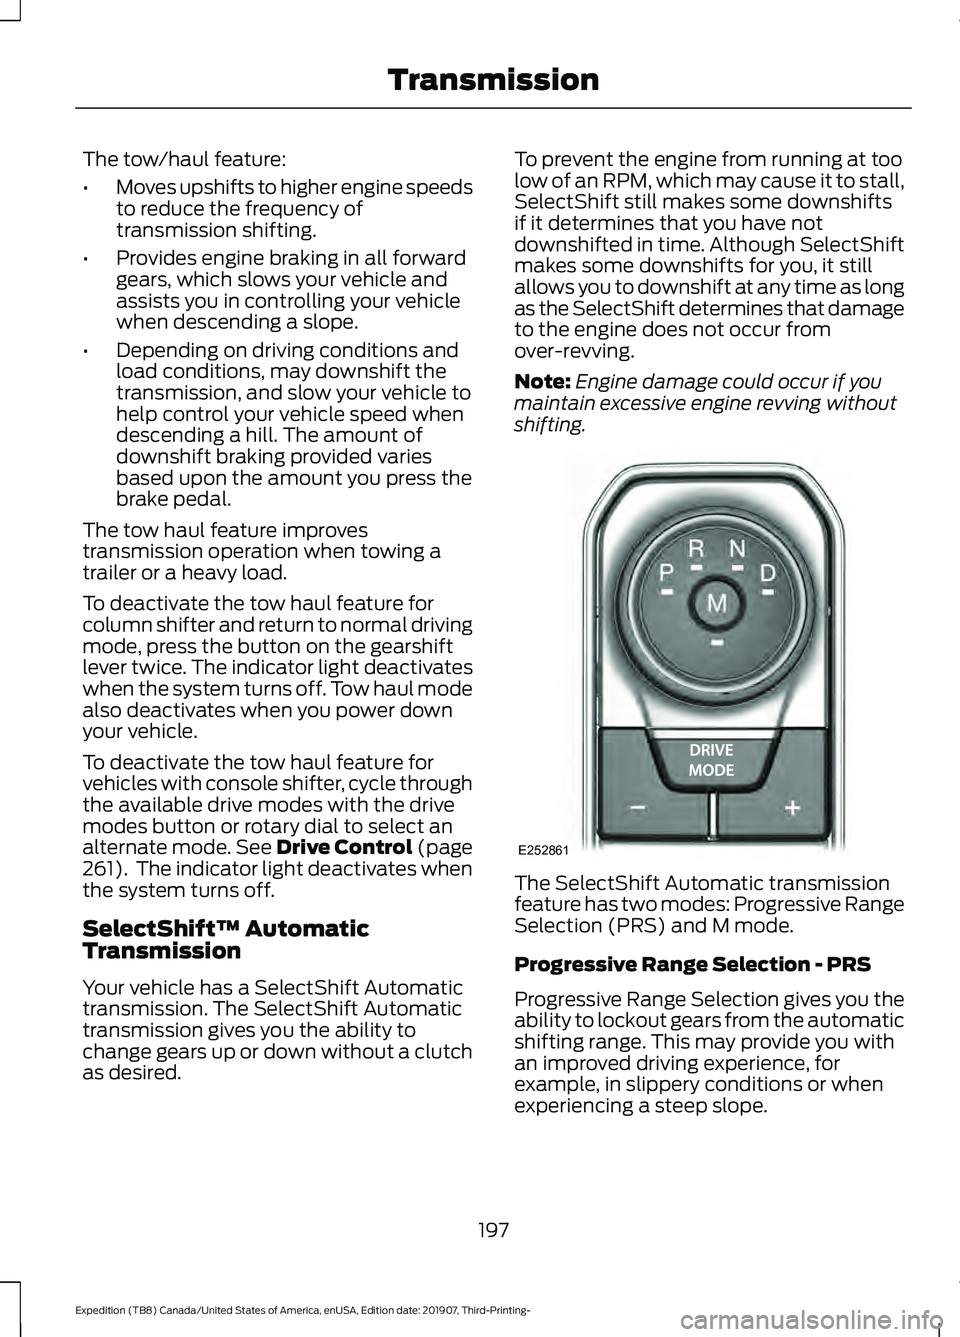
To activate tow haul, press the drive
modes button or rotate the dial, to cycle
through the available drive modes until you
can select tow haul mode.
See Drive
Control (page 261). The tow haul indicator
light illuminates in the instrument cluster
when the system is active.
196
Expedition (TB8) Canada/United States of America, enUSA, Edition date: 201907, Third-Printing- TransmissionE246592
Page 200 of 542
The tow/haul feature:
•
Moves upshifts to higher engine speeds
to reduce the frequency of
transmission shifting.
• Provides engine braking in all forward
gears, which slows your vehicle and
assists you in controlling your vehicle
when descending a slope.
• Depending on driving conditions and
load conditions, may downshift the
transmission, and slow your vehicle to
help control your vehicle speed when
descending a hill. The amount of
downshift braking provided varies
based upon the amount you press the
brake pedal.
The tow haul feature improves
transmission operation when towing a
trailer or a heavy load.
To deactivate the tow haul feature for
column shifter and return to normal driving
mode, press the button on the gearshift
lever twice. The indicator light deactivates
when the system turns off. Tow haul mode
also deactivates when you power down
your vehicle.
To deactivate the tow haul feature for
vehicles with console shifter, cycle through
the available drive modes with the drive
modes button or rotary dial to select an
alternate mode. See Drive Control (page
261). The indicator light deactivates when
the system turns off.
SelectShift™ Automatic
Transmission
Your vehicle has a SelectShift Automatic
transmission. The SelectShift Automatic
transmission gives you the ability to
change gears up or down without a clutch
as desired. To prevent the engine from running at too
low of an RPM, which may cause it to stall,
SelectShift still makes some downshifts
if it determines that you have not
downshifted in time. Although SelectShift
makes some downshifts for you, it still
allows you to downshift at any time as long
as the SelectShift determines that damage
to the engine does not occur from
over-revving.
Note:
Engine damage could occur if you
maintain excessive engine revving without
shifting. The SelectShift Automatic transmission
feature has two modes: Progressive Range
Selection (PRS) and M mode.
Progressive Range Selection - PRS
Progressive Range Selection gives you the
ability to lockout gears from the automatic
shifting range. This may provide you with
an improved driving experience, for
example, in slippery conditions or when
experiencing a steep slope.
197
Expedition (TB8) Canada/United States of America, enUSA, Edition date: 201907, Third-Printing- TransmissionE252861
Page 201 of 542
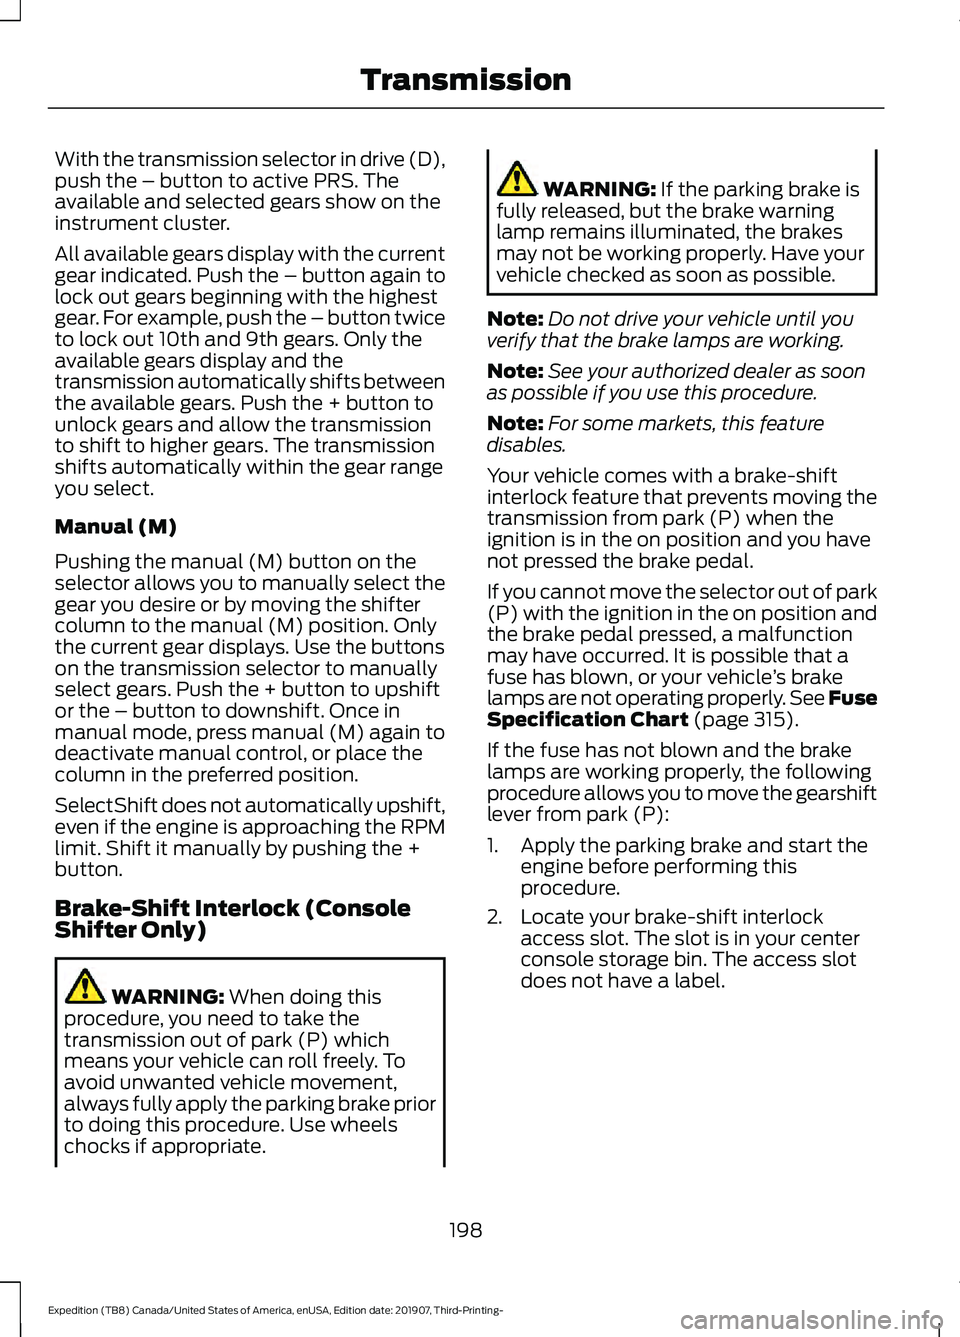
With the transmission selector in drive (D),
push the – button to active PRS. The
available and selected gears show on the
instrument cluster.
All available gears display with the current
gear indicated. Push the – button again to
lock out gears beginning with the highest
gear. For example, push the – button twice
to lock out 10th and 9th gears. Only the
available gears display and the
transmission automatically shifts between
the available gears. Push the + button to
unlock gears and allow the transmission
to shift to higher gears. The transmission
shifts automatically within the gear range
you select.
Manual (M)
Pushing the manual (M) button on the
selector allows you to manually select the
gear you desire or by moving the shifter
column to the manual (M) position. Only
the current gear displays. Use the buttons
on the transmission selector to manually
select gears. Push the + button to upshift
or the – button to downshift. Once in
manual mode, press manual (M) again to
deactivate manual control, or place the
column in the preferred position.
SelectShift does not automatically upshift,
even if the engine is approaching the RPM
limit. Shift it manually by pushing the +
button.
Brake-Shift Interlock (Console
Shifter Only)
WARNING: When doing this
procedure, you need to take the
transmission out of park (P) which
means your vehicle can roll freely. To
avoid unwanted vehicle movement,
always fully apply the parking brake prior
to doing this procedure. Use wheels
chocks if appropriate. WARNING:
If the parking brake is
fully released, but the brake warning
lamp remains illuminated, the brakes
may not be working properly. Have your
vehicle checked as soon as possible.
Note: Do not drive your vehicle until you
verify that the brake lamps are working.
Note: See your authorized dealer as soon
as possible if you use this procedure.
Note: For some markets, this feature
disables.
Your vehicle comes with a brake-shift
interlock feature that prevents moving the
transmission from park (P) when the
ignition is in the on position and you have
not pressed the brake pedal.
If you cannot move the selector out of park
(P) with the ignition in the on position and
the brake pedal pressed, a malfunction
may have occurred. It is possible that a
fuse has blown, or your vehicle ’s brake
lamps are not operating properly. See Fuse
Specification Chart
(page 315).
If the fuse has not blown and the brake
lamps are working properly, the following
procedure allows you to move the gearshift
lever from park (P):
1. Apply the parking brake and start the engine before performing this
procedure.
2. Locate your brake-shift interlock access slot. The slot is in your center
console storage bin. The access slot
does not have a label.
198
Expedition (TB8) Canada/United States of America, enUSA, Edition date: 201907, Third-Printing- Transmission
Page 202 of 542
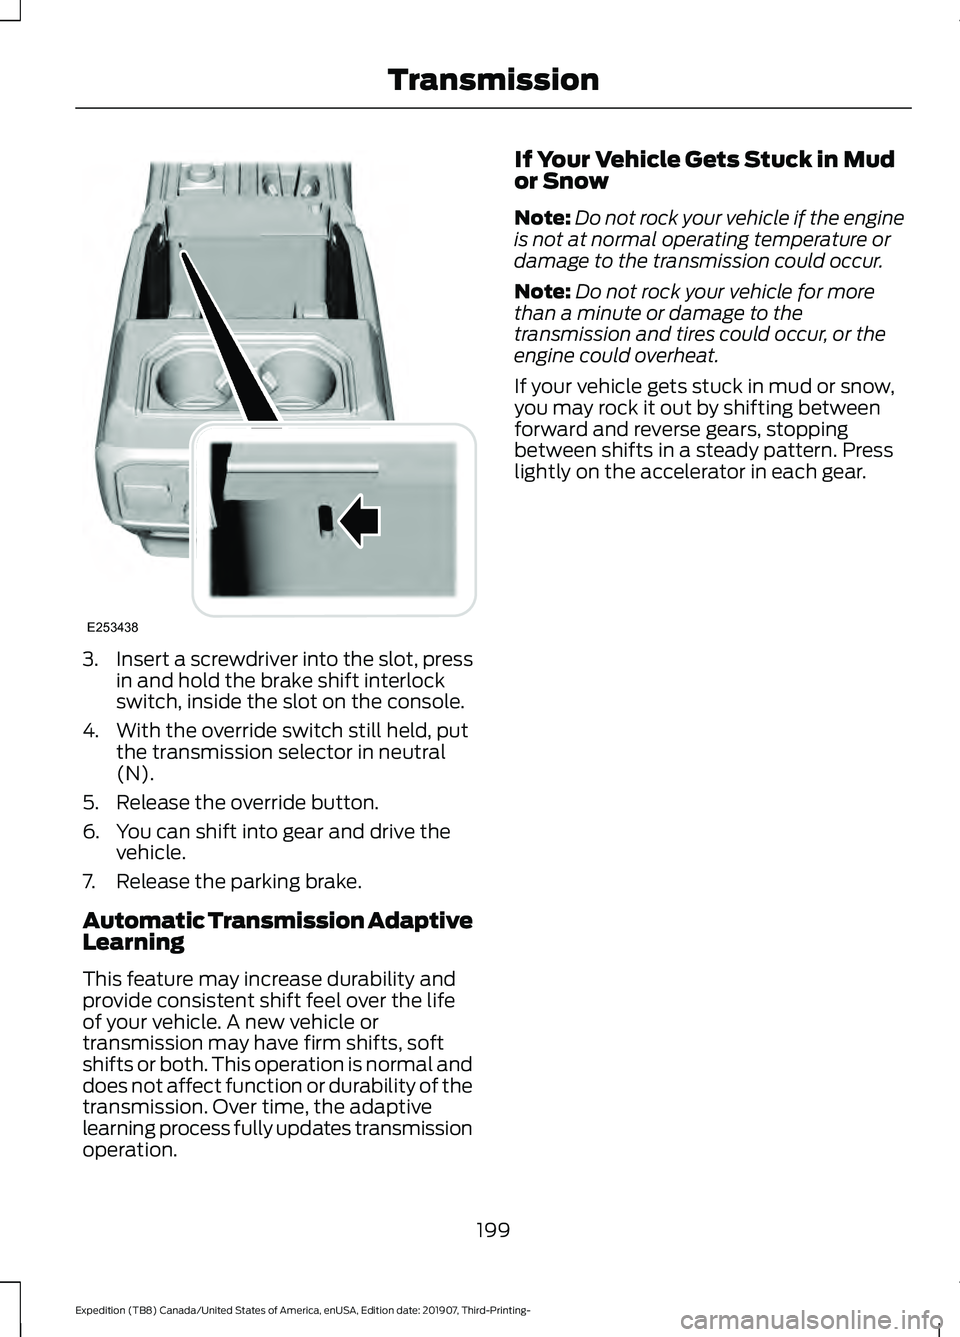
3.
Insert a screwdriver into the slot, press
in and hold the brake shift interlock
switch, inside the slot on the console.
4. With the override switch still held, put the transmission selector in neutral
(N).
5. Release the override button.
6. You can shift into gear and drive the vehicle.
7. Release the parking brake.
Automatic Transmission Adaptive
Learning
This feature may increase durability and
provide consistent shift feel over the life
of your vehicle. A new vehicle or
transmission may have firm shifts, soft
shifts or both. This operation is normal and
does not affect function or durability of the
transmission. Over time, the adaptive
learning process fully updates transmission
operation. If Your Vehicle Gets Stuck in Mud
or Snow
Note:
Do not rock your vehicle if the engine
is not at normal operating temperature or
damage to the transmission could occur.
Note: Do not rock your vehicle for more
than a minute or damage to the
transmission and tires could occur, or the
engine could overheat.
If your vehicle gets stuck in mud or snow,
you may rock it out by shifting between
forward and reverse gears, stopping
between shifts in a steady pattern. Press
lightly on the accelerator in each gear.
199
Expedition (TB8) Canada/United States of America, enUSA, Edition date: 201907, Third-Printing- TransmissionE253438
Page 203 of 542
USING FOUR-WHEEL DRIVE
Note:
For important information regarding
safe operation of this type of vehicle, see
General Information in the Wheels and Tires
chapter.
Note: Do not use 4H or 4L mode on dry,
hard surfaced roads. Doing so can produce
excessive noise, increase tire wear and may
damage drive components. 4H and 4L mode
is only intended for consistently slippery or
loose surfaces. Use of 4L mode on these
surfaces may produce some noise, such as
occasional clunks, but does not damage
drive components.
Note: If 4L mode is selected when your
vehicle is moving above 3 mph (5 km/h),
the 4WD system does not perform a shift.
This is normal and should be no reason for
concern. Refer to Shifting to or from 4L for
proper operation.
4X4 Indicator Lights
4X2 Momentarily illuminates when
2H is selected.
4X4 AUTO Continuously illuminates when
4A is selected.
4X4 HIGH Continuously illuminates when
4H is selected.
4X4 LOW Continuously illuminates when
4L is selected. CHECK 4X4 Displays when a 4X4 system
fault is present.
Note: When a 4X4 system fault is present,
the system typically remains in whichever
4WD mode was selected prior to the fault
condition occurring. It does not default to
4X2 in all circumstances. When this warning
is displayed, have your vehicle serviced by
an authorized dealer.
4WD Switch Selections WARNING:
Vehicles with a higher
center of gravity (utility and four-wheel
drive vehicles) handle differently than
vehicles with a lower center of gravity
(passenger cars). Avoid sharp turns,
excessive speed and abrupt steering in
these vehicles. Failure to drive cautiously
increases the risk of losing control of your
vehicle, vehicle rollover, personal injury
and death.
Note: If your vehicle is equipped with
AdvanceTrac® with RSC®, the system
automatically turns off the stability
enhancement feature when you shift the
4WD system into 4L - 4X4 LOW. You can
manually turn the system off by pressing
the AdvanceTrac button. See
Using
Traction Control (page 213). This turns off
the engine management feature, allowing
the vehicle to maintain full power and
enhanced momentum through the obstacle.
The brake traction enhancement feature is
still turned on.
Note: The AdvanceTrac system has the
ability to take over control of the transfer
case clutch and disable it during driving
maneuvers when necessary.
Note: 4WD mode availability is based on
Drive Mode selection.
See Drive Control
(page 261).
200
Expedition (TB8) Canada/United States of America, enUSA, Edition date: 201907, Third-Printing- Four-Wheel Drive
(If Equipped)E181778 E181781 E181779 E181780
Page 204 of 542
Note:
The information display may show
messages during 4WD operation. See
Information Messages (page 123).
Your 4X4 control is located in one of the
following locations:
• On the instrument panel.
• On the
DRIVE MODE selection switch.
2H - 4X2
Delivers power to the rear wheels only. The
information display momentarily shows
2H when this mode is selected. This mode
is appropriate for normal on-road driving
on dry pavement and provides the best
fuel economy.
Note: 2H may turn on or off automatically
based on Drive Mode selection. See
Drive
Control (page 261).
4A - 4X4 AUTO
Provides electronic controlled four-wheel
drive with power delivered to the front and
rear wheels, as required, for increased
traction. When you select this mode, the
information display shows 4A. The system
continuously monitors road conditions,
driver input as well as other vehicle sensors
and optimizes the system's behavior based
on drive mode selection.
Note: On vehicles with a rotary drive mode
switch, 4A should remain on in Mud/Rut and
Sand but with aggressive tuning which
provides electronically locked four-wheel
drive power to front and rear wheels, the
same as traditional 4H.
Note: 4A may turn on or off automatically
based on Drive Mode selection. See
Drive
Control (page 261). 4H - 4X4 HIGH
Provides electronically locked four-wheel
drive power to front and rear wheels. When
you select this mode, the information
display shows 4H. This mode is not
recommended for use on dry pavement.
This mode is only intended for severe
winter or off-road conditions, such as deep
snow, ice or shallow sand.
Note:
4H may turn on or off automatically
based on Drive Mode selection. In
configurations with a rotary Drive Mode
switch, 4H functionality is within the
Mud/Ruts and Sand Drive Modes even when
the indicator lamp shows 4A. See
Drive
Control (page 261).
4L - 4X4 LOW
Provides electronically locked four-wheel
drive power to both the front and rear
wheels with additional gearing for
increased torque multiplication. Intended
only for off-road applications such as deep
sand, steep grades, or pulling heavy
objects. 4L - 4X4 low does not engage
when your vehicle is moving above
3 mph
(5 km/h); this is normal and should be no
reason for concern. Refer to Shifting to or
from 4L - 4X4 low for proper operation.
Note: 4L may turn off automatically based
on Drive Mode selection. See
Drive Control
(page 261).
Shifting Between 4WD System Modes
Note: Momentarily releasing the accelerator
pedal when a shift in progress message
displays improves engagement and
disengagement performance.
Note: Do not perform this operation if the
rear wheels are slipping.
Note: Some noise may be heard as the
system shifts or engages; this is normal.
201
Expedition (TB8) Canada/United States of America, enUSA, Edition date: 201907, Third-Printing- Four-Wheel Drive
(If Equipped)
Page 206 of 542
The differences that make your vehicle so
versatile also make it handle differently
than an ordinary passenger car.
Maintain steering wheel control at all
times, especially in rough terrain. Since
sudden changes in terrain can result in
abrupt steering wheel motion, make sure
you grip the steering wheel from the
outside. Do not grip the spokes.
Drive cautiously to avoid vehicle damage
from concealed objects such as rocks and
stumps.
You should either know the terrain or
examine maps of the area before driving.
Map out your route before driving in the
area. To maintain steering and braking
control of your vehicle, you must have all
four wheels on the ground and they must
be rolling, not sliding or spinning.
Driving Off-Road With Truck and
Utility Vehicles
Note:
On some models, the initial shift from
two-wheel drive to four-wheel drive when
your vehicle is moving can cause some
momentary clunk and ratcheting sounds.
This is the front drivetrain coming up to
speed and the automatic locking hubs
engaging and is not cause for concern.
Note: Your vehicle may have a front air dam
that can become damaged, due to reduced
ground clearance, when taking your vehicle
off-road. You may remove this air dam by
removing eight bolts.
Four-wheel drive vehicles are specially
equipped for driving on sand, snow, mud
and rough terrain and have operating
characteristics that are somewhat
different from conventional vehicles, both
on and off the road. The transfer case supples power to all four
wheels. On four-wheel drive vehicles, the
transfer case allows you to select different
4WD modes when necessary. You can find
information on transfer case operation and
shifting procedures in this chapter. You can
find information on transfer case
maintenance in the Maintenance chapter.
You should become thoroughly familiar
with this information before you operate
your vehicle.
Four-wheel drive, when you select a 4WD
mode, uses all four wheels to power your
vehicle. This increases traction, enabling
you to drive over terrain and road
conditions that a conventional two-wheel
drive vehicle cannot.
Basic Operating Principles
•
Drive slower in strong crosswinds which
can affect the normal steering
characteristics of your vehicle.
• When driving your vehicle on surfaces
made slippery by loose sand, water,
gravel, snow or ice proceed with care.
• Do not use 4H or 4L on dry, hard
surfaced roads. Doing so can produce
excessive noise, increase tire wear and
may damage drive components. 4H or
4L modes are only for consistently
slippery or loose surfaces.
If Your Vehicle leaves the Road
If your vehicle leaves the road, reduce your
vehicle speed and avoid severe braking.
When your vehicle speed decreases, ease
your vehicle back onto the road. Do not
turn the steering wheel sharply when
returning your vehicle to the road.
It may be safer to stay on the shoulder of
the road and slow down gradually before
returning to the road. You may lose control
if you do not slow down or if you turn the
steering wheel too sharply or abruptly.
203
Expedition (TB8) Canada/United States of America, enUSA, Edition date: 201907, Third-Printing- Four-Wheel Drive (If Equipped)