automatic FORD EXPEDITION 2020 Owners Manual
[x] Cancel search | Manufacturer: FORD, Model Year: 2020, Model line: EXPEDITION, Model: FORD EXPEDITION 2020Pages: 542, PDF Size: 6.73 MB
Page 5 of 542
Steering Wheel
Adjusting the Steering Wheel - Vehicles
With: Manual Adjustable Steering
Column ..........................................................87
Adjusting the Steering Wheel - Vehicles With: Power Adjustable Steering
Column ..........................................................
87
Audio Control .................................................
88
Voice Control ..................................................
89
Cruise Control - Vehicles With: Adaptive Cruise Control ............................................
89
Cruise Control - Vehicles With: Cruise Control ..........................................................
89
Information Display Control .....................
89
Heated Steering Wheel ..............................
89
Horn ...................................................................
90
Adjustable Pedals
Adjusting the Pedals .....................................
91
Wipers and Washers
Windshield Wipers ........................................
92
Autowipers ......................................................
92
Windshield Washers ....................................
93
Rear Window Wiper and Washers ..........
93
Lighting
General Information ....................................
94
Lighting Control .............................................
94
Autolamps .......................................................
95
Instrument Lighting Dimmer ....................
95
Headlamp Exit Delay ...................................
95
Daytime Running Lamps - Vehicles With: Configurable Daytime Running Lamps
........................................................................\
..
96
Daytime Running Lamps - Vehicles With: Daytime Running Lamps (DRL) .........
96
Front Fog Lamps ...........................................
96
Direction Indicators .......................................
97
Interior Lamps ................................................
97
Ambient Lighting ..........................................
98Automatic High Beam Control
What Is Automatic High Beam Control
........................................................................\
..
99
Switching Automatic High Beam Control On and Off ..................................................
99
Automatic High Beam Control Indicators ........................................................................\
..
99
Overriding Automatic High Beam Control ........................................................................\
..
99
Windows and Mirrors
Power Windows ............................................
101
Global Opening and Closing ....................
101
Exterior Mirrors .............................................
102
Interior Mirror .................................................
103
Childminder Mirror ......................................
104
Sun Visors ......................................................
104
Moonroof ........................................................
105
Liftgate Window ..........................................
106
Instrument Cluster
Gauges .............................................................
107
Warning Lamps and Indicators ...............
110
Audible Warnings and Indicators ............
113
Information Displays
General Information ....................................
114
Information Messages ...............................
123
Climate Control
Manual Climate Control ............................
139
Automatic Climate Control .......................
141
Hints on Controlling the Interior Climate - Vehicles With: Automatic
Temperature Control ..............................
143
Hints on Controlling the Interior Climate - Vehicles With: Manual Temperature
Control .........................................................
144
Rear Passenger Climate Controls - Vehicles With: Automatic
Temperature Control .............................
145
2
Expedition (TB8) Canada/United States of America, enUSA, Edition date: 201907, Third-Printing- Table of Contents
Page 6 of 542
Rear Passenger Climate Controls -
Vehicles With: Manual Temperature
Control ........................................................146
Heated Windshield ......................................
147
Heated Rear Window .................................
148
Heated Exterior Mirrors .............................
148
Cabin Air Filter ..............................................
148
Remote Start ................................................
148
Seats
Sitting in the Correct Position .................
150
Head Restraints ...........................................
150
Manual Seats ................................................
154
Power Seats ..................................................
154
Memory Function .........................................
157
Rear Seats ......................................................
158
Climate Controlled Seats .........................
163
Garage Door Opener
Universal Garage Door Opener ..............
165
Auxiliary Power Points
Auxiliary Power Points ...............................
169
Wireless Accessory Charger ....................
170
Storage Compartments
Center Console ..............................................
172
Overhead Console .......................................
172
Starting and Stopping the Engine
General Information ....................................
173
Ignition Switch ...............................................
173
Keyless Starting ............................................
173
Starting a Gasoline Engine .......................
174
Engine Block Heater ....................................
177
Unique Driving Characteristics
Auto-Start-Stop ...........................................
179Fuel and Refueling
Safety Precautions
......................................
182
Fuel Quality ....................................................
182
Fuel Filler Funnel Location .......................
183
Running Out of Fuel ...................................
183
Refueling .........................................................
185
Fuel Consumption .......................................
187
Engine Emission Control
Emission Law ................................................
189
Catalytic Converter .....................................
190
Transmission
Automatic Transmission ...........................
193
Four-Wheel Drive
Using Four-Wheel Drive ..........................
200
Rear Axle
Limited Slip Differential ...........................
208
Brakes
General Information ..................................
209
Hints on Driving With Anti-Lock Brakes .......................................................................
209
Electric Parking Brake ................................
210
Hill Start Assist ..............................................
211
Traction Control
Principle of Operation ................................
213
Using Traction Control ...............................
213
Stability Control
Principle of Operation ................................
214
Using Stability Control ...............................
215
Hill Descent Control
Principle of Operation ................................
217
Using Hill Descent Control ........................
217
3
Expedition (TB8) Canada/United States of America, enUSA, Edition date: 201907, Third-Printing- Table of Contents
Page 8 of 542
Maintenance
General Information
..................................325
Opening and Closing the Hood .............
325
Under Hood Overview ..............................
326
Engine Oil Dipstick ......................................
327
Engine Oil Check ..........................................
327
Oil Change Indicator Reset .....................
328
Changing the Engine Air Filter ...............
329
Engine Coolant Check ..............................
329
Automatic Transmission Fluid Check ........................................................................\
333
Transfer Case Fluid Check .......................
334
Brake Fluid Check .......................................
334
Power Steering Fluid Check ....................
335
Changing the 12V Battery ........................
335
Adjusting the Headlamps ........................
337
Washer Fluid Check ...................................
338
Fuel Filter .......................................................
339
Checking the Wiper Blades ....................
339
Changing the Wiper Blades ....................
339
Removing a Headlamp ............................
340
Changing a Bulb .........................................
340
Vehicle Care
General Information ..................................
343
Cleaning Products ......................................
343
Cleaning the Exterior .................................
344
Waxing ............................................................
345
Cleaning the Engine ...................................
345
Cleaning the Windows and Wiper Blades ........................................................................\
345
Cleaning the Interior ..................................
346
Cleaning the Instrument Panel and Instrument Cluster Lens ......................
346
Cleaning Leather Seats .............................
347
Repairing Minor Paint Damage .............
348
Cleaning the Wheels .................................
348
Vehicle Storage ...........................................
348Wheels and Tires
General Information
...................................
351
Tire Care .........................................................
353
Using Snow Chains ....................................
367
Tire Pressure Monitoring System .........
368
Changing a Road Wheel ...........................
372
Technical Specifications ..........................
378
Capacities and Specifications
Engine Specifications ...............................
380
Motorcraft Parts .........................................
380
Vehicle Identification Number ...............
382
Vehicle Certification Label ......................
383
Transmission Code Designation ...........
383
Capacities and Specifications ...............
384
Bulb Specification Chart ..........................
392
Connected Vehicle
Connected Vehicle Requirements .......
394
Connected Vehicle Limitations .............
394
Connecting the Vehicle to a Mobile Network .....................................................
394
Connecting the Vehicle to a Wi-Fi Network .....................................................
394
Connected Vehicle – Troubleshooting ........................................................................\
395
Vehicle Wi-Fi Hotspot
Creating a Vehicle Wi-Fi Hotspot .........
397
Changing the Vehicle Wi-Fi Hotspot Name or Password .................................
397
Audio System
General Information ..................................
398
Audio Unit - Vehicles Without: Touchscreen Display .............................
398
Audio Unit - Vehicles With: Touchscreen Display .........................................................
401
Digital Radio .................................................
402
Satellite Radio .............................................
405
5
Expedition (TB8) Canada/United States of America, enUSA, Edition date: 201907, Third-Printing- Table of Contents
Page 15 of 542
Entertainment Data
Data recorded includes, for example:
•
Music, videos or album art.
• Contacts and corresponding address
book entries.
• Navigation destinations.
Services That We Provide
If you use our services, we collect and use
data, for example, account information,
vehicle location and driving characteristics,
that could identify you. We transmit this
data through a dedicated, protected
connection. We only collect and use data
to enable your use of our services to which
you have subscribed, with your consent or
where permitted by law. For additional
information, see the terms and conditions
of the services to which you have
subscribed.
Services That Third Parties
Provide
We recommend that you review the terms
and conditions and data privacy
information for any services to which you
subscribe. We take no responsibility for
services that third parties provide.
Vehicles With a Modem (If Equipped) The modem has a SIM. The
modem was enabled when your
vehicle was built and periodically
sends messages to stay connected to the
cell phone network, receive automatic
software updates and send vehicle-related
information to us, for example, diagnostic
information. These messages could
include information that identifies your
vehicle, the SIM and the electronic serial
number of the modem. Cell phone network service providers could have access to
additional information, for example, cell
phone network tower identification. For
additional information about our privacy
policy, visit
www .For dC onne c t e d . c om or
refer to your local Ford website.
Note: The modem continues to send this
information unless you disable the modem
or stop the modem from sharing vehicle
data by changing the modem settings. See
Connected Vehicle
(page 394).
Note: The service can be unavailable or
interrupted for a number of reasons, for
example, environmental or topographical
conditions and data plan coverage.
Note: To find out if your vehicle has a
modem, visit
www .For dC onne c t e d . c om .
Vehicles With SYNC
Mobile Device Data
If you connect a mobile device to your
vehicle, you can display data from your
device on the touchscreen for example,
music and album art. You can share your
vehicle data with mobile apps on your
device through the system. See
Apps
(page 454).
The mobile apps function operates by your
connected device sending data to us in the
United States. The data is encrypted and
includes the vehicle identification number
of your vehicle, the SYNC module serial
number, odometer, enabled apps, usage
statistics and debugging information. We
retain it only as long as necessary to
provide the service, to troubleshoot, for
continuous improvement and to offer you
products and services that may be of
interest to you according to your
preferences and where allowed by law.
12
Expedition (TB8) Canada/United States of America, enUSA, Edition date: 201907, Third-Printing- Introduction
Page 25 of 542
INSTALLING CHILD
RESTRAINTS
Child Seats
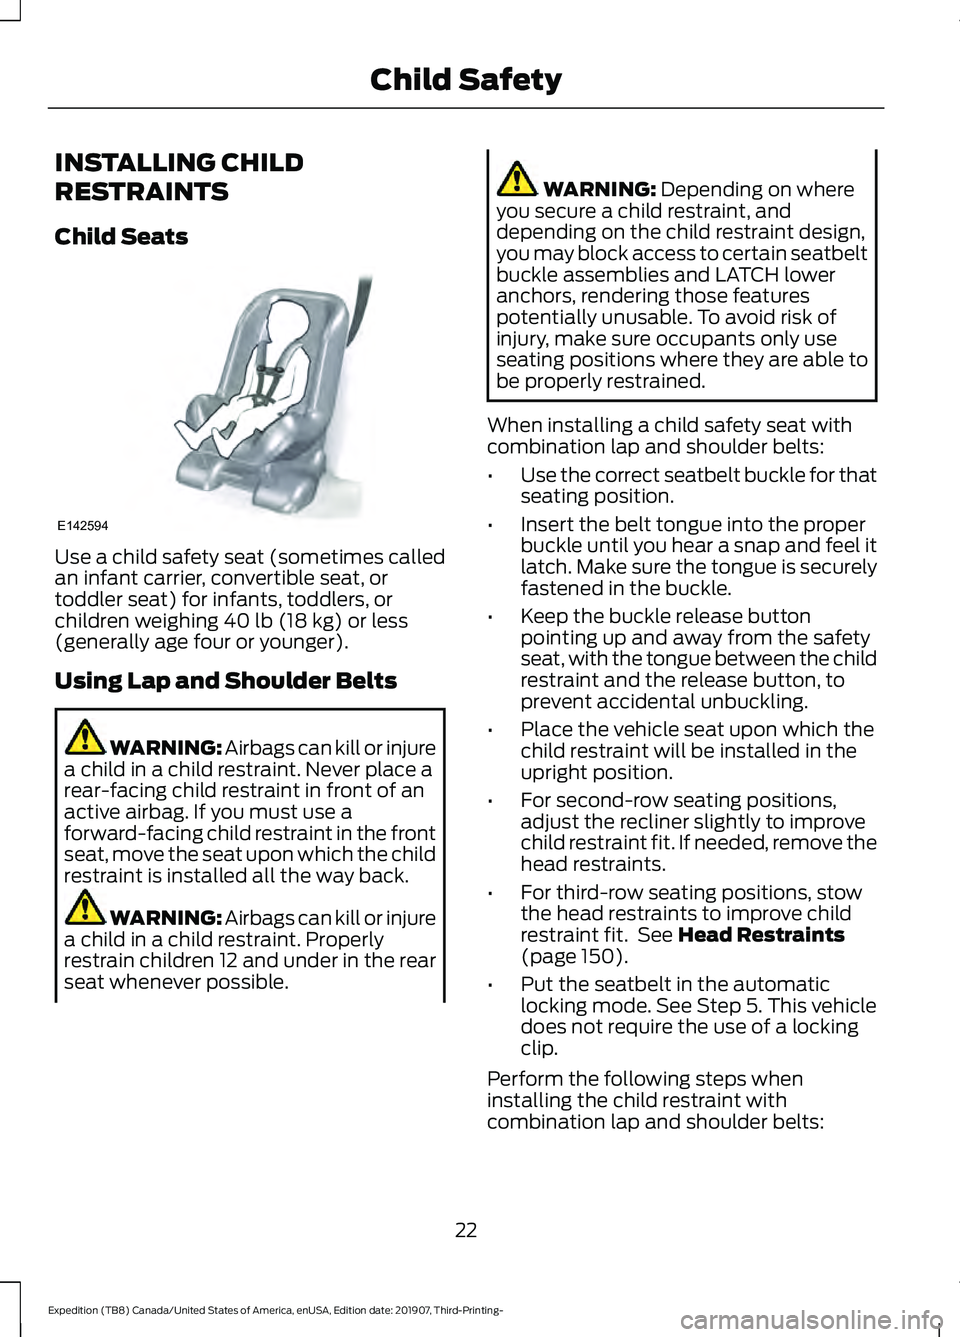
Use a child safety seat (sometimes called
an infant carrier, convertible seat, or
toddler seat) for infants, toddlers, or
children weighing 40 lb (18 kg) or less
(generally age four or younger).
Using Lap and Shoulder Belts WARNING: Airbags can kill or injure
a child in a child restraint. Never place a
rear-facing child restraint in front of an
active airbag. If you must use a
forward-facing child restraint in the front
seat, move the seat upon which the child
restraint is installed all the way back. WARNING: Airbags can kill or injure
a child in a child restraint. Properly
restrain children 12 and under in the rear
seat whenever possible. WARNING:
Depending on where
you secure a child restraint, and
depending on the child restraint design,
you may block access to certain seatbelt
buckle assemblies and LATCH lower
anchors, rendering those features
potentially unusable. To avoid risk of
injury, make sure occupants only use
seating positions where they are able to
be properly restrained.
When installing a child safety seat with
combination lap and shoulder belts:
• Use the correct seatbelt buckle for that
seating position.
• Insert the belt tongue into the proper
buckle until you hear a snap and feel it
latch. Make sure the tongue is securely
fastened in the buckle.
• Keep the buckle release button
pointing up and away from the safety
seat, with the tongue between the child
restraint and the release button, to
prevent accidental unbuckling.
• Place the vehicle seat upon which the
child restraint will be installed in the
upright position.
• For second-row seating positions,
adjust the recliner slightly to improve
child restraint fit. If needed, remove the
head restraints.
• For third-row seating positions, stow
the head restraints to improve child
restraint fit. See
Head Restraints
(page 150).
• Put the seatbelt in the automatic
locking mode. See Step 5. This vehicle
does not require the use of a locking
clip.
Perform the following steps when
installing the child restraint with
combination lap and shoulder belts:
22
Expedition (TB8) Canada/United States of America, enUSA, Edition date: 201907, Third-Printing- Child SafetyE142594
Page 27 of 542
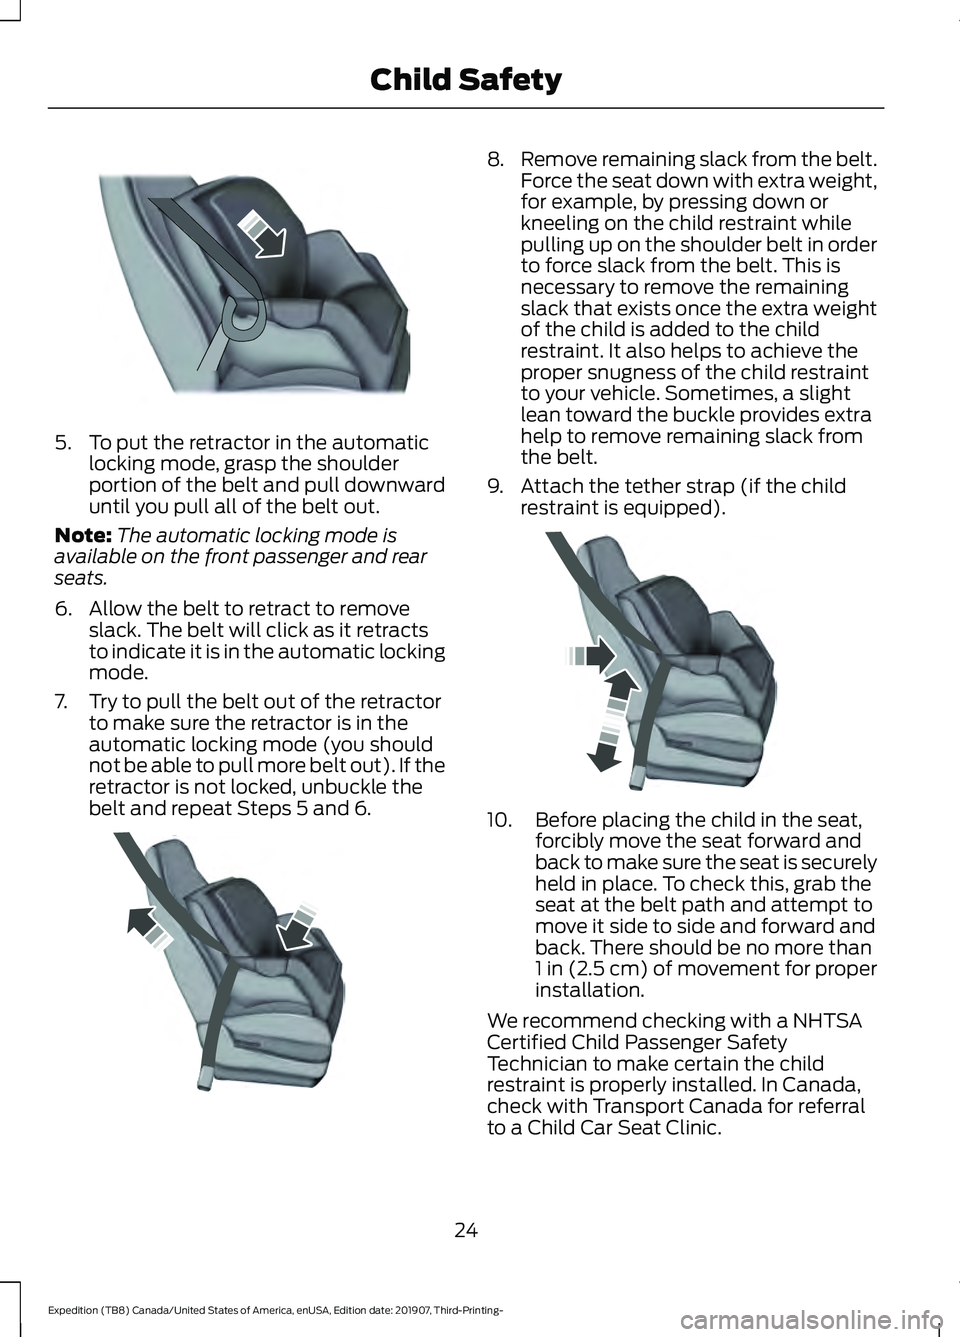
5. To put the retractor in the automatic
locking mode, grasp the shoulder
portion of the belt and pull downward
until you pull all of the belt out.
Note: The automatic locking mode is
available on the front passenger and rear
seats.
6. Allow the belt to retract to remove slack. The belt will click as it retracts
to indicate it is in the automatic locking
mode.
7. Try to pull the belt out of the retractor to make sure the retractor is in the
automatic locking mode (you should
not be able to pull more belt out). If the
retractor is not locked, unbuckle the
belt and repeat Steps 5 and 6. 8.
Remove remaining slack from the belt.
Force the seat down with extra weight,
for example, by pressing down or
kneeling on the child restraint while
pulling up on the shoulder belt in order
to force slack from the belt. This is
necessary to remove the remaining
slack that exists once the extra weight
of the child is added to the child
restraint. It also helps to achieve the
proper snugness of the child restraint
to your vehicle. Sometimes, a slight
lean toward the buckle provides extra
help to remove remaining slack from
the belt.
9. Attach the tether strap (if the child restraint is equipped). 10. Before placing the child in the seat,
forcibly move the seat forward and
back to make sure the seat is securely
held in place. To check this, grab the
seat at the belt path and attempt to
move it side to side and forward and
back. There should be no more than
1 in (2.5 cm) of movement for proper
installation.
We recommend checking with a NHTSA
Certified Child Passenger Safety
Technician to make certain the child
restraint is properly installed. In Canada,
check with Transport Canada for referral
to a Child Car Seat Clinic.
24
Expedition (TB8) Canada/United States of America, enUSA, Edition date: 201907, Third-Printing- Child SafetyE142875 E142533 E142534
Page 29 of 542
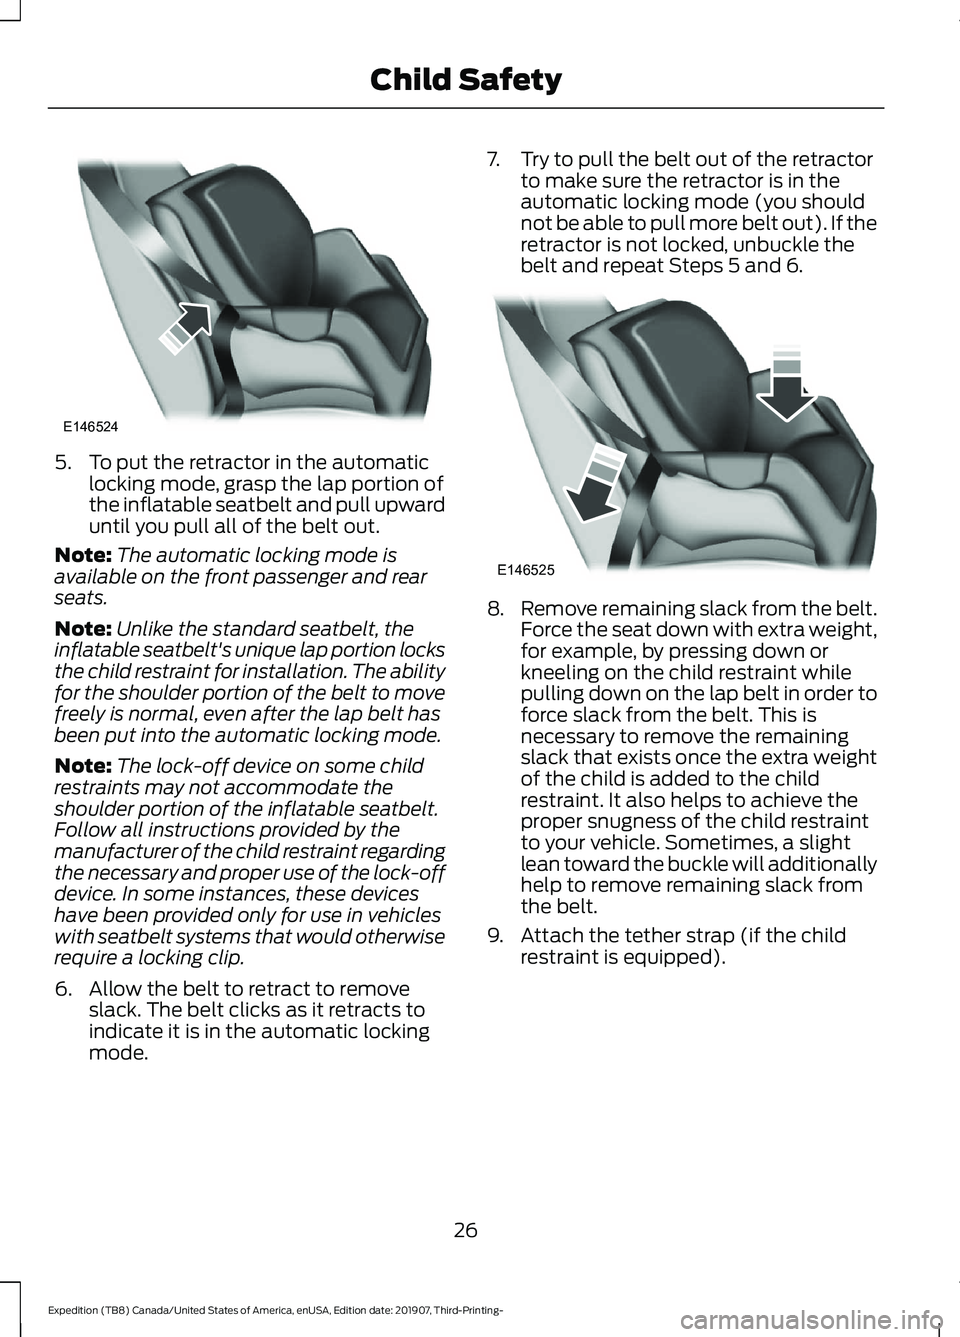
5. To put the retractor in the automatic
locking mode, grasp the lap portion of
the inflatable seatbelt and pull upward
until you pull all of the belt out.
Note: The automatic locking mode is
available on the front passenger and rear
seats.
Note: Unlike the standard seatbelt, the
inflatable seatbelt's unique lap portion locks
the child restraint for installation. The ability
for the shoulder portion of the belt to move
freely is normal, even after the lap belt has
been put into the automatic locking mode.
Note: The lock-off device on some child
restraints may not accommodate the
shoulder portion of the inflatable seatbelt.
Follow all instructions provided by the
manufacturer of the child restraint regarding
the necessary and proper use of the lock-off
device. In some instances, these devices
have been provided only for use in vehicles
with seatbelt systems that would otherwise
require a locking clip.
6. Allow the belt to retract to remove slack. The belt clicks as it retracts to
indicate it is in the automatic locking
mode. 7. Try to pull the belt out of the retractor
to make sure the retractor is in the
automatic locking mode (you should
not be able to pull more belt out). If the
retractor is not locked, unbuckle the
belt and repeat Steps 5 and 6. 8.
Remove remaining slack from the belt.
Force the seat down with extra weight,
for example, by pressing down or
kneeling on the child restraint while
pulling down on the lap belt in order to
force slack from the belt. This is
necessary to remove the remaining
slack that exists once the extra weight
of the child is added to the child
restraint. It also helps to achieve the
proper snugness of the child restraint
to your vehicle. Sometimes, a slight
lean toward the buckle will additionally
help to remove remaining slack from
the belt.
9. Attach the tether strap (if the child restraint is equipped).
26
Expedition (TB8) Canada/United States of America, enUSA, Edition date: 201907, Third-Printing- Child SafetyE146524 E146525
Page 40 of 542
PRINCIPLE OF OPERATION
WARNING: Always drive and ride
with your seatback upright and the lap
belt snug and low across the hips. WARNING:
Children must always
be properly restrained. WARNING:
Never let a passenger
hold a child on his or her lap while the
vehicle is moving. The passenger cannot
protect the child from injury in a crash. WARNING:
All occupants of your
vehicle, including the driver, should
always properly wear their seatbelts,
even when an airbag supplemental
restraint system is provided. Failure to
properly wear your seatbelt could
seriously increase the risk of injury or
death. WARNING:
It is extremely
dangerous to ride in a cargo area, inside
or outside of a vehicle. In a crash, people
riding in these areas are more likely to be
seriously injured or killed. Do not allow
people to ride in any area of your vehicle
that is not equipped with seats and
seatbelts. Make sure everyone in your
vehicle is in a seat and properly using a
seatbelt. Failure to follow this warning
could result in serious personal injury or
death. WARNING:
In a rollover crash, an
unbelted person is significantly more
likely to die than a person wearing a
seatbelt. WARNING:
Each seating position
in your vehicle has a specific seatbelt
assembly made up of one buckle and
one tongue designed to be used as a pair.
Use the shoulder belt on the outside
shoulder only. Never wear the shoulder
belt under the arm. Never use a single
seatbelt for more than one person. WARNING:
Even with advanced
restraints systems, properly restrain
children 12 and under in a rear seating
position. Failure to follow this could
seriously increase the risk of injury or
death. WARNING:
Seatbelts and seats
may be hot in a vehicle that is in the
sunshine. The hot seatbelts or seats may
burn a small child. Check seat covers and
buckles before you place a child
anywhere near them.
All seating positions in your vehicle have
lap and shoulder seatbelts. All occupants
of the vehicle should always properly wear
their seatbelts, even when an airbag
supplemental restraint system is provided.
The seatbelt system consists of:
• Lap and shoulder seatbelts.
• Shoulder seatbelt with automatic
locking mode, (except driver seatbelt
and rear inflatable seatbelt).
• Height adjuster at the front outboard
seating positions.
• Seatbelt pretensioner at the front
outboard seating positions.
• Belt tension sensor at the front
outboard passenger seating position. •
Seatbelt warning light and chime.
37
Expedition (TB8) Canada/United States of America, enUSA, Edition date: 201907, Third-Printing- SeatbeltsE71880
Page 43 of 542
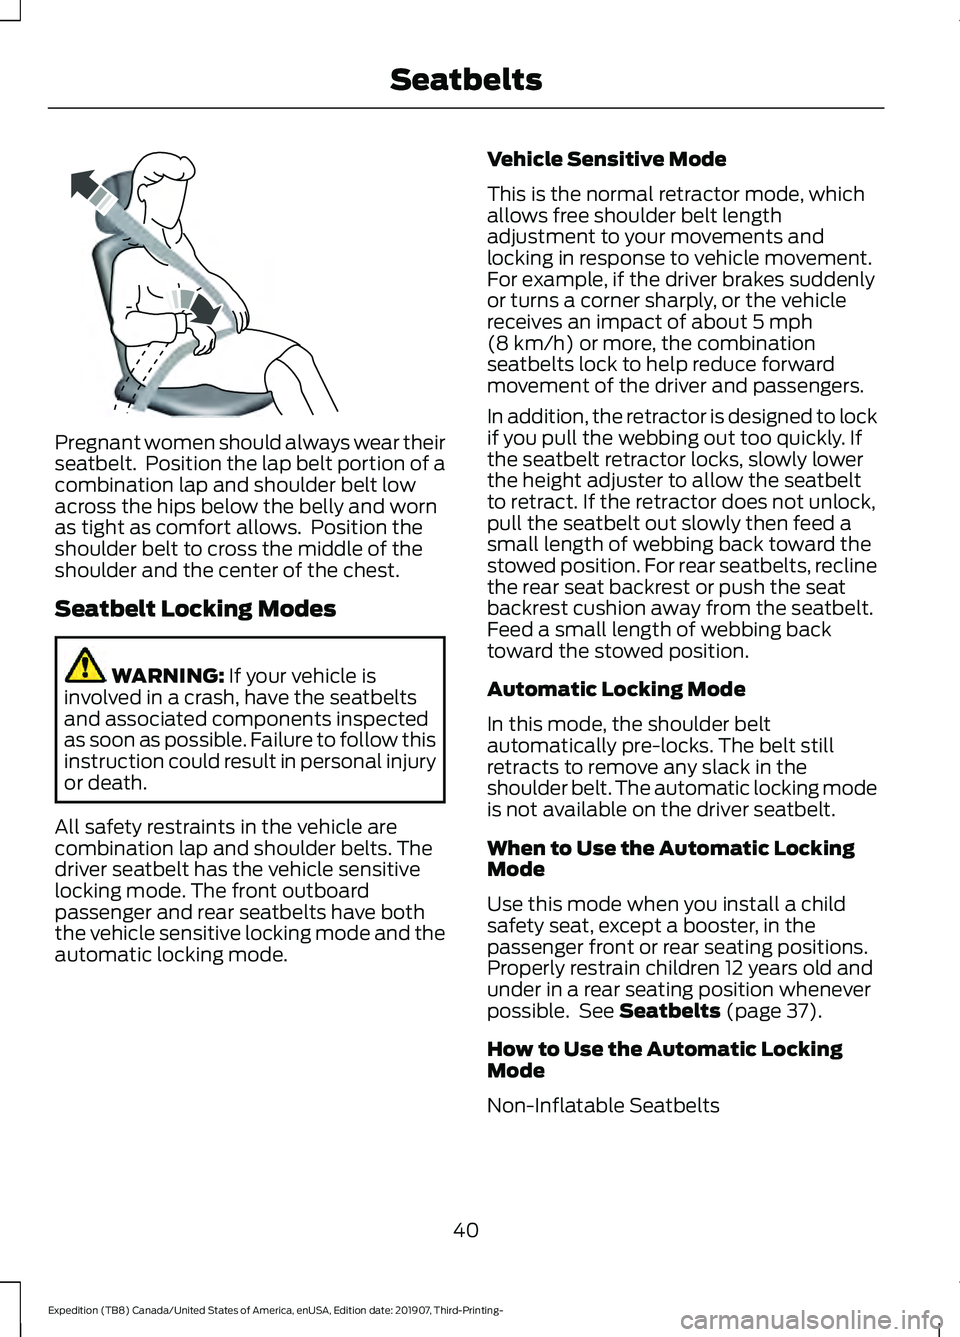
Pregnant women should always wear their
seatbelt. Position the lap belt portion of a
combination lap and shoulder belt low
across the hips below the belly and worn
as tight as comfort allows. Position the
shoulder belt to cross the middle of the
shoulder and the center of the chest.
Seatbelt Locking Modes
WARNING: If your vehicle is
involved in a crash, have the seatbelts
and associated components inspected
as soon as possible. Failure to follow this
instruction could result in personal injury
or death.
All safety restraints in the vehicle are
combination lap and shoulder belts. The
driver seatbelt has the vehicle sensitive
locking mode. The front outboard
passenger and rear seatbelts have both
the vehicle sensitive locking mode and the
automatic locking mode. Vehicle Sensitive Mode
This is the normal retractor mode, which
allows free shoulder belt length
adjustment to your movements and
locking in response to vehicle movement.
For example, if the driver brakes suddenly
or turns a corner sharply, or the vehicle
receives an impact of about
5 mph
(8 km/h) or more, the combination
seatbelts lock to help reduce forward
movement of the driver and passengers.
In addition, the retractor is designed to lock
if you pull the webbing out too quickly. If
the seatbelt retractor locks, slowly lower
the height adjuster to allow the seatbelt
to retract. If the retractor does not unlock,
pull the seatbelt out slowly then feed a
small length of webbing back toward the
stowed position. For rear seatbelts, recline
the rear seat backrest or push the seat
backrest cushion away from the seatbelt.
Feed a small length of webbing back
toward the stowed position.
Automatic Locking Mode
In this mode, the shoulder belt
automatically pre-locks. The belt still
retracts to remove any slack in the
shoulder belt. The automatic locking mode
is not available on the driver seatbelt.
When to Use the Automatic Locking
Mode
Use this mode when you install a child
safety seat, except a booster, in the
passenger front or rear seating positions.
Properly restrain children 12 years old and
under in a rear seating position whenever
possible. See
Seatbelts (page 37).
How to Use the Automatic Locking
Mode
Non-Inflatable Seatbelts
40
Expedition (TB8) Canada/United States of America, enUSA, Edition date: 201907, Third-Printing- SeatbeltsE142590
Page 44 of 542
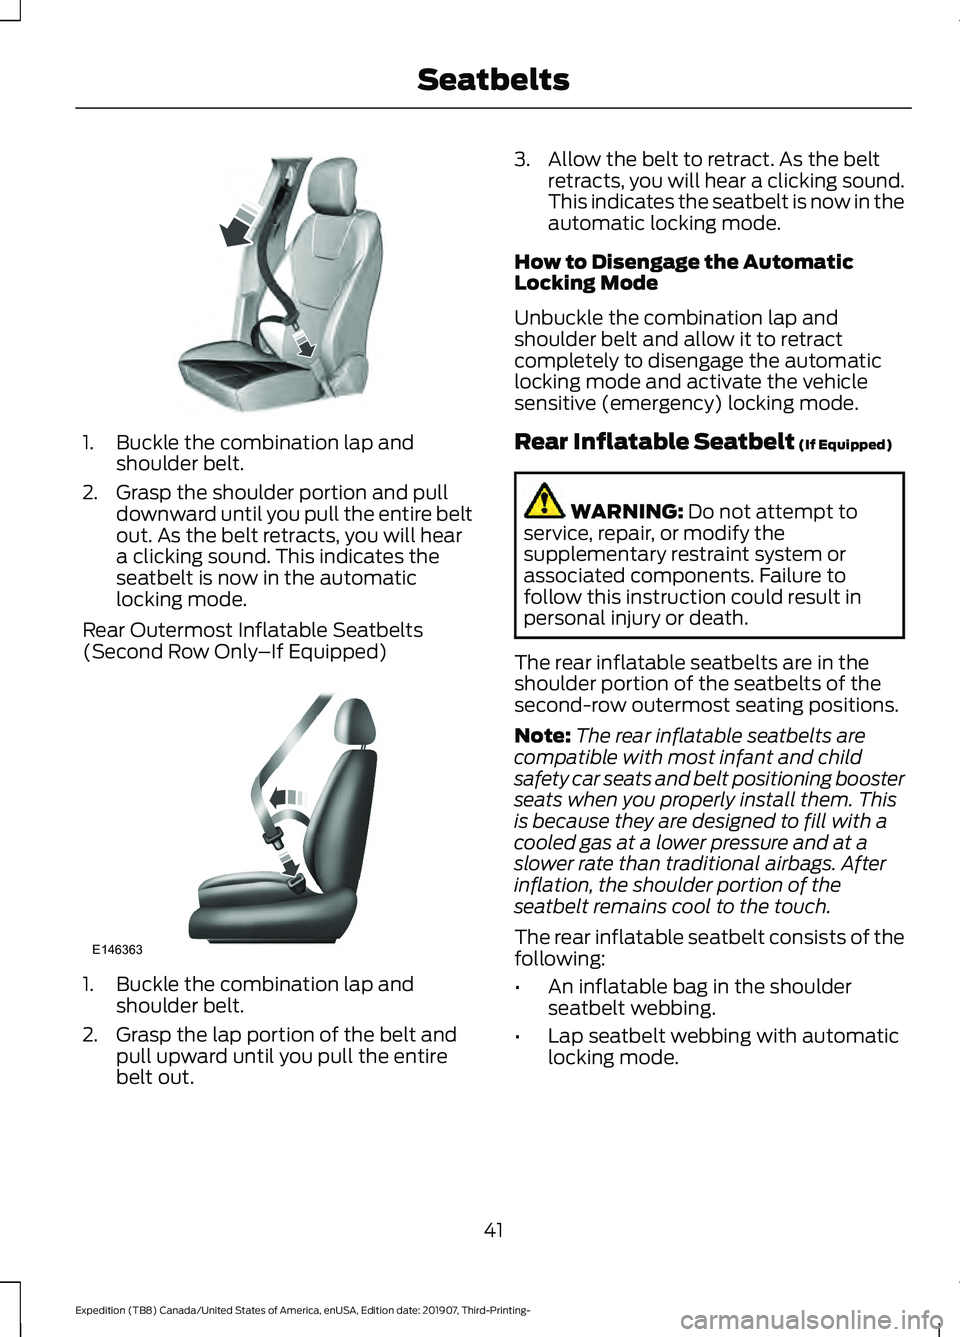
1. Buckle the combination lap and
shoulder belt.
2. Grasp the shoulder portion and pull downward until you pull the entire belt
out. As the belt retracts, you will hear
a clicking sound. This indicates the
seatbelt is now in the automatic
locking mode.
Rear Outermost Inflatable Seatbelts
(Second Row Only –If Equipped)1. Buckle the combination lap and
shoulder belt.
2. Grasp the lap portion of the belt and pull upward until you pull the entire
belt out. 3. Allow the belt to retract. As the belt
retracts, you will hear a clicking sound.
This indicates the seatbelt is now in the
automatic locking mode.
How to Disengage the Automatic
Locking Mode
Unbuckle the combination lap and
shoulder belt and allow it to retract
completely to disengage the automatic
locking mode and activate the vehicle
sensitive (emergency) locking mode.
Rear Inflatable Seatbelt (If Equipped) WARNING:
Do not attempt to
service, repair, or modify the
supplementary restraint system or
associated components. Failure to
follow this instruction could result in
personal injury or death.
The rear inflatable seatbelts are in the
shoulder portion of the seatbelts of the
second-row outermost seating positions.
Note: The rear inflatable seatbelts are
compatible with most infant and child
safety car seats and belt positioning booster
seats when you properly install them. This
is because they are designed to fill with a
cooled gas at a lower pressure and at a
slower rate than traditional airbags. After
inflation, the shoulder portion of the
seatbelt remains cool to the touch.
The rear inflatable seatbelt consists of the
following:
• An inflatable bag in the shoulder
seatbelt webbing.
• Lap seatbelt webbing with automatic
locking mode.
41
Expedition (TB8) Canada/United States of America, enUSA, Edition date: 201907, Third-Printing- SeatbeltsE142591 E146363