check engine light FORD EXPEDITION 2021 User Guide
[x] Cancel search | Manufacturer: FORD, Model Year: 2021, Model line: EXPEDITION, Model: FORD EXPEDITION 2021Pages: 574, PDF Size: 8.33 MB
Page 219 of 574
Avoid sudden braking. Although a
four-wheel drive vehicle may accelerate
better than a two-wheel drive vehicle in
snow and ice, it does not stop any faster
as braking occurs at all four wheels. Do not
become overconfident as to road
conditions.
Make sure you allow sufficient distance
between you and other vehicles for
stopping. Drive slower than usual and
consider using one of the lower gears. In
emergency stopping situations, apply the
brake steadily. Do not pump the brake
pedal. See Hints on Driving With
Anti-Lock Brakes (page 219).
Note: Excessive tire slippage can cause
transmission damage.
If Your Vehicle Gets Stuck In Mud or
Snow WARNING:
Do not spin the wheels
at over 34 mph (55 km/h). The tires may
fail and injure a passenger or bystander.
If your vehicle gets stuck in mud or snow,
you may rock it out by shifting between
forward and reverse gears, stopping
between shifts in a steady pattern. Press
lightly on the accelerator in each gear.
Note: Do not rock your vehicle if the engine
is not at normal operating temperature or
damage to the transmission could occur.
Note: Do not rock your vehicle for more
than a minute or damage to the
transmission and tires could occur or the
engine may overheat. Parking WARNING:
If the parking brake is
fully released, but the brake warning
lamp remains illuminated, the brakes
may not be working properly. Have your
vehicle checked as soon as possible. WARNING:
Always fully apply the
parking brake and make sure you shift
into park (P). Failure to follow this
instruction could result in personal injury
or death.
On some four-wheel drive vehicles, when
the transfer case is in the neutral (N)
position, the engine and transmission
disconnect from the rest of the driveline.
Therefore, your vehicle is free to roll even
if it is parked. Do not leave your vehicle
unattended with the transfer case in the
neutral (N) position. Always set the parking
brake fully and turn off the ignition when
leaving your vehicle.
Maintenance and Modifications
The suspension and steering systems on
your vehicle have been designed and
tested to provide predictable performance
whether loaded or empty. For this reason,
we strongly recommend that you do not
make modifications such as adding or
removing parts, for example, lift kits or
stabilizer bars, or by using replacement
parts not equivalent to the original factory
equipment.
We recommend that you use caution when
your vehicle has either a high load or
device, such as ladders or luggage racks.
Any modifications to your vehicle that raise
the center of gravity could cause your
vehicle to roll over when there is a loss of
vehicle control.
216
Expedition (TB8) Canada/United States of America, enUSA, First-Printing Four-Wheel Drive
(If Equipped)
Page 222 of 574
GENERAL INFORMATION
Note:
Occasional brake noise is normal. If
a metal-to-metal, continuous grinding or
continuous squeal sound is present, the
brake linings could be worn-out, you should
have them checked. If the vehicle has
continuous vibration or shudder in the
steering wheel while braking, you should
have the system checked.
Note: Brake dust may accumulate on the
wheels, even under normal driving
conditions. Some dust is inevitable as the
brakes wear and does not contribute to
brake noise. See Cleaning the Wheels
(page 358). See
Warning Lamps and
Indicators (page 115).
Wet brakes result in reduced braking
efficiency. Gently press the brake pedal a
few times when driving from a car wash or
standing water to dry the brakes.
Brake Over Accelerator
In the event the accelerator pedal
becomes stuck or entrapped, apply steady
and firm pressure to the brake pedal to
slow the vehicle and reduce engine power.
If you experience this condition, apply the
brakes and bring your vehicle to a safe
stop. Switch the engine off, move the
transmission to park (P) and apply the
parking brake. Inspect the accelerator
pedal and the area around it for any items
or debris that may be obstructing its
movement. If none are found and the
condition persists, do not drive your vehicle.
Have your vehicle towed to the location
you are having it checked. Emergency Brake Assist
Emergency brake assist detects when you
brake heavily by measuring the rate at
which you press the brake pedal. It
provides maximum braking efficiency as
long as you press the pedal. Emergency
brake assist can reduce stopping distances
in critical situations.
Anti-lock Brake System
This system helps you maintain steering
control during emergency stops by keeping
the brakes from locking.
This lamp momentarily
illuminates when you switch the
ignition on. If the light does not
illuminate during start up, remains on or
flashes, the anti-lock braking system may
be disabled. Have the system checked. If
the anti-lock brake system is disabled,
normal braking is still effective. If the brake warning lamp
illuminates with the parking
brake released, have your brake
system serviced immediately.
It also illuminates momentarily when you
switch the ignition on to confirm the lamp
is functional. If it does not illuminate when
you switch the ignition on, or begins to
flash at any time, have the system
checked.
HINTS ON DRIVING WITH
ANTI-LOCK BRAKES
The anti-lock braking system does not
eliminate the risks when:
• You drive too closely to the vehicle in
front of you.
• Your vehicle is hydroplaning.
• You take corners too fast.
• The road surface is poor.
219
Expedition (TB8) Canada/United States of America, enUSA, First-Printing BrakesE138644 E138644
Page 228 of 574
Traction Control
The system enhances your vehicle
’s ability
to maintain traction of the wheels by
detecting and controlling wheel spin. See
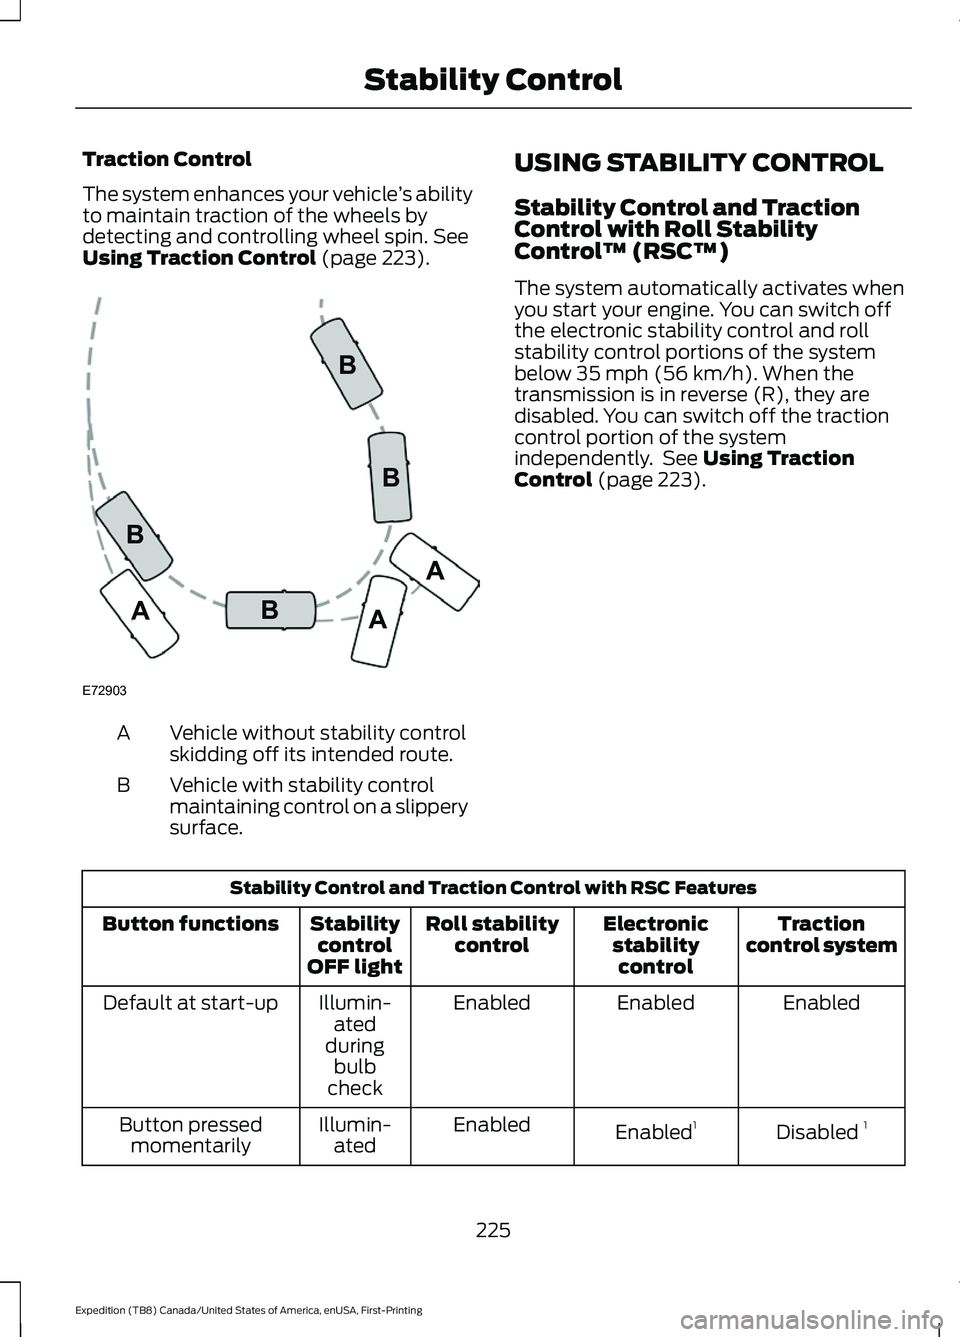
Using Traction Control (page 223). Vehicle without stability control
skidding off its intended route.
A
Vehicle with stability control
maintaining control on a slippery
surface.
B USING STABILITY CONTROL
Stability Control and Traction
Control with Roll Stability
Control
™ (RSC™)
The system automatically activates when
you start your engine. You can switch off
the electronic stability control and roll
stability control portions of the system
below
35 mph (56 km/h). When the
transmission is in reverse (R), they are
disabled. You can switch off the traction
control portion of the system
independently. See
Using Traction
Control (page 223). Stability Control and Traction Control with RSC Features
Traction
control system
Electronic
stabilitycontrol
Roll stability
control
Stability
control
OFF light
Button functions
Enabled
Enabled
Enabled
Illumin-
ated
during bulb
check
Default at start-up
Disabled 1
Enabled 1
Enabled
Illumin-
ated
Button pressed
momentarily
225
Expedition (TB8) Canada/United States of America, enUSA, First-Printing Stability ControlE72903A
AA
B
BB
B
Page 299 of 574
This feature applies your vehicle brakes at
individual wheels and, if necessary, reduces
engine power. If the trailer begins to sway,
the stability control light flashes and the
message TRAILER SWAY REDUCE
SPEED appears in the information display.
The first thing to do is slow your vehicle
down, then pull safely to the side of the
road and check for proper tongue load and
trailer load distribution. See Towing (page
285
).
RECOMMENDED TOWING
WEIGHTS
Note: Do not exceed the trailer
weight for your vehicle
configuration listed in the chart
that follows.
Note: Make sure to take into
consideration trailer frontal area.
Do not exceed 55 ft² (5.11 m²) if
your vehicle has the standard
towing package, or 60 ft² (5.57 m²)
if your vehicle has the heavy duty
package.
Note: Your vehicle could have
reduced performance when
operating at high altitudes and
when heavily loaded or towing a
trailer. When driving at elevation,
to match driving performance as
perceived at sea level, reduce gross
vehicle weight and gross
combination weight by 2% per
1,000 ft (300 m)
of elevation. Note:
Certain states require
electric trailer brakes for trailers
over a specified weight. Be sure to
check state regulations for this
specified weight. This specified
weight could limit the maximum
trailer weights, as the vehicle ’s
electrical system may not include
the wiring connector needed to
activate electric trailer brakes.
Your vehicle may tow a trailer
provided the maximum trailer
weight is less than or equal to the
maximum trailer weight listed for
your vehicle configuration on the
chart that follows.
To calculate the maximum loaded
trailer weight for your vehicle:
1. Start with the gross combined weight rating for your vehicle
model and axle ratio. See the
chart that follows.
2. Subtract all of the following
that apply to your vehicle:
•Vehicle curb weight.
• Hitch hardware weight, such
as a draw bar, ball, locks or
weight distributing.
• Driver weight.
• Passenger weight.
• Payload, cargo and luggage
weight.
• Aftermarket equipment
weight.
3. This equals the maximum
loaded trailer weight for this
combination.
296
Expedition (TB8) Canada/United States of America, enUSA, First-Printing Towing
Page 313 of 574
•
Avoid adding particular accessories to
your vehicle (e.g. bug deflectors,
rollbars/light bars, running boards, ski
racks).
• Avoid driving with the wheels out of
alignment.
BREAKING-IN
You need to break in new tires for
approximately 300 mi (480 km). During
this time, your vehicle may exhibit some
unusual driving characteristics.
DRIVING THROUGH WATER WARNING:
Do not drive through
flowing or deep water as you may lose
control of your vehicle.
Note: Driving through standing water can
cause vehicle damage.
Note: Engine damage can occur if water
enters the air filter.
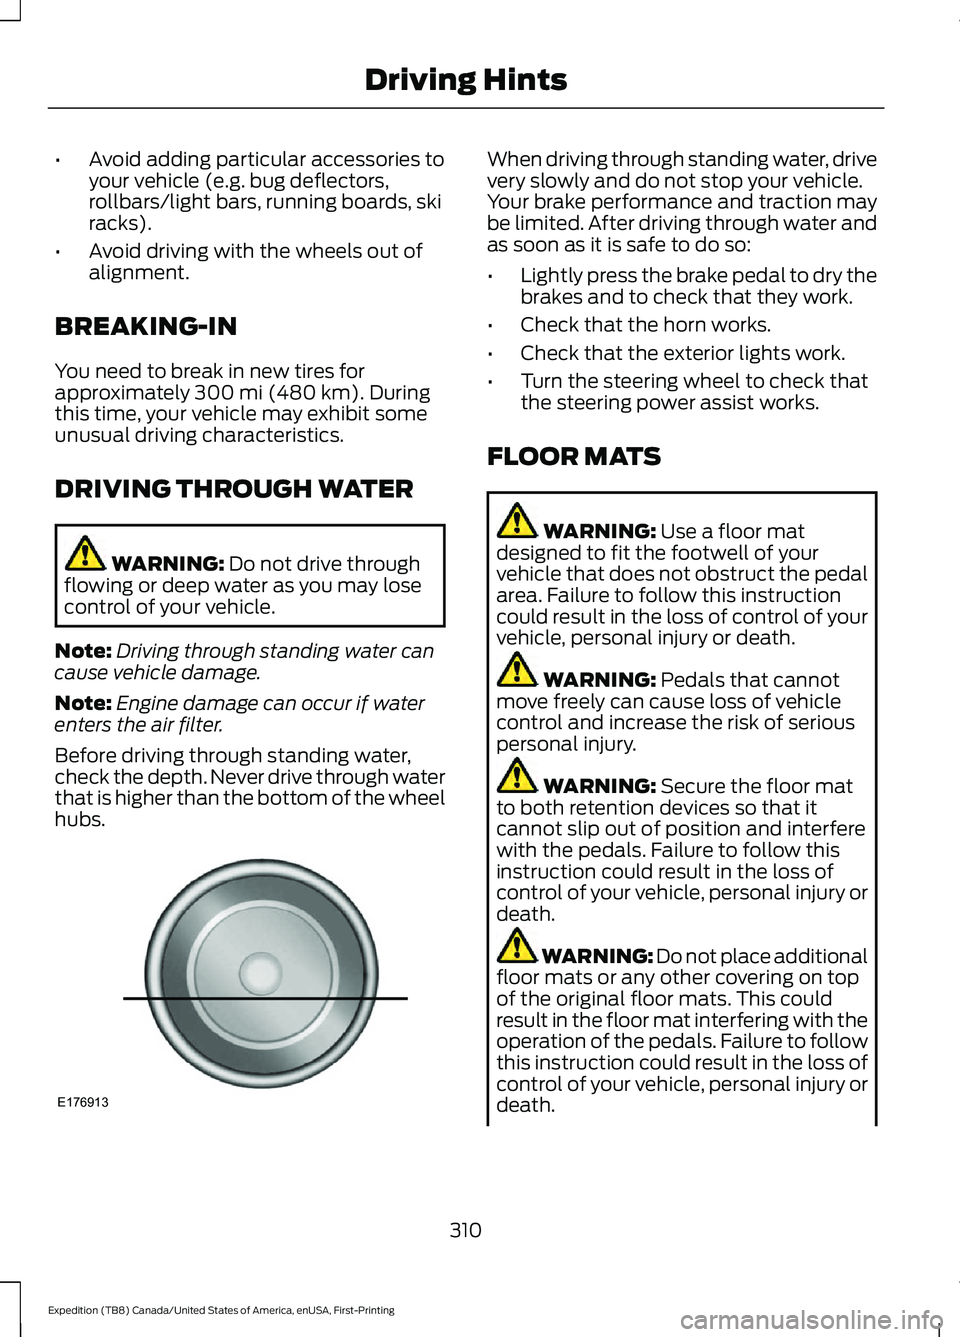
Before driving through standing water,
check the depth. Never drive through water
that is higher than the bottom of the wheel
hubs. When driving through standing water, drive
very slowly and do not stop your vehicle.
Your brake performance and traction may
be limited. After driving through water and
as soon as it is safe to do so:
•
Lightly press the brake pedal to dry the
brakes and to check that they work.
• Check that the horn works.
• Check that the exterior lights work.
• Turn the steering wheel to check that
the steering power assist works.
FLOOR MATS WARNING:
Use a floor mat
designed to fit the footwell of your
vehicle that does not obstruct the pedal
area. Failure to follow this instruction
could result in the loss of control of your
vehicle, personal injury or death. WARNING:
Pedals that cannot
move freely can cause loss of vehicle
control and increase the risk of serious
personal injury. WARNING:
Secure the floor mat
to both retention devices so that it
cannot slip out of position and interfere
with the pedals. Failure to follow this
instruction could result in the loss of
control of your vehicle, personal injury or
death. WARNING: Do not place additional
floor mats or any other covering on top
of the original floor mats. This could
result in the floor mat interfering with the
operation of the pedals. Failure to follow
this instruction could result in the loss of
control of your vehicle, personal injury or
death.
310
Expedition (TB8) Canada/United States of America, enUSA, First-Printing Driving HintsE176913
Page 342 of 574
Action and description
Message
If the instrument cluster
displays one of the following
messages, repeat the
process.
Not Reset
Reset Cancelled
CHANGING THE ENGINE AIR
FILTER WARNING: To reduce the risk of
vehicle damage and personal burn
injuries, do not start your engine with the
air cleaner removed and do not remove
it while the engine is running.
Note: Failure to use the correct air filter
element may result in severe engine
damage. Resulting component damage
may not be covered by the vehicle Warranty.
When changing the air filter element, use
only the air filter element listed. See
Motorcraft Parts
(page 390).
Change the air filter element at the correct
interval. See
Scheduled Maintenance
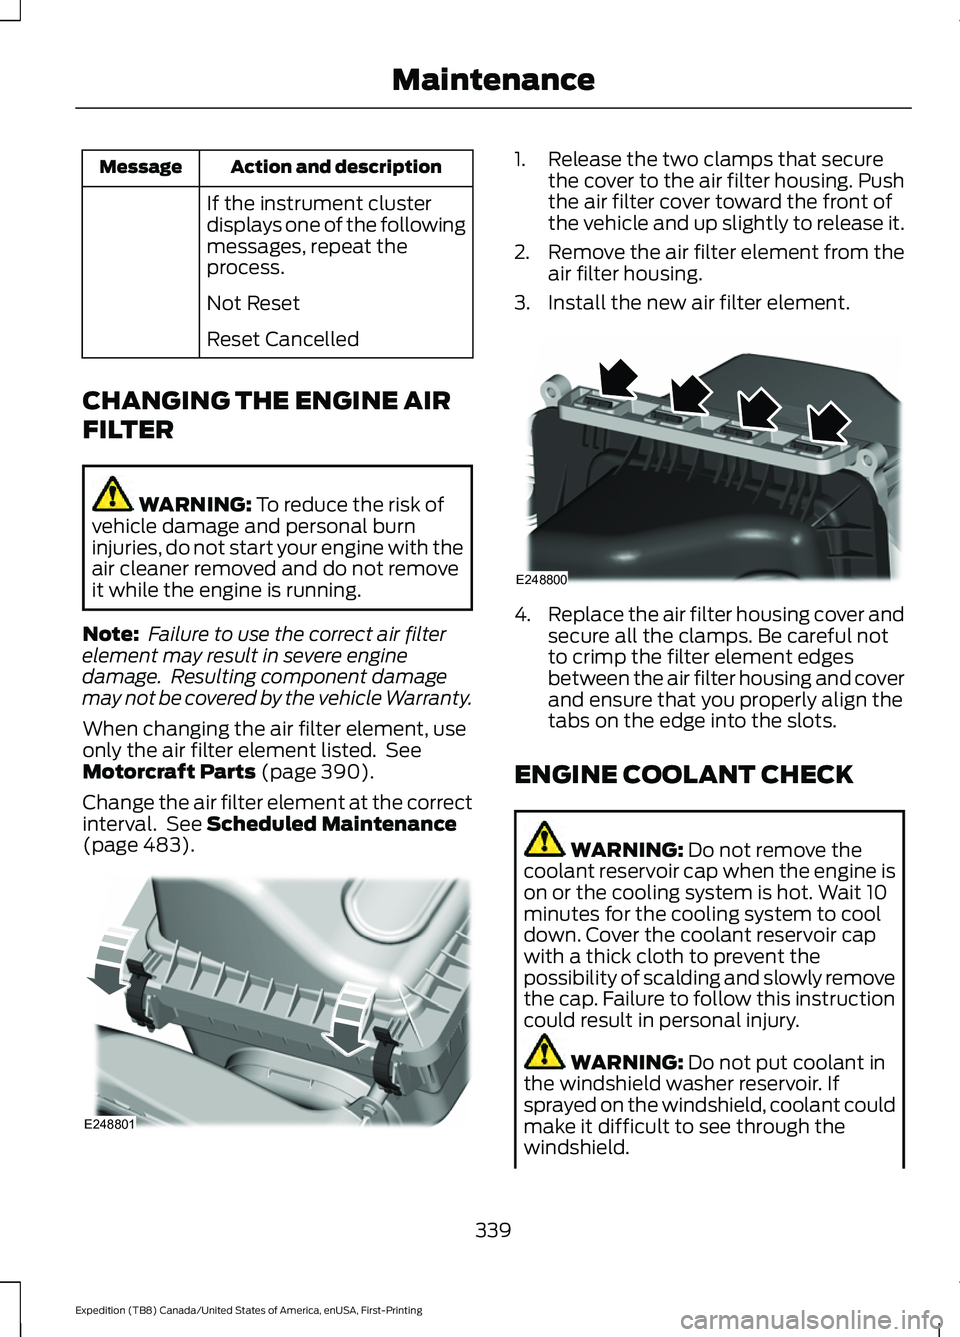
(page 483). 1. Release the two clamps that secure
the cover to the air filter housing. Push
the air filter cover toward the front of
the vehicle and up slightly to release it.
2. Remove the air filter element from the
air filter housing.
3. Install the new air filter element. 4.
Replace the air filter housing cover and
secure all the clamps. Be careful not
to crimp the filter element edges
between the air filter housing and cover
and ensure that you properly align the
tabs on the edge into the slots.
ENGINE COOLANT CHECK WARNING: Do not remove the
coolant reservoir cap when the engine is
on or the cooling system is hot. Wait 10
minutes for the cooling system to cool
down. Cover the coolant reservoir cap
with a thick cloth to prevent the
possibility of scalding and slowly remove
the cap. Failure to follow this instruction
could result in personal injury. WARNING:
Do not put coolant in
the windshield washer reservoir. If
sprayed on the windshield, coolant could
make it difficult to see through the
windshield.
339
Expedition (TB8) Canada/United States of America, enUSA, First-Printing MaintenanceE248801 E248800
Page 343 of 574
WARNING: To reduce the risk of
personal injury, make sure the engine is
cool before unscrewing the coolant
pressure relief cap. The cooling system
is under pressure. Steam and hot liquid
can come out forcefully when you loosen
the cap slightly. WARNING:
Do not add coolant
further than the MAX mark.
When the engine is cold, check the
concentration and level of the coolant at
the intervals listed in the scheduled
maintenance information. See Scheduled
Maintenance
(page 483).
Note: Make sure that the coolant level is
between the
MIN and MAX marks on the
coolant reservoir.
Note: Coolant expands when it is hot. The
level may extend beyond the
MAX mark.
Maintain coolant concentration within
48% to 50%, which equates to a freeze
point between
-29°F (-34°C) and -35°F
(-37°C). Coolant concentration should be
checked using a refractometer. We do not
recommend the use of hydrometers or
coolant test strips for measuring coolant
concentration.
Adding Coolant WARNING:
Do not remove the
coolant reservoir cap when the engine is
on or the cooling system is hot. Wait 10
minutes for the cooling system to cool
down. Cover the coolant reservoir cap
with a thick cloth to prevent the
possibility of scalding and slowly remove
the cap. Failure to follow this instruction
could result in personal injury. WARNING:
Do not add engine
coolant when the engine is on or the
cooling system is hot. Failure to follow
this instruction could result in personal
injury.
Note: Automotive fluids are not
interchangeable. Take care not to put
engine coolant in the windshield washer
fluid reservoir or windshield washer fluid in
the engine coolant reservoir.
Note: Do not use stop leak pellets, cooling
system sealants, or non-specified additives
as they can cause damage to the engine
cooling or heating systems. Resulting
component damage may not be covered by
the vehicle Warranty.
It is very important to use prediluted
coolant approved to the correct
specification in order to avoid plugging the
small passageways in the engine cooling
system. See
Capacities and
Specifications (page 392). Do not mix
different colors or types of coolant in your
vehicle. Mixing of engine coolants or using
an incorrect coolant may harm the engine
or cooling system components and may
not be covered by the vehicle Warranty.
Note: If prediluted coolant is not available,
use the approved concentrated coolant
diluting it to 50/50 with distilled water. See
Capacities and Specifications (page 392).
Using water that has not been deionised
may contribute to deposit formation,
corrosion and plugging of the small cooling
system passageways.
Note: Coolants marketed for all makes and
models may not be approved to our
specifications and may cause damage to
the cooling system. Resulting component
damage may not be covered by the vehicle
Warranty.
340
Expedition (TB8) Canada/United States of America, enUSA, First-Printing Maintenance
Page 362 of 574
Body
•
Wash your vehicle thoroughly to
remove dirt, grease, oil, tar or mud from
exterior surfaces, rear-wheel housing
and the underside of front fenders.
• Periodically wash your vehicle if it is
stored in exposed locations.
• Touch-up exposed or primed metal to
prevent rust.
• Cover chrome and stainless steel parts
with a thick coat of auto wax to prevent
discoloration. Re-wax as necessary
when you wash your vehicle.
• Lubricate all hood, door and luggage
compartment hinges and latches with
a light grade oil.
• Cover interior trim to prevent fading.
• Keep all rubber parts free from oil and
solvents.
Engine
• Change the engine oil and filter prior to
storage because used engine oil
contains contaminates which may
cause engine damage.
• Start the engine every 15 days for a
minimum of 15 minutes. Run at fast
idle with the climate controls set to
defrost until the engine reaches normal
operating temperature.
• With your foot on the brake, shift
through all the gears while the engine
is running.
• We recommend that you change the
engine oil before you use your vehicle
again.
Fuel system
• Fill the fuel tank with high-quality fuel
until the first automatic shutoff of the
fuel pump nozzle. Cooling system
•
Protect against freezing temperatures.
• When removing your vehicle from
storage, check coolant fluid level.
Confirm that there are no cooling
system leaks and that fluid is at the
recommended level.
Disconnecting Your 12 Volt Battery
• Check and recharge as necessary. Keep
connections clean.
• If storing your vehicle for more than 30
days without recharging the battery,
we recommend that you disconnect
the battery cables to maintain battery
charge for quick starting.
Note: It is necessary to reset memory
features if you disconnect the battery
cables.
Brakes
• Make sure the brakes and parking brake
release fully.
Tires
• Maintain recommended air pressure.
Miscellaneous
• Make sure all linkages, cables, levers
and pins under your vehicle are covered
with grease to prevent rust.
• Move vehicles at least 25 ft (7.5 m)
every 15 days to lubricate working parts
and prevent corrosion.
359
Expedition (TB8) Canada/United States of America, enUSA, First-Printing Vehicle Care
Page 487 of 574
When the oil change message appears in
the information display, it is time for an oil
change. Make sure you perform the oil
change within two weeks or 500 mi
(800 km) of the message appearing. Make
sure you reset the Intelligent Oil-Life
Monitor after each oil change. See
Oil
Change Indicator Reset (page 338).
If your information display resets
prematurely or becomes inoperative, you
should perform the oil change interval at
six months or
5,000 mi (8,000 km) from
your last oil change. Never exceed one year
or
10,000 mi (16,000 km) between oil
change intervals,
Your vehicle is very sophisticated and built
with multiple, complex, performance
systems. Every manufacturer develops
these systems using different
specifications and performance features.
That is why it is important to rely upon your
dealership to properly diagnose and repair
your vehicle.
We have recommended maintenance
intervals for various parts and component
systems based upon engineering testing.
We rely upon this testing to determine the
most appropriate mileage for replacement
of oils and fluids to protect your vehicle at
the lowest overall cost to you and
recommends against maintenance
schedules that deviate from the scheduled
maintenance information.
We strongly recommend the use of only
genuine Ford, Motorcraft or
Ford-authorized re-manufactured
replacement parts engineered for your
vehicle. Additives and Chemicals
This owner's manual and our Workshop
Manual list the recommended additives
and chemicals for your vehicle. We do not
recommend using chemicals or additives
not approved by us as part of your vehicle
’s
normal maintenance. Please consult your
warranty information.
Oils, Fluids and Flushing
In many cases, fluid discoloration is a
normal operating characteristic and, by
itself, does not necessarily indicate a
concern or that the fluid needs to be
changed. However, a qualified expert, such
as the factory-trained technicians at your
dealership, should inspect discolored fluids
that also show signs of overheating or
foreign material contamination
immediately.
Make sure to change your vehicle ’s oils and
fluids at the specified intervals or in
conjunction with a repair. Flushing is a
viable way to change fluid for many vehicle
sub-systems during scheduled
maintenance. It is critical that systems are
flushed only with new fluid that is the same
as that required to fill and operate the
system or using a Ford-approved flushing
chemical.
Owner Checks and Services
Make sure you perform the following basic
maintenance checks and inspections every
month or at six-month intervals. Check Every Month
Engine oil level.
Function of all interior and exterior lights.
Tires (including spare) for wear and proper pressure.
484
Expedition (TB8) Canada/United States of America, enUSA, First-Printing Scheduled Maintenance