clock FORD EXPEDITION 2021 Owners Manual
[x] Cancel search | Manufacturer: FORD, Model Year: 2021, Model line: EXPEDITION, Model: FORD EXPEDITION 2021Pages: 574, PDF Size: 8.33 MB
Page 41 of 574
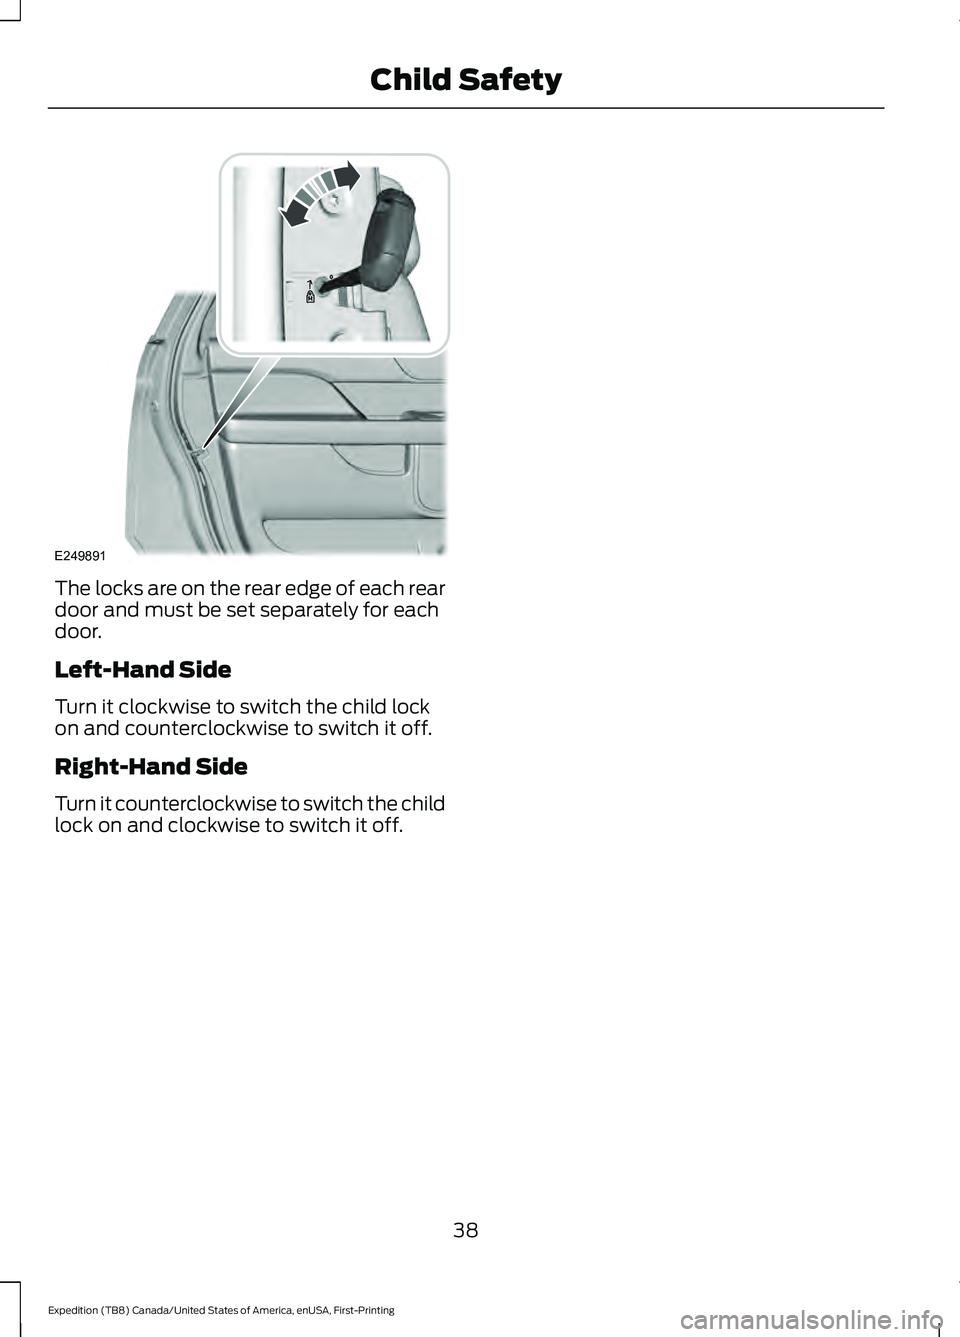
The locks are on the rear edge of each rear
door and must be set separately for each
door.
Left-Hand Side
Turn it clockwise to switch the child lock
on and counterclockwise to switch it off.
Right-Hand Side
Turn it counterclockwise to switch the child
lock on and clockwise to switch it off.
38
Expedition (TB8) Canada/United States of America, enUSA, First-Printing Child SafetyE249891
Page 150 of 574
Use air conditioning with recirculated air
to improve cooling performance and
efficiency.
Note:
In certain conditions (for example,
maximum defrost) the air conditioning
compressor may continue to operate even
though you switch off the air conditioning.
Switching the Climate Control On
and Off Press and release the button.
Switching Maximum Air
Conditioning On and Off Turn the temperature control
counterclockwise to the lowest
setting for maximum cooling.
Recirculated air flows through the
instrument panel air vents, air conditioning
turns on and the blower motor adjusts to
the highest speed.
Switching Maximum Defrost On
and Off Turn the temperature control
clockwise to the highest setting
for maximum defrosting.
Air flows through the windshield air vents,
and the blower motor adjusts to the
highest speed.
Note: Depending on your region, air
conditioning turns on.
You can also use this setting to defog and
clear the windshield of a thin covering of
ice.
Note: To prevent window fogging, you
cannot select recirculated air when
maximum defrost is on.
Note: The heated rear window also turns
on when you select maximum defrost. Switching Recirculated Air On and
Off Press and release the button to
switch between outside air and
recirculated air.
The air currently in the passenger
compartment recirculates. This may
reduce the time needed to cool the interior,
when used with A/C, and reduce unwanted
odors from entering your vehicle.
Note: Recirculated air may turn off, or
prevent you from switching on, in all air flow
modes except MAX A/C to reduce the risk
of fogging. Recirculation may also turn on
and off in various air distribution control
combinations during hot weather to improve
cooling efficiency.
Locking the Rear Climate Control Press and release the button.
When illuminated, you can only operate
the rear passenger settings through the
front controls.
Setting the Rear Blower Motor
Speed Press and release + or - to adjust
the volume of air circulated in
the rear passenger
compartment.
Setting the Rear Temperature Press and release
+ or - to set
the temperature in the rear
passenger compartment.
Switching the Rear Climate
Control On and Off Press and release the button.
147
Expedition (TB8) Canada/United States of America, enUSA, First-Printing Climate Control E266664 E265400
Page 293 of 574
A message displays during calibration and
after calibration is complete.
Using Pro Trailer Backup Assist
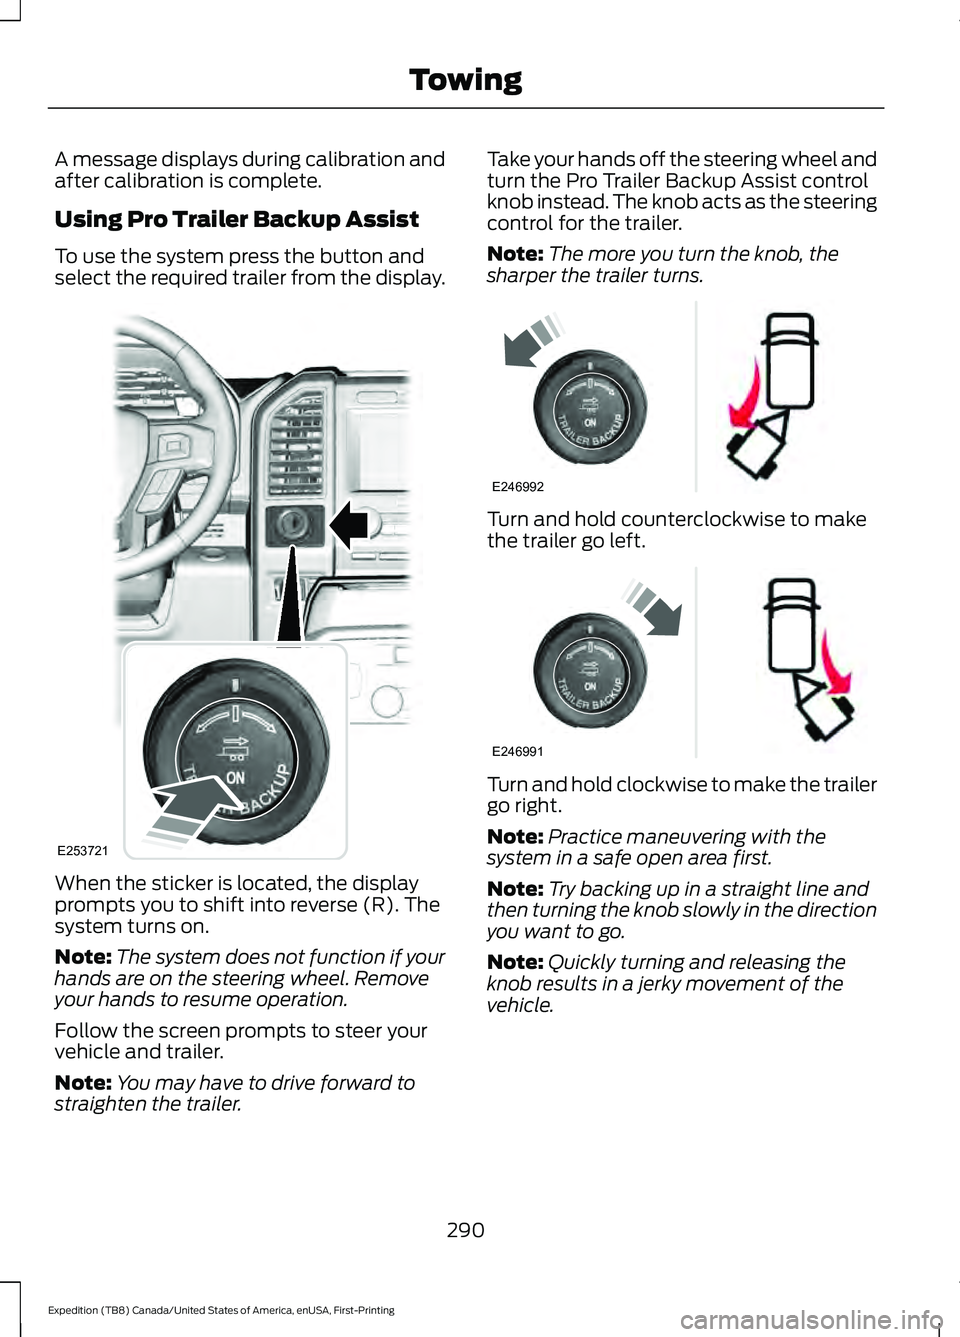
To use the system press the button and
select the required trailer from the display.
When the sticker is located, the display
prompts you to shift into reverse (R). The
system turns on.
Note:
The system does not function if your
hands are on the steering wheel. Remove
your hands to resume operation.
Follow the screen prompts to steer your
vehicle and trailer.
Note: You may have to drive forward to
straighten the trailer. Take your hands off the steering wheel and
turn the Pro Trailer Backup Assist control
knob instead. The knob acts as the steering
control for the trailer.
Note:
The more you turn the knob, the
sharper the trailer turns. Turn and hold counterclockwise to make
the trailer go left.
Turn and hold clockwise to make the trailer
go right.
Note:
Practice maneuvering with the
system in a safe open area first.
Note: Try backing up in a straight line and
then turning the knob slowly in the direction
you want to go.
Note: Quickly turning and releasing the
knob results in a jerky movement of the
vehicle.
290
Expedition (TB8) Canada/United States of America, enUSA, First-Printing TowingE253721 E246992 E246991
Page 341 of 574
Only use oils certified for gasoline engines
by the American Petroleum Institute (API).
An oil with this trademark symbol
conforms to the current engine and
emission system protection standards and
fuel economy requirements of the
International Lubricants Specification
Advisory Committee (ILSAC).
To top up the engine oil level do the
following:
1. Clean the area surrounding the engine
oil filler cap before you remove it.
2. Remove the engine oil filler cap. See Under Hood Overview (page 336).
Turn it counterclockwise and remove
it.
3. Add engine oil that meets our specifications. See
Capacities and
Specifications (page 392). You may
have to use a funnel to pour the engine
oil into the opening.
4. Recheck the oil level.
5. If the oil level is correct, replace the dipstick and make sure it is fully seated.
6. Replace the engine oil filler cap. Turn it clockwise until you feel a strong
resistance.
Note: Do not add oil further than the
maximum mark. Oil levels above the
maximum mark may cause engine damage. Note:
Make sure you install the oil filler cap
correctly.
Note: Soak up any spillage with an
absorbent cloth immediately.
OIL CHANGE INDICATOR
RESET
Use the information display controls on
the steering wheel to reset the oil change
indicator.
From the main menu scroll to: Action and description
Message
Press the right arrow button,
then from this menu scroll
to the following message.
Settings
Press the right arrow button,
then from this menu scroll
to the following message.
Vehicle
Press the right arrow button,
then from this menu scroll
to the following message.
Oil Life
Press and hold the
OK
button until the instrument
cluster displays the
following message.
Hold OK to
Reset
Reset Successful
When the oil change indic-
ator resets the instrument
cluster displays 100%.
Remaining Life
{00}%
338
Expedition (TB8) Canada/United States of America, enUSA, First-Printing MaintenanceE142732
Page 344 of 574
If the coolant level is at or below the
minimum mark, add prediluted coolant
immediately.
To top up the coolant level do the
following:
1. Unscrew the cap slowly. Any pressure
escapes as you unscrew the cap.
2. Add prediluted coolant approved to the correct specification. See
Capacities and Specifications (page
392).
3. Add enough prediluted coolant to reach the correct level.
4. Replace the coolant reservoir cap. Turn
the cap clockwise until it contacts the
hard stop.
5. Check the coolant level in the coolant reservoir the next few times you drive
your vehicle. If necessary, add enough
prediluted engine coolant to bring the
coolant level to the correct level.
If you have to add more than
1.1 qt (1 L) of
engine coolant per month, have your
vehicle checked as soon as possible.
Operating an engine with a low level of
coolant can result in engine overheating
and possible engine damage.
In case of emergency, you can add a large
amount of water without engine coolant
in order to reach a vehicle service location.
In this instance, qualified personnel:
1. Must drain the cooling system.
2. Chemically clean the coolant system.
3. Refill with engine coolant as soon as possible.
Water alone, without engine coolant, can
cause engine damage from corrosion,
overheating or freezing.
Do not use the following as a coolant
substitute:
• Alcohol.
• Methanol. •
Brine.
• Any coolant mixed with alcohol or
methanol antifreeze.
Alcohol and other liquids can cause engine
damage from overheating or freezing.
Do not add extra inhibitors or additives to
the coolant. These can be harmful and
compromise the corrosion protection of
the coolant.
Recycled Coolant
We do not recommend the use of recycled
coolant as an approved recycling process
is not yet available.
Dispose of used engine coolant in an
appropriate manner. Follow your
community's regulations and standards
for recycling and disposing of automotive
fluids.
Severe Climates
If you drive in extremely cold climates:
• It may be necessary to increase the
coolant concentration above 50%.
• A coolant concentration of 60%
provides improved freeze point
protection. Coolant concentrations
above 60% decrease the overheat
protection characteristics of the
coolant and may cause engine
damage.
If you drive in extremely hot climates:
• You can decrease the coolant
concentration to 40%.
• Coolant concentrations below 40%
decrease the freeze and corrosion
protection characteristics of the
coolant and may cause engine
damage.
Vehicles driven year-round in non-extreme
climates should use prediluted coolant for
optimum cooling system and engine
protection.
341
Expedition (TB8) Canada/United States of America, enUSA, First-Printing Maintenance
Page 349 of 574
WARNING: Battery posts,
terminals and related accessories
contain lead and lead compounds,
chemicals known to the State of
California to cause cancer and
reproductive harm. Wash your hands
after handling
. WARNING:
This vehicle may have
more than one battery. Removing the
battery cables from only one battery
does not disconnect your vehicle
electrical system. Make sure you
disconnect the battery cables from all
batteries when disconnecting power.
Failure to do so may cause serious
personal injury or property damage.
Your vehicle is fitted with a Motorcraft
maintenance-free battery which normally
does not require additional water.
When a battery replacement is required,
you must use a recommended
replacement battery that matches the
electrical requirements of the vehicle.
Note: After cleaning or replacing the
battery, make sure you reinstall the battery
vent tube, battery cover or shield.
For longer, trouble-free operation, keep the
top of the battery clean and dry.
If you see any corrosion on the battery or
terminals, remove the cables from the
terminals and clean with a wire brush. You
can neutralize the acid with a solution of
baking soda and water. Because your vehicle
’s engine is
electronically controlled by a computer,
some control conditions are maintained
by power from the battery. When the
battery is disconnected or a new battery
is installed, the engine must relearn its idle
and fuel trim strategy for optimum
driveability and performance. Flexible fuel
vehicles (FFV) must also relearn the
ethanol content of the fuel for optimum
driveability and performance.
To restore the settings, do the following:
1. Apply the parking brake.
2. Shift into park (P) or neutral (N).
3. Switch off all accessories.
4. Press the brake pedal and start your vehicle.
5. Run the engine until it reaches normal operating temperature. While the
engine is warming up, complete the
following: Reset the clock. Reset the
power windows bounce-back feature.
See
Windows and Mirrors (page 105).
Reset the radio station presets. See
Audio System
(page 408).
6. Allow the engine to idle for at least one
minute.
7. Drive the vehicle at least 10 mi (16 km)
to completely relearn the idle trim and
fuel trim strategy.
Note: If you do not allow the engine to
relearn the idle and fuel trim strategy, the
idle quality of your vehicle may be adversely
affected until the engine computer
eventually relearns the idle trim and fuel
trim strategy.
Note: For flexible fuel vehicles, if you are
operating on E85, you may experience poor
starts or an inability to start the engine and
driveability problems until the fuel trim and
ethanol content have been relearned.
346
Expedition (TB8) Canada/United States of America, enUSA, First-Printing Maintenance
Page 351 of 574
Vertical Aim Adjustment
1. Park your vehicle directly in front of a
wall or screen on a level surface,
approximately 25 ft (7.6 m) away.
2. Measure the height from the center of your headlamp (indicated by a 3 mm
circle on the lens) to the ground and
mark an
8 ft (2.4 m) horizontal
reference line on the vertical wall or
screen at this height (a piece of
masking tape works well).
Note: To see a clearer light pattern for
adjusting, you may want to block the light
from one headlamp while adjusting the
other.
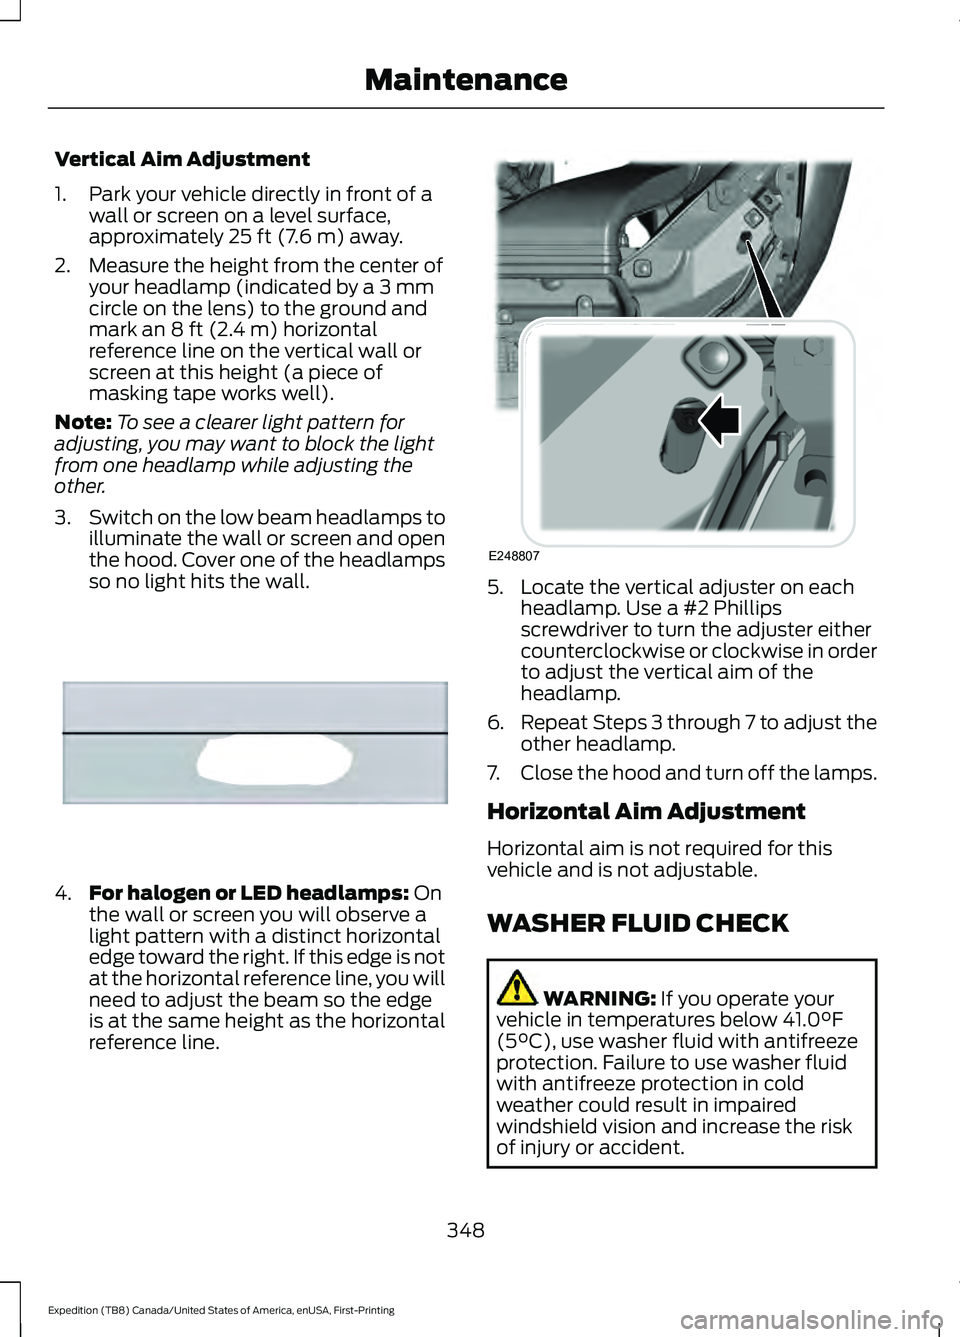
3. Switch on the low beam headlamps to
illuminate the wall or screen and open
the hood. Cover one of the headlamps
so no light hits the wall. 4.
For halogen or LED headlamps:
On
the wall or screen you will observe a
light pattern with a distinct horizontal
edge toward the right. If this edge is not
at the horizontal reference line, you will
need to adjust the beam so the edge
is at the same height as the horizontal
reference line. 5. Locate the vertical adjuster on each
headlamp. Use a #2 Phillips
screwdriver to turn the adjuster either
counterclockwise or clockwise in order
to adjust the vertical aim of the
headlamp.
6. Repeat Steps 3 through 7 to adjust the
other headlamp.
7. Close the hood and turn off the lamps.
Horizontal Aim Adjustment
Horizontal aim is not required for this
vehicle and is not adjustable.
WASHER FLUID CHECK WARNING:
If you operate your
vehicle in temperatures below 41.0°F
(5°C), use washer fluid with antifreeze
protection. Failure to use washer fluid
with antifreeze protection in cold
weather could result in impaired
windshield vision and increase the risk
of injury or accident.
348
Expedition (TB8) Canada/United States of America, enUSA, First-Printing MaintenanceE167358 E248807
Page 353 of 574
3. Press the wiper blade secondary
locking clip.
4. Remove the wiper blade.
Note: Make sure that the wiper arm does
not spring back against the glass when the
wiper blade is not attached.
5. Install in the reverse order.
Note: Make sure that the wiper blade locks
into place.
REMOVING A HEADLAMP
The bumper fascia and grille must be
removed in order to remove the headlamp
assembly, see an authorized dealer if your
headlamp assembly need replacement.
CHANGING A BULB WARNING: Bulbs can become hot.
Let the bulb cool down before removing
it. Failure to do so could result in
personal injury.
Install in the reverse order unless otherwise
stated.
Note: If the bulb is accidentally touched,
clean it with rubbing alcohol before
installing it.
LED Headlamp (If Equipped)
These lamps are LED, contact an
authorized dealer.
LED Foglamp
(If Equipped)
These lamps are LED, contact an
authorized dealer.
Headlamp Bulb
1. Switch all of the lamps and the ignition
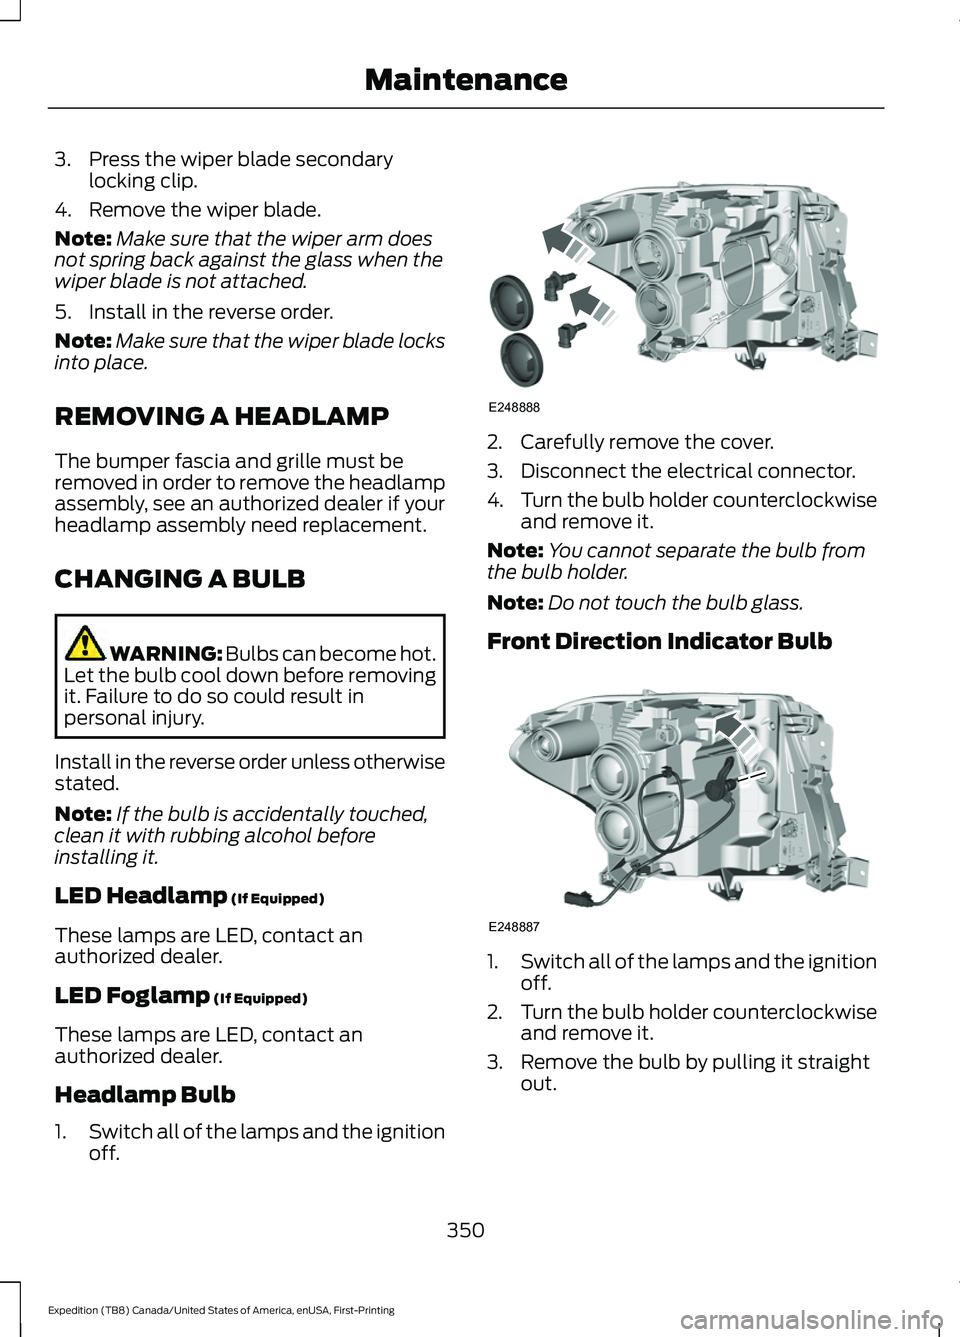
off. 2. Carefully remove the cover.
3. Disconnect the electrical connector.
4.
Turn the bulb holder counterclockwise
and remove it.
Note: You cannot separate the bulb from
the bulb holder.
Note: Do not touch the bulb glass.
Front Direction Indicator Bulb 1.
Switch all of the lamps and the ignition
off.
2. Turn the bulb holder counterclockwise
and remove it.
3. Remove the bulb by pulling it straight out.
350
Expedition (TB8) Canada/United States of America, enUSA, First-Printing MaintenanceE248888 E248887
Page 354 of 574
LED Direction Indicator and Side
Marker Bulbs (If Equipped)
These lamps are LED, contact an
authorized dealer.
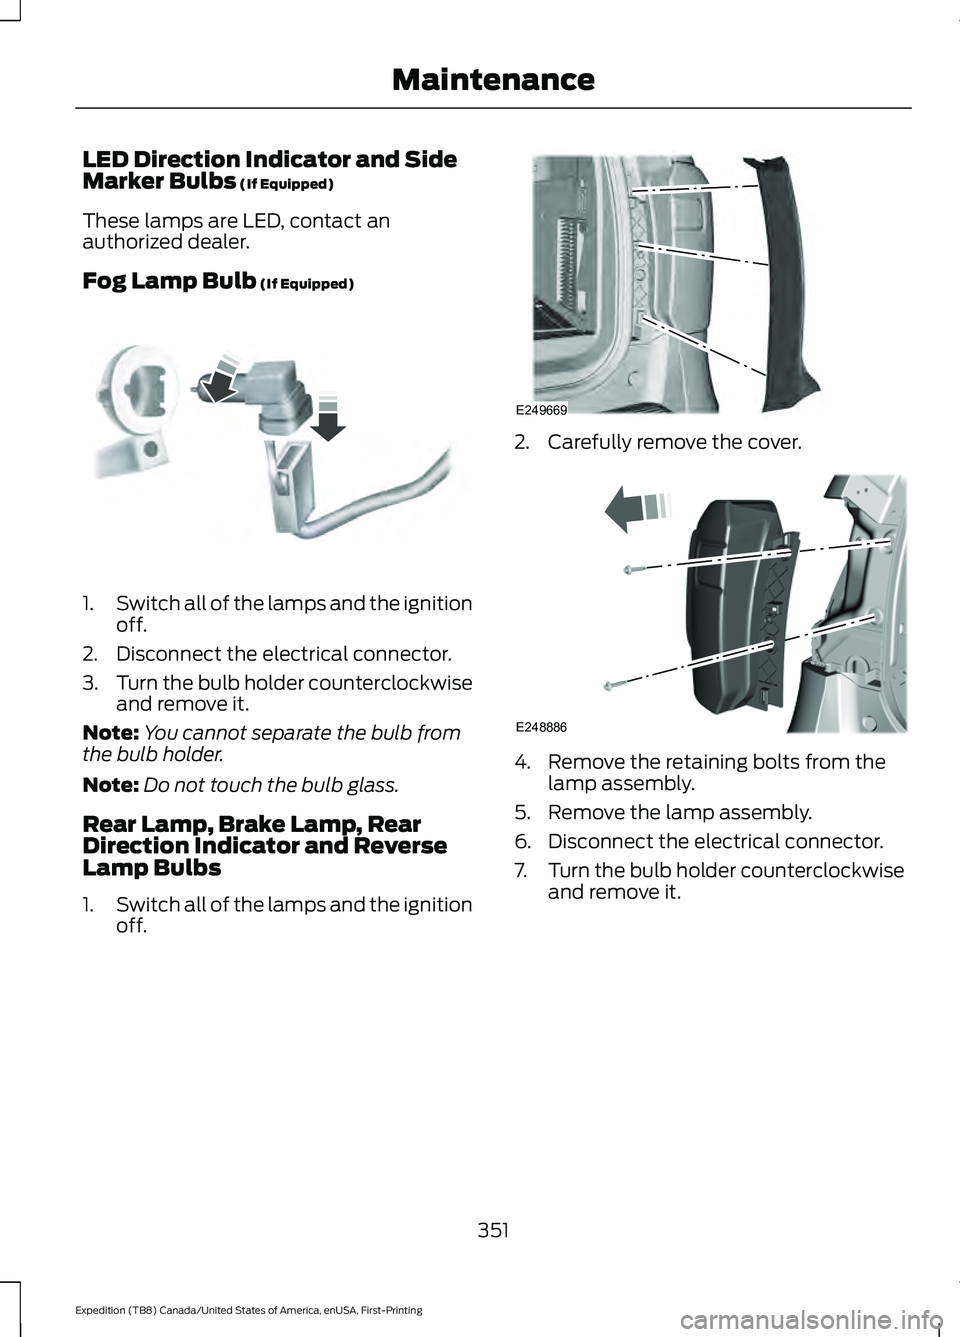
Fog Lamp Bulb
(If Equipped) 1.
Switch all of the lamps and the ignition
off.
2. Disconnect the electrical connector.
3. Turn the bulb holder counterclockwise
and remove it.
Note: You cannot separate the bulb from
the bulb holder.
Note: Do not touch the bulb glass.
Rear Lamp, Brake Lamp, Rear
Direction Indicator and Reverse
Lamp Bulbs
1. Switch all of the lamps and the ignition
off. 2. Carefully remove the cover.
4. Remove the retaining bolts from the
lamp assembly.
5. Remove the lamp assembly.
6. Disconnect the electrical connector.
7. Turn the bulb holder counterclockwise
and remove it.
351
Expedition (TB8) Canada/United States of America, enUSA, First-Printing MaintenanceE163826 E249669 E248886
Page 387 of 574
as possible. Use of any tire or wheel not
recommended by Ford can affect the
safety and performance of your vehicle,
which could result in an increased risk of
loss of vehicle control, vehicle rollover,
personal injury and death.
WARNING: To help prevent your
vehicle from moving when changing a
wheel, shift the transmission into park
(P), set the parking brake and use an
appropriate block or wheel chock to
secure the wheel diagonally opposite to
the wheel being changed. For example,
when changing the front left wheel,
place an appropriate block or wheel
chock on the right rear wheel. WARNING:
Do not attempt to
change a tire on the side of the vehicle
close to moving traffic. Pull far enough
off the road to avoid the danger of being
hit when operating the jack or changing
the wheel. WARNING:
Always use the jack
provided as original equipment with your
vehicle. If using a jack other than the one
provided, make sure the jack capacity is
adequate for the vehicle weight,
including any vehicle cargo or
modifications. If you are unsure if the jack
capacity is adequate, contact the
authorized dealer. WARNING:
Switch off the running
boards before jacking or placing any
object under your vehicle. Never place
your hand between the extended running
board and your vehicle. A moving running
board may cause injury. WARNING:
Only use the spare
wheel carrier to stow the wheel provided
with your vehicle. Other wheel sizes
could cause the spare wheel carrier to
fail if it does not fit securely or is too
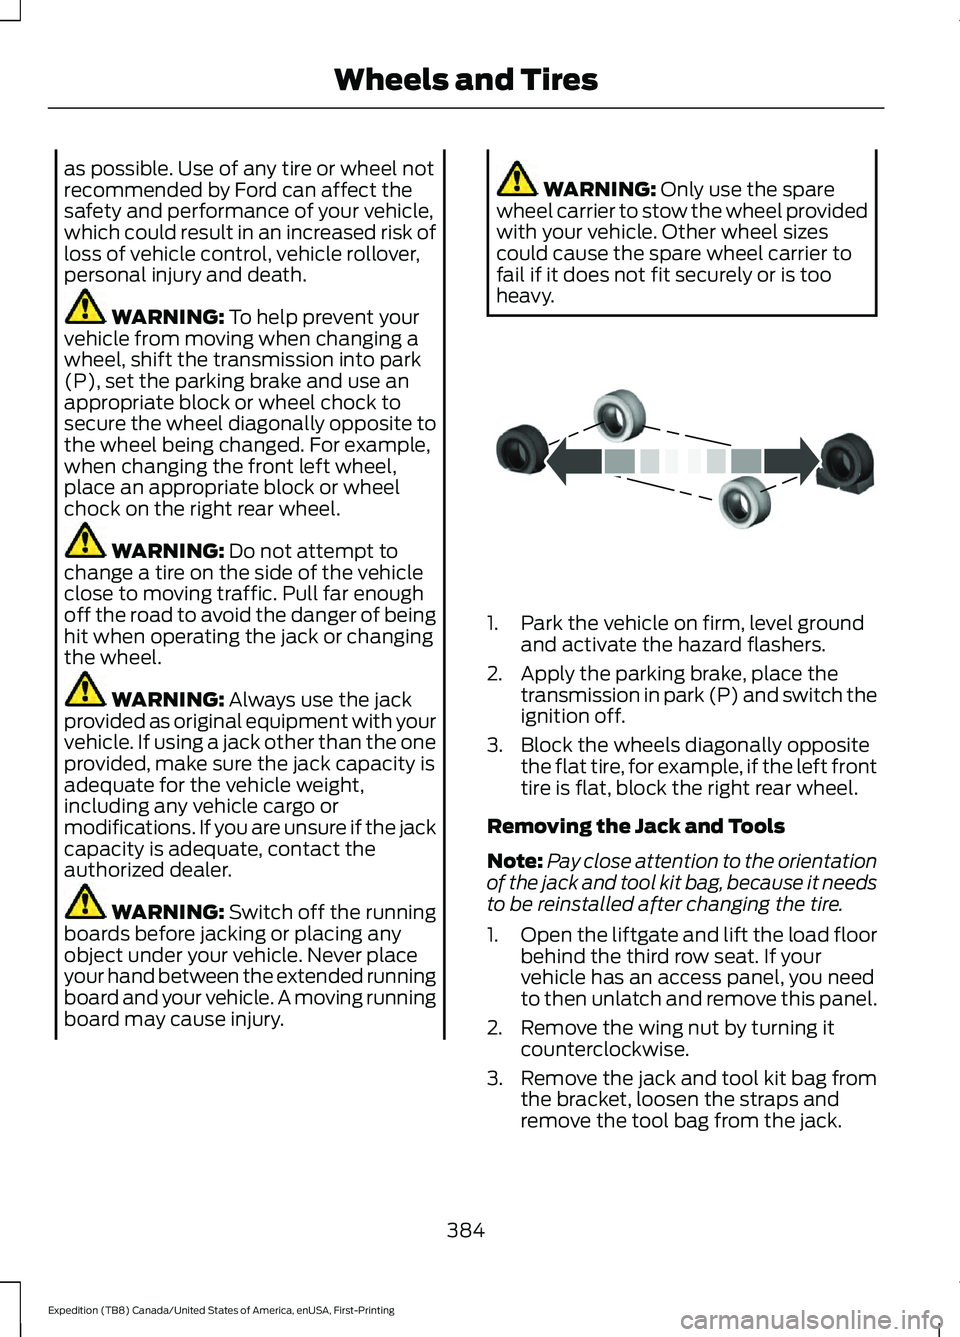
heavy. 1. Park the vehicle on firm, level ground
and activate the hazard flashers.
2. Apply the parking brake, place the transmission in park (P) and switch the
ignition off.
3. Block the wheels diagonally opposite the flat tire, for example, if the left front
tire is flat, block the right rear wheel.
Removing the Jack and Tools
Note: Pay close attention to the orientation
of the jack and tool kit bag, because it needs
to be reinstalled after changing the tire.
1. Open the liftgate and lift the load floor
behind the third row seat. If your
vehicle has an access panel, you need
to then unlatch and remove this panel.
2. Remove the wing nut by turning it counterclockwise.
3. Remove the jack and tool kit bag from the bracket, loosen the straps and
remove the tool bag from the jack.
384
Expedition (TB8) Canada/United States of America, enUSA, First-Printing Wheels and TiresE175447