seat adjustment FORD EXPEDITION 2021 Owners Manual
[x] Cancel search | Manufacturer: FORD, Model Year: 2021, Model line: EXPEDITION, Model: FORD EXPEDITION 2021Pages: 574, PDF Size: 8.33 MB
Page 4 of 574
Introduction
About This Manual
..........................................9
Symbols Glossary ............................................
9
Data Recording .................................................
11
Perchlorate .......................................................
15
Ford Credit ........................................................
15
Replacement Parts Recommendation ........................................................................\
...
16
Special Notices ...............................................
16
Mobile Communications Equipment ........................................................................\
....
17
Export Unique Options ................................
18
Environment
Protecting the Environment .......................
19
At a Glance
Instrument Panel ..........................................
20
Child Safety
General Information .....................................
22
Installing Child Restraints ..........................
24
Booster Seats .................................................
33
Child Restraint Positioning ........................
35
Child Safety Locks .........................................
37
Seatbelts
Principle of Operation .................................
39
Fastening the Seatbelts .............................
40
Seatbelt Height Adjustment ....................
44
Seatbelt Warning Lamp and Indicator Chime ............................................................
45
Seatbelt Reminder .......................................
45
Child Restraint and Seatbelt Maintenance ...............................................
47
Seatbelt Extensions .....................................
47
Personal Safety System ™
Personal Safety System ™........................
49 Supplementary Restraints
System
Principle of Operation .................................
50
Driver and Passenger Airbags ....................
51
Front Passenger Sensing System ...........
52
Side Airbags ....................................................
54
Safety Canopy ™...........................................
55
Crash Sensors and Airbag Indicator ......
56
Airbag Disposal ..............................................
57
911 Assist
What Is 911 Assist ..........................................
58
Emergency Call Requirements ................
58
Emergency Call Limitations ......................
59
Keys and Remote Controls
General Information on Radio Frequencies ................................................
60
Remote Control .............................................
60
Replacing a Lost Key or Remote Control ........................................................................\
...
67
MyKey ™
Principle of Operation .................................
68
Creating a MyKey ..........................................
69
Clearing All MyKeys ......................................
70
Checking MyKey System Status ..............
70
Using MyKey With Remote Start Systems ..........................................................
71
MyKey – Troubleshooting ............................
71
Doors and Locks
Locking and Unlocking ................................
73
Keyless Entry ...................................................
76
Liftgate
Manual Liftgate .............................................
80
Power Liftgate .................................................
81
1
Expedition (TB8) Canada/United States of America, enUSA, First-Printing Table of Contents
Page 45 of 574
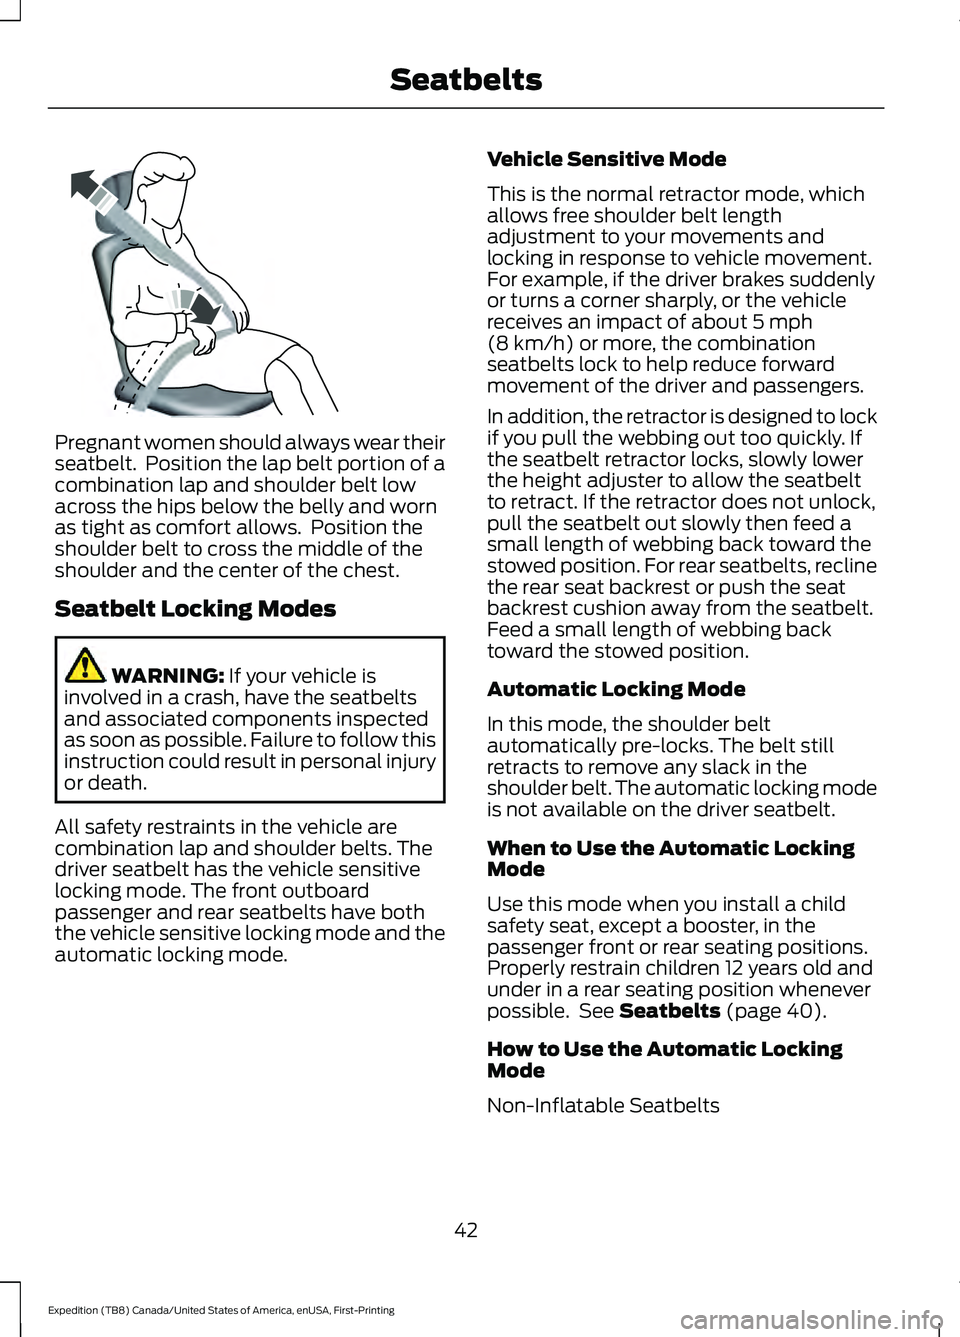
Pregnant women should always wear their
seatbelt. Position the lap belt portion of a
combination lap and shoulder belt low
across the hips below the belly and worn
as tight as comfort allows. Position the
shoulder belt to cross the middle of the
shoulder and the center of the chest.
Seatbelt Locking Modes
WARNING: If your vehicle is
involved in a crash, have the seatbelts
and associated components inspected
as soon as possible. Failure to follow this
instruction could result in personal injury
or death.
All safety restraints in the vehicle are
combination lap and shoulder belts. The
driver seatbelt has the vehicle sensitive
locking mode. The front outboard
passenger and rear seatbelts have both
the vehicle sensitive locking mode and the
automatic locking mode. Vehicle Sensitive Mode
This is the normal retractor mode, which
allows free shoulder belt length
adjustment to your movements and
locking in response to vehicle movement.
For example, if the driver brakes suddenly
or turns a corner sharply, or the vehicle
receives an impact of about
5 mph
(8 km/h) or more, the combination
seatbelts lock to help reduce forward
movement of the driver and passengers.
In addition, the retractor is designed to lock
if you pull the webbing out too quickly. If
the seatbelt retractor locks, slowly lower
the height adjuster to allow the seatbelt
to retract. If the retractor does not unlock,
pull the seatbelt out slowly then feed a
small length of webbing back toward the
stowed position. For rear seatbelts, recline
the rear seat backrest or push the seat
backrest cushion away from the seatbelt.
Feed a small length of webbing back
toward the stowed position.
Automatic Locking Mode
In this mode, the shoulder belt
automatically pre-locks. The belt still
retracts to remove any slack in the
shoulder belt. The automatic locking mode
is not available on the driver seatbelt.
When to Use the Automatic Locking
Mode
Use this mode when you install a child
safety seat, except a booster, in the
passenger front or rear seating positions.
Properly restrain children 12 years old and
under in a rear seating position whenever
possible. See
Seatbelts (page 40).
How to Use the Automatic Locking
Mode
Non-Inflatable Seatbelts
42
Expedition (TB8) Canada/United States of America, enUSA, First-Printing SeatbeltsE142590
Page 47 of 574
•
The same warning light, electronic
control and diagnostic unit as used for
the front seatbelts.
• Impact sensors in various parts of the
vehicle.
How does the rear inflatable seatbelt
system work? WARNING: If a supplementary
restraint system component has
deployed, it will not function again. Have
the system and associated components
inspected as soon as possible. Failure to
follow this instruction could result in
personal injury or death.
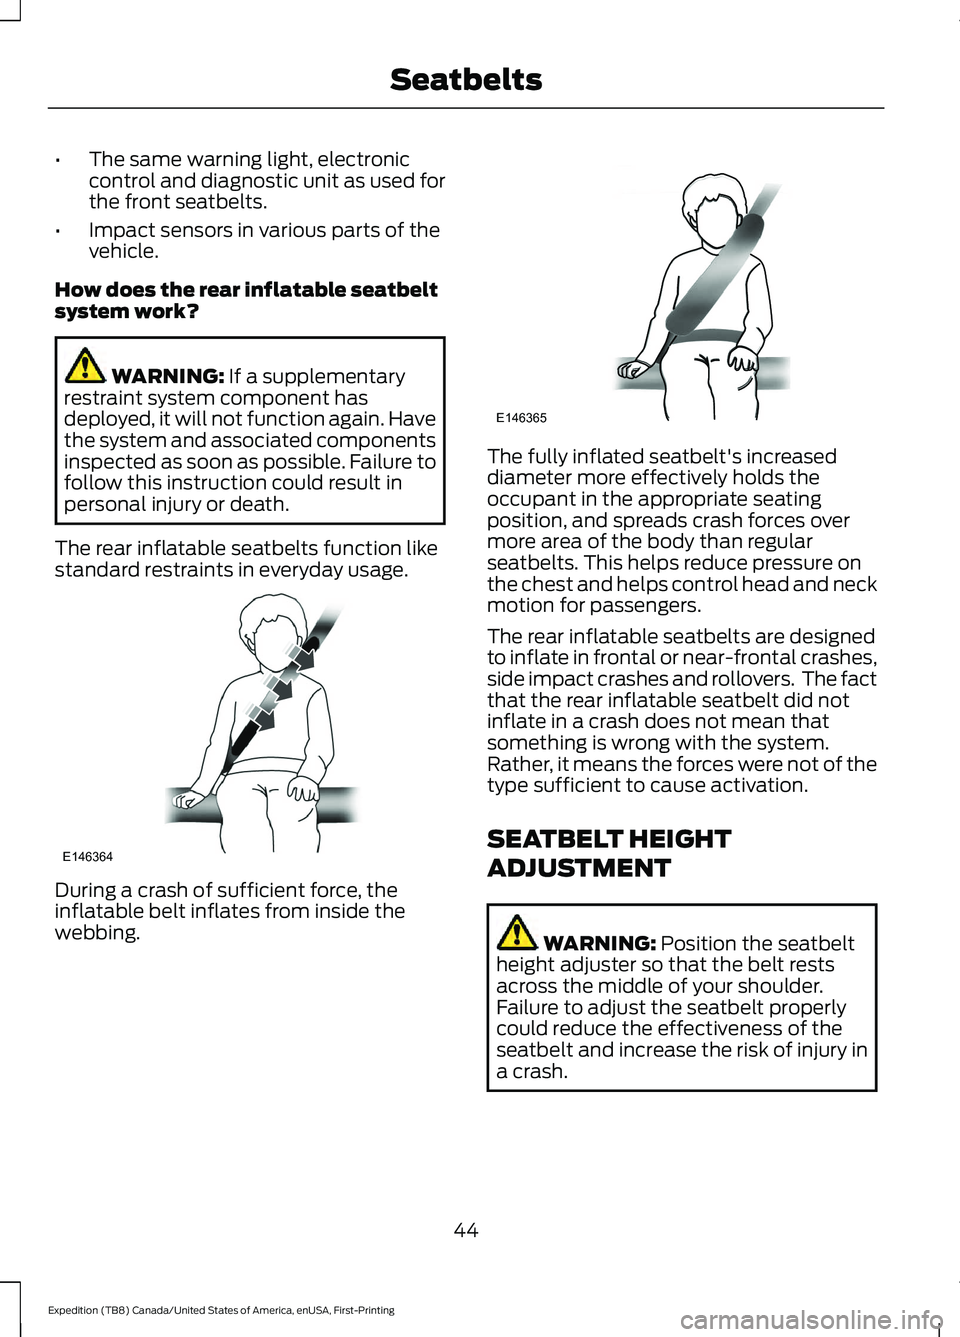
The rear inflatable seatbelts function like
standard restraints in everyday usage. During a crash of sufficient force, the
inflatable belt inflates from inside the
webbing. The fully inflated seatbelt's increased
diameter more effectively holds the
occupant in the appropriate seating
position, and spreads crash forces over
more area of the body than regular
seatbelts. This helps reduce pressure on
the chest and helps control head and neck
motion for passengers.
The rear inflatable seatbelts are designed
to inflate in frontal or near-frontal crashes,
side impact crashes and rollovers. The fact
that the rear inflatable seatbelt did not
inflate in a crash does not mean that
something is wrong with the system.
Rather, it means the forces were not of the
type sufficient to cause activation.
SEATBELT HEIGHT
ADJUSTMENT
WARNING:
Position the seatbelt
height adjuster so that the belt rests
across the middle of your shoulder.
Failure to adjust the seatbelt properly
could reduce the effectiveness of the
seatbelt and increase the risk of injury in
a crash.
44
Expedition (TB8) Canada/United States of America, enUSA, First-Printing SeatbeltsE146364 E146365
Page 54 of 574
While the system is designed to help
reduce serious injuries, contact with a
deploying airbag may also cause abrasions
or swelling. Temporary hearing loss is also
a possibility as a result of the noise
associated with a deploying airbag.
Because airbags must inflate rapidly and
with considerable force, there is the risk of
death or serious injuries such as fractures,
facial and eye injuries or internal injuries,
particularly to occupants who are not
properly restrained or are otherwise out of
position at the time of airbag deployment.
Thus, it is extremely important that
occupants be properly restrained as far
away from the airbag module as possible
while maintaining vehicle control.
Routine maintenance of the airbags is not
required.
DRIVER AND PASSENGER
AIRBAGS
WARNING: Do not place your arms
on the airbag cover or through the
steering wheel. Failure to follow this
instruction could result in personal injury. WARNING:
Keep the areas in front
of the airbags free from obstruction. Do
not affix anything to or over the airbag
covers. Objects could become projectiles
during airbag deployment or in a sudden
stop. Failure to follow this instruction
could result in personal injury or death. WARNING: Airbags can kill or injure
a child in a child restraint. Never place a
rear-facing child restraint in front of an
active airbag. If you must use a
forward-facing child restraint in the front
seat, move the seat upon which the child
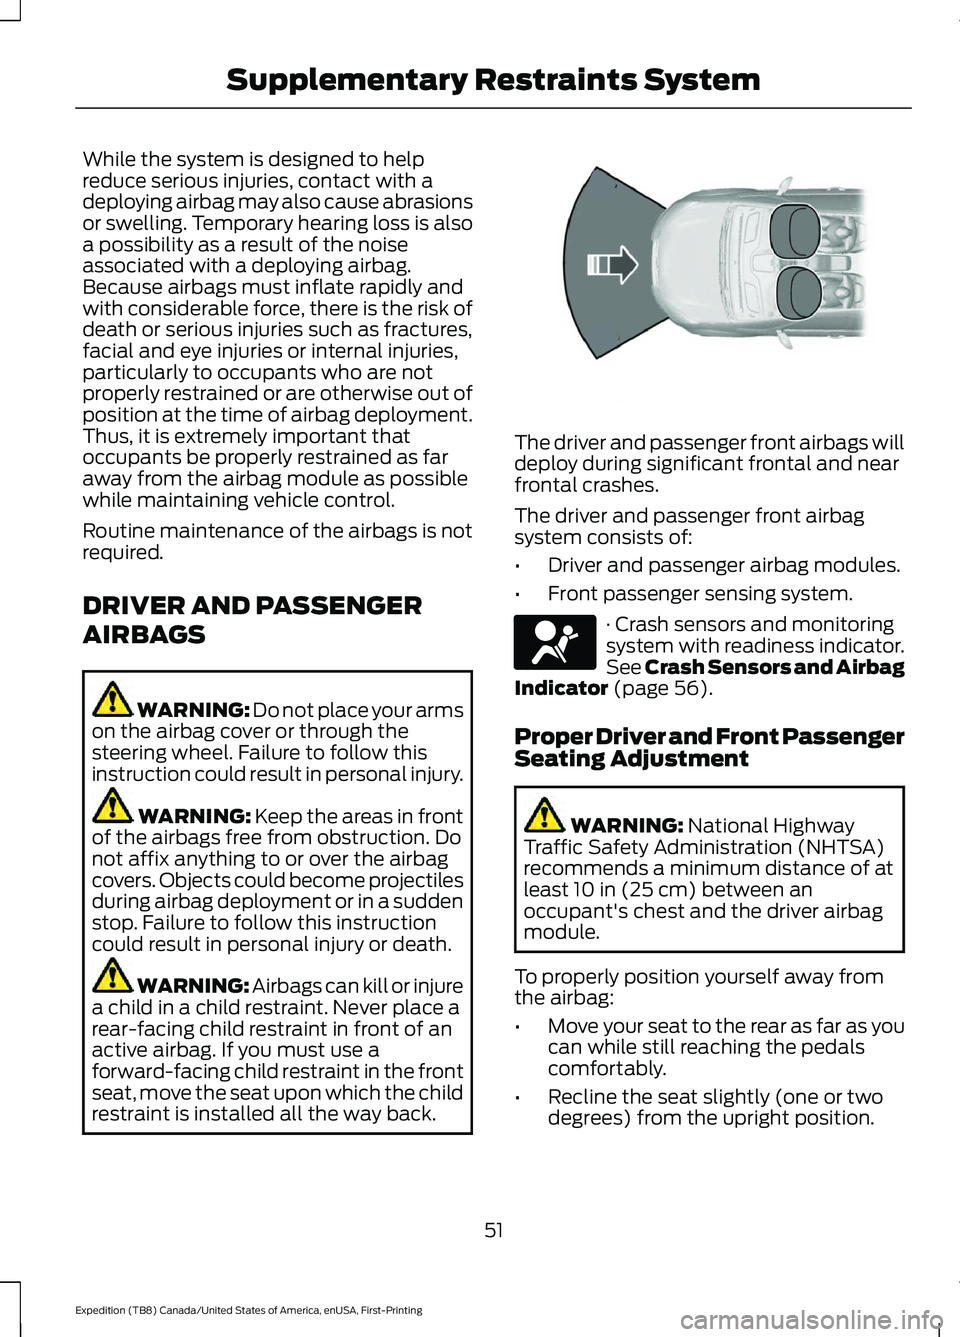
restraint is installed all the way back. The driver and passenger front airbags will
deploy during significant frontal and near
frontal crashes.
The driver and passenger front airbag
system consists of:
•
Driver and passenger airbag modules.
• Front passenger sensing system. · Crash sensors and monitoring
system with readiness indicator.
See Crash Sensors and Airbag
Indicator
(page 56).
Proper Driver and Front Passenger
Seating Adjustment WARNING:
National Highway
Traffic Safety Administration (NHTSA)
recommends a minimum distance of at
least
10 in (25 cm) between an
occupant's chest and the driver airbag
module.
To properly position yourself away from
the airbag:
• Move your seat to the rear as far as you
can while still reaching the pedals
comfortably.
• Recline the seat slightly (one or two
degrees) from the upright position.
51
Expedition (TB8) Canada/United States of America, enUSA, First-Printing Supplementary Restraints System E151127 E67017
Page 158 of 574
Note:
Do not use harsh chemicals, razor
blades or other sharp objects to clean or
remove decals from the inside of the heated
rear window. The vehicle warranty may not
cover damage to the heated rear window
grid lines.
HEATED EXTERIOR MIRRORS
When you switch the heated rear window
on, the heated exterior mirrors turn on.
Note: Do not remove ice from the mirrors
with a scraper or adjust the mirror glass
when it is frozen in place.
Note: Do not clean the mirror housing or
glass with harsh abrasives, fuel or other
petroleum-based cleaning products. The
vehicle warranty may not cover damage
caused to the mirror housing or glass.
REMOTE START (IF EQUIPPED)
You can switch this feature on or off and
adjust the settings using the information
display controls. See
Information
Displays (page 119).
The climate control system adjusts the
interior temperature during remote start.
You cannot adjust the climate control
setting during remote start operation.
Switch the ignition on to make
adjustments.
Based on your remote start settings, the
following vehicle-dependent features may
or may not remain on after remote starting
your vehicle:
• Climate controlled seats.
• Heated steering wheel.
• Heated mirrors.
• Heated rear window.
• Windshield wiper de-icer. Note:
For dual zone climate controlled
seats, the passenger seat setting defaults
to match the driver seat during remote start.
Automatic Settings
If
Auto is on, the system sets the interior
temperature to 72°F (22°C) and heats or
cools the vehicle interior as required to
achieve comfort.
Note: In cold weather, the heated rear
window and heated mirrors turn on.
Last Settings
If
Last Settings is on, the system uses the
settings last selected before you turned
off the vehicle.
Heated and Cooled Features
In Auto mode, certain heated features may
switch on during cold weather, and cooled
features during hot weather.
155
Expedition (TB8) Canada/United States of America, enUSA, First-Printing Climate Control
Page 164 of 574
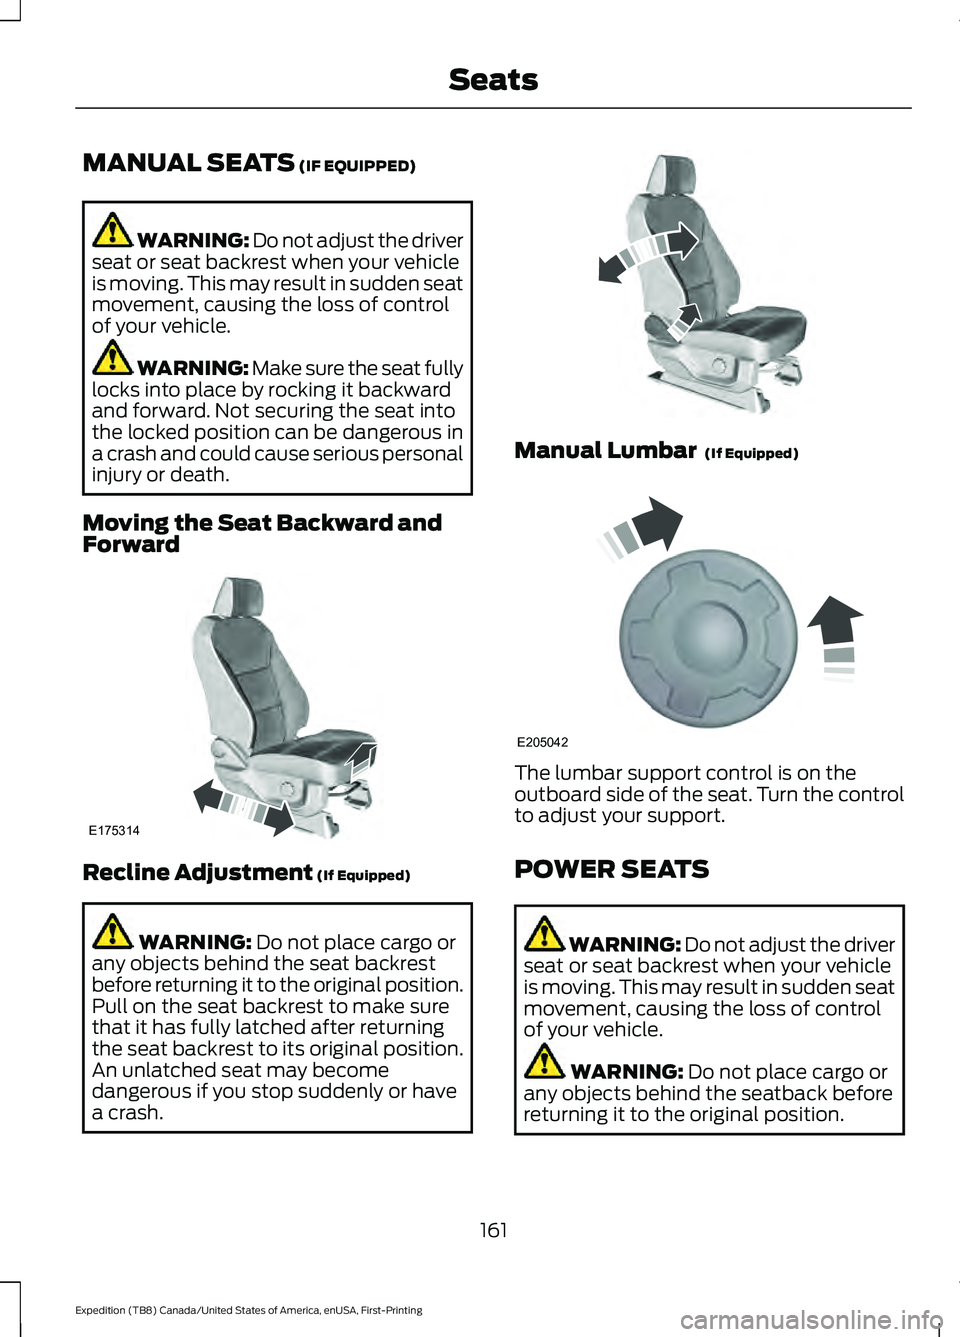
MANUAL SEATS (IF EQUIPPED)
WARNING: Do not adjust the driver
seat or seat backrest when your vehicle
is moving. This may result in sudden seat
movement, causing the loss of control
of your vehicle. WARNING: Make sure the seat fully
locks into place by rocking it backward
and forward. Not securing the seat into
the locked position can be dangerous in
a crash and could cause serious personal
injury or death.
Moving the Seat Backward and
Forward Recline Adjustment
(If Equipped)
WARNING:
Do not place cargo or
any objects behind the seat backrest
before returning it to the original position.
Pull on the seat backrest to make sure
that it has fully latched after returning
the seat backrest to its original position.
An unlatched seat may become
dangerous if you stop suddenly or have
a crash. Manual Lumbar
(If Equipped)
The lumbar support control is on the
outboard side of the seat. Turn the control
to adjust your support.
POWER SEATS
WARNING: Do not adjust the driver
seat or seat backrest when your vehicle
is moving. This may result in sudden seat
movement, causing the loss of control
of your vehicle. WARNING:
Do not place cargo or
any objects behind the seatback before
returning it to the original position.
161
Expedition (TB8) Canada/United States of America, enUSA, First-Printing SeatsE175314 E175315 E205042
Page 166 of 574
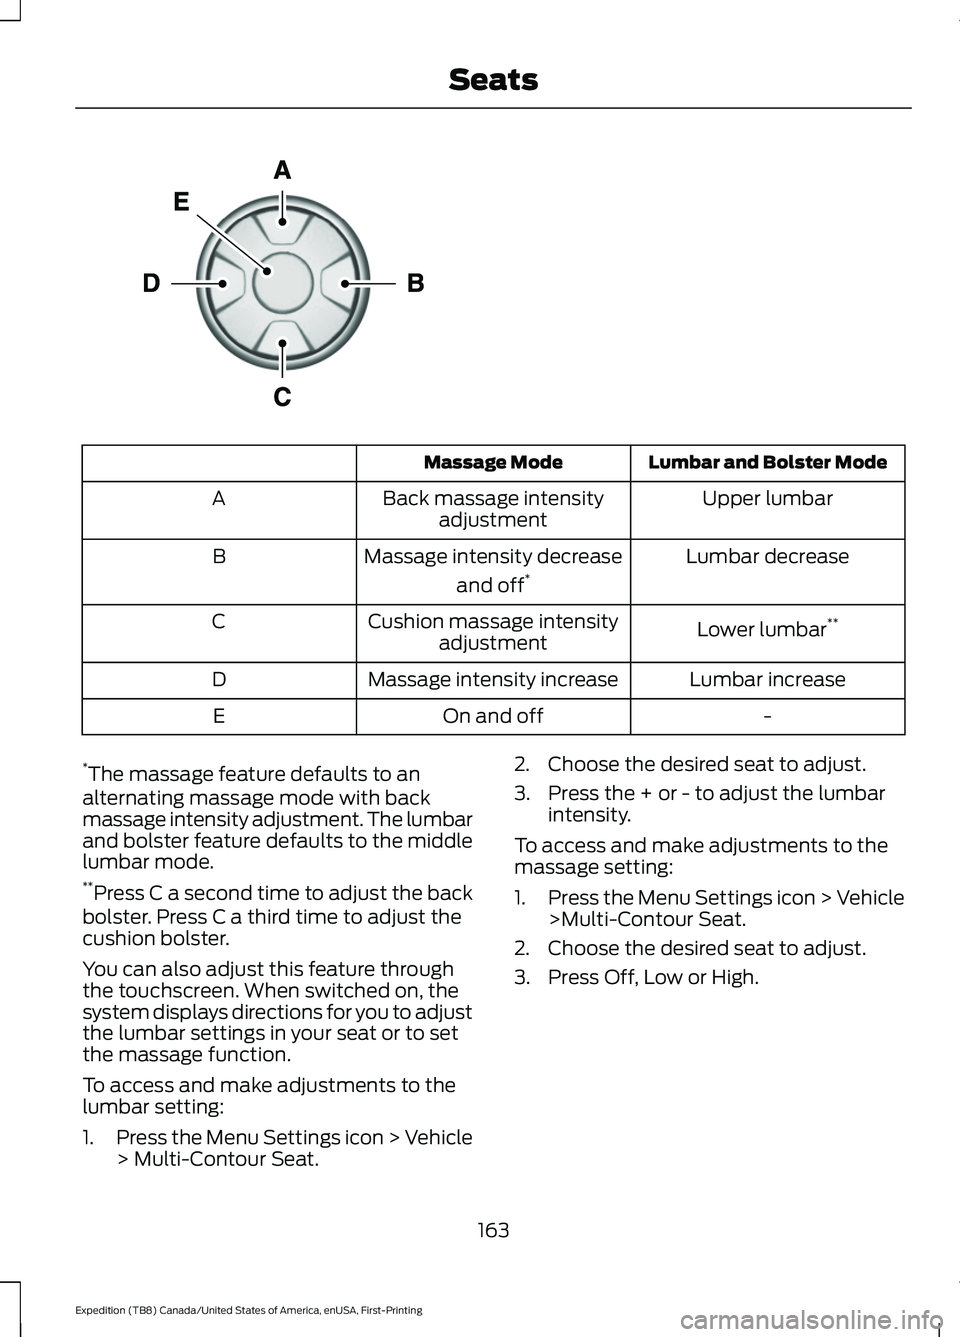
Lumbar and Bolster Mode
Massage Mode
Upper lumbar
Back massage intensity
adjustment
A
Lumbar decrease
Massage intensity decrease
and off*
B
Lower lumbar**
Cushion massage intensity
adjustment
C
Lumbar increase
Massage intensity increase
D
-
On and off
E
* The massage feature defaults to an
alternating massage mode with back
massage intensity adjustment. The lumbar
and bolster feature defaults to the middle
lumbar mode.
** Press C a second time to adjust the back
bolster. Press C a third time to adjust the
cushion bolster.
You can also adjust this feature through
the touchscreen. When switched on, the
system displays directions for you to adjust
the lumbar settings in your seat or to set
the massage function.
To access and make adjustments to the
lumbar setting:
1. Press the Menu Settings icon > Vehicle
> Multi-Contour Seat. 2. Choose the desired seat to adjust.
3. Press the + or - to adjust the lumbar
intensity.
To access and make adjustments to the
massage setting:
1. Press the Menu Settings icon > Vehicle
>Multi-Contour Seat.
2. Choose the desired seat to adjust.
3. Press Off, Low or High.
163
Expedition (TB8) Canada/United States of America, enUSA, First-Printing SeatsE156301
Page 167 of 574
MEMORY FUNCTION (IF EQUIPPED)
WARNING:
Before activating the
memory seat, make sure that the area
immediately surrounding the seat is clear
of obstructions and that all occupants
are clear of moving parts. WARNING:
Do not use the memory
function when your vehicle is moving.
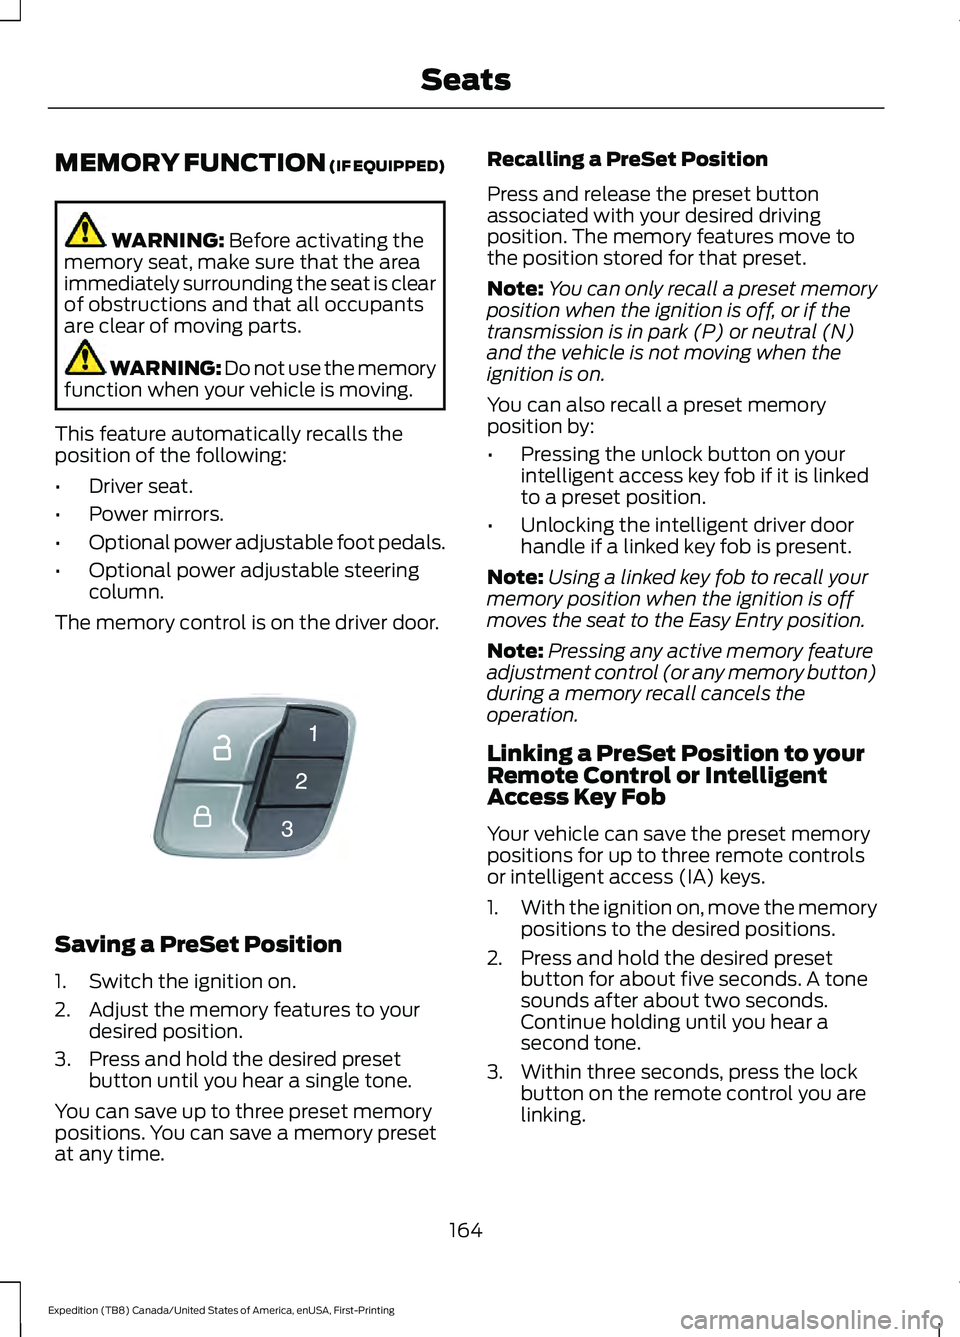
This feature automatically recalls the
position of the following:
• Driver seat.
• Power mirrors.
• Optional power adjustable foot pedals.
• Optional power adjustable steering
column.
The memory control is on the driver door. Saving a PreSet Position
1. Switch the ignition on.
2. Adjust the memory features to your
desired position.
3. Press and hold the desired preset button until you hear a single tone.
You can save up to three preset memory
positions. You can save a memory preset
at any time. Recalling a PreSet Position
Press and release the preset button
associated with your desired driving
position. The memory features move to
the position stored for that preset.
Note:
You can only recall a preset memory
position when the ignition is off, or if the
transmission is in park (P) or neutral (N)
and the vehicle is not moving when the
ignition is on.
You can also recall a preset memory
position by:
• Pressing the unlock button on your
intelligent access key fob if it is linked
to a preset position.
• Unlocking the intelligent driver door
handle if a linked key fob is present.
Note: Using a linked key fob to recall your
memory position when the ignition is off
moves the seat to the Easy Entry position.
Note: Pressing any active memory feature
adjustment control (or any memory button)
during a memory recall cancels the
operation.
Linking a PreSet Position to your
Remote Control or Intelligent
Access Key Fob
Your vehicle can save the preset memory
positions for up to three remote controls
or intelligent access (IA) keys.
1. With the ignition on, move the memory
positions to the desired positions.
2. Press and hold the desired preset button for about five seconds. A tone
sounds after about two seconds.
Continue holding until you hear a
second tone.
3. Within three seconds, press the lock button on the remote control you are
linking.
164
Expedition (TB8) Canada/United States of America, enUSA, First-Printing SeatsE142554
Page 350 of 574
Make sure that you dispose of old batteries
in an environmentally friendly way. Seek
advice from your local authority about
recycling old batteries.
If storing your vehicle for more than 30
days without recharging the battery, we
recommend that you disconnect the
negative battery cable to maintain battery
charge for quick starting.
Battery Management System (If
Equipped)
The battery management system monitors
battery conditions and takes actions to
extend battery life. If excessive battery
drain is detected, the system temporarily
disables some electrical systems to
protect the battery.
Systems included are:
• Heated rear window.
• Heated seats.
• Climate control.
• Heated steering wheel.
• Audio unit.
• Navigation system.
A message may appear in the information
displays to alert you that battery
protection actions are active. These
messages are only for notification that an
action is taking place, and not intended to
indicate an electrical problem or that the
battery requires replacement.
After battery replacement, or in some
cases after charging the battery with an
external charger, the battery management
system requires eight hours of vehicle sleep
time to relearn the battery state of charge.
During this time your vehicle must remain
fully locked with the ignition switched off.
Note: Prior to relearning the battery state
of charge, the battery management system
may temporarily disable some electrical
systems. Electrical Accessory Installation
To make sure the battery management
system works correctly, do not connect an
electrical device ground connection
directly to the battery negative post. This
can cause inaccurate measurements of
the battery condition and potential
incorrect system operation.
Note:
If you add electrical accessories or
components to the vehicle, it may adversely
affect battery performance and durability.
This may also affect the performance of
other electrical systems in the vehicle.
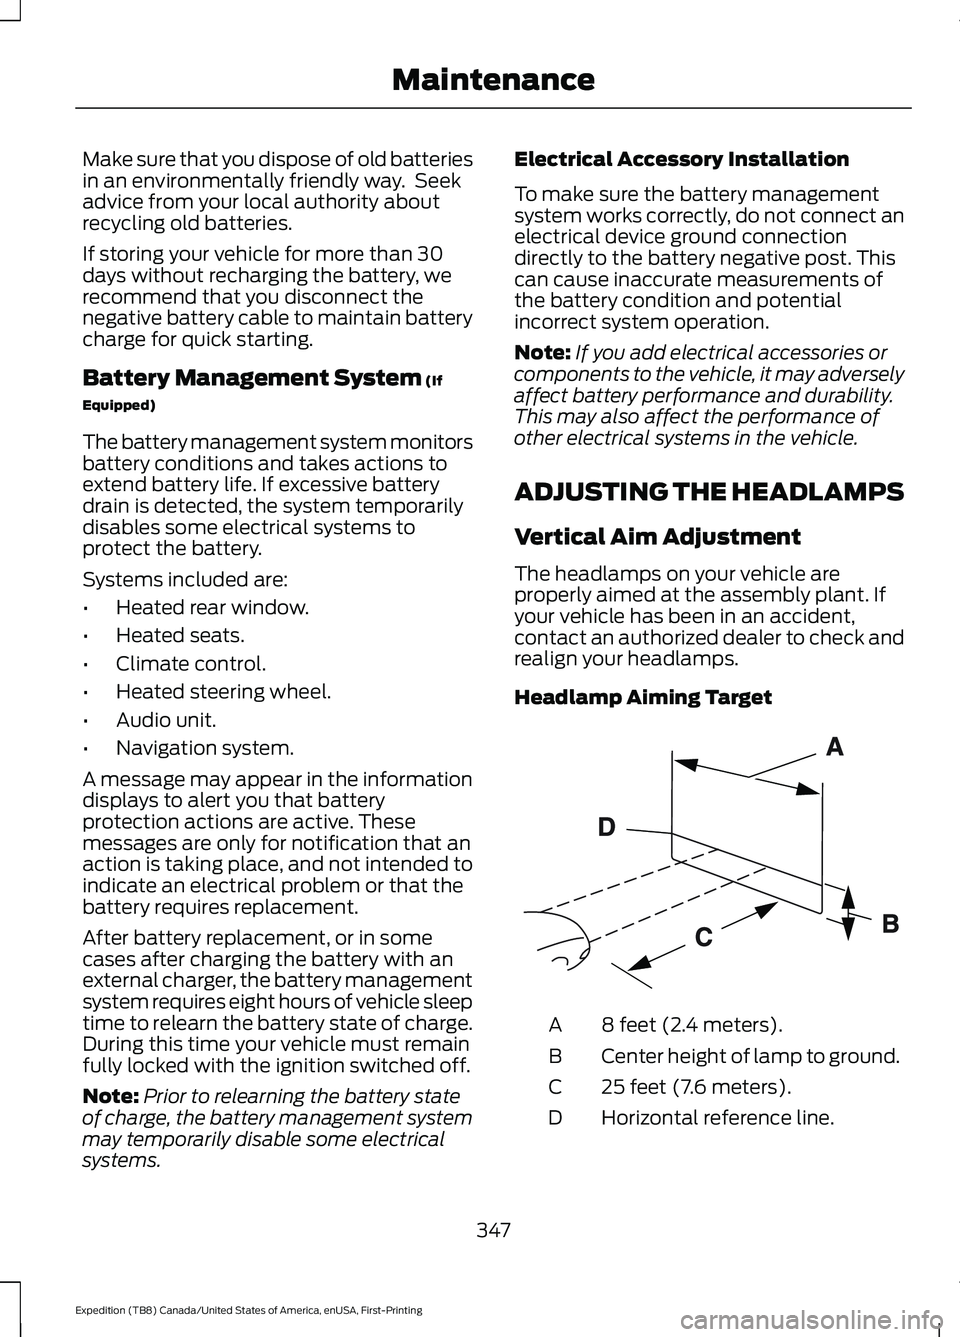
ADJUSTING THE HEADLAMPS
Vertical Aim Adjustment
The headlamps on your vehicle are
properly aimed at the assembly plant. If
your vehicle has been in an accident,
contact an authorized dealer to check and
realign your headlamps.
Headlamp Aiming Target 8 feet (2.4 meters).
A
Center height of lamp to ground.
B
25 feet (7.6 meters).
C
Horizontal reference line.
D
347
Expedition (TB8) Canada/United States of America, enUSA, First-Printing MaintenanceE142592
Page 564 of 574
Services That Third Parties Provide...............14
Services That We Provide..................................
14
Vehicles With a Modem...................................... 14
Vehicles With an Emergency Call System.................................................................. 15
Vehicles With SYNC............................................. 14
Daytime Running Lamps - Vehicles With: Configurable Daytime Running
Lamps...........................................................100
Daytime Running Lamps - Vehicles With: Daytime Running Lamps (DRL)..........100
Declaration of Conformity - Vehicles With: SYNC 3..............................................556
Radio Frequency Statement......................... 556
Digital Radio...................................................412
HD Radio Reception and Station
Troubleshooting............................................. 413
Direction Indicators
.......................................101
Doors and Locks..............................................73
Drive Control...................................................271 Selectable Drive Modes.................................... 271
Driver Alert
.....................................................254
Using Driver Alert............................................... 254
Driver and Passenger Airbags.....................51 Children and Airbags........................................... 52
Proper Driver and Front Passenger Seating Adjustment......................................................... 51
Driving Aids....................................................254
Driving Hints
..................................................309
Driving Through Water...............................310
DRL See: Daytime Running Lamps - Vehicles With:
Configurable Daytime Running
Lamps............................................................... 100
See: Daytime Running Lamps - Vehicles With: Daytime Running Lamps (DRL)..............100
E
Economical Driving....................................309
Electric Parking Brake................................220 Applying the Electric Parking Brake............220
Automatically Releasing the Electric
Parking Brake................................................... 221
Manually Releasing the Electric Parking Brake.................................................................. 220Releasing the Electric Parking Brake if the
Vehicle Battery is Running Out of
Charge................................................................ 221
Electromagnetic Compatibility
..............528
Emergency Call Limitations.......................59
Emergency Call Requirements.................58
Emission Law
.................................................199
Noise Emissions Warranty, Prohibited
Tampering Acts and
Maintenance.................................................. 200
Tampering With a Noise Control System.............................................................. 199
End User License Agreement...................531 VEHICLE SOFTWARE END USER LICENSE
AGREEMENT (EULA) .................................. 531
Engine Block Heater
....................................187
Using the Engine Block Heater...................... 188
Engine Coolant Check...............................339 Adding Coolant.................................................. 340
Coolant Change................................................. 342
Engine Coolant Temperature Management.................................................. 343
Fail-Safe Cooling............................................... 342
Recycled Coolant................................................ 341
Severe Climates.................................................. 341
Engine Emission Control...........................199
Engine Immobilizer See: Passive Anti-Theft System..................... 85
Engine Oil Check..........................................337 Adding Engine Oil............................................... 337
Engine Oil Dipstick.......................................337
Engine Specifications................................390 Drivebelt Routing.............................................. 390
Entertainment..............................................443 AM/FM Radio...................................................... 444
Apps........................................................................\
452
Bluetooth Stereo or USB................................. 451
CD........................................................................\
... 450
HD Radio ™ Information (If
Available)......................................................... 447
SiriusXM® Satellite Radio (If Activated)........................................................ 445
Sources.................................................................. 443
Supported Media Players, Formats and Metadata Information................................ 452
USB Ports............................................................. 452
Environment.....................................................19
561
Expedition (TB8) Canada/United States of America, enUSA, First-Printing Index