brakes FORD EXPEDITION EL 2016 Owners Manual
[x] Cancel search | Manufacturer: FORD, Model Year: 2016, Model line: EXPEDITION EL, Model: FORD EXPEDITION EL 2016Pages: 421, PDF Size: 7.39 MB
Page 6 of 421
Starting and Stopping theEngine
General Information....................................145
Ignition Switch...............................................145
Keyless Starting............................................145
Starting a Gasoline Engine.......................146
Engine Block Heater....................................149
Fuel and Refueling
Safety Precautions........................................151
Fuel Quality.....................................................152
Fuel Filler Funnel Location........................152
Running Out of Fuel.....................................152
Refueling..........................................................153
Fuel Consumption........................................155
Emission Control System..........................156
Transmission
Automatic Transmission...........................159
Four-Wheel Drive
Using Four-Wheel Drive.............................164
Rear Axle
Limited Slip Differential...............................171
Brakes
General Information.....................................172
Hints on Driving With Anti-LockBrakes............................................................172
Parking Brake..................................................173
Hill Start Assist..............................................173
Traction Control
Principle of Operation.................................175
Using Traction Control................................175
Stability Control
Principle of Operation.................................176
Using Stability Control................................177
Terrain Response
Using Hill Descent Control........................179
Parking Aids
Principle of Operation..................................181
Rear Parking Aid.............................................181
Front Parking Aid..........................................182
Rear View Camera.......................................183
Cruise Control
Principle of Operation................................186
Using Cruise Control...................................186
Driving Aids
Blind Spot Information System..............188
Cross Traffic Alert........................................190
Steering............................................................193
Drive Control..................................................194
Self-Leveling Suspension.........................195
Load Carrying
Rear Under Floor Storage.........................196
Roof Racks and Load Carriers..................197
Load Limit.......................................................198
Towing
Towing a Trailer............................................205
Trailer Sway Control...................................206
Recommended Towing Weights...........206
Essential Towing Checks..........................208
Towing Points.................................................215
Transporting the Vehicle............................216
Towing the Vehicle on Four Wheels.......217
Driving Hints
Breaking-In.....................................................220
Reduced Engine Performance................220
3
Expedition (TB7) Canada/United States of America, enUSA, First Printing
Table of Contents
Page 12 of 421
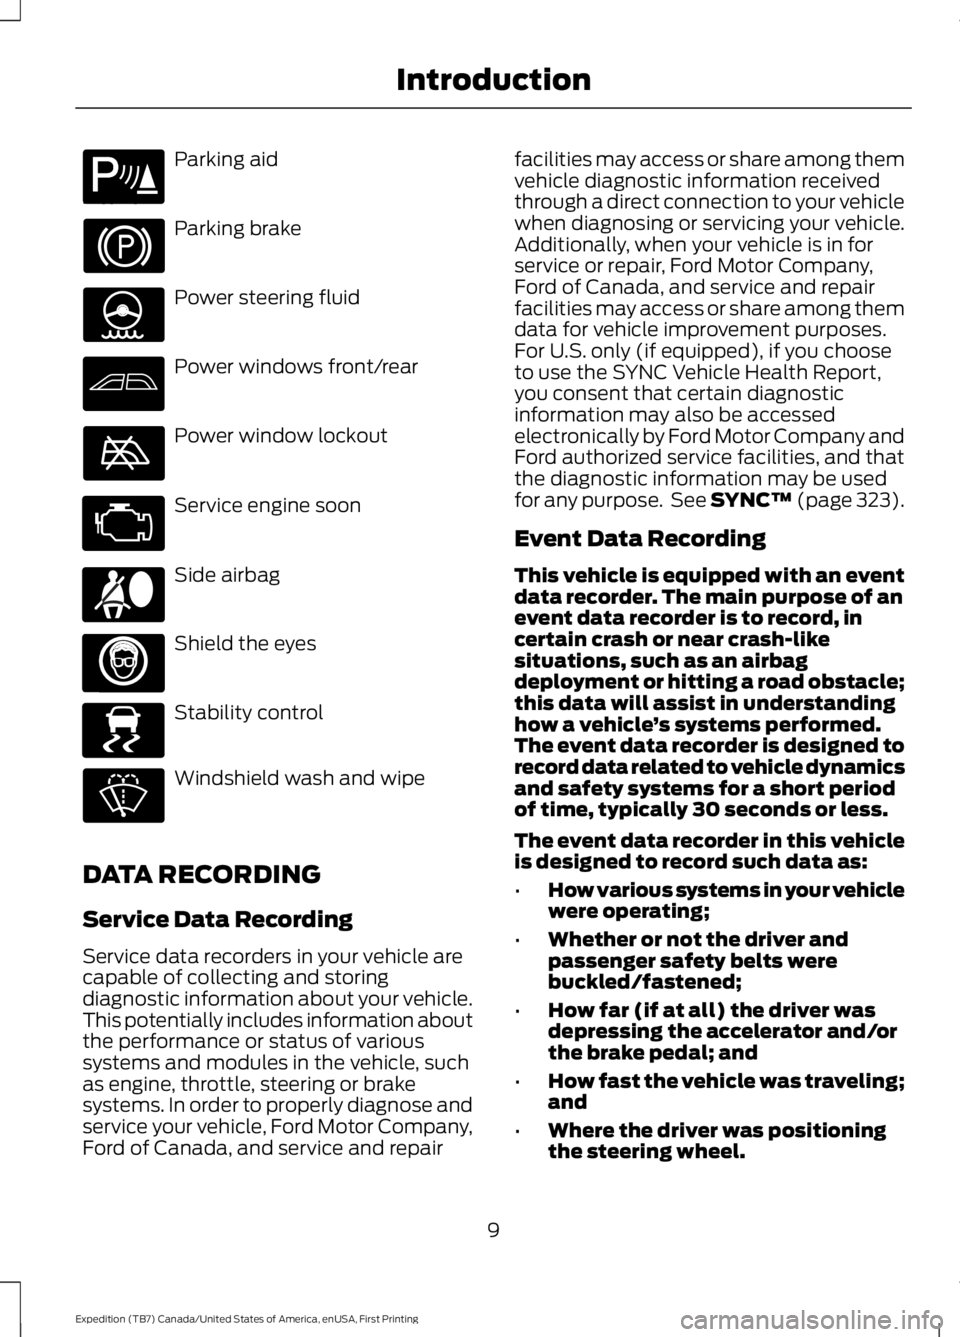
Parking aid
Parking brake
Power steering fluid
Power windows front/rear
Power window lockout
Service engine soon
Side airbag
Shield the eyes
Stability control
Windshield wash and wipe
DATA RECORDING
Service Data Recording
Service data recorders in your vehicle arecapable of collecting and storingdiagnostic information about your vehicle.This potentially includes information aboutthe performance or status of varioussystems and modules in the vehicle, suchas engine, throttle, steering or brakesystems. In order to properly diagnose andservice your vehicle, Ford Motor Company,Ford of Canada, and service and repair
facilities may access or share among themvehicle diagnostic information receivedthrough a direct connection to your vehiclewhen diagnosing or servicing your vehicle.Additionally, when your vehicle is in forservice or repair, Ford Motor Company,Ford of Canada, and service and repairfacilities may access or share among themdata for vehicle improvement purposes.For U.S. only (if equipped), if you chooseto use the SYNC Vehicle Health Report,you consent that certain diagnosticinformation may also be accessedelectronically by Ford Motor Company andFord authorized service facilities, and thatthe diagnostic information may be usedfor any purpose. See SYNC™ (page 323).
Event Data Recording
This vehicle is equipped with an eventdata recorder. The main purpose of anevent data recorder is to record, incertain crash or near crash-likesituations, such as an airbagdeployment or hitting a road obstacle;this data will assist in understandinghow a vehicle’s systems performed.The event data recorder is designed torecord data related to vehicle dynamicsand safety systems for a short periodof time, typically 30 seconds or less.
The event data recorder in this vehicleis designed to record such data as:
•How various systems in your vehiclewere operating;
•Whether or not the driver andpassenger safety belts werebuckled/fastened;
•How far (if at all) the driver wasdepressing the accelerator and/orthe brake pedal; and
•How fast the vehicle was traveling;and
•Where the driver was positioningthe steering wheel.
9
Expedition (TB7) Canada/United States of America, enUSA, First Printing
IntroductionE139213 E167012 E138639
Page 33 of 421
Pregnant women should always wear theirsafety belt. The lap belt portion of acombination lap and shoulder belt shouldbe positioned low across the hips belowthe belly and worn as tight as comfort willallow. The shoulder belt should bepositioned to cross the middle of theshoulder and the center of the chest.
Safety Belt Locking Modes
WARNINGS
After any vehicle crash, the safetybelt system at all passenger seatingpositions must be checked by anauthorized dealer to verify that theautomatic locking retractor feature forchild seats is still functioning properly. Inaddition, all safety belts should be checkedfor proper function.
The belt and retractor assemblymust be replaced if the safety beltassembly automatic locking retractorfeature or any other safety belt function isnot operating properly when checked byan authorized dealer. Failure to replace thebelt and retractor assembly could increasethe risk of injury in crashes.
All safety restraints in the vehicle arecombination lap and shoulder belts. Thedriver safety belt has the first type oflocking mode. The front outboardpassenger and rear seat safety belts haveboth types of locking modes described asfollows:
Vehicle Sensitive Mode
This is the normal retractor mode, whichallows free shoulder belt lengthadjustment to your movements andlocking in response to vehicle movement.For example, if the driver brakes suddenlyor turns a corner sharply, or the vehiclereceives an impact of about 5 mph(8 km/h) or more, the combination safetybelts will lock to help reduce forwardmovement of the driver and passengers.
In addition, the retractor is designed to lockif the webbing is pulled out too quickly. Ifthis occurs, let the belt retract slightly andpull webbing out again in a slow andcontrolled manner.
Automatic Locking Mode
In this mode, the shoulder belt isautomatically pre-locked. The belt will stillretract to remove any slack in the shoulderbelt. The automatic locking mode is notavailable on the driver safety belt.
When to Use the Automatic LockingMode
This mode should be used any time a childsafety seat, except a booster, is installedin passenger front or rear seating positions.Children 12 years old and under should beproperly restrained in a rear seatingposition whenever possible. See ChildSafety (page 15).
30
Expedition (TB7) Canada/United States of America, enUSA, First Printing
Seatbelts
Page 91 of 421
WARNING LAMPS AND
INDICATORS
The following warning lamps andindicators alert you to a vehicle conditionthat may become serious. Some lampsilluminate when you start your vehicle tomake sure they work. If any lamps remainon after starting your vehicle, refer to therespective system warning lamp for furtherinformation.
Note:Some warning indicators appear inthe information display and function thesame as a warning lamp but do not displaywhen you start your vehicle.
Anti-Lock Braking System
If it illuminates when you aredriving, this indicates amalfunction. You continue tohave the normal braking system (withoutABS) unless the brake warning lamp is alsoilluminated. Have the system checked byan authorized dealer.
Battery
If it illuminates while driving, itindicates a malfunction. Switchoff all unnecessary electricalequipment and have the system checkedby an authorized dealer.
Brake System
It illuminates when you engagethe parking brake and theignition is on.
If it illuminates when you are driving, checkthat the parking brake is not engaged. Ifthe parking brake is not engaged, thisindicates low brake fluid level or a brakesystem malfunction. Have the systemchecked immediately by an authorizeddealer.
WARNING
Driving a vehicle with the brakesystem warning light on is dangerous.A significant decrease in brakingperformance may occur. It will take youlonger to stop the vehicle. Have the vehiclechecked by your authorized dealer as soonas possible. Driving extended distanceswith the parking brake engaged can causebrake failure and the risk of personal injury.
Cruise Control
It illuminates when you switchthis feature on. See UsingCruise Control (page 186).
Direction Indicator
Illuminates when you switch theleft or right direction indicator orthe hazard warning flasher on. Ifthe indicators stay on or flash faster, checkfor a burned out bulb.
Door Ajar
Displays when the ignition is onand any door is not completelyclosed.
Engine Coolant Temperature
Illuminates when the enginecoolant temperature is high.Stop the vehicle as soon aspossible, switch off the engine and let cool.See Engine Coolant Check (page 247).
88
Expedition (TB7) Canada/United States of America, enUSA, First Printing
Instrument Cluster E144522 E71340
Page 151 of 421
Automatic Engine Shutdown
For vehicles with a keyless ignition, thisfeature automatically shuts down theengine if it has been idling for an extendedperiod. The ignition also turns off in orderto save battery power. Before your vehicleshuts down, a message appears in theinformation display showing a timercounting down from 30 seconds. If you donot intervene within 30 seconds, yourvehicle shuts down. Another messageappears in the information display toinform you that your vehicle has shut downto save fuel. Start your vehicle as younormally do.
Automatic Engine Shutdown Override
Note:You cannot permanently switch offthe automatic shutdown feature. When youswitch it off temporarily, it turns on at thenext ignition cycle.
You can stop the shutdown, or reset thetimer, at any point before the 30-secondcountdown has expired by doing any of thefollowing:
•You can reset the timer by interactingwith your vehicle, for example pressingthe brake or accelerator pedal.
•You can temporarily switch off theshutdown feature any time the ignitionis on using the information display. SeeInformation Displays (page 92). Thefeature only remains off for the currentignition cycle.
•During the 30-second countdown, thesystem prompts you to press OK orRESET to temporarily switch thefeature off for the current ignition cycleonly.
Stopping the Engine When YourVehicle is Stationary
Vehicles with an Ignition Key
1. Shift into park (P).
2. Switch the ignition off.
3. Apply the parking brake.
Vehicles with Keyless Start
1. Shift into park (P).
2. Press the push button ignition switch.
3. Apply the parking brake.
Note:The ignition, all electrical circuits andall warning lamps and indicators will beturned off.
Note:If the engine is idling for 30 minutes,the ignition and engine automatically shutdown.
Stopping the Engine When YourVehicle is Moving
WARNING
Switching off the engine when thevehicle is still moving will result in aloss of brake and steering assistance.The steering will not lock, but higher effortwill be required. When the ignition isswitched off, some electrical circuits,including air bags, warning lamps andindicators may also be off. If the ignitionwas turned off accidentally, you can shiftinto neutral (N) and re-start the engine.
Vehicles with an Ignition Key
1.Shift into neutral and use the brakes tobring your vehicle to a safe stop.
2. When your vehicle has stopped, shiftinto park (P) and switch the ignitionoff.
3. Apply the parking brake.
Vehicles with Keyless Start
1.Shift into neutral and use the brakes tobring your vehicle to a safe stop.
2. When your vehicle has stopped, shiftinto park (P).
148
Expedition (TB7) Canada/United States of America, enUSA, First Printing
Starting and Stopping the Engine
Page 165 of 421
Brake-Shift Interlock
WARNINGS
Do not drive your vehicle until youverify that the brake lamps areworking.
When doing this procedure, you willbe taking your vehicle out of park (P)which means your vehicle can rollfreely. To avoid unwanted vehiclemovement, always fully set the parkingbrake prior to doing this procedure. Usewheel chocks if appropriate.
If you fully release the parking brakeand the brake warning lamp remainsilluminated, the brakes may not beworking properly. See your authorizeddealer.
Your vehicle is equipped with a brake-shiftinterlock feature that prevents moving thegearshift lever from park (P) when theignition is in the on position and the brakepedal is not pressed.
If you cannot move the gearshift lever outof park (P) position with the ignition in theon position and the brake pedal pressed,a malfunction may have occurred. It ispossible that a fuse has blown or yourvehicle’s brake lamps are not operatingproperly. See Fuse Specification Chart(page 234).
If the fuse is not blown and the brakelamps are working properly, the followingprocedure will allow you to move thegearshift lever from park (P):
Column-shifter
1. Apply the parking brake. Turn theignition key to the off position, thenremove the key.
2. Move the steering column to the fulldown and full rearward position(toward the driver’s seat).
3. Remove the gearshift lever boot.
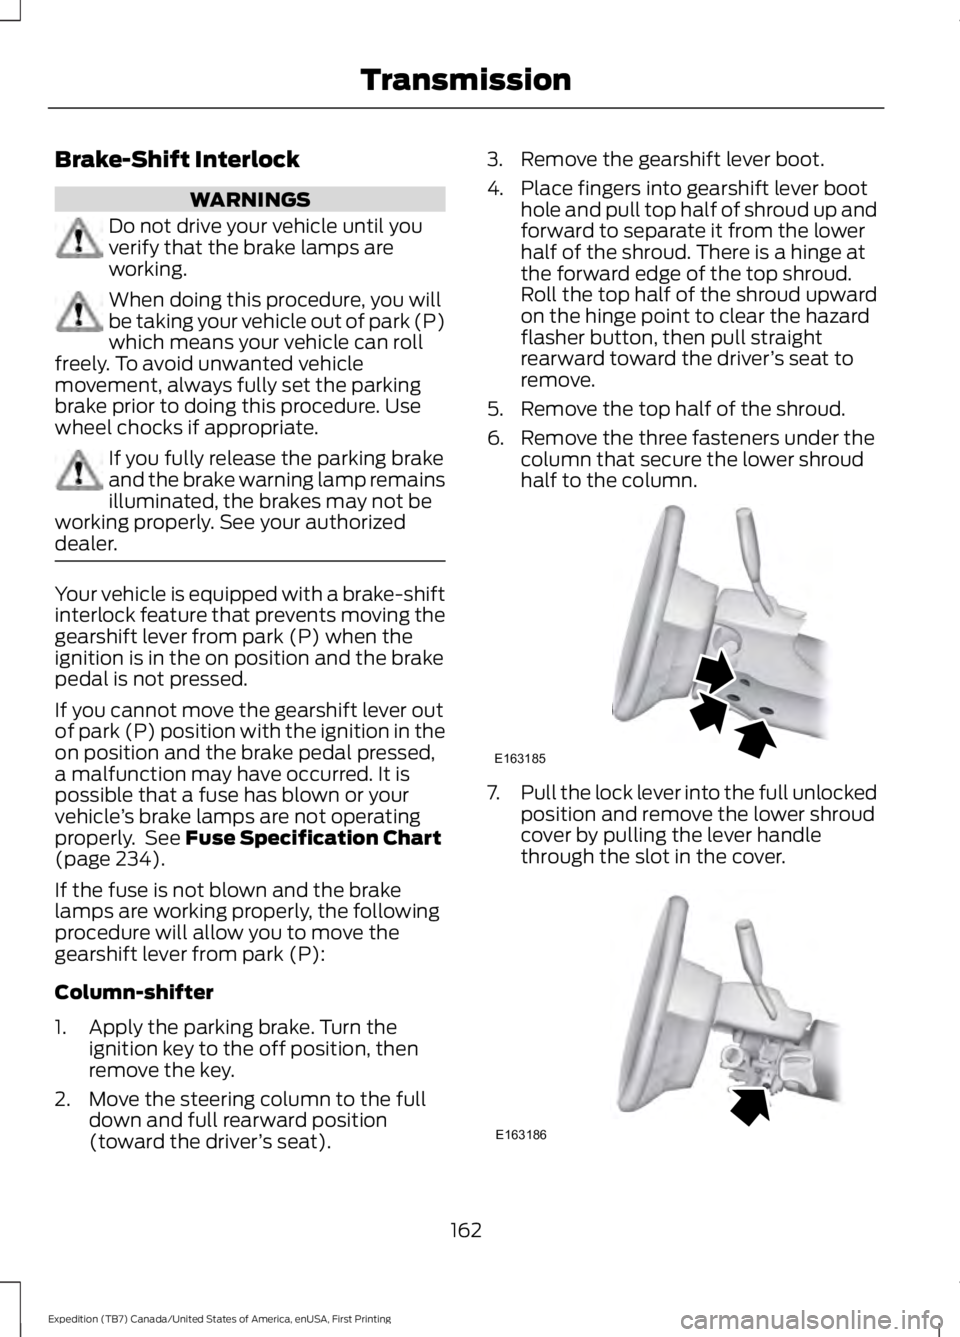
4. Place fingers into gearshift lever boothole and pull top half of shroud up andforward to separate it from the lowerhalf of the shroud. There is a hinge atthe forward edge of the top shroud.Roll the top half of the shroud upwardon the hinge point to clear the hazardflasher button, then pull straightrearward toward the driver’s seat toremove.
5. Remove the top half of the shroud.
6. Remove the three fasteners under thecolumn that secure the lower shroudhalf to the column.
7.Pull the lock lever into the full unlockedposition and remove the lower shroudcover by pulling the lever handlethrough the slot in the cover.
162
Expedition (TB7) Canada/United States of America, enUSA, First Printing
TransmissionE163185 E163186
Page 171 of 421
In the event of an emergency stop, avoidskidding the tires and do not attempt anysharp steering wheel movements.
If your vehicle goes from one type ofsurface to another (i.e. from concrete togravel) there will be a change in the wayyour vehicle responds to a maneuver (i.e.steering, acceleration or braking).
Sand
When driving over sand, try to keep all fourwheels on the most solid area of the trail.Avoid reducing the tire pressures but shiftto a lower gear and drive steadily throughthe terrain. Apply the accelerator slowlyand avoid excessive wheel slip.
Avoid driving at excessive speeds, thiscauses vehicle momentum to work againstyou and your vehicle could become stuckto the point that assistance may berequired from another vehicle. Remember,you may be able to back out the way youcame if you proceed with caution.
Mud and Water
Note:Driving through deep water maydamage the vehicle.
If you must drive through high water, driveslowly. Traction or brake capability maybe limited.
When driving through water, determine thedepth and avoid water higher than thebottom of the hubs. If the ignition systemgets wet, your vehicle may stall.
Once through water, always try the brakes.Wet brakes do not stop your vehicle aseffectively as dry brakes. Drying can beimproved by applying light pressure to thebrake pedal while moving slowly.
Be cautious of sudden changes in vehiclespeed or direction when you are driving inmud. Even 4WD vehicles can lose tractionin slick mud. As when you are driving oversand, apply the accelerator slowly andavoid spinning your wheels. If the vehicledoes slide, steer in the direction of the slideuntil you regain control of the vehicle.
If the transmission, transfer case or frontaxle are submerged in water, their fluidsshould be checked and changed, ifnecessary.
If the front or rear axle is submerged inwater, the axle lubricant should bereplaced.
After driving through mud, clean off residuestuck to rotating driveshafts and tires.Excess mud stuck on tires and rotatingdriveshafts causes an imbalance thatcould damage drive components.
“Tread Lightly” is an educational programdesigned to increase public awareness ofland-use regulations and responsibilitiesin our nations wilderness areas. Ford MotorCompany joins the U.S. Forest Service andthe Bureau of Land Management inencouraging you to help preserve ournational forest and other public and privatelands by “treading lightly”.
Driving on Hilly or Sloping Terrain
Note:Avoid driving crosswise or turning onsteep slopes or hills.
168
Expedition (TB7) Canada/United States of America, enUSA, First Printing
Four-Wheel Drive (If Equipped)E143950
Page 172 of 421
Note:Avoid turning on steep slopes or hills.A danger lies in losing traction, slippingsideways and possible vehicle roll over.Whenever driving on a hill, determinebeforehand the route you will use. Do notdrive over the crest of a hill without seeingwhat conditions are on the other side. Donot drive in reverse over a hill without theaid of an observer.
Although natural obstacles may make itnecessary to travel diagonally up or downa hill or steep incline, you should alwaystry to drive straight up or straight down.
When climbing a steep slope or hill, startin a lower gear rather than downshifting toa lower gear from a higher gear once theascent has started. This reduces strain onthe engine and the possibility of stalling.
If your vehicle stalls, do not try to turnaround because this could cause vehicleroll over. It is better to reverse back to asafe location.
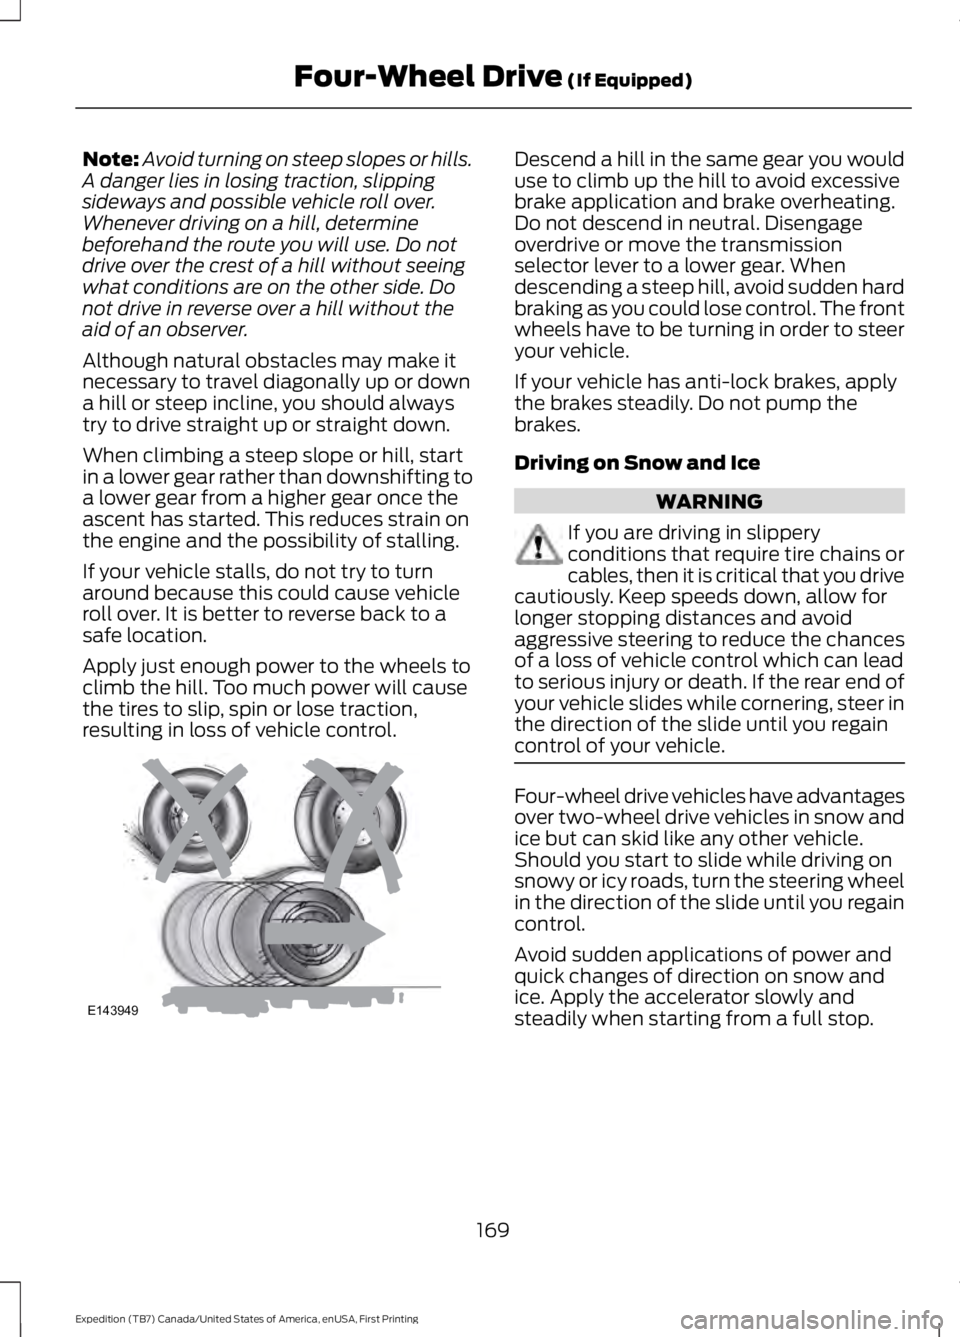
Apply just enough power to the wheels toclimb the hill. Too much power will causethe tires to slip, spin or lose traction,resulting in loss of vehicle control.
Descend a hill in the same gear you woulduse to climb up the hill to avoid excessivebrake application and brake overheating.Do not descend in neutral. Disengageoverdrive or move the transmissionselector lever to a lower gear. Whendescending a steep hill, avoid sudden hardbraking as you could lose control. The frontwheels have to be turning in order to steeryour vehicle.
If your vehicle has anti-lock brakes, applythe brakes steadily. Do not pump thebrakes.
Driving on Snow and Ice
WARNING
If you are driving in slipperyconditions that require tire chains orcables, then it is critical that you drivecautiously. Keep speeds down, allow forlonger stopping distances and avoidaggressive steering to reduce the chancesof a loss of vehicle control which can leadto serious injury or death. If the rear end ofyour vehicle slides while cornering, steer inthe direction of the slide until you regaincontrol of your vehicle.
Four-wheel drive vehicles have advantagesover two-wheel drive vehicles in snow andice but can skid like any other vehicle.Should you start to slide while driving onsnowy or icy roads, turn the steering wheelin the direction of the slide until you regaincontrol.
Avoid sudden applications of power andquick changes of direction on snow andice. Apply the accelerator slowly andsteadily when starting from a full stop.
169
Expedition (TB7) Canada/United States of America, enUSA, First Printing
Four-Wheel Drive (If Equipped)E143949
Page 173 of 421
Avoid sudden braking. Although afour-wheel drive vehicle may acceleratebetter than a two-wheel drive vehicle insnow and ice, it will not stop any faster asbraking occurs at all four wheels. Do notbecome overconfident as to roadconditions.
Make sure you allow sufficient distancebetween you and other vehicles forstopping. Drive slower than usual andconsider using one of the lower gears. Inemergency stopping situations, apply thebrake steadily. Do not pump the brakepedal. See Hints on Driving WithAnti-Lock Brakes (page 172).
Maintenance and Modifications
The suspension and steering systems onyour vehicle have been designed andtested to provide predictable performancewhether loaded or empty. For this reason,we strongly recommend that you do notmake modifications such as adding orremoving parts (for example, lift kits orstabilizer bars) or by using replacementparts not equivalent to the original factoryequipment.
We recommend that you use caution whenyour vehicle has either a high load or device(such as ladders or luggage racks). Anymodifications to your vehicle that raise thecenter of gravity may cause your vehicleto roll over when there is a loss of vehiclecontrol.
Failure to maintain your vehicle correctlymay void the warranty, increase your repaircost, reduce vehicle performance andoperational capabilities and adverselyaffect you and your passenger's safety. Werecommend you frequently inspect yourvehicle's chassis components when yourvehicle is subject to off road usage.
170
Expedition (TB7) Canada/United States of America, enUSA, First Printing
Four-Wheel Drive (If Equipped)
Page 175 of 421
GENERAL INFORMATION
Note:Occasional brake noise is normal. Ifa metal-to-metal, continuous grinding orcontinuous squeal sound is present, thebrake linings may be worn-out and anauthorized dealer should check them. If thevehicle has continuous vibration or shudderin the steering wheel while braking, anauthorized dealer should check your vehicle.
Note:Brake dust may accumulate on thewheels, even under normal drivingconditions. Some dust is inevitable as thebrakes wear and does not contribute tobrake noise. See Cleaning the AlloyWheels (page 269).
See Warning Lamps andIndicators (page 88).
Wet brakes result in reduced brakingefficiency. Gently press the brake pedal afew times when driving from a car wash orstanding water to dry the brakes.
Brake Over Accelerator
In the event the accelerator pedalbecomes stuck or entrapped, apply steadyand firm pressure to the brake pedal toslow the vehicle and reduce engine power.If you experience this condition, apply thebrakes and bring your vehicle to a safestop. Switch the engine off, move thetransmission to park (P) and apply theparking brake. Inspect the acceleratorpedal and the area around it for any itemsor debris that may be obstructing itsmovement. If none are found and thecondition persists, have your vehicle towedto the nearest authorized dealer.
Emergency Brake Assist
Emergency brake assist detects when youbrake heavily by measuring the rate atwhich you press the brake pedal. Itprovides maximum braking efficiency aslong as you press the pedal. Emergencybrake assist can reduce stopping distancesin critical situations.
Anti-lock Brake System
This system helps you maintain steeringcontrol during emergency stops by keepingthe brakes from locking.
This lamp momentarilyilluminates when you switch theignition on. If the light does notilluminate during start up, remains on orflashes, the anti-lock braking system maybe disabled. Have the system checked byan authorized dealer. If the anti-lock brakesystem is disabled, normal braking is stilleffective.
If the brake warning lampilluminates with the parkingbrake released, have your brakesystem serviced immediately.
HINTS ON DRIVING WITH
ANTI-LOCK BRAKES
Note:When the system is operating, thebrake pedal will pulse and may travelfurther. Maintain pressure on the brakepedal. You may also hear a noise from thesystem. This is normal.
The anti-lock braking system will noteliminate the risks when:
•You drive too closely to the vehicle infront of you.
•Your vehicle is hydroplaning.
•You take corners too fast.
•The road surface is poor.
172
Expedition (TB7) Canada/United States of America, enUSA, First Printing
BrakesE138644 E138644