tow bar FORD EXPEDITION EL 2016 Owners Manual
[x] Cancel search | Manufacturer: FORD, Model Year: 2016, Model line: EXPEDITION EL, Model: FORD EXPEDITION EL 2016Pages: 421, PDF Size: 7.39 MB
Page 98 of 421
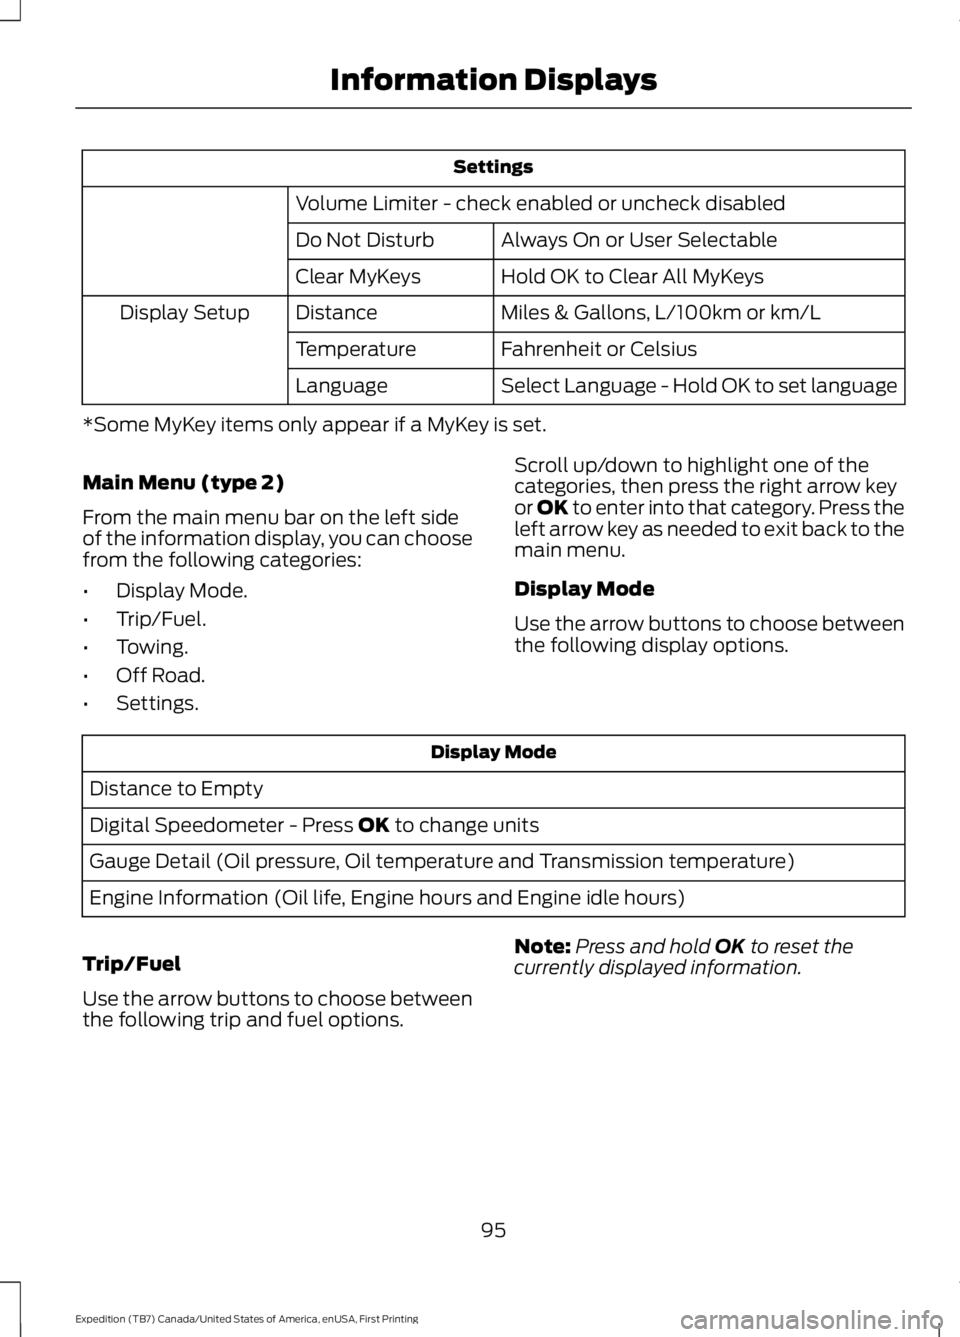
Settings
Volume Limiter - check enabled or uncheck disabled
Always On or User SelectableDo Not Disturb
Hold OK to Clear All MyKeysClear MyKeys
Miles & Gallons, L/100km or km/LDistanceDisplay Setup
Fahrenheit or CelsiusTemperature
Select Language - Hold OK to set languageLanguage
*Some MyKey items only appear if a MyKey is set.
Main Menu (type 2)
From the main menu bar on the left sideof the information display, you can choosefrom the following categories:
•Display Mode.
•Trip/Fuel.
•Towing.
•Off Road.
•Settings.
Scroll up/down to highlight one of thecategories, then press the right arrow keyor OK to enter into that category. Press theleft arrow key as needed to exit back to themain menu.
Display Mode
Use the arrow buttons to choose betweenthe following display options.
Display Mode
Distance to Empty
Digital Speedometer - Press OK to change units
Gauge Detail (Oil pressure, Oil temperature and Transmission temperature)
Engine Information (Oil life, Engine hours and Engine idle hours)
Trip/Fuel
Use the arrow buttons to choose betweenthe following trip and fuel options.
Note:Press and hold OK to reset thecurrently displayed information.
95
Expedition (TB7) Canada/United States of America, enUSA, First Printing
Information Displays
Page 99 of 421
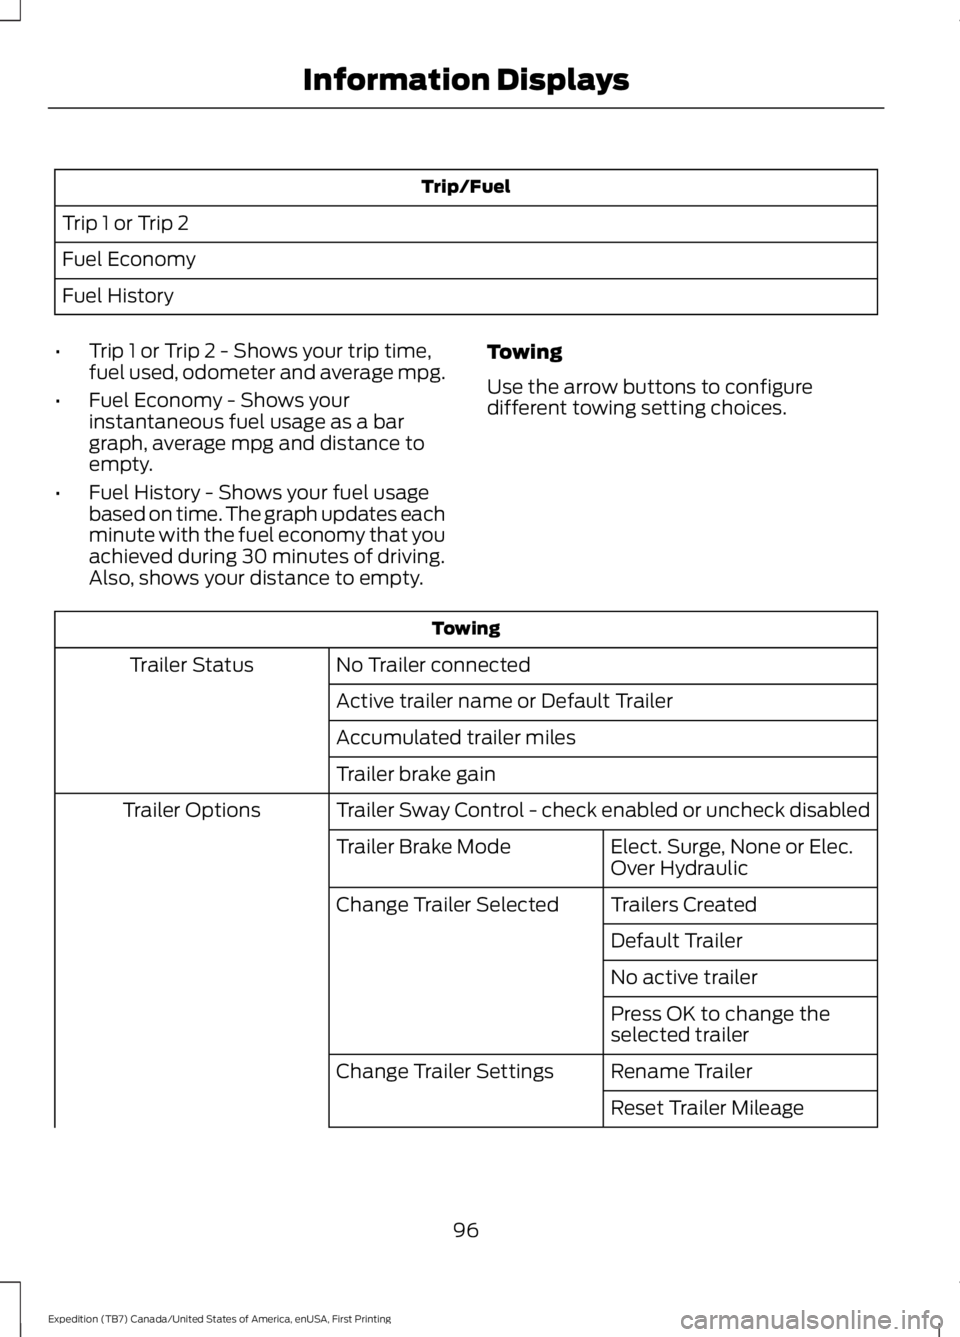
Trip/Fuel
Trip 1 or Trip 2
Fuel Economy
Fuel History
•Trip 1 or Trip 2 - Shows your trip time,fuel used, odometer and average mpg.
•Fuel Economy - Shows yourinstantaneous fuel usage as a bargraph, average mpg and distance toempty.
•Fuel History - Shows your fuel usagebased on time. The graph updates eachminute with the fuel economy that youachieved during 30 minutes of driving.Also, shows your distance to empty.
Towing
Use the arrow buttons to configuredifferent towing setting choices.
Towing
No Trailer connectedTrailer Status
Active trailer name or Default Trailer
Accumulated trailer miles
Trailer brake gain
Trailer Sway Control - check enabled or uncheck disabledTrailer Options
Elect. Surge, None or Elec.Over HydraulicTrailer Brake Mode
Trailers CreatedChange Trailer Selected
Default Trailer
No active trailer
Press OK to change theselected trailer
Rename TrailerChange Trailer Settings
Reset Trailer Mileage
96
Expedition (TB7) Canada/United States of America, enUSA, First Printing
Information Displays
Page 102 of 421
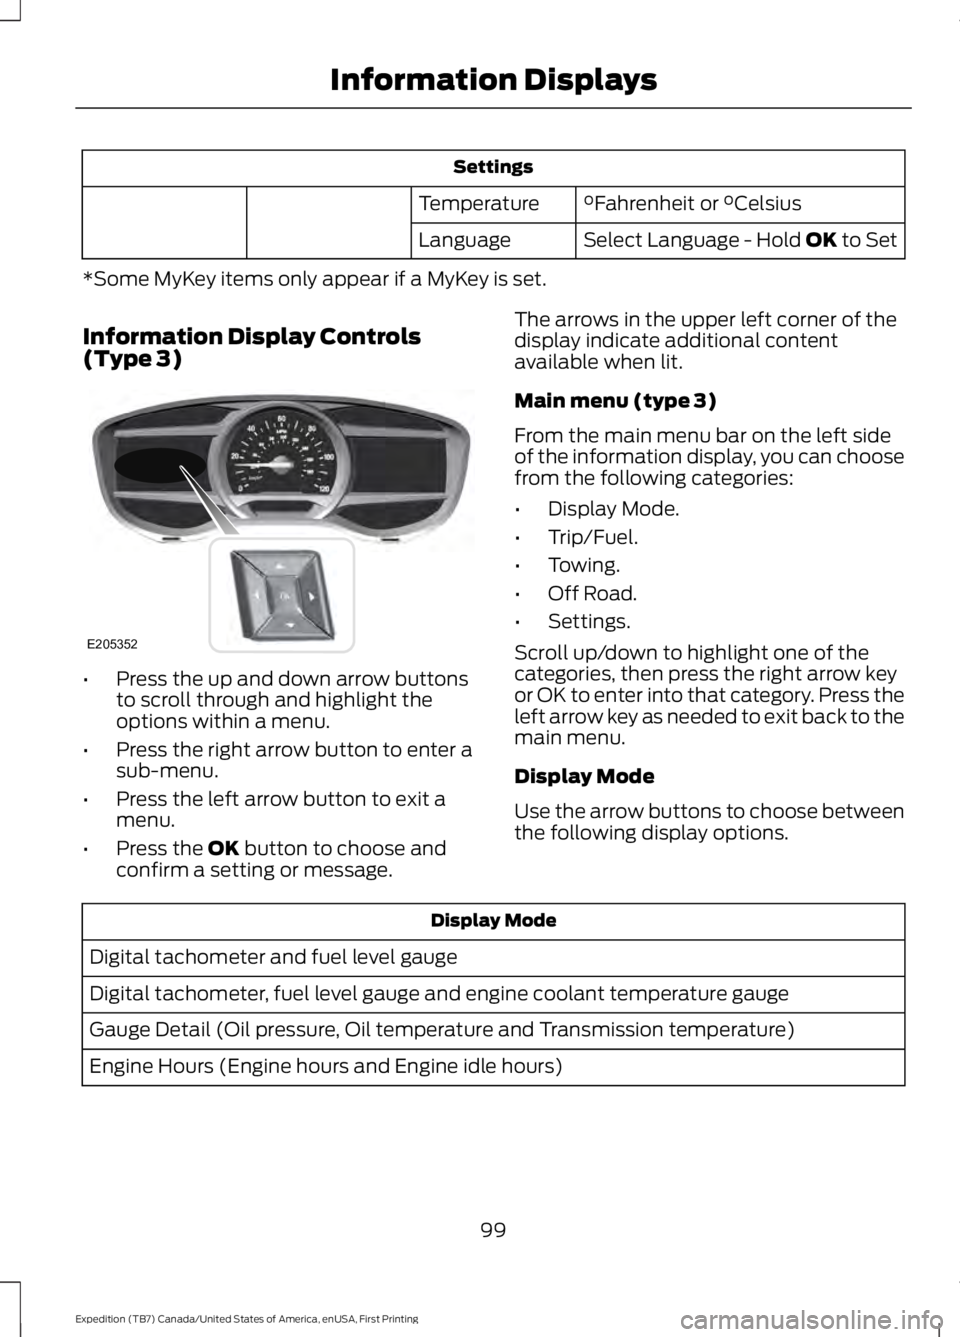
Settings
°Fahrenheit or °CelsiusTemperature
Select Language - Hold OK to SetLanguage
*Some MyKey items only appear if a MyKey is set.
Information Display Controls(Type 3)
•Press the up and down arrow buttonsto scroll through and highlight theoptions within a menu.
•Press the right arrow button to enter asub-menu.
•Press the left arrow button to exit amenu.
•Press the OK button to choose andconfirm a setting or message.
The arrows in the upper left corner of thedisplay indicate additional contentavailable when lit.
Main menu (type 3)
From the main menu bar on the left sideof the information display, you can choosefrom the following categories:
•Display Mode.
•Trip/Fuel.
•Towing.
•Off Road.
•Settings.
Scroll up/down to highlight one of thecategories, then press the right arrow keyor OK to enter into that category. Press theleft arrow key as needed to exit back to themain menu.
Display Mode
Use the arrow buttons to choose betweenthe following display options.
Display Mode
Digital tachometer and fuel level gauge
Digital tachometer, fuel level gauge and engine coolant temperature gauge
Gauge Detail (Oil pressure, Oil temperature and Transmission temperature)
Engine Hours (Engine hours and Engine idle hours)
99
Expedition (TB7) Canada/United States of America, enUSA, First Printing
Information DisplaysE205352
Page 103 of 421
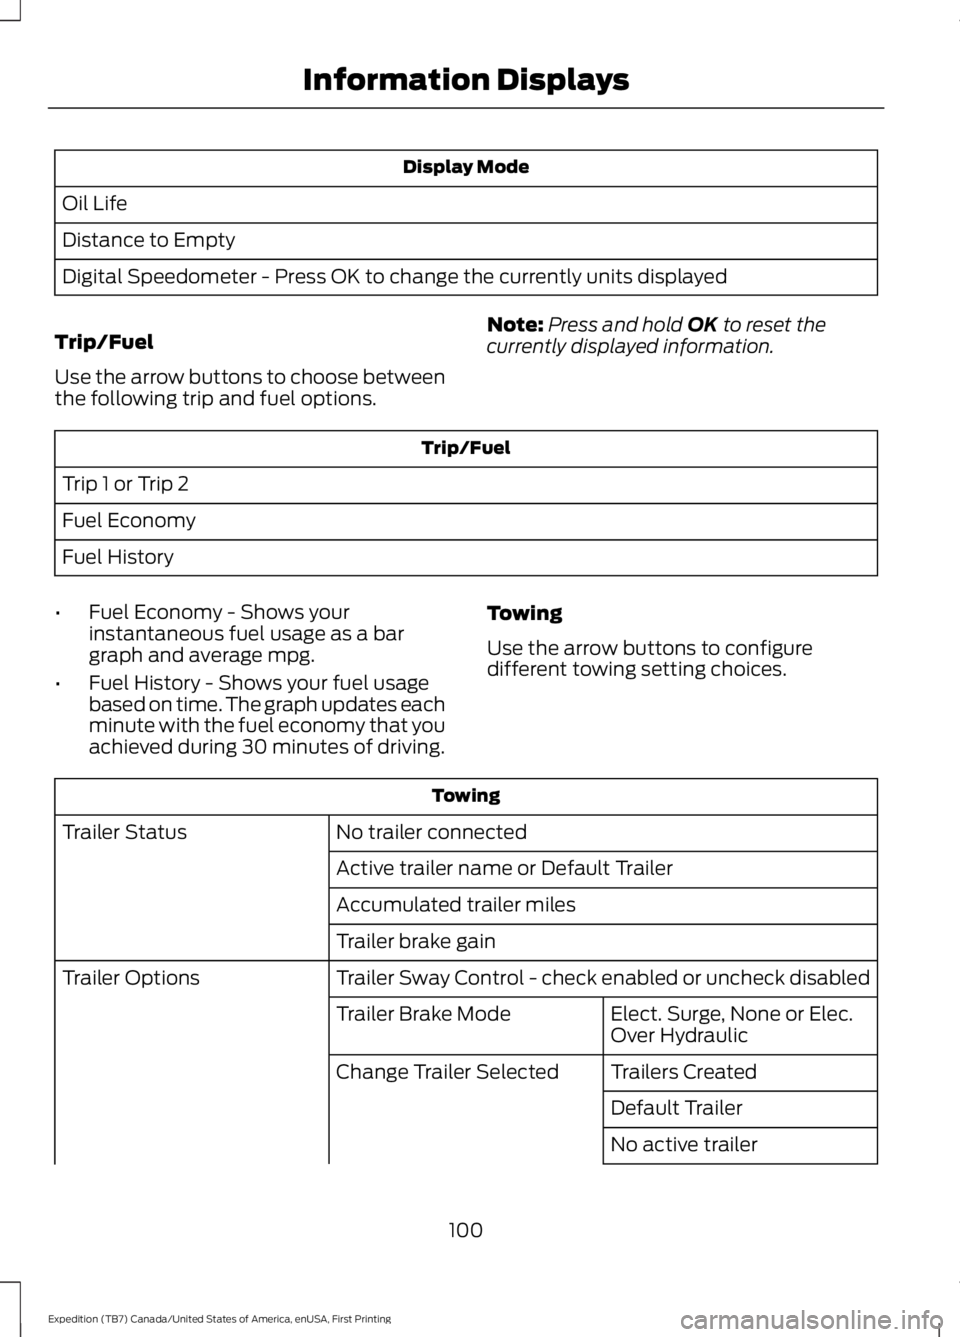
Display Mode
Oil Life
Distance to Empty
Digital Speedometer - Press OK to change the currently units displayed
Trip/Fuel
Use the arrow buttons to choose betweenthe following trip and fuel options.
Note:Press and hold OK to reset thecurrently displayed information.
Trip/Fuel
Trip 1 or Trip 2
Fuel Economy
Fuel History
•Fuel Economy - Shows yourinstantaneous fuel usage as a bargraph and average mpg.
•Fuel History - Shows your fuel usagebased on time. The graph updates eachminute with the fuel economy that youachieved during 30 minutes of driving.
Towing
Use the arrow buttons to configuredifferent towing setting choices.
Towing
No trailer connectedTrailer Status
Active trailer name or Default Trailer
Accumulated trailer miles
Trailer brake gain
Trailer Sway Control - check enabled or uncheck disabledTrailer Options
Elect. Surge, None or Elec.Over HydraulicTrailer Brake Mode
Trailers CreatedChange Trailer Selected
Default Trailer
No active trailer
100
Expedition (TB7) Canada/United States of America, enUSA, First Printing
Information Displays
Page 193 of 421
If the system detects a degradedperformance condition, a message warningof a blocked sensor will appear in theinformation display. Also the BLIS alertindicators will remain ON and BLIS will nolonger provide any vehicle warnings. Youcan clear the information display warningbut the alert indicators will remainilluminated.
A "blocked" condition can be cleared intwo ways:
•After the blockage in front of thesensors is removed or therainfall/snowfall rate decreases orstops, drive for a few minutes in trafficto allow the sensors to detect passingvehicles.
•By cycling the ignition from ON to OFFand then back ON.
Note:If your vehicle has a tow bar with afactory equipped trailer tow module and itis towing a trailer, the sensors willautomatically turn the Blind SpotInformation System off. If your vehicle hasa tow bar but no factory equipped trailertow module, it is recommended to turn theBlind Spot Information System offmanually. Operating the Blind SpotInformation System with a trailer attachedwill cause poor system performance.
System Errors
If the system senses a problem with theleft or right sensor, the telltale willilluminate and a message will appear inthe information display. See InformationMessages (page 103).
Switching the System Off and On
You can temporarily switch the Blind SpotInformation System off in the informationdisplay. See General Information (page92). When the Blind Spot InformationSystem switches off, you will not receivealerts and the information display showsa system off message. The telltale in thecluster also illuminates. When you switchthe Blind Spot Information System on oroff, the alert indicators flash twice.
Note:The Blind Spot Information Systemremembers the last selected on or offsetting.
You can also have the Blind SpotInformation System switched offpermanently at an authorized dealer. Onceswitched off permanently, the system canonly be switched back on at an authorizeddealer.
CROSS TRAFFIC ALERT
WARNING
To help avoid personal injury, NEVERuse the Cross Traffic Alert system asa replacement for using the interiorand exterior mirrors and looking over yourshoulder before backing out of a parkingspace. Cross Traffic Alert is not areplacement for careful driving.
Cross Traffic Alert is designed to warn youof vehicles approaching from the sideswhen the transmission is in reverse (R).
Using the System
Cross Traffic Alert turns on when you startthe engine and you shift into reverse (R).Once shifted out of reverse (R), CrossTraffic Alert turns off.
Note:Cross Traffic Alert only functionswhile your transmission is in reverse (R).
190
Expedition (TB7) Canada/United States of America, enUSA, First Printing
Driving Aids
Page 196 of 421
The following are other situations that maylimit the Cross Traffic Alert performance:
•Adjacently parked vehicles or objectsobstructing the sensors.
•Approaching vehicles passing atspeeds greater than 37 mph(60 km/h).
•Driving in reverse faster than 7 mph(12 km/h).
•Backing out of an angled parking spot.
False Alerts
Note:If your vehicle has a tow bar with afactory equipped trailer tow module and itis towing a trailer, the sensors willautomatically turn the Cross Traffic Alertoff. If your vehicle has a tow bar but nofactory equipped trailer tow module, it isrecommended to turn the Cross Traffic Alertoff manually. Operating Cross Traffic Alertwith a trailer attached will cause poor CrossTraffic Alert performance.
There may be certain instances when thereis a false alert by the Cross Traffic Alertsystem that illuminates the alert indicatorwith no vehicle in the coverage zone. Someamount of false alerts are normal; they aretemporary and self-correct.
System Errors
If Cross Traffic Alert senses a problem withthe left or right sensor a message willappear in the information display. SeeInformation Messages (page 103).
Switching the System Off and On
You can temporarily switch Cross TrafficAlert off in the information display. SeeGeneral Information (page 92). Whenyou switch Cross Traffic Alert off, you willnot receive alerts and the informationdisplay will display a system off message.
Note:The Cross Traffic Alert switches onwhenever the ignition is switched on andready to provide appropriate alerts whenthe transmission is in reverse (R). CrossTraffic Alert will not remember the lastselected on or off setting.
You can also have Cross Traffic Alertswitched off permanently at an authorizeddealer. Once switched off permanently,the system can only be switched back onat an authorized dealer.
STEERING
Electric Power Steering
WARNINGS
The electric power steering systemhas diagnostic checks thatcontinuously monitor the system. Ifa fault is detected, a message displays inthe information display. Stop your vehicleas soon as it is safe to do so. Switch theignition off. After at least 10 seconds,switch the ignition on and watch theinformation display for a steering systemwarning message. If a steering systemwarning message returns, have the systemchecked by an authorized dealer.
If the system detects an error, youmay not feel a difference in thesteering, however a serious conditionmay exist. Obtain immediate service froman authorized dealer, failure to do so mayresult in loss of steering control.
Your vehicle has an electric power steeringsystem. There is no fluid reservoir. Nomaintenance is required.
If your vehicle loses electrical power whileyou are driving, electric power steeringassistance is lost. The steering system stilloperates and you can steer your vehiclemanually. Manually steering your vehiclerequires more effort.
193
Expedition (TB7) Canada/United States of America, enUSA, First Printing
Driving Aids
Page 208 of 421
TOWING A TRAILER
WARNINGS
Do not exceed the GVWR orthe GAWR specified on thecertification label.
Towing trailers beyond themaximum recommendedgross trailer weight exceeds thelimit of the vehicle and couldresult in engine damage,transmission damage, structuraldamage, loss of vehicle control,vehicle rollover and personalinjury.
Your vehicle may have electricalitems, such as fuses or relays,related to towing. See the Fuseschapter.
Your vehicle's load capacitydesignation is by weight, not byvolume, so you cannot necessarilyuse all available space whenloading a vehicle or trailer.
Towing a trailer places an extraload on your vehicle's engine,transmission, axle, brakes, tiresand suspension. Inspect thesecomponents periodically during,and after, any towing operation.
Load Placement
To help minimize how trailermovement affects your vehiclewhen driving:
•Load the heaviest items closestto the trailer floor.
•Load the heaviest itemscentered between the left andright side trailer tires.
•Load the heaviest items abovethe trailer axles or just slightlyforward toward the trailertongue. Do not allow the finaltrailer tongue weight to goabove or below 10-15% of theloaded trailer weight.
•Select a tow bar with thecorrect rise or drop. When boththe loaded vehicle and trailerare connected, the trailer frameshould be level, or slightlyangled down toward yourvehicle, when viewed from theside.
When driving with a trailer orpayload, a slight takeoff vibrationor shudder may be present due tothe increased payload weight.Additional information regardingproper trailer loading and settingyour vehicle up for towing islocated in another chapter of thismanual. See Load Limit (page198).
You can also find information inthe RV & Trailer Towing Guideavailable at your authorizeddealer, or online.
205
Expedition (TB7) Canada/United States of America, enUSA, First Printing
Towing
Page 210 of 421
To calculate the maximum loaded trailerweight for your vehicle:
1. Start with the gross combined weightrating for your vehicle model and axleratio. See the following chart.
2.Subtract all of the following that applyto your vehicle:
•Vehicle curb weight
•Hitch hardware weight, such as adraw bar, ball, locks or weightdistributing
•Driver weight
•Passenger(s) weight
•Payload, cargo and luggage weight
•Aftermarket equipment weight.
3. This equals the maximum loadedtrailer weight for this combination.
Note:The trailer tongue load figures intothe payload for your vehicle. Reduce thetotal payload by the final trailer tongueweight.
Consult an authorized dealer to determinethe maximum trailer weight allowed foryour vehicle if you are not sure.
Maximum GCWRTowing PackageVehicle Type
12300 lb (5579 kg)
Standard
Two-wheel drive (exceptEL)
12500 lb (5669 kg)Two-wheel drive EL
12500 lb (5669 kg)Four-wheel drive (exceptEL)
12800 lb (5806 kg)Four-wheel drive EL
14900 lb (6758 kg)
Optional Heavy Duty
Two-wheel drive (exceptEL)
15100 lb (6849 kg)Two-wheel drive EL
15200 lb (6894 kg)Four-wheel drive (exceptEL)
15300 lb (6940 kg)Four-wheel drive EL
207
Expedition (TB7) Canada/United States of America, enUSA, First Printing
Towing
Page 212 of 421
Integrated Hitch Rating
WARNING
Towing trailers beyond the maximumtongue weight exceeds the limit ofthe towing system and could resultin vehicle structural damage, loss of vehiclecontrol and personal injury.
The standard integrated hitch has tworatings depending on mode of operation:
•Weight-carrying mode requires a drawbar and hitch ball. The draw barsupports all the vertical tongue load ofthe trailer.
•Weight-distributing mode requires anaftermarket weight-distributingsystem, which includes draw bar, hitchball, spring bars and snap-up brackets.This system distributes the verticaltongue load of the trailer between thetruck and the trailer.
Maximum Tongue WeightMaximum Trailer WeightMode
600 lb (272 kg)6000 lb (2721 kg)Weight carrying
920 lb (417 kg)9200 lb (4173 kg)Weight distributing
Note:These are hitch ratings only. Actualvehicle ratings are dependent on engine,transmission and axle combinations.
Weight-distributing Hitch - Vehicleswithout Automatic LevelingSuspension
WARNING
Do not adjust a weight-distributinghitch to any position where the rearbumper of the vehicle is higher thanit was before attaching the trailer. Doingso will defeat the function of theweight-distributing hitch, which may causeunpredictable handling, and could resultin serious personal injury.
When hooking-up a trailer using aweight-distributing hitch, always use thefollowing procedure:
1. Park the loaded vehicle, without thetrailer, on a level surface.
2. Measure the height to the top of yourvehicle's front wheel opening on thefender. This is H1.
3.Attach the loaded trailer to your vehiclewithout the weight-distributing barsconnected.
4. Measure the height to the top of yourvehicle's front wheel opening on thefender a second time. This is H2.
5. Install and adjust the tension in theweight-distributing bars so that theheight of your vehicle's front wheelopening on the fender is approximatelyhalf the way down from H2, toward H1.
6.Check that the trailer is level or slightlynose down toward your vehicle. If not,adjust the ball height accordingly andrepeat Steps 2-6.
When the trailer is level or slightly nosedown toward the vehicle:
•Lock the bar tension adjuster in place.
•Check that the trailer tongue securelyattaches and locks onto the hitch.
•Install safety chains, lighting, and trailerbrake controls as required by law or thetrailer manufacturer.
209
Expedition (TB7) Canada/United States of America, enUSA, First Printing
Towing
Page 213 of 421
Weight-distributing Hitch - Vehicleswith Automatic Leveling Suspension
WARNING
Do not adjust a weight-distributinghitch to any position where the rearbumper of the vehicle is higher thanit was before attaching the trailer. Doingso will defeat the function of theweight-distributing hitch, which may causeunpredictable handling, and could resultin serious personal injury.
Note:If you do not move the loaded vehiclefor approximately 12 hours, the levelingsystem may bleed down to a lower height.This can be especially apparent if you leavea trailer attached to the parked vehicle forlong periods. You must drive your vehicle inorder to re-level the suspension.
When hooking-up a trailer using aweight-distributing hitch, always use thefollowing procedure:
1. Load the interior of the vehicle to aweight similar to that which you intendto carry when towing. This includesthings such as passenger weight andcargo.
2. Drive the vehicle for approximately 2miles (3 kilometers) to re-level thesuspension.
3. Park the loaded vehicle, without thetrailer, on a level surface.
4. Measure the height to the top of yourvehicle's front wheel opening on thefender. This is H1.
5.Attach the loaded trailer to your vehiclewithout the weight-distributing barsconnected.
6.Make sure you securely attach and lockthe trailer tongue to the hitch.
7.Install safety chains, lighting, and trailerbrake controls as required by law or thetrailer manufacturer.
8. Drive the vehicle and trailer at 20–25mph (32–40 km/h) for approximately2 miles (3 kilometers) to re-level thesuspension.
9. Park your vehicle and trailer on a levelsurface.
10.Measure the height to the top of yourvehicle's front wheel opening on thefender a second time. This is H2.
11. Install and adjust the tension in theweight-distributing bars so that theheight of your vehicle's front wheelopening on the fender isapproximately half the way downfrom H2, toward H1.
12. Check that the trailer is level orslightly nose down toward yourvehicle. If not, remove the trailer,adjust the ball height accordingly andrepeat Steps 5-11.
When the trailer is level or slightly nosedown toward the vehicle:
•Lock the bar tension adjuster in place.
•Check that the trailer tongue securelyattaches and locks onto the hitch.
•Install safety chains, lighting, and trailerbrake controls as required by law or thetrailer manufacturer.
Safety Chains
Note:Do not attach safety chains to thebumper.
Always connect the safety chains to theframe or hook retainers of your vehiclehitch.
To connect the safety chains, cross thechains under the trailer tongue and allowenough slack for turning tight corners. Donot allow the chains to drag on the ground.
210
Expedition (TB7) Canada/United States of America, enUSA, First Printing
Towing