FORD EXPEDITION EL 2017 Owners Manual
Manufacturer: FORD, Model Year: 2017, Model line: EXPEDITION EL, Model: FORD EXPEDITION EL 2017Pages: 500, PDF Size: 6.13 MB
Page 191 of 500
Changing the Set Speed
Note: If you accelerate by pressing theaccelerator pedal, the set speed will notchange. When you release the acceleratorpedal, your vehicle returns to the speed thatyou previously set.
•Press and release SET+ or SET-. Whenyou select km/h as the displaymeasurement in the Informationdisplay the set speed changes inapproximately 2 km/h increments.When you select mph as the displaymeasurement in the informationdisplay the set speed changes inapproximately 1 mph increments.
•Press the accelerator or brake pedaluntil you reach the desired speed. Pressand release SET +.
•Press and hold SET+ or SET-. Releasethe control when you reach the desiredspeed.
Canceling the Set Speed
Press and release CNCL or tap the brakepedal. The set speed does not erase.
Resuming the Set Speed
Press and release RSM.
Switching Cruise Control Off
Press and release OFF when the systemis in stand by mode or switch the ignitionoff.
Note:You erase the set speed when youswitch the system off.
188
Expedition (TB7) Canada/United States of America, enUSA, Edition date: 03/2016, First Printing
Cruise Control
Page 192 of 500
BLIND SPOT INFORMATION
SYSTEM
WARNING
Never use the Blind SpotInformation System as areplacement for using the interiorand exterior mirrors or looking over yourshoulder before changing lanes. The BlindSpot Information System is not areplacement for careful driving.
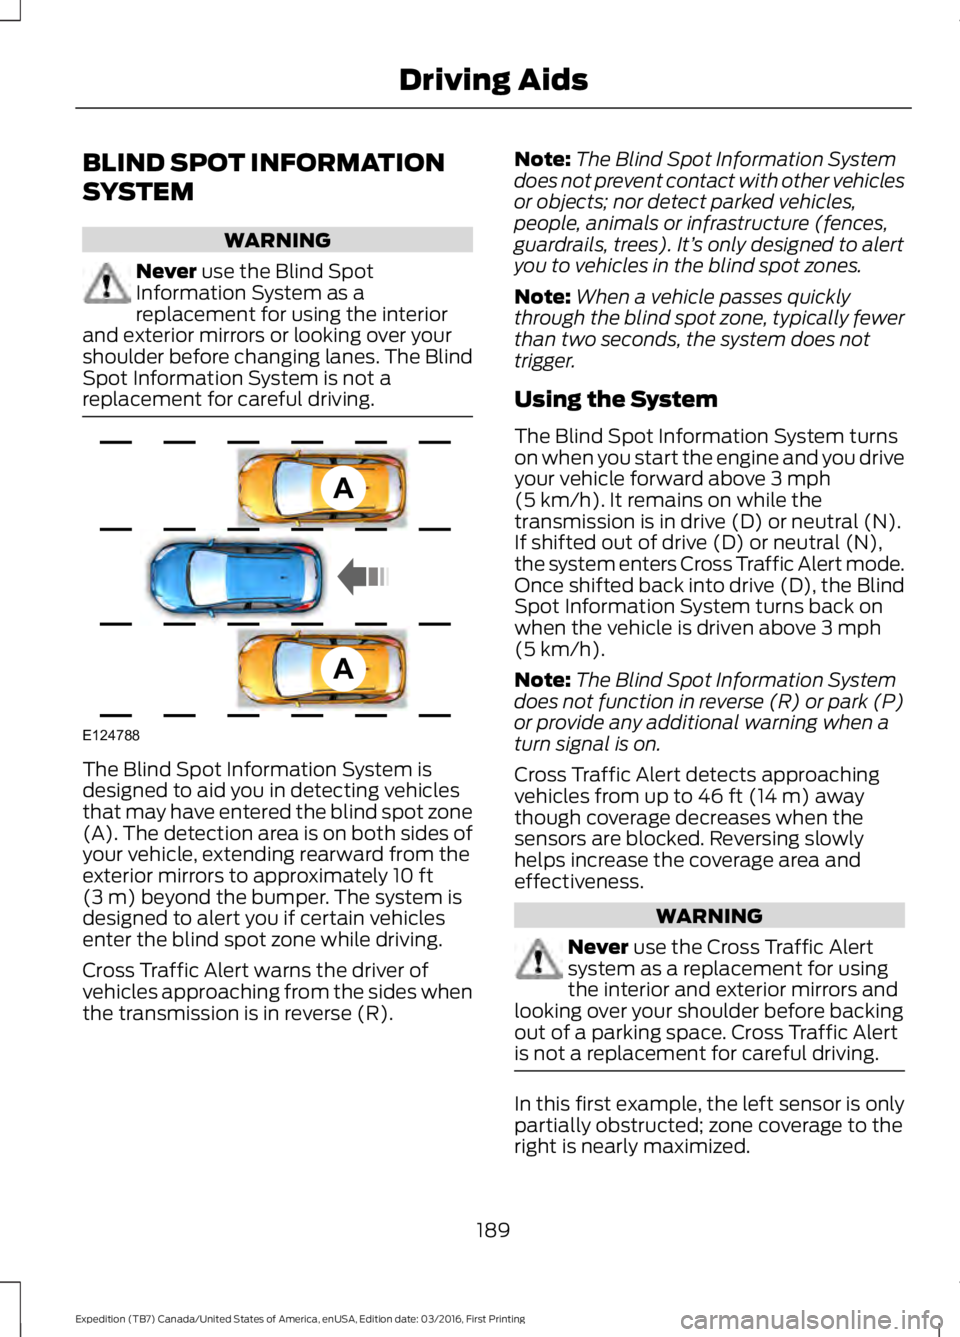
The Blind Spot Information System isdesigned to aid you in detecting vehiclesthat may have entered the blind spot zone(A). The detection area is on both sides ofyour vehicle, extending rearward from theexterior mirrors to approximately 10 ft(3 m) beyond the bumper. The system isdesigned to alert you if certain vehiclesenter the blind spot zone while driving.
Cross Traffic Alert warns the driver ofvehicles approaching from the sides whenthe transmission is in reverse (R).
Note:The Blind Spot Information Systemdoes not prevent contact with other vehiclesor objects; nor detect parked vehicles,people, animals or infrastructure (fences,guardrails, trees). It’s only designed to alertyou to vehicles in the blind spot zones.
Note:When a vehicle passes quicklythrough the blind spot zone, typically fewerthan two seconds, the system does nottrigger.
Using the System
The Blind Spot Information System turnson when you start the engine and you driveyour vehicle forward above 3 mph(5 km/h). It remains on while thetransmission is in drive (D) or neutral (N).If shifted out of drive (D) or neutral (N),the system enters Cross Traffic Alert mode.Once shifted back into drive (D), the BlindSpot Information System turns back onwhen the vehicle is driven above 3 mph(5 km/h).
Note:The Blind Spot Information Systemdoes not function in reverse (R) or park (P)or provide any additional warning when aturn signal is on.
Cross Traffic Alert detects approachingvehicles from up to 46 ft (14 m) awaythough coverage decreases when thesensors are blocked. Reversing slowlyhelps increase the coverage area andeffectiveness.
WARNING
Never use the Cross Traffic Alertsystem as a replacement for usingthe interior and exterior mirrors andlooking over your shoulder before backingout of a parking space. Cross Traffic Alertis not a replacement for careful driving.
In this first example, the left sensor is onlypartially obstructed; zone coverage to theright is nearly maximized.
189
Expedition (TB7) Canada/United States of America, enUSA, Edition date: 03/2016, First Printing
Driving AidsA
A
E124788
Page 193 of 500
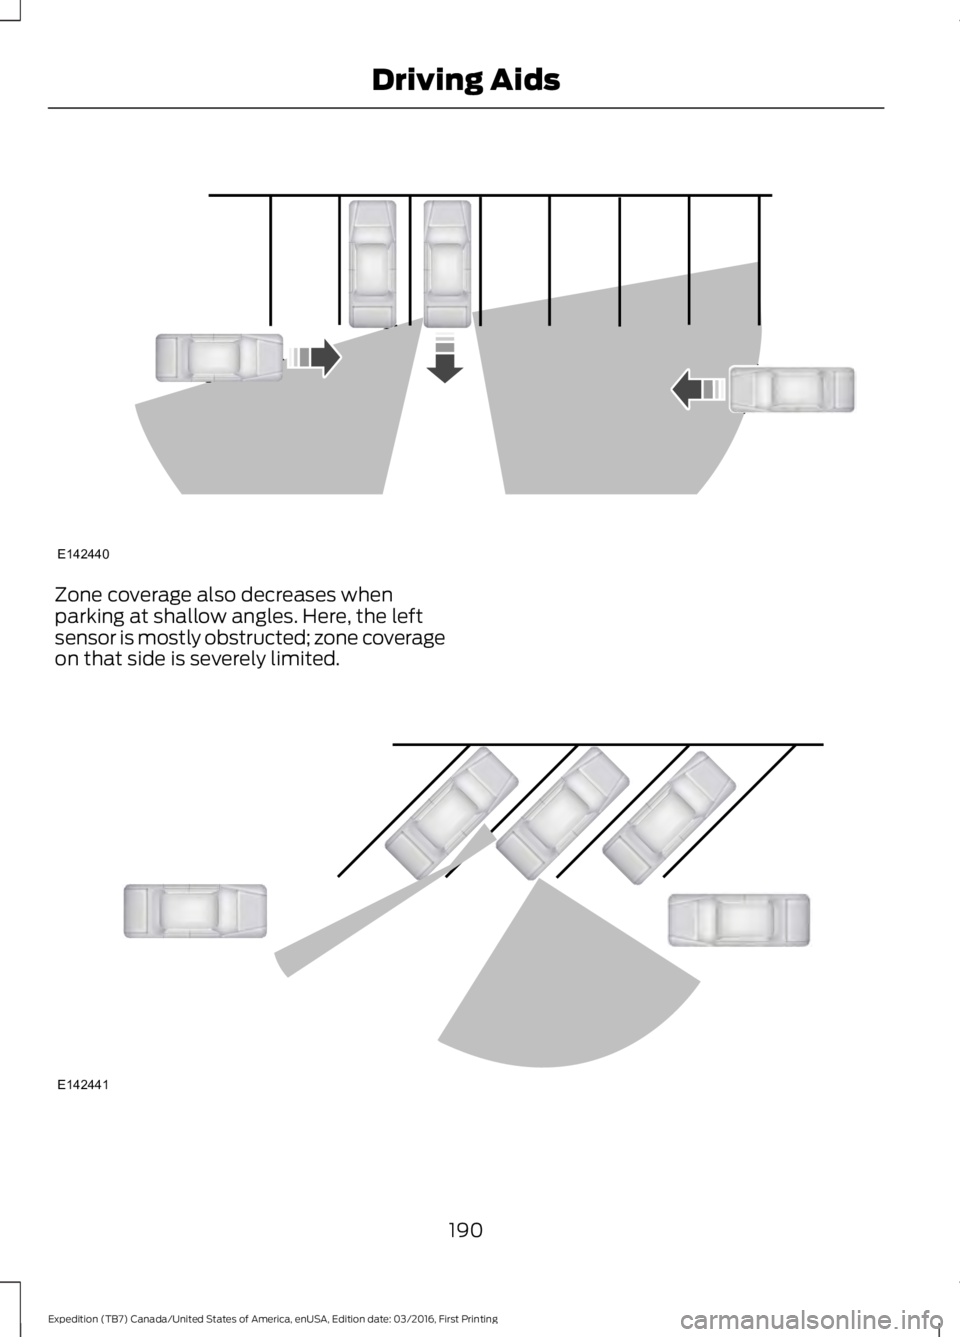
Zone coverage also decreases whenparking at shallow angles. Here, the leftsensor is mostly obstructed; zone coverageon that side is severely limited.
190
Expedition (TB7) Canada/United States of America, enUSA, Edition date: 03/2016, First Printing
Driving AidsE142440 E142441
Page 194 of 500
System Lights and Messages
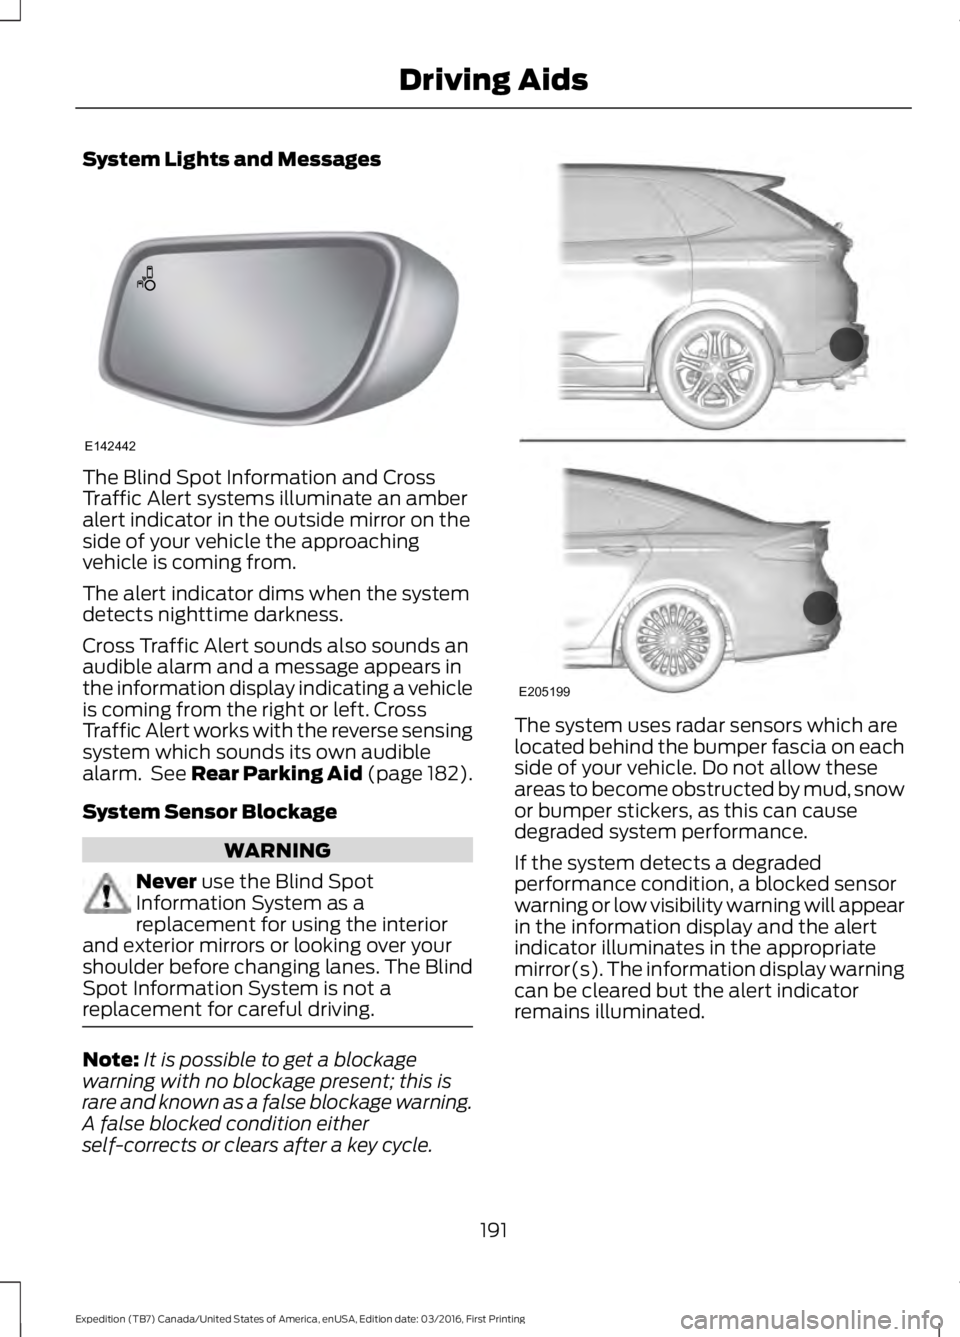
The Blind Spot Information and CrossTraffic Alert systems illuminate an amberalert indicator in the outside mirror on theside of your vehicle the approachingvehicle is coming from.
The alert indicator dims when the systemdetects nighttime darkness.
Cross Traffic Alert sounds also sounds anaudible alarm and a message appears inthe information display indicating a vehicleis coming from the right or left. CrossTraffic Alert works with the reverse sensingsystem which sounds its own audiblealarm. See Rear Parking Aid (page 182).
System Sensor Blockage
WARNING
Never use the Blind SpotInformation System as areplacement for using the interiorand exterior mirrors or looking over yourshoulder before changing lanes. The BlindSpot Information System is not areplacement for careful driving.
Note:It is possible to get a blockagewarning with no blockage present; this israre and known as a false blockage warning.A false blocked condition eitherself-corrects or clears after a key cycle.
The system uses radar sensors which arelocated behind the bumper fascia on eachside of your vehicle. Do not allow theseareas to become obstructed by mud, snowor bumper stickers, as this can causedegraded system performance.
If the system detects a degradedperformance condition, a blocked sensorwarning or low visibility warning will appearin the information display and the alertindicator illuminates in the appropriatemirror(s). The information display warningcan be cleared but the alert indicatorremains illuminated.
191
Expedition (TB7) Canada/United States of America, enUSA, Edition date: 03/2016, First Printing
Driving AidsE142442 E205199
Page 195 of 500
When the blockage is removed, the systemcan be reset in two ways: 1) when at leasttwo objects are detected while driving, or2) turn the ignition key from on to off, then
back on. If the blockage is still present afterthe key cycle, the system senses again thatit is blocked after driving in traffic.
Reasons for messages being displayed
Clean the fascia area in front of the radaror remove the obstruction.The radar surface is dirty or obstructed
Drive normally in traffic for a few minutesto allow the radar to detect passingvehicles so it can clear the blocked state.
The radar surface is not dirty or obstructed
No action required. The system automatic-ally resets to an unblocked state once therainfall/snowfall rate decreases or stops.Do not use the Blind Spot InformationSystem or Cross Traffic Alert in theseconditions.
Heavy rainfall/snowfall interferes with theradar signals
System Limitations
The Blind Spot Information and CrossTraffic Alert systems do have theirlimitations; situations such as severeweather conditions or debris build-up onthe sensor area may limit vehicle detection.
The following are other situations that maylimit the Blind Spot Information System:
•Certain maneuvering of vehiclesentering and exiting the blind zone.
•Vehicles passing through the blind zoneat very fast rates.
•When several vehicles forming aconvoy pass through the blind zone.
The following are other situations that maylimit the Cross Traffic Alert:
•Adjacently parked vehicles or objectsobstructing the sensors.
•Approaching vehicles passing atspeeds greater than 15 mph (24 km/h).
•Driving in reverse faster than 3 mph(5 km/h).
•Backing out of an angled parking spot.
False Alerts
Note:If you connected a trailer to yourvehicle, the Blind Spot Information Systemmay detect the trailer causing a false alert.To avoid false alerts you may want to turnthe system off manually.
There may be certain instances wheneither the Blind Spot Information or CrossTraffic Alert systems illuminate the alertindicator with no vehicle in the coveragezone; this is known as a false alert. Someamount of false alerts are normal; they aretemporary and self-correct.
System Errors
If the system senses a problem with theleft or right sensor, the telltale willilluminate and a message will appear inthe information display. See InformationMessages (page 102).
192
Expedition (TB7) Canada/United States of America, enUSA, Edition date: 03/2016, First Printing
Driving Aids
Page 196 of 500
Switching the System Off and On
One or both systems can be switched offtemporarily by using the informationdisplay control; See InformationDisplays (page 91). . When you switch offthe Blind Spot Information System, youwill not receive alerts and the informationdisplay will display a system off message.The yellow alert indicator in the outsidemirror will also flash twice. The systemswitches back on whenever you switch theignition on.
You can also have the Blind SpotInformation System switched offpermanently at an authorized dealer. Onceswitched off permanently, the system canonly be switched back on at an authorizeddealer.
STEERING
Electric Power Steering
WARNINGS
The electric power steering systemhas diagnostic checks thatcontinuously monitor the system. Ifa fault is detected, a message displays inthe information display. Stop your vehicleas soon as it is safe to do so. Switch theignition off. After at least 10 seconds,switch the ignition on and watch theinformation display for a steering systemwarning message. If a steering systemwarning message returns, have the systemchecked by an authorized dealer.
If the system detects an error, youmay not feel a difference in thesteering, however a serious conditionmay exist. Obtain immediate service froman authorized dealer, failure to do so mayresult in loss of steering control.
Your vehicle has an electric power steeringsystem. There is no fluid reservoir. Nomaintenance is required.
If your vehicle loses electrical power whileyou are driving, electric power steeringassistance is lost. The steering system stilloperates and you can steer your vehiclemanually. Manually steering your vehiclerequires more effort.
Extreme continuous steering may increasethe effort required for you to steer yourvehicle. This increased effort preventsoverheating and permanent damage tothe steering system. You do not lose theability to steer your vehicle manually.Typical steering and driving maneuversallow the system to cool and return tonormal operation.
Steering Tips
If the steering wanders or pulls, check for:
•Correct tire pressures.
•Uneven tire wear.
•Loose or worn suspensioncomponents.
•Loose or worn steering components.
•Improper vehicle alignment.
Note:A high crown in the road or highcrosswinds may also make the steeringseem to wander or pull.
Adaptive Learning
The electronic power steering systemadaptive learning helps correct roadirregularities and improves overall handlingand steering feel. It communicates withthe brake system to help operateadvanced stability control and accidentavoidance systems. Additionally, wheneverthe battery is disconnected or a newbattery installed, you must drive yourvehicle a short distance before the systemrelearns the strategy and reactivates allsystems.
193
Expedition (TB7) Canada/United States of America, enUSA, Edition date: 03/2016, First Printing
Driving Aids
Page 197 of 500
DRIVE CONTROL
Driver Select Suspension (If Equipped)
Driver select suspension delivers a uniquedriving experience through a suite ofsophisticated electronic vehicle systems.These systems continuously monitor yourdriving inputs and the road conditions tooptimize ride comfort, steering andhandling.
Driver select suspension consists of thefollowing systems:
•Continuously controlled dampingdynamically adjusts the shockabsorbers stiffness in real time tomatch the road surface and driverinputs. This system continuouslymonitors your vehicle’s motion (roll,pitch, bounce), suspension position,load, speed, road conditions, andsteering to adjust the suspensiondamping for optimal vehicle control.
•Electronically power-assisted steeringadjusts steering effort and feel basedon your vehicle speed and your inputs.
The configuration remains active untilmodified from the main menu on theinformation display. See GeneralInformation (page 91).
Modes:
•Comfort – Provides a more relaxeddriving experience, maximizing comfort.Your steering effort decreases and thesuspension movement is more fluid.Comfort mode is ideal when you desireenhanced traveling comfort.
•Normal – Delivers a balancedcombination of comfortable, controlledride and confident handling. This modeprovides an engaging drive experienceand a direct connection to the roadwithout sacrificing any of thecomposure demanded from yourvehicle.
•Sport – Provides a sportier drivingexperience. The suspension stiffens,with an emphasis on handling andcontrol. The engine responds moredirectly to your inputs. Sport mode isideal for use during more spiriteddriving.
SELF-LEVELING SUSPENSION
The self-leveling suspension system isdesigned to improve ride, handling andgeneral vehicle performance during:
•Certain road conditions
•Steering maneuvers
•Braking
•Acceleration
•Towing
This system keeps the rear of your vehicleat a constant level through a hydraulicpump inside each rear shock. Dependingon the payload or road surface conditionsit will take approximately 2 mi (3.2 km) forthe leveling to complete.
194
Expedition (TB7) Canada/United States of America, enUSA, Edition date: 03/2016, First Printing
Driving Aids
Page 198 of 500
If the loaded vehicle is not moved forapproximately 12 hours, the leveling systemmay bleed down to a lower height. Thiscan be especially apparent if a trailer is leftattached to the parked vehicle for longperiods of time. You must drive your vehiclein order to re-level the suspension.
If a self-equalizing hitch is used, yourvehicle should be driven approximately2 mi (3.2 km) with the trailer prior toadjusting (leveling) the hitch.
195
Expedition (TB7) Canada/United States of America, enUSA, Edition date: 03/2016, First Printing
Driving Aids
Page 199 of 500
REAR UNDER FLOOR
STORAGE (If Equipped)
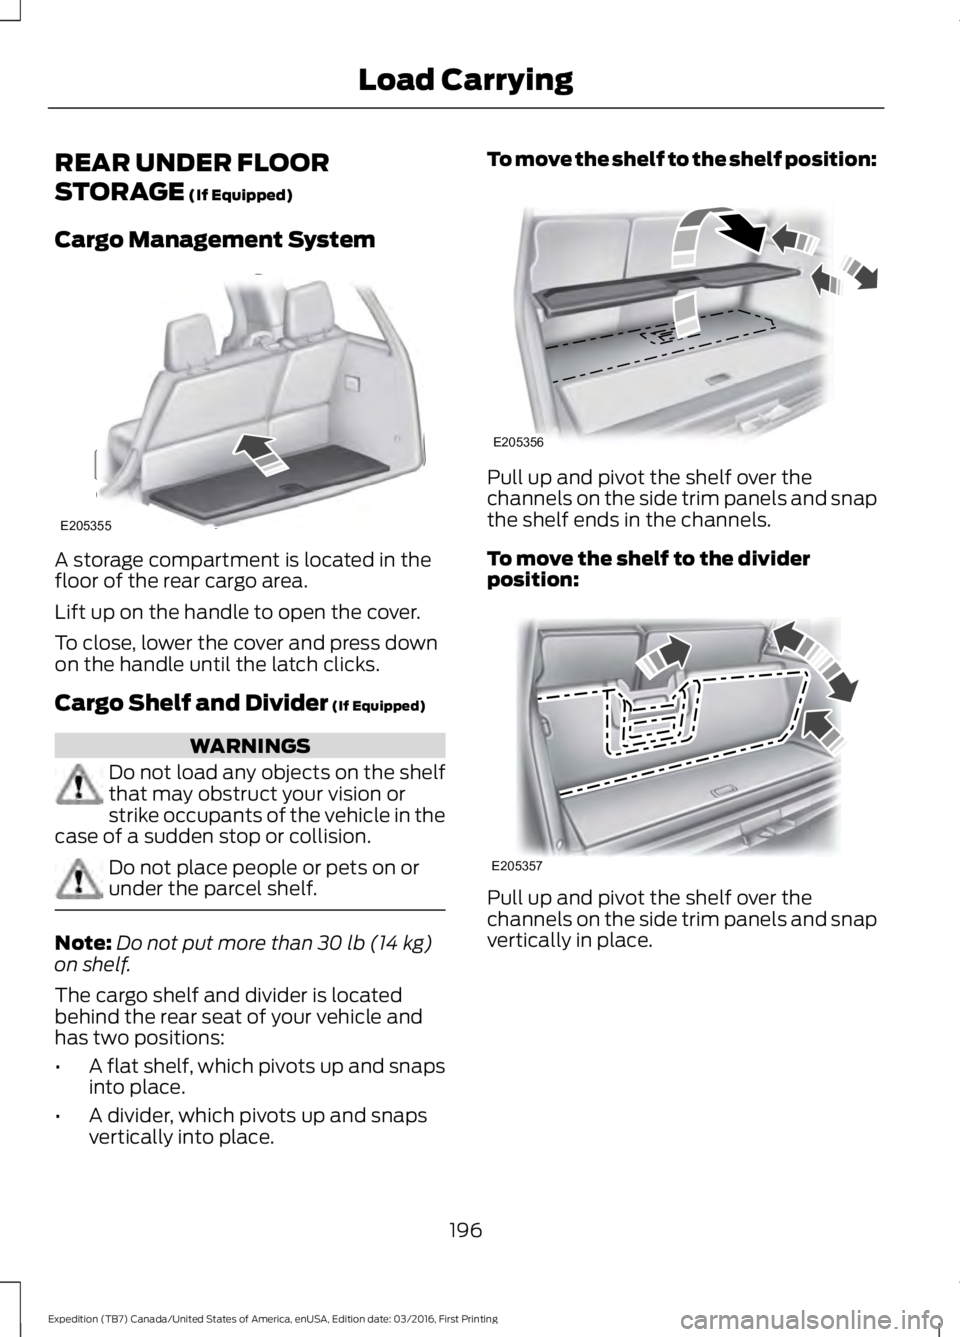
Cargo Management System
A storage compartment is located in thefloor of the rear cargo area.
Lift up on the handle to open the cover.
To close, lower the cover and press downon the handle until the latch clicks.
Cargo Shelf and Divider (If Equipped)
WARNINGS
Do not load any objects on the shelfthat may obstruct your vision orstrike occupants of the vehicle in thecase of a sudden stop or collision.
Do not place people or pets on orunder the parcel shelf.
Note:Do not put more than 30 lb (14 kg)on shelf.
The cargo shelf and divider is locatedbehind the rear seat of your vehicle andhas two positions:
•A flat shelf, which pivots up and snapsinto place.
•A divider, which pivots up and snapsvertically into place.
To move the shelf to the shelf position:
Pull up and pivot the shelf over thechannels on the side trim panels and snapthe shelf ends in the channels.
To move the shelf to the dividerposition:
Pull up and pivot the shelf over thechannels on the side trim panels and snapvertically in place.
196
Expedition (TB7) Canada/United States of America, enUSA, Edition date: 03/2016, First Printing
Load CarryingE205355 E205356 E205357
Page 200 of 500
Third Row Storage Bin (If Equipped)
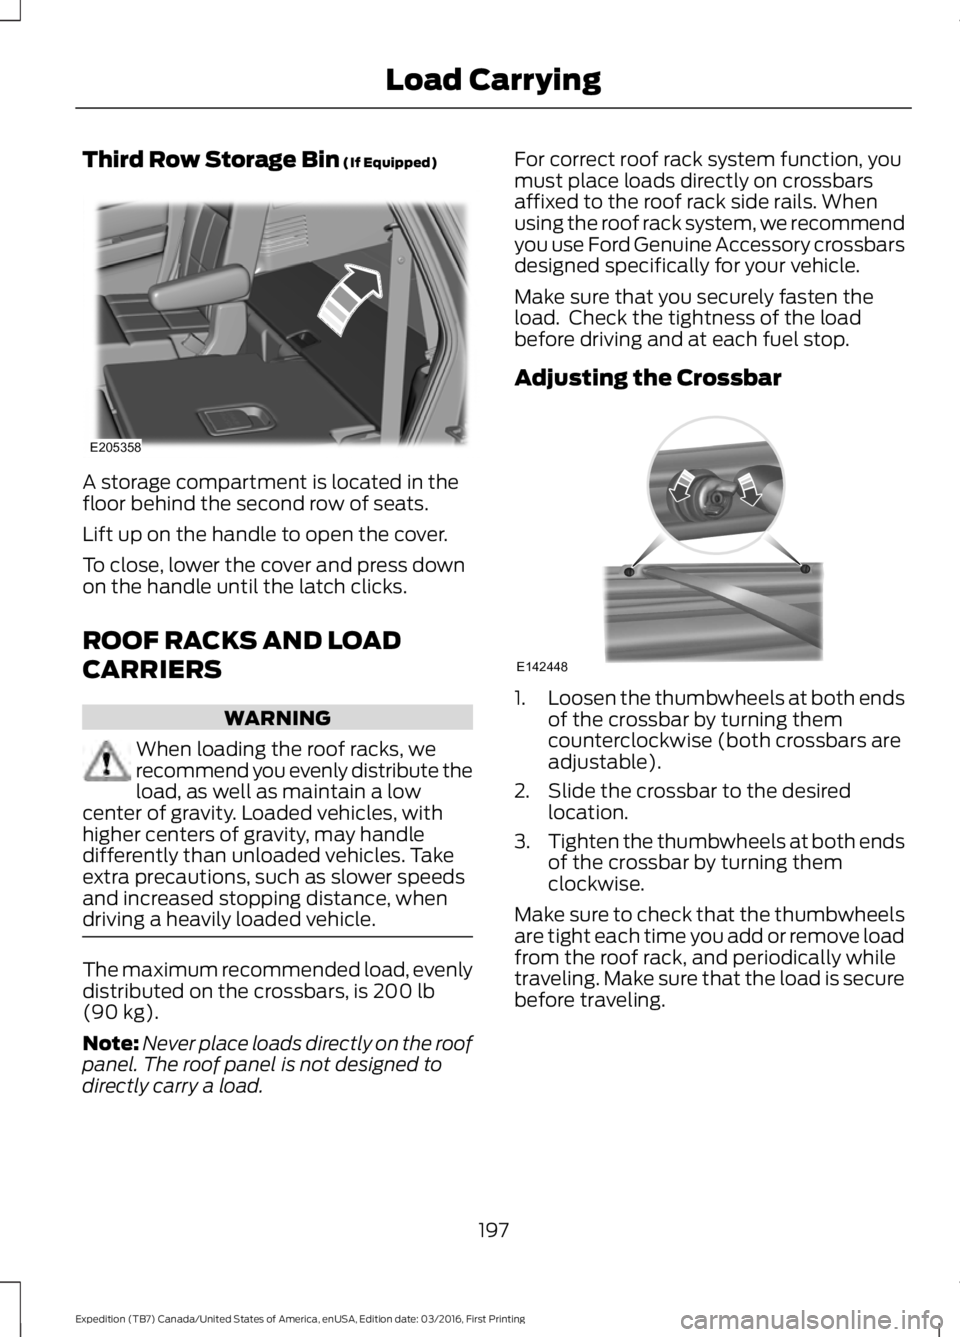
A storage compartment is located in thefloor behind the second row of seats.
Lift up on the handle to open the cover.
To close, lower the cover and press downon the handle until the latch clicks.
ROOF RACKS AND LOAD
CARRIERS
WARNING
When loading the roof racks, werecommend you evenly distribute theload, as well as maintain a lowcenter of gravity. Loaded vehicles, withhigher centers of gravity, may handledifferently than unloaded vehicles. Takeextra precautions, such as slower speedsand increased stopping distance, whendriving a heavily loaded vehicle.
The maximum recommended load, evenlydistributed on the crossbars, is 200 lb(90 kg).
Note:Never place loads directly on the roofpanel. The roof panel is not designed todirectly carry a load.
For correct roof rack system function, youmust place loads directly on crossbarsaffixed to the roof rack side rails. Whenusing the roof rack system, we recommendyou use Ford Genuine Accessory crossbarsdesigned specifically for your vehicle.
Make sure that you securely fasten theload. Check the tightness of the loadbefore driving and at each fuel stop.
Adjusting the Crossbar
1.Loosen the thumbwheels at both endsof the crossbar by turning themcounterclockwise (both crossbars areadjustable).
2. Slide the crossbar to the desiredlocation.
3.Tighten the thumbwheels at both endsof the crossbar by turning themclockwise.
Make sure to check that the thumbwheelsare tight each time you add or remove loadfrom the roof rack, and periodically whiletraveling. Make sure that the load is securebefore traveling.
197
Expedition (TB7) Canada/United States of America, enUSA, Edition date: 03/2016, First Printing
Load CarryingE205358 E142448