wiring FORD EXPEDITION EL 2017 Owners Manual
[x] Cancel search | Manufacturer: FORD, Model Year: 2017, Model line: EXPEDITION EL, Model: FORD EXPEDITION EL 2017Pages: 500, PDF Size: 6.13 MB
Page 40 of 500
Restraint Safety System
The restraint safety system provides animproved overall level of frontal crashprotection to front seat occupants and isdesigned to help further reduce the risk ofairbag-related injuries. The system is ableto analyze different occupant conditionsand crash severity before activating theappropriate safety devices to help betterprotect a range of occupants in a varietyof frontal crash situations.
Your vehicle restraint safety systemconsists of:
•Driver and passenger dual-stage airbagsupplemental restraints.
•Front outboard safety belts withpretensioners, energy managementretractors (first row only), and safetybelt usage sensors.
•Driver seat position sensor.
•Front crash severity sensors.
•Restraints control module with impactand safing sensors.
•Restraint system warning light andbackup tone.
•The electrical wiring for the airbags,crash sensor(s), safety beltpretensioners, front safety belt usagesensors, driver seat position sensor, andindicator lights.
How does the restraint safety systemwork?
The restraint safety system can adapt thedeployment strategy of your vehicle’ssafety devices according to crash severityand occupant conditions. A collection ofcrash and occupant sensors providesinformation to the restraints control
module. During a crash, the restraintscontrol module may activate the safetybelt pretensioners and/or either one orboth stages of the dual-stage airbagsupplemental restraints based on crashseverity and occupant conditions.
DRIVER AND PASSENGER
AIRBAGS
WARNINGS
Never place your arm or any objectsover an airbag module. Placing yourarm over a deploying airbag canresult in serious arm fractures or otherinjuries. Objects placed on or over theairbag inflation area may cause thoseobjects to be propelled by the airbag intoyour face and torso causing serious injury.
Airbags can kill or injure a child in achild seat. Never place a rear-facingchild seat in front of an active airbag.If you must use a forward-facing child seatin the front seat, move the seat upon whichthe child seat is installed all the way back.
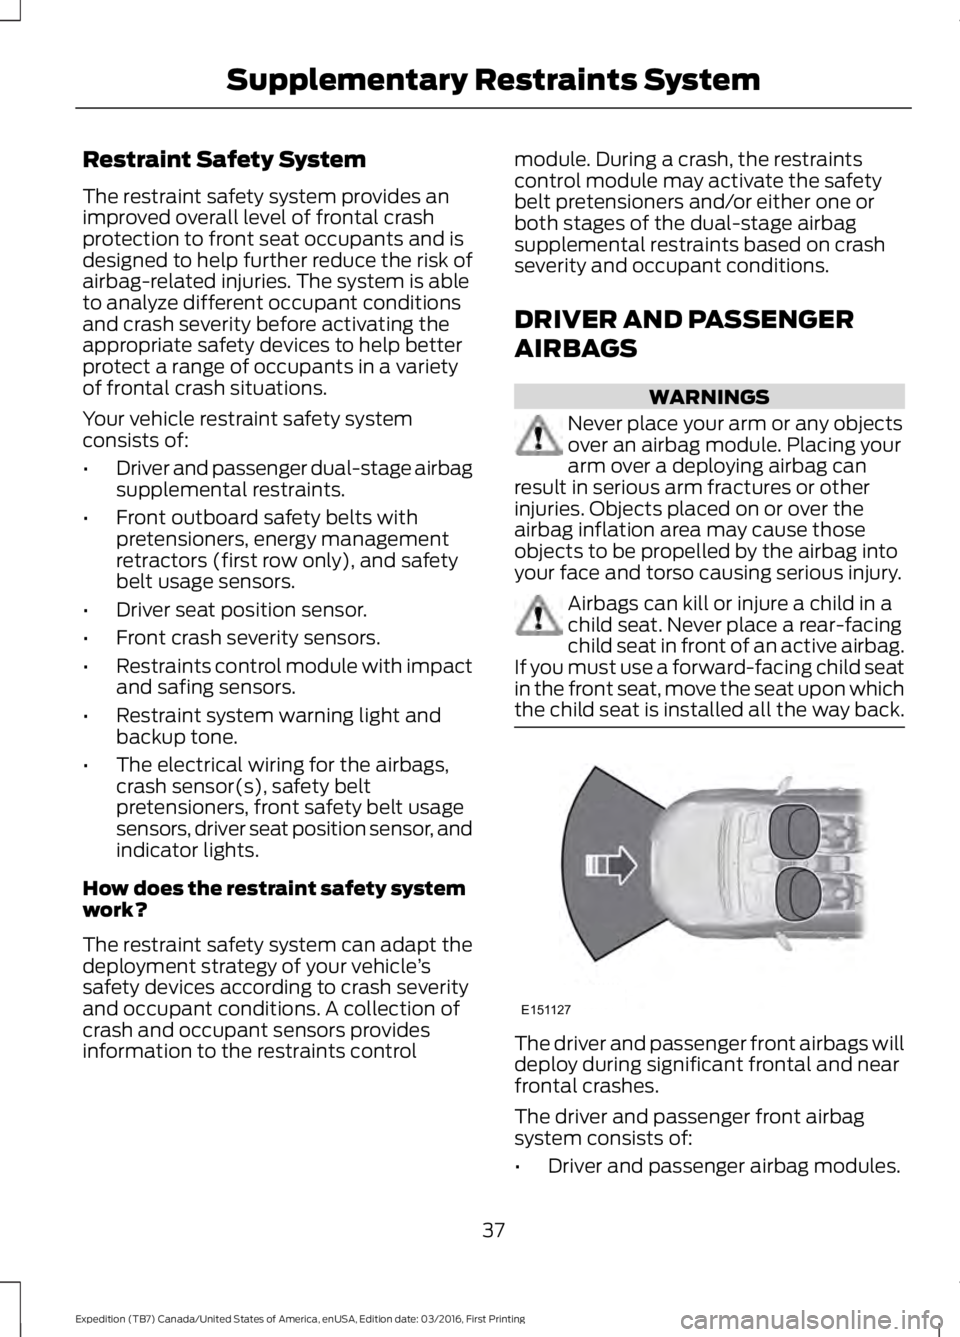
The driver and passenger front airbags willdeploy during significant frontal and nearfrontal crashes.
The driver and passenger front airbagsystem consists of:
•Driver and passenger airbag modules.
37
Expedition (TB7) Canada/United States of America, enUSA, Edition date: 03/2016, First Printing
Supplementary Restraints SystemE151127
Page 99 of 500
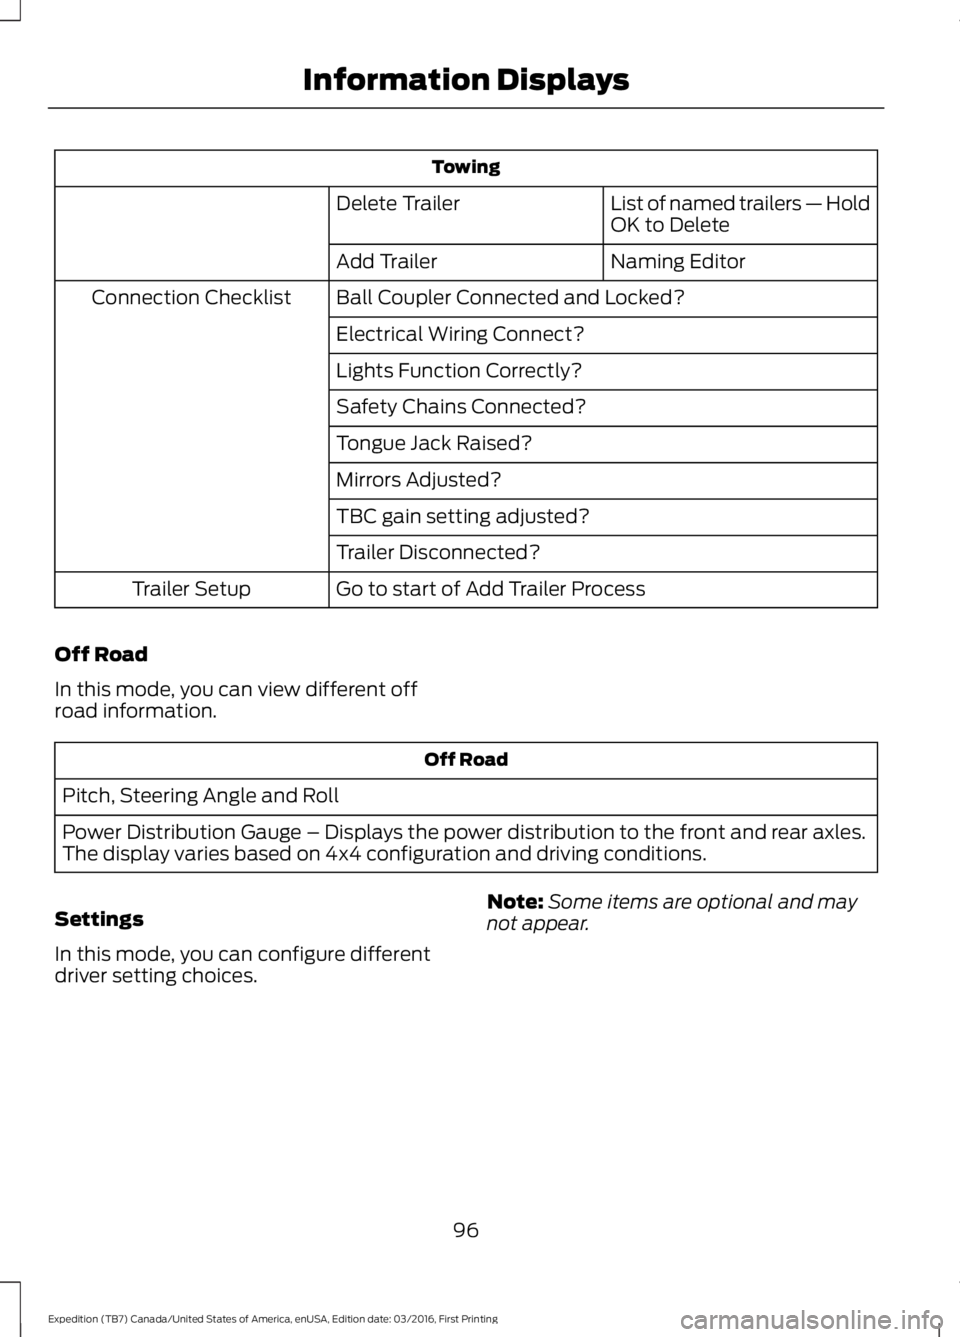
Towing
List of named trailers — HoldOK to DeleteDelete Trailer
Naming EditorAdd Trailer
Ball Coupler Connected and Locked?Connection Checklist
Electrical Wiring Connect?
Lights Function Correctly?
Safety Chains Connected?
Tongue Jack Raised?
Mirrors Adjusted?
TBC gain setting adjusted?
Trailer Disconnected?
Go to start of Add Trailer ProcessTrailer Setup
Off Road
In this mode, you can view different offroad information.
Off Road
Pitch, Steering Angle and Roll
Power Distribution Gauge – Displays the power distribution to the front and rear axles.The display varies based on 4x4 configuration and driving conditions.
Settings
In this mode, you can configure differentdriver setting choices.
Note:Some items are optional and maynot appear.
96
Expedition (TB7) Canada/United States of America, enUSA, Edition date: 03/2016, First Printing
Information Displays
Page 103 of 500
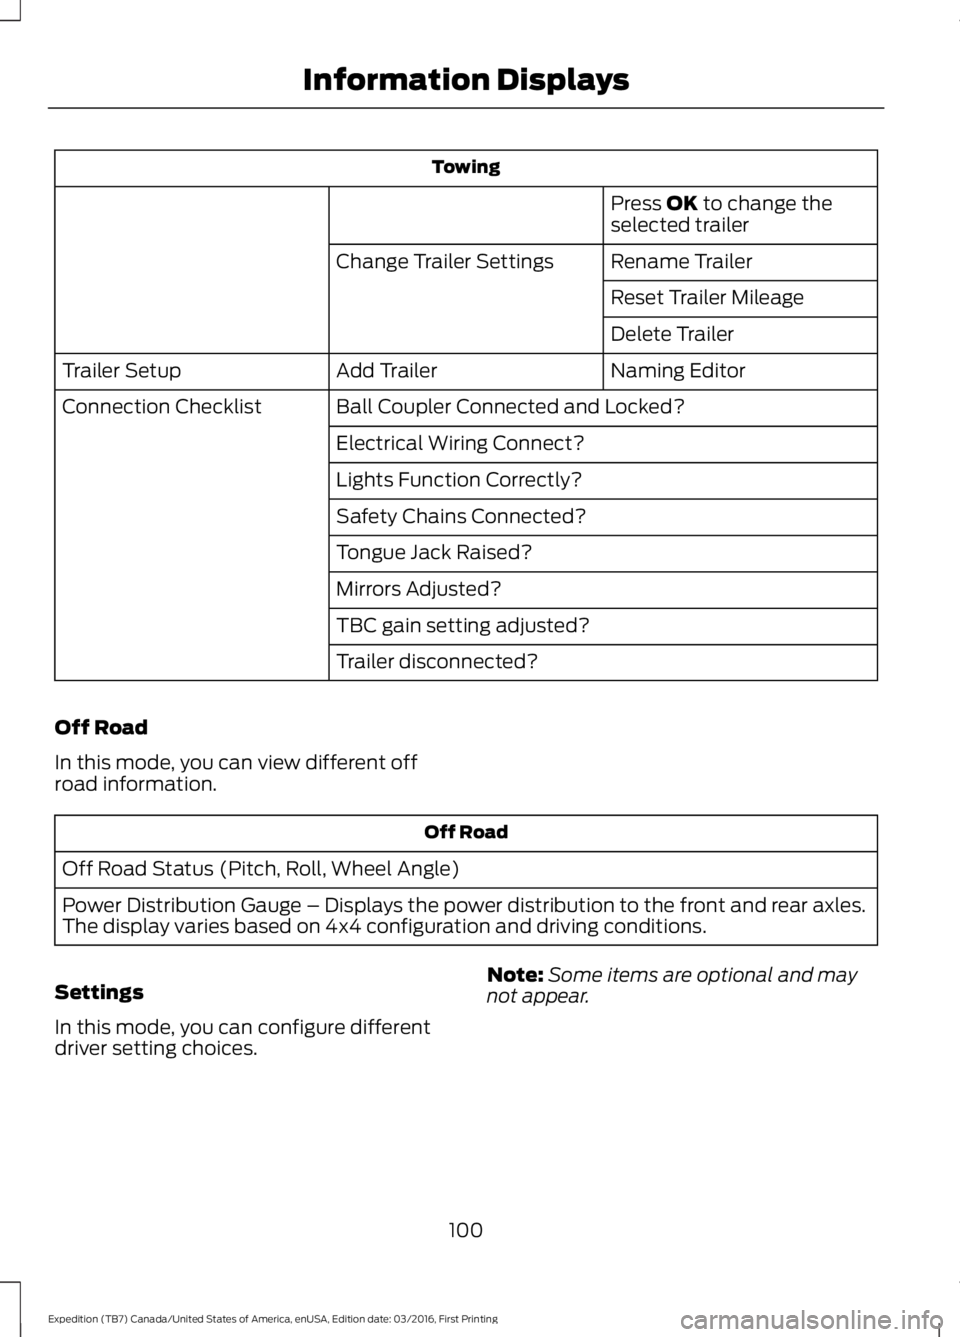
Towing
Press OK to change theselected trailer
Rename TrailerChange Trailer Settings
Reset Trailer Mileage
Delete Trailer
Naming EditorAdd TrailerTrailer Setup
Ball Coupler Connected and Locked?Connection Checklist
Electrical Wiring Connect?
Lights Function Correctly?
Safety Chains Connected?
Tongue Jack Raised?
Mirrors Adjusted?
TBC gain setting adjusted?
Trailer disconnected?
Off Road
In this mode, you can view different offroad information.
Off Road
Off Road Status (Pitch, Roll, Wheel Angle)
Power Distribution Gauge – Displays the power distribution to the front and rear axles.The display varies based on 4x4 configuration and driving conditions.
Settings
In this mode, you can configure differentdriver setting choices.
Note:Some items are optional and maynot appear.
100
Expedition (TB7) Canada/United States of America, enUSA, Edition date: 03/2016, First Printing
Information Displays
Page 113 of 500
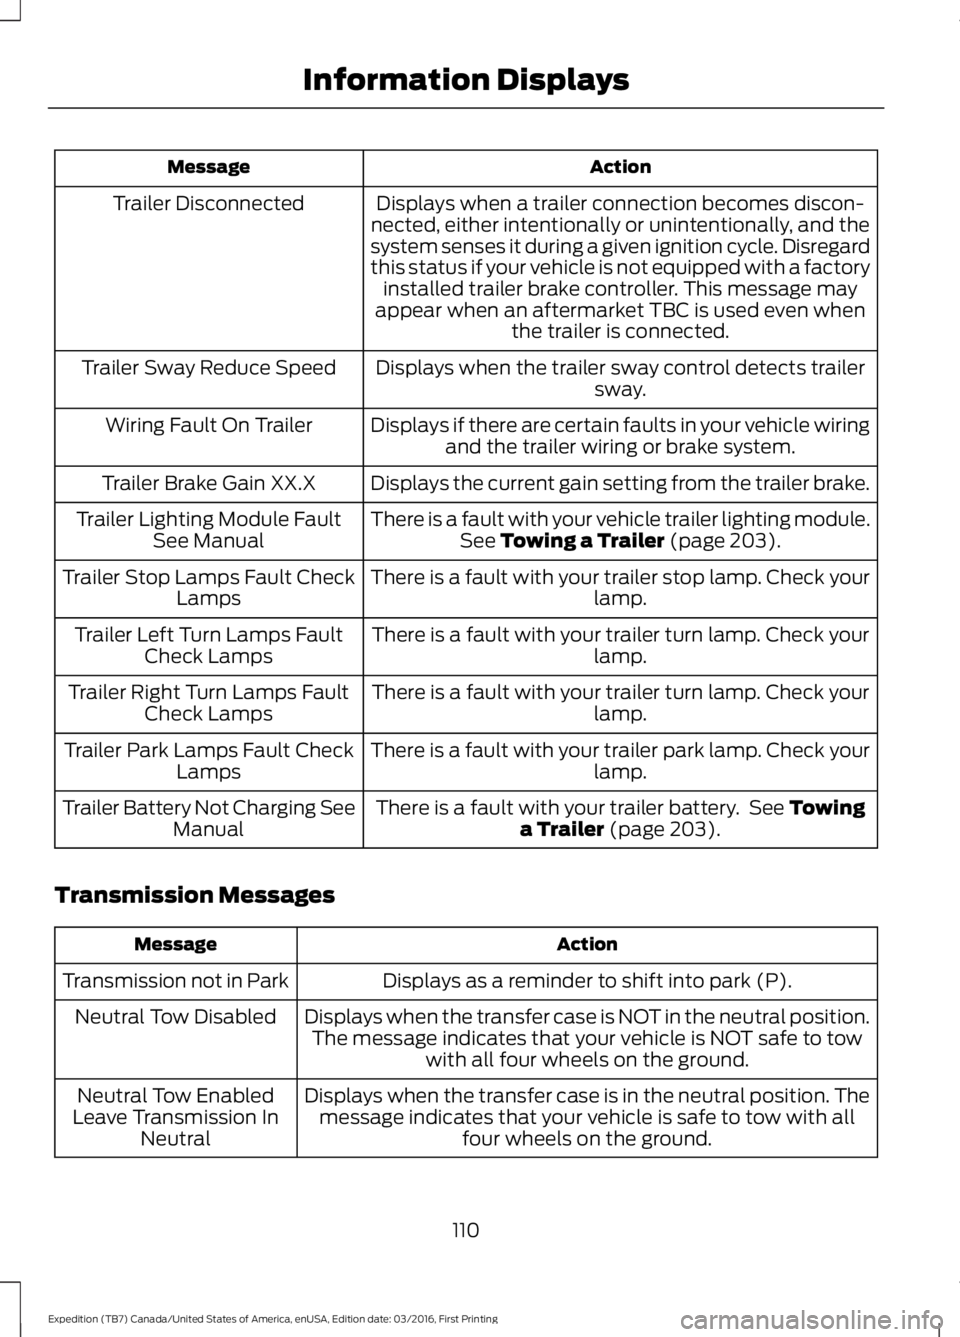
ActionMessage
Displays when a trailer connection becomes discon-nected, either intentionally or unintentionally, and thesystem senses it during a given ignition cycle. Disregardthis status if your vehicle is not equipped with a factoryinstalled trailer brake controller. This message mayappear when an aftermarket TBC is used even whenthe trailer is connected.
Trailer Disconnected
Displays when the trailer sway control detects trailersway.Trailer Sway Reduce Speed
Displays if there are certain faults in your vehicle wiringand the trailer wiring or brake system.Wiring Fault On Trailer
Displays the current gain setting from the trailer brake.Trailer Brake Gain XX.X
There is a fault with your vehicle trailer lighting module.See Towing a Trailer (page 203).Trailer Lighting Module FaultSee Manual
There is a fault with your trailer stop lamp. Check yourlamp.Trailer Stop Lamps Fault CheckLamps
There is a fault with your trailer turn lamp. Check yourlamp.Trailer Left Turn Lamps FaultCheck Lamps
There is a fault with your trailer turn lamp. Check yourlamp.Trailer Right Turn Lamps FaultCheck Lamps
There is a fault with your trailer park lamp. Check yourlamp.Trailer Park Lamps Fault CheckLamps
There is a fault with your trailer battery. See Towinga Trailer (page 203).Trailer Battery Not Charging SeeManual
Transmission Messages
ActionMessage
Displays as a reminder to shift into park (P).Transmission not in Park
Displays when the transfer case is NOT in the neutral position.The message indicates that your vehicle is NOT safe to towwith all four wheels on the ground.
Neutral Tow Disabled
Displays when the transfer case is in the neutral position. Themessage indicates that your vehicle is safe to tow with allfour wheels on the ground.
Neutral Tow EnabledLeave Transmission InNeutral
110
Expedition (TB7) Canada/United States of America, enUSA, Edition date: 03/2016, First Printing
Information Displays
Page 208 of 500
Note:Certain states requireelectric trailer brakes for trailersover a specified weight. Be sure tocheck state regulations for thisspecified weight. The maximumtrailer weights listed may be limitedto this specified weight, as thevehicle’s electrical system may notinclude the wiring connectorneeded to activate electric trailerbrakes.
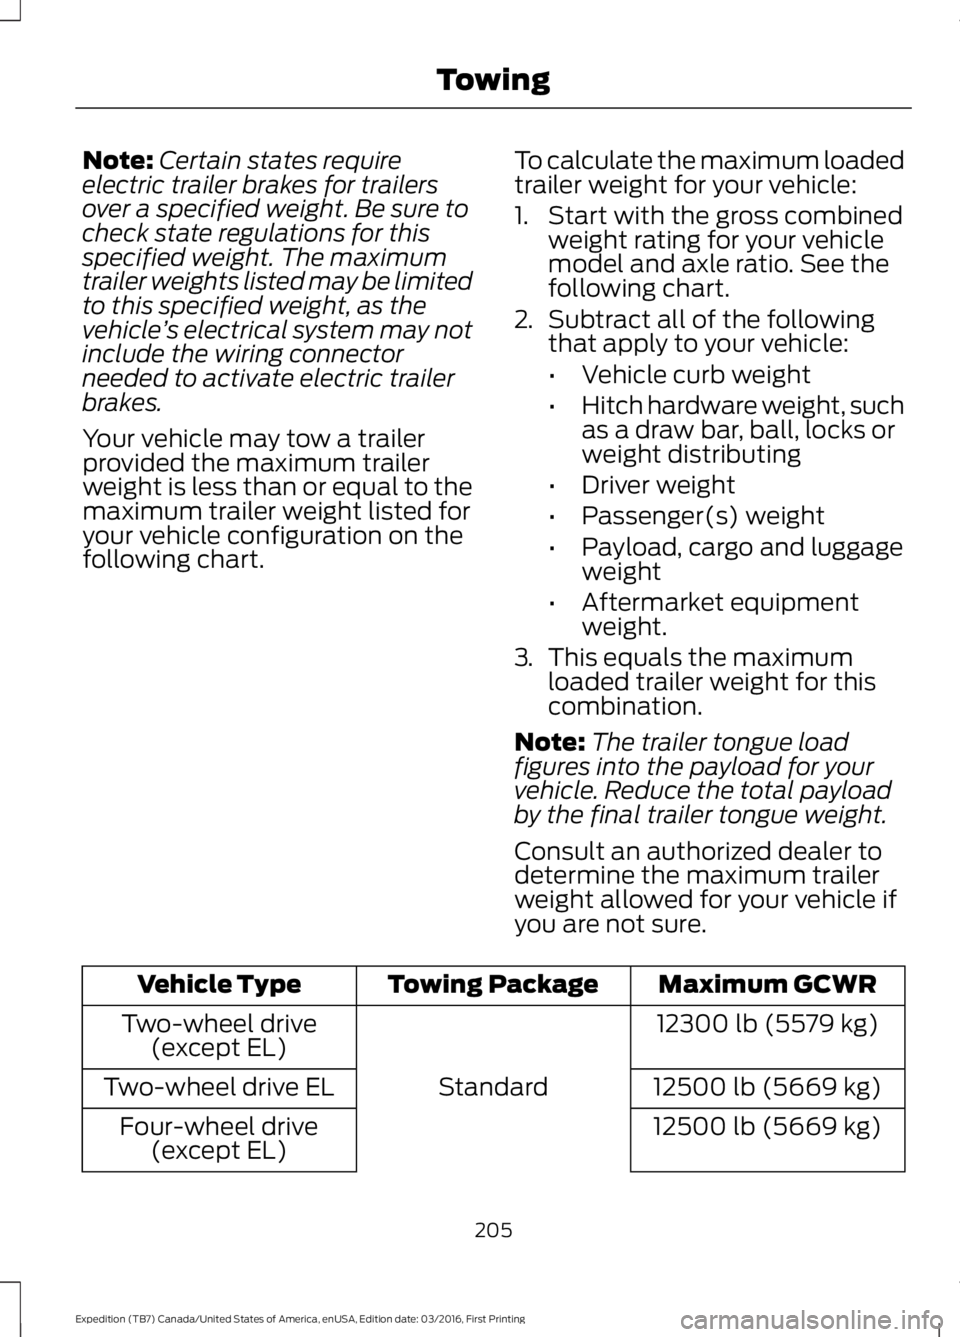
Your vehicle may tow a trailerprovided the maximum trailerweight is less than or equal to themaximum trailer weight listed foryour vehicle configuration on thefollowing chart.
To calculate the maximum loadedtrailer weight for your vehicle:
1. Start with the gross combinedweight rating for your vehiclemodel and axle ratio. See thefollowing chart.
2.Subtract all of the followingthat apply to your vehicle:
•Vehicle curb weight
•Hitch hardware weight, suchas a draw bar, ball, locks orweight distributing
•Driver weight
•Passenger(s) weight
•Payload, cargo and luggageweight
•Aftermarket equipmentweight.
3.This equals the maximumloaded trailer weight for thiscombination.
Note:The trailer tongue loadfigures into the payload for yourvehicle. Reduce the total payloadby the final trailer tongue weight.
Consult an authorized dealer todetermine the maximum trailerweight allowed for your vehicle ifyou are not sure.
Maximum GCWRTowing PackageVehicle Type
12300 lb (5579 kg)
Standard
Two-wheel drive(except EL)
12500 lb (5669 kg)Two-wheel drive EL
12500 lb (5669 kg)Four-wheel drive(except EL)
205
Expedition (TB7) Canada/United States of America, enUSA, Edition date: 03/2016, First Printing
Towing
Page 210 of 500
ESSENTIAL TOWING CHECKS
Follow these guidelines for safe towing:
•Do not tow a trailer until you drive yourvehicle at least 1000 miles (1600kilometers).
•Consult your local motor vehicle lawsfor towing a trailer.
•See the instructions included withtowing accessories for the properinstallation and adjustmentspecifications.
•Service your vehicle more frequently ifyou tow a trailer. See your scheduledmaintenance information.
•If you use a rental trailer, follow theinstructions the rental agency givesyou.
See Load limits in the Load Carryingchapter for load specification terms foundon the tire label and Safety Compliancelabel and instructions on calculating yourvehicle's load.
Remember to account for the trailertongue weight as part of your vehicle loadwhen calculating the total vehicle weight.
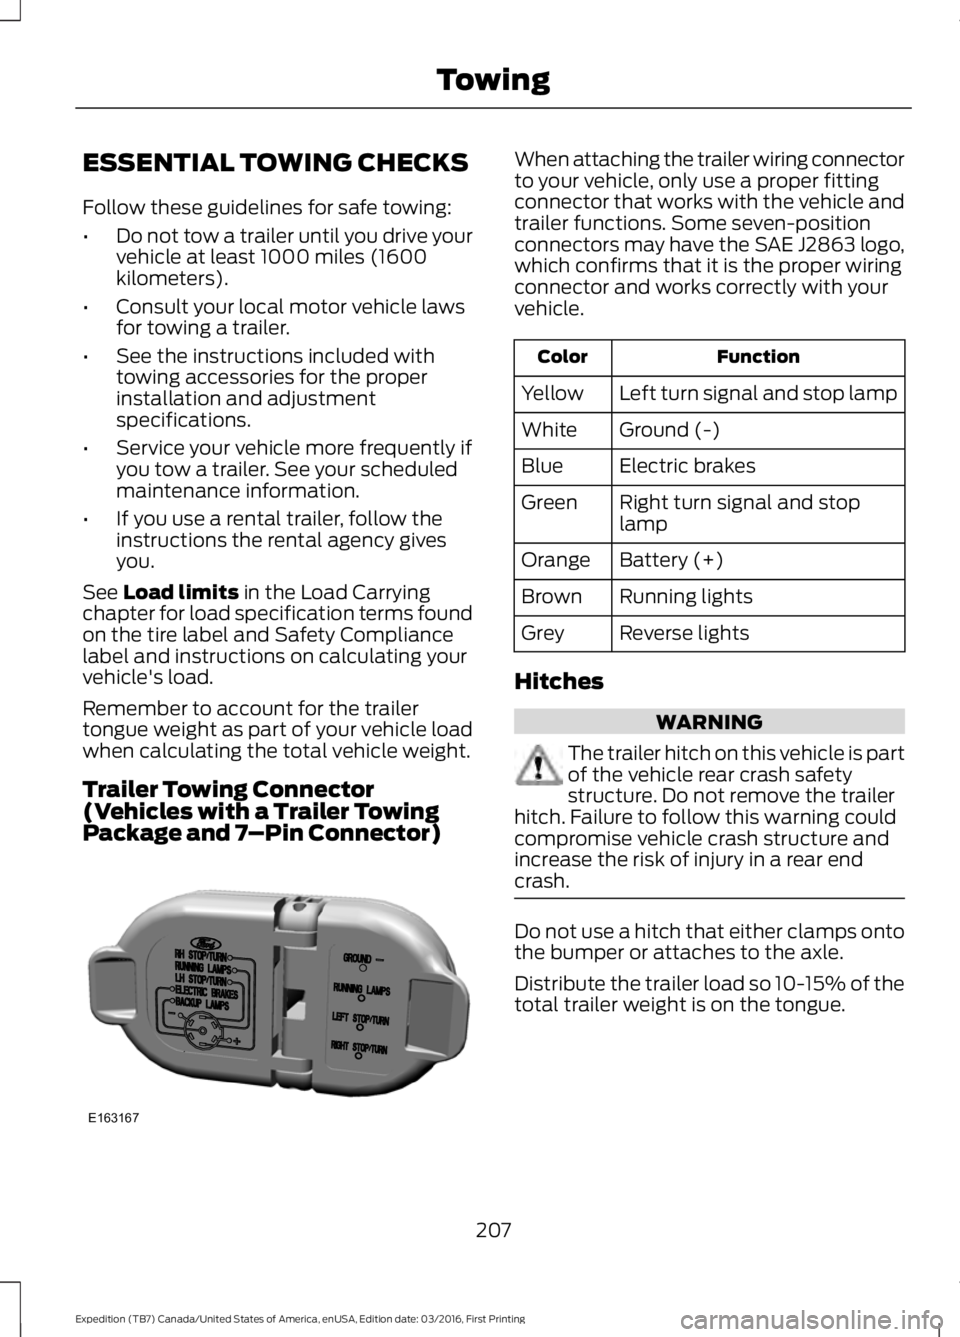
Trailer Towing Connector(Vehicles with a Trailer TowingPackage and 7–Pin Connector)
When attaching the trailer wiring connectorto your vehicle, only use a proper fittingconnector that works with the vehicle andtrailer functions. Some seven-positionconnectors may have the SAE J2863 logo,which confirms that it is the proper wiringconnector and works correctly with yourvehicle.
FunctionColor
Left turn signal and stop lampYellow
Ground (-)White
Electric brakesBlue
Right turn signal and stoplampGreen
Battery (+)Orange
Running lightsBrown
Reverse lightsGrey
Hitches
WARNING
The trailer hitch on this vehicle is partof the vehicle rear crash safetystructure. Do not remove the trailerhitch. Failure to follow this warning couldcompromise vehicle crash structure andincrease the risk of injury in a rear endcrash.
Do not use a hitch that either clamps ontothe bumper or attaches to the axle.
Distribute the trailer load so 10-15% of thetotal trailer weight is on the tongue.
207
Expedition (TB7) Canada/United States of America, enUSA, Edition date: 03/2016, First Printing
TowingE163167
Page 214 of 500
The controller shows gain setting, outputbar graph, and trailer connectivity statusin the information display. They appear inthe information display as follows:
•Trailer Brake Controller Gain (withouttrailer connected): Shows the currentgain setting during a given ignition cycleand when adjusting the gain. This alsodisplays if you use the manual controllever or make gain adjustments withno trailer connected.
•Trailer Brake Controller Gain Output:Displays when you push your vehicle'sbrake pedal, or upon use of the manualcontrol. Bar indicators illuminate in theinformation display to indicate theamount of power going to the trailerbrakes relative to the brake pedal ormanual control input. One bar indicatesthe least amount of output; six barsindicate maximum output.
•Trailer Connected: Displays when thesystem senses a correct trailer wiringconnection (a trailer with electric trailerbrakes) during a given ignition cycle.
•Trailer Disconnected: Displays,accompanied by a single audible time,when the system senses a trailerconnection and then a disconnection,either intentional or unintentional,during a given ignition cycle. It alsodisplays if a truck or trailer-wiring faultoccurs causing the trailer to appeardisconnected. This message can alsodisplay if you use the manual controllever without a trailer connected. Afterdisconnecting the trailer connector,press the brake pedal forapproximately five seconds to allowthe system to detect and update thetrailer status.
B: Manual control lever: Slide the controllever to the left to turn on the trailer'selectric brakes independent of the towvehicle's. See the following Procedure foradjusting gain section for instructions onproper use of this feature. If you use themanual control while the brake is alsoapplied, the greater of the two inputsdetermines the power sent to the trailerbrakes.
•Stop lamps: Using the manual controllever illuminates both the trailer brakelamps and your vehicle brake lampsexcept the center high-mount stoplamp, if you make the proper electricalconnection to the trailer. Pressing yourvehicle brake pedal also illuminatesboth trailer and vehicle brake lamps.
Procedure for Adjusting Gain
Note:Only perform this procedure in atraffic-free environment at speeds ofapproximately 20-25 mph (30-40 km/h).
The gain setting sets the trailer brakecontroller for the specific towing condition.You should change the setting as towingconditions change. Changes to towingconditions include trailer load, vehicle load,road conditions and weather.
The gain should be set to provide themaximum trailer braking assistance whilemaking sure the trailer wheels do not lockwhen using the brakes. Locked trailerwheels may lead to trailer instability.
1.Make sure the trailer brakes are in goodworking condition, functioning normallyand properly adjusted. See your trailerdealer if necessary.
2. Hook up the trailer and make theelectrical connections according to thetrailer manufacturer's instructions.
3. When you plug in a trailer with electricor electric-over-hydraulic brakes, amessage confirming connectionappears in the information display.
211
Expedition (TB7) Canada/United States of America, enUSA, Edition date: 03/2016, First Printing
Towing
Page 215 of 500
4. Use the gain adjustment (+ and -)buttons to increase or decrease thegain setting to the desired startingpoint. A gain setting of 6.0 is a goodstarting point for heavier loads.
5. In a traffic-free environment, tow thetrailer on a dry, level surface at a speedof 20-25 mph (30-40 km/h) andsqueeze the manual control levercompletely.
6. If the trailer wheels lock up, indicatedby squealing tires, reduce the gainsetting. If the trailer wheels turn freely,increase the gain setting. Repeat Steps5 and 6 until the gain setting is at apoint just below trailer wheel lock-up.If towing a heavier trailer, trailer wheellock-up may not be attainable evenwith the maximum gain setting of 10.
Explanation of Information DisplayWarning Messages
Note:An authorized dealer can diagnosethe trailer brake controller to determineexactly which trailer fault has occurred.However, your Ford warranty does not coverthis diagnosis if the fault is with the trailer.
A message indicating a trailer brakemodule fault may display in response tofaults sensed by the trailer brake controller,accompanied by a single tone. If thismessage appears, contact an authorizeddealer as soon as possible for diagnosisand repair. The controller may stillfunction, but performance may bedegraded.
A message indicating a trailer wiring faultmay display when there is a short circuiton the electric brake output wire. If thismessage displays, accompanied by asingle tone, with no trailer connected, theproblem is with your vehicle wiringbetween the trailer brake controller andthe 7-pin connector at the bumper. If themessage only displays with a trailerconnected, the problem is with the trailer
wiring. Consult your trailer dealer forassistance. This can be a short to ground(such as a chaffed wire), short to voltage(such as a pulled pin on trailer emergencybreakaway battery) or the trailer brakesmay be drawing too much current.
Points to Remember
Note:Do not attempt removal of the trailerbrake controller without consulting theWorkshop Manual. Damage to the unit mayresult.
•Adjust gain setting before using thetrailer brake controller for the first time.
•Adjust gain setting, using the procedureabove, whenever road, weather andtrailer or vehicle loading conditionschange from when the gain was initiallyset.
•Only use the manual control lever forproper adjustment of the gain duringtrailer setup. Misuse, such asapplication during trailer sway, couldcause instability of trailer or towvehicle.
•Avoid towing in adverse weatherconditions. The trailer brake controllerdoes not provide anti-lock control ofthe trailer wheels. Trailer wheels canlock up on slippery surfaces, resultingin reduced stability of trailer and towvehicle.
•The trailer brake controller is equippedwith a feature that reduces output atvehicle speeds below 11 mph (18 km/h)so trailer and vehicle braking is not jerkyor harsh. This feature is only availablewhen applying the brakes using yourvehicle's brake pedal, not thecontroller.
•The controller interacts with the brakecontrol system and powertrain controlsystem of your vehicle to provide thebest performance on different roadconditions.
212
Expedition (TB7) Canada/United States of America, enUSA, Edition date: 03/2016, First Printing
Towing
Page 216 of 500
•Your vehicle's brake system and thetrailer brake system workindependently of each other. Changingthe gain setting on the controller doesnot affect the operation of yourvehicle's brakes whether you attach atrailer or not.
•When you switch the engine off, thecontroller output is disabled and thedisplay and module shut down. Thecontroller module and display turn onwhen you switch the ignition on.
•The trailer brake controller is only afactory-installed or dealer-installeditem. Ford is not responsible forwarranty or performance of thecontroller due to misuse or customerinstallation.
Trailer Lamps
WARNING
Never connect any trailer lamp wiringto the vehicle's tail lamp wiring; thismay damage the electrical systemresulting in fire. Contact your authorizeddealer as soon as possible for assistancein proper trailer tow wiring installation.Additional electrical equipment may berequired.
Trailer lamps are required on most towedvehicles. Make sure all running lights, brakelights, turn signals and hazard lights areworking.
Before Towing a Trailer
Practice turning, stopping and backing upto get the feel of your vehicle-trailercombination before starting on a trip.When turning, make wider turns so thetrailer wheels clear curbs and otherobstacles.
When Towing a Trailer
•Do not drive faster than 70 mph (113km/h) during the first 500 miles (800kilometers).
•Do not make full-throttle starts.
•Check your hitch, electrical connectionsand trailer wheel lug nuts thoroughlyafter you have traveled 50 miles (80kilometers).
•When stopped in congested or heavytraffic during hot weather, place thegearshift in position P to aid engine andtransmission cooling and to help A/Cperformance.
•Turn off the speed control with heavyloads or in hilly terrain. The speedcontrol may turn off automaticallywhen you are towing on long, steepgrades.
•Shift to a lower gear when driving downa long or steep hill. Do not apply thebrakes continuously, as they mayoverheat and become less effective.
•If your transmission is equipped with aGrade Assist or Tow/Haul feature, usethis feature when towing. This providesengine braking and helps eliminateexcessive transmission shifting foroptimum fuel economy andtransmission cooling.
•If your vehicle is equipped withAdvanceTrac with RSC, this systemmay turn on during typical corneringmaneuvers with a heavily loaded trailer.This is normal. Turning the corner at aslower speed while towing may reducethis tendency.
•If you are towing a trailer frequently inhot weather, hilly conditions, at thegross combined weight rating (or anycombination of these factors), considerrefilling your rear axle with syntheticgear lubricant (if the axle is not alreadyfilled with it). See Capacities andSpecifications (page 304).
213
Expedition (TB7) Canada/United States of America, enUSA, Edition date: 03/2016, First Printing
Towing
Page 217 of 500
•Allow more distance for stopping witha trailer attached. Anticipate stops andbrake gradually.
•Avoid parking on a grade. However, ifyou must park on a grade:
1. Turn the steering wheel to point yourvehicle tires away from traffic flow.
2. Set your vehicle parking brake.
3. Place the automatic transmission inposition P.
4. Place wheel chocks in front and backof the trailer wheels. (Chocks notincluded with vehicle.)
Your vehicle may be equipped with atemporary or conventional spare tire. A"temporary" spare tire is different in size(diameter or width), tread-type(All-Season or All Terrain) or is from adifferent manufacturer than the road tireson your vehicle. Consult information on thetire label or Safety Compliance label forlimitations when using.
Launching or Retrieving a Boat orPersonal Watercraft (PWC)
Note:Disconnect the wiring to the trailerbefore backing the trailer into the water.
Note:Reconnect the wiring to the trailerafter removing the trailer from the water.
When backing down a ramp during boatlaunching or retrieval:
•Do not allow the static water level torise above the bottom edge of the rearbumper.
•Do not allow waves to break higherthan 6 inches (15 centimeters) abovethe bottom edge of the rear bumper.
Exceeding these limits may allow water toenter vehicle components:
•Causing internal damage to thecomponents.
•Affecting driveability, emissions, andreliability.
Replace the rear axle lubricant anytimethe rear axle has been submerged in water.Water may have contaminated the rearaxle lubricant, which is not normallychecked or changed unless a leak issuspected or other axle repair is required.
TOWING POINTS (If Equipped)
WARNINGS
Using recovery hooks is dangerousand should only be done by a personfamiliar with proper vehicle recoverysafety practices. Improper use of recoveryhooks may cause hook failure or separationfrom the vehicle and could result in seriousinjury or death.
Always slowly remove the slack fromthe recovery strap prior to pulling.Failure to do so can introducesignificantly higher loads which can causethe recovery hooks to break off, or therecovery strap to fail which can causeserious injury or death.
Never link two straps together witha clevis pin. These heavy metalobjects could become projectiles ifthe strap breaks and can cause seriousinjury or death.
Your vehicle comes equipped withframe-mounted front recovery hooks.These hooks should never have a loadapplied to them greater than the grossvehicle weight rating of your vehicle.
214
Expedition (TB7) Canada/United States of America, enUSA, Edition date: 03/2016, First Printing
Towing