wheel FORD EXPLORER 1997 2.G User Guide
[x] Cancel search | Manufacturer: FORD, Model Year: 1997, Model line: EXPLORER, Model: FORD EXPLORER 1997 2.GPages: 236, PDF Size: 2.43 MB
Page 131 of 236

Driving Through Water
Do not drive quickly through
standing water, especially if the
depth is unknown. Traction or
brake capability may be limited
and if the ignition system gets wet,
your engine may stall. Water may
also enter your engine's air intake
and severely damage your engine.
If driving through deep or standing
water is unavoidable, proceed very
slowly. Never drive through water
that is higher than the bottom of
the hubs (truck) / wheel rims
(car).
Once through the water, always try
the brakes. Wet brakes do not stop
the vehicle as effectively as dry
brakes. Drying can be improved by
moving your vehicle slowly while
applying light pressure on the
brake pedal.
Driving on hill or slope terrain
When driving on a hill, avoid
driving crosswise or turning on
steep slopes. You could lose
traction and slip sideways. Drive
straight up, straight down or avoid
the hill completely. Know the
conditions on the other side of a
hill before driving over the crest.
When climbing a steep hill, start in
a lower gear rather than
downshifting to a lower gear from
a higher gear once the ascent has
started. This reduces strain on the
engine and the possibility of
stalling.
Driving
132
Page 133 of 236

Allow more stopping distance and
drive slower than usual. Consider
using one of the lower gears.
Control trac system indicator
lights
4WD and 4WD LOW indicator
lights are located in the instrument
cluster. If either light flashes, see
your dealer or qualified service
technician.
The indicator lights will also
illuminate under the following
conditions:
²4WD AUTO modeÐ Neither
light will illuminate.
²4WD HIGH modeÐ Only the
4WD high light illuminates.
²4WD LOW modeÐ The 4WD
LOW light illuminates.
ALL WHEEL DRIVE (AWD)
SYSTEM (5.0L ENGINES ONLY)
Your vehicle is equipped with an
all wheel drive (AWD) transfer
case. Power is constantly supplied
to all four wheels through the
transfer case. The AWD system is
full time and has no external
controls.
Like all utility type vehicles, your
AWD vehicle has special design
and equipment features that make
it capable of performing in a
variety of off-road applications.
Specific design characteristics give
these vehicles higher centers of
gravity than ordinary passenger
cars.
4WD
4WD
LOW
uno_indicator_lights
uno_awd
Driving
134
Page 134 of 236
Utility and four-wheel
drive vehicles are NOT
designed for cornering at speeds
as high as passenger cars any
more than low-slung sports cars
are designed to perform
satisfactorily under off-road
conditions. Avoid sharp turns or
abrupt maneuvers in these
vehicles.
LOADING YOUR VEHICLE
Before loading your vehicle,
familiarize yourself with these
terms:
²Base curb weight ÐWeight of
the vehicle including any
standard equipment, fluids,
lubricants, etc. It does not
include passengers or
aftermarket equipment.
²Payload ÐCombined
maximum allowable weight of
passengers, cargo and optional
equipment.
²GVW (Gross Vehicle Weight)
ÐBase curb weight plus the
payload weight. The GVW is not
a limit or a specification.
²GVWR (Gross Vehicle Weight
Rating) ÐMaximum total
weight of the base vehicle,
passengers, optional equipment
and cargo. The GVWR is specific
to each vehicle and is listed on
the Safety Compliance
Certification Label on the
driver's door pillar.
uno_heavy_load
Driving
135
Page 143 of 236

working properly, the warning
lights in the instrument cluster
may not work properly.
Using a hitch
Do not use hitches that:
²clamp onto the vehicle bumper
²attach to the axle.
Distribute the load so that only 10
to 15% of the total weight of the
trailer is on the tongue. tie down
the load so that it does not shift
and change the weight on the
hitch. Follow the towing
instructions of a reputable rental
agency.
Driving while towing a trailer
Do not drive faster than 70 km/h
(45 mph) while towing a 454 kg
(1000 lb) trailer. Do not drive
faster than 72 km/h (45 mph) with
any weight trailer while towing in
hilly terrain or on hot days.
Speed control (if equipped) may
not work properly while towing on
long, steep grades.
If driving with an automatic
transmission:
²use D or L rather than while
towing up or down steep hills
²anticipate stops and brake
gradually.
Towing behind another vehicle
Do not tow your vehicle behind
another vehicle, such as an RV,
unless front wheel dollies are used.
uno_hitch
uno_driving_towing
uno_towing_behind
Driving
144
Page 144 of 236

Your vehicle can not be flat towed
with all wheels on the ground.
Servicing while towing
If you tow a trailer for long
distances, your vehicle requires
more frequent service than a
vehicle not used for towing. Refer
to the ªService Guideº for more
information on maintenance
intervals.
Using a step bumper
The rear bumper is equipped with
an integral hitch and requires only
a ball with a ô inch shank
diameter. The bumper has a Class
II capability (1590 kg / 3500 lb
trailer weight and 159 kg / 350 lb
tongue weight).
Use a frame mounted weight
distributing hitch for trailers over
1590 kg (3500 lb).
Launching or retrieving a boat
When backing down a ramp during
boat launching or retrieval,
²Do not allow the static water
level to rise above the bottom
edge of the rear bumper and
²Do not allow waves to break
higher than 15 cm (six inches)
above the bottom edge of the
rear bumper.
Exceeding these limits may allow
water to enter critical vehicle
components, adversely affecting
driveability, emissions and
reliability.uno_servicing_while_towing
uno_step_bumper_towing
com_launch-retrieving_boat.01
uno_roof-rack_title
Driving
145
Page 145 of 236
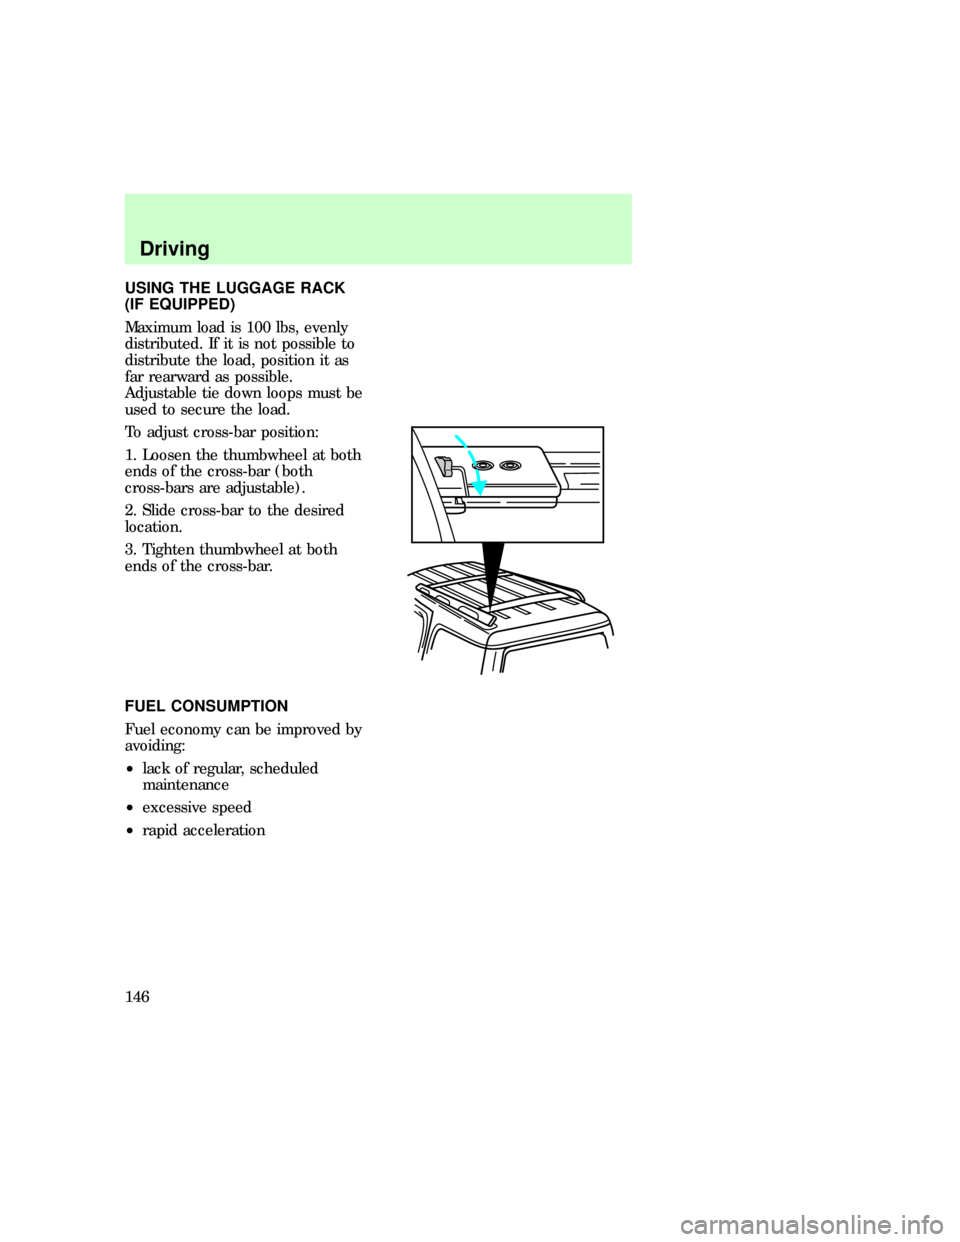
USING THE LUGGAGE RACK
(IF EQUIPPED)
Maximum load is 100 lbs, evenly
distributed. If it is not possible to
distribute the load, position it as
far rearward as possible.
Adjustable tie down loops must be
used to secure the load.
To adjust cross-bar position:
1. Loosen the thumbwheel at both
ends of the cross-bar (both
cross-bars are adjustable).
2. Slide cross-bar to the desired
location.
3. Tighten thumbwheel at both
ends of the cross-bar.
FUEL CONSUMPTION
Fuel economy can be improved by
avoiding:
²lack of regular, scheduled
maintenance
²excessive speed
²rapid acceleration
com_fuel_consumption.01
Driving
146
Page 156 of 236
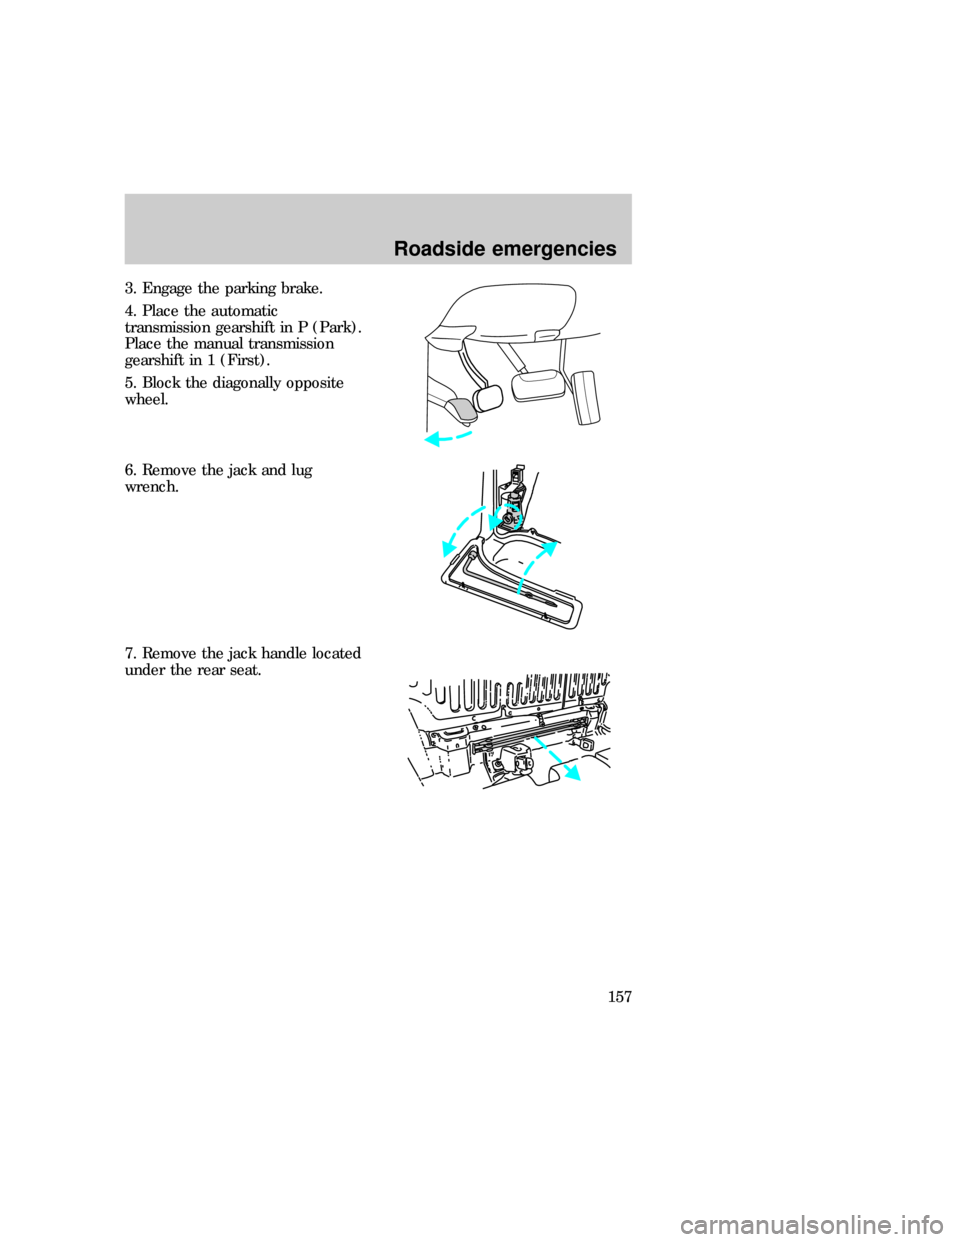
3. Engage the parking brake.
4. Place the automatic
transmission gearshift in P (Park).
Place the manual transmission
gearshift in 1 (First).
5. Block the diagonally opposite
wheel.
6. Remove the jack and lug
wrench.
7. Remove the jack handle located
under the rear seat.
Roadside emergencies
157
Page 157 of 236
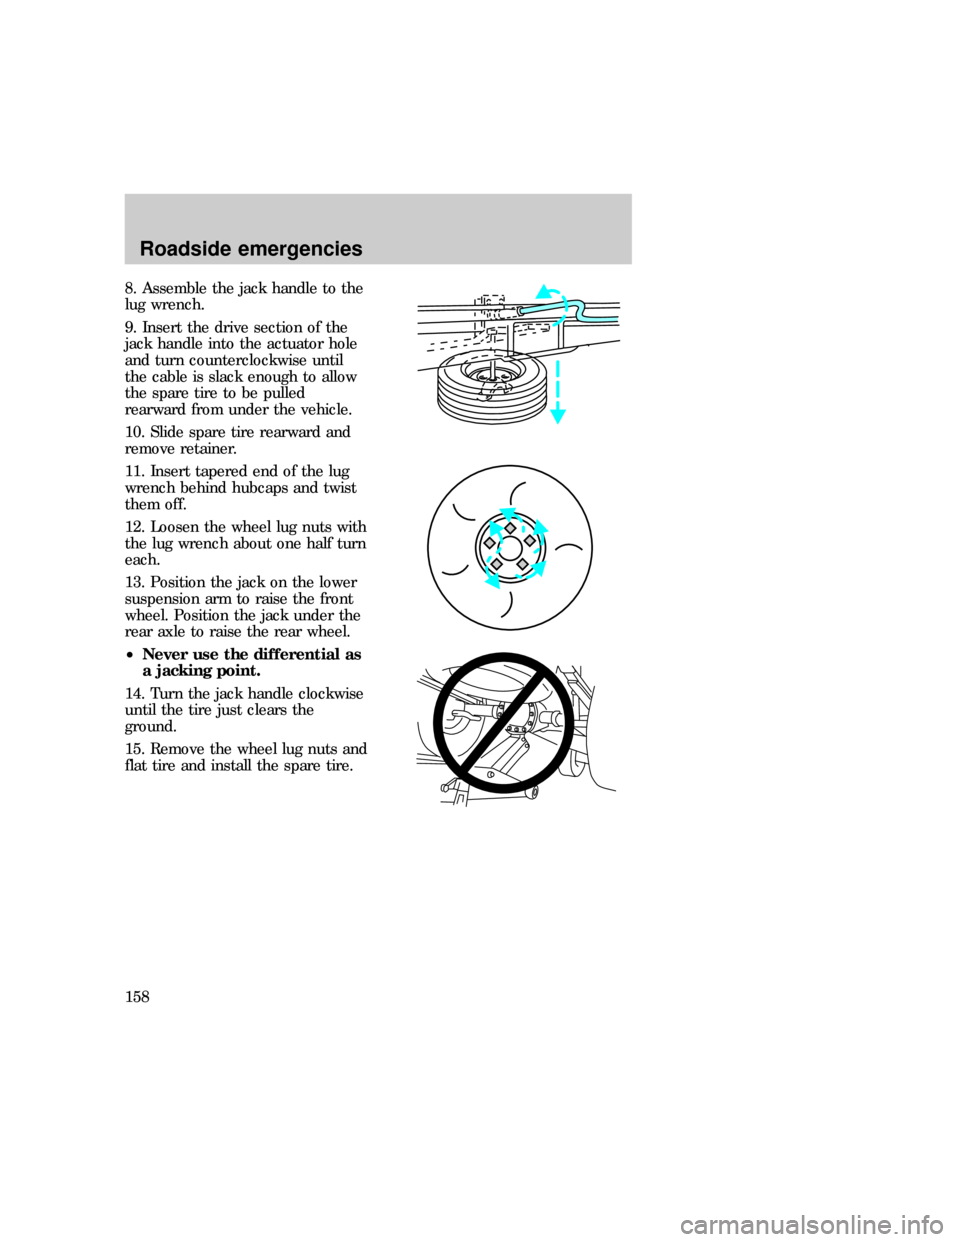
8. Assemble the jack handle to the
lug wrench.
9. Insert the drive section of the
jack handle into the actuator hole
and turn counterclockwise until
the cable is slack enough to allow
the spare tire to be pulled
rearward from under the vehicle.
10. Slide spare tire rearward and
remove retainer.
11. Insert tapered end of the lug
wrench behind hubcaps and twist
them off.
12. Loosen the wheel lug nuts with
the lug wrench about one half turn
each.
13. Position the jack on the lower
suspension arm to raise the front
wheel. Position the jack under the
rear axle to raise the rear wheel.
²Never use the differential as
a jacking point.
14. Turn the jack handle clockwise
until the tire just clears the
ground.
15. Remove the wheel lug nuts and
flat tire and install the spare tire.
Roadside emergencies
158
Page 158 of 236
16. Install the lug nuts and tighten
until snug.
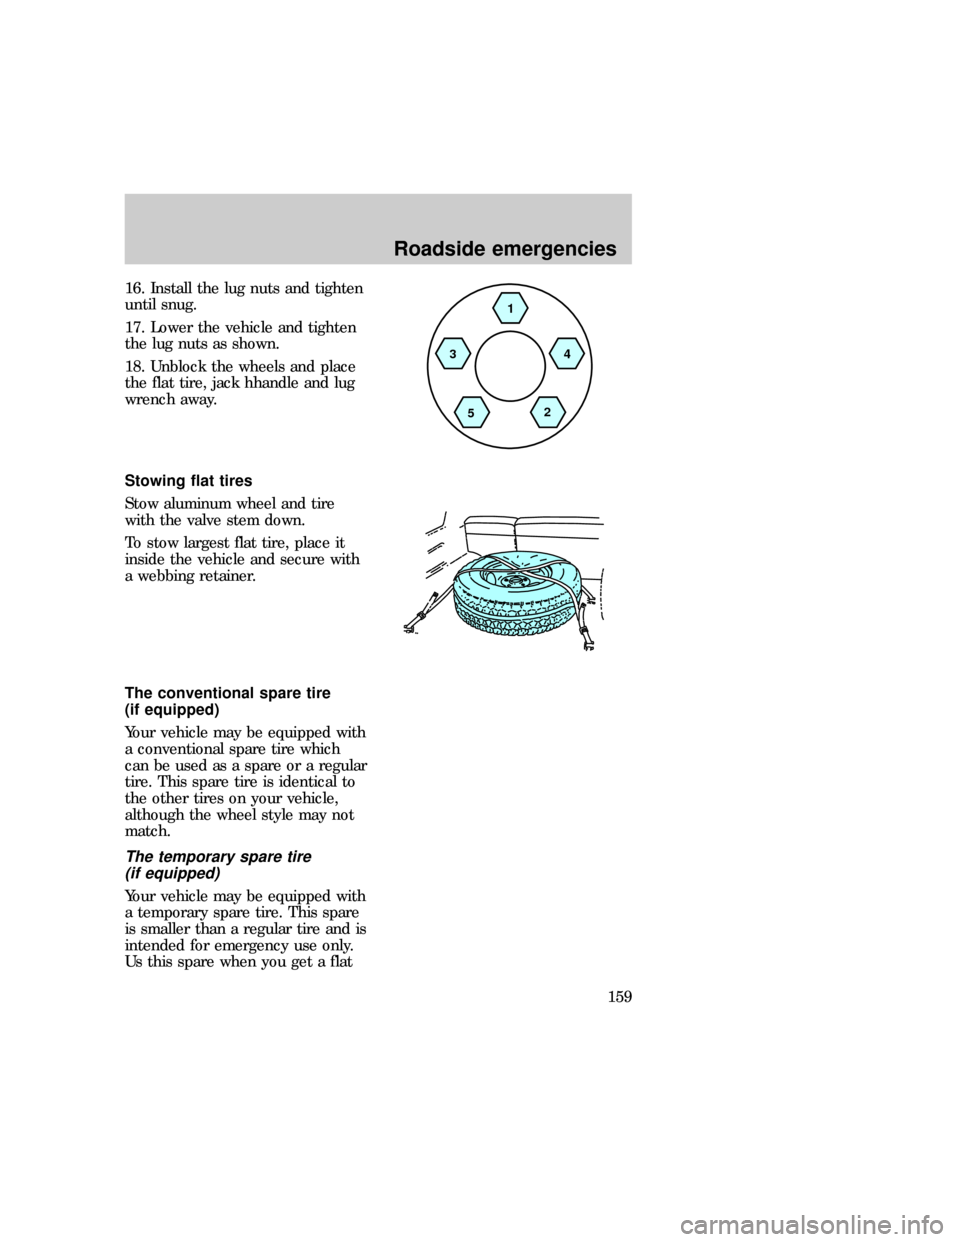
17. Lower the vehicle and tighten
the lug nuts as shown.
18. Unblock the wheels and place
the flat tire, jack hhandle and lug
wrench away.
Stowing flat tires
Stow aluminum wheel and tire
with the valve stem down.
To stow largest flat tire, place it
inside the vehicle and secure with
a webbing retainer.
The conventional spare tire
(if equipped)
Your vehicle may be equipped with
a conventional spare tire which
can be used as a spare or a regular
tire. This spare tire is identical to
the other tires on your vehicle,
although the wheel style may not
match.
The temporary spare tire
(if equipped)
Your vehicle may be equipped with
a temporary spare tire. This spare
is smaller than a regular tire and is
intended for emergency use only.
Us this spare when you get a flat
1
4
2
5 3
uno_stowing_flat_tires
uno_conventional_spare
uno_temporary_spare
Roadside emergencies
159
Page 159 of 236
tire and replace it with a full-size
tire as soon as possible.
It is not recommended that the
vehicle be operated in 4WD HIGH
or LOW modes with a temporary
spare. If 4WD HIGH or LOW
operation is necessary, do not
operate above speeds of 16 km/h
(10 mph) or for distances above 80
km (50 miles).
When driving with a temporary
spare,do not:
²exceed 80 km/h (50 mph) under
any circumstances.
²load your vehicle so that it
exceeds the maximum load
rating listed on the tire decal.
²tow a trailer.
²use tire chains on this tire.
²try to repair the temporary
spare or remove it from its
wheel.
²use the wheel for any other type
of vehicle.
²drive through an automatic car
wash.
JUMP STARTING YOUR
VEHICLE
The gases around the
battery can explode if
exposed to flames, sparks, or lit
cigarettes. An explosion could
result in injury or vehicle
damage.
com_jump-starting.01
Roadside emergencies
160