air suspension FORD EXPLORER 1998 2.G Owners Manual
[x] Cancel search | Manufacturer: FORD, Model Year: 1998, Model line: EXPLORER, Model: FORD EXPLORER 1998 2.GPages: 210, PDF Size: 1.65 MB
Page 106 of 210

Always set the parking brake fully and make sure that the
gearshift is securely latched in P (Park) (automatic
transmission) or in 1 (First) (manual transmission).
The parking brake is not designed to stop a moving vehicle. However, if
the normal brakes fail, the parking brake can be used to stop your
vehicle in an emergency. Since the parking brake applies only the rear
brakes, the vehicle's stopping distance will be adversely affected.
Pull the release lever to release the
brake. Driving with the parking
brake on will cause the brakes to
wear out quickly and reduce fuel
economy.
AIR SUSPENSION SYSTEM (IF EQUIPPED)
The air suspension system is designed to improve ride, handling and
general vehicle performance during:
²certain road conditions
²steering maneuvers
²braking
²accelerations
This system maintains the vehicle height at a constant level by
automatically adding air or releasing air from the springs to offset
changes in vehicle loads.
Driving
106
Page 107 of 210

The air suspension shut-off switch is
located in the cargo area behind the
left rear quarter trim panel.
On vehicles equipped with
Air Suspension, turn OFF
the Air Suspension switch prior to
jacking, hoisting or towing your
vehicle.
Normal vehicle operation does not
require any action by the driver.
TRANSMISSION OPERATION
Automatic transmission operation
Brake-shift interlock
This vehicle is equipped with a brake-shift interlock feature that prevents
the gearshift from being moved from P (Park) unless the brake pedal is
depressed.
If you cannot move the gearshift out of P (Park) with the brake pedal
depressed:
1. Apply the parking brake, turn ignition key to LOCK, then remove the
key.
2. Insert the key and turn it to OFF. Apply the brake pedal and shift to N
(Neutral).
3. Start the vehicle.
If it is necessary to use the above procedure to move the gearshift, it is
possible that a fuse has blown. Refer toFuses and relaysin the
Roadside emergencieschapter.
Do not drive your vehicle until you verify that the brakelamps
are working.
If your vehicle gets stuck in mud or snow it may be rocked out by
shifting from forward and reverse gears in a steady pattern. Press lightly
on the accelerator in each gear.
Driving
107
Page 126 of 210

Calculating the load your vehicle can carry/tow
1. Use the Safety Compliance Certification Label to find the axle code
number and engine type for your vehicle.
2. Use the appropriate maximum gross combined weight rating (GCWR)
chart to find the maximum GCWR for your type engine and rear axle
ratio.
3. Weigh your vehicle as you customarily operate the vehicle without
cargo. To obtain correct weights, try taking your vehicle to a shipping
company or an inspection station for trucks.
4. Subtract your loaded vehicle weight from the maximum GCWR on the
following charts. This is the maximum trailer weight your vehicle can tow
and must fall below the maximum shown under maximum trailer weight
on the chart.
DRIVING THROUGH WATER
Do not drive quickly through standing water, especially if the depth is
unknown. Traction or brake capability may be limited and if the ignition
system gets wet, your engine may stall. Water may also enter your
engine's air intake and severely damage your engine.
If driving through deep or standing water is unavoidable, proceed very
slowly. Never drive through water that is higher than the bottom of the
hubs (truck)/wheel rims (car).
Once through the water, always try the brakes. Wet brakes do not stop
the vehicle as effectively as dry brakes. Drying can be improved by
moving your vehicle slowly while applying light pressure on the brake
pedal.
TRAILER TOWING
Trailer towing with your vehicle may require the use of a trailer tow
option package.
Trailer towing puts additional loads on your vehicle's engine,
transmission, axle, brakes, tires, and suspension. For your safety and to
maximize vehicle performance, be sure to use the proper equipment
while towing.
Follow these guidelines to ensure safe towing procedure:
²Stay within your vehicle's load limits.
Driving
126
Page 145 of 210

Stowing the spare
1. Lay the tire on the ground with the valve stem facing up.
2. Slide the wheel under the vehicle
and install the retainer through the
wheel center.
3. Turn the jack handle clockwise
until the tire is raised to its original
position underneath the vehicle. The
jack handle ratchets when the tire is
raised to the stowed position. It will
not allow you to overtighten.
Tire change procedure
On vehicles equipped with Air Suspension, turn OFF the Air
Suspension switch prior to jacking, hoisting or towing your
vehicle.
Refer to the instruction sheet for detailed tire change instructions.
1. Park on a level surface, activate
hazard flashers and set the parking
brake.
2. Place gearshift lever in P (Park)
or in the reverse gear (manual
transmission).
When one of the rear wheels is off
the ground, the transmission alone
will not prevent the vehicle from
moving or slipping off the jack, even
if the transmission is in P (Park)
(automatic transmission) or reverse
(manual transmission).
Roadside emergencies
145
Page 146 of 210

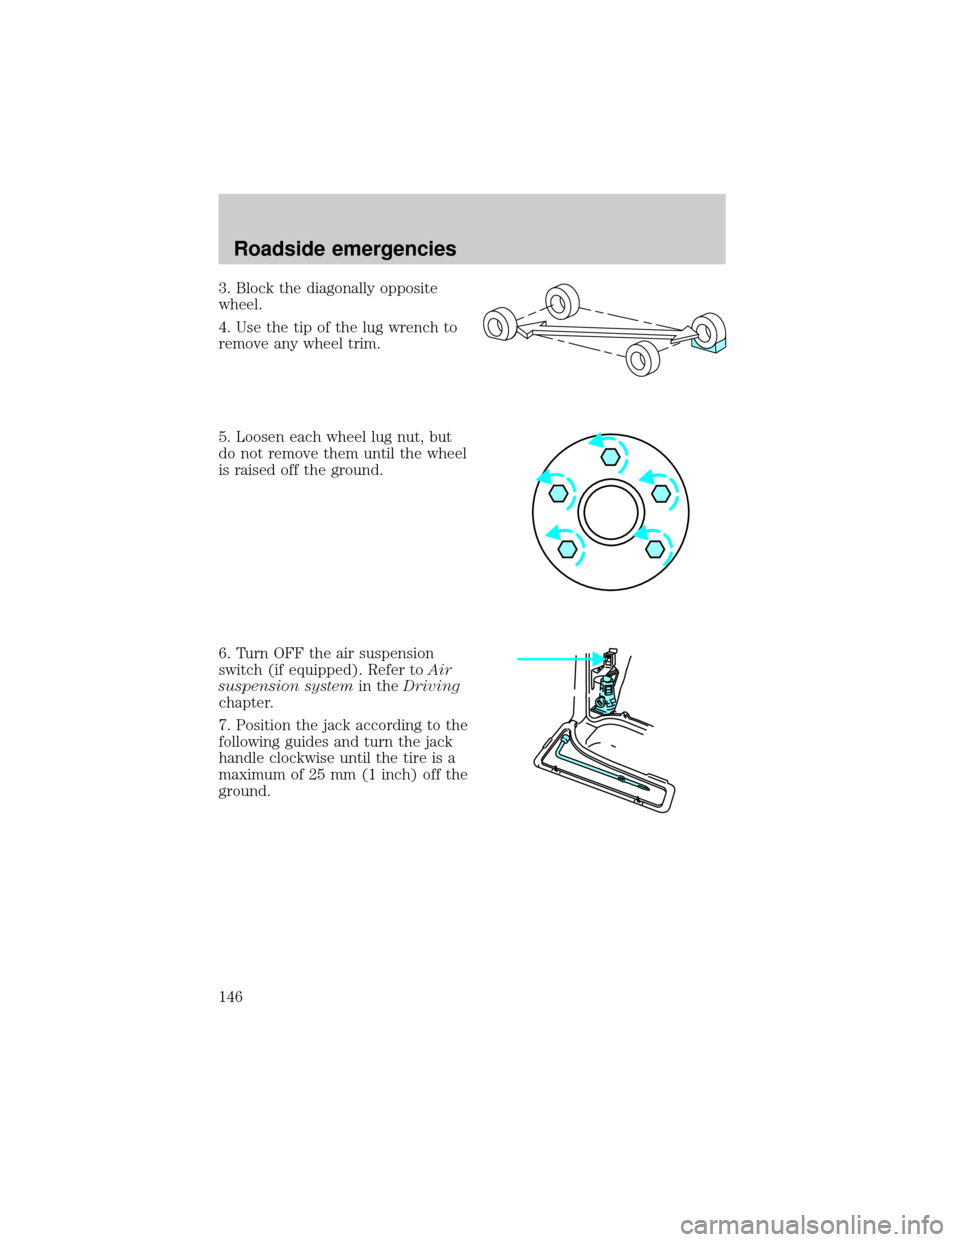
3. Block the diagonally opposite
wheel.
4. Use the tip of the lug wrench to
remove any wheel trim.
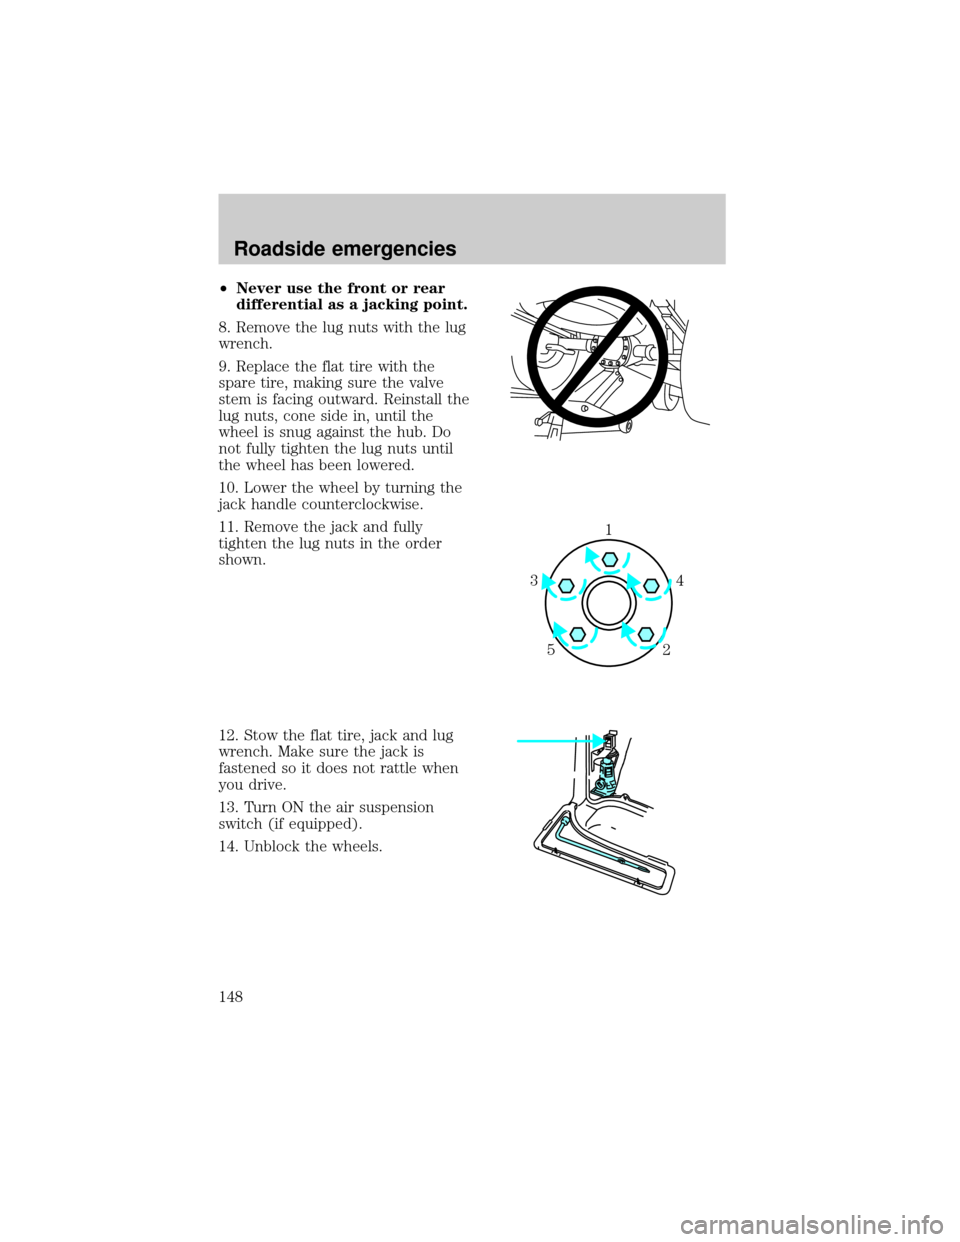
5. Loosen each wheel lug nut, but
do not remove them until the wheel
is raised off the ground.
6. Turn OFF the air suspension
switch (if equipped). Refer toAir
suspension systemin theDriving
chapter.
7. Position the jack according to the
following guides and turn the jack
handle clockwise until the tire is a
maximum of 25 mm (1 inch) off the
ground.
Roadside emergencies
146
Page 148 of 210

²Never use the front or rear
differential as a jacking point.
8. Remove the lug nuts with the lug
wrench.
9. Replace the flat tire with the
spare tire, making sure the valve
stem is facing outward. Reinstall the
lug nuts, cone side in, until the
wheel is snug against the hub. Do
not fully tighten the lug nuts until
the wheel has been lowered.
10. Lower the wheel by turning the
jack handle counterclockwise.
11. Remove the jack and fully
tighten the lug nuts in the order
shown.
12. Stow the flat tire, jack and lug
wrench. Make sure the jack is
fastened so it does not rattle when
you drive.
13. Turn ON the air suspension
switch (if equipped).
14. Unblock the wheels.
1
4 3
52
Roadside emergencies
148
Page 154 of 210

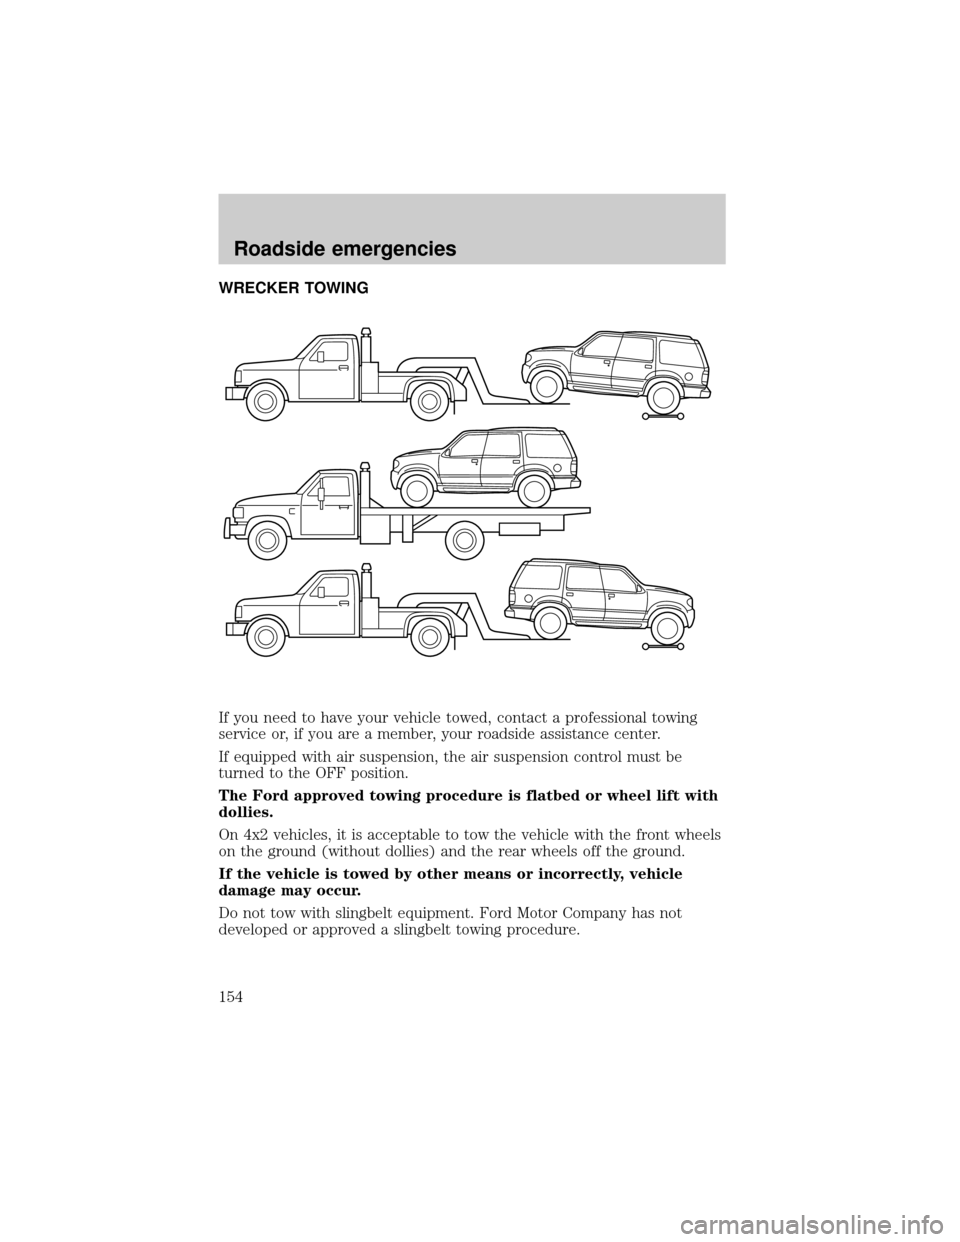
WRECKER TOWING
If you need to have your vehicle towed, contact a professional towing
service or, if you are a member, your roadside assistance center.
If equipped with air suspension, the air suspension control must be
turned to the OFF position.
The Ford approved towing procedure is flatbed or wheel lift with
dollies.
On 4x2 vehicles, it is acceptable to tow the vehicle with the front wheels
on the ground (without dollies) and the rear wheels off the ground.
If the vehicle is towed by other means or incorrectly, vehicle
damage may occur.
Do not tow with slingbelt equipment. Ford Motor Company has not
developed or approved a slingbelt towing procedure.
Roadside emergencies
154
Page 206 of 210

Air bag supplemental
restraint system ........................82
and child safety seats ..............83
description ................................82
disposal ......................................86
indicator light ...........................85
passenger air bag .....................84
Air conditioning
manual heating and air
conditioning system ............23,25
Air suspension
description ..............................106
All wheel drive (AWD) .............121
Ambulance packages ....................3
Anti-lock brake system (ABS)
description ..............................104
Anti-theft system ........................67
Autolamp system (see
Headlamps) .................................48
Automatic dimming mirror ...48,49
Battery .......................................175
voltage gauge ............................14
Brake fluid
checking and adding ..............164
Brakes ........................................104
anti-lock ...................................104
anti-lock brake system (ABS)
warning light ...........................104
fluid, checking and adding ....164
Brake-shift interlock .................107
Break-in period .............................2
Bulbs, replacing ........................186
headlamps ...............................187
specifications ..........................188
Cargo cover .................................57
Changing a tire .........................144
Child safety seats ........................87
built-in child seat ......91,92,96,97
Childproof locks ..........................52
Chime
headlamps on ............................11
Cleaning your vehicle ...............191built-in child seat ...................195
engine compartment ..............192
fabric ........................................194
instrument panel ....................194
plastic parts ............................194
safety belts ..............................194
tail lamps .................................194
washing ....................................191
waxing .....................................192
wheels ......................................194
windows ..................................196
woodtone trim ........................196
Climate control system
automatic temperature
control .........26,27,28,29,30,31,32
Clutch
fluid ..........................................165
Compass, electronic ...............45,46
calibration .................................48
set zone adjustment .................47
Console, description ...................54
Control trac 4WD system .........116
Controls ..................................53,54
Cupholder (s) .............................55
Defrost
rear window ..............................34
Driving under special
conditions .........................120,122
high water ........................120,123
slippery roads ....120,121,123,124
Emission control system ..........185
Engine ........................................202
service points ............158,159,160
Engine block heater .................102
Engine coolant
checking and adding .......166,167
disposal ....................................168
refill capacities ........................168
Engine oil ...........................160,163
changing oil and oil filter .......163
checking and adding .......160,162
Exhaust fumes ..........................103
Index
206