battery FORD EXPLORER 1998 2.G Owners Manual
[x] Cancel search | Manufacturer: FORD, Model Year: 1998, Model line: EXPLORER, Model: FORD EXPLORER 1998 2.GPages: 210, PDF Size: 1.65 MB
Page 9 of 210

Turn signal
Illuminates when the left or right
turn signal or the hazard lights are
turned on. If one or both of the
indicators stay on continuously,
check for a burned-out turn signal
bulb. Refer toExterior bulbsin the
Maintenance and carechapter.
High beams
Illuminates when the high beam
headlamps are turned on.
Anti-theft system (if equipped)
Refer toAnti-theft systemin the
Controls and featureschapter.
Charging system
Momentarily illuminates when the
ignition is turned ON and the engine
is off. The light also illuminates
when the battery is not charging
properly, requiring electrical system
service.
THEFT
Instrumentation
9
Page 14 of 210
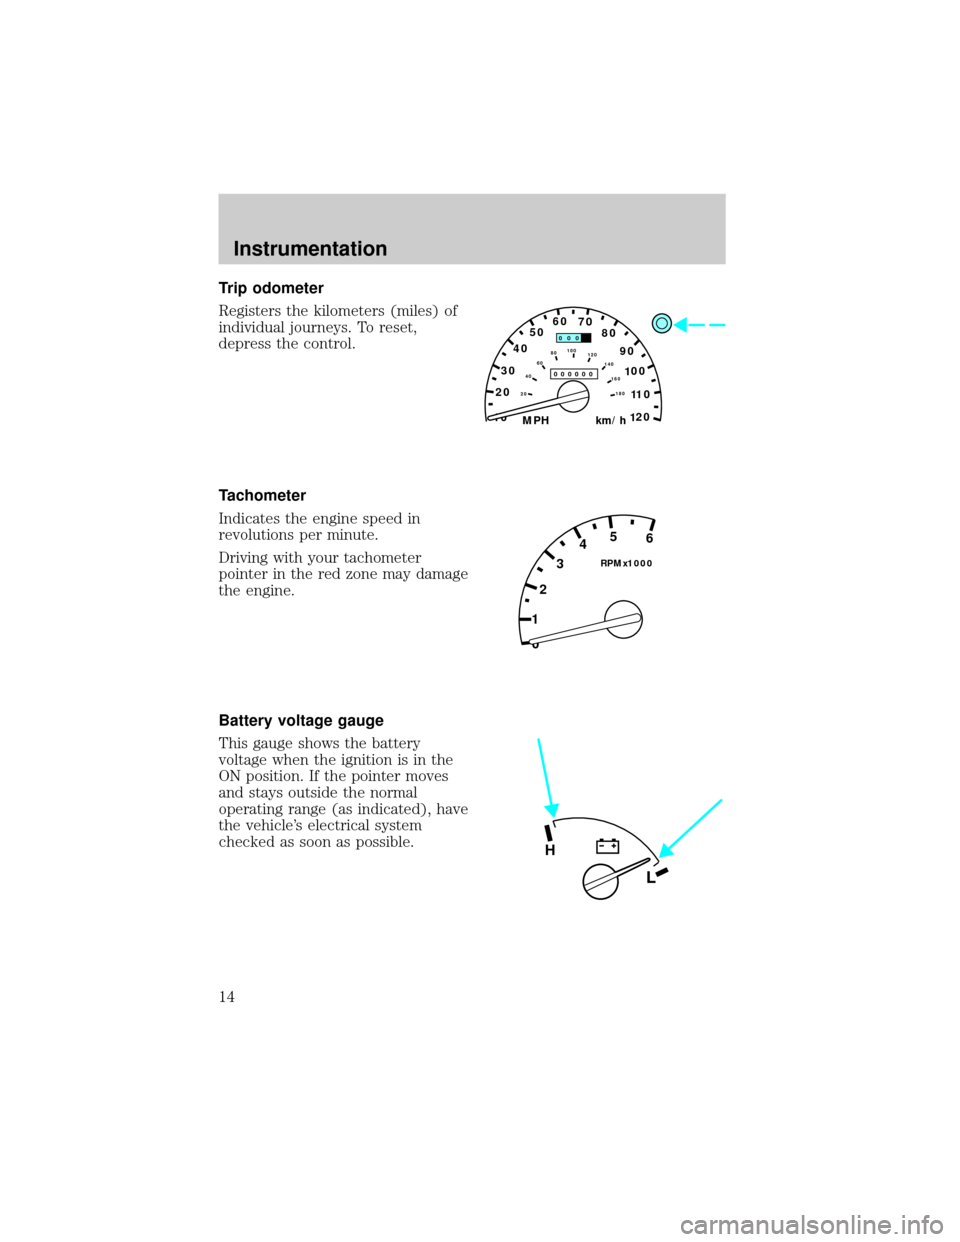
Trip odometer
Registers the kilometers (miles) of
individual journeys. To reset,
depress the control.
Tachometer
Indicates the engine speed in
revolutions per minute.
Driving with your tachometer
pointer in the red zone may damage
the engine.
Battery voltage gauge
This gauge shows the battery
voltage when the ignition is in the
ON position. If the pointer moves
and stays outside the normal
operating range (as indicated), have
the vehicle's electrical system
checked as soon as possible.
10MPH 205060
70
304080
90
km/h
0 0 0
10 100
1
20
1
0 0 0 0 0 0406080100
120
140
160
180
20
0 12345
6
RPMx1000
L
H
Instrumentation
14
Page 62 of 210

Replacing the battery
The transmitter is powered by one coin type three-volt lithium battery
CR2032 or equivalent. Typical operating range will allow you to be up to
10 meters (33 feet) away from your vehicle. A decrease in operating
range can be caused by:
²battery weakness due to time and use
²weather conditions
²nearby radio towers
²structures around the vehicle
²other vehicles parked next to the vehicle
To replace the battery:
1. Twist a thin coin between the two halves of the transmitter near the
key ring. DO NOT TAKE THE FRONT PART OF THE TRANSMITTER
APART.
2. Place the positive (+ ) side of new battery in the same orientation.
Refer to the diagram inside the transmitter unit.
3. Snap the two halves back together.
Replacing lost transmitters
Take all your vehicle's transmitters
to your dealer for reprogramming if:
²a transmitter is lost or
²you want to purchase additional
transmitters (up to four may be
programmed).
To reprogram the transmitters, place
the key in the ignition and switch
from OFF to ON five times in rapid
succession (within 10 seconds).
After doors lock/unlock, press any
button on all transmitters (up to
four). When completed, switch the ignition to OFF.
All transmitters must be programmed at the same time.
Controls and features
62
Page 63 of 210

Reprogramming transmitters
To reprogram all transmitters, place the key in the ignition and switch
from OFF to ON eight times in a row (within 10 seconds). After doors
lock/unlock, press any button on all transmitters (up to four). When
completed, switch the ignition to OFF.
All transmitters must be reprogrammed at the same time.
Illuminated entry
The interior lamps and the puddle lamps (located on the bottom of the
exterior rear view mirrors) illuminate when the remote entry system is
used to unlock the door(s) or sound the personal alarm.
The system automatically turns off after 25 seconds or when the ignition
is turned to the START or ACC position. The dome lamp switch (if
equipped) mustnotbe set to the OFF position for the illuminated entry
system to operate.
The inside lights will not turn off if:
²they have been turned on with the dimmer control or
²any door is open.
Battery saver will shut off the interior lamps 45 minutes after the last
door is closed.
Autolock
Autolock is a feature that will automatically lock all doors when:
²all vehicle doors, liftgate and liftgate window are fully closed
²the ignition key is in the ON position
²you shift into or through R (Reverse)
²the brake pedal is released
The autolock feature repeats when:
²any door is opened and then closed
²the brake pedal is released
Deactivating autolock
Before following the activation or deactivation procedures, make sure
that the anti-theft system is not armed, the ignition is OFF and all
vehicle doors and liftgate window are closed.
Controls and features
63
Page 140 of 210

Fuse/Relay
LocationFuse Amp
RatingDescription
21 15A Flasher (Hazard)
22 20A Auxiliary Power Socket
23 - NOT USED
24 7.5A Clutch Pedal Position (CPP) Switch,
Starter Interrupt Relay, Anti-Theft
25 7.5A Generic Electronic Module (GEM),
Instrument Cluster, Securi-Lock
26 10A Battery Saver Relay, Electronic Shift
Relay, Interior Lamp Relay, Power
Window Relay, Electronic Shift Control
Module
27 15A DRL, Backup Lamps Switch, DTR
Sensor, GEM, Electric Shift
28 7.5A Generic Electronic Module (GEM),
Radio, Memory Seat
29 25A Radio
30 15A Park Lamp/Trailer Tow Relay
31 - NOT USED
32 10A Heated Mirror
33 15A Headlamps, Daytime Running Lamps
(DRL) Module, Instrument Cluster
34 7.5A Rear Integrated Control Panel, CD
35 7.5A Rear Blower Motor (With EATC)
36 7.5A EATC Memory, CD, Rear Integrated
Control Panel, Memory Seat, Message
Center
Roadside emergencies
140
Page 141 of 210
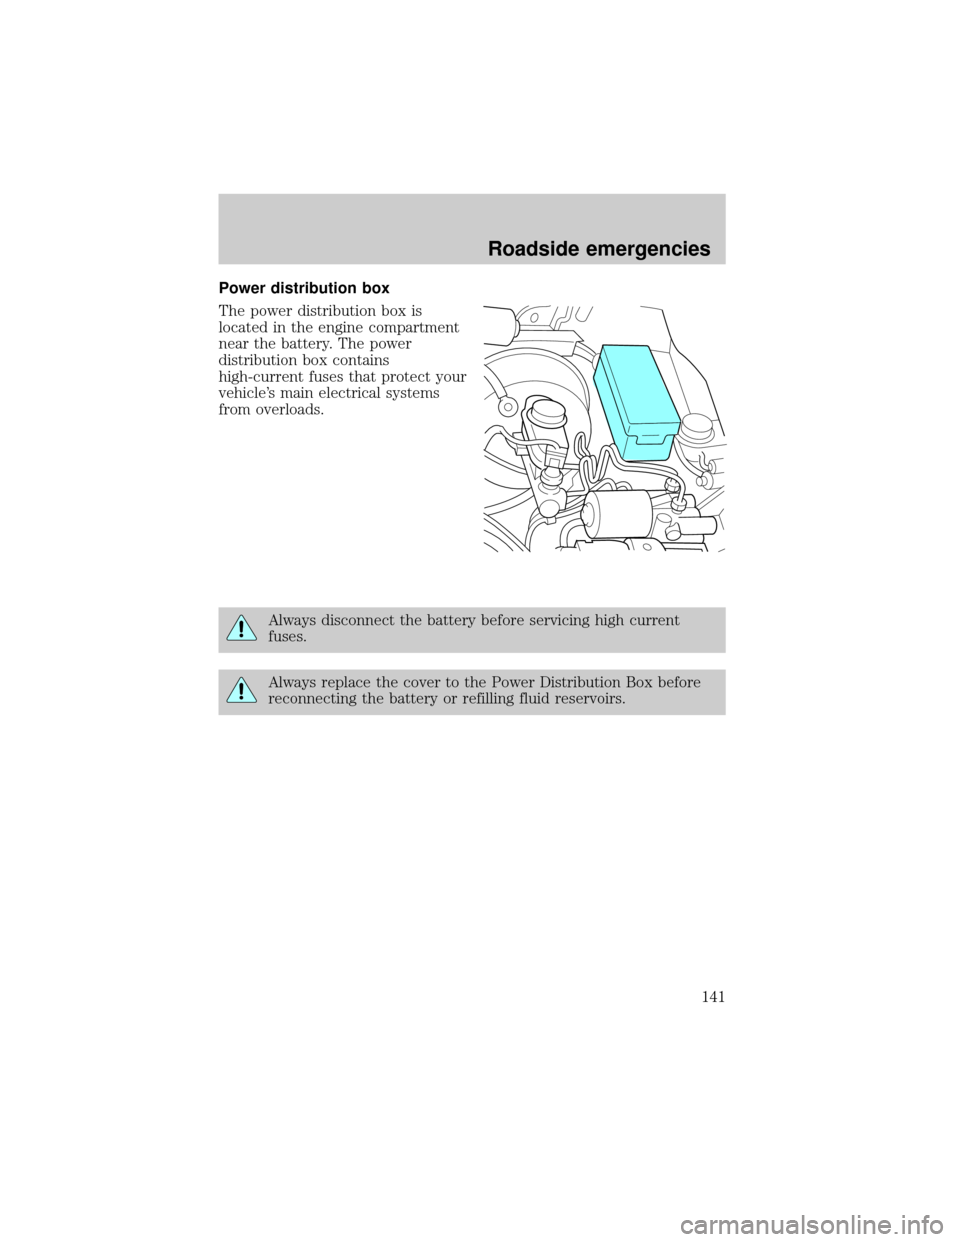
Power distribution box
The power distribution box is
located in the engine compartment
near the battery. The power
distribution box contains
high-current fuses that protect your
vehicle's main electrical systems
from overloads.
Always disconnect the battery before servicing high current
fuses.
Always replace the cover to the Power Distribution Box before
reconnecting the battery or refilling fluid reservoirs.
Roadside emergencies
141
Page 149 of 210
JUMP STARTING YOUR VEHICLE
The gases around the battery can explode if exposed to flames,
sparks, or lit cigarettes. An explosion could result in injury or
vehicle damage.
Do not push start your vehicle. You could damage the catalytic
converter.
Batteries contain sulfuric acid which burns skin, eyes, and
clothing.
Preparing your vehicle
Also see the label on the battery.
1. Use only a 12±volt supply to start your vehicle. If you connect your
battery to a 24±volt power supply you can damage your starter, ignition
system and other electrical components.
2. Do not disconnect the battery of the disabled vehicle as this could
damage the vehicle's electrical system.
3. Park the booster vehicle close to the hood of the disabled vehicle
making sure theydo nottouch. Set the parking brake on both vehicles
and stay clear of the engine cooling fan and other moving parts.
4. Check all battery terminals and remove any excessive corrosion before
you attach the battery cables.
5. Turn the heater fan on in both vehicles to protect any electrical
surges. Turn all other accessories off.
Connecting the jumper cables
1. Position the vehicles so that they do not touch one another.
2. Switch off the engine. Switch off any unnecessary electrical
equipment.
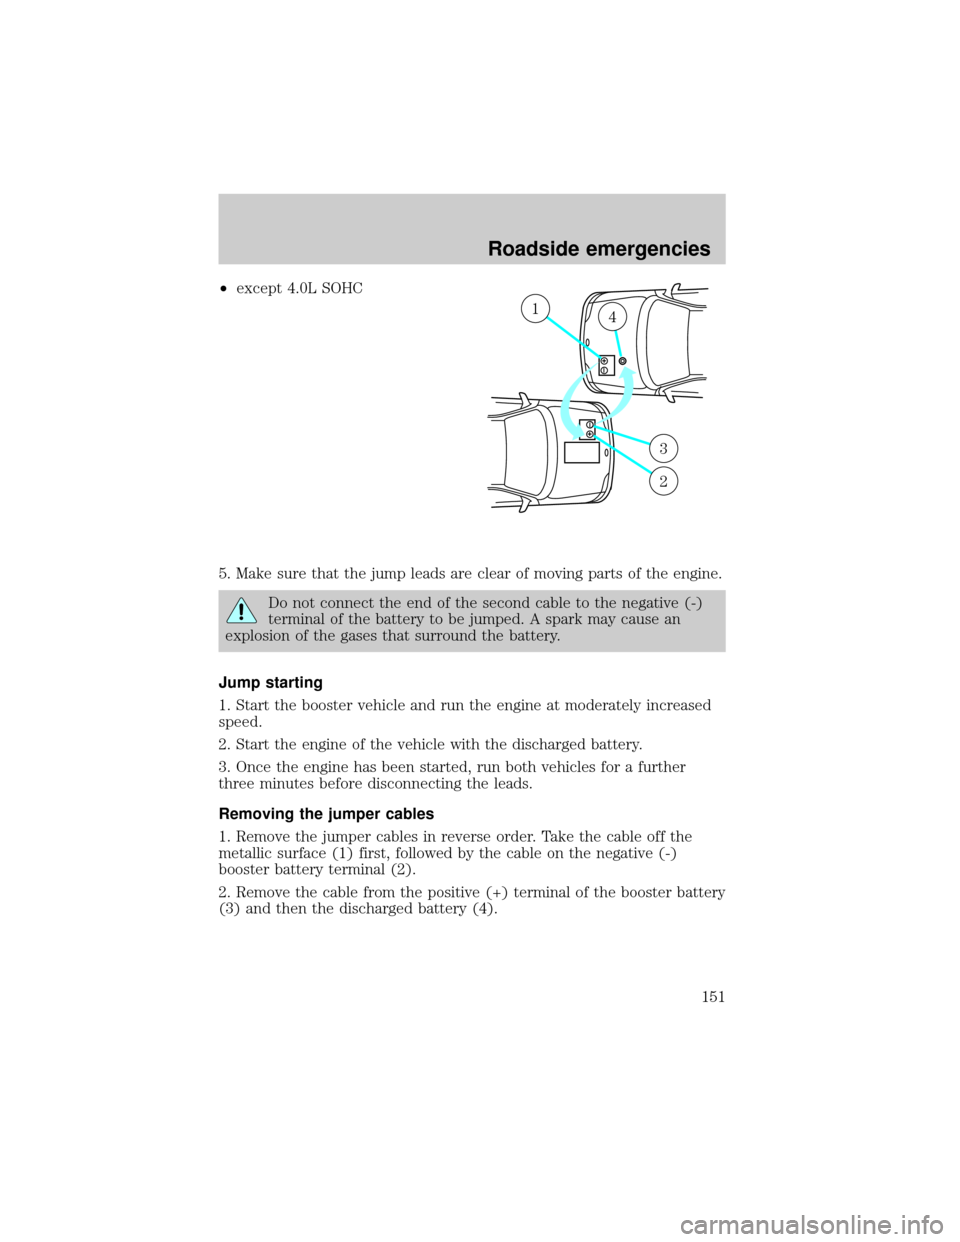
3. Connect the positive (+) terminal of the discharged battery (1) to the
positive (+) terminal of the booster battery (2).
4. Connect one end of the second lead to the negative (-) terminal of the
booster battery (3) and the other end to a metal part of the engine to be
started (4), not to the negative (-) terminal of the discharged battery.
Roadside emergencies
149
Page 151 of 210
²except 4.0L SOHC
5. Make sure that the jump leads are clear of moving parts of the engine.
Do not connect the end of the second cable to the negative (-)
terminal of the battery to be jumped. A spark may cause an
explosion of the gases that surround the battery.
Jump starting
1. Start the booster vehicle and run the engine at moderately increased
speed.
2. Start the engine of the vehicle with the discharged battery.
3. Once the engine has been started, run both vehicles for a further
three minutes before disconnecting the leads.
Removing the jumper cables
1. Remove the jumper cables in reverse order. Take the cable off the
metallic surface (1) first, followed by the cable on the negative (-)
booster battery terminal (2).
2. Remove the cable from the positive (+) terminal of the booster battery
(3) and then the discharged battery (4).
+–
+–
14
3
2
Roadside emergencies
151
Page 156 of 210

SERVICE RECOMMENDATIONS
To help you service your vehicle:
²We highlight do-it-yourself items in the engine compartment for easy
location.
²We provide a ``Service Guide'' which makes tracking routine service
easy.
If your vehicle requires professional service, your dealership can provide
necessary parts and service. Check your ``Warranty Guide'' to find out
which parts and services are covered.
Use only recommended fuels, lubricants, fluids and service parts
conforming to specifications. Motorcraft parts are designed and built to
provide the best performance in your vehicle.
PRECAUTIONS WHEN SERVICING YOUR VEHICLE
Be especially careful when inspecting or servicing your vehicle.
²Do not work on a hot engine.
²When the engine is running, make sure that loose clothing, jewelry or
long hair does not get caught up in moving parts.
²Do not work on a vehicle with the engine running in an enclosed
space, unless you are sure you have enough ventilation.
²Keep all lit cigarettes, open flames and other lit material away from
the battery and all fuel related parts.
If you disconnect the battery, the engine must ``relearn'' its idle
conditions before your vehicle will drive properly, as explained inBattery
in this chapter.
Working with the engine off
²Automatic transmission:
1. Set the parking brake and
ensure the gearshift is securely latched in P (Park).
2. Turn off the engine and remove the key.
3. Block the wheels to prevent the vehicle from moving unexpectedly.
²Manual transmission:
1. Set the parking brake.
2. Depress the clutch and place the gearshift in 1 (First).
Maintenance and care
156
Page 158 of 210
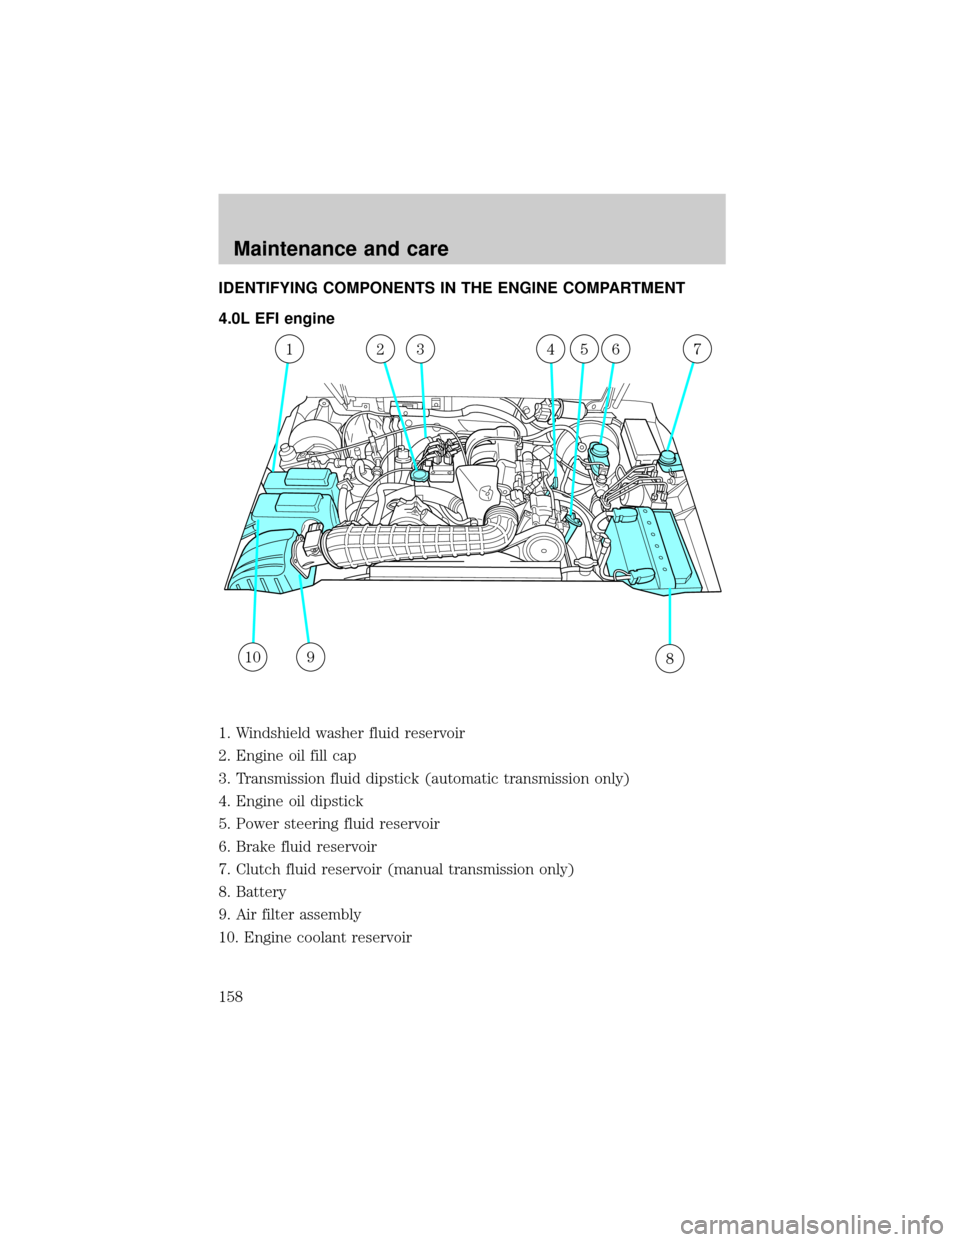
IDENTIFYING COMPONENTS IN THE ENGINE COMPARTMENT
4.0L EFI engine
1. Windshield washer fluid reservoir
2. Engine oil fill cap
3. Transmission fluid dipstick (automatic transmission only)
4. Engine oil dipstick
5. Power steering fluid reservoir
6. Brake fluid reservoir
7. Clutch fluid reservoir (manual transmission only)
8. Battery
9. Air filter assembly
10. Engine coolant reservoir
10
1235674
89
Maintenance and care
158